http://www.ostechnix.com/safest-way-remove-old-kernels-ubuntu
![remove old kernels in ubuntu]()
![Remove old kernels]()
![Deepin Terminal_002]()

The Ubuntu Kernel team will release new Kernel updates, bug fixes, and security patches every month. If you are a long-time Ubuntu user, and regularly updating your Ubuntu system, then it might be accumulated with lot of unused and old Kernels. So, there are chances that the /boot partition in your hard disk will run out of disk space in a period of time. If your /boot partition is full, you can’t upgrade the system or you can’t even upgrade your Kernel to any latest available version. This is no good, and it is very important to regularly update your Kernel and softwares. To do so, You should have enough free space in the /boot partition. It is always a good practice to remove unused Kernels, unnecessary packages, dependencies, and system cache periodically. Keep in mind that in order to function Ubuntu system properly, you must have enough free space in /boot and /root partitions.
Of course, We can easily wipe out the system cache, unneeded packages and dependencies using commands:
sudo apt-get autoremove
sudo apt-get autoclean
But the problem is this works only if you have installed the kernels automatically, or if you have installed them using Software updater. These commands will not remove manually installed kernels. However, you can use some third-party utilities such as Ubuntu Tweak to remove obsolete Kernels, packages, and dependencies which are no longer necessary. But Ubuntu Tweak is a GUI utility, so we can’t use it servers that has no Graphical mode.
No worries, there is an another utility called ‘purge-old-kernels’ to safely remove old Kernels from your Ubuntu systems. This utility was created by Dustin Kirkland from Ubuntu Product and Strategy team. This utility will safely remove the old and unused Kernels and header packages which are not necessary anymore from your Ubuntu desktop and server.
How to use purge-old-kernels utility
purge-old-kernels utility comes with Ubuntu 16.04 LTS by default. In old versions, you have to install ‘byobu’ or ‘bikeshed’ to use this utility.
sudo apt-get install bikeshed
Or
sudo apt-get install byobu
To remove the old Kernels safely, just run:
sudo purge-old-kernels
Sample output:
Reading package lists... Done
Building dependency tree
Reading state information... Done
The following package was automatically installed and is no longer required:
 linux-headers-4.4.0-21
Use 'sudo apt autoremove' to remove it.
The following packages will be REMOVED:
 linux-headers-4.4.0-21-generic* linux-image-4.4.0-21-generic*
 linux-image-extra-4.4.0-21-generic*
0 upgraded, 0 newly installed, 3 to remove and 0 not upgraded.
After this operation, 224 MB disk space will be freed.
Do you want to continue? [Y/n]
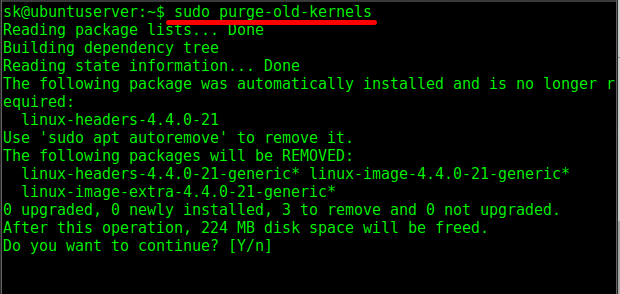
Remove old kernels
As you see in the above output, the old kernels have occupied 224 MB in my Ubuntu 16.04 server. Press ‘Y’ to get rid of the unused Kernels to free up some space.
If there is no old Kernels in your system, this utility will display the following message.
No kernels are eligible for removal

The beauty of this utility is it will never remove the currently running kernel. By default, it will keep at least the latest 2 kernels, but the user can override that value using the –keep parameter.
For example, to remove all old kernels except 3 latest Kernels, run:
sudo purge-old-kernels --keep 3 -qy
For more details, refer man pages.
man purge-old-kernels
Important: It is highly recommended to have at least two Kernels (Current Kernel and one old Kernel). In case, you had any problems, such as hardware or software compatibility issues, with the current Kernel, you can immediately switch back to the old Kernel. This way you can still have a chance to fix what will be the problem with the current Kernel. So, do not remove all old Kernels. It is always better to keep at least one old Kernel for any emergency backup.
That’s all for today. Hope this guide helps.
Happy weekend! Cheers!!
Reference link: