Quantcast
Channel: Sameh Attia
Viewing all 1417 articles
Browse latest View live

9 Best IDEs and Code Editors for JavaScript Users

$
0
0
http://devzum.com/2015/01/31/9-best-ides-and-code-editors-for-javascript-users

Web designing and developing is one of the trending sectors in the recent times, where more and more peoples started to search for their career opportunities. But, Getting the right opportunity as a web developer or graphic designer is not just a piece of cake for everyone, It certainly requires a strong mind presence as well as right skills to find the find the right job. There are a lot of websites available today which can help you to get the right job description according to your knowledge. But still if you want to achieve something in this sector you must have some excellent skills like working with different platforms, IDEs and various other tools too.
Talking about the different platforms and IDEs used for various languages for different purposes, gone is the time when we learn just one IDE and get the optimum solutions for our web design projects easily. Today we are living in the modern lifestyle where competition is getting more and more tough on every single day. Same is the case with the IDEs, IDE is basically a powerful client application for creating and deploying applications. Today we are going to share some best javascript IDE for web designers and developers.
Please visit this list of best code editors for javascript user and share your thought with us.

1) Spket

Spket IDE is powerful toolkit for JavaScript and XML development. The powerful editor for JavaScript, XUL/XBL and Yahoo! Widget development. The JavaScript editor provides features like code completion, syntax highlighting and content outline that helps developers productively create efficient JavaScript code.
best ide for javascript for development and design - spket

2) Ixedit

IxEdit is a JavaScript-based interaction design tool for the web. With IxEdit, designers can practice DOM-scripting without coding to change, add, move, or transform elements dynamically on your web pages.
best ide for javascript for development and design - ixedit

3) Komodo Edit

Komode is free and powerful code editor for Javascript and other programming languages.
best ide for javascript for development and design - komodo-edit

4) EpicEditor

EpicEditor is an embeddable JavaScript Markdown editor with split fullscreen editing, live previewing, automatic draft saving, offline support, and more. For developers, it offers a robust API, can be easily themed, and allows you to swap out the bundled Markdown parser with anything you throw at it.
best ide for javascript for development and design - epiceditor

5) codepress

CodePress is web-based source code editor with syntax highlighting written in JavaScript that colors text in real time while it’s being typed in the browser.
best ide for javascript for development and design - codepres

6) ACe

Ace is an embeddable code editor written in JavaScript. It matches the features and performance of native editors such as Sublime, Vim and TextMate. It can be easily embedded in any web page and JavaScript application.
best ide for javascript for development and design - ace

7) scripted

Scripted is a fast and lightweight code editor with an initial focus on JavaScript editing. Scripted is a browser based editor and the editor itself is served from a locally running Node.js server instance.
best ide for javascript for development and design - scripted

8) Netbeans

This is another more impressive and useful code editors for javascript and other programming languages.
best ide for javascript for development and design - code_editing

9) Webstorm

This is the smartest ID for javascript. WebStorm is a lightweight yet powerful IDE, perfectly equipped for complex client-side development and server-side development with Node.js.
best ide for javascript for development and design - webstorm

11 Linux Terminal Commands That Will Rock Your World

$
0
0
http://linux.about.com/od/commands/tp/11-Linux-Terminal-Commands-That-Will-Rock-Your-World.htm

I have been using Linux for about 10 years and what I am going to show you in this article is a list of Linux commands, tools and clever little tricks that I wish somebody had shown me from the outset instead of stumbling upon them as I went along.
Linux Keyboard Shortcuts -
Linux Keyboard Shortcuts.

1.  Useful Command Line Keyboard Shortcuts

The following keyboard shortcuts are incredibly useful and will save you loads of time:
  • CTRL + U - Cuts text up until the cursor.
  • CTRL + K - Cuts text from the cursor until the end of the line
  • CTRL + Y - Pastes text
  • CTRL + E - Move cursor to end of line
  • CTRL + A - Move cursor to the beginning of the line
  • ALT + F - Jump forward to next space
  • ALT + B - Skip back to previous space
  • ALT + Backspace - Delete previous word
  • CTRL + W - Cut word behind cursor
  • Shift + Insert - Pastes text into terminal
Just so that the commands above make sense look at the next line of text.
sudo apt-get intall programname
As you can see I have a spelling error and for the command to work I would need to change "intall" to "install".
Imagine the cursor is at the end of the line. There are various ways to get back to the word install to change it.
I could press ALT + B twice which would put the cursor in the following position (denoted by the ^ symbol):
sudo apt-get^intall programname
Now you could press the cursor key and insert the ''s' into install.
Another useful command is "shift + insert" especially If you need to copy text from a browser into the terminal.
sudo !! -
sudo !!.

2.  SUDO !!

You are going to really thank me for the next command if you don't already know it because until you know this exists you curse yourself every time you enter a command and the words "permission denied" appear.
  • sudo !!
How do you use sudo !!? Simply. Imagine you have entered the following command:
apt-get install ranger
The words "Permission denied" will appear unless you are logged in with elevated privileges.
sudo !! runs the previous command as sudo. So the previous command now becomes:
sudo apt-get install ranger
If you don't know what sudo is start here.
Pause Terminal Applications -
Pause Terminal Applications.

3.  Pausing Commands And Running Commands In The Background

I have already written a guide showing how to run terminal commands in the background.
  • CTRL + Z - Pauses an application
  • fg - Returns you to the application
So what is this tip about?
Imagine you have opened a file in nano as follows:
sudo nano abc.txt
Halfway through typing text into the file you realise that you quickly want to type another command into the terminal but you can't because you opened nano in foreground mode.
You may think your only option is to save the file, exit nano, run the command and then re-open nano.
All you have to do is press CTRL + Z and the foreground application will pause and you will be returned to the command line. You can then run any command you like and when you have finished return to your previously paused session by entering "fg" into the terminal window and pressing return.
An interesting thing to try out is to open a file in nano, enter some text and pause the session. Now open another file in nano, enter some text and pause the session. If you now enter "fg" you return to the second file you opened in nano. If you exit nano and enter "fg" again you return to the first file you opened within nano.
nohup -
nohup.

4.  Use nohup To Run Commands After You Log Out Of An SSH Session

The nohup command is really useful if you use the ssh command to log onto other machines.
So what does nohup do?
Imagine you are logged on to another computer remotely using ssh and you want to run a command that takes a long time and then exit the ssh session but leave the command running even though you are no longer connected then nohup lets you do just that.
For instance I use my Raspberry PI to download distributions for review purposes.
I never have my Raspberry PI connected to a display nor do I have a keyboard and mouse connected to it.
I always connect to the Raspberry PI via ssh from a laptop. If I started downloading a large file on the Raspberry PI without using the nohup command then I would have to wait for the download to finish before logging off the ssh session and before shutting down the laptop. If I did this then I may as well have not used the Raspberry PI to download the file at all.
To use nohup all I have to type is nohup followed by the command as follows:
nohup wget http://mirror.is.co.za/mirrors/linuxmint.com/iso//stable/17.1/linuxmint-17.1-cinnamon-64bit.iso &
Schedule tasks with at -
Schedule tasks with at.

5.  Running A Linux Command 'AT' A Specific Time

The 'nohup' command is good if you are connected to an SSH server and you want the command to remain running after logging out of the SSH session.
Imagine you want to run that same command at a specific point in time.
The 'at' command allows you to do just that. 'at' can be used as follows.
at 10:38 PM Fri
at> cowsay 'hello'
at> CTRL + D
The above command will run the program cowsay at 10:38 PM on Friday evening.
The syntax is 'at' followed by the date and time to run.
When the at> prompt appears enter the command you want to run at the specified time.
The CTRL + D returns you to the cursor.
There are lots of different date and time formats and it is worth checking the man pages for more ways to use 'at'.


Colourful MAN pages -
Colourful MAN pages.

6.  Man Pages

Man pages give you an outline of what commands are supposed to do and the switches that can be used with them.
The man pages are kind of dull on their own. (I guess they weren't designed to excite us).
You can however do things to make your usage of man more appealing.
export PAGER=most
You will need to install 'most; for this to work but when you do it makes your man pages more colourful.
You can limit the width of the man page to a certain number of columns using the following command:
export MANWIDTH=80
Finally, if you have a browser available you can open any man page in the default browser by using the -H switch as follows:
man -H
Note this only works if you have a default browser set up within the $BROWSER environment variable.
View Processes With htop -
View Processes With htop.

7.  Use htop To View And Manage Processes

Which command do you currently use to find out which processes are running on your computer? My bet is that you are using 'ps' and that you are using various switches to get the output you desire.
Install 'htop'. It is definitely a tool you will wish that you installed earlier.
htop provides a list of all running processes in the terminal much like the file manager in Windows.
You can use a mixture of function keys to change the sort order and the columns that are displayed. You can also kill processes from within htop.
To run htop simply type the following into the terminal window:
htop
Command Line File Manager - Ranger -
Command Line File Manager - Ranger.

8.  Navigate The File System Using ranger

If htop is immensely useful for controlling the processes running via the command line then ranger is immensely useful for navigating the file system using the command line.
You will probably need to install ranger to be able to use it but once installed you can run it simply by typing the following into the terminal:
ranger
The command line window will be much like any other file manager but it works left to right rather than top to bottom meaning that if you use the left arrow key you work your way up the folder structure and the right arrow key works down the folder structure.
It is worth reading the man pages before using ranger so that you can get used to all keyboard switches that are available.
Cancel Linux Shutdown -
Cancel Linux Shutdown.

9.  Cancel A Shutdown

So you started the shutdown either via the command line or from the GUI and you realised that you really didn't want to do that.
  • shutdown -c
Note that if the shutdown has already started then it may be too late to stop the shutdown.
Another command to try is as follows:
Kill Hung Processes With XKill -
Kill Hung Processes With XKill.

10.  Killing Hung Processes The Easy Way

Imagine you are running an application and for whatever reason it hangs.
You could use 'ps -ef' to find the process and then kill the process or you could use 'htop'.
There is a quicker and easier command that you will love called xkill.
Simply type the following into a terminal and then click on the window of the application you want to kill.
xkill
What happens though if the whole system is hanging?
Hold down the 'alt' and 'sysrq' keys on your keyboard and whilst they are held down type the following slowly:
REISUB
This will restart your computer without having to hold in the power button.
youtube-dl -
youtube-dl.

11.  Download Youtube Videos

Generally speaking most of us are quite happy for Youtube to host the videos and we watch them by streaming them through our chosen media player.
If you know you are going to be offline for a while (i.e. due to a plane journey or travelling between the south of Scotland and the north of England) then you may wish to download a few videos onto a pen drive and watch them at your leisure.
All you have to do is install youtube-dl from your package manager.
You can use youtube-dl as follows:
youtube-dl url-to-video
You can get the url to any video on Youtube by clicking the share link on the video's page. Simply copy the link and paste it into the command line (using the shift + insert shortcut).

Summary

I hope that you found this list useful and that you are thinking "i didn't know you could do that" for at least 1 of the 11 items listed.

25 Linux Shell Scripting interview Questions & Answers

$
0
0
http://www.linuxtechi.com/linux-shell-scripting-interview-questions-answers
Q:1 What is Shell Script and why it is required ?
Ans: A Shell Script is a text file that contains one or more commands. As a system administrator we often need to issue number of commands to accomplish the task, we can add these all commands together in a text file (Shell Script) to complete daily routine task.
Q:2 What is the default login shell and how to change default login shell for a specific user ?
Ans: In Linux like Operating system “/bin/bash” is the default login shell which is assigned while user creation. We can change default shell using the “chsh” command . Example is shown below :
# chsh -s
# chsh linuxtechi -s /bin/sh
Q:3 What are the different type of variables used in a shell Script ?
Ans: In a shell script we can use two types of variables :
  • System defined variables
  • User defined variables
System defined variables are defined or created by Operating System(Linux) itself. These variables are generally defined in Capital Letters and can be viewed by “set” command.
User defined variables are created or defined by system users and the values of variables can be viewed by using the command “echo $
Q:4 How to redirect both standard output and standard error to the same location ?
Ans: There two method to redirect std output and std error to the same location:
Method:1 2>&1 (# ls /usr/share/doc > out.txt 2>&1 )
Method:2 &> (# ls /usr/share/doc &> out.txt )
Q:5 What is the Syntax of “nested if statement” in shell scripting ?
Ans : Basic Syntax is shown below :
if [ Condition ]
then
command1
command2
…..
else
if [ condition ]
then
command1
command2
….
else
command1
command2
…..
fi
fi
Q:6 What is the use of “$?” sign in shell script ?
Ans:While writing a shell script , if you want to check whether previous command is executed successfully or not , then we can use “$?” with if statement to check the exit status of previous command. Basic example is shown below :
root@localhost:~# ls /usr/bin/shar
/usr/bin/shar
root@localhost:~# echo $?
0
If exit status is 0 , then command is executed successfully
root@localhost:~# ls /usr/bin/share
ls: cannot access /usr/bin/share: No such file or directory
root@localhost:~# echo $?
2
If the exit status is other than 0, then we can say command is not executed successfully.
Q:7 How to compare numbers in Linux shell Scripting ?
Ans: test command is used to compare numbers in if-then statement. Example is shown below :
#!/bin/bash
x=10
y=20
if [ $x -gt $y ]
then
echo “x is greater than y”
else
echo “y is greater than x”
fi
Q:8 What is the use of break command ?
Ans: The break command is a simple way to escape out of a loop in progress. We can use the break command to exit out from any loop, including while and until loops.
Q:9 What is the use of continue command in shell scripting ?
Ans The continue command is identical to break command except it causes the present iteration of the loop to exit, instead of the entire loop. Continue command is useful in some scenarios where error has occurred but we still want to execute the next commands of the loop.
Q:10 Tell me the Syntax of “Case statement” in Linux shell scripting ?
Ans: The basic syntax is shown below :
case word in
value1)
command1
command2
…..
last_command
!!
value2)
command1
command2
……
last_command
;;
esac
Q:11 What is the basic syntax of while loop in shell scripting ?
Ans: Like the for loop, the while loop repeats its block of commands a number of times. Unlike the for loop, however, the while loop iterates until its while condition is no longer true. The basic syntax is :
while [ test_condition ]
do
commands…
done
Q:12 How to make a shell script executable ?
Ans: Using the chmod command we can make a shell script executable. Example is shown below :
# chmod a+x myscript.sh
Q:13 What is the use of “#!/bin/bash” ?
Ans: #!/bin/bash is the first of a shell script , known as shebang , where # symbol is called hash and ‘!’ is called as bang. It shows that command to be executed via /bin/bash.
Q:14 What is the syntax of for loop in shell script ?
Ans: Basic Syntax of for loop is given below :
for variables in list_of_items
do
command1
command2
….
last_command
done
Q:15 How to debug a shell script ?
Ans: A shell script can be debug if we execute the script with ‘-x’ option ( sh -x myscript.sh). Another way to debug a shell script is by using ‘-nv’ option ( sh -nv myscript.sh).
Q:16 How compare the strings in shell script ?
Ans: test command is used to compare the text strings. The test command compares text strings by comparing each character in each string.
Q:17 What are the Special Variables set by Bourne shell for command line arguments ?
Ans: The following table lists the special variables set by the Bourne shell for command line arguments .
Special Variables
Holds
$0
Name of the Script from the command line
$1
First Command-line argument
$2
Second Command-line argument
…..
…….
$9
Ninth Command line argument
$#
Number of Command line arguments
$*
All Command-line arguments, separated with spaces
Q:18 How to test files in a shell script ?
Ans: test command is used to perform different test on the files. Basic test are listed below :
Test
Usage
-d file_name
Returns true if the file exists and is a directory
-e file_name
Returns true if the file exists
-f file_name
Returns true if the file exists and is a regular file
-r file_name
Returns true if the file exists and have read permissions
-s file_name
Returns true if the file exists and is not empty
-w file_name
Returns true if the file exists and have write permissions
-x file_name
Returns true if the file exists and have execute permissions
Q:19 How to put comments in your shell script ?
Ans: Comments are the messages to yourself and for other users that describe what a script is supposed to do and how its works.To put comments in your script, start each comment line with a hash sign (#) . Example is shown below :
#!/bin/bash
# This is a command
echo “I am logged in as $USER”
Q:20 How to get input from the terminal for shell script ?
Ans: ‘read’ command reads in data from the terminal (using keyboard). The read command takes in whatever the user types and places the text into the variable you name. Example is shown below :
# vi /tmp/test.sh
#!/bin/bash
echo ‘Please enter your name’
read name
echo “My Name is $name”
# ./test.sh
Please enter your name
LinuxTechi
My Name is LinuxTechi
Q:21 How to unset or de-assign variables ?
Ans: ‘unset’ command is used to de-assign or unset a variable. Syntax is shown below :
# unset
Q:22 How to perform arithmetic operation ?
Ans: There are two ways to perform arithmetic operations :
1. Using expr command (# expr 5 + 2 )
2. using a dollar sign and square brackets ( $[ operation ] ) Example : test=$[16 + 4] ; test=$[16 + 4]
Q:23 Basic Syntax of do-while statement ?
Ans: The do-while statement is similar to the while statement but performs the statements before checking the condition statement. The following is the format for the do-while statement:
do
{
statements
} while (condition)
Q:24 How to define functions in shell scripting ?
Ans: A function is simply a block of of code with a name. When we give a name to a block of code, we can then call that name in our script, and that block will be executed. Example is shown below :
$ diskusage () { df -h ; }
Q:25 How to use bc (bash calculator) in a shell script ?
Ans: Use the below Syntax to use bc in shell script.
variable=`echo “options; expression” | bc`

Careers In Open Source

$
0
0
https://opensource.com/resources/open-source-jobs-and-careers

A collection of articles on jobs and careers in open source

2015

How open source can be a gateway to your next job by Tarus Balog, on what kinds of projects can lead to a great tech career.
How volunteering at events can advance your open source career by Rikki Endsley, on how volunteering at and attending open source events put her in touch with people and led to great jobs.
Why now is the time to learn R by David Smith, Chief Community Officer at Revolution Analytics and leads the open source solutions group.
Confessions of a systems librarian by Robin Isard, on his career teaching open source to others and implementing software in libraries.
Building a cloud career with OpenStack by Jason Baker, on the world of working on OpenStack.
Get a paycheck in open source, be a social activist by Don Watkins, an interview with Ross Brunson of the Linux Professional Institute.
Breaking out of the 'comfort zone' with open source by Erika Heidi, on her new role at Developer Evangelist for the PHP community.
How I landed a job in open source by David Both, on the path of his career in Linux.

2014

The future of scientific discovery relies on open by Marcus Hanwell, an interview with Ross Mounce of the University of Bath on scientific research in the open.
How to think like open source pioneer Michael Tiemann by Bryan Brehrenshausen, an interview with Michael Tiemann of Red Hat on open source's past, present, and future.
Everyone's your partner in open source by Nicole Engard, on her experience working for ByWater Solutions and with Koha communities, an open source library system.
4 lessons from the trenches of community management by Jason Hibbets, on what it's like to be the community manager at Opensource.com.
From bench scientist to open science software developer by Marcus Hanwell, on his journey from the sidelines to the frontlines of science discovery and research that matters.
Does having open source experience on your resume really matter? by Aseem Sharma, on the critical role software plays in today's economy.
We cannot do modern science unless it's open by Peter Murray-Rust of the Blue Obelisk community gives an exclusive at the past, present, and future of open science.
Want a fulfilling IT career? Learn Linux by Shawn Powers gives tips on how to get a job in Linux.
Everyday I help libraries make the switch to open source by Kyle Hall on his job with ByWater Solutions, helping libraries upgrade to open source with Koha.
Upgrading libraries to open source Koha system by Nicole Engard, an interview with Melissa Lefebvre on her jobs as an operations manager for ByWater Solutions, implementing Koha in libraries.

From the archives

7 skills to land your open source dream job by Jason Hibbets
Want an IT job? Learn OpenStack by Jason Baker
Teens and their first job: How to get on the path to a happy career by Jim Whitehurst

How to make remote incremental backup of LUKS-encrypted disk/partition

$
0
0
http://xmodulo.com/remote-incremental-backup-luks-encrypted-disk-partition.html

Some of us have our hard drives at home or on a VPS encrypted by Linux Unified Key Setup (LUKS) for security reasons, and these drives can quickly grow to tens or hundreds of GBs in size. So while we enjoy the security of our LUKS device, we may start to think about a possible remote backup solution. For secure off-site backup, we will need something that operates at the block level of the encrypted LUKS device, and not at the un-encrypted file system level. So in the end we find ourselves in a situation where we will need to transfer the entire LUKS device (let's say 200GB for example) each time we want to make a backup. Clearly not feasible. How can we deal with this problem?

A Solution: Bdsync

This is when a brilliant open-source tool called Bdsync (thanks to Rolf Fokkens) comes to our rescue. As the name implies, Bdsync can synchronize "block devices" over network. For fast synchronization, Bdsync generates and compares MD5 checksums of blocks in the local/remote block devices, and sync only the differences. What rsync can do at the file system level, Bdsync can do it at the block device level. Naturally, it works with encrypted LUKS devices as well. Pretty neat!
Using Bdsync, the first-time backup will copy the entire LUKS block device to a remote host, so it will take a lot of time to finish. However, after that initial backup, if we make some new files on the LUKS device, the second backup will be finished quickly because we will need to copy only that blocks which have been changed. Classic incremental backup at play!

Install Bdsync on Linux

Bdsync is not included in the standard repositories of Linux distributions. Thus you need to build it from the source. Use the following distro-specific instructions to install Bdsync and its man page on your system.

Debian, Ubuntu or Linux Mint

$ sudo apt-get install git gcc libssl-dev
$ git clone https://github.com/TargetHolding/bdsync.git
$ cd bdsync
$ make
$ sudo cp bdsync /usr/local/sbin
$ sudo mkdir -p /usr/local/man/man1
$ sudo sh -c 'gzip -c bdsync.1 > /usr/local/man/man1/bdsync.1.gz'

Fedora or CentOS/RHEL

$ sudo yum install git gcc openssl-devel
$ git clone https://github.com/TargetHolding/bdsync.git
$ cd bdsync
$ make
$ sudo cp bdsync /usr/local/sbin
$ sudo mkdir -p /usr/local/man/man1
$ sudo sh -c 'gzip -c bdsync.1 > /usr/local/man/man1/bdsync.1.gz'

Perform Off-site Incremental Backup of LUKS-Encrypted Device

I assume that you have already provisioned a LUKS-encrypted block device as a backup source (e.g., /dev/LOCDEV). I also assume that you have a remote host where the source device will be backed up (e.g., as /dev/REMDEV).
You need to access the root account on both systems, and set up password-less SSH access from the local host to a remote host. Finally, you need to install Bdsync on both hosts.
To initiate a remote backup process on the local host, we execute the following command as the root:
# bdsync "ssh root@remote_host bdsync --server" /dev/LOCDEV /dev/REMDEV | gzip > /some_local_path/DEV.bdsync.gz
Some explanations are needed here. Bdsync client will open an SSH connection to the remote host as the root, and execute Bdsync client with --server option. As clarified, /dev/LOCDEV is our source LUKS block device on the local host, and /dev/REMDEV is the target block device on the remote host. They could be /dev/sda (for an entire disk) or /dev/sda2 (for a single partition). The output of the local Bdsync client is then piped to gzip, which creates DEV.bdsync.gz (so-called binary patch file) in the local host.
The first time you run the above command, it will take very long time, depending on your Internet/LAN speed and the size of /dev/LOCDEV. Remember that you must have two block devices (/dev/LOCDEV and /dev/REMDEV) with the same size.
The next step is to copy the generated patch file from the local host to the remote host. Using scp is one possibility:
# scp /some_local_path/DEV.bdsync.gz root@remote_host:/remote_path
The final step is to execute the following command on the remote host, which will apply the patch file to /dev/REMDEV:
# gzip -d < /remote_path/DEV.bdsync.gz | bdsync --patch=/dev/DSTDEV
I recommend doing some tests with small partitions (without any important data) before deploying Bdsync with real data. After you fully understand how the entire setup works, you can start backing up real data.

Conclusion

In conclusion, we showed how to use Bdsync to perform incremental backups for LUKS devices. Like rsync, only a fraction of data, not the entire LUKS device, is needed to be pushed to an off-site backup site at each backup, which saves bandwidth and backup time. Rest assured that all the data transfer is secured by SSH or SCP, on top of the fact that the device itself is encrypted by LUKS. It is also possible to improve this setup by using a dedicated user (instead of the root) who can run bdsync. We can also use bdsync for ANY block device, such as LVM volumes or RAID disks, and can easily set up Bdsync to back up local disks on to USB drives as well. As you can see, its possibility is limitless!
Feel free to share your thought.

How to replace a failed harddisk in Linux software RAID

$
0
0
https://www.howtoforge.com/tutorial/linux-raid-replace-failed-harddisk


This guide shows how to remove a failed hard drive from a Linux RAID1 array (software RAID), and how to add a new hard disk to the RAID1 array without losing data. I will use gdisk to copy the partition scheme, so it will work with large harddisks with GPT (GUID Partition Table) too.

1 Preliminary Note

In this example I have two hard drives, /dev/sda and /dev/sdb, with the partitions /dev/sda1 and /dev/sda2 as well as /dev/sdb1 and /dev/sdb2.
/dev/sda1 and /dev/sdb1 make up the RAID1 array /dev/md0.
/dev/sda2 and /dev/sdb2 make up the RAID1 array /dev/md1.
/dev/sda1 + /dev/sdb1 = /dev/md0
/dev/sda2 + /dev/sdb2 = /dev/md1
/dev/sdb has failed, and we want to replace it.

2 How Do I Tell If A Hard Disk Has Failed?

If a disk has failed, you will probably find a lot of error messages in the log files, e.g. /var/log/messages or /var/log/syslog.
You can also run
cat /proc/mdstat
and instead of the string [UU] you will see [U_] if you have a degraded RAID1 array.

3 Removing The Failed Disk

To remove /dev/sdb, we will mark /dev/sdb1 and /dev/sdb2 as failed and remove them from their respective RAID arrays (/dev/md0 and /dev/md1).
First we mark /dev/sdb1 as failed:
mdadm --manage /dev/md0 --fail /dev/sdb1
The output of
cat /proc/mdstat
should look like this:
server1:~# cat /proc/mdstat
Personalities : [linear] [multipath] [raid0] [raid1] [raid5] [raid4] [raid6] [raid10]
md0 : active raid1 sda1[0] sdb1[2](F)
      24418688 blocks [2/1] [U_]

md1 : active raid1 sda2[0] sdb2[1]
      24418688 blocks [2/2] [UU]

unused devices: 
Then we remove /dev/sdb1 from /dev/md0:
mdadm --manage /dev/md0 --remove /dev/sdb1
The output should be like this:
server1:~# mdadm --manage /dev/md0 --remove /dev/sdb1
mdadm: hot removed /dev/sdb1
And
cat /proc/mdstat
should show this:
server1:~# cat /proc/mdstat
Personalities : [linear] [multipath] [raid0] [raid1] [raid5] [raid4] [raid6] [raid10]
md0 : active raid1 sda1[0]
      24418688 blocks [2/1] [U_]

md1 : active raid1 sda2[0] sdb2[1]
      24418688 blocks [2/2] [UU]

unused devices: 
Now we do the same steps again for /dev/sdb2 (which is part of /dev/md1):
mdadm --manage /dev/md1 --fail /dev/sdb2
cat /proc/mdstat
server1:~# cat /proc/mdstat
Personalities : [linear] [multipath] [raid0] [raid1] [raid5] [raid4] [raid6] [raid10]
md0 : active raid1 sda1[0]
      24418688 blocks [2/1] [U_]

md1 : active raid1 sda2[0] sdb2[2](F)
      24418688 blocks [2/1] [U_]

unused devices: 
mdadm --manage /dev/md1 --remove /dev/sdb2
server1:~# mdadm --manage /dev/md1 --remove /dev/sdb2
mdadm: hot removed /dev/sdb2
cat /proc/mdstat
server1:~# cat /proc/mdstat
Personalities : [linear] [multipath] [raid0] [raid1] [raid5] [raid4] [raid6] [raid10]
md0 : active raid1 sda1[0]
      24418688 blocks [2/1] [U_]

md1 : active raid1 sda2[0]
      24418688 blocks [2/1] [U_]

unused devices: 
Then power down the system:
shutdown -h now
and replace the old /dev/sdb hard drive with a new one (it must have at least the same size as the old one - if it's only a few MB smaller than the old one then rebuilding the arrays will fail).

4 Adding The New Hard Disk

After you have changed the hard disk /dev/sdb, boot the system.
The first thing we must do now is to create the exact same partitioning as on /dev/sda. We can do this with the command sgdisk from the gdisk package. If you havent installed gdisk yet, run this command to install it on Debian and Ubuntu:
apt-get install gdisk
For RedHat based Linux distributions like CentOS use:
yum install gdisk
and for OpenSuSE use:
yast install gdisk
The next step is optional but recomended. To ensure that you have a backup of the partition scheme, you can use sgdisk to write the partition schemes of both disks into a file. I will store the backup in the /root folder.
sgdisk --backup=/root/sda.partitiontable /dev/sda
sgdisk --backup=/root/sdb.partitiontable /dev/sdb
In case of a failure you can restore the partition tables with the --load-backup option of the sgdisk command.
Now copy the partition scheme from /dev/sda to /dev/sdb run:
sgdisk -R /dev/sdb /dev/sda
afterwards you have to randomize the GUID on the new harddisk to ensure that they are unique
sdgisk -G /dev/sdb
You can run
sgdisk -p /dev/sda
sgdisk -p /dev/sdb
to check if both hard drives have the same partitioning now.
Next we add /dev/sdb1 to /dev/md0 and /dev/sdb2 to /dev/md1:
mdadm --manage /dev/md0 --add /dev/sdb1
server1:~# mdadm --manage /dev/md0 --add /dev/sdb1
mdadm: re-added /dev/sdb1
mdadm --manage /dev/md1 --add /dev/sdb2
server1:~# mdadm --manage /dev/md1 --add /dev/sdb2
mdadm: re-added /dev/sdb2
Now both arays (/dev/md0 and /dev/md1) will be synchronized. Run
cat /proc/mdstat
to see when it's finished.
During the synchronization the output will look like this:
server1:~# cat /proc/mdstat
Personalities : [linear] [multipath] [raid0] [raid1] [raid5] [raid4] [raid6] [raid10]
md0 : active raid1 sda1[0] sdb1[1]
      24418688 blocks [2/1] [U_]
      [=>...................]  recovery =  9.9% (2423168/24418688) finish=2.8min speed=127535K/sec

md1 : active raid1 sda2[0] sdb2[1]
      24418688 blocks [2/1] [U_]
      [=>...................]  recovery =  6.4% (1572096/24418688) finish=1.9min speed=196512K/sec

unused devices: 
When the synchronization is finished, the output will look like this:
server1:~# cat /proc/mdstat
Personalities : [linear] [multipath] [raid0] [raid1] [raid5] [raid4] [raid6] [raid10]
md0 : active raid1 sda1[0] sdb1[1]
      24418688 blocks [2/2] [UU]

md1 : active raid1 sda2[0] sdb2[1]
      24418688 blocks [2/2] [UU]

unused devices: 
That's it, you have successfully replaced /dev/sdb!

HPL (High Performance Linpack): Benchmarking Raspberry PIs

$
0
0
https://www.howtoforge.com/tutorial/hpl-high-performance-linpack-benchmark-raspberry-pi

Benchmarking is the process of running some of the standard programs to evaluate the speed achieved by a system. There are a number of standard bechmarking programs and in this tutorial we benchmark the Linux system using a well known program called the HPL, also known as High Performance Linpack.

Introduction

In this tutorial we cover how to go about benchmarking a single processor system, the Raspberry Pi. First we will benchmark a single node, and then continue to benchmark multiple nodes, each node representing a Raspberry Pi. There are a few things to be noted here. Firstly, benchmarking a single node or multiple nodes has a few dependencies to be satisfied which will be covered in this tutorial. BUT, on multiple nodes there are even more dependencies like the MPI implementation (like MPICH or OpenMPI) has to be built and running for the HPL to work. So for benchmarking multiple nodes, I assume that your nodes have MPICH installed and running.

What is HPL?

HPL is a software package that solves a (random) dense linear system in double precision (64 bits) arithmetic on distributed-memory computers. The HPL package provides a testing and timing program to quantify the accuracy of the obtained solution as well as the time it took to compute it. The best performance achievable by this software on your system depends on a large variety of factors. This implementation is scalable in the sense that their parallel efficiency is maintained constant with respect to the per processor memory usage. Thus we can use this to benchmark a single processor or a series of distributed processors in parallel. So lets begin installing HPL.

1 Installing dependencies

HPL has a few software dependencies that have to be satisfied before it can be installed. They are:
  • gfortran - fortran program compiler
  • MPICH2 - an implementation of MPI
  • mpich2-dev - development tools
  • BLAS - Basic Linear Algebra Subprograms
Here we assume that you have MPICH2 installed. To install other dependencies and packages, use the following command:
sudo apt-get install libatlas-base-dev libmpich2-dev gfortran
Only this step has to be repeated in each of the nodes (Pis) present in the cluster.

2 Download HPL and set it up

Download the HPL package from here. The next thing to do is extract the tar file and create a makefile based on the given template. Open the terminal and change the directory to where the downloaded HPL tar file is stored. Execute the following set of commands one after another.
tar xf hpl-2.1.tar.gz
cd hpl-2.1/setup
sh make_generic
cd ..
cp setup/Make.UNKNOWN Make.rpi
The last command copies the contents of Make.UNKNOWN to Make.rpi . We do this is because, the make file contains all the configuration details of the system ( The raspberry pi) and also the details various libraries such as mpich2, atlas/blas packages, home directory, etc. In the next step, we make changes to the Make.rpi file.

3 Adjust the Make.rpi file

This is an important step. Changes shown below vary according to your system. Here I show it with respect to my system. Please note that the following changes have parameters shown which are spread throughout the Make.rpi file. So I suggest you to find each parameter and replace or add the changes and only then continue to the next parameter.
Open the Make.rpi file using a text editor using the command:
nano Make.rpi
Make the following changes to the file.
ARCH         = rpi
TOPdir = $(HOME)/hpl-2.1
MPdir = /usr/local/mpich2
MPinc = -I $(MPdir)/include
MPlib = $(MPdir)/lib/libmpich.a
LAdir = /usr/lib/atlas-base/
LAlib = $(LAdir)/libf77blas.a $(LAdir)/libatlas.a

4 Compiling the HPL

Once the Make file is ready, we can start with the compilation of the HPL. The ".xhpl" file will be present in the "bin/rpi" folder within the HPL folder. Run the following command:
makeh arch=rpi

5 Creating the HPL input file

The following is an example of the "HPL.dat" file. This is the input file for HPL when it is run. The values provided in this file is used to generate and compute the problem. You can use this file directly to run tests for a single node. Create a file within the "bin/rpi" folder and name it "HPL.dat". copy the contents below into that file.
HPLinpack benchmark input file
Innovative Computing Laboratory, University of Tennessee
HPL.out output file name (if any)
6 device out (6=stdout,7=stderr,file)
1 # of problems sizes (N)
5040 Ns
1 # of NBs
128 NBs
0 PMAP process mapping (0=Row-,1=Column-major)
1 # of process grids (P x Q)
1 Ps
1 Qs
16.0 threshold
1 # of panel fact
2 PFACTs (0=left, 1=Crout, 2=Right)
1 # of recursive stopping criterium
4 NBMINs (>= 1)
1 # of panels in recursion
2 NDIVs
1 # of recursive panel fact.
1 RFACTs (0=left, 1=Crout, 2=Right)
1 # of broadcast
1 BCASTs (0=1rg,1=1rM,2=2rg,3=2rM,4=Lng,5=LnM)
1 # of lookahead depth
1 DEPTHs (>=0)
2 SWAP (0=bin-exch,1=long,2=mix)
64 swapping threshold
0 L1 in (0=transposed,1=no-transposed) form
0 U in (0=transposed,1=no-transposed) form
1 Equilibration (0=no,1=yes)
8 memory alignment in double (> 0)
The contents of this file has to be varied by trial and error method, till one gets an output that is satisfactory. To know about each of the parameter and how to change it refer to a paper here. To skip to the main point, start reading from Page no. 6 in that document.

6 Running HPL on single node

Once the HPL.dat file is ready, we can run the HPL. The HPL.dat file above is for a single node or processor. The product of the P*Q values in the above file give the number of processors the HPL is being tested for. Thus from the above file P=1 and Q=1 , 1*1=1, so it is for a single processor. Now to run it use the commands:
cd bin/rpi
./xhpl
The output looks something similar to what is shown below:
================================================================================
HPLinpack 2.1 -- High-Performance Linpack benchmark -- October 26, 2012
Written by A. Petitet and R. Clint Whaley, Innovative Computing Laboratory, UTK
Modified by Piotr Luszczek, Innovative Computing Laboratory, UTK
Modified by Julien Langou, University of Colorado Denver
================================================================================

An explanation of the input/output parameters follows:
T/V : Wall time / encoded variant.
N : The order of the coefficient matrix A.
NB : The partitioning blocking factor.
P : The number of process rows.
Q : The number of process columns.
Time : Time in seconds to solve the linear system.
Gflops : Rate of execution for solving the linear system.

The following parameter values will be used:

N : 5040
NB : 128
PMAP : Row-major process mapping
P : 1
Q : 1
PFACT : Right
NBMIN : 4
NDIV : 2
RFACT : Crout
BCAST : 1ringM
DEPTH : 1
SWAP : Mix (threshold = 64)
L1 : transposed form
U : transposed form
EQUIL : yes
ALIGN : 8 double precision words

--------------------------------------------------------------------------------

- The matrix A is randomly generated for each test.
- The following scaled residual check will be computed:
||Ax-b||_oo / ( eps * ( || x ||_oo * || A ||_oo + || b ||_oo ) * N )
- The relative machine precision (eps) is taken to be 1.110223e-16
- Computational tests pass if scaled residuals are less than 16.0
Also, we have to concentrate on the final result. The final output that comes on the terminal will look similar as shown below. The last value gives the speed and the values before that show the different parameters provided. In the below content ,the speed is shown in Gflops and its value is around 1.21e-01 Gflops , which when converted gives 121 Mega FLOPS (MFLOPS).
================================================================================
T/V N NB P Q Time Gflops
--------------------------------------------------------------------------------
WR11C2R4 21400 128 3 11 537.10 1.210e-01
HPL_pdgesv() start time Mon Jun 23 17:29:42 2014

HPL_pdgesv() end time Mon Jun 23 17:55:19 2014

--------------------------------------------------------------------------------
||Ax-b||_oo/(eps*(||A||_oo*||x||_oo+||b||_oo)*N)= 0.0020152 ...... PASSED
================================================================================
Please note that depending your Raspberry Pi the speed and the time taken might be significantly different. So please do not use these results as a comparison to your node or cluster.

7 Running HPL on multiple nodes

When we want to run HPL for multiple nodes, we will have to change the HPL.dat file. Here lets assume that we have 32 nodes. So the product of P*Q should be 32. I chose P=4 , Q=8 thus 4*8=32. So apart from this change, we will have to change value of N, from trial and error, we got the maximum speed for N=17400. The final file content is shown below. make those changes accordingly in your "HPL.dat" file.
HPLinpack benchmark input file
Innovative Computing Laboratory, University of Tennessee
HPL.out output file name (if any)
6 device out (6=stdout,7=stderr,file)
1 # of problems sizes (N)
17400 Ns
1 # of NBs
128 NBs
0 PMAP process mapping (0=Row-,1=Column-major)
1 # of process grids (P x Q)
4 Ps
8 Qs
16.0 threshold
1 # of panel fact
2 PFACTs (0=left, 1=Crout, 2=Right)
1 # of recursive stopping criterium
4 NBMINs (>= 1)
1 # of panels in recursion
2 NDIVs
1 # of recursive panel fact.
1 RFACTs (0=left, 1=Crout, 2=Right)
1 # of broadcast
1 BCASTs (0=1rg,1=1rM,2=2rg,3=2rM,4=Lng,5=LnM)
1 # of lookahead depth
1 DEPTHs (>=0)
2 SWAP (0=bin-exch,1=long,2=mix)
64 swapping threshold
0 L1 in (0=transposed,1=no-transposed) form
0 U in (0=transposed,1=no-transposed) form
1 Equilibration (0=no,1=yes)
8 memory alignment in double (> 0)
Once this is done we will have to run the HPL again. Use the following command. Remember to change the path in the command below to represent the path of machine file in your system.
cd bin/rpi
mpiexec -f ~/mpi_testing/machinefile -n 32 ./xhpl
The result of this will be similar to as shown above for one node, but it will definitely have a higher speed.
This kind of changes can be done depending on the number of nodes or processors in the system and the benchmark results can be found out. And as I mentioned earlier, to know more about how to set the values in the HPL.dat file, head over to the document here and give it a read.

Linux file system hierarchy

$
0
0
http://www.blackmoreops.com/2015/02/14/linux-file-system-hierarchy

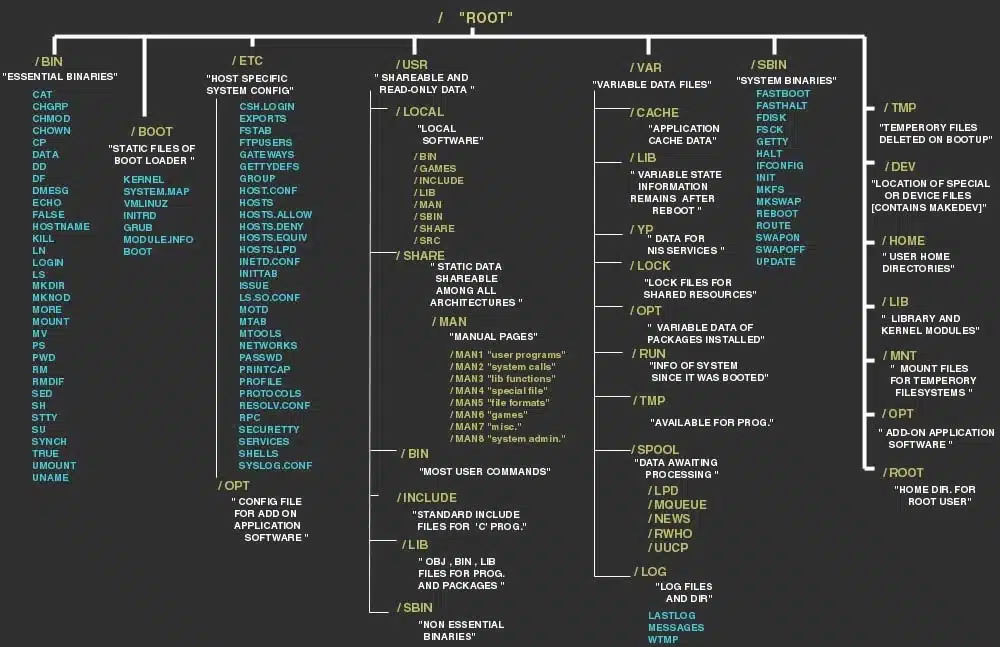
What is a file in Linux? What is file system in Linux? Where are all the configuration files? Where do I keep my downloaded applications? Is there really a filesystem standard structure in Linux? Well, the above image explains Linux file system hierarchy in a very simple and non-complex way. It’s very useful when you’re looking for a configuration file or a binary file. I’ve added some explanation and examples below, but that’s TLDR.

What is a file in Linux?

A simple description of the UNIX system, also applicable to Linux, is this:
On a UNIX system, everything is a file; if something is not a file, it is a process.
This statement is true because there are special files that are more than just files (named pipes and sockets, for instance), but to keep things simple, saying that everything is a file is an acceptable generalization. A Linux system, just like UNIX, makes no difference between a file and a directory, since a directory is just a file containing names of other files. Programs, services, texts, images, and so forth, are all files. Input and output devices, and generally all devices, are considered to be files, according to the system.
Linux file system hierarchy - Linux file structure - Optimized - blackMORE Ops
In order to manage all those files in an orderly fashion, man likes to think of them in an ordered tree-like structure on the hard disk, as we know from MS-DOS (Disk Operating System) for instance. The large branches contain more branches, and the branches at the end contain the tree’s leaves or normal files. For now we will use this image of the tree, but we will find out later why this is not a fully accurate image.

DirectoryDescription
/
Primary hierarchy root and root directory of the entire file system hierarchy.
/bin
Essential command binaries that need to be available in single user mode; for all users, e.g., cat, ls, cp.
/boot
Boot loader files, e.g., kernels, initrd.
/dev
Essential devices, e.g., /dev/null.
/etc
Host-specific system-wide configuration filesThere has been controversy over the meaning of the name itself. In early versions of the UNIX Implementation Document from Bell labs, /etc is referred to as the etcetera directory, as this directory historically held everything that did not belong elsewhere (however, the FHS restricts /etc to static configuration files and may not contain binaries). Since the publication of early documentation, the directory name has been re-designated in various ways. Recent interpretations include backronyms such as “Editable Text Configuration” or “Extended Tool Chest”.
/opt
Configuration files for add-on packages that are stored in /opt/.
/sgml
Configuration files, such as catalogs, for software that processes SGML.
/X11
Configuration files for the X Window System, version 11.
/xml
Configuration files, such as catalogs, for software that processes XML.
/home
Users’ home directories, containing saved files, personal settings, etc.
/lib
Libraries essential for the binaries in /bin/ and /sbin/.
/lib
Alternate format essential libraries. Such directories are optional, but if they exist, they have some requirements.
/media
Mount points for removable media such as CD-ROMs (appeared in FHS-2.3).
/mnt
Temporarily mounted filesystems.
/opt
Optional application software packages.
/proc
Virtual filesystem providing process and kernel information as files. In Linux, corresponds to a procfs mount.
/root
Home directory for the root user.
/sbin
Essential system binaries, e.g., init, ip, mount.
/srv
Site-specific data which are served by the system.
/tmp
Temporary files (see also /var/tmp). Often not preserved between system reboots.
/usr
Secondary hierarchy for read-only user data; contains the majority of (multi-)user utilities and applications.
/bin
Non-essential command binaries (not needed in single user mode); for all users.
/include
Standard include files.
/lib
Libraries for the binaries in /usr/bin/ and /usr/sbin/.
/lib
Alternate format libraries (optional).
/local
Tertiary hierarchy for local data, specific to this host. Typically has further subdirectories, e.g., bin/, lib/, share/.
/sbin
Non-essential system binaries, e.g., daemons for various network-services.
/share
Architecture-independent (shared) data.
/src
Source code, e.g., the kernel source code with its header files.
/X11R6
X Window System, Version 11, Release 6.
/var
Variable files—files whose content is expected to continually change during normal operation of the system—such as logs, spool files, and temporary e-mail files.
/cache
Application cache data. Such data are locally generated as a result of time-consuming I/O or calculation. The application must be able to regenerate or restore the data. The cached files can be deleted without loss of data.
/lib
State information. Persistent data modified by programs as they run, e.g., databases, packaging system metadata, etc.
/lock
Lock files. Files keeping track of resources currently in use.
/log
Log files. Various logs.
/mail
Users’ mailboxes.
/opt
Variable data from add-on packages that are stored in /opt/.
/run
Information about the running system since last boot, e.g., currently logged-in users and running daemons.
/spool
Spool for tasks waiting to be processed, e.g., print queues and outgoing mail queue.
/mail
Deprecated location for users’ mailboxes.
/tmp
Temporary files to be preserved between reboots.

Types of files in Linux

Most files are just files, called regular files; they contain normal data, for example text files, executable files or programs, input for or output from a program and so on.
While it is reasonably safe to suppose that everything you encounter on a Linux system is a file, there are some exceptions.
  • Directories: files that are lists of other files.
  • Special files: the mechanism used for input and output. Most special files are in /dev, we will discuss them later.
  • Links: a system to make a file or directory visible in multiple parts of the system’s file tree. We will talk about links in detail.
  • (Domain) sockets: a special file type, similar to TCP/IP sockets, providing inter-process networking protected by the file system’s access control.
  • Named pipes: act more or less like sockets and form a way for processes to communicate with each other, without using network socket semantics.

File system in reality

For most users and for most common system administration tasks, it is enough to accept that files and directories are ordered in a tree-like structure. The computer, however, doesn’t understand a thing about trees or tree-structures.
Every partition has its own file system. By imagining all those file systems together, we can form an idea of the tree-structure of the entire system, but it is not as simple as that. In a file system, a file is represented by an inode, a kind of serial number containing information about the actual data that makes up the file: to whom this file belongs, and where is it located on the hard disk.
Every partition has its own set of inodes; throughout a system with multiple partitions, files with the same inode number can exist.
Each inode describes a data structure on the hard disk, storing the properties of a file, including the physical location of the file data. When a hard disk is initialized to accept data storage, usually during the initial system installation process or when adding extra disks to an existing system, a fixed number of inodes per partition is created. This number will be the maximum amount of files, of all types (including directories, special files, links etc.) that can exist at the same time on the partition. We typically count on having 1 inode per 2 to 8 kilobytes of storage.
At the time a new file is created, it gets a free inode. In that inode is the following information:
  • Owner and group owner of the file.
  • File type (regular, directory, …)
  • Permissions on the file
  • Date and time of creation, last read and change.
  • Date and time this information has been changed in the inode.
  • Number of links to this file (see later in this chapter).
  • File size
  • An address defining the actual location of the file data.
The only information not included in an inode, is the file name and directory. These are stored in the special directory files. By comparing file names and inode numbers, the system can make up a tree-structure that the user understands. Users can display inode numbers using the -i option to ls. The inodes have their own separate space on the disk.

Real-Time Rogue Wireless Access Point Detection with the Raspberry Pi

$
0
0
http://www.linuxjournal.com/content/real-time-rogue-wireless-access-point-detection-raspberry-pi

Years ago, I worked for an automotive IT provider, and occasionally we went out to the plants to search for rogue Wireless Access Points (WAPs). A rogue WAP is one that the company hasn't approved to be there. So if someone were to go and buy a wireless router, and plug it in to the network, that would be a rogue WAP. A rogue WAP also could be someone using a cell phone or MiFi as a Wi-Fi hotspot.

The tools we used were laptops with Fluke Networks' AirMagnet, at the time a proprietary external Wi-Fi card and the software dashboard. The equipment required us to walk around the plants—and that is never safe due to the product lines, autonomous robots, parts trucks, HiLos, noise, roof access and so on. Also when IT people are walking around with laptops, employees on site will take notice. We became known, and the people with the rogue WAPs would turn them off before we could find the devices.

The payment card industry, with its data security standard (PCI-DSS), is the only one I could find that requires companies to do quarterly scans for rogue WAPs. Personally, I have three big problems with occasional scanning. One, as I said before, rogue WAPs get turned off during scans and turned back on after. Two, the scans are just snapshots in time. A snapshot doesn't show what the day-to-day environment looks like, and potential problems are missed. Third, I think there is more value for every company to do the scans, regardless of whether they're required.

Later, when I was a network engineer at a publishing company, I found it was good to know what was on my employer's network. The company wanted to know if employees followed policy. The company also was worried about data loss, especially around a couple projects. Other companies near us had set up their own wireless networks that caused interference with the ones we ran. Finally, I had to worry about penetration testers using tools like the WiFi Pineapple and the Pwn Plug. These allow network access over Wi-Fi beyond the company's physical perimeter.

One thing I always wanted was a passive real-time wireless sensor network to watch for changes in Wi-Fi. A passive system, like Kismet and Airodump-NG, collects all the packets in the radio frequency (RF) that the card can detect and displays them. This finds hidden WAPs too, by looking at the clients talking to them. In contrast, active systems, like the old Netsumbler, try to connect WAPs by broadcasting null SSID probes and displaying the WAPs that reply back. This misses hidden networks.

A couple years ago, I decided to go back to school to get a Bachelor's degree. I needed to find a single credit hour to fill for graduation. That one credit hour became an independent study on using the Raspberry Pi (RPi) to create a passive real-time wireless sensor network.

About the same time I left the automotive job, Larry Pesce of the SANS Institute wrote "Discovering Rogue Wireless Access Points Using Kismet and Disposable Hardware". This was a paper about real-time wireless sensors using the Linksys WRT54GL router and OpenWRT. But, I didn't find out about that until I had already re-invented the wheel with the RPi.

Today lots of wireless intrusion detection systems exist on the market, but as listed in the Hardware sidebar, mine cost me little more than $400.00 USD to make. Based on numbers I could get, via Google Shopping, using Cisco Network's Wireless IDS data sheet from 2014, a similar set up would have cost about $11,500 USD. I've been told by a wireless engineer I know that he was quoted about twice that for just one piece of hardware from the Cisco design.

Hardware

Below is the hardware per sensor—your prices may vary depending on where you buy and what's on sale.

Cost of parts: $69.95 per sensor; I used six Raspberry Pis in the project.

Raspberry Pi Wireless Sensor Drone:
  • Raspberry Pi Model B: $35.00 (found on sale for $29.99).
  • 5v 1amp power supply: $9.99.
  • Plastic Raspberry Pi case: $8.99.
  • TP-Link TL-WN722N: $14.99.
  • Class 10 SDHC 8-gigabit Flash card: $5.99.
Network:
  • Cat 5e cable between 25–50' long: already had.
  • Linksys WRT54GL: already had.
  • Linksys 16-port workgroup switch: already had.
Monitor and Kismet Sever:
  • Laptop running Xubuntu Linux VM: already had.
When I started looking into using the RPi for this, I kept coming across people using the RPi and Kismet for war driving, war walking and war biking. David Bryan of Trustwave's Spider Labs did a blog post in 2012 called "Wardrive, Raspberry Pi Style!" where he talked about using Kismet with the RPi to track WAPs on his walk and drive around his area. He used a USB GPS device to map out where the access points were.

Because the RPis are used as stationary devices, I didn't need GPS. One thing I did need though was a rough idea of where to place the sensors. Based on readings, Wi-Fi is good for about 328 feet (100 meters) with the omnidirectional antenna being used on the TP-Link card indoors. Having the existing wireless survey (or doing one) will be useful (see Wireless Survey sidebar). It will let you know where the existing WAPs are. This information also could come from the network documentation, if it exists. It is important to keep the detectors from being overpowered by approved access points. The wireless survey or network documentation also should provide the BSSIDs for the approved devices to be filtered out.

Wireless Survey

A wireless survey is usually a map of a building or location showing the signal strengths associated with wireless access points. Surveys are usually the first step when a new wireless network is installed. Surveys give the installers how many WAPs are needed, where they should be spaced, and what channels would be best to use in those areas.

Surveys normally are done with a WAP and a Wi-Fi-enabled device. The WAP is placed in a location, and signal strength is recorded as the client is moved around the area.

A rogue WAP or a survey WAP can be built from a Raspberry Pi with a wireless card and Hostapd.

Most on-line documentation for a Hostapd WAP says to bridge the network cards on the RPi. This can be skipped if the WAP will not be used with clients that connect to the Internet.

The RPis have no shortage of operating systems to run. My choice for this project was to run Kali Linux on the RPi, with Airodump-NG and Kismet. Originally, it was going to be just Kali and Kismet, but I ran into some limitations. The reason I chose Kali for this project, was the hardware drivers for the network card I used didn't need to be recompiled. Kali also came with Airodump-NG preinstalled, and an apt-get update && apt-get install kismet took care of installing the rest of what I needed.

Kali Linux:

Kali Linux is the new version of Backtrack Linux—one of the specialized Linux distributions for penetration testing and security. It is currently based off Debian Linux, with security-focused tools preinstalled. Kali runs everything via the root login.

Kali has builds available as ISOs and VMware images in 64-bit, 32-bit and custom-built ARM images for single card boards, Chrome OS and Android OS devices.

Airodump-NG

Airodump is a raw 802.11 packet capture device. It is part of the Aircrack-NG suite. Normally, Airodump-NG will capture a file of packets to be cracked by Aircrack-NG. However, in my case, I wanted the feature where Airodump-NG can list the clients and access points it sees around it, which is about 300 feet indoors (this distance is based on documentation by the 802.11 standard).

What Is Kismet?

Kismet is an 802.11 wireless network detector, sniffer and intrusion detection system. Kismet will work with any wireless card that supports raw monitoring mode, and it can sniff 802.11b, 802.11a, 802.11g and 802.11n traffic (devices and drivers permitting).

Kismet also sports a plugin architecture allowing for additional non-802.11 protocols to be decoded.
Kismet identifies networks by passively collecting packets and detecting networks, which allows it to detect (and given time, expose the names of) hidden networks and the presence of non-beaconing networks via data traffic.

Kismet has two modes that can be run. The first is the Kismet Server, which the Kismet User Interface (Kismet UI) connects to (Figure 1). The Kismet UI shows the WAP name, if is an access point or not, encrypted or not, the channel and other information. The "seen by" column is the list of capture sources that saw the WAPs.
Figure 1. Kismet Network List

Kismet calls the remote sensors drones. They're configured through the kismet drone configuration file in /etc/kismet/kismet_drone.conf. I found the documentation for setting up this part rather sparse. Everything I found spanned multiple years and didn't go into too much detail.

When I configured my drones, I set one up first and then cloned the SD card with the dd command. I copied the cloned image to the other SD cards, again using dd. To speed up dd, set the block size to about half the computer's memory.

Making the drones this way did cause a problem with the wireless network cards. Use ifconfig to see what cards the system lists. As you can see from the screenshot shown in Figure 2, my drone02 has the wireless card listed as wlan1, and it is already in monitor mode. After the drives were all cloned, I just had to go in and make minor configuration changes—besides the wireless card change.
Figure 2. iconfig Screenshot

The Raspberry Pi uses about 750 mAh, and a 5-volt 1-amp power supply doesn't put enough power out to start the wireless card after the Raspberry Pi is booted. Many of the forums I read said that you need something that puts out 1.5–2.1 amps. I found that plugging in the card first prevents the extra draw, and I didn't have a problem.

In the steps below, if you plug in the Wi-Fi card after booting, you risk a power drop to the Raspberry Pi. The loss of power will crash the RPi, and the SD card could be corrupted.

Configuring the Raspberry Pi with Kali

First, download the Kali Raspberry Pi distro from the Kali Linux Web site.

Copy the image to the SD card with the dd command or a tool like Win32DiskImage in Windows. This creates a bit-for-bit copy of the image on the SD card. It is similar to burning an ISO to a DVD or CD.

Put the SD card into the RPi. Then, attach the Wi-Fi card you're using to a USB port.

Attach a Cat5, Cat5e or Cat6 cable to the Ethernet port. Wired is used to communicate data to the network to prevent problems with the wireless card in monitor mode.

Plug in the micro USB cable to turn on the RPi. Next, ssh to the device. You may need to do a port scan with nmap to find the RPi. Alternatively, you can use a monitor and keyboard to access the console directly. Again, have all peripherals plugged in prior to plugging in the power.

The login is "root", and the password is "toor".

Configure the Kismet Drone

Configure eth0 with a static IP address like in the static IP address screenshot (Figure 3). This is done under /etc/network/interfaces.
Figure 3. Static IP Address Screenshot

Restart the networking with service networking restartor reboot. If you connected via SSH, you'll have to reconnect.

Next, edit /etc/kismet/kismet_drone.conf. I have included a screenshot (Figure 4), but below are settings I used, and the fields that need to be changed.
Figure 4. drone.conf

Set the following either to something that makes sense to you or the right information for your network and device. I used what I have configured for the examples.

Name the drone with servername. This will show up in the bottom of the Kismet UI and logs when connecting.

Use dronelisten to set the protocol, interface's IP address and port for the drone is to listen on for servers' connection.

 List what servers can talk to this drone with allowedhosts. This can be a whole network using CIDR notation or just individual boxes on the network, and also allow the drone to talk to itself with  
droneallowedhosts.

Set the maximum number of servers that can talk to the drone with dronemaxclients.

Set the max backlog of packets for the kismet drone with droneringlen. Smaller than what I have might be better. I had problems with drone04 crashing. It also was the one that saw the most networks.

Turn off GPS with gps=false. You don't need it since these are stationary devices and you should know where they are.

Set the capture source, ncsource. This tells the system what interface to use and driver to use for that card:

servername=Kismet-Drone-pi2
dronelisten=tcp://192.168.1.12:2502
allowedhosts=192.168.1.65
droneallowedhosts==127.0.0.1
dronemaxclients=10
droneringlen=65535
gps=false
ncsource=wlan1:type=ath5k

The rest of the options I left set to default. Unless you're in a country that uses more B/G channels than the US, there is nothing that needs to be modified.

The last thing to configure on the drones is the /etc/rc.local file. This will start the kismet drone program in the background when the RPi powers on. Add these two lines before the exit 0 so yours looks like the code below:

# start kistmet
/usr/bin/kismet_drone --daemonize

exit 0 

Configure the Kismet Server on a PC or Server for the Drone Sensors

There are two settings to change in /etc/kismet/kismet.conf. The first is in the ncsource. The second is the filter_tracking.

The line below and related screen capture (Figure 5) tell Kismet what its capture sources are. In this case, nothing local is being used, just the drones. Repeat this line for each drone, with the proper information:

ncsource=drone:host=192.168.1.12,port=2502,name=i2

The line says the source is a drone, the drone's IP address, what port to connect to on the drone, and what the drone should show as in the Kismet UI. The name is seen "network list" view and "network detail" view. I went with the two-character name of "i#" because the "Last Seen By" field in the network list has a hard-coded limit of ten characters. I wanted that field to show as many drones as it could.
Figure 5. Kismet Server Sources

Next, filter out the known network BSSIDs. Previously, I mentioned that a wireless survey or network documentation should be able to provide this information. As you can see in the network list screenshot, several devices are listed. If you have devices you don't want to see, you'll need to filter them out in the Kismet Server configuration file /etc/kismet/kismet.conf.

In the configuration file, it has an example of:

filter_tracker=ANY(!"00:00:DE:AD:BE:EF")

In my version of Kismet, that did not work. I had to remove the quotes so the line looked like this:

filter_tracker=BSSID(!00:00:DE:AD:BE:EF)

The bang (!) ignores that MAC address. This shows everything but ignored WAPs. Without the bang (!), Kismet would show only the WAP with that BSSID in the network list. The choices are ANY, BSSID, SOURCE and DEST. Although the documentation says you can use ANY with a bang (!), trying it fails. The error said to use one of the other three options. The MAC address can be stacked using a comma-separated list:

filter_tracker=BSSID(!00:00:DE:AD:BE:EF,!00:0:DE:AD:BE:EE, ↪!00:00:DE:AD:BE:ED)

With the Drone Sensor Network running, the network detail screen for an access point will show which drones see the WAP (Figure 6). But, this is a limitation of the system. This screen provides only the signal strength for the drone with the strongest signal. This was the limit of Mr Pesce's WRT54GL option.
Figure 6. Network Detail Screen

In Mr Pesce's model, once the rogue WAP was detected, someone had to go out and search. The search area was around all the drones that saw the rouge WAP. Although his design makes the search area smaller than a whole building, it doesn't triangulate very well. By using the RPis as drones, there is a second program you can use for triangulation.

Airodump-NG, as I mentioned before, is for capturing packets on over Wi-Fi. The user interface, when running Airodump-NG, provides several bits of information. The ones you want are BSSID, PWR (power measured in negative DB), Channel and ESSID (Figures 7–9: each image shows a different power level, which when used with the Roosevelt picture, shows how to use it for triangulation).
Figure 7. Drone2 airodump
Figure 8. Drone3 airodump
Figure 9. Drone4 airodump
 
ssh to each RPi drone, and run this command. Don't forget to replace the bssid with the MAC address of the WAP you are looking for and the interface for what that drone is monitoring with:
airodump-ng --bssid
Note: I did not use the channel command in the above line to lock a channel. This would interfere with data going back to the Kismet Server and lose the device if the WAP is configured for channel hopping.

Proof of Concept

I did my proof of concept at Eastern Michigan University's Roosevelt Hall, which is where my degree program's labs are. In the map of Roosevelt Hall (Figure 10), there are three drones. This was due to power and Ethernet cable limitations. There is also a rogue WAP (rogue_ap_pi), hidden by my professor. Kismet showed me all the networks in the area, because I didn't have BSSIDs to filter them out. Again, this is where having network documentation or a wireless survey would be helpful.
Figure 10. Map of Roosevelt Hall at Eastern Michigan University (Google Maps)

Drone3 and drone4 are in a hallway. Drone2 is in one of the lab rooms, with the Linksys network and my laptop running the Kismet Server and Kismet UI. When drone4 was just inside the lab's door, there was a 10DB signal loss. Again, a wireless survey would have helped, because it would show how much signal the walls blocked.

Once I had the system up and running and the drones where I wanted them, my professor hid the rogue WAP somewhere on the same floor. By looking at the power levels, I was able to figure out where to go to find the rouge WAP. I knew that drone4 was the closest and that the rogue WAP was on the other side of that drone. I walked down that hallway and found the rogue WAP in less than two minutes. It was hidden under a bench in the hall, outside a classroom and the other lab.

Limitations of the Wi-Fi Card

The last limitation I want to cover is the TP-Link TL-WN722N card. I went with this card because of the cost, the external antenna, the power draw when plugged in to the RPi and its availability at a local store. The card can talk only on the 2.4GHz range, meaning that it picks up only 802.11 B, G and N networks. It does not have the ability to detect or use the 5GHz range used by parts of N, A or the new AC networks.

Although I have a couple ALFA wireless cards, and one that should be able to detect A and AC, I do not know if I could run them on the RPi drone without a separate powered USB hub.

This setup also does not detect Zigbee/Xbee or Bluetooth. Xbee uses both 900MHz and 2.4GHz.

Bluetooth uses 2.4GHz. Although both devices use 2.4GHz, frequencies (channels) are outside the Wi-Fi card's range. Mike Kershaw (aka Dragorn, Kismet's developer) is working on a hardware and software Xbee detector called kisbee. An Ubertooth One should work with Kismet to detect Bluetooth.

Cell phones and related cellular network cards also would be missed. Phones operate outside the Wi-Fi card's range, unless the phone is a Wi-Fi hotspot. The new HackRF One card might be able to detect the cellular networks, as well as A/B/G/N/AC Wi-Fi, Xbee and Bluetooth, but I haven't gotten one to play with, and they would drive up the cost to about $300 USD per sensor.

Resources

Kismet: http://kismetwireless.net
Kali Linux: http://www.kali.org

Build your own combined OpenVPN/WiKID server for a VPN with built-in two-factor authentication using Packer

$
0
0
https://www.howtoforge.com/tutorial/build-wikid-openvpn-server-with-packer

In past tutorials, we have added one-time passwords to OpenVPN and created a WiKID server using Packer. In this tutorial we create a combined OpenVPN/WiKID server using Packer. Packer allows us to create VMware, VirtualBox, EC2, GCE, Docker, etc images using code. Note that combining your two-factor authentication server and VPN server on one box may or may not be the best solution for you. We typically like separation of duties for security and flexibility. However, if you need something fast - the PCI auditors arrive Monday - or you are in a repressive state and just need a secure outbound connection for a short period of time. And you still have some flexibility. You can add more services to the WiKID server. You can disable the OpenVPN server and instead switch to a different VPN.

Build the Combined Server

First, download and install Packer.
Checkout our Packer scripts from GitHub. The scripts consist of a main JSON file that tells Packer what do it, an http directory with Anaconda build scripts, a files directory that gets uploaded to the image and provisioners that run after the image is built. Basically Packer starts with some source such as an ISO or AMI, builds the server based on Anaconda (at least for CentOS), uploads any files and then runs the provisioners. Packer is primarily geared toward creating idempotent servers. In our case, we are using it to execute the commands, allowing us to run one command instead of about 50 (just for the provisioning).
Before building, you need to edit a few files. First, edit /files/vars. This is the standard vars file for creating the OpenVPN certs. Just enter your values for the cert fields.
# These are the default values for fields
# which will be placed in the certificate.
# Don't leave any of these fields blank.
export KEY_COUNTRY="US"
export KEY_PROVINCE="GA"
export KEY_CITY="Atlanta"
export KEY_ORG="WiKID Systems Inc"
export KEY_EMAIL="me@wikidsystems.com"
export KEY_OU="WiKID Systems, Inc"
Next, you need to edit the shared secret in /files/server. This file will tell PAM which RADIUS server to use. In this case, it is talking straight to the WiKID server. The shared secret is used to encode the radius traffic. Since WiKID is running on the same server, keep the localhost as the server:
# server[:port] shared_secret      timeout (s)
127.0.0.1 secret 3
You will need this shared secret later.
Take a look in centos-6-x86-64.json. You can run it as is, but you might like to edit a few things. You should confirm the source_ami (the listed ami is in the US-East) or switch it to one of your preferred CentOS AMIs. If you are building on VMware or VirtualBox, you will want to change the iso_url to the location of the CentOS ISO on your hard drive and update the MD5Sum. You may want to edit the names and descriptions. You may also want to change the EC2 region. Most importantly, you can change the ssh_password which is the root password.
Once you are happy with the JSON file, you can verify it with Packer:
$packer_location/packer verify centos-6-x86-64.json
If that works, build it. You can specify the target platform on the command line:
$packer_location/packer build --only=virtualbox-iso centos-6-x86-64.json
If you build for EC2, put the required credentials in the command line:
$packer_location/packer build -var 'aws_access_key=XXXXXXXXXXXXXXXXXXXX' -var 'aws_secret_key=XXXXXXXXXXXXXXXXXXXXXXXXXXXXXXXXXXXXXXXX' --only=amazon-ebs centos66.json
If you watch the commands run, you will see a complete OpenVPN server being built complete with fresh certificates!

Configure the WiKID two-factor authentication server

Once it is created, you will need to launch the AMI or import the virtual machine. Start VirtBox and select File, Import Appliance. Point it to output-virtualbox-iso directory created by the build command and open the OVF file. Make any changes you may want to the virtual machine (eg memory or network) and start the server.
Login using root/wikid or whatever you may have set the root password as in the JSON file. We will be configuring the WiKID server using the quick-start configuration option. Copy the file to the current directory:
cp /opt/WiKID/conf/sample-quick-setup.properties wikid.conf
Edit wikid.conf per those instructions. Use the external IP address of your server or EC2 instance zero-padded as the domaincode. So, 54.163.165.73 becomes 054163165073. For the RADIUS host use the localhost and the shared secret you created in /files/server above:
information for setting up a RADIUS host
radiushostip=127.0.0.1
radiushostsecret=secret
; *NOTE*: YOU SHOULD REMOVE THIS SETTING AFTER CONFIGURATION FOR SECURITY
If you are on a VM, you can configure the network by running:
wikidctl setup
On EC2, you can just configure the WiKID server:
wikidctl quick-setup configfile=wikid.conf
You will see configuration information scroll past. Start the WiKID server:
wikidctl start
You will be prompted for the passphrase you set in wikid.conf. Browse to the WIKIDAdmin interface at https://yourserver.com/WiKIDAdmin/ and you should see your domain created, your radius network client configured and all the required certs completed.
Before leaving the server, you should add your username as an account on the server with 'useradd $username'. There is no need to add a password.

Register the WiKID Software token

Download a WiKID software token or install one for iOS or Android from the apps stores.
Start the token and select "Add a Domain". Enter the domain identifier code you set in wikid.conf and you should be double-prompted to set your PIN. Do so and you will get back a registration code. Go to the WiKIDAdmin web UI and click on the Users Tab, then Manually Validate a User. Click on your registration code and enter your username. This process associates the token (and the keys that were exchanged) with the user.

Setup the VPN client

Download the ca.crt to the client:
scp -i ~/Downloads/wikid.pem root@yourserver.com:/etc/openvpn/ca.crt .
Edit the client.conf OpenVPN file. Set the remote server as your combined WiKID/OpenVPN server:
# The hostname/IP and port of the server.
# You can have multiple remote entries
# to load balance between the servers.
remote yourserver.com 1194
Comment out the lines for the cert and key. Leaving only the CA. Since we are using WiKID to authenticate and identify the user, they are not needed.
ca ca.crt
#cert client.crt
#key client.key
At the bottom of the file, tell the client to prompt for a password:
auth-user-pass
Now start the OpenVPN client:
sudo openvpn client.conf
You will be prompted for a username and a password. Request a passcode from your WiKID token and enter it into the password field. You should be granted accesss.
Related:

Crack passwords

$
0
0
http://www.linuxvoice.com/crack-passwords

How secure are your passwords? Find out (and stay safer online) by cracking them with John The Ripper.

Most people use passwords many times a day. They’re the keys that unlock digital doors and give us access to our computers, our email, our data and sometimes even our money. As more and more things move online, passwords secure an ever growing part of our lives. We’re told to add capital letters, numbers and punctuation to these passwords to make them more secure, but just what difference do these have? What does a really secure password look like?

In order to answer these questions, we’re going to turn into an attacker and look at the methods used to crack passwords. There are a few password-cracking tools available for Linux, but we’re going to use John The Ripper, because it’s open source and is in most distros’ repositories (usually, the package is just called john).
In order to use it, we need something to try to crack. We’ve created a file with a set of MD5-hashed passwords; they’re all real passwords that were stolen from a website and posted on the internet. MD5 is quite an old hashing method, and we’re using it because it should be relatively quick to crack on most hardware. To make matters easier, all the hashes use the same salt. Although we’ve chosen a setup that’s quick to crack, this same setup is quite common in organisations that don’t focus on security. You can download the file from here.
After downloading that file, you can try and crack the passwords with:
john md5s-short
The passwords in this file are all quite simple, and you should crack them all very quickly. Not all password hashes will surrender their secrets this easily.
When you run John The Ripper like this, it tries increasingly more complex sequences until it finds the password. If there are complex passwords, it may continue running for months or years unless you press Ctrl+C to terminate it.
Once this has finished running you can see what passwords it found with:
john --show md5s-short
That’s the simplest way of cracking passwords – and you’ve just seen that it can be quite effective – so now lets take a closer look at what just happened.


The speed at which John can crack hashes varies dramatically depending on the hashing algorithm. Slow algorithms (such as bcrypt) can be tens of thousands of times slower than quick ones like DES.

John The Ripper works by taking words from a dictionary, hashing them, and comparing these hashes with the ones you’re trying to crack. If the two hashes match, that’s the password you’re looking for. A crucial point in password cracking is how quickly you can perform these checks. You can see how fast john can run on your computer by entering:
john --test
This will benchmark a few different hashing algorithms and give their speeds in checks per second (c/s).
By default, John will run in single-threaded mode, but if you want to take full advantage of a multi-threaded approach, you can add the –fork=N option to the command where N is the number of processes. Typically, this is best where N is the number of CPU cores you want to dedicate to the task.
In the previous example, you probably found John cracked most of the passwords very quickly. This is because they were all common passwords. Since John works by checking a dictionary of words, common passwords are very easy to find.
John comes with a word list that it uses by default. This is quite good, but to crack more and more secure passwords, you then need a word list with more words. People who crack passwords regularly often build their own word lists over years, and they can come from many sources. General dictionaries are good places to start (which languages you pick will depend on your target demographic), but these don’t usually contain names, slang or other terms.
Crackers regularly steal passwords from organisations (often websites) and post them online. These password leaks may contain thousands or even millions of passwords, so these are a great source of extra words. Good word lists are often sold (such as https://crackstation.net/buy-crackstation-wordlist-password-cracking-dictionary.htm, which is pay-what-you-want). This latter has about 1.5 billion words; even larger word lists are available, but usually for a fee.
With John, you can use a custom word list with the –wordlist= option. For example, to check passwords using your system’s dictionary, use:
rm ~/.john/john.pot
john --wordlist=/usr/share/dict/words md5s-short
This should work on most Debian-based systems, but on other distros, the words file may be in a different place. The first line deletes the file that contains the cracked passwords. If you don’t run this, it won’t bother trying to crack anything, as it already has all the passwords. The regular dictionary isn’t as good as John The Ripper’s dictionary, so this won’t get all the passwords.

How passwords work

Passwords present something of a computing conundrum. When people enter their password, the computer has to be able to check that they’ve entered the right password. At the same time though, it’s a bad idea to store passwords anywhere on the computer, since that would mean that any hacker or malware might be able to get the passwords file and then compromise every user account.
Hashing (AKA one-way encryption) is the solution to this problem. Hashing is a mathematical process that scrambles the password so that it’s impossible to unscramble it (hence one-way encryption).
When you set the password, the computer hashes it and stores the hash (but not the password). When you enter the password, the computer then hashes it and compares this hash to the stored hash. If they’re the same, then the computer assumes that the passwords are the same and therefore lets you log in.
There are a few things make a good hashing algorithm. Obviously, it should be impossible to reverse (otherwise it’s not a hashing algorithm), but other than this, it should minimise the number of collisions. This is where two different things produce the same hash, and the computer would therefore accept both as valid. It was a collision in the MD5 hashing algorithm that allowed the Flame malware to infiltrate the Iranian Oil Ministry and many other government organisations in the Middle East.
Another important thing about good hashing algorithms is that they’re slow. That might sound a little odd, since generally algorithms are designed to be fast, but the slower a hash is, the harder it is to crack. For normal use, it doesn’t make much difference if the hash takes 0.000001 seconds or 0.001 seconds, but the latter takes 1,000 times longer to crack.
You can get a reasonable idea of how fast or slow an algorithm is by running john –test to benchmark the different algorithms on your computer. The fewer checks per second, the slower it will be for an attacker to break any hashes using that algorithm.

Mangling words

Secure services often place rules on what passwords are allowed. For example, they might insist on upper and lower case letters as well as numbers or punctuation. In general, people won’t add these randomly, but put them in words in specific ways. For example, they might add a number to the end of a word, or replace letters in a word with punctuation that looks similar (such as a with @).
John The Ripper provides the tools to mangle words in this way, so that we can check these combinations from a normal word list.
For this example, we’ll use the password file from www.linuxvoice.com/passwords, which contains the passwords: password, Password, PASSWORD, password1, p@ssword, P@ssword, Pa55w0rd, p@55w0rd. First, create a new text file called passwordlist containing just:
password
This will be the dictionary, and we’ll create rules that crack all the passwords based of this one root word.
Rules are specified in the john.conf file. By default, john uses the configuration files in ~/.john, so you’ll need to create that file in a text editor. We’ll start by adding the lines:
[List.Rules:Wordlist]
:
c
The first line tells john what mode you want to use the rules for, end every line below that is a rule (we’ll add more in a minute). The : just tells John to try the word as it is, no alterations, while c stands for capitalise, which makes the first character of the word upper case. You can try this out with:
john passwords.md5 --wordlist=passwordlist --rules
You should now crack two of the passwords despite there only being one word in the dictionary. Let’s try and get a few more now. Add the following to the config file:
u
$[0-9]
The first line here makes the whole word upper case. On the second line, the $ symbol means append the following character to the password. In this case, it’s not a single character, but a class of characters (digits), so it tries ten different words (password0, password1… password9).
To get the remaining passwords, you need to add the following rules to the config file:
csa@
sa@so0ss5
css5so0
The rule s replaces all occurrences of character1 with character2. In the above rules, this is used to switch a for @ (sa@), o for 0 (so0) and s for 5 (ss5). All of these are combination rules that build up the final word through more than one alteration.

Processing power

The faster your computer can hash passwords, the more you can try in a given amount of time, and therefore the better chance you have of cracking the password. In this article, we’ve used John The Ripper because it’s an open source tool that’s available on almost all Linux platforms. However, it’s not always the best option. John runs on the CPU, but password hashing can be run really efficiently on graphics cards.
Hashcat is password cracking program that runs on graphics cards, and on the right hardware can perform much better than John. Specialised password cracking computers usually have several high-performance GPUs and rely on these for their speed.
You probably won’t find Hashcat in your distro’s repositories, but you can download it from www.hashcat.net (it’s free as in zero cost, but not free as in free software). It comes in two flavours: ocl-Hashcat for OpenCL cards (AMD), and cuda-Hashcat for Nvidia cards.
Raw performance, of course, means very little without finesse, so fancy hardware with GPU crackers means very little if you don’t have a good set of words and rules.


A text-menu driven tool for creating John The Ripper config files is available from this page.

Limitations of cracking rules

The language for creating rules isn’t very expressive. For example, you can’t say: ‘try every combination of the following rules’. The reason for that is speed. The rules engine has to be able to run thousands or even millions of times per second while not significantly slowing down the hashing.
You’ve probably guessed by now that creating a good set of rules is quite a time-consuming process. It involves a detailed knowledge of what patterns are commonly used to create passwords, and an understanding of the archaic syntax used in the rules engines. It’s good to have an understanding of how they work, but unless you’re a professional penetration tester, it’s usually best to use a pre-created rule list.
The default rules with John are quite good, but there are some more complex ones available. One of the best public ones comes from a DefCon contest in 2010. You can grab the ruleset from the website: http://contest-2010.korelogic.com/rules.html.
You’ll get a file called rules.txt, which is a John The Ripper configuration file, and there are some usage examples on the above website. However, it’s not designed to work with the default version of JohnThe Ripper, but a patched version (sometimes called -jumbo). This isn’t usually available in distro repositories, but it can be worth compiling it because it has more features than the default build. To get it, you’ll need to clone it from GitHub with:
git clone https://github.com/magnumripper/JohnTheRipper
cd JohnTheRipper/
There are a few options in the install procedure, and these are documented in JohnTheRipper/doc/Install. We compiled it on an Ubuntu 14.04 system with:
cd JohnTheRipper/src
./configure && make -s clean && make -sj4
This will leave the binary JohnTheRipper/run/john that you can execute. It will expect the john.conf file (which can be the file downloaded from KoreLogic) in the same directory.
If you don’t want to compile the -jumbo version of John, you can still use the rules from KoreLogic, you’ll just have to integrate them into a john.conf file by hand first. There are a lot of rules, so you’ll probably want to pick out a few, and copy them into the john.conf file in the same way you did when creating the rules earlier, and omit the lines with square brackets.
As you’ve seen, cracking passwords is part art and part science. Although it’s often thought of as a malicious practice, there are some real positive benefits of it. For example, if you run an organisation, you can use cracking tools like John to audit the passwords people have chosen. If they can be cracked, then it’s time to talk to people about computer security. Some companies run periodic checks and offer a small reward for any employee whose password isn’t cracked. Obviously, all of these should be done with appropriate authorisation, and you should never use a password cracker to attack someone else’s password except when you have explicit permission.
John The Ripper is an incredibly powerful tool whose functionality we’ve only just touched on. Unfortunately, its more powerful features (such as its rule engine) aren’t well documented. If you’re interested in learning more about it, the best way of doing this is by generating hashes and seeing how to crack them. It’s easy to generate hashes by simply creating new users in your Linux system and giving them a password; then you can copy the /etc/shadow file to your home directory and change the owner with:
sudo cp /etc/shadow ~
sudo chown ~/shadow
Where is your username. You can then run John on the shadow file. If you’ve got a friend who’s interested in cracking as well, you could create challenges for each other (remember to delete the lines for real users from the shadow file though!). Alternatively, you can try our shadow file for the latest in our illustrious series of competitions.
So, what does a secure password look like? Well, it shouldn’t be based on a dictionary word. As you’ve seen, word mangling rules can find these even if you’ve obscured it with numbers or punctuation. It should also be long enough to make brute force attacks impossible (at least 10 characters). Beyond that, it’s best to use your own method, because any method that becomes popular can be exploited by attackers to create better word lists and rules.

PostgreSQL, the NoSQL Database

$
0
0
http://www.linuxjournal.com/content/postgresql-nosql-database

One of the most interesting trends in the computer world during the past few years has been the rapid growth of NoSQL databases. The term may be accurate, in that NoSQL databases don't use SQL in order to store and retrieve data, but that's about where the commonalities end. NoSQL databases range from key-value stores to columnar databases to document databases to graph databases.
On the face of it, nothing sounds more natural or reasonable than a NoSQL database. The "impedance mismatch" between programming languages and databases, as it often is described, means that we generally must work in two different languages, and in two different paradigms. In our programs, we think and work with objects, which we carefully construct. And then we deconstruct those objects, turning them into two-dimensional tables in our database. The idea that I can manipulate objects in my database in the same way as I can in my program is attractive at many levels.
In some ways, this is the holy grail of databases: we want something that is rock-solid reliable, scalable to the large proportions that modern Web applications require and also convenient to us as programmers. One popular solution is an ORM (object-relational mapper), which allows us to write our programs using objects. The ORM then translates those objects and method calls into the appropriate SQL, which it passes along to the database. ORMs certainly make it more convenient to work with a relational database, at least when it comes to simple queries. And to no small degree, they also improve the readability of our code, in that we can stick with our objects, without having to use a combination of languages and paradigms.
But ORMs have their problems as well, in no small part because they can shield us from the inner workings of our database. NoSQL advocates say that their databases have solved these problems, allowing them to stay within a single language. Actually, this isn't entirely true. MongoDB has its own SQL-like query language, and CouchDB uses JavaScript. But there are adapters that do similar ORM-like translations for many NoSQL databases, allowing developers to stay within a single language and paradigm when developing.
The ultimate question, however, is whether the benefits of NoSQL databases outweigh their issues. I have largely come to the conclusion that, with the exception of key-value stores, the answer is "no"—that a relational database often is going to be a better solution. And by "better", I mean that relational databases are more reliable, and even more scalable, than many of their NoSQL cousins. Sure, you might need to work hard in order to get the scaling to work correctly, but there is no magic solution. In the past few months alone, I've gained several new clients who decided to move from NoSQL solutions to relational databases, and needed help with the architecture, development or optimization.
The thing is, even the most die-hard relational database fan will admit there are times when NoSQL data stores are convenient. With the growth of JSON in Web APIs, it would be nice to be able to store the result sets in a storage type that understands that format and allows me to search and retrieve from it. And even though key-value stores, such as Redis, are powerful and fast, there are sometimes cases when I'd like to have the key-value pairs connected to data in other relations (tables) in my database.
If this describes your dilemma, I have good news for you. As I write this, PostgreSQL, an amazing database and open-source project, is set to release version 9.4. This new version, like all other PostgreSQL versions, contains a number of optimizations, improvements and usability features. But two of the most intriguing features to me are HStore and JSONB, features that actually turn PostgreSQL into a NoSQL database.
Fine, perhaps I'm exaggerating a bit here. PostgreSQL was and always will be relational and transactional, and adding these new data types hasn't changed that. But having a key-value store within PostgreSQL opens many new possibilities for developers. JSONB, a binary version of JSON storage that supports indexing and a large number of operators, turns PostgreSQL into a document database, albeit one with a few other features in it besides.
In this article, I introduce these NoSQL features that are included in PostgreSQL 9.4, which likely will be released before this issue of Linux Journal gets to you. Although not every application needs these features, they can be useful—and with this latest release of PostgreSQL, the performance also is significantly improved.

HStore

One of the most interesting new developments in PostgreSQL is that of HStore, which provides a key-value store within the PostgreSQL environment. Contrary to what I originally thought, this doesn't mean that PostgreSQL treats a particular table as a key-value store. Rather, HStore is a data type, akin to INTEGER, TEXT and XML. Thus, any column—or set of columns—within a table may be defined to be of type HSTORE. For example:

CREATE TABLE People (
id SERIAL,
info HSTORE,
PRIMARY KEY(id)
);
Once I have done that, I can ask PostgreSQL to show me the definition of the table:

\d people
Table "public.people"

-----------------------------------------------------------------
| Column | Type | Modifiers |
-----------------------------------------------------------------
| id | integer | not null default |
| | | ↪nextval('people_id_seq'::regclass)|
-----------------------------------------------------------------
| info | hstore | |
-----------------------------------------------------------------
Indexes:
"people_pkey" PRIMARY KEY, btree (id)
As you can see, the type of my "info" column is hstore. What I have effectively created is a (database) table of hash tables. Each row in the "people" table will have its own hash table, with any keys and values. It's typical in such a situation for every row to have the same key names, or at least some minimum number of overlapping key names, but you can, of course, use any keys and values you like.
Both the keys and the values in an HStore column are text strings. You can assign a hash table to an HStore column with the following syntax:

INSERT INTO people(info) VALUES ('foo=>1, bar=>abc, baz=>stuff');
Notice that although this example inserts three key-value pairs into the HStore column, they are stored together, converted automatically into an HStore, splitting the pairs where there is a comma, and each pair where there is a => sign.
So far, you won't see any difference between an HStore and a TEXT column, other than (perhaps) the fact that you cannot use text functions and operators on that column. For example, you cannot use the || operator, which normally concatenates text strings, on the HStore:

UPDATE People SET info = info || 'abc';
ERROR: XX000: Unexpected end of string
LINE 1: UPDATE People SET info = info || 'abc';
^
PostgreSQL tries to apply the || operator to the HStore on the left, but cannot find a key-value pair in the string on the right, producing an error message. However, you can add a pair, which will work:

UPDATE People SET info = info || 'abc=>def';
As with all hash tables, HStore is designed for you to use the keys to retrieve the values. That is, each key exists only once in each HStore value, although values may be repeated. The only way to retrieve a value is via the key. You do this with the following syntax:

SELECT info->'bar' FROM People;
----------------
| ?column? | |
----------------
| abc | |
----------------
(1 row)
Notice several things here. First, the name of the column remains without any quotes, just as you do when you're retrieving the full contents of the column. Second, you put the name of the key after the -> arrow, which is different from the => ("hashrocket") arrow used to delineate key-value pairs within the HStore. Finally, the returned value always will be of type TEXT. This means if you say:

SELECT info->'foo' || 'a' FROM People;
----------------
| ?column? | |
----------------
| 1a | |
----------------
(1 row)
Notice that ||, which works on text values, has done its job here. However, this also means that if you try to multiply your value, you will get an error message:

SELECT info->'foo' * 5 FROM People;
info->'foo' * 5 from people;
^
Time: 5.041 ms
If you want to retrieve info->'foo' as an integer, you must cast that value:

SELECT (info->'foo')::integer * 5 from people;
----------------
| ?column? | |
----------------
| 5 | |
----------------
(1 row)
Now, why is HStore so exciting? In particular, if you're a database person who values normalization, you might be wondering why someone even would want this sort of data store, rather than a nicely normalized table or set of tables.
The answer, of course, is that there are many different uses for a database, and some of them can be more appropriate for an HStore. I never would suggest storing serious data in such a thing, but perhaps you want to keep track of user session information, without keeping it inside of a binary object.
Now, HStore is not new to PostgreSQL. The big news in version 9.4 is that GiN and GIST indexes now support HStore columns, and that they do so with great efficiency and speed.
Where do I plan to use HStore? To be honest, I'm not sure yet. I feel like this is a data type that I likely will want to use at some point, but for now, it's simply an extra useful, efficient tool that I can put in my programming toolbox. The fact that it is now extremely efficient, and its operators can take advantage of improved indexes, means that HStore is not only convenient, but speedy, as well.

JSON and JSONB

It has long been possible to store JSON inside PostgreSQL. After all, JSON is just a textual representation of JavaScript objects ("JavaScript Object Notation"), which means that they are effectively strings. But of course, when you store data in PostgreSQL, you would like a bit more than that. You want to ensure that stored data is valid, as well as use PostgreSQL's operators to retrieve and work on that data.
PostgreSQL has had a JSON data type for several years. The data type started as a simple textual representation of JSON, which would check for valid contents, but not much more than that. The 9.3 release of PostgreSQL allowed you to use a larger number of operators on your JSON columns, making it possible to retrieve particular parts of the data with relative ease.
However, the storage and retrieval of JSON data was never that efficient, and the JSON-related operators were particularly bad on this front. So yes, you could look for a particular name or value within a JSON column, but it might take a while.
That has changed with 9.4, with the introduction of the JSONB data type, which stores JSON data in binary form, such that it is both more compact and more efficient than the textual form. Moreover, the same GIN and GIST indexes that now are able to work so well with HStore data also are able to work well, and quickly, with JSONB data. So you can search for and retrieve text from JSONB documents as easily (or more) as would have been the case with a document database, such as MongoDB.
I already have started to use JSONB in some of my work. For example, one of the projects I'm working on contacts a remote server via an API. The server returns its response in JSON, containing a large number of name-value pairs, some of them nested. (I should note that using a beta version of PostgreSQL, or any other infrastructural technology, is only a good idea if you first get the client's approval, and explain the risks and benefits.)
Now, I'm a big fan of normalized data. And I'm not a huge fan of storing JSON in the database. But rather than start to guess what data I will and won't need in the future, I decided to store everything in a JSONB column for now. If and when I know precisely what I'll need, I will normalize the data to a greater degree.
Actually, that's not entirely true. I knew from the start that I would need two different values from the response I was receiving. But because I was storing the data in JSONB, I figured it would make sense for me simply to retrieve the data from the JSONB column.
Having stored the data there, I then could retrieve data from the JSON column:

SELECT id, email,
personal_data->>'surname' AS surname
personal_data->>'forename' as given_name
FROM ID_Checks
WHERE personal_data->>'surname' ilike '%lerner%';
Using the double-arrow operator (->>), I was able to retrieve the value of a JSON object by using its key. Note that if you use a single arrow (->), you'll get an object back, which is quite possibly not what you want. I've found that the text portion is really what interests me most of the time.

Conclusion

People use NoSQL databases for several reasons. One is the impedance mismatch between objects and tables. But two other common reasons are performance and convenience. It turns out that modern versions of PostgreSQL offer excellent performance, thanks to improved data types and indexes. But they also offer a great deal of convenience, letting you set, retrieve and delete JSON and key-value data easily, efficiently and naturally.
I'm not going to dismiss the entire NoSQL movement out of hand. But I will say that the next time you're thinking of using a NoSQL database, consider using one that can already fulfill all of your needs, and which you might well be using already—PostgreSQL.

Resources

Blog postings about improvements to PostgreSQL's GiN and GIST indexes, which affect the JSON and HStore types:
PostgreSQL documentation is at http://postgresql.org/docs, and it includes several sections for each of HStore and JSONB.

Linux Namespaces

$
0
0
https://www.howtoforge.com/linux-namespaces

Background

Starting from kernel 2.6.24, Linux supports 6 different types of namespaces. Namespaces are useful in creating processes that are more isolated from the rest of the system, without needing to use full low level virtualization technology.
  • CLONE_NEWIPC: IPC Namespaces: SystemV IPC and POSIX Message Queues can be isolated.
  • CLONE_NEWPID: PID Namespaces: PIDs are isolated, meaning that a virtual PID inside of the namespace can conflict with a PID outside of the namespace. PIDs inside the namespace will be mapped to other PIDs outside of the namespace. The first PID inside the namespace will be '1' which outside of the namespace is assigned to init
  • CLONE_NEWNET: Network Namespaces: Networking (/proc/net, IPs, interfaces and routes) are isolated. Services can be run on the same ports within namespaces, and "duplicate" virtual interfaces can be created.
  • CLONE_NEWNS: Mount Namespaces. We have the ability to isolate mount points as they appear to processes. Using mount namespaces, we can achieve similar functionality to chroot() however with improved security.
  • CLONE_NEWUTS: UTS Namespaces. This namespaces primary purpose is to isolate the hostname and NIS name.
  • CLONE_NEWUSER: User Namespaces. Here, user and group IDs are different inside and outside of namespaces and can be duplicated.
Let's look first at the structure of a C program, required to demonstrate process namespaces. The following has been tested on Debian 6 and 7. First, we need to allocate a page of memory on the stack, and set a pointer to the end of that memory page. We use alloca to allocate stack memory rather than malloc which would allocate memory on the heap.
void *mem = alloca(sysconf(_SC_PAGESIZE)) + sysconf(_SC_PAGESIZE);
Next, we use clone to create a child process, passing the location of our child stack 'mem', as well as the required flags to specify a new namespace. We specify 'callee' as the function to execute within the child space:
mypid = clone(callee, mem, SIGCHLD | CLONE_NEWIPC | CLONE_NEWPID | CLONE_NEWNS | CLONE_FILES, NULL);
After calling clone we then wait for the child process to finish, before terminating the parent. If not, the parent execution flow will continue and terminate immediately after, clearing up the child with it:
while (waitpid(mypid, &r, 0) < 0 && errno == EINTR)
{
continue;
}
Lastly, we'll return to the shell with the exit code of the child:
if (WIFEXITED(r))
{
return WEXITSTATUS(r);
}
return EXIT_FAILURE;
Now, let's look at the callee function:
static int callee()
{
int ret;
mount("proc", "/proc", "proc", 0, "");
setgid(u);
setgroups(0, NULL);
setuid(u);
ret = execl("/bin/bash", "/bin/bash", NULL);
return ret;
}
Here, we mount a /proc filesystem, and then set the uid (User ID) and gid (Group ID) to the value of 'u' before spawning the /bin/bash shell. LXC is an OS level virtualization tool utilizing cgroups and namespaces for resource isolation. Let's put it all together, setting 'u' to 65534 which is user "nobody" and group "nogroup" on Debian:
#define _GNU_SOURCE
#include
#include
#include
#include
#include
#include
#include
#include
#include
#include
static int callee();
const int u = 65534;
int main(int argc, char *argv[])
{
int r;
pid_t mypid;
void *mem = alloca(sysconf(_SC_PAGESIZE)) + sysconf(_SC_PAGESIZE);
mypid = clone(callee, mem, SIGCHLD | CLONE_NEWIPC | CLONE_NEWPID | CLONE_NEWNS | CLONE_FILES, NULL);
while (waitpid(mypid, &r, 0) < 0 && errno == EINTR)
{
continue;
}
if (WIFEXITED(r))
{
return WEXITSTATUS(r);
}
return EXIT_FAILURE;
}
static int callee()
{
int ret;
mount("proc", "/proc", "proc", 0, "");
setgid(u);
setgroups(0, NULL);
setuid(u);
ret = execl("/bin/bash", "/bin/bash", NULL);
return ret;
}
To execute the code produces the following:
root@w:~/pen/tmp# gcc -O -o ns.c -Wall -Werror -ansi -c89 ns.c
root@w:~/pen/tmp# ./ns
nobody@w:~/pen/tmp$ id
uid=65534(nobody) gid=65534(nogroup)
nobody@w:~/pen/tmp$ ps auxw
USER PID %CPU %MEM VSZ RSS TTY STAT START TIME COMMAND
nobody 1 0.0 0.0 4620 1816 pts/1 S 21:21 0:00 /bin/bash
nobody 5 0.0 0.0 2784 1064 pts/1 R+ 21:21 0:00 ps auxw
nobody@w:~/pen/tmp$
Notice that the UID and GID are set to that of nobody and nogroup. Specifically notice that the full ps output shows only two running processes and that their PIDs are 1 and 5 respectively. Now, let's move on to using ip netns to work with network namespaces. First, let's confirm that no namespaces exist currently:
root@w:~# ip netns list
Object "netns" is unknown, try "ip help".
In this case, either ip needs an upgrade, or the kernel does. Assuming you have a kernel newer than 2.6.24, it's most likely ip. After upgrading, ip netns list should by default return nothing. Let's add a new namespace called 'ns1':
root@w:~# ip netns add ns1
root@w:~# ip netns list
ns1
First, let's list the current interfaces:
root@w:~# ip link list
1: lo: mtu 65536 qdisc noqueue state UNKNOWN mode DEFAULT
link/loopback 00:00:00:00:00:00 brd 00:00:00:00:00:00
2: eth0: mtu 1500 qdisc pfifo_fast state UNKNOWN mode DEFAULT qlen 1000
link/ether 00:0c:29:65:25:9e brd ff:ff:ff:ff:ff:ff
Now to create a new virtual interface, and add it to our new namespace. Virtual interfaces are created in pairs, and are linked to each other - imagine a virtual crossover cable:
root@w:~# ip link add veth0 type veth peer name veth1
root@w:~# ip link list
1: lo: mtu 65536 qdisc noqueue state UNKNOWN mode DEFAULT
link/loopback 00:00:00:00:00:00 brd 00:00:00:00:00:00
2: eth0: mtu 1500 qdisc pfifo_fast state UNKNOWN mode DEFAULT qlen 1000
link/ether 00:0c:29:65:25:9e brd ff:ff:ff:ff:ff:ff
3: veth1: mtu 1500 qdisc noop state DOWN mode DEFAULT qlen 1000
link/ether d2:e9:52:18:19:ab brd ff:ff:ff:ff:ff:ff
4: veth0: mtu 1500 qdisc noop state DOWN mode DEFAULT qlen 1000
link/ether f2:f7:5e:e2:22:ac brd ff:ff:ff:ff:ff:ff
ifconfig -a will also now show the addition of both veth0 and veth1. Great, now to assign our new interfaces to the namespace. Note that ip netns exec is used to execute commands within the namespace:
root@w:~# ip link set veth1 netns ns1
root@w:~# ip netns exec ns1 ip link list
1: lo: mtu 65536 qdisc noop state DOWN mode DEFAULT
link/loopback 00:00:00:00:00:00 brd 00:00:00:00:00:00
3: veth1: mtu 1500 qdisc noop state DOWN mode DEFAULT qlen 1000
link/ether d2:e9:52:18:19:ab brd ff:ff:ff:ff:ff:ff
ifconfig -a will now only show veth0, as veth1 is in the ns1 namespace. Should we want to delete veth0/veth1:
ip netns exec ns1 ip link del veth1
We can now assign IP address 192.168.5.5/24 to veth0 on our host:
ifconfig veth0 192.168.5.5/24
And assign veth1 192.168.5.10/24 within ns1:
ip netns exec ns1 ifconfig veth1 192.168.5.10/24 up
To execute ip addr list on both our host and within our namespace:
root@w:~# ip addr list
1: lo: mtu 65536 qdisc noqueue state UNKNOWN
link/loopback 00:00:00:00:00:00 brd 00:00:00:00:00:00
inet 127.0.0.1/8 scope host lo
inet6 ::1/128 scope host
valid_lft forever preferred_lft forever
2: eth0: mtu 1500 qdisc pfifo_fast state UNKNOWN qlen 1000
link/ether 00:0c:29:65:25:9e brd ff:ff:ff:ff:ff:ff
inet 192.168.3.122/24 brd 192.168.3.255 scope global eth0
inet6 fe80::20c:29ff:fe65:259e/64 scope link
valid_lft forever preferred_lft forever
6: veth0: mtu 1500 qdisc pfifo_fast state UP qlen 1000
link/ether 86:b2:c7:bd:c9:11 brd ff:ff:ff:ff:ff:ff
inet 192.168.5.5/24 brd 192.168.5.255 scope global veth0
inet6 fe80::84b2:c7ff:febd:c911/64 scope link
valid_lft forever preferred_lft forever
root@w:~# ip netns exec ns1 ip addr list
1: lo: mtu 65536 qdisc noop state DOWN
link/loopback 00:00:00:00:00:00 brd 00:00:00:00:00:00
5: veth1: mtu 1500 qdisc pfifo_fast state UP qlen 1000
link/ether 12:bd:b6:76:a6:eb brd ff:ff:ff:ff:ff:ff
inet 192.168.5.10/24 brd 192.168.5.255 scope global veth1
inet6 fe80::10bd:b6ff:fe76:a6eb/64 scope link
valid_lft forever preferred_lft forever
To view routing tables inside and outside of the namespace:
root@w:~# ip route list
default via 192.168.3.1 dev eth0 proto static
192.168.3.0/24 dev eth0 proto kernel scope link src 192.168.3.122
192.168.5.0/24 dev veth0 proto kernel scope link src 192.168.5.5
root@w:~# ip netns exec ns1 ip route list
192.168.5.0/24 dev veth1 proto kernel scope link src 192.168.5.10
Lastly, to connect our physical and virtual interfaces, we'll require a bridge. Let's bridge eth0 and veth0 on the host, and then use DHCP to gain an IP within the ns1 namespace:
root@w:~# brctl addbr br0
root@w:~# brctl addif br0 eth0
root@w:~# brctl addif br0 veth0
root@w:~# ifconfig eth0 0.0.0.0
root@w:~# ifconfig veth0 0.0.0.0
root@w:~# dhclient br0
root@w:~# ip addr list br0
7: br0: mtu 1500 qdisc noqueue state UP
link/ether 00:0c:29:65:25:9e brd ff:ff:ff:ff:ff:ff
inet 192.168.3.122/24 brd 192.168.3.255 scope global br0
inet6 fe80::20c:29ff:fe65:259e/64 scope link
valid_lft forever preferred_lft forever
br0 has been assigned an IP of 192.168.3.122/24. Now for the namespace:
root@w:~# ip netns exec ns1 dhclient veth1
root@w:~# ip netns exec ns1 ip addr list
1: lo: mtu 65536 qdisc noop state DOWN
link/loopback 00:00:00:00:00:00 brd 00:00:00:00:00:00
5: veth1: mtu 1500 qdisc pfifo_fast state UP qlen 1000
link/ether 12:bd:b6:76:a6:eb brd ff:ff:ff:ff:ff:ff
inet 192.168.3.248/24 brd 192.168.3.255 scope global veth1
inet6 fe80::10bd:b6ff:fe76:a6eb/64 scope link
valid_lft forever preferred_lft forever
Excellent! veth1 has been assigned 192.168.3.248/24

Links

IO Digital Sec
Linux Consultant

How to share files between computers over network with btsync

$
0
0
http://xmodulo.com/share-files-between-computers-over-network.html

If you are the type of person who uses several devices to work online, I'm sure you must be using, or at least wishing to use, a method for syncing files and directories among those devices.
BitTorrent Sync, also known as btsync for short, is a cross-platform sync tool (freeware) which is powered by BitTorrent, the famous protocol for peer-to-peer (P2P) file sharing. Unlike classic BitTorrent clients, however, btsync encrypts traffic and grants access to shared files based on auto-generated keys across different operating system and device types.
More specifically, when you add files or folder to btsync as shareable, corresponding read/write keys (so-called secret codes) are created. These keys are then shared among different devices via HTTPS links, emails, QR codes, etc. Once two devices are paired via a key, the linked content can be synced directly between them. There is no file size limit, and transfer speeds are never throttled unless you explicitly say so. You will be able to create accounts inside btsync, under which you can create and manage keys and files to share via web interface.
BitTorrent Sync is available on multiple operating systems including Linux, MacOS X, Windows, as well as Android and iOS. In this tutorial, I will show you how to use BitTorrent Sync to sync files between a Linux box (a home server), and a Windows machine (a work laptop).

Installing Btsync on Linux

BitTorrent Sync is available for download from the project's website. I assume that the Windows version of BiTorrent Sync is installed on a Windows laptop, which can be done very easily. I will focus on installing and configuring it on the Linux server.
In the download page, choose your architecture, right click on the corresponding link, choose Copy link location (or similar, depending on your browser), and paste the link to wget in your terminal, as follows:
For 64-bit Linux:
# wget http://download.getsyncapp.com/endpoint/btsync/os/linux-x64/track/stable
For 32-bit Linux:
# wget http://download.getsyncapp.com/endpoint/btsync/os/linux-i386/track/stable

Once the download has completed, extract the contents of the tarball into a directory specially created for that purpose:
# cd /usr/local/bin
# mkdir btsync
# tar xzf stable -C btsync

You can now either add /usr/local/bin/btsync to your PATH environment variable.
export PATH=$PATH:/usr/local/bin/btsync
or run the btsync binary right from that folder. We'll go with the first option as it requires less typing and is easier to remember.

Configuring Btsync

Btsync comes with a built-in web server which is used as the management interface for BitTorrent Sync. To be able to access the web interface, you need to create a configuration file. You can do that with the following command:
# btsync --dump-sample-config > btsync.config
Then edit the btsync.config file (webui section) with your preferred text editor, as follows:
"listen" : "0.0.0.0:8888",
"login" : "yourusername",
"password" : "yourpassword"
You can choose any username and password.

Feel free to check the README file in /usr/local/bin/btsync directory if you want to tweak the configuration further, but this will do for now.

Running Btsync for the First Time

As system administrators we believe in logs! So before we launch btsync, we will create a log file for btsync.
# touch /var/log/btsync.log
Finally it's time to start btsync:
# btsync --config /usr/local/bin/btsync/btsync.config --log /var/log/btsync.log

Now point your web browser to the IP address of the Linux server and the port where btsync is listening on (192.168.0.15:8888 in my case), and agree to the privacy policies, terms, and EULA:

and you will be taken to the home page of your btsync installation:

Click on Add a folder, and choose a directory in your file system that you want to share. In our example, we will use /btsync:

That's enough by now. Please install BitTorrent Sync on your Windows machine (or another Linux box, if you want) before proceeding.

Sharing Files with Btsync

The following screencast shows how to sync an existing folder in a Windows 8 machine [192.168.0.106]. After adding the desired folder, get its key, and add it in your Linux installation via the "Enter a key or link" menu (as shown in the previous image), and the sync will start:
Now repeat the process for other computers or devices; selecting a folder or files to share, and importing the corresponding key(s) in your "central"btsync installation via the web interface on your Linux server.

Auto-start Btsync as a Normal User

You will notice that the synced files in the screencast were created in the /btsync directory belonging to user and group 'root'. That is because we launched BitTorrent Sync manually as the superuser. However, under normal circumstances, you will want to have BitTorrent Sync start on boot and running as a non-privileged user (www-data or other special account created for that purpose, btsync user for example).
To do so, create a user called btsync, and add the following stanza to the /etc/rc.local file (before the exit 0 line):
sudo -u btsync /usr/local/bin/btsync/btsync --config /usr/local/bin/btsync/btsync.config --log /var/log/btsync.log
Finally, create the pid file:
# touch /usr/local/bin/btsync/.sync//sync.pid
and change the ownership of /usr/local/bin/btsync recursively:
# chown -R btsync:root /usr/local/bin/btsync
Now reboot and verify that btsync is running as the intended user:

Based on your chosen distribution, you may find other ways to enable btsync to start on boot. In this tutorial I chose the rc.local approach since it's distribution-agnostic.

Final Remarks

As you can see, BitTorrent Sync is almost like server-less Dropbox for you. I said "almost" because of this: When you sync between devices on the same local network, sync happens directly between two devices. However, if you try to sync across different networks, and the devices to be paired are behind restrictive firewalls, there is a chance that the sync traffic goes through a third-party relay server operated by BitTorrent. While they claim that the traffic is AES-encrypted, you may still not want this to happen. For your privacy, be sure to turn off relay/tracker server options in every folder that you are sharing.

Hope it helps! Happy syncing!

Linux Basics: How To Check The State Of A Network Interface Card

$
0
0
http://www.unixmen.com/linux-basics-check-state-network-interface-card

Please shareShare on FacebookShare on Google+Tweet about this on TwitterShare on LinkedInShare on RedditDigg thisShare on StumbleUpon
Normally, we can easily check the state of a network interface card like whether the cable plugged in to the slot or the network card is up or down in Graphical mode. What if you have only command line mode? Ofcourse, you can turn around the system and check for the cable is properly plugged in, or you can do the same easily from your Terminal. Here is how to do that. This method is almost same for Debian and RPM based systems.

Check Network Card State

I have two ethernet cards on my laptop. One, eth0,  is wired, And another, wlan0, is wireless.
Let us check the state of the eth0.
cat /sys/class/net/eth0/carrier
Sample output:
0
Or, use the following command to check the status.
cat /sys/class/net/eth0/operstate
Sample output:
down
As you see in the above results, the NIC is down or cable is not connected.
Let me plug a network cable to the eth0 slot, and check again.
After plugged in the cable, I executed the above commands:
cat /sys/class/net/eth0/carrier
Sample output:
1
Or,
cat /sys/class/net/eth0/operstate
Sample output:
up
Voila, the eth0 is up or the cable is connected to eth0.
Be mindful, it doesn’t mean that the IP address has been assigned to the eth0. The cable is just connected to that slot. That’s all.
Let us check for the wlan0 state.
cat /sys/class/net/wlan0/carrier
Sample output:
1
The result is 1, which means the wlan0 is up and connected.
Or,
cat /sys/class/net/wlan0/operstate
Sample output:
up
Likewise, you can check all the network cards on your machine.
Cheers!

5 specialized Linux distributions for computer repair

$
0
0
http://opensource.com/life/15/2/five-specialized-linux-distributions-computer-repair

Computer and mouse kaleidoscope graphic
Image by : 
opensource.com
Computers are incredible tools that let users doing amazing things, but sometimes things go wrong. The problem could be as small as accidentally deleting files or forgetting a password—and as major as having an operating system rendered non-bootable by file system corruption. Or, worst case scenario, a hard drive dying completely. In each of these cases, and many more like them, there are specialized tools that can aid you in fixing problems with a computer or help you be prepared for when something bad does happen.

Many of these tools are actually highly-specialized Linux distributions. These distributions have a much narrower focus than the major desktop and server Linux distributions. So while you can find the vast majority of the same software packages are included in the repositories for the major distributions, these specialized distributions are designed to put all the programs you would need for computer repair or backup/restoration in one convenient place. Many of them even have customized user interfaces to make using the software easier.

Below, I look at five different Linux distributions designed to make your life easier when computers start giving you a headache. Give them a try, and make sure you keep CDs or USB drives with your favorites handy for when something does go wrong. If you like, you can even try using Scott Nesbitt's instructions for how to test drive Linux to install these distributions to a USB stick instead of burning a CD or using the sometimes more complex instructions available on the projects' websites for creating a bootable flash drive installation.

Clonezilla Live

Designed for backup and recovery of disk images and partitions, Clonezilla Live is an open source alternative to Norton Ghost. Clonezilla can save images to and restore images from a local device (such as a hard disk or USB flash drive) or over the network using SSH, Samba, or NFS. The underlying software used for creating images is Partclone, which provides a wide array of options and supports a large number of file systems. Clonezilla's user interface is a spartan ncurses-based menu system, but is very usable. The menu options in the interface walk you through everything. As an added bonus, once you have selected a task, Clonezilla provides you with the command line options you can use to run that task again without having to work your way through all the menus.
Clonezilla is developed by Taiwan's National Center for High-Performance Computing's Free Software Labs and is released under the GNU General Public License Version 2. Users needing an even more robust backup and recovery system should check out Clonezilla Server Edition, which works much like the Live version but requires a dedicated server installation.

Rescatux

Rescatux is a repair distribution designed to fix problems with both Linux and Windows. It's still a beta release, so there are some rough edges, but it provides easy access to various tools using its wizard, Rescapp. The wizard helps you perform various repair tasks without having to have extensive knowledge of the command line. You can reset passwords for Windows and Linux, restore GRUB or a Windows Master Boot Record, and perform a file system check for Linux systems. There are also a few "expert tools" for testing and repairing hard disks and recovering deleted files. Despite the beta nature of Rescatux, the inline documentation is already quite good, and you can learn even more by visiting the Rescatux wiki or by watching the tutorial videos on YouTube.
Based on Debian 7 (Wheezy), Rescatux is released under Version 3 of the GNU General Public License.

Redo Backup & Recovery

Like Clonezilla Live, Redo Backup & Recovery uses Partclone to clone disks and partitions. However, unlike Clonezilla, it has a polished graphic user interface. Redo Backup & Recovery boots into a graphic environment and has a lightweight desktop which provides access to other tools you can use while Redo Backup & Recovery completes its tasks. In addition to the backup & restore functionality, Redo Backup and Recovery's desktop includes a file manager, terminal, text editor, web browser, and utilities to recover deleted files, manage partitions and logical volumes, and to erase all data on a drive and restore it to factory defaults.
The Redo Backup & Recovery utility is released under the GNU General Public License Version 3 and is based on Ubuntu 12.04 LTS.

SystemRescueCD

Aimed at system administrators, SystemRescueCD is a powerful tool for repairing Linux systems. By default, SystemRescueCD boots into console interface with very little hand-holding, but a welcome message provides basic instructions for starting the network interface, running various command line programs (text editors and a web browser), enabling NTFS support in order to read Windows hard drives, and starting the XFCE-based graphical desktop environment. SystemRescueCD does include a large number of utilities, but you really need to know what you are doing to use it.
SystemRescueCD is based on Gentoo and is released under the GNU General Public License Version 2.

Trinity Rescue Kit

Designed for repairing Microsoft Windows, Trinity Rescue Kit provides a wide variety of tools to help rescue a broken Windows system. Trinity includes five different virus scanners: Clam AV, F-Prot, BitDefender, Vexira, and Avast (but Avast does require a license key). It also has an option for cleaning junk files, such as temp files and files in the Recycle Bin. Password resetting is handled by Winpass, which can reset passwords for the Administrator account or regular users. All of these features, and several other more advanced functions, are accessed using a interactive text menu, which does include a very extensive help file. It might intimidate someone not used to using a text-based interface, but Trinity Rescue Kit is really easy to use.
Trinity Rescue Kit is released under Version 2 of the GNU General Public License.

10 quick tar command examples to create/extract archives in Linux

$
0
0
http://www.binarytides.com/linux-tar-command

Tar command on Linux

The tar (tape archive) command is a frequently used command on linux that allows you to store files into an archive.


The commonly seen file extensions are .tar.gz and .tar.bz2 which is a tar archive further compressed using gzip or bzip algorithms respectively.
In this tutorial we shall take a look at simple examples of using the tar command to do daily jobs of creating and extracting archives on linux desktops or servers.

Using the tar command

The tar command is available by default on most linux systems and you do not need to install it separately.
With tar there are 2 compression formats, gzip and bzip. The "z" option specifies gzip and "j" option specifies bzip. It is also possible to create uncompressed archives.

1. Extract a tar.gz archive

Well, the more common use is to extract tar archives. The following command shall extract the files out a tar.gz archive
$ tar -xvzf tarfile.tar.gz
Here is a quick explanation of the parameters used -
x - Extract files
v - verbose, print the file names as they are extracted one by one
z - The file is a "gzipped" file
f - Use the following tar archive for the operation
Those are some of the important options to memorise
Extract tar.bz2/bzip archives
Files with extension bz2 are compressed with the bzip algorithm and tar command can deal with them as well. Use the j option instead of the z option.
$ tar -xvjf archivefile.tar.bz2

2. Extract files to a specific directory or path

To extract out the files to a specific directory, specify the path using the "-C" option. Note that its a capital C.
$ tar -xvzf abc.tar.gz -C /opt/folder/
However first make sure that the destination directory exists, since tar is not going to create the directory for you and will fail if it does not exist.

3. Extract a single file

To extract a single file out of an archive just add the file name after the command like this
$ tar -xz -f abc.tar.gz "./new/abc.txt"
More than once file can be specified in the above command like this
$ tar -xv -f abc.tar.gz "./new/cde.txt""./new/abc.txt"

4. Extract multiple files using wildcards

Wildcards can be used to extract out a bunch of files matching the given wildcards. For example all files with ".txt" extension.
$ tar -xv -f abc.tar.gz --wildcards "*.txt"


5. List and search contents of the tar archive

If you want to just list out the contents of the tar archive and not extract them, use the "-t" option. The following command prints the contents of a gzipped tar archive,
$ tar -tz -f abc.tar.gz
./new/
./new/cde.txt
./new/subdir/
./new/subdir/in.txt
./new/abc.txt
...
Pipe the output to grep to search a file or less command to browse the list. Using the "v" verbose option shall print additional details about each file.
For tar.bz2/bzip files use the "j" option
Use the above command in combination with the grep command to search the archive. Simple!
$ tar -tvz -f abc.tar.gz | grep abc.txt
-rw-rw-r-- enlightened/enlightened 0 2015-01-13 11:40 ./new/abc.txt

6. Create a tar/tar.gz archive

Now that we have learnt how to extract existing tar archives, its time to start creating new ones. The tar command can be told to put selected files in an archive or an entire directory. Here are some examples.
The following command creates a tar archive using a directory, adding all files in it and sub directories as well.
$ tar -cvf abc.tar ./new/
./new/
./new/cde.txt
./new/abc.txt
The above example does not create a compressed archive. Just a plain archive, that puts multiple files together without any real compression.
In order to compress, use the "z" or "j" option for gzip or bzip respectively.
$ tar -cvzf abc.tar.gz ./new/
The extension of the file name does not really matter. "tar.gz" and tgz are common extensions for files compressed with gzip. ".tar.bz2" and ".tbz" are commonly used extensions for bzip compressed files.

7. Ask confirmation before adding files

A useful option is "w" which makes tar ask for confirmation for every file before adding it to the archive. This can be sometimes useful.
Only those files would be added which are given a yes answer. If you do not enter anything, the default answer would be a "No".
# Add specific files

$ tar -czw -f abc.tar.gz ./new/*
add ‘./new/abc.txt’?y
add ‘./new/cde.txt’?y
add ‘./new/newfile.txt’?n
add ‘./new/subdir’?y
add ‘./new/subdir/in.txt’?n

# Now list the files added
$ tar -t -f abc.tar.gz
./new/abc.txt
./new/cde.txt
./new/subdir/

8. Add files to existing archives

The r option can be used to add files to existing archives, without having to create new ones. Here is a quick example
$ tar -rv -f abc.tar abc.txt
Files cannot be added to compressed archives (gz or bzip). Files can only be added to plain tar archives.

9. Add files to compressed archives (tar.gz/tar.bz2)

Its already mentioned that its not possible to add files to compressed archives. However it can still be done with a simple trick. Use the gunzip command to uncompress the archive, add file to archive and compress it again.
$ gunzip archive.tar.gz
$ tar -rf archive.tar ./path/to/file
$ gzip archive.tar
For bzip files use the bzip2 and bunzip2 commands respectively.

10. Backup with tar

A real scenario is to backup directories at regular intervals. The tar command can be scheduled to take such backups via cron. Here is an example -
$ tar -cvz -f archive-$(date +%Y%m%d).tar.gz ./new/
Run the above command via cron and it would keep creating backup files with names like -
'archive-20150218.tar.gz'.
Ofcourse make sure that the disk space is not overflown with larger and larger archives.

11. Verify archive files while creation

The "W" option can be used to verify the files after creating archives. Here is a quick example.
$ tar -cvW -f abc.tar ./new/
./new/
./new/cde.txt
./new/subdir/
./new/subdir/in.txt
./new/newfile.txt
./new/abc.txt
Verify ./new/
Verify ./new/cde.txt
Verify ./new/subdir/
Verify ./new/subdir/in.txt
Verify ./new/newfile.txt
Verify ./new/abc.txt
Note that the verification cannot be done on compressed archives. It works only with uncompressed tar archives.
Thats all for now. For more check out the man page for tar command, with "man tar".

Localhost DNS Cache

$
0
0
http://www.linuxjournal.com/content/localhost-dns-cache

Is it weird to say that DNS is my favorite protocol? Because DNS is my favorite protocol. There's something about the simplicity of UDP packets combined with the power of a service that the entire Internet relies on that grabs my interest. Through the years, I've been impressed with just how few resources you need to run a modest DNS infrastructure for an internal network.

Recently, as one of my environments started to grow, I noticed that even though the DNS servers were keeping up with the load, the query logs were full of queries for the same hosts over and over within seconds of each other. You see, often a default Linux installation does not come with any sort of local DNS caching. That means that every time a hostname needs to be resolved to an IP, the external DNS server is hit no matter what TTL you set for that record.

This article explains how simple it is to set up a lightweight local DNS cache that does nothing more than forward DNS requests to your normal resolvers and honor the TTL of the records it gets back.

There are a number of different ways to implement DNS caching. In the past, I've used systems like nscd that intercept DNS queries before they would go to name servers in /etc/resolv.conf and see if they already are present in the cache. Although it works, I always found nscd more difficult to troubleshoot than DNS when something went wrong. What I really wanted was just a local DNS server that honored TTL but would forward all requests to my real name servers. That way, I would get the speed and load benefits of a local cache, while also being able to troubleshoot any errors with standard DNS tools.

The solution I found was dnsmasq. Normally I am not a big advocate for dnsmasq, because it's often touted as an easy-to-configure full DNS and DHCP server solution, and I prefer going with standalone services for that. Dnsmasq often will be configured to read /etc/resolv.conf for a list of upstream name servers to forward to and use /etc/hosts for zone configuration. I wanted something completely different. I had full-featured DNS servers already in place, and if I liked relying on /etc/hosts instead of DNS for hostname resolution, I'd hop in my DeLorean and go back to the early 1980s. Instead, the bulk of my dnsmasq configuration will be focused on disabling a lot of the default features.

The first step is to install dnsmasq. This software is widely available for most distributions, so just use your standard package manager to install the dnsmasq package. In my case, I'm installing this on Debian, so there are a few Debianisms to deal with that you might not have to consider if you use a different distribution. First is the fact that there are some rather important settings placed in /etc/default/dnsmasq. The file is fully commented, so I won't paste it here. Instead, I list two variables I made sure to set:

ENABLED=1
IGNORE_RESOLVCONF=yes

The first variable makes sure the service starts, and the second will tell dnsmasq to ignore any input from the resolvconf service (if it's installed) when determining what name servers to use. I will be specifying those manually anyway.

The next step is to configure dnsmasq itself. The default configuration file can be found at /etc/dnsmasq.conf, and you can edit it directly if you want, but in my case, Debian automatically sets up an /etc/dnsmasq.d directory and will load the configuration from any file you find in there. As a heavy user of configuration management systems, I prefer the servicename.d configuration model, as it makes it easy to push different configurations for different uses. If your distribution doesn't set up this directory for you, you can just edit /etc/dnsmasq.conf directly or look into adding an option like this to dnsmasq.conf:

conf-dir=/etc/dnsmasq.d

In my case, I created a new file called /etc/dnsmasq.d/dnscache.conf with the following settings:

no-hosts
no-resolv
listen-address=127.0.0.1
bind-interfaces
server=/dev.example.com/10.0.0.5
server=/10.in-addr.arpa/10.0.0.5
server=/dev.example.com/10.0.0.6
server=/10.in-addr.arpa/10.0.0.6
server=/dev.example.com/10.0.0.7
server=/10.in-addr.arpa/10.0.0.7

Let's go over each setting. The first, no-hosts, tells dnsmasq to ignore /etc/hosts and not use it as a source of DNS records. You want dnsmasq to use your upstream name servers only. The no-resolv setting tells dnsmasq not to use /etc/resolv.conf for the list of name servers to use. This is important, as later on, you will add dnsmasq's own IP to the top of /etc/resolv.conf, and you don't want it to end up in some loop. The next two settings, listen-address and bind-interfaces ensure that dnsmasq binds to and listens on only the localhost interface (127.0.0.1). You don't want to risk outsiders using your service as an open DNS relay.

The server configuration lines are where you add the upstream name servers you want dnsmasq to use. In my case, I added three different upstream name servers in my preferred order. The syntax for this line is server=/domain_to_use/nameserver_ip. So in the above example, it would use those name servers for dev.example.com resolution. In my case, I also wanted dnsmasq to use those name servers for IP-to-name resolution (PTR records), so since all the internal IPs are in the 10.x.x.x network, I added 10.in-addr.arpa as the domain.

Once this configuration file is in place, restart dnsmasq so the settings take effect. Then you can use dig pointed to localhost to test whether dnsmasq works:

$ dig ns1.dev.example.com @localhost

; <<>> DiG 9.8.4-rpz2+rl005.12-P1 <<>> ns1.dev.example.com @localhost
;; global options: +cmd
;; Got answer:
;; ->>HEADER<<- 00:59:18="" 0="" 10.0.0.5="" 127.0.0.1="" 18="" 1="" 2014="" 265="" 4208="" 56="" a="" additional:="" answer:="" answer="" authority:="" code="" flags:="" id:="" in="" msec="" msg="" noerror="" ns1.dev.example.com.="" opcode:="" qr="" query:="" query="" question="" ra="" rcvd:="" rd="" section:="" sep="" server:="" size="" status:="" thu="" time:="" when:="">->

Here, I tested ns1.dev.example.com and saw that it correctly resolved to 10.0.0.5. If you inspect the dig output, you can see near the bottom of the output that SERVER: 127.0.0.1#53(127.0.0.1) confirms that I was indeed talking to 127.0.0.1 to get my answer. If you run this command again shortly afterward, you should notice that the TTL setting in the output (in the above example it was set to 265) will decrement. Dnsmasq is caching the response, and once the TTL gets to 0, dnsmasq will query a remote name server again.

After you have validated that dnsmasq functions, the final step is to edit /etc/resolv.conf and make sure that you have nameserver 127.0.0.1 listed above all other nameserver lines. Note that you can leave all of the existing name servers in place. In fact, that provides a means of safety in case dnsmasq ever were to crash. If you use DHCP to get an IP or otherwise have these values set from a different file (such as is the case when resolvconf is installed), you'll need to track down what files to modify instead; otherwise, the next time you get a DHCP lease, it will overwrite this with your new settings.

I deployed this simple change to around 100 servers in a particular environment, and it was amazing to see the dramatic drop in DNS traffic, load and log entries on my internal name servers. What's more, with this in place, the environment is even more tolerant in the case there ever were a real problem with downstream DNS servers—existing cached entries still would resolve for the host until TTL expired. So if you find your internal name servers are getting hammered with traffic, an internal DNS cache is something you definitely should consider.

Creating Forms for Easy LibreOffice Database Entry on Linux

$
0
0
http://www.linux.com/learn/tutorials/811444-creating-forms-for-easy-libreoffice-database-entry-on-linux

The LibreOffice suite of tools includes a very powerful database application ─ one that happens to be incredibly user-friendly. These databases can be managed/edited by any user and data can be entered by anyone using a LibreOffice-generated form. These forms are very simple to create and can be attached to existing databases or you can create both a database and a form in one fell swoop.
There are two ways to create LibreOffice Base forms:
  • Form Wizard
  • Design View.
Design view is a versatile drag and drop form creator that is quite powerful and allows you to add elements and assign those elements to database tables. The Form Wizard is a very simple step-by-step wizard that walks the user through the process of creating a form. Although the Wizard isn’t nearly as powerful as the Design View ─ it will get the job done quickly and doesn’t require any form design experience.
For this entry, I will address the Form Wizard (in a later post, I will walk you through the more challenging Design View). I will assume you already have a database created and ready for data entry. This database can either be created with LibreOffice and reside on the local system or be a remote database of the format:
  • Oracle JDBC
  • Spreadsheet
  • dBASE
  • Text
  • MySQL
  • ODBC.
For purposes of simplicity, we’ll go with a local LibreOffice Base-generated database. I’ve created a very simple database with two tables to be used for this process. Let’s create a data entry form for this database.

Opening the database

The first step is to open LibreOffice Base. When the Database Wizard window appears (Figure 1), select Open an existing database file, click the Open button, navigate to the database to be used, and click Finish
lo base form 1
Figure 1: Opening your database for editing in LibreOffice Base.
The next window to appear is the heart and soul of LibreOffice Base. Here (Figure 2) you can manage tables, run queries, create/edit forms, and view reports of the opened database.
lo base form 2
Figure 2: The heart and soul of LibreOffice Base.
Click the Forms button in the left-side navigation and then double-click Use Wizard to Create Form under Tasks.
When the database opens in the Form Wizard, your first step is to select the fields available to the form. You do not have to select all fields from the database. You can select them all or you can select as few as one.
If your database has more than one table, you can select between the tables in the Tables or queries drop-down (NOTE: You can only select fields from one table in the database at this point). Select the table to be used and then add the fields from the Available fields section to the Fields in the form section (Figure 3).
lo base form 3
Figure 3: Adding fields to be used with your form.

Add a sub-form

Once you’ve selected all the necessary fields, click Next. At this point, you can choose to add a sub-form. A sub-form is a form-within-a-form and allows you to add more specific data to the original form. For example, you can include secondary data for employee records (such as work history, raises, etc.) to a form. This is the point at which you can include fields from other tables (besides the initial table selected from the Tables or queries drop-down). If you opt to create a sub-form for your data, the steps include:
  • Selecting the table
  • Adding the fields
  • Joining the fields (such as AuthorID to ID ─ Figure 4).
lo base form 4
Figure 4: Adding sub-forms to your form.

Arrange form controls

After all sub-forms are added, click Next to continue on. In the next step, you must arrange the controls of the form. This is just another way of saying how you want to the form to look and feel (where do you want the data entry field to reside against the field label). You can have different layouts for forms and sub-forms (Figure 5).
lo base form 5
Figure 5: Selecting the arrangement of the form and sub-form controls.

Select data entry mode

Click Next when you’ve arranged your controls. The next step is to select the data entry mode (Figure 6). There are two data entry modes:
  • Enter new data only
  • Display all data.
If you want to use the form only as a means to enter new data, select Enter new data only. If, however, you know you’ll want to use the form to enter and view data, select Display all data. If you go for the latter option, you will want to select whether previously entered data can be modified or not. If you want to prevent write access to the previous data, select Do not allow modification of existing data.
lo base form 6
Figure 6: Selecting if the form is to be used only for entering new data or not.
Make your selection and click Next.

Start entering data

At this point you can select a style for your form. This allows you to pick a color and field border (no border, 3D border, or flat). Make your selection and click Next.
The last step is to name your form. In this same window you can select the option, immediately begin working with the form (Figure 7). Select that option and click Finish. At this point, your form will open and you can start entering data.
lo base form 7
Figure 7: You are ready to start working with your form!
After a form is created, and you’ve worked with and closed said form … how do you re-open a form to add more data? Simple:
  1. Open LibreOffice Base.
  2. Open the existing database (in the same manner you did when creating the form).
  3. Double-click the form name under Forms (Figure 8).
  4. Start entering data.
lo base form 8
Figure 8: Opening a previously created form.
As a final note, make sure, after you finish working with your forms, that you click File > Save in the LibreOffice Base main window, to ensure you save all of your work.
You can create as many forms as you need with a single database ─ there is no limit to what you can do.
If you’re looking to easily enter data into LibreOffice databases, creating user-friendly forms is just a few steps away. Next time we visit this topic, we’ll walk through the Design View method of form creation.

Scripted window actions on Ubuntu with Devilspie 2

$
0
0
https://www.howtoforge.com/tutorial/ubuntu-desktop-devilspie-2

Devilspie2 is a program that detects windows as they are created, and performs scripted actions on them. The scripts are written in LUA, allowing a great deal of customization. This tutorial will show you the installation of Devilspie 2 on Ubuntu 14.04 and give you a introduction into Devilspie scripting.

What is LUA?

Lua is a powerful, fast, lightweight, embeddable scripting language. Lua combines simple procedural syntax with powerful data description constructs based on associative arrays and extensible semantics. Lua is dynamically typed, runs by interpreting bytecode for a register-based virtual machine, and has automatic memory management with incremental garbage collection, making it ideal for configuration, scripting, and rapid prototyping.

For futher infomation visit: http://www.lua.org/

Installation.

Type in the following:
sudo apt-get install devilspie2
(make sure it is devilspie2, because the devilspie is kinda messed up and no longer in development.)
Unfortunately the rules of the original Devils Pie are not supported in Devilspie 2 anymore.

Config and Scripting.

If you don't give devilspie2 any folder with --folder, it will read LUA scripts from the ~/.config/devilspie2/ folder, and this folder will be created if it doesn't already exist. This folder is changeable with the --folder option. If devilspie2 doesn't find any LUA files in the folder, it will stop execution.


Above are some usage options...

Sample Scripts.

the debug_print command does only print anything to stdout 
-- if devilspie2 is run using the --debug option


debug_print("Window Name: ".. get_window_name());
debug_print("Application name: "..get_application_name())

I want my Xfce4-terminal to the right on the second screen of my two-monitor
setup,


if (get_window_name()=="Terminal") then
-- x,y, xsize, ysize
set_window_geometry(1600,300,900,700);
end

Make Iceweasel always start maximized.

if (get_application_name()=="Iceweasel") then
maximize();
end
To learn more about the scripting language visit the following:

See FAQ at

www.lua.org/FAQ.html

Documentation at

www.lua.org/docs.html

Tutorials at

http://lua-users.org/wiki/TutorialDirectory

Sript Commands.

get_window_name()
     returns a string containing the name of the current window.

get_application_name()
     returns the application name of the current window.

set_window_position(xpos, ypos)
     Sets the position of a window.

set_window_size(xsize, ysize)
     Sets the size of a window.

set_window_geometry(xpos, ypos, xsize ysize)
     Set the geometry of a window.

make_always_on_top()
     Set the windows always on top flag.

set_on_top()
     Sets a window on top of the others (this will however not lock the window in this position).

debug_print()
     Debug helper that prints a string to stdout. It is only printed if devilspie2 is run with the --debug option.

shade()
     "Shades" a window, showing only the title-bar.

unshade()
     Unshades a window - the opposite of "shade"

maximize()
     maximizes a window

unmaximize()
     unmaximizes a window

maximize_vertically()
     maximizes the current window vertically.

maximize_horisontally()
     maximizes the current window horisontally.

minimize()
     minimizes a window

unminimize()
     unminimizes a window, that is bringing it back to screen from the minimized position/size.

decorate_window()
     Shows all window decoration.

undecorate_window()
     Removes all window decorations.

set_window_workspace(number)
     Moves a window to another workspace. The number variable starts counting at 1.

change_workspace(number)
     Changes the current workspace to another. The number variable starts counting at 1.

pin_window()
     asks the window manager to put the window on all workspaces.

unpin_window()
     Asks the window manager to put window only in the currently active workspace.

stick_window()
     Asks the window manager to keep the window's position fixed on the screen, even when the workspace or viewport scrolls.

unstick_window()
     Asks the window manager to not have window's position fixed on the screen when the workspace or viewport scrolls.

This will be the end of the tutorial for using devilspie2.

Links

Viewing all 1417 articles
Browse latest View live


<script src="https://jsc.adskeeper.com/r/s/rssing.com.1596347.js" async> </script>