Quantcast
Channel: Sameh Attia
Viewing all 1413 articles
Browse latest View live

How to change UID or GID safely in Linux

$
0
0
https://kerneltalks.com/tips-tricks/how-to-change-uid-or-gid-safely-in-linux

Learn how to change UID or GID safely in Linux. Also, know how to switch UID between two users and GID between two groups without impacting files ownership they own.
How to change UID or GID safely in Linux

In this article, we will walk you through to change UID or GID of existing user or group without affecting file ownership owned by them. Later, we also explained how to switch GID between two groups and how to switch UID between two users on the system without affecting file ownership owned by them.
Let’s start with changing UID or GID on the system.

Current scenario :

User shrikant with UID 1001
Group sysadmin with GID 2001

Expected scenario :

User shrikant with UID 3001
Group sysadmin with GID 4001
Changing GID and UID is simple using usermod or groupmod command, but you have to keep in mind that after changing UID or GID you need to change ownership of all files owned by them manually since file ownership is known to the kernel by GID and UID, not by username.
The procedure will be –
Change UID or GID as below :
Now, search and change all file’s ownership owned by this user or group with for loop
That’s it. You have safely changed UID and GID on your system without affecting any file ownership owned by them!

How to switch GID of two groups

Current scenario :

Group sysadmin with GID 1111
Group oracle with GID 2222

Expected scenario :

Group sysadmin with GID 2222
Group oracle with GID 1111
In above situation, we need to use one intermediate GID which is currently not in use on your system. Check /etc/group file and select one GID XXXX which is not present in a file. In our example, we take 9999 as intermediate GID.
Now, the process is simple –
  1. Change sysadmin GID to 9999
  2. Find and change group of all files owned by GID 1111 to sysadmin
  3. Change oracle GID to 1111
  4. Find and change group of all files owned by GID 2222 to oracle
  5. Change sysadmin GID to 2222
  6. Find and change group of all files owned by GID 9999 to sysadmin
List of commands for above steps are –

How to switch UID of two users

It can be done in the same way we switched GID above by using intermediate UID.

How to use FIND in Linux

$
0
0
https://opensource.com/article/18/4/how-use-find-linux

With the right arguments, the FIND command is a powerful and flexible way to locate data on your system.

How to use FIND in Linux
Image by : 
opensource.com

Get the newsletter

Join the 85,000 open source advocates who receive our giveaway alerts and article roundups.
In a recent Opensource.com article, Lewis Cowles introduced the find command.
find is one of the more powerful and flexible command-line programs in the daily toolbox, so it's worth spending a little more time on it.
At a minimum, find takes a path to find things. For example:
find /
will find (and print) every file on the system. And since everything is a file, you will get a lot of output to sort through. This probably doesn't help you find what you're looking for. You can change the path argument to narrow things down a bit, but it's still not really any more helpful than using the ls command. So you need to think about what you're trying to locate.
Perhaps you want to find all the JPEG files in your home directory. The -name argument allows you to restrict your results to files that match the given pattern.
find ~ -name '*jpg'
But wait! What if some of them have an uppercase extension? -iname is like -name, but it is case-insensitive.
find ~ -iname '*jpg'
Great! But the 8.3 name scheme is so 1985. Some of the pictures might have a .jpeg extension. Fortunately, we can combine patterns with an "or," represented by -o.
find ~ ( -iname 'jpeg' -o -iname 'jpg' )
We're getting closer. But what if you have some directories that end in jpg? (Why you named a directory bucketofjpg instead of pictures is beyond me.) We can modify our command with the -type argument to look only for files.
find ~ \( -iname '*jpeg' -o -iname '*jpg' \) -type f
Or maybe you'd like to find those oddly named directories so you can rename them later:
find ~ \( -iname '*jpeg' -o -iname '*jpg' \) -type d
It turns out you've been taking a lot of pictures lately, so let's narrow this down to files that have changed in the last week.
find ~ \( -iname '*jpeg' -o -iname '*jpg' \) -type f -mtime -7
More Linux resources
You can do time filters based on file status change time (ctime), modification time (mtime), or access time (atime). These are in days, so if you want finer-grained control, you can express it in minutes instead (cmin, mmin, and amin, respectively). Unless you know exactly the time you want, you'll probably prefix the number with + (more than) or (less than). But maybe you don't care about your pictures. Maybe you're running out of disk space, so you want to find all the gigantic (let's define that as "greater than 1 gigabyte") files in the log directory:
find /var/log -size +1G
Or maybe you want to find all the files owned by bcotton in /data:
find /data -owner bcotton
You can also look for files based on permissions. Perhaps you want to find all the world-readable files in your home directory to make sure you're not oversharing.
find ~ -perm -o=r
This post only scratches the surface of what find can do. Combining tests with Boolean logic can give you incredible flexibility to find exactly the files you're looking for. And with arguments like -exec or -delete, you can have find take action on what it... finds. Have any favorite find expressions? Share them in the comments!

How 11 open source projects got their names

$
0
0
https://opensource.com/article/18/3/how-11-open-source-projects-got-their-names

Python, Raspberry Pi, and Red Hat to name a few.

How 11 open source projects got their names
Image by : 
opensource.com

Get the newsletter

Join the 85,000 open source advocates who receive our giveaway alerts and article roundups.
What is the meaning of "life"?
Well, it's the condition that distinguishes animals and plants from inorganic matter, of course. So, what is the meaning of "open source life"? Leo Babauta, writing for LifeHack, says:
"It can apply to anything in life, any area where information is currently in the hands of few instead of many, any area where a few people control the production and distribution and improvement of a product or service or entity."
Phew! Now that we have that figured out, what is the meaning of "Kubernetes"? Or, "Arduino"?
Like many well-known brand names we take for granted, such as "Kleenex" or "Pepsi," the open source world has its own unique collection of strange names that meant something to someone at some time, but that we simply accept (or mispronounce) without knowing their true origins.
Let's take a look at the etymology of 11 such open source names.

Arduino

"So, two open source developers walk into a bar..."Arduino derives its name from one of co-founder Massimo Banzi's favorite bars in Ivrea, Italy, where the founders of this "hardware and software ecosystem" used to meet. The bar was named for Arduin of Ivrea, who was king of Italy a bit more than 1,000 years ago.

Debian

First introduced in 1993 by Ian Murdock, Debian was one of the first operating systems based on the Linux kernel. First released as the "Debian Linux Release," Debian's name is a portmanteau (a word created by combing two other words, such as "[mo]dulator [dem]odulator"—so that's what "modem" means!). By combining the first name of Murdock's then-girlfriend, Debra Lynn and his own name, Ian, they formed "Debian."

Kubernetes

The open source system for automating deployment, scaling, and management of containerized applications, also called "K8s," gets its moniker from the Greek for "helmsman" or "pilot."Kubernetes traces its lineage to Google's Borg system and was originally codenamed "Project Seven," a reference to Star Trek Voyager's previously assimilated Borg, Seven of Nine. The seven spokes in Kubernetes' logo—a helmsman's wheel—are a visual reference to Seven.

openSUSE

openSUSE gets its name from Germany. SUSE is an acronym for "Software und System-Entwicklung" or "software and system development." The "open" part was appended after Novell acquired SUSE in 2003 and when they opened distribution development to the community in 2005.

PHP

PHP started as a simple set of CGI binaries written in C for helping its creator, Rasmus Lerdorf, maintain his personal homepage, thus the project was abbreviated "PHP." This later became an acronym for what the project became—a hypertext preprocessor—so "PHP: hypertext preprocessor" became the new meaning of "PHP" (yes, a recursive backronym).

PostgreSQL

Originally just "postgres," PostgreSQL was created at the University of California-Berkeley by Michael Stonebraker in 1986 as a follow-up to the "Ingres" database system. Postgres was developed to break new ground in database concepts, such as object-relational technologies. Its pronunciation causes a lot of debate, as seen in this Reddit thread.

Python

When he began implementing the Python programming language, Guido van Rossum was a fan of Monty Python's Flying Circus. Van Rossum thought he needed a short name that was unique and slightly mysterious, so he settled on Python.

Raspberry Pi

Raspberry Pi co-founder Eben Upton explains: "Raspberry is a reference to a fruit-naming tradition in the old days of microcomputers," such as Tangerine Computer Systems, Apricot Computers, and Acorn. As the Raspberry Pi was intended to be a processor that booted into a Python shell, "Py" was added, but changed to "Pi" in reference to the mathematical constant.

Red Hat

Red Hat was founded out of a sewing room in Connecticut and a bachelor pad in Raleigh, N.C., by co-founders Bob Young and Marc Ewing. The "red hat" refers to a red Cornell University lacrosse cap, which Ewing wore at his job helping students in the computer lab at Carnegie Mellon. Students were told: "If you need help, look for the guy in the red hat."

Ubuntu

Ubuntu's About page explains the word's meaning: "Ubuntu is an ancient African word meaning 'humanity to others.'" It also means "I am what I am because of who we all are," and the operating system intends to bring "the spirit of Ubuntu to the world of computers and software." The word can be traced to the Nguni languages, part of the Bantu languages spoken in Southern African, and simply means "humanity."

Wikipedia

To get the answer to this one, let's turn to Wikipedia! In 1995, Howard G. "Ward" Cunningham developed WikiWikiWeb, "the simplest online database that could possibly work." The word "wiki" is Hawaiian and means "quick" and "pedia" means, ummm, "pedia."
Acronyms, portmanteaus, pubs, foreign words—these are just some examples of the etymology of open source labels. There are many others. What other strange and alien words have you encountered in the open source universe? Where do they come from? What do they mean? Let us know in the comments section below.
Thanks to Ben Nuttall, community manager for the Raspberry Pi Foundation, for providing definitions for PHP, Python, and Raspberry Pi.

Dry – An Interactive CLI Manager For Docker Containers

$
0
0
https://www.2daygeek.com/dry-an-interactive-cli-manager-for-docker-containers

Docker is a software that allows operating-system-level virtualization also known as containerization.
It uses the resource isolation features of the Linux kernel such as cgroups and kernel namespaces, and others to allows independent containers to run within a single Linux instance.
Docker provides a way to run applications securely isolated in a container, packaged with all its dependencies and libraries.

What Is Dry

Dry is a command line utility to manage & monitor Docker containers and images.
It shows information about Containers, Images, Name of the containers, Networks, Running commands in the containers, and status, and, if running a Docker Swarm, it also shows all kinds of information about the state of the Swarm cluster.
It can connect to both local or remote Docker daemons. Docker host shows unix:///var/run/docker.sock if the local Docker connected.
Docker host shows tcp://IP Address:Port Number or tcp://Host Name:Port Number if the remote Docker connected.
It could provide you the similar output metrics like docker ps but it has more verbose and colored output than “docker ps”.
It also has an additional NAME column which comes handy at times when you have many containers you are not a memory champion.

How To Install Dry On Linux

The latest dry utility can be installed through single shell script on Linux. It does not require external libraries. Most of the Docker commands are available in dry with the same behavior.
$ curl -sSf https://moncho.github.io/dry/dryup.sh | sudo sh
% Total % Received % Xferd Average Speed Time Time Time Current
Dload Upload Total Spent Left Speed
100 10 100 10 0 0 35 0 --:--:-- --:--:-- --:--:-- 35
dryup: downloading dry binary
######################################################################## 100.0%
dryup: Moving dry binary to its destination
dryup: dry binary was copied to /usr/local/bin, now you should 'sudo chmod 755 /usr/local/bin/dry'
Change the file permission to 755 using the below command.
$ sudo chmod 755 /usr/local/bin/dry
For Arch Linux users can install from AUR repository with help of Packer or Yaourt package manager.
$ yaourt -S dry-bin
or
$ packer -S dry-bin
If you wants to run dry as a Docker container, run the following command. Make sure Docker should be installed on your system for this as a prerequisites.
$ docker run -it -v /var/run/docker.sock:/var/run/docker.sock moncho/dry

How To Launch & Use Dry

Simply run the dry command from your terminal to launch the utility. The default output for dry is similar to below.
$ dry

How To Monitor Docker Using Dry

You can open the monitor mode in dry by pressing m key.

How To Manage Container Using Dry

To monitor any containers, just hit Enter on that. Dry allows you to perform activity such as logs, inspect, kill, remove container, stop, start, restart, stats, and image history.

How To Monitor Container Resource Utilization

Dry allows users to monitor particular container resource utilization using Stats+Top option.
We can achieve this by navigating to container management page (Follow the above steps and hit the Stats+Top option). Alternatively we can press s key to open container resource utilization page.

How To Check Container, Image, & Local Volume Disk Usage

We can check disk usage of containers, images, and local volumes using F8 key.
This will clearly display the total number of containers, images, and volumes, and how many are active, and total disk usage and reclaimable size details.

How To Check Downloaded Images

Press 2 key to list all the downloaded images.

How To Show Network List

Press 3 key to list all the networks and it’s gateway.

How To List All Docker Containers

Press F2 key to list all the containers (This output includes Running & Stopped containers).

Dry Keybinds

To view keybinds, navigate to help page or dry github page.

Understanding the SMACK stack for big data

$
0
0
https://www.hpe.com/us/en/insights/articles/understanding-the-smack-stack-for-big-data-1803.html

Just as the LAMP stack revolutionized servers and web hosting, the SMACK stack has made big data applications viable and easier to develop. Want to come up to speed? Here are the basics.
Just as LAMP made it easy to create server applications, SMACK is making it simple (or at least simpler) to build big data programs. SMACK's role is to provide big data information access as fast as possible. In other words, developers can create big data applications without reinventing the wheel.
We don't discuss the LAMP stack much, anymore. Once a buzzword for describing the technology underlying server and web hosting projects, LAMP (Linux, Apache, MySQL, and PHP/Python/Perl) was a shortcut way to refer to the pieces used for online infrastructure. The details may change—MariaDB in place of MySQL, Nginx for Apache, and so on—but the fundamental infrastructure doesn't.
It had a major impact. LAMP, with its combination of operating system, web front end, transactional data store, and server-side programming, enabled the birth of Web 2.0. Nowadays, LAMP doesn’t get a lot of dedicated attention because it’s taken for granted.
The premise was, and still is, a good one. A well-known set of technologies designed to easily integrate with one another can be a reliable starting point for creating larger, complex applications. While each component is powerful in its own right, together they become more so.
And thus today, Spark, Mesos, Akka, Cassandra, and Kafka (SMACK) has become the foundation for big data applications.
Among the technology influences driving SMACK adoption is the demand for real-time big data analysis. Apache Hadoop architectures, usually including Hadoop Distributed File System, MapReduce, and YARN, work well for batch or offline jobs, where data is captured and processed periodically, but they're inadequate for real-time analysis.
SMACK is a registered trademark of By the Bay, but the code of its components is open source software.
Keep up with today’s hot topics with enterprise.nxt’s newsletter.

SMACK history

Most community tech initiatives begin with a pioneer and a lead innovator. In 2014, Apple engineer Helena Edelson wrote KillrWeather to show how easy it would be to integrate big data streaming and processing into a single pipeline. Edelson’s efforts got the attention of other San Francisco big data developers, some of whom organized tech conferences.
This quickly transformed into a movement. The programmers in each component met in 2015 at a pair of West Coast developer conferences, where they defined the SMACK stack by doing and teaching. Among the interested parties was Mesosphere, a container and big data company, which certainly has contributed to popularizing SMACK.
Immediately after those conferences, Mesosphere announced its Mesosphere Infinity product. This pulled together the SMACK stack programs into a whole, with the aid of Cisco.
Mesosphere Infinity's purpose was to create "an ideal environment for handling all sorts of data processing needs—from nightly batch-processing tasks to real-time ingestion of sensor data, and from business intelligence to hard-core data science."
The SMACK stack quickly gained in popularity. It's currently employed in multiple big data pipeline data architectures for data stream processing.

SMACK components

As with LAMP, a developer or system administrator is not wedded to SMACK's main programs. You can replace individual components, just as some original LAMP users swapped out MariaDB for MySQL or Python for Perl. For instance, a SMACK developer can replace Mesos as the cluster scheduler with Apache YARN or use Apache Flink for batch and stream processing instead of Akka. But, as with LAMP, it’s a useful starting point for process and documentation as well as predictable toolsets.
Here's are SMACK's basic pieces:
Apache Mesos is SMACK's foundation. Mesos, a distributed systems kernel, abstracts CPU, memory, storage, and other computational resources away from physical or virtual machines. On Mesos, you build fault-tolerant and elastic distributed systems. Mesos runs applications within its cluster. It also provides a highly available platform. In the event of a system failure, Mesos relocates applications to different cluster nodes.
This Mesos kernel provides the SMACK applications (and other big data applications, such as Hadoop), with the APIs they need for resource management and scheduling across data center, cloud, and container platforms. While many SMACK implementations use Mesosphere's Mesos Data Center Operating System (DC/OS) distribution, SMACK works with any version of Mesos or, with some elbow grease, other distributed systems.
Next on the stack is Akka. Akka both brings data into a SMACK stack and sends it out to end-user applications.
The Akka toolkit aims to help developers build highly concurrent, distributed, and resilient message-driven applications for Java and Scala. It uses the actor model as its abstraction level to provide a platform to build scalable, resilient, and responsive applications.
The actor model is a conceptual model to work with concurrent computation. It defines general rules for how the system’s components should behave and interact. The best-known language using this abstraction is Erlang.
With Akka, all interactions work in a distributed environment; its interactions actors use pure message-passing data in an asynchronous approach.
Apache Kafka is a distributed, partitioned, replicated commit log service. In SMACK, Kafka serves to provide messaging system functionality.
In a larger sense, Kafka decouples data pipelines and organizes data streams. With Kafka, data messages are byte arrays, which you can use to store objects in many formats, such as Apache Avro, JSON, and String. Kafka treats each set of data messages as a log—that is, an ordered set of messages. SMACK uses Kafka as a messaging system between its other programs.
In SMACK, data is kept in Apache Cassandra, a well-known distributed NoSQL database for managing large amounts of structured data across multiple servers, depended on for a lot of high-availability applications. Cassandra can handle huge quantities of data across multiple storage devices and vast numbers of concurrent users and operations per second.
The job of actually analyzing the data goes to Apache Spark. This fast and general-purpose big data processing engine enables you to combine SQL, streaming, and complex analytics. It also provides high-level APIs for Java, Scala, Python, and R, with an optimized general execution graphs engine.

Running through the SMACK pipeline

The smart bit, of course, is how all those pieces form a big data pipeline. There are many ways to install a SMACK stack using your choice of clouds, Linux distributions, and DevOps tools. Follow along with me as I create one to illustrate the process.
I start my SMACK stack by setting up a Mesos-based cluster. For SMACK, you need a minimum of three nodes, with two CPUs each and 32 GB of RAM. You can set this up on most clouds using any supported Linux distribution.
Next, I set up the Cassandra database from within Mesos or a Mesos distribution such as DC/OS.
That done, I set up Kafka inside Mesos.
Then I get Spark up and running in cluster mode. This way, when a task requires Spark, Spark instances are automatically spun up to available resources.
That's the basic framework.
But wait—the purpose here is to process data! That means I need to get data into the stack. For that, I install Akka. This program reads in data—data ingestion—from the chosen data sources.
As the data comes in from the outside world, Akka passes it on to Kafka. Kafka, in turn, streams the data to Akka, Spark, and Cassandra. Cassandra stores the data, while Spark analyzes it. All the while, Mesos is orchestrating all the components and managing system requirements. Once the data is stored and analyzed, you can query it, using Spark for further analysis with the Spark Cassandra Connector. You can then use Akka to move the data and analytic results from Cassandra to the end user.
This is just an overview. For a more in-depth example, see The SMACK stack – hands on!

Who needs SMACK

Before you start to build a SMACK stack, is it the right tool?
The first question to ask is whether you need big data analysis in real time. If you don't, Hadoop-based batch approaches can serve you well. As Patrick McFadin, chief evangelist for Apache Cassandra at DataStax, explains in an interview, "Hadoop fits in the 'slow data' space, where the size, scope, and completeness of the data you are looking at is more important than the speed of the response. For example, a data lake consisting of large amounts of stored data would fall under this."
How much faster than Hadoop is SMACK's analysis engine, Spark? According to Natalino Busa, head of data science at Teradata, "Spark's multistage in-memory primitives provides performance up to 100 times faster for certain applications.” Busa argues that by allowing user programs to load data into a cluster's memory and query it repeatedly, Spark works well with machine learning algorithms.
But when you do need fast big data, SMACK can deliver great performance. Achim Nierbeck, a senior IT consultant for Codecentric AG, explains, "Our requirements contained the ability to process approximately 130,000 messages per second. Those messages needed to be stored in a Cassandra and also be accessible via a front end for real-time visualization." With 15 Cassandra nodes on a fast Amazon Web Services-based Meos cluster, Nierbeck says, "processing 520K [messages per second] was easily achieved."
Another major business win is that SMACK enables you to get the most from your hardware. As McFadin says, Mesos capabilities “allow potentially conflicting workloads to act in isolation from each other, ensuring more efficient use of infrastructure.”
Finally, SMACK provides a complete, open source toolkit for addressing real-time big data problems. Like LAMP, it provides all the tools needed for developers to create applications without getting bogged down in the details of integrating a new stack.
Today, most people still don't know what SMACK is. Tomorrow, expect it to become a commonplace set of tools.

SMACK: Lessons for leaders

  • SMACK enables your company to quickly create big data analysis applications.
  • Once built, those applications let you pull data speedily from your real-time data.
  • And because SMACK is both flexible and makes efficient use of your server resources, you can do all the above with minimal hardware costs.
This article/content was written by the individual writer identified and does not necessarily reflect the view of Hewlett Packard Enterprise Company.

How to Turn Vim into a Word Processor

$
0
0
https://www.maketecheasier.com/turn-vim-word-processor


Believe it or not, I use Vim as my every-day word processor. I like its simple layout and its modal design that favors keyboard commands above mouse clicks.
Although you probably know Vim as a text editor more suited for coding than for prose, with a few tweaks, you, too, can write documents like you’re in Word or LibreOffice while staying within the comfortable confines of a terminal.
If you haven’t already familiarized yourself with the basics of Vim, check out this article, which is the first in a series of four. Make sure you learn how to open a text file, enter and exit the program, and move around the screen with your keyboard before jumping further into this piece.
Your Linux distro probably comes with Vim in its package repository, so you can easily install it with your Software Manager or package manager. When you edit Vim’s config file later, you can do that as a normal user.
Arch Linux:
Fedora:
Ubuntu:
Everyone else can grab Vim from its Github repository:
An installation of Vim may create a .vimrc file in your home directory. If it doesn’t, create one:
You can open it with Vim itself:
Now you’re probably looking at an empty file. Let’s change that.
We can create a function called “WordProcessor” that you can call up at any time. It will look like this:
Now that you see the function as a whole, we can break down its parts. Follow along by looking at the sections of our function commented out with a single quotation mark, the individual lines in gray.

1. Movement changes with map j gj and map k gk

What you see here is a change in how cursor movement works inside Vim. If you read the previous Vim articles mentioned at the beginning of this article, you will know that j moves your cursor down and k moves your cursor up. Similarly, gj and gk move you down and up, but they move the cursor by line on the screen rather than by line in the file.
Our mapping of j/k to gj/gk gives your cursor the ability to move up and down through wrapped lines on your screen. This helps when you’re typing long paragraphs and need to move your cursor easily to the middle of those paragraphs.

2. Formatting text with the “setlocal” commands

First, see setlocal formatoptions=1.  “Formatoptions” lets you pick from a number of text-formatting modes. In the case of option “1,” Vim will refrain from breaking lines after a one-letter word. It will try, when possible, to break lines before the one-letter word instead.
Next, setlocal noexpandtab lets you keep Vim from changing tabs into spaces. As an example, the “expandtab” setting will tell Vim to change your press of the Tab key into a number of spaces that fits the same length. “Noexpandtab” does the opposite; it preserves your Tab press as a single character.
setlocal wrap tells Vim to wrap your text when it reaches the end of your screen. This is the behavior you would expect from a word processor.
Finally, setlocal linebreak gets Vim to break your lines at sensible places. It keeps your lines from being wrapped at the last character that fits on the screen. This is why, in part, you will see lines of text reach various points on the screen before they wrap to the beginning. Check out what it looks like with an unfinished copy of this article in the screenshot below
Vim line break example

3. Spelling and an offline thesaurus

Vim comes with a built-in spellcheck ability. You can make your “WordProcessor” function use that ability by using the command setlocal spell spelllang=en_us. You can define multiple languages here in a comma-separated list.
Find more language files at this Vim FTP site. Place your selected files (both .spl and .sug files for each language) in “$HOME/.vim/spell/.” Change your function’s line to set spelllang=en_us,nl,medical, for example, to check for English, Dutch, and medical words.
Misspelled words will show up as underlined and bold in your text.
Vim spellcheck
You can search for replacements by entering :z= in Normal mode. (Use the Escape key to get to Normal mode.) That command will produce a screen like the following image.
Vim misspelled word suggestions
You can use Vim’s thesaurus feature by telling it your chosen thesaurus directory with set thesaurus+=/home//.vim/thesaurus/mthesaur.txt or similar. You can find the “mthesaur.txt” file at Project Gutenberg. Place your downloaded text file into the directory you define with that command.
Search for words similar to your highlighted word by entering Insert mode (press i when in Normal mode), and typing Ctrl + x and then Ctrl + t. It will show you a list like the following image that you can scroll through to find a new word.
Vim thesaurus suggestions
Sometimes the suggestions aren’t the best.

4. Autocomplete words with the “complete” option

Look at set complete+=s for our final consideration. This option tells Vim to search your thesaurus for a word you want to autocomplete.
Normally, you can autocomplete words by having Vim look at previous words you’ve typed, such as “missspelled” and “mistake” in the following screenshot. You just enter Insert mode and type Ctrl + n or Ctrl + p to look for a word that, for instance, the half-spelled “mis” matches.
Vim autocomplete suggestions
See how the first two selections aren’t from the thesaurus? Those two lines are the only options you’d see here if our function had not used “complete+=s.” You can omit or comment out that line for quicker autocompletions.
The final line of your .vimrc that makes the WordProcessor function work is com! WP call WordProcessor(). It lets you type :WP in Normal mode to set Vim’s word processing abilities.
You can edit the “WP” in this line to read anything you like – just make sure the text is contiguous. Whatever text you choose will then change the command to :.
The functionality I’ve discussed here only lasts for a single Vim session. Therefore, when you close and reopen Vim, the default settings will take hold once again. This will happen even if you open the same file a second time.
You could set these options outside the function to have them work all the time, but they might not do justice to many of the programming tasks Vim was made to handle. It’s not hard to type a couple characters anyway. Just enjoy your new settings and the fact that you’ve turned your terminal into a powerful paragraph editor.

Create Your Own Linux Virtual Private Network With OpenVPN

$
0
0
https://www.maketecheasier.com/create-own-linux-vpn


Virtual private networks (VPNs) allow you to hide your online data transmissions and enhance your security while browsing the Internet from public places. Many online service providers offer both free and paid VPN options for you to use. However, even the best paid plans can be unreliable or slow at times.
If only you could create your own VPN between your mobile computer and your home computer.
Actually, that process is easier than you might think. Today we’ll discuss how you can use OpenVPN to create a secure connection between a client and server on a Linux machine.
Keep in mind that we’ll be creating a routing configuration and not a bridging one, which should be fine for most use cases. Windows users can follow along by reading the OpenVPN documentation, beginning with the section on setting up a Certificate Authority. Commands used in Windows will be similar to those shown below.
You will need two computers – one is the server machine while the other is the client. The server machine can be your home desktop or a Linux instance from DigitalOcean or Linode. The client machine is the computer that you are using regularly. As this tutorial is done on Linux, both computers need to run Linux as well.
Note: In this tutorial, we will be using Ubuntu as our distro for both the server and client machine.
To get started, you need to install OpenVPN and Easy-RSA on your server. Then install OpenVPN on your client machine.
On Ubuntu you should install Easy-RSA from this Github page. Ubuntu includes Easy-RSA version 2 in its repositories. The Github link offers Easy-RSA version 3, which follows the commands I will use in this article.
In the directory you cloned the Github repository into, copy the “easyrsa3” directory it contains into “/etc/easy-rsa/.”
OpenVPN makes use of a Public Key Infrastructure (PKI) to establish the identity of servers and clients so those separate entities can talk to one another. The PKI uses a master Certificate Authority (CA) alongside individual certificates and private keys for each server and client.
The CA must sign the server and client certificates. OpenVPN then checks to see that the server authenticates the identity of each client, and, at the same time, each client checks the identity of the server.
The setup here is more complicated than you might find for PPTP-style connections, but it provides better security to users and gives the server more freedom to accept or deny requested incoming client connections.
For tighter security it is recommended that your CA machine be different from your server. For brevity, this article will use the same machine for both tasks. You should alter your file-copying procedures to accommodate your situation – whether it’s using scp for network transfers or using a USB key to manually move files.
Note: if you use a separate computer as your CA, you will need to install Easy-RSA on that machine.
1. Change directories to “/etc/easy-rsa/:”
2. If necessary, copy “/etc/easy-rsa/vars.example” to “/etc/easy-rsa/vars.” Then, open vars to edit its contents:
3. Enter the details such as your country, province, city, organization, and email. Uncomment the lines shown here by removing the “#” at the beginning of each one.
OpenVPN variables
Once you are done with the editing, save (Ctrl + o) and exit (Ctrl + x).
4. Initialize your new PKI and generate the Certificate Authority keypair that you will use to sign individual server and client certificates:
Copy the ca.crt file you just created to your OpenVPN server directory. You should also change its owner and group with Chown:
Change back to your Easy-RSA directory and generate the server certificate and its private key:
You can change “ServerName” in the command above to whatever name you wish. Make sure you reflect that change when you copy your new key to the OpenVPN server directory:
OpenVPN makes use of the Diffie-Hellman (DH) key exchange method of securely exchanging cryptographic keys across a network. You will create a DH parameters file with the following command:
The final number, 2048, in that command shows the number of bits used in creating the file. For example, you could use 4096, but it would take a lot longer to generate the file and wouldn’t improve security much. The default is 2048, and that value is sufficient for most use cases.
OpenVPN also uses a Hash-based Message Authentication (HMAC) signature to guard against vulnerabilities in SSL/TLS handshakes. Create the file with this command:
At this point you will have created a number of files for your server. Now it’s time to create files for your clients. You can repeat this process multiple times for as many clients as you need. You can create client files safely on any computer with Easy-RSA installed.
Enter the Easy-RSA directory and initialize the PKI again if you haven’t done so already:
Create a client key and certificate. Change directories if you skipped the previous step.
If you repeat the process, you don’t need to initialize the PKI for each new client. Just make sure to change “ClientName” to be unique every time.
The CA must now sign your server and client certificates.
If you look in your “/etc/easy-rsa/pki/reqs/” file, you should see all the request (.req) files Easy-RSA created in the previous easyrsa gen-req commands.
OpenVPN reqs directory
In this screenshot there are only two .req files. Your number will vary if you made more than one client in the previous step.
If you used a separate CA machine, you must now transfer those .req files to the CA for signing. Once that is complete, change to the Easy-RSA directory and sign your files with the following commands, making sure to reflect the proper location of each .req and the name of each server and client.
Note that you will need to provide Easy-RSA with a different name for your server and client certificates. ServerName.req will be used here, for example, to create Server1.crt.
You should now find two new files – “/etc/easy-rsa/pki/issued/Server1.crt” and “/etc/easy-rsa/pki/issued/Client1.crt” – that you’ll transfer to their respective machines (seen in the next section of this article). You can delete any .req files that remain.
Now the signed certificates (each .crt) are ready to work for their owners. Move the server file to its OpenVPN location and make a new directory for the client certificates:
Creating the “…pki/signed/” folder here gives you a labeled location to place multiple client certificates.
Now you should have five files in your “/etc/openvpn/server/” directory: ca.crt, dh.pem, Server1.crt, ServerName.key, and ta.key.
You will need two of those same files in your OpenVPN client folder on the client’s machine. Copy them over using scp or a flash disk as appropriate. Copy both “/etc/openvpn/server/ca.crt” and “/etc/openvpn/server/ta.key” to your client’s “/etc/openvpn/client/.”
Make sure to copy your client certificate and key to that same location. Copy “/etc/easy-rsa/pki/signed/Client1.crt” and “/etc/easy-rsa/pki/private/ClientName.key” to your client’s “/etc/openvpn/client/.” Repeat this process for any additional clients you may have created.
For any client, you should now have four files in “/etc/openvpn/client:” Client1.crt, ClientName.key, ca.crt, and ta.key.
Your last step before starting the VPN is to edit configuration files for the server and client. First, locate the “default server.conf” and “client.conf” files. They will likely be in one of these locations:
  • “/usr/share/openvpn/examples”
  • “/usr/share/doc/openvpn/examples/sample-config-files/” (Ubuntu configs are located here)
Note: On Ubuntu you will need to unpack the “server.conf.gz” file. Use gunzip -d ./server.conf.gz to get the server.conf file from the compressed package.
Copy each config file to its respective “/etc/openvpn/server/” and “/etc/openvpn/client/” directory.
In server.conf make the following changes. Make sure the names and locations of your ca.crt, Server1.crt, ServerName.key, and dh.pem are listed in your config file. You may need to use full paths – like a line that reads “cert /etc/openvpn/server/Server1.crt.”
OpenVPN server config file
Change the tls-auth... line to read tls-crypt ta.key. Again, a full path may be necessary.
OpenVPN server config file
Uncomment (remove the “;”) from the “user nobody” and “group nobody” lines.
OpenVPN server config file
For your client you will make similar changes. After making the config file, reflect the names and locations of your ca.crt, Client1.crt, ClientName.key, and ta.key (with the same move from tls-auth... to tls-crypt...), insert the name or IP address and port of your server.
OpenVPN client config file
Now you can start your server and client. This is a simple matter if everything above went as planned.
Start the server with:
and the client with:
The successful creation of a VPN will show the client’s output reading “Initialization Sequence Completed” at the end of its output. You will also find a new type of connection in your available network interfaces.
ip addr show command
This screenshot shows the “tun0” interface. That’s what the OpenVPN server made. You can see its address as 10.8.0.1 and ping that address from the client to verify a successful connection.
Ping command
At this point you’ll probably want to access the Internet through your server from your remote client. To do this, you’ll first need to change your server configuration file. Add the line push ‘redirect-gateway def1 to your server configuration file.
You will also need to tell your server to properly route the client’s Internet traffic requests. This command will alter your Iptables packet filtering rules:
If you haven’t changed the “server 10.8.0.0 255.255.255.0” line in your server.conf file, the IP address in that command should work. You will need to change “eth0” to match your server’s ethernet interface. You can see from previous screenshots that my machine uses “enp19s0.”
Next, you can push DNS settings to the client. Any address a client can reach may be pushed. You can use this command as a starting point:
Finally, you can enable packet forwarding on the server as follows:
You should now be able to use your client to access the Internet through the VPN.
I know this has been a long road. Hopefully you have found success in creating a VPN and connecting to the Internet in a secure manner.
If nothing else, this will have been a good learning experience for what it takes to create a secure digital tunnel. Thanks for joining me to the end.

Configure HAProxy and Keepalived with Puppet

$
0
0
https://www.lisenet.com/2018/configure-haproxy-and-keepalived-with-puppet

We’re going to use Puppet to install and configure HAProxy to load balance Apache web services. We’ll also configure Keepalived to provide failover capabilities.
This article is part of the Homelab Project with KVM, Katello and Puppet series. See here for a blog post on how to configure HAProxy and Keepalived manually.

Homelab

We have two CentOS 7 servers installed which we want to configure as follows:
proxy1.hl.local (10.11.1.19)– HAProxy with Keepalived (master router node)
proxy2.hl.local (10.11.1.20)– HAProxy with Keepalived (slave router node)
SELinux set to enforcing mode.
See the image below to identify the homelab part this article applies to.

HAProxy and Virtual IP

We use 10.11.1.30 as a virtual IP, with a DNS name of blog.hl.local. This is the DNS of our WordPress site.

Configuration with Puppet

Puppet master runs on the Katello server.

Puppet Modules

We use the following Puppet modules:
  1. arioch-keepalived– to configure Keepalived
  2. puppetlabs-haproxy– to configure HAProxy
  3. thias-sysctl– to configure kernel parameters
Please see each module’s documentation for features supported and configuration options available.

Firewall Configuration

Configure both proxy servers to allow VRRP and HTTP/S traffic. Port 8080 will be used for HAProxy statistics.
firewall { '007 allow VRRP':
source => '10.11.1.0/24',
proto => 'vrrp',
action => accept,
}->
firewall { '008 allow HTTP/S':
dport => [80, 443, 8080],
source => '10.11.1.0/24',
proto => tcp,
action => accept,
}

Kernel Parameters and IP Forwarding

Load balancing in HAProxy requires the ability to bind to an IP address that is nonlocal. This allows a running load balancer instance to bind to a an IP that is not local for failover.
In order for the Keepalived service to forward network packets properly to the real servers, each router node must have IP forwarding turned on in the kernel.
sysctl { 'net.ipv4.ip_forward': value => '1' }
sysctl { 'net.ipv4.ip_nonlocal_bind': value => '1' }

Install HAProxy

This needs to be applied for both proxy servers.
file {'/etc/pki/tls/private/hl.pem':
ensure => 'file',
source => 'puppet:///homelab_files/hl.pem',
path => '/etc/pki/tls/private/hl.pem',
owner => '0',
group => '0',
mode => '0640',
}->
class { 'haproxy':
global_options => {
'log' => "127.0.0.1 local2",
'chroot' => '/var/lib/haproxy',
'pidfile' => '/var/run/haproxy.pid',
'maxconn' => '4096',
'user' => 'haproxy',
'group' => 'haproxy',
'daemon' => '',
'ssl-default-bind-ciphers' => 'kEECDH+aRSA+AES:kRSA+AES:+AES256:!RC4:!kEDH:!LOW:!EXP:!MD5:!aNULL:!eNULL',
'ssl-default-bind-options' => 'no-sslv3',
'tune.ssl.default-dh-param' => '2048 ',
},
defaults_options => {
'mode' => 'http',
'log' => 'global',
'option' => [
'httplog',
'dontlognull',
'http-server-close',
'forwardfor except 127.0.0.0/8',
'redispatch',
],
'retries' => '3',
'timeout' => [
'http-request 10s',
'queue 1m',
'connect 10s',
'client 1m',
'server 1m',
'http-keep-alive 10s',
'check 10s',
],
'maxconn' => '2048',
},
}
haproxy::listen { 'frontend00':
mode => 'http',
options => {
'balance' => 'source',
'redirect' => 'scheme https code 301 if !{ ssl_fc }',
},
bind => {
'10.11.1.30:80' => [],
'10.11.1.30:443' => ['ssl', 'crt', '/etc/pki/tls/private/hl.pem'],
},
}->
haproxy::balancermember { 'web1_web2':
listening_service => 'frontend00',
ports => '443',
server_names => ['web1.hl.local','web2.hl.local'],
ipaddresses => ['10.11.1.21','10.11.1.22'],
options => 'check ssl verify none',
}->
haproxy::listen { 'stats':
ipaddress => $::ipaddress,
ports => ['8080'],
options => {
'mode' => 'http',
'stats' => ['enable','uri /','realm HAProxy\ Statistics','auth admin:PleaseChangeMe'],
},
}
Note how we forward all HTTP traffic to HTTPS. We also enable HAProxy stats.
There are several HAProxy load balancing algorithms available, we use the source algorithm to select a server based on a hash of the source IP. This method helps to ensure that a user will end up on the same server.

Install Keepalived

Apply the following to the master node proxy1.hl.local:
include ::keepalived
keepalived::vrrp::script { 'check_haproxy':
script => '/usr/bin/killall -0 haproxy',
}
keepalived::vrrp::instance { 'LVS_HAP':
interface => 'eth0',
state => 'MASTER',
virtual_router_id => '51',
priority => '5',
auth_type => 'PASS',
auth_pass => 'PleaseChangeMe',
virtual_ipaddress => '10.11.1.30/32',
track_script => 'check_haproxy',
}
Apply the following to the slave node proxy2.hl.local:
include ::keepalived
keepalived::vrrp::script { 'check_haproxy':
script => '/usr/bin/killall -0 haproxy',
}
keepalived::vrrp::instance { 'LVS_HAP':
interface => 'eth0',
state => 'SLAVE',
virtual_router_id => '51',
priority => '4',
auth_type => 'PASS',
auth_pass => 'PleaseChangeMe',
virtual_ipaddress => '10.11.1.30/32',
track_script => 'check_haproxy',
}

HAProxy Stats

If all goes well, we should be able to get some stats from HAProxy.

WordPress Site

Our WordPress site should be accessible via https://blog.hl.local.

Exploring application portability across clouds using Kubernetes

$
0
0
https://opensource.com/article/18/5/exploring-application-portability-kubernetes

Pre-alpha component aims to simplify the management of multiple Kubernetes clusters by synchronizing resources across multiple public, private, and hybrid clouds.

different types of clouds
Image by : 
Robbie T. Modified by Opensource.com. CC BY-SA 4.0

Get the newsletter

Join the 85,000 open source advocates who receive our giveaway alerts and article roundups.
This article was co-written with Lindsey Tulloch.
In a world rapidly moving to the cloud, investors, customers, and developers are watching the "cloud wars" with bated breath. As cloud giants rise and the backbone of a new kind of infrastructure is forged before our eyes, it is critical for those of us on the ground to stay agile to maintain our technical and economic edge.
Applications that are portable—able to run seamlessly across operating systems—make sense from both a development and adoption standpoint. Interpreted languages and runtime environments have enabled applications to be run anywhere.
This is expected when talking about operating systems, but how does this translate on a practical level to work across public, private, and hybrid clouds? Say you have an application deployed in your on-premises private cloud application that you someday plan to move entirely to the public cloud. How do you ensure scalability of your app on public cloud infrastructure? Alternatively, you may have already deployed on a public cloud providers' infrastructure and decide that you no longer want to use that cloud provider due to its costs. How do you avoid vendor lock-in and ensure a smooth transition to a new provider? Whatever solution you choose, change is constant, and software application portability in the cloud is key to making any of these potential future decisions possible.
This is not yet a straightforward exercise. Every cloud provider has its own way of doing things, from supporting APIs to implementing compute, storage, and networking operations. So, how do you write cloud-agnostic application code so it is portable across different cloud infrastructures? One answer to overcoming these provider-specific hurdles involves Kubernetes.
Kubernetes is open source software for "automating deployment, scaling, and management of containerized applications." Kubernetes itself is an abstraction across all infrastructure and cloud providers that enables a simplified approach to orchestrating all of your resources. The feature of Kubernetes that allows for the orchestration of multiple Kubernetes clusters is aptly called multi-cluster. Still in an early pre-alpha phase, multi-cluster (formerly federation) aims to simplify the management of multiple Kubernetes clusters by synchronizing resources across member clusters. Multi-cluster promises high availability through balancing workloads across clusters and increases reliability in the event of a cluster failure. Additionally, it avoids vendor lock-in by giving you the ability to write your application once and deploy it on any single cloud provider or across many cloud providers.
In contrast with the original federation project, which provided a single monolithic control plane to manage multiple federated Kubernetes clusters, the current architecture takes a more compositional approach. Smaller projects like kubemci, cluster-registry, and federation-v2 prototyping efforts are tackling the fundamental elements of federation—management of ingresses, access to individual clusters, and workload distribution—to build a federation ecosystem from the ground up to give users more control over how applications are distributed and scaled across a multi-cluster network.
As engineers working out of the CTO Office at Red Hat, we wanted to test the promise of Kubernetes multi-cluster and explore application portability further. We set out to build a credible reference application to validate portability. This involved building separate Kubernetes clusters in Google Cloud, Amazon Web Services, and Microsoft Azure. Each Kubernetes cluster was created in a different region to test the prospect of high availability.
We arbitrarily selected a Kubernetes cluster hosted in Google Cloud to be the primary cluster and used apiserver-builder to deploy the aggregated federation API server and controller to it. To join the three clusters together, we used kubefnord, a multi-cluster management tool. This gave us three separate Kubernetes clusters spanning three different regions—all managed through the same primary Kubernetes cluster as shown in the diagram below.
We built a stateful microservices reference web application based on an open source Pac-Man HTML5 game and modified it to use Node.js (chosen for its web server component, ease of debugging, containerization capabilities, and to facilitate as our backend API). We used MongoDB as the distributed database to persist the high-score data for the stateful piece. We made our Pac-Man app cloud-aware by displaying details showing the cloud provider name, region, and hostname where the instance was running. Lastly, we containerized Pac-Man and MongoDB using Red Hat Enterprise Linux as the container operating system.
To provide MongoDB with a persistent volume to store user data such as high scores, we used the default storage class in each of the clusters that enables the use of each of the cloud providers' block storage capability: Google Persistent Disk, Amazon Elastic Block Storage, and Azure Disk. We created a PersistentVolumeClaim (PVC) so the MongoDB deployment could simply request a storage volume by referencing the PVC, and Kubernetes would provide a dynamically provisioned volume. We subsequently deployed containerized MongoDB onto the federated Kubernetes clusters by building a distributed MongoDB set so that the high-score data would be replicated across to each of the Kubernetes clusters in the federation. We then mapped each of the load balancer IP addresses for the MongoDB services in each of the clusters to DNS entries for load balancing and high availability.
After containerizing Pac-Man, we deployed it, along with containerized MongoDB, to the three Kubernetes clusters. This involved mapping each of the load balancer IP addresses for the Pac-Man services in each of the clusters to DNS entries. The final result looked like this:
Now we've successfully scaled our application across the three largest public cloud providers! This example could have included an on-premises private cloud easily enough. But what if we wanted to scale down our application from a particular cloud provider?
To verify that use case, we deployed our app with the same steps outlined above, except this time only on Google Cloud Platform and Amazon Web Services. Once the application was deployed on both providers, we updated our placement preferences for the Kubernetes YAML resource to reflect that we wanted the Pac-Man application running only on Google Cloud Platform. After applying the change through the federation interface, the Pac-Man application deployment quickly updated to be running only on our Google Cloud Platform Kubernetes cluster. Our scale-down was a success!
As demonstrated by our brief walkthrough, Kubernetes federation-v2 enables software application portability. What's important is that Kubernetes provides a common platform that can be used across any cloud provider. When you add multi-cluster features to the mix, you can write your application code once and deploy it across any combination of cloud providers. So you can rest assured knowing that the application code you write today can be easily deployed across cloud providers as long as there is one common denominator: Kubernetes.

This article is based on "Exploring application portability across clouds using Kubernetes," a talk the authors will be giving at Red Hat Summit 2018, which will be held May 8-10 in San Francisco. Register by May 7 to save US$ 500 off of registration. Use discount code OPEN18 on the payment page to apply the discount.

How to deploy Odoo 11 on Ubuntu 18.04

$
0
0
https://linuxize.com/post/how-to-deploy-odoo-11-on-ubuntu-18-04

Odoo is the most popular all-in-one business software in the world packed up a range of business applications, including CRM, website ,e-Commerce, billing, accounting, manufacturing, warehouse, project management, inventory and much more, all seamlessly integrated.
There are several ways to install Odoo depending on the required use case. This guide covers the steps necessary for installing and configuring Odoo for production using Git source and Python virtualenv on a Ubuntu 18.04 system.

Before you begin

Update the system to the latest packages:
sudo apt update && sudo apt upgrade
Copy
Install git, pip and the tools and libraries required to build Odoo dependencies:
sudo apt install git python3-pip build-essential wget python3-dev libxslt-dev libzip-dev libldap2-dev libsasl2-dev python3-setuptools
Copy

Create Odoo user

Create a new system user and group with home directory /opt/odoo that will run the Odoo service.
useradd -m -d /opt/odoo -U -r -s /bin/bash odoo
Copy
You can name the user whatever you like, just make sure you create a postgres user with the same name.

Install and configure PostgreSQL

Install the Postgres package from the Ubuntu’s default repositories:
sudo apt-get install postgresql
Copy
Once the installation is completed create a postgres user with the same name as the previously created system user, in our case odoo:
sudo su - postgres -c "createuser -s odoo"
Copy

Install and configure Odoo

We will install odoo from the GitHub repository so we can have more control over versions and updates. We will also use virtualenv which is a tool to create isolated Python environments.
Before starting with the installation process, make sure you switch to odoo user.
sudo su - odoo
Copy
To confirm that you are logged-in as odoo user you can use the following command:
whoami
Copy
Now we can start with the installation process, first clone the odoo from the GitHub repository:
git clone https://www.github.com/odoo/odoo --depth 1 --branch 11.0 /opt/odoo/odoo11
Copy
  • If you want to install a different Odoo version just change the version number after the --branch switch.
  • You can name the directory as you like, for example instead odoo11 you can use the name of your domain.
pip is a tool for installing and managing Python packages, which we will use to install all required Python modules, install it with:
pip3 install virtualenv
Copy
To create a new virtual environment for our Odoo 11 installation run:
cd /opt/odoo
virtualenv odoo11-venv
Copy
Using base prefix '/usr'
New python executable in /opt/odoo/odoo11-venv/bin/python3
Also creating executable in /opt/odoo/odoo11-venv/bin/python
Installing setuptools, pip, wheel...done.
Copy
activate the environment:
source odoo11-venv/bin/activate
Copy
and install all required Python modules:
pip3 install -r odoo11/requirements.txt
Copy
If you encounter any compilation errors during the installation, make sure that you installed all of the required dependencies listed in the Before you begin section.
Once the installation is completed deactivate the environment and switch back to your sudo user using the following commands:
deactivate
exit
Copy
If you plan to install custom modules it is best to install those modules in a separate directory. To create a new directory for our custom modules run:
sudo mkdir /opt/odoo/odoo11-custom-addons
sudo chown odoo: /opt/odoo/odoo11-custom-addons
Copy
Next, we need to create a configuration file, we can either create a new one from scratch or copy the included configuration file:
sudo cp /opt/odoo/odoo11/debian/odoo.conf /etc/odoo11.conf
Copy
Open the file and edit it as follows:
/etc/odoo11.conf
[options]
; This is the password that allows database operations:
admin_passwd = my_admin_passwd
db_host = False
db_port = False
db_user = odoo
db_password = False
addons_path = /opt/odoo/odoo11/addons
; If you are using custom modules
; addons_path = /opt/odoo/odoo11/addons,/opt/odoo/odoo11-custom-addons
Copy
Do not forget to change the my_admin_passwd to something more secure and adjust the addons_path if you’re using custom modules.
Advertisement

Create a systemd unit file

To run odoo as a service we will create a odoo11.service unit file in the /etc/systemd/system/ directory with the following contents:
/etc/systemd/system/odoo11.service
[Unit]
Description=Odoo11
Requires=postgresql.service
After=network.target postgresql.service

[Service]
Type=simple
SyslogIdentifier=odoo11
PermissionsStartOnly=true
User=odoo
Group=odoo
ExecStart=/opt/odoo/odoo11-venv/bin/python3 /opt/odoo/odoo11/odoo-bin -c /etc/odoo11.conf
StandardOutput=journal+console

[Install]
WantedBy=multi-user.target
Copy
Notify systemd that we created a new unit file and start the Odoo service by executing:
sudo systemctl daemon-reload
sudo systemctl start odoo11
Copy
You can check the service status with the the following command:
sudo systemctl status odoo11
Copy
● odoo11.service - Odoo11
Loaded: loaded (/etc/systemd/system/odoo11.service; disabled; vendor preset: enabled)
Active: active (running) since Thu 2018-05-03 21:23:08 UTC; 3s ago
Main PID: 18351 (python3)
Tasks: 4 (limit: 507)
CGroup: /system.slice/odoo11.service
└─18351 /opt/odoo/odoo11-venv/bin/python3 /opt/odoo/odoo11/odoo-bin -c /etc/odoo11.conf
Copy
and if there are no errors you can enable the Odoo service to be automatically started at boot time:
sudo systemctl enable odoo11
Copy
If you want to see the messages logged by the Odoo service you can use the command below:
sudo journalctl -u odoo11
Copy

Test the Installation

Open your browser and type: http://:8069
Assuming that installation is successful, a screen similar to the following will appear:

Configure Nginx as a SSL termination proxy

If you want to use Nginx as a SSL termination proxy make sure that you have meet the following prerequisites:
  • You have a domain name pointing to your public server IP. In this tutorial we will use example.com.
  • You have Nginx installed by following this introductions.
  • You have a SSL certificate installed for your domain. You can install a free Let’s Encrypt SSL certificate by following this introductions .
The default Odoo web server is serving traffic over HTTP. To make our Odoo deployment most secure we will configure Nginx as a SSL termination proxy which will serve the traffic over HTTPS.
SSL termination proxy is a proxy server which handles the SSL encryption/decryption. This means that our termination proxy (Nginx) will handle and decrypt incoming TLS connections (HTTPS), and it will pass on the unencrypted requests to our internal service (Odoo) so the traffic between Nginx and Odoo will not be encrypted (HTTP).
We need to tell Odoo that we will use a proxy, open the configuration file and add the following line:
/etc/odoo11.conf
proxy_mode = True
Copy
Restart the Odoo service for the changes to take effect:
sudo systemctl restart odoo11
Copy
Using Nginx as a proxy give us several benefits. In this example we will configure SSL Termination, HTTP to HTTPS redirection, WWW to non-WWW redirection, cache the static files and enable GZip compression.
/etc/nginx/sites-enabled/example.com
# Odoo servers
upstreamodoo{
server127.0.0.1:8069;
}

upstreamodoochat{
server127.0.0.1:8072;
}

# HTTP -> HTTPS
server{
listen80;
server_namewww.example.comexample.com;

includesnippets/letsencrypt.conf;
return301https://example.com$request_uri;
}

# WWW -> NON WWW
server{
listen443sslhttp2;
server_namewww.example.com;

ssl_certificate/etc/letsencrypt/live/example.com/fullchain.pem;
ssl_certificate_key/etc/letsencrypt/live/example.com/privkey.pem;
ssl_trusted_certificate/etc/letsencrypt/live/example.com/chain.pem;
includesnippets/ssl.conf;

return301https://example.com$request_uri;
}

server{
listen443sslhttp2;
server_nameexample.com;

proxy_read_timeout720s;
proxy_connect_timeout720s;
proxy_send_timeout720s;

# Proxy headers
proxy_set_headerX-Forwarded-Host$host;
proxy_set_headerX-Forwarded-For$proxy_add_x_forwarded_for;
proxy_set_headerX-Forwarded-Proto$scheme;
proxy_set_headerX-Real-IP$remote_addr;

# SSL parameters
ssl_certificate/etc/letsencrypt/live/example.com/fullchain.pem;
ssl_certificate_key/etc/letsencrypt/live/example.com/privkey.pem;
ssl_trusted_certificate/etc/letsencrypt/live/example.com/chain.pem;
includesnippets/ssl.conf;

# log files
access_log/var/log/nginx/odoo.access.log;
error_log/var/log/nginx/odoo.error.log;

# Handle longpoll requests
location/longpolling{
proxy_passhttp://odoochat;
}

# Handle / requests
location/{
proxy_redirectoff;
proxy_passhttp://odoo;
}

# Cache static files
location~*/web/static/{
proxy_cache_valid20090m;
proxy_bufferingon;
expires864000;
proxy_passhttp://odoo;
}

# Gzip
gzip_typestext/csstext/lesstext/plaintext/xmlapplication/xmlapplication/jsonapplication/javascript;
gzipon;
}
Copy
Don’t forget to replace example.com with your Odoo domain and set the correct path to the SSL certificate files. The snippets used in this configuration are created in this guide .
Once you are done, restart the Nginx service with:
sudo systemctl restart nginx
Copy

Change the binding interface

This step is optional, but it is a good security practice. By default, Odoo server listens to port 8069 on all interfaces, so if you want to disable direct access to your Odoo instance you can either block the port 8069 for all public interfaces or force Odoo to listen only on the local interface.
In this guide we will force Odoo to listen only on 127.0.0.1, open the Odoo configuration add the following two lines at the end of the file:
/etc/odoo11.conf
xmlrpc_interface = 127.0.0.1
netrpc_interface = 127.0.0.1
Copy
Save the configuration file and restart the Odoo server for the changes to take effect:
sudo systemctl restart odoo
Copy

Enable multiprocessing

By default, Odoo is working in multithreading mode. For production deployments, it is recommended to switch to the multiprocessing server as it increases stability, and make better usage of the system resources. In order to enable multiprocessing we need to edit the Odoo configuration and set a non-zero number of worker processes.
Multiprocessing mode is only available on Unix-based systems it is available on Windows systems
The number of workers is calculated based on the number of CPU cores in the system and the available RAM memory.
According to the official [Odoo documentation](“https://www.odoo.com/documentation/11.0/setup/deploy.html") to calculate the workers number and required RAM memory size we will use the following formulas and assumptions:
Worker number calculation
  • theoretical maximal number of worker = (system_cpus * 2) + 1
  • 1 worker can serve ~= 6 concurrent users
  • Cron workers also requires CPU
RAM memory size calculation
  • We will consider that 20% of all requests are heavy requests, while 80% are lighter ones. Heavy requests are using around 1 GB of RAM while the lighter ones are using around 150 MB of RAM
  • Needed RAM = number_of_workers * ( (light_worker_ratio * light_worker_ram_estimation) + (heavy_worker_ratio * heavy_worker_ram_estimation) )
If you do not know how many CPUs you have on your system you can use the following command:
grep -c ^processor /proc/cpuinfo
Copy
Let’s say we have a system with 4 CPU cores, 8 GB of RAM memory and 30 concurrent Odoo users.
  • 30 users / 6 = **5** (5 is theoretical number of workers needed )
  • (4 * 2) + 1 = **9** ( 9 is the theoretical maximum number of workers)
Based on the calculation above we can use 5 workers + 1 worker for the cron worker which is total of 6 workers. Let’s check if the RAM memory consumption based on the number of the workers.
  • RAM = 6 * ((0.8*150) + (0.2*1024)) ~= 2 GB of RAM
The calculation above show us that our Odoo installation will need around 2GB of RAM.
To switch to multiprocessing mode, open the configuration file and append the following lines:
/etc/odoo11.conf
limit_memory_hard = 2684354560
limit_memory_soft = 2147483648
limit_request = 8192
limit_time_cpu = 600
limit_time_real = 1200
max_cron_threads = 1
workers = 5
Copy
Restart the Odoo service for the changes to take effect:
sudo systemctl restart odoo11
Copy
The rest of the system resources will be used by other services that run on our machine. In this guide we installed Odoo along with PostgreSQL and Nginx on a same server and depending on your setup you may also have other services running on your server.

A Beginners Guide To Cron Jobs

$
0
0
https://www.ostechnix.com/a-beginners-guide-to-cron-jobs


A Beginners Guide To Cron Jobs
Cron is one of the most useful utility that you can find in any Unix-like operating system. It is used to schedule commands at a specific time. These scheduled commands or tasks are known as “Cron Jobs”. Cron is generally used for running scheduled backups, monitoring disk space, deleting files (for example log files) periodically which are no longer required, running system maintenance tasks and a lot more. In this brief guide, we will see the basic usage of Cron Jobs in Linux.

The Beginners Guide To Cron Jobs

The typical format of a cron job is:
Minute(0-59) Hour(0-24) Day_of_month(1-31) Month(1-12) Day_of_week(0-6) Command_to_execute
Just memorize the cron job format or print the following illustration and keep it in your desk.

In the above picture, the asterisks refers the specific blocks of time.
To display the contents of the crontab file of the currently logged in user:
$ crontab -l
To edit the current user’s cron jobs, do:
$ crontab -e
If it is the first time, you will be asked to editor to edit the jobs.
no crontab for sk - using an empty one

Select an editor. To change later, run 'select-editor'.
1. /bin/nano <---- 1-4="" 2.="" 3.="" 4.="" bin="" choose="" easiest="" ed="" pre="" usr="" vim.basic="" vim.tiny="">
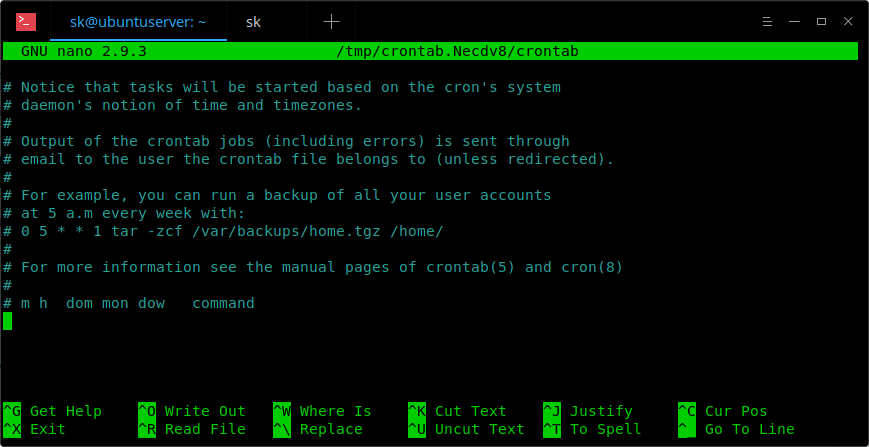
Choose any one that suits you. Here it is how a sample crontab file looks like.


In this file, you need to add your cron jobs.


To edit the crontab of a different user, for example ostechnix, do:


$ crontab -u ostechnix -e
Let us see some examples.
To run a cron job every minute, the format should be like below.
* * * * * 
To run cron job every 5 minute, add the following in your crontab file.
*/5 * * * * 
To run a cron job at every quarter hour (every 15th minute), add this:
*/15 * * * * 
To run a cron job every hour at 30 minutes, run:
30 * * * * 
You can also define multiple time intervals separated by commas. For example, the following cron job will run three times every hour, at minutes 0, 5 and 10:
0,5,10 * * * * 
Run a cron job every half hour:
*/30 * * * * 
Run a job every hour:
0 * * * * 
Run a job every 2 hours:
0 */2 * * * 
Run a job every day (It will run at 00:00):
0 0 * * * 
Run a job every day at 3am:
0 3 * * * 
Run a job every sunday:
0 0 * * SUN 
Or,
0 0 * * 0 
It will run at exactly at 00:00 on Sunday.
Run a job on every day-of-week from Monday through Friday i.e every weekday:
0 0 * * 1-5 
The job will start at 00:00.
Run a job every month:
0 0 1 * * 
Run a job at 16:15 on day-of-month 1:
15 16 1 * * 
Run a job at every quarter i.e on day-of-month 1 in every 3rd month:
0 0 1 */3 * 
Run a job on a specific month at a specific time:
5 0 * 4 * 
The job will start at 00:05 in April.
Run a job every 6 months:
0 0 1 */6 * 
This cron job will start at 00:00 on day-of-month 1 in every 6th month.
Run a job every year:
0 0 1 1 * 
This cron job will start at 00:00 on day-of-month 1 in January.
We can also use the following strings to define job.
@rebootRun once, at startup.
@yearlyRun once a year.
@annually(same as @yearly).
@monthlyRun once a month.
@weeklyRun once a week.
@dailyRun once a day.
@midnight(same as @daily).
@hourlyRun once an hour.
For example, to run a job every time the server is rebooted, add this line in your crontab file.
@reboot 
To remove all cron jobs for the current user:
$ crontab -r
There is also a dedicated website named crontab.guru for learning cron jobs examples. This site provides a lot of cron job examples.
For more details, check man pages.
$ man crontab
And, that’s all for now. At this point, you might have a basic understanding of cron jobs and how to use them in real time. More good stuffs to come. Stay tuned!!
Cheers!
Reference links:
---->

How to install Java on Ubuntu 18.04 Bionic Beaver Linux

$
0
0
https://linuxconfig.org/how-to-install-java-on-ubuntu-18-04-bionic-beaver-linux

Objective

The objective of this tutorial is to install Java on Ubuntu. We will be installing the latest version of Oracle Java SE Development Kit (JDK) on Ubuntu 18.04 Bionic Beaver Linux. This will be performed in three ways: Installing Java using the Ubuntu Open JDK binaries, installing Java via PPA and installing Java using the official Oracle Java binaries.

Operating System and Software Versions

  • Operating System: - Ubuntu 18.04 Bionic Beaver
  • Software: - Java(TM) SE Runtime Environment 8,9,10 or 11

Requirements

Privileged access to to your Ubuntu 18.04 Bionic Beaver Linux system is required to perform this installation.

Difficulty

EASY

Conventions

  • # - requires given command to be executed with root privileges either directly as a root user or by use of sudo command
  • $ - given command to be executed as a regular non-privileged user

Instructions

Install Java using the Ubuntu Open JDK binaries

In most cases you do not need to look further to install Java on Ubuntu than Ubuntu's repository which contains an opensource version of Java runtime binaries called Open JDK.
To install Ubuntu Java Open JDK version 11 execute:
$ sudo apt install openjdk-11-jdk
To install Ubuntu Java Open JDK version 9 execute:
$ sudo apt install openjdk-9-jdk
and for Java Open JDK 8 run:
$ sudo apt install openjdk-8-jdk

Install Java on Ubuntu via PPA

Add PPA Repository

Using Webupd8 Team's PPA repository we can install Java on Ubuntu automatically using the apt command. Webupd8 Team currently maintains Oracle Java 8 and Oracle Java 9 PPA repositories for Ubuntu 18.04 Bionic Beaver.

Let's start by adding a PPA repository:
$ sudo add-apt-repository ppa:webupd8team/java
$ sudo apt update

Install Java on Ubuntu

After adding PPA repository we can move to installing java on Ubuntu. Executing apt search oracle-java command should now show multiple java versions available for install.

Namely they are java8 and java9.

To install Java 8 execute:
$ sudo apt install oracle-java8-set-default
To install Java 9 execute
(see the below manual Java installation intructions if version 9 is unavailable and you need java version greater than 8.) :
$ sudo apt install oracle-java9-set-default


The above commands will automatically install selected java version and set all necessary java environment variables.

$ java --version
java 9.0.4
Java(TM) SE Runtime Environment (build 9.0.4+11)
Java HotSpot(TM) 64-Bit Server VM (build 9.0.4+11, mixed mode)

Set default Java Version Automatically

It is possible to install both Oracle Java 8 and Oracle Java 9 versions at the same time.

To switch between version simply re-install oracle-java8-set-default or oracle-java9-set-default package.

Please note this will not cause apt to remove Java installer, as it will simply update all java related environmental variables and remove oracle-javaX-set-default package counterpart.

Example:

$ sudo apt install oracle-java8-set-default
Reading package lists... Done
Building dependency tree
Reading state information... Done
The following packages will be REMOVED:
oracle-java9-set-default
The following NEW packages will be installed:
oracle-java8-set-default
0 to upgrade, 1 to newly install, 1 to remove and 0 not to upgrade.
Need to get 6,830 B of archives.
After this operation, 4,096 B of additional disk space will be used.
Do you want to continue? [Y/n]
Get:1 http://ppa.launchpad.net/webupd8team/java/ubuntu bionic/main amd64 oracle-java8-set-default all 8u161-1~webupd8~0 [6,830 B]
Fetched 6,830 B in 1s (9,357 B/s)
(Reading database ... 99410 files and directories currently installed.)
Removing oracle-java9-set-default (9.0.4-1~webupd8~0) ...
Selecting previously unselected package oracle-java8-set-default.
(Reading database ... 99407 files and directories currently installed.)
Preparing to unpack .../oracle-java8-set-default_8u161-1~webupd8~0_all.deb ...
Unpacking oracle-java8-set-default (8u161-1~webupd8~0) ...
Setting up oracle-java8-set-default (8u161-1~webupd8~0) ...
Installing new version of config file /etc/profile.d/jdk.csh ...
Installing new version of config file /etc/profile.d/jdk.sh ...

Set default Java Version Manually

If you maintain multiple versions of java including the OpenJDK java version on your server at the same time you may need to switch between java versions manually.

Start by listing your current java environment variable settings:

$ sudo update-alternatives --get-selections | grep ^java
java manual /usr/lib/jvm/java-8-oracle/jre/bin/java
javac manual /usr/lib/jvm/java-8-oracle/bin/javac
javadoc manual /usr/lib/jvm/java-8-oracle/bin/javadoc
javafxpackager manual /usr/lib/jvm/java-8-oracle/bin/javafxpackager
javah manual /usr/lib/jvm/java-8-oracle/bin/javah
javap manual /usr/lib/jvm/java-8-oracle/bin/javap
javapackager manual /usr/lib/jvm/java-8-oracle/bin/javapackager
javaws manual /usr/lib/jvm/java-8-oracle/jre/bin/javaws
javaws.real auto /usr/lib/jvm/java-9-oracle/bin/javaws.real


For more verbose version of the above command execute sudo update-alternatives --get-selections | grep java.

To set java to eg. Java 9 executable run:

$ sudo update-alternatives --config java
There are 2 choices for the alternative java (providing /usr/bin/java).

Selection Path Priority Status
------------------------------------------------------------
0 /usr/lib/jvm/java-8-oracle/jre/bin/java 1081 auto mode
* 1 /usr/lib/jvm/java-8-oracle/jre/bin/java 1081 manual mode
2 /usr/lib/jvm/java-9-oracle/bin/java 1 manual mode

Press to keep the current choice[*], or type selection number: 2
update-alternatives: using /usr/lib/jvm/java-9-oracle/bin/java to provide /usr/bin/java (java) in manual mode
Confirm your selection:

$ sudo update-alternatives --get-selections | grep ^java
java manual /usr/lib/jvm/java-9-oracle/bin/java
javac manual /usr/lib/jvm/java-8-oracle/bin/javac
javadoc manual /usr/lib/jvm/java-8-oracle/bin/javadoc
javafxpackager manual /usr/lib/jvm/java-8-oracle/bin/javafxpackager
javah manual /usr/lib/jvm/java-8-oracle/bin/javah
javap manual /usr/lib/jvm/java-8-oracle/bin/javap
javapackager manual /usr/lib/jvm/java-8-oracle/bin/javapackager
javaws manual /usr/lib/jvm/java-8-oracle/jre/bin/javaws
javaws.real auto /usr/lib/jvm/java-9-oracle/bin/javaws.real

Use the update-alternatives --config JAVA-EXECUTABLE-HERE to change the environmental path to any other java executable binaries as required.

Install Java using the Official Oracle binaries

The following section will describe a manual Oracle Java installation on Ubuntu 18.04.

Java Download

Navigate your browser to the official Oracle java download page and download the latest binaries.

We are interested in eg. jdk-10.0.1_linux-x64_bin.tar.gz file.

Download java file and save it into your home directory:

$ ls ~/jdk-10.0.1_linux-x64_bin.tar.gz 
/home/linuxconfig/jdk-10.0.1_linux-x64_bin.tar.gz

Install Java on Ubuntu 18.04

Now, that your java download is completed and you have obtained the Oracle JDK binaries, execute the following commands to perform the java ubuntu install into a /opt/java-jdk directory:

$ sudo mkdir /opt/java-jdk
$ sudo tar -C /opt/java-jdk -zxf ~/jdk-10.0.1_linux-x64_bin.tar.gz

Set Defaults

The following commands will set Oracle JDK as system wide default. Amend the below commands to suit your installed version:

$ sudo update-alternatives --install /usr/bin/java java /opt/java-jdk/jdk-10.0.1/bin/java 1
$ sudo update-alternatives --install /usr/bin/javac javac /opt/java-jdk/jdk-10.0.1/bin/javac 1

Confirm Java Installation

What remains is to check for installed java version:

$ java --version
java 10.0.1 2018-04-17
Java(TM) SE Runtime Environment 18.3 (build 10.0.1+10)
Java HotSpot(TM) 64-Bit Server VM 18.3 (build 10.0.1+10, mixed mode)
$ javac --version
javac 10.0.1

How to Use Systemd Timers as a Cron Replacement

$
0
0
https://www.maketecheasier.com/use-systemd-timers-as-cron-replacement


As a Linux user you’re probably familiar with cron. It has worked as the go-to Unix time-based job scheduler for many years. Now many users are seeing Systemd timers begin to replace cron’s dominance.
This article will discuss the basics of how to set up your own timer and make sure it’s running properly on your system.
If you’re already using Systemd as an init system– many popular Linux distros run it by default, including Arch, Debian, Fedora, Red Hat, and Ubuntu – you will see timers already in use. There’s nothing left to do other than use that feature already installed.
The easiest way you can check that a timer exists on your computer is with the command:
You don’t have to run this as root.
The --all option here shows inactive timers as well. There aren’t any inactive timers currently on this system.
You should find an output similar to the following image:
Systemd timer list
You can see the date and time each timer will activate, the countdown until that point, how much time has passed since it last ran, the unit name of the timer itself, and the service each timer unit activates.
All timers must be paired with a corresponding service. In the next section you will see how to create a “.timer” file that activates a “.service” file.
You can create a new timer by placing a custom .timer file in “/etc/systemd/system/.” In creating a new timer for my DuckDNS dynamic DNS service file, I ended up with this text:

1. [Unit] section

The “Description=…” option in the file tells you the name/description of the timer itself. In this case my “duckdns.timer” will update my DNS by telling the “duckdns.service” file to run a series of commands.
You can change the wording after “Description=” to say whatever you like.

2. [Timer] section

“OnCalendar=…” here shows one way of telling the timer when to activate. *-*-* stands for “Year-Month-Day, and the asterisks mean it will run every day of every month of every year from hereon forward. The time that follows the asterisks shows what time of the day the timer should run.
“Persistent=true” just means that the timer will run automatically if it missed the previous start time. This could happen because the computer was turned off before the event could take place. This is optional but recommended.

3. [Install] section

Finally, “WantedBy=timers.target” shows that the Systemd timers.target will use this .timer file. This line in the file shows the dependency chain from one file to another. You should not omit or change this line.

Other options

You can find many other features by scanning Systemd’s man page with man systemd.timer. Navigate to the “OPTIONS” section to discover options for accuracy, persistence, and running after boot.
Activate any timer you’ve created with the systemctl enable and systemctl start syntax.
Look again at systemctl list-timers to see your timer in action.
Systemd timer list
You can see if your timer ran as expected by inspecting its corresponding service file with systemctl status. In this case you can see that my timer ran at 11:43:00 like it was supposed to.
Systemd status
Although many third-party programs, including DuckDNS, come with scripts that allow them to update as needed, creating timers in Systemd is a helpful skill to know. My creation of a timer for DuckDNS here was unnecessary, but it shows how other types of Systemd timers would work.
This knowledge will be helpful, for instance, for creating and running your own Bash scripts. You could even use it to alter an existing timer to better suit your preferences. Furthermore, it’s always good to know how your computer operates, and since Systemd controls many basic functions, this one piece of the puzzle can help you better understand the manner in which events are triggered every day.
Thanks for following along. Good luck with creating your own timers.

Developing Console Applications with Bash

$
0
0
https://www.linuxjournal.com/content/developing-console-applications-bash

Bash screenshot from Wikipedia, https://en.wikipedia.org/wiki/Bash_(Unix_shell)
Bring the power of the Linux command line into your application development process.
As a novice software developer, the one thing I look for when choosing a programming language is this: is there a library that allows me to interface with the system to accomplish a task? If Python didn't have Flask, I might choose a different language to write a web application. For this same reason, I've begun to develop many, admittedly small, applications with Bash. Although Python, for example, has many modules to import and extend functionality, Bash has thousands of commands that perform a variety of features, including string manipulation, mathematic computation, encryption and database operations. In this article, I take a look at these features and how to use them easily within a Bash application.

Reusable Code Snippets

Bash provides three features that I've found particularly useful when creating reusable functions: aliases, functions and command substitution. An alias is a command-line shortcut for a long command. Here's an example:

alias getloadavg='cat /proc/loadavg'

The alias for this example is getloadavg. Once defined, it can be executed as any other Linux command. In this instance, alias will dump the contents of the /proc/loadavg file. Something to keep in mind is that this is a static command alias. No matter how many times it is executed, it always will dump the contents of the same file. If there is a need to vary the way a command is executed (by passing arguments, for instance), you can create a function. A function in Bash functions the same way as a function in any other language: arguments are evaluated, and commands within the function are executed. Here's an example function:

getfilecontent() {
if [ -f $1 ]; then
cat $1
else
echo "usage: getfilecontent "
fi
}

This function declaration defines the function name as getfilecontent. The if/else statement checks whether the file specified as the first function argument ($1) exists. If it does, the contents of the file is outputted. If not, usage text is displayed. Because of the incorporation of the argument, the output of this function will vary based on the argument provided.
The final feature I want to cover is command substitution. This is a mechanism for reassigning output of a command. Because of the versatility of this feature, let's take a look at two examples. This one involves reassigning the output to a variable:

LOADAVG="$(cat /proc/loadavg)"

The syntax for command substitution is $(command)where "command" is the command to be executed. In this example, the LOADAVG variable will have the contents of the /proc/loadavg file stored in it. At this point, the variable can be evaluated, manipulated or simply echoed to the console.

Text Manipulation

If there is one feature that sets scripting on UNIX apart from other environments, it is the robust ability to process text. Although many text processing mechanisms are available when scripting in Linux, here I'm looking at grep, awk, sed and variable-based operations. The grepcommand allows for searching through text whether in a file or piped from another command. Here's a grep example:

alias searchdate='grep
↪"[0-9][0-9][0-9][0-9]-[0-9][0-9]-[0-9][0-9]"'

The alias created here will search through data for a date in the YYYY-MM-DD format. Like the grep command, text either can be provided as piped data or as a file path following the command. As the example shows, search syntax for the grep command includes the use of regular expressions (or regex).
When processing lines of text for the purpose of pulling out delimited fields, awk is the easiest tool for the job. You can use awk to create verbose output of the /proc/loadavg file:

awk '{ printf("1-minute: %s\n5-minute: %s\n15-minute:
↪%s\n",$1,$2,$3); }' /proc/loadavg

For the purpose of this example, let's examine the structure of the /proc/loadavg file. It is a single-line file, and there are typically five space-delimited fields, although this example uses only the first three fields. Much like Bash function arguments, fields in awk are references as variables are named by their position in the line ($1 is the first field and so on). In this example, the first three fields are referenced as arguments to the printf statement. The printf statement will display three lines, and each line will contain a description of the data and the data itself. Note that each %s is substituted with the corresponding parameter to the printf function.
Within all of the commands available for text processing on Linux, sed may be considered the Swiss army knife for text processing. Like grep, seduses regex. The specific operation I'm looking at here involves regex substitution. For an accurate comparison, let's re-create the previous awk example using sed:

sed 's/^\([0-9]\+\.[0-9]\+\) \([0-9]\+\.[0-9]\+\)
↪\([0-9]\+\.[0-9]\+\).*$/1-minute: \1\n5-minute:
↪\2\n15-minute: \3/g' /proc/loadavg

Since this is a long example, I'm going to separate this into smaller parts. As I mentioned, this example uses regex substitution, which follows this syntax: s/search/replace/g. The "s" begins the definition of the substitution statement. The "search" value defines the text pattern you want to search for, and the "replace" value defines what you want to replace the search value with. The "g" at the end is a flag that denotes global substitution within the file and is one of many flags available with the substitute statement. The search pattern in this example is:

^\([0-9]\+\.[0-9]\+\) \([0-9]\+\.[0-9]\+\)
↪\([0-9]\+\.[0-9]\+\).*$

The caret (^) at the beginning of the string denotes the beginning of a line of text being processed, and the dollar sign ($) at the end of the string denotes the end of a line of text. Four things are being searched for within this example. The first three items are:

\([0-9]\+\.[0-9]\+\)

This entire string is enclosed with escaped parentheses, which makes the value within available for use in the replace value. Just like the grepexample, the [0-9] will match a single numeric character. When followed by an escaped plus sign, it will match one or more numeric characters. The escaped period will match a single period. When you put this whole expression together, you get an pattern for a decimal digit.
The fourth item in the search value is simply a period followed by an asterisk. The period will match any character, and the asterisk will match zero or more of whatever preceded it. The replace value of the example is:

1-minute: \1\n5-minute: \2\n15-minute: \3

This is largely composed of plain text; however, it contains four unique special items. There are newline characters that are represented by the slash-"/n". The other three items are slashes followed by a number. This number corresponds to the patterns in the search value surrounded by parentheses. Slash-1 is the first pattern in parentheses, slash-2 is the second and so on. The output of this sed command will be exactly the same as the awk command from earlier.
The final mechanism for string manipulation that I want to discuss involves using Bash variables to manipulate strings. Although this is much less powerful than traditional regex, it provides a number of ways to manipulate text. Here are a few examples using Bash variables:

MYTEXT="my example string"
echo "String Length: ${#MYTEXT}"
echo "First 5 Characters: ${MYTEXT:0:5}"
echo "Remove \"example\": ${MYTEXT/ example/}"

The variable named MYTEXT is the sample string this example works with. The first echo command shows how to determine the length of a string variable. The second echo command will return the first five characters of the string. This substring syntax involves the beginning character index (in this case, zero) and the length of the substring (in this case, five). The third echo command removes the word "example" along with a leading space.

Mathematic Computation

Although text processing might be what makes Bash scripting great, the need to do mathematics still exists. Basic math problems can be evaluated using either bc, awk or Bash arithmetic expansion. The bc command has the ability to evaluate math problems via an interactive console interface and piped input. For the purpose of this article, let's look at evaluating piped data. Consider the following:

pow() {
if [ -z "$1" ]; then
echo "usage: pow "
else
echo "$1^$2" | bc
fi
}

This example shows creating an implementation of the pow function from C++. The function requires two arguments. The result of the function will be the first number raised to the power of the second number. The math statement of "$1^$2" is piped into the bc command for calculation.
Although awk does provide the ability to do basic math calculation, the ability for awk to iterate through lines of text makes it especially useful for creating summary data. For instance, if you want to calculate the total size of all files within a folder, you might use something like this:

foldersize() {
if [ -d $1 ]; then
ls -alRF $1/ | grep '^-' | awk 'BEGIN {tot=0} {
↪tot=tot+$5 } END { print tot }'
else
echo "$1: folder does not exist"
fi
}

This function will do a recursive long-listing for all entries underneath the folder supplied as an argument. It then will search for all lines beginning with a dash (this will select all files). The final step is to use awk to iterate through the output and calculate the combined size of all files.
Here is how the awk statement breaks down. Before processing of the piped data begins, the BEGIN block sets a variable named tot to zero. Then for each line, the next block is executed. This block will add to tot the value of the fifth field in each line, which is the file size. Finally, after the piped data has been processed, the ENDblock then will print the value of tot.
The other way to perform basic math is through arithmetic expansion. This will take a similar visual for the command substitution. Let's rewrite the previous example using arithmetic expansion:

pow() {
if [ -z "$1" ]; then
echo "usage: pow "
else
echo "$[$1**$2]"
fi
}

The syntax for arithmetic expansion is $[expression], where expression is a mathematic expression. Notice that instead of using the caret operator for exponents, this example uses a double-asterisk. Although there are differences and limitations to this method of calculation, the syntax can be more intuitive than piping data to the bc command.

Cryptography

The ability to perform cryptographic operations on data may be necessary depending on the needs of an application. If a string needs to be hashed, a file needs to be encrypted, or data needs to be base64-encoded, this all can be accomplished using the opensslcommand. Although openssl provides a large set of ciphers, hashing algorithms and other functions, I cover only a few here.
The first example shows encrypting a file using the blowfish cipher:

$1.enc
else
echo "usage: bf-enc "
fi
}

This function requires two arguments: a file to encrypt and the password to use to encrypt it. After running, this script produces a file named the same as your original but with the file extension of "enc".
Once you have the data encrypted, you need a function to decrypt it. Here's the decryption function:

bf-dec() {
if [ -f $1 ] && [ -n "$2" ]; then
cat $1 | openssl enc -d -blowfish -pass pass:$2 >
↪${1%%.enc}
else
echo "usage: bf-dec "
fi
}

The syntax for the decryption function is almost identical to the encryption function with the addition of "-d" to decrypt the piped data and the syntax to remove ".enc" from the end of the decrypted filename.
Another piece of functionality provided by openssl is the ability to create hashes. Although files may be hashed using openssl, I'm going to focus on hashing strings here. Let's make a function to create an MD5 hash of a string:

md5hash() {
if [ -z "$1" ]; then
echo "usage: md5hash "
else
echo "$1" | openssl dgst -md5 | sed 's/^.*= //g'
fi
}

This function will take the string argument provided to the function and generate an MD5 hash of that string. The sed statement at the end of the command will strip off text that openssl puts at the beginning of the command output, so that the only text returned by the function is the hash itself.
The way that you would validate a hash (as opposed to decrypting it) is to create a new hash and compare it to the old hash. If the hashes match, the original strings will match.
I also want to discuss the ability to create a base64-encoded string of data. One particular application that I have found this useful for is creating an HTTP basic authentication header string (this contains username:password). Here is a function that accomplishes this:

basicauth() {
if [ -z "$1" ]; then
echo "usage: basicauth "
else
echo "$1:$(read -s -p "Enter password: " pass ;
↪echo $pass)" | openssl enc -base64
fi
}

This function will take the user name provided as the first function argument and the password provided by user input through command substitution and use openssl to base64-encode the string. This string then can be added to an HTTP authorization header field.

Database Operations

An application is only as useful as the data that sits behind it. Although there are command-line tools to interact with database server software, here I focus on the SQLite file-based database. Something that can be difficult when moving an application from one computer to another is that depending on the version of SQLite, the executable may be named differently (typically either sqlite or sqlite3). Using command substitution, you can create a fool-proof way of calling sqlite:

$(ls /usr/bin/sqlite* | grep 'sqlite[0-9]*$' | head -n1)

This will return the full file path of the sqlite executable available on a system.
Consider an application that, upon first execution, creates an empty database. If this syntax is used to invoke the sqlite binary, the empty database always will be created using the correct version of sqlite on that system.
Here's an example of how to create a new database with a table for personal information:

$(ls /usr/bin/sqlite* | grep 'sqlite[0-9]*$' | head -n1) test.db
↪"CREATE TABLE people(fname text, lname text, age int)"

This will create a database file named test.db and will create the people table as described. This same syntax could be used to perform any SQL operations that SQLite provides, including SELECT, INSERT, DELETE, DROP and many more.
This article barely scrapes the surface of commands available to develop console applications on Linux. There are a number of great resources for learning more in-depth scripting techniques, whether in Bash, awk, sed or any other console-based toolset. See the Resources section for links to more helpful information.

Resources

The Numfmt Command Tutorial With Examples For Beginners

$
0
0
https://www.ostechnix.com/the-numfmt-command-tutorial-with-examples-for-beginners


numfmt command
Today, I cam across an interesting and rather unknown command named “Numfmt” that converts the numbers to/from human readable format. It reads the numbers in various representations and reformats them in human readable format according to the specified options. If no numbers given, it reads the numbers from the standard input. It is part of the GNU coreutils package, so you need not bother installing it. In this brief tutorial, let us see the usage of Numfmt command with some practical examples.

The Numfmt Command Tutorial With Examples

Picture a complex number, for example ‘1003040500’. Of course the Mathematics ninjas can easily find the human readable representation of this number in seconds. But It is bit hard for me. This is where Numfmt commands comes in help. Run the following command to convert the given in human readable form.
$ numfmt --to=si 1003040500
1.1G
Let us go for some really long and complex number than the previous number. How about “10090008000700060005”? Bit hard, right? Yes. But the Numfmt command will display the human readable format of this number instantly.
$ numfmt --to=si 10090008000700060005
11E
Here, si refers the International System of Units (abbreviated SI from systeme internationale , the French version of the name).
So, if you use si, the numfmt command will auto-scale numbers according to the International System of Units (SI) standard.
The Numfmt also uses the following unit options too.
  • iec and iec-i– Auto-scale numbers according to the International Electrotechnical Commission (IEC) standard.
  • auto– With this method, numbers with ‘K’,‘M’,‘G’,‘T’,‘P’,‘E’,‘Z’,‘Y’ suffixes are interpreted as SI values, and numbers with ‘Ki’, ‘Mi’,‘Gi’,‘Ti’,‘Pi’,‘Ei’,‘Zi’,‘Yi’ suffixes are interpreted as IEC values.
  • none– no auto-scaling.
Here is some more examples for the above options.
$ numfmt --to=iec 10090008000700060005
8.8E
$ numfmt --to=iec-i 10090008000700060005
8.8Ei
We have seen how to convert the numbers to human readable format. Now let us do the reverse. I.e We are going to convert the numbers from human readable format. To do simply replace “–to” with “–from” option like below.
$ numfmt --from=si 1G
1000000000
$ numfmt --from=si 1M
1000000
$ numfmt --from=si 1P
1000000000000000
We can also do this with iec and iec-i standards.
$ numfmt --from=iec 1G
1073741824
$ numfmt --from=iec-i 1Gi
1073741824
$ numfmt --from=auto 1G
1000000000
$ numfmt --from=auto 1Gi
1073741824
Like I already mentioned, when using “auto”, the numbers with ‘K’,‘M’,‘G’,‘T’,‘P’,‘E’,‘Z’,‘Y’ suffixes are interpreted as SI values, and numbers with ‘Ki’, ‘Mi’,‘Gi’,‘Ti’,‘Pi’,‘Ei’,‘Zi’,‘Yi’ suffixes are interpreted as IEC values.
Numfmt command can also be used in conjunction with other commands. Have a look at the following examples.
$ echo 1G | numfmt --from=si
1000000000
$ echo 1G | numfmt --from=iec
1073741824
$ df -B1 | numfmt --header --field 2-4 --to=si
$ ls -l | numfmt --header --field 5 --to=si
Please note that the ls and df commands already have “–human-readable” option to display the outputs in human readable form. The above examples are given just for the demonstration purpose only.
You can tweak the output using “–format” or “–padding” options as well.
Pad to 5 characters, right aligned using ‘–format’ option:
$ du -s * | numfmt --to=si --format="%5f"
Pad to 5 characters, left aligned using ‘–format’ option:
$ du -s * | numfmt --to=si --format="%-5f"
Pad to 5 characters, right aligned using ‘–padding’ option:
$ du -s * | numfmt --to=si --padding=5
Pad to 5 characters, left aligned using ‘–padding’ option:
$ du -s * | numfmt --to=si --padding=-5
For more options and usage, refer man pages.
$ man numfmt
And, that’s all for now. More good stuffs to come. Stay tuned!
Cheers!
Resource:

How to use autofs to mount NFS shares

$
0
0
https://opensource.com/article/18/6/using-autofs-mount-nfs-shares

Configure a basic automount function on your network file system.

open source button on keyboard
Image by : 
opensource.com

Get the newsletter

Join the 85,000 open source advocates who receive our giveaway alerts and article roundups.
Most Linux file systems are mounted at boot and remain mounted while the system is running. This is also true of any remote file systems that have been configured in the fstab file. However, there may be times when you prefer to have a remote file system mount only on demand—for example, to boost performance by reducing network bandwidth usage, or to hide or obfuscate certain directories for security reasons. The package autofs provides this feature. In this article, I'll describe how to get a basic automount configuration up and running.
First, a few assumptions: Assume the NFS server named tree.mydatacenter.net is up and running. Also assume a data directory named ourfiles and two user directories, for Carl and Sarah, are being shared by this server. A few best practices will make things work a bit better: It is a good idea to use the same user ID for your users on the server and any client workstations where they have an account. Also, your workstations and server should have the same domain name. Checking the relevant configuration files should confirm.


alan@workstation1:~$ sudo getent passwd carl sarah

[sudo] password for alan:

carl:x:1020:1020:Carl,,,:/home/carl:/bin/bash

sarah:x:1021:1021:Sarah,,,:/home/sarah:/bin/bash


alan@workstation1:~$ sudo getent hosts

127.0.0.1       localhost

127.0.1.1       workstation1.mydatacenter.net workstation1

10.10.1.5       tree.mydatacenter.net tree


As you can see, both the client workstation and the NFS server are configured in the hosts file. I’m assuming a basic home or even small office network that might lack proper internal domain name service (i.e., DNS).

Install the packages

You need to install only two packages: nfs-common for NFS client functions, and autofs to provide the automount function.
alan@workstation1:~$ sudo apt-get install nfs-common autofs
You can verify that the autofs files have been placed in the etc directory:


alan@workstation1:~$ cd /etc; ll auto*

-rw-r--r-- 1 root root 12596 Nov 19  2015 autofs.conf

-rw-r--r-- 1 root root   857 Mar 10  2017 auto.master

-rw-r--r-- 1 root root   708 Jul  6  2017 auto.misc

-rwxr-xr-x 1 root root  1039 Nov 19  2015 auto.net*

-rwxr-xr-x 1 root root  2191 Nov 19  2015 auto.smb*

alan@workstation1:/etc$


Configure autofs

Now you need to edit several of these files and add the file auto.home. First, add the following two lines to the file auto.master:


/mnt/tree  /etc/auto.misc

/home/tree  /etc/auto.home


Each line begins with the directory where the NFS shares will be mounted. Go ahead and create those directories:
alan@workstation1:/etc$ sudo mkdir /mnt/tree /home/tree
Second, add the following line to the file auto.misc:
ourfiles        -fstype=nfs     tree:/share/ourfiles
This line instructs autofs to mount the ourfiles share at the location matched in the auto.master file for auto.misc. As shown above, these files will be available in the directory /mnt/tree/ourfiles.
Third, create the file auto.home with the following line:
*               -fstype=nfs     tree:/home/&
This line instructs autofs to mount the users share at the location matched in the auto.master file for auto.home. In this case, Carl and Sarah's files will be available in the directories /home/tree/carl or /home/tree/sarah, respectively. The asterisk (referred to as a wildcard) makes it possible for each user's share to be automatically mounted when they log in. The ampersand also works as a wildcard representing the user's directory on the server side. Their home directory should be mapped accordingly in the passwd file. This doesn’t have to be done if you prefer a local home directory; instead, the user could use this as simple remote storage for specific files.
Finally, restart the autofs daemon so it will recognize and load these configuration file changes.
alan@workstation1:/etc$ sudo service autofs restart

Testing autofs

If you change to one of the directories listed in the file auto.master and run the ls command, you won’t see anything immediately. For example, change directory (cd) to /mnt/tree. At first, the output of ls won’t show anything, but after running cd ourfiles, the ourfiles share directory will be automatically mounted. The cd command will also be executed and you will be placed into the newly mounted directory.


carl@workstation1:~$ cd /mnt/tree

carl@workstation1:/mnt/tree$ ls

carl@workstation1:/mnt/tree$ cd ourfiles

carl@workstation1:/mnt/tree/ourfiles$


To further confirm that things are working, the mount command will display the details of the mounted share.


carl@workstation1:~$ mount

tree:/mnt/share/ourfiles on /mnt/tree/ourfiles type nfs4
(rw,relatime,vers=4.0,rsize=131072,wsize=131072,namlen=255,hard,proto=tcp,timeo=600,retrans=2,sec=sys,clientaddr=10.10.1.22,local_lock=none,addr=10.10.1.5)


The /home/tree directory will work the same way for Carl and Sarah.
I find it useful to bookmark these directories in my file manager for quicker access.

MySQL without the MySQL: An introduction to the MySQL Document Store

$
0
0
https://opensource.com/article/18/6/mysql-document-store

The MySQL Document Store enables storing data without having to create an underlying schema, normalize data, or do other tasks normally required to use a database.

An introduction to the MySQL Document Store
Image credits : 

Get the newsletter

Join the 85,000 open source advocates who receive our giveaway alerts and article roundups.
MySQL can act as a NoSQL JSON Document Store so programmers can save data without having to normalize data, set up schemas, or even have a clue what their data looks like before starting to code. Since MySQL version 5.7 and in MySQL 8.0, developers can store JSON documents in a column of a table. By adding the new X DevAPI, you can stop embedding nasty strings of structured query language in your code and replace them with API calls that support modern programming design.
Very few developers have any formal training in structured query language (SQL), relational theory, sets, or other foundations of relational databases. But they need a secure, reliable data store. Add in a dearth of available database administrators, and things can get very messy quickly.
The MySQL Document Store allows programmers to store data without having to create an underlying schema, normalize data, or any of the other tasks normally required to use a database. A JSON document collection is created and can then be used.

JSON data type

This is all based on the JSON data type introduced a few years ago in MySQL 5.7. This provides a roughly 1GB column in a row of a table. The data has to be valid JSON or the server will return an error, but developers are free to use that space as they want.

X DevAPI

The old MySQL protocol is showing its age after almost a quarter-century, so a new protocol was developed called X DevAPI. It includes a new high-level session concept that allows code to scale from one server to many with non-blocking, asynchronous I/O that follows common host-language programming patterns. The focus is put on using CRUD (create, replace, update, delete) patterns while following modern practices and coding styles. Or, to put it another way, you no longer have to embed ugly strings of SQL statements in your beautiful, pristine code.
A new shell, creatively called the MySQL Shell, supports this new protocol. It can be used to set up high-availability clusters, check servers for upgrade readiness, and interact with MySQL servers. This interaction can be done in three modes: JavaScript, Python, and SQL.

Coding examples

The coding examples that follow are in the JavaScript mode of the MySQL Shell; it has a JS> prompt.
Here, we will log in as dstokes with the password password to the local system and a schema named demo. There is a pointer to the schema demo that is named db.


$ mysqlsh dstokes:password@localhost/demo

JS> db.createCollection("example")

JS> db.example.add(

      {

        Name:"Dave",

        State: "Texas",

        foo :"bar"

      }

     )

JS>


Above we logged into the server, connected to the demo schema, created a collection named example, and added a record, all without creating a table definition or using SQL. We can use or abuse this data as our whims desire. This is not an object-relational mapper, as there is no mapping the code to the SQL because the new protocol “speaks” at the server layer.

Node.js supported

The new shell is pretty sweet; you can do a lot with it, but you will probably want to use your programming language of choice. The following example uses the world_x demo database to search for a record with the _id field matching "CAN." We point to the desired collection in the schema and issue a find command with the desired parameters. Again, there’s no SQL involved.


var mysqlx = require('@mysql/xdevapi');

mysqlx.getSession({            //Auth to server

        host:'localhost',

        port:'33060',

        dbUser:'root',

        dbPassword:'password'

}).then(function(session){   // use world_x.country.info

     var schema = session.getSchema('world_x');

     var collection = schema.getCollection('countryinfo');


collection                      // Get row for 'CAN'

  .find("$._id == 'CAN'")

  .limit(1)

  .execute(doc => console.log(doc))

  .then(()=> console.log("\n\nAll done"));


  session.close();

})


Here is another example in PHP that looks for "USA":


#!/usr/bin/php


// Connection parameters

  $user='root';

  $passwd='S3cret#';

  $host='localhost';

  $port='33060';

  $connection_uri='mysqlx://'.$user.':'.$passwd.'@'.$host.':'.$port;

  echo$connection_uri."\n";


// Connect as a Node Session

  $nodeSession= mysql_xdevapi\getNodeSession($connection_uri);

// "USE world_x" schema

  $schema=$nodeSession->getSchema("world_x");

// Specify collection to use

  $collection=$schema->getCollection("countryinfo");

// SELECT * FROM world_x WHERE _id = "USA"

  $result=$collection->find('_id = "USA"')->execute();

// Fetch/Display data

  $data=$result->fetchAll();

  var_dump($data);

?>


Note that the find operator used in both examples looks pretty much the same between the two different languages. This consistency should help developers who hop between programming languages or those looking to reduce the learning curve with a new language.
Other supported languages include C, Java, Python, and JavaScript, and more are planned.

Best of both worlds

Did I mention that the data entered in this NoSQL fashion is also available from the SQL side of MySQL? Or that the new NoSQL method can access relational data in old-fashioned relational tables? You now have the option to use your MySQL server as a SQL server, a NoSQL server, or both.

Lynis – Automated Security Auditing tool for Linux Servers

$
0
0
https://www.linuxtechi.com/lynis-security-auditing-tool-linux-servers

Today, as we all know that how security is important for servers and network in this era. We spend our most of time to implement our security policy for infrastructure. So here is a question in mind that, is there any automatic tool which can help us to find out the vulnerability for us. So I would like to introduce free and open source tool called Lynis.
Lynis is a one of the popular security auditing tool for Unix and Linux like systems, it can find out malwares and security related vulnerability in Linux based systems.
Lynis-Security-Auditing-Tool
Normally we run so many things on our Linux server like webserver, database server, Email server, FTP server etc. Lynis can make Linux administrator’s life easy by doing the automated security auditing and penetration testing on their all Linux Boxes.
Lynis is free and open source all in one network and Server auditing tool. Once the audit is complete, we can review the results, warnings, and suggestions, and then we can implement our security related policy according to it. It will show reports of a system, that report can be broken into sections.

Why we should use Lynis :

There are numbers of reasons why we should Lynis in our environment, but prominent are listed below:
  • Network and Servers Security Audit
  • Vulnerability detection and scanning
  • System hardening
  • Penetration Testing
Till date Lynis supports multiple operating systems like :
  • RPM Based OS like Red Hat, CentOS and Fedora
  • Debian Based OS like Ubuntu, Linux Mint
  • FreeBS
  • macOS
  • NetBSD
  • OpenBSD
  • Solaris
In this article this article, we will demonstrate how we can install Lynis on a Linux server and how to perform security auditing of a Linux Server.

Installation of Lynis on Linux Server

Lynis is light weight software, it will not break your system and will not affect any application or services which are hosted on your Linux Box
First of all we will create a directory for Lynis installation,
[root@linuxtechi ~]# mkdir /usr/local/lynis
[root@linuxtechi ~]#
Now go to the directory and download latest Lynis source code with the help of wget command
[root@linuxtechi ~]# cd /usr/local/lynis/
[root@linuxtechi lynis]# wget https://downloads.cisofy.com/lynis/lynis-2.6.4.tar.gz
Extract the downloaded Lynis tar.gz file using below command,
[root@linuxtechi lynis]# ll
total 268
-rw-r--r--. 1 root root 273031 May  2 07:45 lynis-2.6.4.tar.gz
[root@linuxtechi lynis]# tar zxpvf lynis-2.6.4.tar.gz
[root@linuxtechi lynis]# ll
total 272
drwxr-xr-x. 6 root root   4096 Jun  1 23:17 lynis
-rw-r--r--. 1 root root 273031 May  2 07:45 lynis-2.6.4.tar.gz
[root@linuxtechi lynis]#
Now Go to the directory lynis, run lynis script what options available. Root user or user with admin privileges can run the script, all logs and output will be saved in /var/log/lynis.log file
root@linuxtechi lynis]# cd lynis
[root@linuxtechi lynis]# ./lynis
Output of above command will be something like below
Lynis-Command-options

Start auditing and find Vulnerabilities

Now we need to start Lynis process, so we must define a ‘audit system’ parameter for scanning whole system.
Run the either of the below command to start the auditing for whole system,
[root@linuxtechi lynis]# ./lynis audit system
Or
[root@linuxtechi lynis]# ./lynis audit system --wait --> (wait for user to hit enter to display report for next section)
Output above command would be something like below:
1)    Initialize Lynis tool
Initialize-lynis-tool
2) System Tool and Boot & Services
system-tool-Boot-services-lynis
3)    Kernel and Memory & Process auditing
Kernel-Memory-Proccess-Lynis
4) User and Group & Authentication
Users-Group-authentication-Audit-Lynis
5) Shells and File System Auditing
Shells-FileSystem-Audit-Lynis
6) USB, Storage, NFS and Name Service Audit
USB-Storage-NFS-Name-Services-Audit-Lynis
7) Port, Packages, Networking and Printers & Spool Audit
Ports-Packages-Networking-Printer-Spools-Audit-lynis
8) Installed Software Audit
Installed-Software-Audit-Lynis
9) SSH Server and SNMP Audit
SSH-SNMP-Audit-Lynis
10) LDAP Service, PHP, Squid and Logging audit
LDAP-PHP-Squid-Logging-Audit-Lynis
11) Insecure Services, Banners, Cron jobs and Accounting audit 
Insecure-service-Banners-Cronjob-Accounting-Audit-Lynis
12) Time Synchronization, Cryptography, Virtualization, Containers and Security Framework Audit
Time Synchronization-Virtualization-Security-frameworks-audit-lynis
13) File Permissions, Malware detection and Home Directory Audit
Malware-detction-File-Permissions-Audit-Lynis
14) Kernel Hardening Audit
Kernel-Hardening-Audit-Lynis
15) Warning and suggestions
Warnings-Suggestion-Lynis
16) Lynis Scan and Audit results
Lynis-Scan-audit-Result
Sometimes we don’t want to scan or audit full system’s Applications or service, So we can audit custom application by category. Let have a look how to perform it,
[root@linuxtechi lynis]# ./lynis show groups
accounting
authentication
banners
boot_services
containers
crypto
databases
dns
file_integrity
file_permissions
filesystems
firewalls
hardening
homedirs
insecure_services
kernel
kernel_hardening
ldap
logging
mac_frameworks
mail_messaging
malware
memory_processes
nameservices
networking
php
ports_packages
printers_spools
scheduling
shells
snmp
squid
ssh
storage
storage_nfs
system_integrity
time
tooling
usb
virtualization
webservers
[root@linuxtechi lynis]#
So now we will get an simple audit of Linux Kernel and database, We will use the command as below.
[root@linuxtechi lynis]# ./lynis  --tests-from-group "databases kernel"
Audit-Specific-Group-Lynis1
Audit-Specific-Group-Lynis2
Audit-Specific-Group-Lynis3
To check more options of lynis command, please refer its man page,
[root@linuxtechi lynis]# ./lynis --man
That’s all from this article, please do share your feedback & comments.

How To Find The Mounted Filesystem Type In Linux

$
0
0
https://www.ostechnix.com/how-to-find-the-mounted-filesystem-type-in-linux

Find The Mounted Filesystem Type In Linux
As you may already know, the Linux supports numerous filesystems, such as Ext4, ext3, ext2, sysfs, securityfs, FAT16, FAT32, NTFS, and many. The most commonly used filesystem is Ext4. Ever wondered what type of filesystem are you currently using in your Linux system? No? Worry not! We got your back. This guide explains how to find the mounted filesystem type in Unix-like operating systems.

Find The Mounted Filesystem Type In Linux

There can be many ways to find the filesystem type in Linux. Here, I have given 8 different methods. Let us get started, shall we?

Method 1 – Using findmnt command

This is the most commonly used method to find out the type of a filesystem. The findmnt command will list all mounted filesystems or search for a filesystem. The findmnt command can be able to search in /etc/fstab, /etc/mtab or /proc/self/mountinfo.
findmnt command comes pre-installed in most Linux distributions, because it is part of the package named util-linux. Just in case if it is not available, simply install this package and you’re good to go. For instance, you can install util-linux package in Debian-based systems using command:
$ sudo apt install util-linux
Let us go ahead and see how to use findmnt command to find out the mounted filesystems.
If you run it without any arguments/options, it will list all mounted filesystems in a tree-like format as shown below.
$ findmnt
Sample output:

As you can see, the findmnt command displays the target mount point (TARGET), source device (SOURCE), file system type (FSTYPE), and relevant mount options, like whether the filesystem is read/write or read-only. (OPTIONS). In my case, my root(/) filesystem type is EXT4.
If you don’t like/want to display the output in tree-like format, use -l flag to display in simple, plain format.
$ findmnt -l

You can also list a particular type of filesystem, for example ext4, using -t option.
$ findmnt -t ext4
TARGET SOURCE FSTYPE OPTIONS
/ /dev/sda2 ext4 rw,relatime,commit=360
└─/boot /dev/sda1 ext4 rw,relatime,commit=360,data=ordered
Findmnt can produce df style output as well.
$ findmnt --df
Or
$ findmnt -D
Sample output:
SOURCE FSTYPE SIZE USED AVAIL USE% TARGET
dev devtmpfs 3.9G 0 3.9G 0% /dev
run tmpfs 3.9G 1.1M 3.9G 0% /run
/dev/sda2 ext4 456.3G 342.5G 90.6G 75% /
tmpfs tmpfs 3.9G 32.2M 3.8G 1% /dev/shm
tmpfs tmpfs 3.9G 0 3.9G 0% /sys/fs/cgroup
bpf bpf 0 0 0 - /sys/fs/bpf
tmpfs tmpfs 3.9G 8.4M 3.9G 0% /tmp
/dev/loop0 squashfs 82.1M 82.1M 0 100% /var/lib/snapd/snap/core/4327
/dev/sda1 ext4 92.8M 55.7M 30.1M 60% /boot
tmpfs tmpfs 788.8M 32K 788.8M 0% /run/user/1000
gvfsd-fuse fuse.gvfsd-fuse 0 0 0 - /run/user/1000/gvfs
You can also display filesystems for a specific device, or mountpoint too.
Search for a device:
$ findmnt /dev/sda1
TARGET SOURCE FSTYPE OPTIONS
/boot /dev/sda1ext4 rw,relatime,commit=360,data=ordered
Search for a mountpoint:
$ findmnt /
TARGET SOURCE FSTYPE OPTIONS
/ /dev/sda2 ext4 rw,relatime,commit=360
You can even find filesystems with specific label:
$ findmnt LABEL=Storage
For more details, refer the man pages.
$ man findmnt
The findmnt command is just enough to find the type of a mounted filesystem in Linux. It is created for that specific purpose only. However, there are also few other ways available to find out the filesystem type. If you’re interested to know, read on.

Method 2 – Using blkid command

The blkid command is used locate and print block device attributes. It is also part of the util-linux package, so you don’t bother to install it.
To find out the type of a filesystem using blkid command, run:
$ blkid /dev/sda1

Method 3 – Using df command

The df command is used to report filesystem disk space usage in Unix-like operating systems. To find the type of all mounted filesystems, simply run:
$ df -T
Sample output:

For details about df command, refer the following guide.
Also, check man pages.
$ man df

Method 4 – Using file command

The file command determines the type of a specified file. It works just fine for files with no file extension.
Run the following command to find the filesystem type of a partition:
$ sudo file -sL /dev/sda1
[sudo] password for sk:
/dev/sda1: Linux rev 1.0 ext4 filesystem data, UUID=83a1dbbf-1e15-4b45-94fe-134d3872af96 (needs journal recovery) (extents) (large files) (huge files)
Check man pages for more details:
$ man file

Method 5 – Using fsck command

The fsck command is used to check the integrity of a filesystem or repair it. You can find the type of a filesystem by passing the partition as an argument like below.
$ fsck -N /dev/sda1
fsck from util-linux 2.32
[/usr/bin/fsck.ext4 (1) -- /boot] fsck.ext4 /dev/sda1
For more details, refer man pages.
$ man fsck

Method 6 – Using fstab Command

fstab is a file that contains static information about the filesystems. This file usually contains the mount point, filesystem type and mount options.
To view the type of a filesystem, simply run:
$ cat /etc/fstab

For more details, refer man pages.
$ man fstab

Method 7 – Using lsblk command

The lsblk command displays the information about devices.
To display info about mounted filesystems, simply run:
$ lsblk -f
NAME FSTYPE LABEL UUID MOUNTPOINT
loop0 squashfs /var/lib/snapd/snap/core/4327
sda
├─sda1 ext4 83a1dbbf-1e15-4b45-94fe-134d3872af96 /boot
├─sda2 ext4 4d25ddb0-5b20-40b4-ae35-ef96376d6594 /
└─sda3 swap 1f8f5e2e-7c17-4f35-97e6-8bce7a4849cb [SWAP]
sr0
For more details, refer man pages.
$ man lsblk

Method 8 – Using mount command

The mount command is used to mount a local or remote filesystems in Unix-like systems.
To find out the type of a filesystem using mount command, do:
$ mount | grep "^/dev"
/dev/sda2 on / type ext4 (rw,relatime,commit=360)
/dev/sda1 on /boot type ext4 (rw,relatime,commit=360,data=ordered)
For more details, refer man pages.
$ man mount
And, that’s all for now folks. You now know 8 different Linux commands to find out the type of a mounted Linux filesystems. If you know any other methods, feel free to let me know in the comment section below. I will check and update this guide accordingly.
More good stuffs to come. Stay tuned!
Cheers!

How to configure encrypted unbound DNS over TLS on CentOS Linux

$
0
0
https://www.dnsknowledge.com/unbound/configure-unbound-dns-over-tls-on-linux

Unbound is a free and open source BSD licensed caching DNS resolver. It also works with DNSSEC and in recursive mode. Coded in C programming language. It means it runs on Linux, Windows, *BSD and Unix-like operating system.

Why use encrypted unbound DNS over TLS on CentOS Linux?

DNS is an old protocol. It was not created with privacy in mind. Anyone can snoop your unencrypted DNS traffic even though connected to privacy and security enhanced HTTPS based web service.

How to see DNS queries sent around the internet in an unencrypted format

Open the terminal application on macOS or Linux based system or your router. Type the following command to capture traffic:
tcpdump -vv -x -X -s 1500 -i 'port 53'
tcpdump -vv -x -X -s 1500 -i br0 'port 53'
tcpdump -vv -x -X -s 1500 -i wifi0 'port 53'
tcpdump -vv -x -X -s 1500 -i eth1 'port 53'

Open another terminal session and type DNS queries:
host google.com 1.1.1.1
host dnsknowledge.com 8.8.8.8

Verify unsecure DNS over Internet in Linux
One can see all DNS queries/data with an unencrypted format (click to enlarge image)

From the above image, it is clear that unencrypted DNS leaks data to anyone who is monitoring your network or Internet connection. In most cases, your ISP will sell data to 3rd parties or they might build a profile about you.

How to install unbound in CentOS Linux 7

Type the following commands:
# yum install epel-release
# yum update
# yum install unbound

Resolving Dependencies
--> Running transaction check
---> Package unbound.x86_64 0:1.6.6-1.el7 will be installed
--> Finished Dependency Resolution
Dependencies Resolved
================================================================================
Package Arch Version Repository Size
================================================================================
Installing:
unbound x86_64 1.6.6-1.el7 base 673 k
Transaction Summary
================================================================================
Install 1 Package
Total download size: 673 k
Installed size: 2.4 M
Is this ok [y/d/N]: y

Turn on service

# systemctl enable unbound
Created symlink from /etc/systemd/system/multi-user.target.wants/unbound.service to /usr/lib/systemd/system/unbound.service.

Configure encrypted unbound DNS over TLS on CentOS Linux

Update /etc/unbound/unbound.conf
# vim /etc/unbound/unbound.conf
Make sure LAN is allowed to access this server:
#control which clients are allowed to make (recursive) queries
access-control: 127.0.0.1/32 allow_snoop
access-control: ::1 allow_snoop
access-control: 127.0.0.0/8 allow
access-control: 192.168.1.0/24 allow

Secure DNS over TLS in Unbound configuration on CentOS

#Adding DNS-Over-TLS support
server:
forward-zone:
name: "."
forward-ssl-upstream: yes
## Cloudflare DNS
forward-addr: 1.1.1.1@853
forward-addr: 1.0.0.1@853
## Also add IBM IPv6 Quad9 over TLS
forward-addr: 9.9.9.9@853
forward-addr: 149.112.112.112@853
## IPv6 Cloudflare DNS over TLS
forward-addr: 2606:4700:4700::1111@853
forward-addr: 2606:4700:4700::1001@853

How do I verifying the certificates of the forwarders with this setup?

The following will only work with the latest version of unbound and not with the current version of unbound server shipped with the CentOS 7.x. Update config as follows:
#Adding DNS-Over-TLS support
server:
tls-cert-bundle: /etc/pki/ca-trust/extracted/pem/tls-ca-bundle.pem
forward-zone:
name: "."
forward-ssl-upstream: yes
## Cloudflare DNS
forward-addr: 1.1.1.1@853#cloudflare-dns.com
forward-addr: 1.0.0.1@853#cloudflare-dns.com
## Also add IBM IPv6 Quad9 over TLS
forward-addr: 9.9.9.9@853#dns.quad9.net
forward-addr: 149.112.112.112@853#dns.quad9.net
## IPv6 Cloudflare DNS over TLS
forward-addr: 2606:4700:4700::1111@853#cloudflare-dns.com
forward-addr: 2606:4700:4700::1001@853#cloudflare-dns.com

Start/restart the service

# systemctl restart unbound

Test it

host google.com your-server-ip-here
host google.com 192.168.1.254

Verify privacy and security settings with the tcpdump

tcpdump -vv -x -X -s 1500 -i 'port 853'
tcpdump -vv -x -X -s 1500 -i br0 'port 853'

After configure encrypted unbound DNS over TLS on CentOS Linux
All dns data encrypted (click to enlarge image)

Conclusion

This quick tutorial showed how encrypting your DNS traffic can help privacy protect your internet browsing. By using Unbound DNS cache server, you are able to allow CentOS Linux 7.x to take advantage of DNS-over-TLS to help encrypt web traffic. I strongly suggest that you use the following pages for more information about using Unbound as a DNS privacy server:
  1. Unbound home page/help page
  2. Verify TLS cert at nlnetlabs when usign DNS over TLS
  3. IBM quad9 home page
  4. Cloudflare DNS home page
Viewing all 1413 articles
Browse latest View live


<script src="https://jsc.adskeeper.com/r/s/rssing.com.1596347.js" async> </script>