Quantcast
Channel: Sameh Attia
Viewing all 1406 articles
Browse latest View live

Linux Directory Structure and Important Files Paths Explained

$
0
0
http://www.tecmint.com/linux-directory-structure-and-important-files-paths-explained

For any person, who does not have a sound knowledge of Linux Operating System and Linux File System, dealing with the files and their location, their use may be horrible, and a newbie may really mess up.
This article is aimed to provide the information about Linux File System, some of the important files, their usability and location.

Linux Directory Structure Diagram

A standard Linux distribution follows the directory structure as provided below with Diagram and explanation.
Linux File System Structure

Linux Directory Structure
Each of the above directory (which is a file, at the first place) contains important information, required for booting to device drivers, configuration files, etc. Describing briefly the purpose of each directory, we are starting hierarchically.
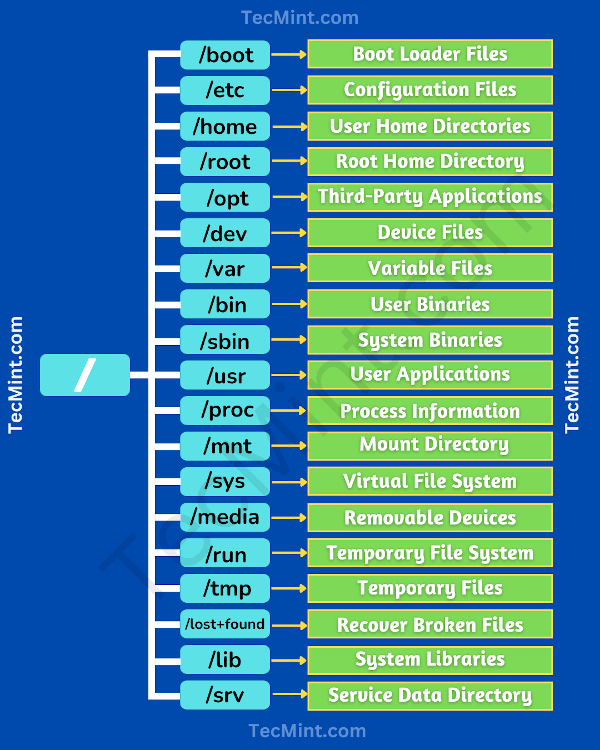
  1. /bin : All the executable binary programs (file) required during booting, repairing, files required to run into single-user-mode, and other important, basic commands viz., cat, du, df, tar, rpm, wc, history, etc.
  2. /boot : Holds important files during boot-up process, including Linux Kernel.
  3. /dev : Contains device files for all the hardware devices on the machine e.g., cdrom, cpu, etc
  4. /etc : Contains Application’s configuration files, startup, shutdown, start, stop script for every individual program.
  5. /home : Home directory of the users. Every time a new user is created, a directory in the name of user is created within home directory which contains other directories like Desktop, Downloads, Documents, etc.
  6. /lib : The Lib directory contains kernel modules and shared library images required to boot the system and run commands in root file system.
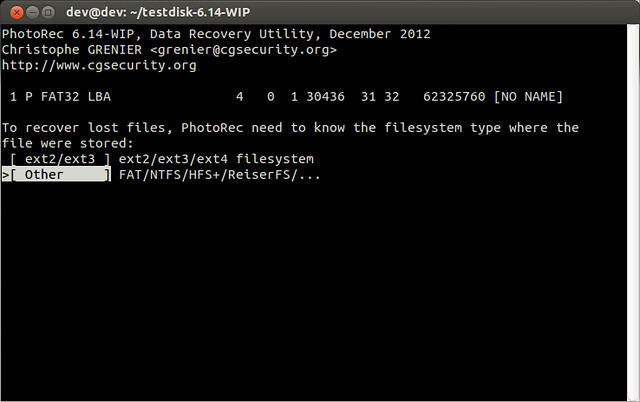
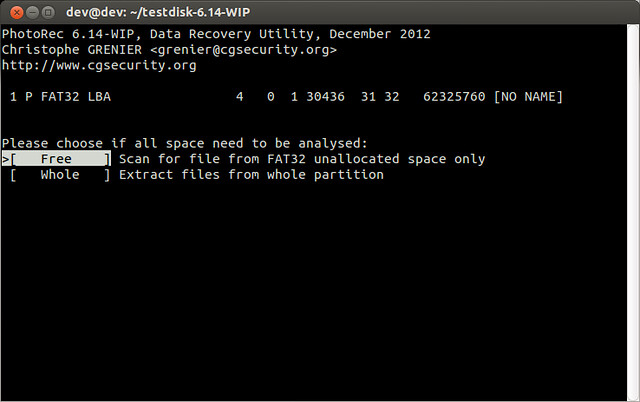
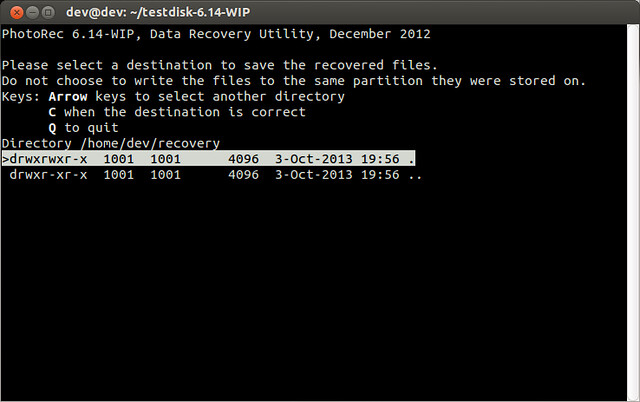
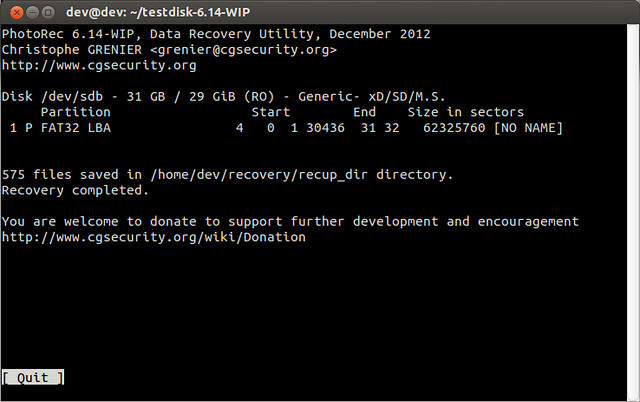
  7. /lost+found : This Directory is installed during installation of Linux, useful for recovering files which may be broken due to unexpected shut-down.
  8. /media : Temporary mount directory is created for removable devices viz., media/cdrom.
  9. /mnt : Temporary mount directory for mounting file system.
  10. /opt : Optional is abbreviated as opt. Contains third party application software. Viz., Java, etc.
  11. /proc : A virtual and pseudo file-system which contains information about running process with a particular Process-id aka pid.
  12. /root : This is the home directory of root user and should never be confused with ‘/
  13. /run : This directory is the only clean solution for early-runtime-dir problem.
  14. /sbin : Contains binary executable programs, required by System Administrator, for Maintenance. Viz., iptables, fdisk, ifconfig, swapon, reboot, etc.
  15. /srv : Service is abbreviated as ‘srv‘. This directory contains server specific and service related files.
  16. /sys : Modern Linux distributions include a /sys directory as a virtual filesystem, which stores and allows modification of the devices connected to the system.
  17. /tmp :System’s Temporary Directory, Accessible by users and root. Stores temporary files for user and system, till next boot.
  18. /usr : Contains executable binaries, documentation, source code, libraries for second level program.
  19. /var : Stands for variable. The contents of this file is expected to grow. This directory contains log, lock, spool, mail and temp files.

Exploring Important file, their location and their Usability

Linux is a complex system which requires a more complex and efficient way to start, stop, maintain and reboot a system unlike Windows. There is a well defined configuration files, binaries, man pages, info files, etc. for every process in Linux.
  1. /boot/vmlinuz : The Linux Kernel file.
  2. /dev/hda : Device file for the first IDE HDD (Hard Disk Drive)
  3. /dev/hdc : Device file for the IDE Cdrom, commonly
  4. /dev/null : A pseudo device, that don’t exist. Sometime garbage output is redirected to /dev/null, so that it gets lost, forever.
  5. /etc/bashrc : Contains system defaults and aliases used by bash shell.
  6. /etc/crontab : A shell script to run specified commands on a predefined time Interval.
  7. /etc/exports : Information of the file system available on network.
  8. /etc/fstab : Information of Disk Drive and their mount point.
  9. /etc/group : Information of Security Group.
  10. /etc/grub.conf : grub bootloader configuration file.
  11. /etc/init.d : Service startup Script.
  12. /etc/lilo.conf : lilo bootloader configuration file.
  13. /etc/hosts : Information of Ip addresses and corresponding host names.
  14. /etc/hosts.allow : List of hosts allowed to access services on the local machine.
  15. /etc/host.deny : List of hosts denied to access services on the local machine.
  16. /etc/inittab : INIT process and their interaction at various run level.
  17. /etc/issue : Allows to edit the pre-login message.
  18. /etc/modules.conf : Configuration files for system modules.
  19. /etc/motd : motd stands for Message Of The Day, The Message users gets upon login.
  20. /etc/mtab : Currently mounted blocks information.
  21. /etc/passwd : Contains password of system users in a shadow file, a security implementation.
  22. /etc/printcap : Printer Information
  23. /etc/profile : Bash shell defaults
  24. /etc/profile.d : Application script, executed after login.
  25. /etc/rc.d : Information about run level specific script.
  26. /etc/rc.d/init.d : Run Level Initialisation Script.
  27. /etc/resolv.conf : Domain Name Servers (DNS) being used by System.
  28. /etc/securetty : Terminal List, where root login is possible.
  29. /etc/skel : Script that populates new user home directory.
  30. /etc/termcap : An ASCII file that defines the behaviour of Terminal, console and printers.
  31. /etc/X11 : Configuration files of X-window System.
  32. /usr/bin : Normal user executable commands.
  33. /usr/bin/X11 : Binaries of X windows System.
  34. /usr/include : Contains include files used by ‘c‘ program.
  35. /usr/share : Shared directories of man files, info files, etc.
  36. /usr/lib : Library files which are required during program compilation.
  37. /usr/sbin : Commands for Super User, for System Administration.
  38. /proc/cpuinfo : CPU Information
  39. /proc/filesystems : File-system Information being used currently.
  40. /proc/interrupts : Information about the current interrupts being utilised currently.
  41. /proc/ioports : Contains all the Input/Output addresses used by devices on the server.
  42. /proc/meminfo : Memory Usages Information.
  43. /proc/modules : Currently using kernel module.
  44. /proc/mount : Mounted File-system Information.
  45. /proc/stat : Detailed Statistics of the current System.
  46. /proc/swaps : Swap File Information.
  47. /version : Linux Version Information.
  48. /var/log/lastlog : log of last boot process.
  49. /var/log/messages : log of messages produced by syslog daemon at boot.
  50. /var/log/wtmp : list login time and duration of each user on the system currently.
That’s all for now. Keep connected to Tecmint for any News and post related to Linux and Foss world. Stay healthy and Don’t forget to give your value-able comments in comment section.

Rsync (Remote Sync): 10 Practical Examples of Rsync Command in Linux

$
0
0
http://www.tecmint.com/rsync-local-remote-file-synchronization-commands

Rsync (Remote Sync) is a most commonly used command for copying and synchronizing files and directories remotely as well as locally in Linux/Unix systems. With the help of rsync command you can copy and synchronize your data remotely and locally across directories, across disks and networks, perform data backups and mirroring between two Linux machines.
Rsync Commands

Rsync Local and Remote File Synchronization
This article explains 10 basic and advanced usage of the rsync command to transfer your files remotely and locally in Linux based machines. You don’t need to be root user to run rsync command.
Some advantages and features of Rsync command
  1. It efficiently copies and sync files to or from a remote system.
  2. Supports copying links, devices, owners, groups and permissions.
  3. It’s faster than scp (Secure Copy) because rsync uses remote-update protocol which allows to transfer just the differences between two sets of files. First time, it copies the whole content of a file or a directory from source to destination but from next time, it copies only the changed blocks and bytes to the destination.
  4. Rsync consumes less bandwidth as it uses compression and decompression method while sending and receiving data both ends.
Basic syntax of rsync command
# rsync options source destination
Some common options used with rsync commands
  1. -v : verbose
  2. -r : copies data recursively (but don’t preserve timestamps and permission while transferring data
  3. -a : archive mode, archive mode allows copying files recursively and it also preserves symbolic links, file permissions, user & group ownerships and timestamps
  4. -z : compress file data
  5. -h : human-readable, output numbers in a human-readable format
Install rsync in your Linux machine
We can install rsync package with the help of following command.
# yum install rsync (On Red Hat based systems)
# apt-get install rsync (On Debian based systems)

1. Copy/Sync Files and Directory Locally

Copy/Sync a File on a Local Computer
This following command will sync a single file on a local machine from one location to another location. Here in this example, a file name backup.tar needs to be copied or synced to /tmp/backups/ folder.
[root@tecmint]# rsync -zvh backup.tar /tmp/backups/

created directory /tmp/backups

backup.tar

sent 14.71M bytes received 31 bytes 3.27M bytes/sec

total size is 16.18M speedup is 1.10
In above example, you can see that if the destination is not already exists rsync will create a directory automatically for destination.
Copy/Sync a Directory on Local Computer
The following command will transfer or sync all the files of from one directory to a different directory in the same machine. Here in this example, /root/rpmpkgs contains some rpm package files and you want that directory to be copied inside /tmp/backups/ folder.
[root@tecmint]# rsync -avzh /root/rpmpkgs /tmp/backups/

sending incremental file list

rpmpkgs/

rpmpkgs/httpd-2.2.3-82.el5.centos.i386.rpm

rpmpkgs/mod_ssl-2.2.3-82.el5.centos.i386.rpm

rpmpkgs/nagios-3.5.0.tar.gz

rpmpkgs/nagios-plugins-1.4.16.tar.gz

sent 4.99M bytes received 92 bytes 3.33M bytes/sec

total size is 4.99M speedup is 1.00

2. Copy/Sync Files and Directory to or From a Server

Copy a Directory from Local Server to a Remote Server
This command will sync a directory from a local machine to a remote machine. For example: There is a folder in your local computer “rpmpkgs” which contains some RPM packages and you want that local directory’s content send to a remote server, you can use following command.
[root@tecmint]$ rsync -avz rpmpkgs/ root@192.168.0.101:/home/

root@192.168.0.101's password:

sending incremental file list

./

httpd-2.2.3-82.el5.centos.i386.rpm

mod_ssl-2.2.3-82.el5.centos.i386.rpm

nagios-3.5.0.tar.gz

nagios-plugins-1.4.16.tar.gz

sent 4993369 bytes received 91 bytes 399476.80 bytes/sec

total size is 4991313 speedup is 1.00
Copy/Sync a Remote Directory to a Local Machine
This command will help you sync a remote directory to a local directory. Here in this example, a directory /home/tarunika/rpmpkgs which is on a remote server is being copied in your local computer in /tmp/myrpms.
[root@tecmint]# rsync -avzh root@192.168.0.100:/home/tarunika/rpmpkgs /tmp/myrpms

root@192.168.0.100's password:

receiving incremental file list

created directory /tmp/myrpms

rpmpkgs/

rpmpkgs/httpd-2.2.3-82.el5.centos.i386.rpm

rpmpkgs/mod_ssl-2.2.3-82.el5.centos.i386.rpm

rpmpkgs/nagios-3.5.0.tar.gz

rpmpkgs/nagios-plugins-1.4.16.tar.gz

sent 91 bytes received 4.99M bytes 322.16K bytes/sec

total size is 4.99M speedup is 1.00

3. Rsync Over SSH

With rsync, we can use SSH (Secure Shell) for data transfer, using SSH protocol while transferring our data you can be ensured that your data is being transferred in a secured connection with encryption so that nobody can read your data while it is being transferred over the wire on the internet.
Also when we use rsync we need to provide the user/root password to accomplish that particular task, so using SSH option will send your logins in an encrypted manner so that your password will be safe.
Copy a File from a Remote Server to a Local Server with SSH
To specify a protocol with rsync you need to give “-e” option with protocol name you want to use. Here in this example, We will be using “ssh” with “-e” option and perform data transfer.
[root@tecmint]# rsync -avzhe ssh root@192.168.0.100:/root/install.log /tmp/

root@192.168.0.100's password:

receiving incremental file list

install.log

sent 30 bytes received 8.12K bytes 1.48K bytes/sec

total size is 30.74K speedup is 3.77
Copy a File from a Local Server to a Remote Server with SSH
[root@tecmint]# rsync -avzhe ssh backup.tar root@192.168.0.100:/backups/

root@192.168.0.100's password:

sending incremental file list

backup.tar

sent 14.71M bytes received 31 bytes 1.28M bytes/sec

total size is 16.18M speedup is 1.10

4. Show Progress While Transferring Data with rsync

To show the progress while transferring the data from one machine to a different machine, we can use ‘–progress’ option for it. It displays the files and the time remaining to complete the transfer.
[root@tecmint]# rsync -avzhe ssh --progress /home/rpmpkgs root@192.168.0.100:/root/rpmpkgs

root@192.168.0.100's password:

sending incremental file list

created directory /root/rpmpkgs

rpmpkgs/

rpmpkgs/httpd-2.2.3-82.el5.centos.i386.rpm

1.02M 100% 2.72MB/s 0:00:00 (xfer#1, to-check=3/5)

rpmpkgs/mod_ssl-2.2.3-82.el5.centos.i386.rpm

99.04K 100% 241.19kB/s 0:00:00 (xfer#2, to-check=2/5)

rpmpkgs/nagios-3.5.0.tar.gz

1.79M 100% 1.56MB/s 0:00:01 (xfer#3, to-check=1/5)

rpmpkgs/nagios-plugins-1.4.16.tar.gz

2.09M 100% 1.47MB/s 0:00:01 (xfer#4, to-check=0/5)

sent 4.99M bytes received 92 bytes 475.56K bytes/sec

total size is 4.99M speedup is 1.00

5. Use of –include and –exclude Options

These two options allows us to include and exclude files by specifying parameters with these option helps us to specify those files or directories which you want to include in your sync and exclude files and folders with you don’t want to be transferred.
Here in this example, rsync command will include those files and directory only which starts with ‘R’ and exclude all other files and directory.
[root@tecmint]# rsync -avze ssh --include 'R*' --exclude '*' root@192.168.0.101:/var/lib/rpm/ /root/rpm

root@192.168.0.101's password:

receiving incremental file list

created directory /root/rpm

./

Requirename

Requireversion

sent 67 bytes received 167289 bytes 7438.04 bytes/sec

total size is 434176 speedup is 2.59

6. Use of –delete Option

If a file or directory not exist at the source, but already exists at the destination, you might want to delete that existing file/directory at the target while syncing .
We can use ‘–delete‘ option to delete files that are not there in source directory.
Source and target are in sync. Now creating new file test.txt at the target.
[root@tecmint]# touch test.txt
[root@tecmint]# rsync -avz --delete root@192.168.0.100:/var/lib/rpm/ .
Password:
receiving file list ... done
deleting test.txt
./
sent 26 bytes received 390 bytes 48.94 bytes/sec
total size is 45305958 speedup is 108908.55
Target has the new file called test.txt, when synchronize with the source with ‘–delete‘ option, it removed the file test.txt.

7. Set the Max Size of Files to be Transferred

You can specify the Max file size to be transferred or sync. You can do it with “–max-size” option. Here in this example, Max file size is 200k, so this command will transfer only those files which are equal or smaller than 200k.
[root@tecmint]# rsync -avzhe ssh --max-size='200k' /var/lib/rpm/ root@192.168.0.100:/root/tmprpm

root@192.168.0.100's password:

sending incremental file list

created directory /root/tmprpm

./

Conflictname

Group

Installtid

Name

Provideversion

Pubkeys

Requireversion

Sha1header

Sigmd5

Triggername

__db.001

sent 189.79K bytes received 224 bytes 13.10K bytes/sec

total size is 38.08M speedup is 200.43

8. Automatically Delete source Files after successful Transfer

Now, suppose you have a main web server and a data backup server, you created a daily backup and synced it with your backup server, now you don’t want to keep that local copy of backup in your web server.
So, will you wait for transfer to complete and then delete those local backup file manually? Of Course NO. This automatic deletion can be done using ‘–remove-source-files‘ option.
[root@tecmint]# rsync --remove-source-files -zvh backup.tar /tmp/backups/

backup.tar

sent 14.71M bytes received 31 bytes 4.20M bytes/sec

total size is 16.18M speedup is 1.10

[root@tecmint]# ll backup.tar

ls: backup.tar: No such file or directory

9. Do a Dry Run with rsync

If you are a newbie and using rsync and don’t know what exactly your command going do. Rsync could really mess up the things in your destination folder and then doing an undo can be a tedious job.
Use of this option will not make any changes only do a dry run of the command and shows the output of the command, if the output shows exactly same you want to do then you can remove ‘–dry-run‘ option from your command and run on the terminal.
root@tecmint]# rsync --dry-run --remove-source-files -zvh backup.tar /tmp/backups/

backup.tar

sent 35 bytes received 15 bytes 100.00 bytes/sec

total size is 16.18M speedup is 323584.00 (DRY RUN)

10. Set Bandwidth Limit and Transfer File

You can set the bandwidth limit while transferring data from one machine to another machine with the the help of ‘–bwlimit‘ option. This options helps us to limit I/O bandwidth.
[root@tecmint]# rsync --bwlimit=100 -avzhe ssh  /var/lib/rpm/  root@192.168.0.100:/root/tmprpm/
root@192.168.0.100's password:
sending incremental file list
sent 324 bytes received 12 bytes 61.09 bytes/sec
total size is 38.08M speedup is 113347.05
Also, by default rsync syncs changed blocks and bytes only, if you want explicitly want to sync whole file then you use ‘-W‘ option with it.
[root@tecmint]# rsync -zvhW backup.tar /tmp/backups/backup.tar
backup.tar
sent 14.71M bytes received 31 bytes 3.27M bytes/sec
total size is 16.18M speedup is 1.10
That’s all with rsync now, you can see man pages for more options. Stay connected with Tecmint for more exciting and interesting tutorials in future. Do leave your comments and suggestions.

Our Favourite Linux Cheat Sheets

$
0
0
http://www.everydaylinuxuser.com/2013/09/our-favourite-linux-cheat-sheets.html

Most Linux system administrators spend their days at the command line, configuring and monitoring their servers through an SSH session. The command line is extremely powerful, but it can be difficult to keep all the options switches and tools in your head. Man pages are only a command away, but they're often not written for quick consultation, so when we're stuck for some of the more arcane options, we reach for the collection of cheat sheets that we've curated over the years.

Even command line masters occasionally need a litte help, and we hope that terminal beginners will find these concise lists useful too. All of these tools are installed by default on a standard Linux box except for Vim and Emacs, which may or may not be available (see the package manager cheat sheets for how to get them).

Server Management

SSH

SSH is the standard tool for connecting securely to remote servers on the command line. (We hope you aren't using Telnet.)

Screen

Screen is a must-have application for those who SSH into multiple servers or who want multiple sessions on the same server. Somewhat akin to a window manager for terminals, screen lets users have multiple command line instances open within the same window.

Bash

Bash is the default shell on most Linux distributions (except Ubuntu, but Dash is almost completely compatible). It's the glue that holds together all the other command line tools, and whether you're on the command line or writing scripts, this Bash cheat sheet will help make you more productive.

Crontab

Cron is a tool for scheduling tasks. The notation is simple but if you don't use it a lot it's easy to forget how to set it to the right times and intervals.

Writing and Manipulating Text

Vim

Vim is a powerful editor, and you'll find it or its older brother Vi on most Linux systems. Vim has a modal interface that can be a bit daunting for newcomers, but once you get to grips with how it works, it's very natural.

Emacs

Emacs is a text editor that throws the "do one thing well" philosophy out of the window. The range of things that Emacs can do is seemingly endless, and a good cheat sheet is necessary for getting to grips with its finger work-out keyboard commands.

Org Mode

As a bonus for the Emacs users out there: check out Org mode. It's a flexible plain text outliner that integrates with Emacs and can be used for planning, to-dos, and writing.

Grep

Getting to grips with grep is essential if you deal with a lot of text files (as almost everyone managing a Linux server will).

SED and AWK

Together Sed and Awk can do just about anything you might want to do with a text file.

Package Management

RPM

Distributions that use RPM for package management, including Fedora, RHEL, and CentOS have a couple of tools to choose from: Yum for high-level package management, and the RPM tool itself for manipulating and querying the package database at a lower level.

Deb Package Management

Debian-based distros like Ubuntu and its derivatives use "apt-get" for general package management, and "dpkg" for direct manipulation of debs.

Cheaters


If you're a regular user of cheat sheets and manage your servers from a Mac, you might want to take a look at Brett Terpstra's cheat sheet app. Cheaters is a collection of scripts that will display an Automator-based pop-up containing a configurable selection of cheat sheets.
Check out the instructions on his site to find out how to integrate the cheat sheets we've covered in this article with Cheaters.

Bossies 2013: The Best of Open Source Software Awards

$
0
0
http://news.techworld.com/applications/3469092/bossies-2013-the-best-of-open-source-software-awards

This year, the annual Bossie Awards recognize 120 of the best open source software for data centers and clouds, desktops and mobile devices, developers and IT pros

What do a McLaren Supercar, a refrigerator, a camera, a washing machine, and a cellphone have to do with open source? They're all examples of how a good pile of code can take on a new life when it's set free with an open source license.

The same forces are turned loose in every corner of business computing, from application development and big data analytics to the software that runs our desktops, data centers, and clouds. This year's edition of our annual Best of Open Source Software Awards rounds up more than 120 top projects in seven categories:
When the Android developers started releasing their operating system in 2007, they just wanted to colonize the world of mobile phones. The iPhone was incredibly popular, and attracting any attention was a challenge. Choosing an open source license was an easy path to partnerships with the phone manufacturers around the world. After all, giving people something free is an easy way to make friends.

In 2013, something unexpected happened: The camera engineers noticed the explosion of creative new software apps for taking photographs with mobile phones. Someone asked, "What if we put Android on our camera?" Now Android cameras with better lenses can leverage the fertile software ecosystem of Android apps.

This is the way that open source software is supposed to work. Developers share, and software proliferates. Is it any surprise that the folks at Samsung are now making an Android refrigerator? Or an Android clothes washer? Or an Android watch? Or that McLaren, the maker of overjuiced cars, wants the radio in its car to run Android? Will there be Android in our doorbells, our cats, and our sofas? Only time and the programmers know. The source code is out there and anyone can install it.

As in years past, this year's collection of Bossie Award winners celebrates this tradition of sharing and cross-fertilization. The open source software ecosystem continues to flourish and grow as old projects continue to snowball while new projects emerge to tackle new needs.

The most successful projects, like Android, are finding new homes in unexpected places, and there seem to be more unexpected places than ever.(( Throughout the Web and the enterprise, open source is less and less the exception and more and more the rule. It's in the server stacks, it's on the desktop, and it's a big, big part of the mobile ecology.

The server stack is growing increasingly open. Much of the software for maintaining our collection of servers is now largely open source thanks to the proliferation of Linux, but the operating system is just the beginning. Almost everything built on top of -- or below -- the operating system is also available as an open source package.

OpenStack is a collection of open source packages that let you build a cloud that rivals Amazon's. If you want your cloud to work the same way Amazon's does, using the same scripts and commands, open source offers that too: Eucalyptus. The cloud companies are using open source's flexibility as a way to lure people into their infrastructures. If things don't work out and you want to leave, open source presumably provides the exit. As Eucalyptus is to Amazon, an OpenStack cloud in your data center should behave like the OpenStack clouds run by Rackspace and HP by answering to the same commands.

The Bossie Awards also focus on an increasingly important layer, the one that keeps all of these machines in the cloud in line. Orchestration tools such as Puppet, Chef, and Salt serve the needs of the harried sys admins who must organize the various servers by making sure they're running the right combination of software, patches, libraries, and extensions. These tools ensure the code will be the right versions, the services will be initialized, and everything will start and stop as it's supposed to do. They automate the tasks that keep the entire cloud in harmony.

Once the machines are configured, another popular layer for the enterprise gets the servers working together on answers to big questions. The cloud is not just for databases and Web serving because more and more complex analytical work is being done by clusters of machines that get spun up to handle big mathematical jobs. Hadoop is a buzzword that refers to both the core software for running massively parallel jobs and the constellation of fat packages that help Hadoop find the answers. Most of these companions are open source too, and a number of them made the list for our awards.

These tools for big data are often closely aligned with the world of NoSQL data stores that offer lightweight storage for extremely large data sets. This next generation of data storage is dominated by open source offerings, and we've recognized several that grew more sophisticated, more stable, and more essential this year. The information for the increasingly social and networked Internet is stored in open source tools.

By the way, the past roles for open source aren't forgotten -- they've simply begun to morph. Some of the awards go to a core of old-fashioned tools that continue to grow more robust. Python, Ruby, WordPress, and the old standard OpenOffice (in a freshly minted version 4) are better and stronger than ever. Firefox -- both the browser and the operating system -- received Bossies, illustrating the enduring strength of the openness of HTML and the World Wide Web.

Some of these new roles are surprising. One of HTML's close cousins or partners in crime, JavaScript, is continuing its bold rush to colonize the server. Node.js, a clever hack designed to repurpose the V8 JavaScript engine by bringing it to the server, is now a flourishing ecosystem of its own. The raw speed of the tool has attracted an explosion of attention, and developers have shared thousands of modules that revise and extend the core server.

What is notable is that many of the newest open source tools are already on the front lines in enterprise shops. The open source ethic began in the labs, where it continues to serve an important role, aligning groups in pre-competitive areas and allowing them to work together without worrying about ownership. A number of important areas of research are advancing through open source blocks of code, and our list of winners includes several projects for studying social networks (Gephi, Neo4j, Giraph, Hama) and constructing statistical models of data (Drill).

Throughout this long list, there continues to be a healthy competition between the different licenses. The most generous and least encumbering options such as the MIT and BSD licenses are generally applied to the tools built by researchers who often aren't ready to commercialize their work. The more polished, productlike tools backed by professional programmers are increasingly being released under tighter rules that force more disclosure. Use of the GPL 3.0 and the AGPL is growing more common as companies look to push more sharing on those who benefit from open source.

Openly commercialThe companies behind open source projects are also becoming more adept at creating tools that exert control and dominance. Many who are drawn into by the lure of open source quickly discover that not everything is as free as it seems. While the code continues to be shared openly, companies often hold something back. Some charge for documentation, others charge for privacy, but all of the successful companies have some secret sauce they use to ensure their role.

Google, for instance, is increasingly flexing its muscle to exert more control by pushing more features into the ubiquitous Play Services. The Android operating system may be free and available under the generous BSD license, but more and more features are appearing in the Play Services layer that's hidden away. The phone companies can customize and enhance the Android layer all they want, but Google maintains control over the Play Services.

This has some advantages. Some developers of Android apps complain about the "matrix of pain," a term that refers to the impossibly wide range of Android devices on the market. Any app that they build should be tested against all of the phones and tablets, both small and large. The Play Services offer some stability in this sea of confusion.

This stability is more and more common in the professional stack as the companies behind the projects find ways to sustain the development. When the software is powering the servers and the apps that power the business, that's what the enterprise customers demand. When the software is running on cars, refrigerators, washing machines, and even mobile phones, that's what the rest of the world needs too.

Most popular open-source projects hosted at GitHub

$
0
0
http://xmodulo.com/2013/09/popular-open-source-projects-hosted-github.html

GitHub is the most popular open source project hosting site. Earlier this year, GitHub reached a milestone in the history of open source project management by hosting 6 million projects over which 3.5 million people collaborate. You may wonder what the hottest open source projects are among those 6 million projects.
In this post, I will describe 20 most popular open source projects that are hosted at GitHub. To rank projects, I use the number of “stars” received by each project as a “popularity” metric. At GitHub, “starring” a project is a way to keep track of projects that you find interesting. So the number of stars added to a project presumably indicates the level of interests in the project among registered GitHub users.
I understand that any kind of “popularity” metric for open source projects would be subjective at best. The value of open source code is in fact very much in the eye of the beholder. With that being said, this post is for introducing nice cool projects that you may not be aware of, and for casual reading to those interested in this kind of tidbits. It is NOT meant for a popularity contest or a competition among different projects.

1. Bootstrap

Bootstrap, which is developed by Twitter, is a powerful front-end framework for web development. Bootstrap contains a collection of HTML/CSS templates and JavaScript extensions to allow you to quickly prototype the front-end UI of websites and web applications.

2. Node.js

Node.js is a server-side JavaScript environment that enables real-time web applications to scale by using asynchronous event-driven model. Node.js uses Google’s V8 JavaScript engine to run its JavaScript. Node.js is the hottest technology used in many production environments including LinkedIn, PayPal, Walmart, Yahoo! and eBay.

3. jQuery

jQuery is a cross-browser JavaScript library designed to simplify the way you write client-side JavaScript. jQuery can handle HTML document traversal, events, animation, AJAX interaction, and much more. According to BuiltWith, jQuery is used by more than 60% of top-ranking websites today.

4. HTML5 Boilerplate

HTML5 Boilerplate is a professional looking front-end template for building fast, robust, and adaptable web sites or web applications in HTML5. If you want to learn HTML5 and CSS3, this is an excellent starting point.

5. Rails

Rails is an open-source framework for developing web applications based on Ruby programming language. Rails is a full-stack framework for developing database-backed web applications, encompassing everything from front-end template rendering to backend database query.

6. D3: Data-Driven Documents

D3.js is a cross-browser JavaScript library for presenting documents with dynamic and interactive graphics driven by data. D3.js can visualize any digital data in W3C-compliant HTML5, CSS3, SVG or JavaScript.

7. Impress.js

Impress.js is a CSS3-based presentation framework that allows you to convert HTML content into a slideshow presentation with stunning visualization and animation. Using impress.js, you can easily create beautiful looking online presentations supported by all modern browsers.

8. Font Awesome

Font Awesome is a suite of scalable vector icons that can be customized in size, color or drop shadow by using CSS. It is designed to be fully compatible with Bootstrap. Font Awesome is completely free for commercial use.

9. AngularJS

AngularJS is a JavaScript framework developed by Google to assist writing client-side web applications with model–view–controller (MVC) capability, so that both development and testing become easier. AngularJS allows you to properly structure web applications by using powerful features such as directives, data binding, filters, modules and scope.

10. Homebrew

Homebrew is package management software for MacOS X. It simplifies installation of other free/open source software that Apples does not ship with MacOS X. As of today, Homebrew has the second largest number of contributors at GitHub (next to Linux kernel source tree by Linus Torvalds).

11. Chosen

Chosen is a jQuery plugin that specializes in creating user-friendly and feature-rich select boxes in HTML. Chosen supports creating single select, multiple select, select with groups, disabled select, etc.

12. Foundation

Foundation is a responsive front-end framework that allows you to easily build websites or applications that run on any kind of mobile devices. Foundation includes layout templates (like a fully responsive grid), elements and best practices.

13. jQuery File Upload

jQuery File Upload is a jQuery plugin that creates a powerful file upload widget. The plugin supports multiple file selection, drag & drop, progress bar, validation, preview images, chunked/resumable uploads, client-side image resizing, etc.

14. Three.js

Three.js is a cross-browser JavaScript library that allows you to create and display lightweight 3D animation and graphics in a web browser without any proprietary browser plugin. It can be used along with HTML5 Canvas, SVG or WebGL.

15. Jekyll

Jekyll is a simple website generator that converts plain texts into static websites or blogs. Without any database, comment moderation, update or installation, it simplifies blog management significantly. It supports permalinks, categories, pages, posts, and custom layouts.

16. Brackets

Brackets is a web code editor written in JavaScript, HTML and CSS, which allows you to edit HTML and CSS. Brackets works directly in your browser, and so you can instantly switch between code editor view and browser view, all within web browser.

17. Oh My Zsh

Oh My Zsh is a community-driven framework for managing ZSH configurations, where contributors contribute their ZSH configurations to GitHub, so that users can grab them. It comes bundled with more than 120 ZSH plugins, themes, functions, etc.

18. Express

Express is a flexible and minimalist web application framework for node.js, offering a set of features for building single-page, multi-page or hybrid web applications.

19. Moment

Moment is a lightweight JavaScript library for parsing, validating, manipulating, and displaying dates in JavaScript.

20. GitLab


GitLab is self hosted Git project management software powered by Ruby on Rails, which allows you host code repositories on your own server. It supports user/access permission, issue tracking, line-comments, code review, etc. GitLab is currently used by more than 25,000 organization to host private code repositories.

user data manifesto

$
0
0
http://userdatamanifesto.org

  user data manifesto  defining basic rights for people to control their own data in the internet age

1. Own the data
The data that someone directly or indirectly creates belongs to the person who created it.
2. Know where the data is stored
Everybody should be able to know: where their personal data is physically stored, how long, on which server, in what country, and what laws apply.
3. Choose the storage location
Everybody should always be able to migrate their personal data to a different provider, server or their own machine at any time without being locked in to a specific vendor.
4. Control access
Everybody should be able to know, choose and control who has access to their own data to see or modify it.
5. Choose the conditions
If someone chooses to share their own data, then the owner of the data selects the sharing license and conditions.
6. Invulnerability of data
Everybody should be able to protect their own data against surveillance and to federate their own data for backups to prevent data loss or for any other reason.
7. Use it optimally
Everybody should be able to access and use their own data at all times with any device they choose and in the most convenient and easiest way for them.
8. Server software transparency
Server software should be free and open source software so that the source code of the software can be inspected to confirm that it works as specified.

Services, projects, software that respects the user data rights and this manifesto. Contact us to have a software or project added to this list.


Supporter:
  • Frank Karlitschek
  • Klaas Freitag
  • Ingo Ebel
  • Georg Ehrke
  • Wolfgang Romey
  • Dan Leinir Turthra Jensen
  • Arthur Schiwon
  • André Crevilaro
  • Ash Crisp
  • Thomas Müller
  • Matt Nunn
  • Michael Gapczynski
  • Felix Rohrbach
  • Claus Christensen
  • Jonas Pfenniger
  • Augusto Destrero
  • Gabor Pusztai
  • Michel Lutynski
  • Carl Symons
  • André Colomb
  • Markus Rex
  • Daniel Devine
  • Victor BONHOMME
  • Jed Ibeftri
  • Diederik de Haas
  • Aaron Seigo
  • Ahmed LADJAL
  • Fabrice Ménard
  • Caleb Cooper
  • Patrick Welch
  • Kevin Ottens
  • Joachim Mairböck
  • Thomas Tanghus Olsen
  • Thomas Baumgart
  • Klaus Weidenbach
  • Aitor Pazos
  • Simon Lees
  • Luis Soeiro
  • Maurizio Napolitano
  • Markus Neteler
  • Stian Viskjer
  • Andy Tow
  • Richard Freytag
  • Stephen Judge
  • Helmut Kudrnovsky
  • Christophe Blondel
  • Etienne Perot
  • Michael Grant
  • Jeffery Benton
  • Eric Berg
  • Bill Barnhill
  • Matthew Cope
  • Mauro Santos
  • Val Miller
  • Kurt Pfeifle
  • Joubin Houshyar
  • Beau Gunderson
  • Ralf Schäfer
  • Georgios Kolokotronis
  • Jeffery MacEachern
  • Margherita Di Leo
  • Dominik Reukauf
  • Oliver Wittenburg
  • Daniel Lee
  • Peter Gasper
  • Mehdi Laouichi
  • John Jolly
  • Tadeas Moravec
  • David Kolibáè
  • Koen Willems
  • Gerlando Gibilaro
  • Robin Lövgren
  • Stewart Johnston
  • Galih Pradhana
  • Luca Brivio
  • Tom Needham
  • Martin Jakl
  • Jan-Christoph Borchardt
  • Peter Daimu
  • Alessandro Cosentino
  • Matt Holman
  • Bart Cornelis
  • David Cullen
  • Luca Delucchi
  • Alessandro Furieri
  • Daniele Galiffa
  • Flavio Rigolon
  • Dario Biazzi
  • Paweł Orzechowski
  • Giovanni Allegri
  • Paolo Corti
  • Iacopo Zetti
  • Alessandro Fanna
  • Amedeo Fadini
  • Paolo Cavallini
  • Hartmut Körber
  • Andrea Ranaldi
  • Martin Klepsch
  • Sebastian Kippe
  • Mathieu Segaud
  • Matti Saastamoinen
  • M. Edwin Zakaria
  • Niklas Cathor
  • Uwe Geuder
  • Chad Cassady
  • Peter Loewe
  • Vaclav Petras
  • Jeremy Malcolm
  • Sebastian Kanschat
  • Walter Lorenzetti
  • Johannes Twittmann
  • Kunal Ghosh
  • Dirk Kutsche
  • Yvonne Mockenhaupt
  • pro-ite GmbH
  • Brice Maron
  • Sven Guckes
  • Hylke Bons
  • Florian Hülsmann
  • Garret Alfert
  • Matteo Bonora
  • Vinzenz Vietzke
  • Nicolas Joyard
  • Drew Pearce
  • Ole-Morten Duesund
  • Zack Tyler
  • Gonçalo Cabrita
  • Kelvin Wong
  • Steffen Fritz
  • Lautaro Silva
  • Björn Schießle
  • Johannes Fürmann
  • Mathieu Carrandié
  • Stefano Iacovella
  • Nicolas Coevoet
  • Arthur Lutz
  • Pavol Rusnak
  • Kjetil.Thuen
  • Austin Seraphin
  • iacopo Spalletti
  • Zach I.
  • Tom Bigelajzen
  • Andy Fuchs
  • Rickie Chung
  • Eder Ruiz Maria
  • Magnus Hoglund
  • Fil
  • Daniel Wunderlich
  • Christian Egle
  • Nelson Saavedra
  • Magnus Anderssen
  • Holger Dyroff
  • Jacob Emcken
  • Jens Ziemann
  • D Waterloo
  • Sam Tuke
  • Simone Balzarotti
  • Samed Beyribey
  • Adil Ilhan
  • Gianluca Massei
  • Anna Kratochvilova
  • Ceyhan Molla
  • Jake Collingwood
  • Osman Alperen Elhan
  • Bora Alper
  • Joey Peso
  • Philippe Hürlimann
  • Wahyu Primadi (LittleOrange)
  • Pierre Alex
  • Vladimir Savić
  • Paul Ortyl
  • Rıza Selçuk Saydam
  • Raghu Nayyar
  • Stefano Costa
  • Francesco de Virgilio
  • Chris Oei
  • emanuela ciccolella
  • Lloyd Watkin
  • Matthias Huisken
  • Andrew Clarke
  • Filipe Cruz
  • Manuel Delgado
  • Andrea Torres
  • Marco Piedra
  • Adrian Patrascu
  • Giovanni Longo, LinuxBird Staff
  • Massimo Donati
  • Atencio Felipe
  • Giuseppe Puliafito
  • Hanns Tappen
  • Ramiro Rivera
  • Renato Rolandi
  • Paul Greindl
  • Michał \"rysiek\" Woźniak
  • Johnson Pau
  • Tomislav Nakic-Alfirevic
  • Mattia Rizzolo
  • YOUNOUSS Abba Soungui
  • Luca Migliorini
  • Nick
  • Postsoftware Movement
  • James Clements
  • Nikolas Sachnikas
  • Nikos Roussos
  • George Giftogiannis
  • Antonio Esposito
  • Ruset Zeno
  • elf Pavlik
  • Jan Wrobel
  • Daniel Harris
  • Kyle Stevenson
  • Andrea Di Marco
  • Florian Jacob
  • Stephen Guerin
  • Jordan Ash (noospheer)
  • Brad Laue
  • David Duncan Ross Palmer
  • Mike Evans
  • Ross Laird
  • Alexander Salnikov
  • hellekin (GNU/consensus)
  • Alan Dawson
  • Daniel E. Renfer
  • Jeremy M Pope
  • Adam Swirkowski
  • Nate Bounds
  • Philipp Steverding
  • Andrija Ljubicic
  • Robert Pollak
  • Alik Barsegian
  • Francz Kafka
  • Julien Rabier
  • Matthias Pfefferle
  • Michael Gisiger
  • Gernot Stangl
  • Peter Laplain
  • Adrien Blanvillain
  • Xavier Gillard
  • Pablo Padilla
  • Taylor Baldwin
  • Martin Steigerwald
  • Aldis Berjoza
  • Michiel de Jong
  • RJ Herrick
  • Oliver Johnston
  • Karl Fischer
  • olia lialina
  • Will Brand
  • Val Anzaldo
  • Michael Dieter
  • Joe Flintham
  • Jack Armitage
  • Anders Carlsson
  • Aram Bartholl
  • Torsten Krill
  • lizvlx
  • Jörn Röder
  • Cristóbal Severin
  • Luis Arce
  • Alexandra Argüelles
  • Ciro Museres
  • Nicolás Narváez
  • Ilian Sapundshiev
  • andrea rota
  • Jari Seppälä
  • Carl Worth
  • Alex Colson
  • Glenn Bakker
  • Ion Martin
  • Chandler Bailey
  • Kim Halavakoski
  • Jan Sarenik
  • Stephan Luckow
  • Sameh Attia

Top 5 Video Editors for Ubuntu/Linux

$
0
0
http://www.techdrivein.com/2013/09/top-5-video-editors-for-ubuntu-linux.html

 Video editing in Linux is a controversial topic. There are a number of video editors for Ubuntu that works quite well. But are they any good for serious movie editing? Perhaps not. But with the arrival of Linux variants from many big-shots such as Lightworks, things are slowly starting to change. Remember the kind of sweeping-change we witnessed in the Linux gaming scene once Valve released their much-touted Steam client for Linux. But that's another story. Here, we'll discuss 5 of the most potent video editors available for Ubuntu. 
lightworks for linux beta
Lightworks is a top notch, professional-grade video/movie editor which recently released a beta version for Linux as well. Lightworks was perhaps one of the firsts to adopt computer-based non-linear editing systems, and has been in development since 1989. The release of an open source version, as well as ports for Linux and Mac OS X were announced in May 2010. Lightworks beta video editor is free to download and use, and their is a PRO paid plan offering which gives you extra features and codec support at $60/year.
best video editors for linux ubuntu

Kdenliveis an open-source, non-linear video editing software available for FreeBSD, Linux and MAC OSX platforms. Kdenlive was one of the earliest to develop a dedicated video editor for Linux with the project starting as early as in 2002. Kdenlive 0.9.4 is available in Ubuntu Software Center by default. But if you want the latest version (Kdenlive 0.9.6 instead), do the following in Terminal. Visit Kdenlive download page for more options.
sudo add-apt-repository ppa:sunab/kdenlive-release
sudo apt-get update
sudo apt-get install kdenlive

top 5 video editors for linux ubuntu

OpenShot is perhaps one of the most active open source video editing software projects out there. In my book, OpenShot is a little more intuitive when compared to its competition. And after a successful Kickstarter funding campaign recently, the team will be launching a Windows and Mac version of OpenShot apart from the normal Linux variant. Add the following PPA to install OpenShot in Ubuntu. More download options here.
sudo add-apt-repository ppa:openshot.developers/ppa
sudo apt-get update
sudo apt-get install openshot openshot-doc

5 best video editors for linux ubuntu

Flowblade Movie Editor is an open source, multitrack and non-linear video editor for Linux. Flowblade is undoubtedly the hottest new entrant into the Linux video editing scene. Project started only last year and there has been just three releases so far. The latest release was Flowblade version 0.10.0 and this happened just two weeks ago. And it is already showing enormous amount of potential. Flowblade is available in DEB packages only at the moment.
top video editing software for linux ubuntu

Cinelerra is a professional video editing and compositing software for Linux which is also open source. Cinelerra was first released August 1, 2002. Cinelerra includes support for very high-fidelity audio and video. The latest version, Cinelerra 4.4, was released more than an year ago and it featured a faster startup and increased responsiveness among other improvements. Cinelerra has plenty of download options. If you're an Ubuntu user, just do the following.

sudo add-apt-repository ppa:cinelerra-ppa/ppa
sudo apt-get update
sudo apt-get install cinelerra-cv

I have deliberately not included Blender here because, even though it can do video editing, Blender is much more than that. Blender is a full blown graphics processing software with advanced 3D modelling capabilities (Tears of Steel was the latest in a long list of official Blender made animation movies). Did we miss out on any other good video editors for Linux? Let us know in the comments. Thanks for reading.

Queueing in the Linux Network Stack

$
0
0
http://www.linuxjournal.com/content/queueing-linux-network-stack

Packet queues are a core component of any network stack or device. They allow for asynchronous modules to communicate, increase performance and have the side effect of impacting latency. This article aims to explain where IP packets are queued on the transmit path of the Linux network stack, how interesting new latency-reducing features, such as BQL, operate and how to control buffering for reduced latency.
Figure 1. Simplified High-Level Overview of the Queues on the Transmit Path of the Linux Network Stack

Driver Queue (aka Ring Buffer)

Between the IP stack and the network interface controller (NIC) lies the driver queue. This queue typically is implemented as a first-in, first-out (FIFO) ring buffer (http://en.wikipedia.org/wiki/Circular_buffer)—just think of it as a fixed-sized buffer. The driver queue does not contain the packet data. Instead, it consists of descriptors that point to other data structures called socket kernel buffers (SKBs, http://vger.kernel.org/%7Edavem/skb.html), which hold the packet data and are used throughout the kernel.
Figure 2. Partially Full Driver Queue with Descriptors Pointing to SKBs
The input source for the driver queue is the IP stack that queues IP packets. The packets may be generated locally or received on one NIC to be routed out another when the device is functioning as an IP router. Packets added to the driver queue by the IP stack are dequeued by the hardware driver and sent across a data bus to the NIC hardware for transmission.
The reason the driver queue exists is to ensure that whenever the system has data to transmit it is available to the NIC for immediate transmission. That is, the driver queue gives the IP stack a location to queue data asynchronously from the operation of the hardware. An alternative design would be for the NIC to ask the IP stack for data whenever the physical medium is ready to transmit. Because responding to this request cannot be instantaneous, this design wastes valuable transmission opportunities resulting in lower throughput. The opposite of this design approach would be for the IP stack to wait after a packet is created until the hardware is ready to transmit. This also is not ideal, because the IP stack cannot move on to other work.

Huge Packets from the Stack

Most NICs have a fixed maximum transmission unit (MTU), which is the biggest frame that can be transmitted by the physical media. For Ethernet, the default MTU is 1,500 bytes, but some Ethernet networks support Jumbo Frames (http://en.wikipedia.org/wiki/Jumbo_frame) of up to 9,000 bytes. Inside the IP network stack, the MTU can manifest as a limit on the size of the packets that are sent to the device for transmission. For example, if an application writes 2,000 bytes to a TCP socket, the IP stack needs to create two IP packets to keep the packet size less than or equal to a 1,500 MTU. For large data transfers, the comparably small MTU causes a large number of small packets to be created and transferred through the driver queue.
In order to avoid the overhead associated with a large number of packets on the transmit path, the Linux kernel implements several optimizations: TCP segmentation offload (TSO), UDP fragmentation offload (UFO) and generic segmentation offload (GSO). All of these optimizations allow the IP stack to create packets that are larger than the MTU of the outgoing NIC. For IPv4, packets as large as the IPv4 maximum of 65,536 bytes can be created and queued to the driver queue. In the case of TSO and UFO, the NIC hardware takes responsibility for breaking the single large packet into packets small enough to be transmitted on the physical interface. For NICs without hardware support, GSO performs the same operation in software immediately before queueing to the driver queue.
Recall from earlier that the driver queue contains a fixed number of descriptors that each point to packets of varying sizes. Since TSO, UFO and GSO allow for much larger packets, these optimizations have the side effect of greatly increasing the number of bytes that can be queued in the driver queue. Figure 3 illustrates this concept in contrast with Figure 2.
Figure 3. Large packets can be sent to the NIC when TSO, UFO or GSO are enabled. This can greatly increase the number of bytes in the driver queue.
Although the focus of this article is the transmit path, it is worth noting that Linux has receive-side optimizations that operate similarly to TSO, UFO and GSO and share the goal of reducing per-packet overhead. Specifically, generic receive offload (GRO, http://vger.kernel.org/%7Edavem/cgi-bin/blog.cgi/2010/08/30) allows the NIC driver to combine received packets into a single large packet that is then passed to the IP stack. When the device forwards these large packets, GRO allows the original packets to be reconstructed, which is necessary to maintain the end-to-end nature of the IP packet flow. However, there is one side effect: when the large packet is broken up, it results in several packets for the flow being queued at once. This "micro-burst" of packets can negatively impact inter-flow latency.

Starvation and Latency

Despite its necessity and benefits, the queue between the IP stack and the hardware introduces two problems: starvation and latency.
If the NIC driver wakes to pull packets off of the queue for transmission and the queue is empty, the hardware will miss a transmission opportunity, thereby reducing the throughput of the system. This is referred to as starvation. Note that an empty queue when the system does not have anything to transmit is not starvation—this is normal. The complication associated with avoiding starvation is that the IP stack that is filling the queue and the hardware driver draining the queue run asynchronously. Worse, the duration between fill or drain events varies with the load on the system and external conditions, such as the network interface's physical medium. For example, on a busy system, the IP stack will get fewer opportunities to add packets to the queue, which increases the chances that the hardware will drain the queue before more packets are queued. For this reason, it is advantageous to have a very large queue to reduce the probability of starvation and ensure high throughput.
Although a large queue is necessary for a busy system to maintain high throughput, it has the downside of allowing for the introduction of a large amount of latency.
Figure 4 shows a driver queue that is almost full with TCP segments for a single high-bandwidth, bulk traffic flow (blue). Queued last is a packet from a VoIP or gaming flow (yellow). Interactive applications like VoIP or gaming typically emit small packets at fixed intervals that are latency-sensitive, while a high-bandwidth data transfer generates a higher packet rate and larger packets. This higher packet rate can fill the queue between interactive packets, causing the transmission of the interactive packet to be delayed.
Figure 4. Interactive Packet (Yellow) behind Bulk Flow Packets (Blue)
To illustrate this behaviour further, consider a scenario based on the following assumptions:
  • A network interface that is capable of transmitting at 5 Mbit/sec or 5,000,000 bits/sec.
  • Each packet from the bulk flow is 1,500 bytes or 12,000 bits.
  • Each packet from the interactive flow is 500 bytes.
  • The depth of the queue is 128 descriptors.
  • There are 127 bulk data packets and one interactive packet queued last.
Given the above assumptions, the time required to drain the 127 bulk packets and create a transmission opportunity for the interactive packet is (127 * 12,000) / 5,000,000 = 0.304 seconds (304 milliseconds for those who think of latency in terms of ping results). This amount of latency is well beyond what is acceptable for interactive applications, and this does not even represent the complete round-trip time—it is only the time required to transmit the packets queued before the interactive one. As described earlier, the size of the packets in the driver queue can be larger than 1,500 bytes, if TSO, UFO or GSO are enabled. This makes the latency problem correspondingly worse.
Large latencies introduced by over-sized, unmanaged queues is known as Bufferbloat (http://en.wikipedia.org/wiki/Bufferbloat). For a more detailed explanation of this phenomenon, see the Resources for this article.
As the above discussion illustrates, choosing the correct size for the driver queue is a Goldilocks problem—it can't be too small, or throughput suffers; it can't be too big, or latency suffers.

Byte Queue Limits (BQL)

Byte Queue Limits (BQL) is a new feature in recent Linux kernels (> 3.3.0) that attempts to solve the problem of driver queue sizing automatically. This is accomplished by adding a layer that enables and disables queueing to the driver queue based on calculating the minimum queue size required to avoid starvation under the current system conditions. Recall from earlier that the smaller the amount of queued data, the lower the maximum latency experienced by queued packets.
It is key to understand that the actual size of the driver queue is not changed by BQL. Rather, BQL calculates a limit of how much data (in bytes) can be queued at the current time. Any bytes over this limit must be held or dropped by the layers above the driver queue.
A real-world example may help provide a sense of how much BQL affects the amount of data that can be queued. On one of the author's servers, the driver queue size defaults to 256 descriptors. Since the Ethernet MTU is 1,500 bytes, this means up to 256 * 1,500 = 384,000 bytes can be queued to the driver queue (TSO, GSO and so forth are disabled, or this would be much higher). However, the limit value calculated by BQL is 3,012 bytes. As you can see, BQL greatly constrains the amount of data that can be queued.
BQL reduces network latency by limiting the amount of data in the driver queue to the minimum required to avoid starvation. It also has the important side effect of moving the point where most packets are queued from the driver queue, which is a simple FIFO, to the queueing discipline (QDisc) layer, which is capable of implementing much more complicated queueing strategies.

Queueing Disciplines (QDisc)

The driver queue is a simple first-in, first-out (FIFO) queue. It treats all packets equally and has no capabilities for distinguishing between packets of different flows. This design keeps the NIC driver software simple and fast. Note that more advanced Ethernet and most wireless NICs support multiple independent transmission queues, but similarly, each of these queues is typically a FIFO. A higher layer is responsible for choosing which transmission queue to use.
Sandwiched between the IP stack and the driver queue is the queueing discipline (QDisc) layer (Figure 1). This layer implements the traffic management capabilities of the Linux kernel, which include traffic classification, prioritization and rate shaping. The QDisc layer is configured through the somewhat opaque tc command. There are three key concepts to understand in the QDisc layer: QDiscs, classes and filters.
The QDisc is the Linux abstraction for traffic queues, which are more complex than the standard FIFO queue. This interface allows the QDisc to carry out complex queue management behaviors without requiring the IP stack or the NIC driver to be modified. By default, every network interface is assigned a pfifo_fast QDisc (http://lartc.org/howto/lartc.qdisc.classless.html), which implements a simple three-band prioritization scheme based on the TOS bits. Despite being the default, the pfifo_fast QDisc is far from the best choice, because it defaults to having very deep queues (see txqueuelen below) and is not flow aware.
The second concept, which is closely related to the QDisc, is the class. Individual QDiscs may implement classes in order to handle subsets of the traffic differently—for example, the Hierarchical Token Bucket (HTB, http://lartc.org/manpages/tc-htb.html). QDisc allows the user to configure multiple classes, each with a different bitrate, and direct traffic to each as desired. Not all QDiscs have support for multiple classes. Those that do are referred to as classful QDiscs, and those that do not are referred to as classless QDiscs.
Filters (also called classifiers) are the mechanism used to direct traffic to a particular QDisc or class. There are many different filters of varying complexity. The u32 filter (http://www.lartc.org/lartc.html#LARTC.ADV-FILTER.U32) is the most generic, and the flow filter is the easiest to use.

Buffering between the Transport Layer and the Queueing Disciplines

In looking at the figures for this article, you may have noticed that there are no packet queues above the QDisc layer. The network stack places packets directly into the QDisc or else pushes back on the upper layers (for example, socket buffer) if the queue is full. The obvious question that follows is what happens when the stack has a lot of data to send? This can occur as the result of a TCP connection with a large congestion window or, even worse, an application sending UDP packets as fast as it can. The answer is that for a QDisc with a single queue, the same problem outlined in Figure 4 for the driver queue occurs. That is, the high-bandwidth or high-packet rate flow can consume all of the space in the queue causing packet loss and adding significant latency to other flows. Because Linux defaults to the pfifo_fast QDisc, which effectively has a single queue (most traffic is marked with TOS=0), this phenomenon is not uncommon.
As of Linux 3.6.0, the Linux kernel has a feature called TCP Small Queues that aims to solve this problem for TCP. TCP Small Queues adds a per-TCP-flow limit on the number of bytes that can be queued in the QDisc and driver queue at any one time. This has the interesting side effect of causing the kernel to push back on the application earlier, which allows the application to prioritize writes to the socket more effectively. At the time of this writing, it is still possible for single flows from other transport protocols to flood the QDisc layer.
Another partial solution to the transport layer flood problem, which is transport-layer-agnostic, is to use a QDisc that has many queues, ideally one per network flow. Both the Stochastic Fairness Queueing (SFQ, http://crpppc19.epfl.ch/cgi-bin/man/man2html?8+tc-sfq) and Fair Queueing with Controlled Delay (fq_codel, http://linuxmanpages.net/manpages/fedora18/man8/tc-fq_codel.8.html) QDiscs fit this problem nicely, as they effectively have a queue-per-network flow.

How to Manipulate the Queue Sizes in Linux

Driver Queue:
The ethtool command (http://linuxmanpages.net/manpages/fedora12/man8/ethtool.8.html) is used to control the driver queue size for Ethernet devices. ethtool also provides low-level interface statistics as well as the ability to enable and disable IP stack and driver features.
The -g flag to ethtool displays the driver queue (ring) parameters:

# ethtool -g eth0
Ring parameters for eth0:
Pre-set maximums:
RX: 16384
RX Mini: 0
RX Jumbo: 0
TX: 16384
Current hardware settings:
RX: 512
RX Mini: 0
RX Jumbo: 0
TX: 256
You can see from the above output that the driver for this NIC defaults to 256 descriptors in the transmission queue. Early in the Bufferbloat investigation, it often was recommended to reduce the size of the driver queue in order to reduce latency. With the introduction of BQL (assuming your NIC driver supports it), there no longer is any reason to modify the driver queue size (see below for how to configure BQL).
ethtool also allows you to view and manage optimization features, such as TSO, GSO, UFO and GRO, via the -k and -K flags. The -k flag displays the current offload settings and -K modifies them.
As discussed above, some optimization features greatly increase the number of bytes that can be queued in the driver queue. You should disable these optimizations if you want to optimize for latency over throughput. It's doubtful you will notice any CPU impact or throughput decrease when disabling these features unless the system is handling very high data rates.
Byte Queue Limits (BQL):
The BQL algorithm is self-tuning, so you probably don't need to modify its configuration. BQL state and configuration can be found in a /sys directory based on the location and name of the NIC. For example: /sys/devices/pci0000:00/0000:00:14.0/net/eth0/queues/tx-0/byte_queue_limits.
To place a hard upper limit on the number of bytes that can be queued, write the new value to the limit_max file:

echo "3000" > limit_max
What Is txqueuelen?
Often in early Bufferbloat discussions, the idea of statically reducing the NIC transmission queue was mentioned. The txqueuelen field in the ifconfig command's output or the qlen field in the ip command's output show the current size of the transmission queue:

$ ifconfig eth0
eth0 Link encap:Ethernet HWaddr 00:18:F3:51:44:10
inet addr:69.41.199.58 Bcast:69.41.199.63 Mask:255.255.255.248
inet6 addr: fe80::218:f3ff:fe51:4410/64 Scope:Link
UP BROADCAST RUNNING MULTICAST MTU:1500 Metric:1
RX packets:435033 errors:0 dropped:0 overruns:0 frame:0
TX packets:429919 errors:0 dropped:0 overruns:0 carrier:0
collisions:0 txqueuelen:1000
RX bytes:65651219 (62.6 MiB) TX bytes:132143593 (126.0 MiB)
Interrupt:23

$ ip link
1: lo: mtu 16436 qdisc noqueue state UNKNOWN
link/loopback 00:00:00:00:00:00 brd 00:00:00:00:00:00
2: eth0: mtu 1500 qdisc pfifo_fast state UP qlen 1000
link/ether 00:18:f3:51:44:10 brd ff:ff:ff:ff:ff:ff
The length of the transmission queue in Linux defaults to 1,000 packets, which is a large amount of buffering, especially at low bandwidths.
The interesting question is what queue does this value control? One might guess that it controls the driver queue size, but in reality, it serves as a default queue length for some of the QDiscs. Most important, it is the default queue length for the pfifo_fast QDisc, which is the default. The "limit" argument on the tc command line can be used to ignore the txqueuelen default.
The length of the transmission queue is configured with the ip or ifconfig commands:

ip link set txqueuelen 500 dev eth0
Queueing Disciplines:
As introduced earlier, the Linux kernel has a large number of queueing disciplines (QDiscs), each of which implements its own packet queues and behaviour. Describing the details of how to configure each of the QDiscs is beyond the scope of this article. For full details, see the tc man page (man tc). You can find details for each QDisc in man tc qdisc-name(for example, man tc htb or man tc fq_codel).
TCP Small Queues:
The per-socket TCP queue limit can be viewed and controlled with the following /proc file: /proc/sys/net/ipv4/tcp_limit_output_bytes.
You should not need to modify this value in any normal situation.

Oversized Queues Outside Your Control

Unfortunately, not all of the over-sized queues that will affect your Internet performance are under your control. Most commonly, the problem will lie in the device that attaches to your service provider (such as DSL or cable modem) or in the service provider's equipment itself. In the latter case, there isn't much you can do, because it is difficult to control the traffic that is sent toward you. However, in the upstream direction, you can shape the traffic to slightly below the link rate. This will stop the queue in the device from having more than a few packets. Many residential home routers have a rate limit setting that can be used to shape below the link rate. Of course, if you use Linux on your home gateway, you can take advantage of the QDisc features to optimize further. There are many examples of tc scripts on-line to help get you started.

Summary

Queueing in packet buffers is a necessary component of any packet network, both within a device and across network elements. Properly managing the size of these buffers is critical to achieving good network latency, especially under load. Although static queue sizing can play a role in decreasing latency, the real solution is intelligent management of the amount of queued data. This is best accomplished through dynamic schemes, such as BQL and active queue management (AQM, http://en.wikipedia.org/wiki/Active_queue_management) techniques like Codel. This article outlines where packets are queued in the Linux network stack, how features related to queueing are configured and provides some guidance on how to achieve low latency.

Acknowledgements

Thanks to Kevin Mason, Simon Barber, Lucas Fontes and Rami Rosen for reviewing this article and providing helpful feedback.

Resources

Controlling Queue Delay: http://queue.acm.org/detail.cfm?id=2209336
Bufferbloat: Dark Buffers in the Internet: http://cacm.acm.org/magazines/2012/1/144810-bufferbloat/fulltext
Bufferbloat Project: http://www.bufferbloat.net
Linux Advanced Routing and Traffic Control How-To (LARTC): http://www.lartc.org/howto

How to access VNC remote desktop in web browser

$
0
0
http://xmodulo.com/2013/09/access-vnc-remote-desktop-web-browser.html

There are many VNC clients available on Linux, differing in their capabilities and operating system support. If you are looking for a cross-platform VNC client, you have two options: use either Java-based VNC viewers (e.g., RealVNC or TightVNC), or web-based VNC clients.
VNC web clients are typically faster than Java-based VNC viewers, and could easily be integrated into other third-party applications.
In this tutorial, I will describe how to access VNC remote desktop in web browser by using VNC web client called noVNC.
noVNC is a HTML5-based remote desktop web client which can communicate with a remote VNC server via Web Sockets. Using noVNC, you can control a remote computer in a web browser over VNC.
noVNC has been integrated into a number of other projects including OpenStack, OpenNebula, CloudSigma, Amahi and PocketVNC.

noVNC Feature List

The following list shows full features offered by noVNC.
  • Supports all modern browsers including those on iOS, Android.
  • Supported VNC encodings: raw, copyrect, rre, hextile, tight, tightPNG
  • WebSocket SSL/TLS encryption (i.e. “wss://”) support
  • 24-bit true color and 8 bit colour mapped
  • Supports desktop resize notification/pseudo-encoding
  • Local or remote cursor
  • Clipboard copy/paste
  • Clipping or scrolling modes for large remote screens

Web Browser Requirements

To run noVNC, your web browser must support HTML5, more specifically HTML5 Canvas and WebSockets. The following browsers meet the requirements: Chrome 8+, Firefox 3.6+, Safari 5+, iOS Safari 4.2+, Opera 11+, IE 9+, and Chrome Frame on IE 6-8. If your browser does not have native WebSockets support, you can use web-socket-js, which is included in noVNC package.
For more detailed browser compatibility, refer to the official guide.

Install noVNC on Linux

To install noVNC remote desktop web client, clone the noVNC GitHub project by running:
$ git clone git://github.com/kanaka/noVNC

Launch Websockify WebSockets Proxy

The first step is to launch Websockify (which comes with noVNC package) on local host. noVNC leverages Websockify to communicate with a remote VNC server. Websockify is a WebSocket to TCP proxy/bridge, which allows a web browser to connect to any application, server or service via local TCP proxy.
I assume that you already set up a running VNC server somewhere. For the purpose of this tutorial, I set up a VNC server at 192.168.1.10:5900 by using x11vnc.
To launch Websockify, use a startup script called launch.sh. This script starts a mini-webserver as well as Websockify. The “--vnc” option is used to specify the location of a remotely running VNC server.
$ cd noVNC
$ ./utils/launch.sh --vnc 192.168.1.10:5900
Warning: could not find self.pem
Starting webserver and WebSockets proxy on port 6080
WebSocket server settings:
- Listen on :6080
- Flash security policy server
- Web server. Web root: /home/xmodulo/noVNC
- No SSL/TLS support (no cert file)
- proxying from :6080 to 192.168.1.10:5900

Navigate to this URL:

http://127.0.0.1:6080/vnc.html?host=127.0.0.1&port=6080

Press Ctrl-C to exit
At this point, you can open up a web browser, and navigate to the URL shown in the output of Websockify (e.g., http://127.0.0.1:6080/vnc.html?host=127.0.0.1&port=6080).
If the remote VNC server requires password authentication, you will see the following screen in your web browser.

After you have successfully connected to a remote VNC server, you will be able to access the remote desktop as follows.

You can adjust the settings of a VNC session by clicking on the settings icon located in the top right corner.

Create Encrypted VNC Session with noVNC

By default a VNC session created by noVNC is not encrypted. If you want, you can create encrypted VNC connections by using the WebSocket ‘wss://’ URI scheme. For that, you need to generate a self-signed encryption certificate (e.g., by using OpenSSL), and have Websockify load the certificate.
To create a self-signed certificate with OpenSSL:
$ openssl req -new -x509 -days 365 -nodes -out self.pem -keyout self.pem
After that, place the certificate in noVNC/utils directory. Then when you run launch.sh, Websockify will automatically load the certificate.

How to access Dropbox from the command line in Linux

$
0
0
http://xmodulo.com/2013/09/access-dropbox-command-line-linux.html

Cloud storage is everywhere in today’s multi-device environment where people want to access content across multiple devices wherever they go. Dropbox is the most widely used cloud storage service due to its elegant UI and flawless multi-platform compatibility. There are numerous official or unofficial Dropbox clients available on multiple platforms.
Linux has its own share of Dropbox clients; CLI clients as well as GUI-based clients. Dropbox Uploader is an easy-to-use Dropbox CLI client written in BASH scripting language. In this tutorial, I describe how to access Dropbox from the command line in Linux by using Dropbox Uploader.

Install and Configure Dropbox Uploader on Linux

To use Dropbox Uploader, download the script and make it executable.
$ wget https://raw.github.com/andreafabrizi/Dropbox-Uploader/master/dropbox_uploader.sh
$ chmod +x dropbox_uploader.sh
Make sure that you have installed curl on your system, since Dropbox Uploader runs Dropbox APIs via curl.
To configure Dropbox Uploader, simply run dropbox_uploader.sh. When you run the script for the first time, it will ask you to grant the script access to your Dropbox account.
$ ./dropbox_uploader.sh

As instructed above, go to https://www2.dropbox.com/developers/apps on your web browser, and create a new Dropbox app. Fill in the information of the new app as shown below, and enter the app name as generated by Dropbox Uploader.

After you have created a new app, you will see app key/secret on the next page. Make a note of them.

Enter the app key and secret in the terminal window where dropbox_uploader.sh is running. dropbox_uploader.sh will then generate an oAUTH URL (e.g., http://www2.dropbox.com/1/oauth/authorize?oauth_token=XXXXXXX).

Go to the oAUTH URL generated above on your web browser, and allow access to your Dropbox account.

This completes Dropbox Uploader configuration. To check whether Dropbox Uploader is successfully authenticated, run the following command.
$ ./dropbox_uploader.sh info
Dropbox Uploader v0.12

> Getting info...

Name: Dan Nanni
UID: XXXXXXXXXX
Email: my@email_address
Quota: 2048 Mb
Used: 13 Mb
Free: 2034 Mb

Dropbox Uploader Examples

To list all contents in the top-level directory:
$ ./dropbox_uploader.sh list
To list all contents in a specific folder:
$ ./dropbox_uploader.sh list Documents/manuals
To upload a local file to a remote Dropbox folder:
$ ./dropbox_uploader.sh upload snort.pdf Documents/manuals
To download a remote file from Dropbox to a local file:
$ ./dropbox_uploader.sh download Documents/manuals/mysql.pdf ./mysql.pdf
To download an entire remote folder from Dropbox to a local folder:
$ ./dropbox_uploader.sh download Documents/manuals ./manuals
To create a new remote folder on Dropbox:
$ ./dropbox_uploader.sh mkdir Documents/whitepapers
To delete an entire remote folder (including all its contents) on Dropbox:
$ ./dropbox_uploader.sh delete Documents/manuals

How to access ssh terminal in web browser on Linux

$
0
0
http://xmodulo.com/2013/09/access-ssh-terminal-web-browser-linux.html

Running “everything” in a web browser used to be a bold statement. However, due to the powerful HTML5/JavaScript stack, a web browser increasingly becomes a dominant application delivery platform. Even the Linux kernel sandboxed in a web browser no longer sounds so crazy these days.
In this tutorial, I describe how to access an SSH terminal in a web browser on Linux. Web-based SSH is useful when the firewall you are behind is so restrictive that only HTTP(s) traffic can get through.
Shell In A Box (or shellinabox) is a web-based terminal emulator which can run as a web-based SSH client. It comes with its own web server (shellinaboxd) which exports a command line shell to a web-based terminal emulator via AJAX interface. Shell In a Box only needs JavaScript/CSS support from a web browser, and does not require any additional browser plugin.

Install Shell In A Box on Linux

To install shellinabox on Debian, Ubuntu or Linux Mint:
$ sudo apt-get install openssl shellinabox
To install shellinabox on Fedora:
$ sudo yum install openssl shellinabox
To install shellinabox on CentOS or RHEL, first enable EPEL repository, and then run:
$ sudo yum install openssl shellinabox

Configure Shellinaboxd Web Server

By default shellinaboxd web server listens on 4200 TCP port on localhost. In this tutorial, I change the default port to 443 for HTTPS. For that, modify shellinabox configuration as follows.
Configure shellinaboxd On Debian, Ubuntu or Linux Mint:
$ sudo vi /etc/default/shellinabox
# TCP port that shellinboxd's webserver listens on
SHELLINABOX_PORT=443

# specify the IP address of a destination SSH server
SHELLINABOX_ARGS="--o-beep -s /:SSH:192.168.1.7"

# if you want to restrict access to shellinaboxd from localhost only
SHELLINABOX_ARGS="--o-beep -s /:SSH:192.168.1.7 --localhost-only"
Configure shellinaboxd On Fedora, CentOS or RHEL:
$ sudo vi /etc/sysconfig/shellinaboxd
# TCP port that shellinboxd's webserver listens on
PORT=443

# specify the IP address of a destination SSH server
OPTS="-s /:SSH:192.168.1.7"

# if you want to restrict access to shellinaboxd from localhost only
OPTS="-s /:SSH:192.168.1.7 --localhost-only"
Heads-up for Fedora users: According to the official document, some operations may not work out of the box when you run shellinaboxd in SELinux mode on Fedora. Refer to the document if you have any issue.

Provision a Self-Signed Certificate

During the installation of Shell In A Box, shellinaboxd attempts to create a new self-signed certificate (certificate.pem) by using /usr/bin/openssl if no suitable certificate is found on your Linux. The created certificate is then placed in /var/lib/shellinabox.
If no certificate is found in the directory for some reason, you can create one yourself as follows.
$ su (change to the root)
# cd /var/lib/shellinabox
# openssl genrsa -des3 -out server.key 1024
# openssl req -new -key server.key -out server.csr
# cp server.key server.key.org
# openssl rsa -in server.key.org -out server.key
# openssl x509 -req -days 365 -in server.csr -signkey server.key -out server.crt
# cat server.crt server.key > certificate.pem

Run Shellinaboxd Web Server

On Debian, Ubuntu or Linux Mint:
$ sudo service shellinabox start
On Fedora, CentOS or RHEL:
$ sudo systemctl enable shellinaboxd.service
$ sudo systemctl start shellinaboxd.service
To verify if shellinaboxd is running:
$ sudo netstat -nap | grep shellinabox
tcp        0      0 0.0.0.0:443             0.0.0.0:*               LISTEN      4787/shellinaboxd
Now open up your web browser, and navigate to https://. You should be able to see a web-based SSH console, and log in to the remote SSH server via web browser interface.

How to recover deleted files on Linux

$
0
0
http://xmodulo.com/2013/10/recover-deleted-files-linux.html

On a typical file system, deleting a file doesn’t necessarily mean that it is gone for good. When a file is removed, its meta data (e.g., file name, size, time, location of data block, etc.) is gone, but actual file data is untouched inside the file system, until the location of the data is overwritten by other file data. This means that if you accidentally deleted a file, there is a chance that you can recover the file.
In this tutorial, I describe how to recover deleted files on Linux. There are several file recovery tools on Linux. Among them is PhotoRec which is an open source file recovery software licensed with GPLV v2+. PhotoRec is available on Linux, BSD, MacOS X and Windows.

PhotoRec Features

As the name implies, PhotoRec is originally designed to restore accidentally deleted digital photos. However, now it has become versatile enough to support various file formats. PhotoRec recovers lost files by checking data blocks one by one against a signature database of different file types.
  • Supported file formats: video (avi, mov, mp3, mp4, mpg), image (jpg, gif, png), audio (mp3, ogg), document (doc(x), ppt(x), xls(x), html), archive (gz, zip) etc.
  • Supported file systems: EXT2, EXT3, EXT4, HFS+, FAT, NTFS, exFAT
Besides hard disks, PhotoRec can restore files stored on CD/DVD drives, USB sticks, memory cards (CompactFlash, Memory Stick, Secure Digital/SD, SmartMedia), etc. So if you accidentally lost digital pictures stored on the memory card of a digital camera, you can use PhotoRec to undelete them.

Install PhotoRec on Linux

The official site offers PhotoRec binaries for various platforms. So you can download static PhotoRec binary for your Linux system.
For 32-bit Linux:
$ wget http://www.cgsecurity.org/testdisk-6.14.linux26.tar.bz2
$ tar xvfvj testdisk-6.14.linux26.tar.bz2
For 64-bit Linux:
$ wget http://www.cgsecurity.org/testdisk-6.14.linux26-x86_64.tar.bz2
$ tar xvfvj testdisk-6.14.linux26-x86_64.tar.bz2
The PhotoRec executable (photorec_static) is found in the extracted directory.

Recover Deleted Photos and Videos

In this tutorial, I demonstrate how to recover deleted photos and video files stored on an SD card, which were generated by Canon EOS Rebel T3i.
When you have removed a file accidentally, what’s important is to NOT save any more files on the same disk drive or memory card, so that you do not overwrite the deleted file.
As soon as you discover the lost files, run PhotoRec to restore them as follows.
$ sudo photorec_static
You will be shown a list of available media. Choose the media where you have deleted files.

Next, choose the partition which contains deleted files.

Choose the file system type used for the partition. In general, you can identify the file system type from the output of mount command. In case of the SD card used by Canon camera, it is formatted in VFAT file system. So choose “Other”.

Choose if all disk space needs to be analyzed. In this case, choose “Free”, which means scanning for unallocated space only.

Choose a destination folder where restored files will be stored. Here you must choose a different partition or drive than the one being analyzed. Press “C” when a destination is chosen.

Now PhotoRec starts reading individual sectors for lost files. You will see the progress of the recovery. Depending on the size of media, it will take a couple of minutes or even longer.

After scanning is completed, the restored files will be stored in the destination folder that you configured. Note that the size of a restored file may be either the same as or larger than the original file size.


Join Fedora 19 to Active Directory Domain using realmd

$
0
0
http://funwithlinux.net/2013/09/join-fedora-19-to-active-directory-domain-realmd

For years, Linux administrators have been successfully using Samba winbind to integrate Linux with Active directory.  While configuring a Linux host to join an Active Directory Domain is pretty simple, it still involves editing a few configuration files manually in most cases.  The new software, realmd, changes all of that, and makes joining a Linux host to an Active Directory Domain easier than ever before!


I have installed F19 stable from Netinstall CD using minimal install, no desktop. Make sure your network and DNS settings are working, obviously.
To successfully join a Windows 2008r2 AD domain using NTLMv2, I have done the following:
yum install realmd
realm discover –verbose example.com

That will tell you what software you need to install (samba-common doesn’t show up, but it will if you try to join a domain and it’s not installed).
yum install sssd oddjob oddjob-mkhomedir adcli samba-common
realm join –client-software=sssd example.com -U mydomainadmin
That should prompt for a password, and if successful, absolutely nothing will be displayed on STDOUT.
To test if you have successfully joined the domain, use
getent passwd EXAMPLE\\mydomainuser
and you should get a long passwd line.
Now, if you want to only allow certain users to log in, you can run the next two commands:
realm deny –all
realm permit mydomainuser@example.com

For more information about logins (including groups!), check out the man page for realm.
Bonus tip:  If you are used to adding AD groups to the sudoers file, the format has changed slightly from RHEL / CentOS 6.  Use the following for groups:
%domain\ admins@example.com ALL=(ALL) ALL
You can skip to the end and leave a response. Pinging is currently not allowed.

Unix: When pipes get names

$
0
0
http://www.itworld.com/operating-systems/375359/unix-when-pipes-get-names

Unix pipes are wonderful because they keep you from having to write intermediate command output to disk (relatively slow) and you don’t need to clean up temporary files afterwards. Once you get the knack, you can string commands together and get a lot of work done with a single line of commands. But there are two types of pipes that you can use when working on a Unix system – regular, unnamed or anonymous pipes and named pipes. These two types of pipes share some advantages, but are used and implemented very differently.

The more common type of pipe allows you to take the output of one command, say ps –ef, and pass it to another command, say grep, to be processed further. Just stick a | between the commands and, voila, you have a pipe and probably some useful output. In fact, you can string together commands and pipes until you run out of things to do with the data you are manipulating. I have seen some clever one-liners with three or four pipes. These pipes exist inside the Unix kernel.

Named pipes, like their unnamed counterparts, allow separate processes to communicate, but they do so by establishing a presence in the file system. They are sometimes referred to as FIFOs. FIFO stands for “first in, first out” and, as you might suspect, these pipes work like a line at the supermarket. If you get in line first, you should be the first to push your shopping cart out to the parking lot. But, unlike unnamed pipes, these pipes can be viewed with the ls command and are created with the mkfifo command.

$ mkfifo mypipe
$ ls -l mypipe
prw-r----- 1 shs geeks 0 Sep 29 2013 mypipe
Notice that the file type is represented by the letter “p” and that the file has no apparent content. Permissions, as with other files, depend on your umask settings and determine who can read or write to your pipe.
Want to try a simple example? Open two ssh sessions to a system. In one, create your pipe and then send some command output to it.
$ mkfifo mypipe
$ cal > mypipe
Don’t worry that your command just seems to hang.
In the other, read from the pipe.
$ cat < mypipe
September 2013
Su Mo Tu We Th Fr Sa
1 2 3 4 5 6 7
8 9 10 11 12 13 14
15 16 17 18 19 20 21
22 23 24 25 26 27 28
29 30
What should pop out of this simple demonstration is how your pipe is able to allow processes running in separate sessions to communicate. Depending on permissions, separate processes run by separate users are just as easy. And, of course, these pipes are reusable. They’ll still be sitting in your file system after your commands have completed.
Run this looping script, sending its output to your pipe.
#!/bin/bash

while true
do
echo "I'm still running"
sleep 10
done
$ ./loop > mypipe
In the second login session, read from your pipe:
$ cat < mypipe
I’m still running
$
As soon as you ^c in the first window, you should see your session go back to the prompt.
I'm still running
I'm still running
$
Depending on what you end up doing with your pipe, you could get a “broken pipe” message in the second window. This means that the input side of the pipe went away too quickly
You can also write scripts or run commands that wait for output from a named before taking the next step – as in this example. In one session, do this:
$ if read line  echo this is a test
> fi
Again, the session seems to freeze. But then send something through the pipe from the other session and you’ll be back at the prompt:
$ echo hello > mypipe
Check on your first window again and you should see something like this:
$ if read line  echo this is a test
> fi
this is a test
Named pipes are especially useful if many processes are going to read from and write to your pipes or when processes need to send a lot of information, especially a variety of data, to other processes. You can look for named pipes on your systems using a command such as this:
$ find / -type p -print 2> /dev/null
Don't be surprised if you find only a handful. Named pipes can be extremely handy, but they're not heavily used on most Unix systems.

How to measure memory usage in Linux

$
0
0
http://www.openlogic.com/wazi/bid/315941/how-to-measure-memory-usage-in-linux


Whether you are a system administrator or a developer, sometimes you need to consider the use of memory in GNU/Linux processes and programs. Memory is a critical resource, and limited memory plus processes that use a lot of RAM can cause a situation where the kernel goes out of memory (OOM). In this state Linux activates an OOM killer kernel process that attempts to recover the system by terminating one or more low-priority processes. Which processes the system kills is unpredictable, so though the OOM killer may keep the server from going down, it can cause problems in the delivery of services that should stay running.
In this article we'll look at three utilities that report information about the memory used on a GNU/Linux system. Each has strengths and weaknesses, with accuracy being their Achilles' heel. I'll use CentOS 6.4 as my demo system, but these programs are available on any Linux distribution.

ps

ps displays information about active processes, with a number of custom fields that you can decide to show or not. For the purposes of this article I'll focus on how to display information about memory usage. ps shows the percentage of memory that is used by each process or task running on the system, so you can easily identify memory-hogging processes.
Running ps aux shows every process on the system. Typical output looks something like this:
USER PID %CPU %MEM VSZ RSS TTY STAT START TIME COMMAND
root 1 0.0 0.0 19228 1488 ? Ss 18:59 0:01 /sbin/init
root 2 0.0 0.0 0 0 ? S 18:59 0:00 [kthreadd]
root 3 0.0 0.0 0 0 ? S 18:59 0:00 [migration/0]
...
...
root 742 0.0 0.0 0 0 ? S 19:00 0:00 [ext4-dio-unwrit]
root 776 0.0 0.0 0 0 ? S 19:00 0:00 [kauditd]
root 785 0.0 0.0 0 0 ? S 19:00 0:00 [flush-253:0]
root 939 0.0 0.0 27636 808 ? S
If you are searching for memory hogs, you probably want to sort the output. The --sort argument takes key values that indicate how you want to order the output. For instance, ps aux --sort -rss
sorts by resident set size, which represents the non-swapped physical
memory that each taskuses. However, RSS can be misleading and may show a
higher value than the real one if pages are shared, for example by
several threads or by dynamically linked libraries.


You can also use -vsz– virtual set size – but it does
not reflect the actual amount of memory used by applications, but rather
the amount of memory reserved for them, which includes the RSS value.
You usually won't want to use it when searching for processes that eat
memory.


ps -aux alone isn't enough to tell you if a process is thrashing, but if your system is thrashing, it will help you identify the processes that are experiencing the biggest hits.


top


The top command displays a dynamic real-time view of
system information and the running tasks managed by the Linux kernel.
The memory usage stats include real-time live total, used, and free
physical memory and swap memory, with buffers and cached memory size
respectively. Type top at the command line to see a constantly updated stats page:


top – 19:56:33 up 56 min, 2 users, load average: 0.00, 0.00, 0.00
Tasks: 67 total, 1 running, 66 sleeping, 0 stopped, 0 zombie
Cpu(s): 4.4%us, 1.7%sy, 0.2%ni, 88.7%id, 5.0%wa, 0.0%hi, 0.0%si, 0.0%st
Mem: 1922680k total, 851808k used, 1070872k free, 19668k buffers
Swap: 4128760k total, 0k used, 4128760k free, 692716k cached

PID USER PR NI VIRT RES SHR S %CPU %MEM TIME+ COMMAND
1 root 20 0 19228 1488 1212 S 0.0 0.1 0:01.29 init
2 root 20 0 0 0 0 S 0.0 0.0 0:00.00 kthreadd
3 root RT 0 0 0 0 S 0.0 0.0 0:00.00 migration/0
4 root 20 0 0 0 0 S 0.0 0.0 0:00.17 ksoftirqd/0
5 root RT 0 0 0 0 S 0.0 0.0 0:00.00 migration/0
6 root RT 0 0 0 0 S 0.0 0.0 0:00.01 watchdog/0
7 root 20 0 0 0 0 S 0.0 0.0 0:01.27 events/0
8 root 20 0 0 0 0 S 0.0 0.0 0:00.00 cgroup
9 root 20 0 0 0 0 S 0.0 0.0 0:00.00 khelper
10 root 20 0 0 0 0 S 0.0 0.0 0:00.00 netns
11 root 20 0 0 0 0 S 0.0 0.0 0:00.00 async/mgr
12 root 20 0 0 0 0 S 0.0 0.0 0:00.00 pm
....
In top memory is mapped as VIRT, RES, and SHR:
  • VIRT is the virtual size of a process, which is the sum of the memory it is actually using, memory it has mapped into itself (for instance a video cards's RAM for the X server), files on disk that have been mapped into it (most notably shared libraries), and memory shared with other processes. VIRT represents how much memory the process is able to access at the present moment.
  • RES is the resident size, which is an accurate representation of how much actual physical memory a process is consuming. (This number corresponds directly to top's %MEM column.) This amount will virtually always be less than the VIRT size, since most programs depend on the C library.
  • SHR indicates how much of the VIRT size is actually sharable, so it includes memory and libraries that could be shared with other processes. In the case of libraries, it does not necessarily mean that the entire library is resident. For example, if a program only uses a few functions in a library, the whole library is mapped and counted in VIRT and SHR, but only the parts of the library file that contain the functions being used are actually loaded in and counted under RES.
Some of these numbers can be a little misleading. For instance, if you have a website that use PHP, and in particular php-fpm, you could see something like:
top – 14:15:34 up 2 days, 12:38, 1 user, load average: 0.97, 1.03, 0.93
Tasks: 124 total, 1 running, 123 sleeping, 0 stopped, 0 zombie
Cpu(s): 4.9%us, 0.3%sy, 0.0%ni, 94.6%id, 0.0%wa, 0.0%hi, 0.1%si, 0.1%st
Mem: 1029508k total, 992140k used, 37368k free, 150404k buffers
Swap: 262136k total, 2428k used, 259708k free, 551500k cached

PID USER PR NI VIRT RES SHR S %CPU %MEM TIME+ COMMAND
6695 www-data 20 0 548m 307m 292m S 0 30.6 8:06.55 php-fpm
6697 www-data 20 0 547m 306m 292m S 0 30.4 7:59.64 php-fpm
6691 www-data 20 0 547m 305m 291m S 2 30.4 8:04.96 php-fpm
6689 www-data 20 0 547m 305m 291m S 2 30.3 8:07.55 php-fpm
6696 www-data 20 0 540m 298m 292m S 1 29.7 8:13.43 php-fpm
6705 www-data 20 0 540m 298m 292m S 0 29.7 8:17.24 php-fpm
6699 www-data 20 0 540m 298m 291m S 4 29.7 8:07.39 php-fpm
6701 www-data 20 0 541m 297m 289m S 0 29.6 7:59.87 php-fpm
6700 www-data 20 0 540m 297m 290m S 0 29.5 8:09.92 php-fpm
6694 www-data 20 0 541m 296m 288m S 2 29.5 8:05.18 php-fpm
6707 www-data 20 0 541m 296m 288m S 0 29.5 8:09.40 php-fpm
6692 www-data 20 0 541m 296m 289m S 0 29.5 8:14.23 php-fpm
6706 www-data 20 0 541m 296m 289m S 3 29.5 8:07.59 php-fpm
6698 www-data 20 0 541m 295m 288m S 4 29.4 8:04.85 php-fpm
6704 www-data 20 0 539m 295m 289m S 2 29.4 8:13.58 php-fpm
6708 www-data 20 0 540m 295m 288m S 1 29.4 8:14.27 php-fpm
6802 www-data 20 0 540m 295m 288m S 3 29.3 8:11.63 php-fpm
6690 www-data 20 0 541m 294m 287m S 3 29.3 8:14.54 php-fpm
6693 www-data 20 0 539m 293m 287m S 2 29.2 8:16.33 php-fpm
6702 www-data 20 0 540m 293m 286m S 0 29.2 8:12.41 php-fpm
8641 www-data 20 0 540m 292m 285m S 4 29.1 6:45.87 php-fpm
8640 www-data 20 0 539m 291m 285m S 2 29.0 6:47.01 php-fpm
6703 www-data 20 0 539m 291m 285m S 2 29.0 8:17.77 php-fpm
Is it possible that all these processes use around 30 percent of the total memory of the system? Yes it is, because they use a lot of shared memory – and this is why you cannot simply add the %MEM number for all of the processes to see how much of the total memory they use.

smem

While you'll find ps and top in any distribution, you probably won't find smem until you install it yourself. This command reports physical memory usage, taking shared memory pages into account. In its output, unshared memory is reported as the unique set size (USS). Shared memory is divided evenly among the processes that share that memory. The USS plus a process's proportion of shared memory is reported as the proportional set size (PSS).
USS and PSS include only physical memory usage. They do not include memory that has been swapped out to disk.
To install smem under Debian/Ubuntu Linux, type the following command:
$ sudo apt-get install smem
There is no smem package in the standard repository for CentOS or other Red Hat-based Linux distributions, but you can get it with the following commands:
# cd /tmp
# wget http://www.selenic.com/smem/download/smem-1.3.tar.gz
# tar xvf smem-1.3.tar.gz
# cp /tmp/smem-1.3/smem /usr/local/bin/
# chmod +x /usr/local/bin/smem
Once it's installed, type smem on the command line to get output like this:
PID User Command Swap USS PSS RSS 
1116 root /sbin/mingetty /dev/tty6 0 76 110 568
1105 root /sbin/mingetty /dev/tty2 0 80 114 572
1109 root /sbin/mingetty /dev/tty4 0 80 114 572
1111 root /sbin/mingetty /dev/tty5 0 80 114 572
1107 root /sbin/mingetty /dev/tty3 0 84 118 576
939 root auditd 0 336 388 808
1205 root dhclient eth0 0 564 571 688
1103 root login -- root 0 532 749 1680
1090 root crond 0 704 784 1420
1 root /sbin/init 0 736 813 1488
1238 root -bash 0 380 856 1924
1283 root /usr/sbin/sshd 0 676 867 1152
1135 root -bash 0 392 868 1932
426 root /sbin/udevd -d 0 948 973 1268
955 root /sbin/rsyslogd -i /var/run/ 0 996 1069 1628
1080 root /usr/libexec/postfix/master 0 984 1602 3272
1089 postfix qmgr -l -t fifo -u 0 1032 1642 3284
1234 root sshd: root@pts/0 0 1772 2328 3912
19319 postfix pickup -l -t fifo -u 0 2376 2738 3276
19352 root python ./smem 0 5756 6039 6416
As you can see, for each process smem shows four interesting fields:
  • Swap– The swap space used by that process.
  • USS– The amount of unshared memory unique to that process – think of it as unique memory. It does not include shared memory, so it underreports the amount of memory a process uses, but this column is helpful when you want to ignore shared memory. This column indicates how much RAM would be immediately freed up if this process exited.
  • PSS– This is the most valuable column. It adds together the unique memory (USS) and a proportion of shared memory derived by dividing total shared memory by the number of other processes sharing that memory. Thus it will give you an accurate representation of how much actual physical memory is being used per process, with shared memory truly represented as shared. Think of it as physical memory.
  • RSS– Resident Set Size, which is the amount of shared memory plus unshared memory used by each process. If any processes share memory, this will overreport the amount of memory actually used, because the same shared memory will be counted more than once, appearing again in each other process that shares the same memory. Thus it is an unreliable number, especially when high-memory processes have a lot of forks.

Now what?

Each of these memory utilities has some pros and cons. ps and top can be useful, but you have to understand what the numbers they show mean. smem is the rookie here, but it shows the most interesting information about your programs, and you can use it with the parameter -u to show the total memory used by all your users – an interesting feature on multiuser systems.
Now that you have the tools to discover what's eating up your memory, what you should do about it?
If you are a developer and you have found that your program is at fault, that's good news! You can work on the code and use a debugger to find out which function, call, or procedure is using all that memory.
If the process or program that eats up most of your memory is a daemon, such as Apache, MySQL, or nginx, you can search online for information that explains how to tweak the parameters of that daemon to save RAM.
When your uber-optimized Java web app becomes so popular that your server can't serve all your users, sometimes the only thing to do is add more RAM. This should be your last alternative, after you have checked all the other steps. If this happens, don't be sad – it means that your application is a big success!

Helpful resources

Understanding memory usage on LinuxOOM KillerLinux memory managementThread about Linux memory

Grive – A Command Line Based [Unofficial] Google Drive Client For Linux

$
0
0
http://mylinuxbook.com/grive-a-command-line-google-drive-client-for-linux-2

With Linux users still waiting for an official Google drive client, there are some unofficial clients that are being used by the Linux community. In this 4-part series, we will cover four different unofficial Google drive clients that you can use till an official client is release by the search engine giant. In this article, we will discuss about a command line google drive client for Linux — Grive.

Grive

grive-main
A snapshot from the man page of Grive
Grive is an open source Google drive client for Linux that is developed in C++ programming language and is released under GPLv2 license. It uses Google Document List API for its interaction with Google servers.

Testing Environment

  • OS– Ubuntu 13.04
  • Shell– Bash (4.2.45)
  • Application– Grive 0.2.0-1

A Brief Tutorial

Once installed, follow these steps to get started with this google drive client :
  1. Create a folder (let’s say gDrive) in your home directory –> mkdir ~/gDrive
  2. Change your current directory to gDrive –> cd gDrive
  3. Run the authorization token command inside the same directory –> grive -a
Ideally the step-3 (mentioned above) should kick-start the authentication process but because of this known BUG in Ubuntu 13.04, I got the following error :
grive-1
As a workaround (mentioned in the comments under the bug report), I tried the following command :
grive-2
After this work around, I repeated the step-3 again and this time the authorization process started. Firstly, a very long URL was produced in output which the user is supposed to open in a web browser. So, I copied it.
grive-3
and then opened it in Firefox web browser.
grive-4
After accepting the terms and conditions, I was presented with the a code:
grive-5
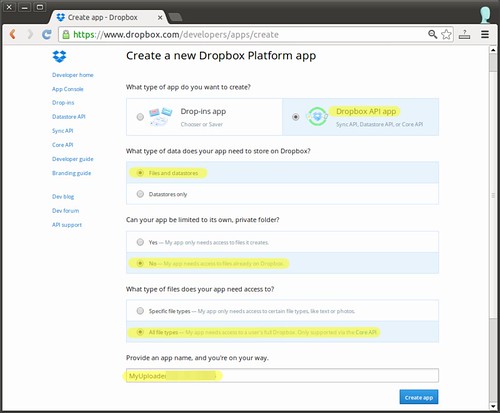
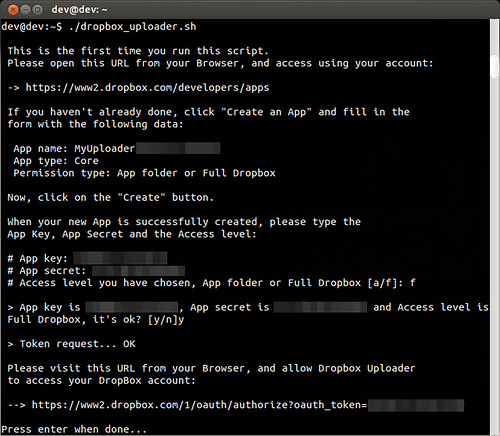
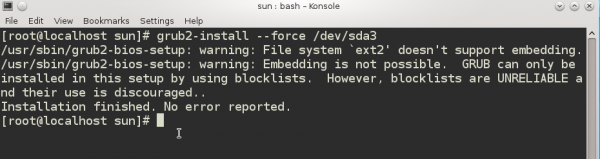
As instructed, I copied the code on the command prompt
grive-6
and the authentication process completed. Gdrive then automatically started syncing the files from my google drive account.
grive-7
and it continued doing so until it finished the syncing process.
grive-8
After the syncing process completed, I could see all the google drive files in my folder gDrive.
Now, it was the time to test this command line application, so I created a test file named test_grive.txt in the folder gDrive and executed the command grive (to initiate syncing process, -a option is not required now) from the same directory.
grive-9
Once the file was synced, I opened the web interface of my google drive to confirm whether the file was really synced or not.
grive-10
As you can see, the file test_grive.txt was actually synced back to the google drive.
NOTE– Grive does not sync with google drive servers automatically. You can either create a cron job or create an alias of ‘cd ~/grive && grive‘ to let this command line application sync with google drive servers.

Download/Install

Here are some of the important links related to this application:
Ubuntu users can also download Grive from Ubuntu Software Centre.

Pros

  • Can download as well as upload the changes.
  • Being command line based, It offers quick syncing with the google drive servers
  • It can be extended easily as it is open source.

Cons

  • File and folders with multiple parents are not supported.
  • Downloading Google documents is also not supported.

Conclusion

Grive is a good command line alternative for those who are still waiting for an official Google drive client. It does basic (download, upload) stuff neatly and can be used for day-to-day work. You can give it a try, it won’t disappoint you.

Complete Frameworks for Quick Styling of Websites

$
0
0
http://www.linuxlinks.com/article/20131005021535977/Frameworks.html

A framework for the quick development of websites is a structure of files and folders of standardized code (HTML, CSS, JS documents, and more). These frameworks provide a basis to start building a web site.
These front-end UI frameworks also enable users to dive into responsive site design. This type of design was inspired from the concept of responsive architecture, a class of architecture or building that demonstrates an ability to alter its form, to continually reflect the environmental conditions that surround it. In a similar way, a responsive web design seeks to accomodate the limitations of the device being used. This includes, but is not limited to, the screen dimensions of the device. Offering a good presentation experience with a minimum of resizing, panning and scrolling across a wide range of devices is the key virtue of responsive design.
There are hundreds of devices that are used to access the web. These devices have different capabilities and constraints, such as screen dimensions, input style, resolution, and form. As more and more users access the web through different devices, in particular tablets and smartphones, developers need tools to build websites. The important of catering for different devices should not be underestimated. After all, in a few countries, mobile web traffic has already overtaken traffic from traditional computers.
There are a number of options available for developers. Some developers may wish to build special dedicated sites for mobile devices. However, this is a time consuming solution. A more attractive route is to build a responsive site usable on all devices, with the site design changing on the fly depending on the screen resolution and size of the device. Responsive design is the way forward for making web sites accessible to mobile users.
The purpose of this article is to list the finest open source software that lets you dive into responsive design. The software presented here makes it easy to get started with responsive design. Pre-built frameworks get designers up to speed with a limited methodology rather than spending time building an intimate knowledge of CSS positioning. The code is portable, and can be output to documents in a wide array of formats.
Now, let's explore the 7 frameworks at hand. For each title we have compiled its own portal page, a full description with an in-depth analysis of its features, together with links to relevant resources and reviews.
Responsive web design
Twitter BootstrapSleek, intuitive, and powerful mobile front-end framework
FoundationAdvanced responsive front-end framework
InkSet of tools for quick development of web interfaces
GumbyAmazing responsive CSS framework
YAMLModular CSS framework for flexible, accessible and responsive websites
Gravity FrameworkSASS based front-end developer framework
GroundworkCSSFully responsive HTML5, CSS and Javascript toolkit
Return to our complete collection of Group Tests, identifying the finest Linux software.

Setting up Flashcache the hard way and some talk about initramfs Text

$
0
0
http://blog.viraptor.info/post/45310603661/setting-up-flashcache-the-hard-way-and-some-talk-about

If you follow the latest versions of… everything and tried to install flashcache you probably noticed that none of the current guides are correct regarding how to install it. Or they are mostly correct but with some bits missing. So here’s an attempt to do a refreshed guide. I’m using kernel version 3.7.10 and mkinitcpio version 0.13.0 (this actually matters, the interface for adding hooks and modules has changed).
Some of the guide is likely to be Arch-specific. I don’t know how much, so please watch out if you’re using another system. I’m going to explain why things are done the way they are, so you can replicate them under other circumstances.

Why flashcache?

First, what do I want to achieve? I’m setting up a system which has a large spinning disk (300GB) and a rather small SSD (16GB). Why such a weird combination? Lenovo allowed me to add a free 16GB SSD drive to the laptop configuration - couldn’t say no ;) The small disk is not useful for a filesystem on its own, but if all disk writes/reads were cached on it before writing them back to the platters, it should give my system a huge performance gain without a huge money loss. Flashcache can achieve exactly that. It was written by people working for Facebook to speed up their databases, but it works just as well for many other usage scenarios.
Why not other modules like bcache or something else dm-based? Because flashcache does not require kernel modifications. It’s just a module and a set of utilities. You get a new kernel and they “just work” again - no source patching required. I’m excited about the efforts for making bcache part of the kernel and for the new dm cache target coming in 3.9, but for now flashcache is what’s available in the easiest way.
I’m going to set up two SSD partitions because I want to cache two real partitions. There has to be a persistent 1:1 mapping between the cache and real storage for flashcache to work. One of the partitions is home (/home), the other is the root (/).

Preparation

Take backups, make sure you have a bootable installer of your system, make sure you really want to try this. Any mistake can cost you all the contents of your harddrive or break your grub configuration, so that you’ll need an alternative method of accessing your system. Also some of your “data has been written” guarantees are going to disappear. You’ve been warned.

Building the modules and tools

First we need the source. Make sure your git is installed and clone the flashcache repository: https://github.com/facebook/flashcache
Then build it, specifying the path where the kernel source is located - in case you’re in the middle of a version upgrade, this is the version you’re compiling for, not the one you’re using now:
make KERNEL_TREE=/usr/src/linux-3.7.10-1-ARCH KERNEL_SOURCE_VERSION=3.7.10-1-ARCH
sudo make KERNEL_TREE=/usr/src/linux-3.7.10-1-ARCH KERNEL_SOURCE_VERSION=3.7.10-1-ARCH install
There should be no surprises at all until now. The above should install a couple of things - the module and 4 utilities:
/usr/lib/modules/<version>/extra/flashcache/flashcache.ko
/sbin/flashcache_load
/sbin/flashcache_create
/sbin/flashcache_destroy
/sbin/flashcache_setioctl
The module is the most interesting bit at the moment, but to load the cache properly at boot time, we’ll need to put those binaries on the ramdisk.

Configuring ramdisk

Arch system creates the ramdisk using mkinitcpio (which is a successor to initramfs (which is a successor to initrd)) - you can read some more about it at Ubuntu wiki for example. The way this works is via hooks configured in /etc/mkinitcpio.conf. When the new kernel gets created, all hooks from that file are run in the defined order to build up the contents of what ends up in /boot/initramfs-linux.img (unless you changed the default).
The runtime scripts live in /usr/lib/initcpio/hooks while the ramdisk building elements live in /usr/lib/initcpio/install. Now the interesting part starts: first let’s place all needed bits into the ramdisk, by creating install hook /usr/lib/initcpio/install/flashcache :
# vim: set ft=sh:

build ()
{
    add_module "dm-mod"
    add_module "flashcache"

    add_dir "/dev/mapper"
    add_binary "/usr/sbin/dmsetup"
    add_binary "/sbin/flashcache_create"
    add_binary "/sbin/flashcache_load"
    add_binary "/sbin/flashcache_destroy"
    add_file "/lib/udev/rules.d/10-dm.rules"
    add_file "/lib/udev/rules.d/13-dm-disk.rules"
    add_file "/lib/udev/rules.d/95-dm-notify.rules"
    add_file "/lib/udev/rules.d/11-dm-lvm.rules"

    add_runscript
}

help ()
{
cat<<HELPEOF
  This hook loads the necessary modules for a flash drive as a cache device for your root device.
HELPEOF
}
This will add the required modules (dm-mod and flashcache), make sure mapper directory is ready, install the tools and add some useful udev disk discovery rules. Same rules are included in the lvm2 hook (I assume you’re using it anyway), so there is an overlap, but this will not cause any conflicts.
The last line of the build function makes sure that the script with runtime hooks will be included too. That’s the file which needs to ensure everything is loaded at boot time. It should contain function run_hook which runs after the modules are loaded, but before the filesystems are mounted, which is a perfect time for additional device setup. It looks like this and goes into /usr/lib/initcpio/hooks/flashcache:
#!/usr/bin/ash

run_hook ()
{
if[!-e "/dev/mapper/control"];then
/bin/mknod "/dev/mapper/control" c $(cat /sys/class/misc/device-mapper/dev | sed 's|:| |')
fi

["${quiet}"="y"]&& LVMQUIET=">/dev/null"

msg "Activating cache volumes..."
oIFS="${IFS}"
IFS=","
for disk in ${flashcache_volumes};do
eval/usr/sbin/flashcache_load "${disk}" $LVMQUIET
done
IFS="${oIFS}"
}

# vim:set ft=sh:
Why the crazy splitting and where does flashcache_volumes come from? It’s done so that the values are not hardcoded and adding a volume doesn’t require rebuilding initramfs. Each variable set as kernel boot parameter is visible in the hook script, so adding a flashcache_volumes=/dev/sdb1,/dev/sdb2 will activate both of those volumes. I just add that to the GRUB_CMDLINE_LINUX_DEFAULT variable in /etc/default/grub.
The commands for loading sdb1, sdb2 are in my case the partitions on the SSD drive - but you may need to change those to match your environment.
Additionally if you’re attempting to have your root filesystem handled by flashcache, you’ll need two more parameters. One is of course root=/dev/mapper/cached_system and the second is lvmwait=/dev/maper/cached_system to make sure the device is mounted before the system starts booting.
At this point regenerating the initramfs (sudo mkinitcpio -p linux) should work and print out something about included flashcache. For example:
==>Building image from preset:'default'
  ->-k /boot/vmlinuz-linux -c /etc/mkinitcpio.conf -g /boot/initramfs-linux.img
==>Starting build:3.7.10-1-ARCH
  ->Running build hook:[base]
  ->Running build hook:[udev]
  ->Running build hook:[autodetect]
  ->Running build hook:[modconf]
  ->Running build hook:[block]
  ->Running build hook:[lvm2]
  ->Running build hook:[flashcache]
  ->Running build hook:[filesystems]
  ->Running build hook:[keyboard]
  ->Running build hook:[fsck]
==>Generatingmodule dependencies
==>Creating gzip initcpio image:/boot/initramfs-linux.img
==>Image generation successful

Finale - fs preparation and reboot

To actually create the initial caching filesystem you’ll have to prepare the SSD drive. Assuming it’s already split into partitions - each one for buffering data from a corresponding real partition, you have to run the flashcache_create app. The details of how to run it and available modes are described in the flashcache-sa-guide.txt file in the repository, but the simplest example is (in my case to create the root partition cache:
flashcache_create -p back cached_system /dev/sdb1 /dev/sda2
which creates a devmapper device called cached_system with fast cache on /dev/sdb1 and backing storage on /dev/sda2.
Now adjust your /etc/fstab to point at the caching devices where necessary, install grub to include the new parameters and reboot. If things went well you’ll be running from the cache instead of directly from the spinning disk.

Was it worth the work?

Learning about initramfs and configuring it by hand - of course - it was lots of fun and I got a ramdisk failing to boot the system only 3 times in the process…
Configuring flashcache - OH YES! It’s a night and day difference. You can check the stats of your cache device by running dmsetup status devicename. In my case after a couple of days of browsing, watching movies, hacking on python and haskell code, I get 92% cache hits on read and 58% on write on the root filesystem. On home it’s 97% and 91% respectively. Each partition is 50GB HDD with 8GB SDD cache. Since the cache persists across reboots, startup times have also dropped from ~5 minutes to around a minute in total.
I worked on SSD-only machines before and honestly can’t tell the difference between them and one with flashcache during standard usage. The only time when you’re likely to notice a delay is when loading a new, uncached program and the disk has to spin up for reading.
Good luck with your setup.

Dual-boot Fedora 18 and Windows 7, with full disk encryption configured on both OSs

$
0
0
http://www.linuxbsdos.com/2013/02/23/dual-boot-fedora-18-and-windows-7-on-a-single-hdd-with-fde-on-both-ends

How to dual-boot Fedora 18 and Windows 7 with full disk encryption (FDE) configured on both operating systems stems from a request from K. Miller. The dual-boot system will be on a single hard disk drive (HDD), GRUB will be installed in Fedora’s boot partition, and Truecrypt will be used to encrypt the Windows 7 end of the installation.
Encrypting Windows when dual-booting it with a Linux distribution is not something I’ve ever considered doing simply because I don’t care a whole lot about that operating system. But K. Miller’s request and suggestion prompted me to take a look at the possibility.
And I didn’t think it was going to be a difficult process until I started. First, I tried Fedora 18 and Windows 8 Pro, with UEFI enabled. That didn’t work. Then I tried Ubuntu 12.10 and Windows 8, also with UEFI enabled. That proved to be even more difficult, mostly because of the issue I wrote about in Why is Windows 8 on SSD invisible to Ubuntu 12.10′s installer?. That problem also affects HDDs.
After almost one full day of trying, I decided to honor K. Miller’s original request, which was for a tutorial on how to “dual boot a Linux (Fedora 18) encrypted partition alongside a Windows 7,” with “full disk encryption for both installations.”
We all know the benefits of dual-booting, but why is it necessary to encrypt both ends of such a system? You’ll find the answer in How Fedora protects your data with full disk encryption. Extending disk encryption to the Windows end of a dual-boot system makes for a more physically secure system.
This is a long tutorial, but keep in mind that the approach I used in this article is not the only way to go about it. It should provide a template for how this can be done.
So, if you want to go along with me, here are the tools you’ll need:
  • An existing installation of Windows 7, or if you are willing to reinstall, a Windows 7 installation CD. Since I don’t keep a running Windows system, a fresh installation was used for this tutorial.
  • Truecrypt. This is the software that will be used to encrypt Windows 7. It is an “open source” software available for download here. Note that Windows has its own disk encryption system called BitLocker. So why not use it instead of a third-party tool like Truecrypt? To use BitLocker, your computer must have a compatible Trusted Platform Module (TPM). The other reason not to use BitLocker this: It is a Microsoft tool. As such, you can bet your left arm that it has a backdoor. And no, I don’t have any evidence to back that up, but this is Microsoft we are talking about.
    One more thing to note: Though Truecrypt is listed on the project’s website as an open source software, its license, TrueCrypt License 3.0, is not listed under GPL-Compatible and GPL-Incompatible Free Software Licenses available here. It is also not listed as an OSI-approved license. Just two points to keep in mind.
  • An installation image of Fedora 18, which is available for download here.
If you have all the pieces in place, let’s get started.
1. Install Windows 7 or shrink an existing C drive: If you are going to install a fresh copy of Windows 7, be sure to leave sufficient disk space for Fedora 18. If you have an existing installation of Windows 7, the only thing you need to do here is to free up disk space for the installation of Fedora 18.
The HDD I used for this installation is 600 GB in size. The next screen shots show how I used Windows 7′s partition manager to recover disk space that I used for Fedora 18. How you divvy up your HDD is up to you. For my test system, I split the HDD in half, one half for Windows 7, the other half for Fedora 18. This screen shot shows the partitions as seen from Windows 7. Right click on C and select “Shrink Volume.”
Shrink Windows 7 C Drive
And this is the Shrink Volume window. Make your selection and click on Shrink.
Shrink Windows 7 C Drive
Here’s the result of the shrinking operation. That unallocated space is what will be used to install Fedora 18. Reboot the computer with the Fedora 18 installation CD or DVD in the optical drive.
Shrink Windows 7 C Drive
2. Install Fedora 18: I know the latest version of Anaconda that shipped with Fedora 18 has received muchas bad press, but that is not going to be an issue here. Well, in a sense, it will be, but the difficulty it presents is just a minor bump on this road. The difficulty stems from the fact that the installer does not give you the option to install GRUB, the boot loader in a custom location. But that is a minor issue, as there is a simple solution to it. It involves working from the command-line, but trust me, it’s a piece of cake.
This screen shot shows the main Anaconda window, the “hub” in the hub-and-spoke installation model. The only thing you’ll have to do here is click on Installation Destination.
Dual-boot Fedora 18 and Windows 7
If you have more than one HDD attached to the computer you are using, they will all be shown at this step. Select the one you wish to use and check “Encrypt my data. I’ll set a passphrase later.” Click on the Continue button.
Dual-boot Fedora 18 and Windows 7
LVM, the Linux Logical Volume Manager, is the default disk partitioning scheme. No need to change that, but you’ll have to check “Let me customize the partitioning of the disks instead.” Continue.
Dual-boot Fedora 18 and Windows 7
This is a partial screen shot of the manual disk partitioning step. But don’t worry. There will be no need to do the partitioning yourself. Anaconda will take care of it. We just need to make sure that it will be using the free, unpartitioned space on the disk. The “Unknown” is actually Windows 7. You can see its partitions.
Dual-boot Fedora 18 and Windows 7
This is another partial screen shot from the same step. This one is, however, showing the options available for Fedora 18. At the bottom of the window you can see the free space available for use. If you let Anaconda partition the space automatically, that is the space it will use. The Windows 7 half of the disk will be untouched. Since there’s no need to create the partitions manually, click on “Click here to create them automatically.”
Dual-boot Fedora 18 and Windows 7
Here are the Fedora 18 partitions that Anaconda just created. Nothing to do here, so click Finish Partitioning.
Dual-boot Fedora 18 and Windows 7
Because you elected to encrypt the space used by Fedora 18, Anaconda will prompt you to specify the passphrase that will be used for encryption. As I noted in Fedora 18 review, Anaconda will insist on a strong password. Save Passphrase.
Dual-boot Fedora 18 and Windows 7
Back to the main Anaconda window, click Begin Installation. On the window that opens after this, be sure to specify a password for the root account.
Dual-boot Fedora 18 and Windows 7
Throughout the Fedora installation process, I’m sure you noticed that Anaconda did not give you the option to choose where to install GRUB 2, the version of the GRand Unified Bootloader used by Fedora. Instead it installs it in the Master Boot Record (MBR), the first sector of the HDD, overwriting the Windows 7 boot files. So when you reboot the system – after installation has completed successfully, you will be presented with the GRUB 2 boot menu.
At this point, you might want to boot into Windows 7 just to be sure that you can still do so. Then boot into your new installation of Fedora 18. Complete the second stage of the installation process, and log in when you are done.

3. Install GRUB 2 to Fedora’s boot partition: Once inside Fedora, the next task is to install GRUB in the Partition Boot Record (PBR) of the boot partition, that is, the first sector of the boot partition. Once in Fedora, launch a shell terminal and su to root. To install GRUB 2 in the boot partition’s PBR, you need to know its partition number or device name. The output of df -h will reveal that information. On my installation, it is /dev/sda3. Next, type grub2-install /dev/sda3. The system will complain and refuse to do as instructed. Not to worry, you can force it.
To compel it to install GRUB 2 where we want, type add “- -force” option to the command, so that it reads grub2-install – -force /dev/sda3. Once that’s done, reboot the computer. Note that completing this step does not remove GRUB from the MBR. It just installs another copy in the boot partition. At the next step, GRUB will be removed from the MBR.
Fedora 18 Anaconda GRUB Install PBR /boot Partition
4. Restore Windows 7′s boot manager to the MBR: When the computer reboots, you will still see Fedora’s boot menu, but instead of booting into Fedora 18, boot into Windows 7. The next task is to restore its boot program to the MBR and add an entry for Fedora 18 in its boot manager’s menu. The program I know that makes it easy to do that, is EasyBCD. Download it from here. Note that EasyBCD is free for personal use. After installing it, start it, if it does not start automatically. Shown below is its main window. Click on Add New Entry to begin.
EasyBCD Windows 7
Then click on the Linux/BSD tab. Select GRUB 2 from the Type dropdown menu, and edit the Name field to match. Click on Add Entry.
EasyBCD Windows 7 Add Linux
This is a preview of what the entries will be on the boot menu of Windows 7. The final task is to restore the Windows 7 boot program to the MBR. To do that, click on BCD Deployment.
EasyBCD Windows 7 Edit Linux
Under MBR Configuration Options, make sure that the first option is selected. Then click on Write MBR. Exit EasyBCD and reboot the computer.
EasyBCD Windows 7 Restore MBR
If you reboot the computer after that last operation, you will be presented with Windows 7′s boot menu. Test to make sure that you can boot into either OS. When you are satisfied, reboot into Windows 7 to start the last series of steps in this operation.
5. Encrypt Windows 7 with Truecrypt: If you’ve not downloaded Truecrypt, you may do so now, and install it. Start it by clicking its icon on the desktop. Throughout this step, very little extra explanation is necessary because the on-screen explanations will suffice. So, at this step, the default is good. Next.
Encrypt Windows 7 with Truecrypt
Click Create Volume.
Encrypt Windows 7 with Truecrypt
Select the last option as shown, then Next.
Encrypt Windows 7 with Truecrypt
The first option is it. Next.
Encrypt Windows 7 with Truecrypt
For obvious reasons, the last option offers a more (physically) secure system. Next.
Encrypt Windows 7 with Truecrypt
Though not indicated in this screen shot, I chose “No”. I think the on-screen explanation is sufficient.
Encrypt Windows 7 with Truecrypt
Last option, then Next.


Yes.
Encrypt Windows 7 with Truecrypt
“Yes,” then Next.
Encrypt Windows 7 with Truecrypt
First option, then Next.
Encrypt Windows 7 with Truecrypt
It was, but we rectified this when we restored Windows boot program to the MBR. So, select “No.” Next.
Encrypt Windows 7 with Truecrypt
This is fine. What will happen is that after this process is completed, pressing the Esc key at Truecrypt’s boot menu will drop you to Fedora’s boot menu. Because Fedora is also encrypted, being able to bypass Truecrypt’s boot menu to get to it does not compromise the integrity of the system’s physical security Next.
Encrypt Windows 7 with Truecrypt
The default encryption algorithm is strong enough, but there are other options, if you feel otherwise. For this test system, I chose the default. Next.
Encrypt Windows 7 with Truecrypt
Pick a strong passphrase. Next.
Encrypt Windows 7 with Truecrypt
Follow the on-screen instructions, then Next.
Encrypt Windows 7 with Truecrypt
Next.
Encrypt Windows 7 with Truecrypt
Next.
Encrypt Windows 7 with Truecrypt
OK.
Encrypt Windows 7 with Truecrypt
Burn.
Encrypt Windows 7 with Truecrypt
Insert a blank CD-R in the optical drive, then click Next. After you’re done creating the Truecrypt Rescue Disk (TRD), you can transfer it to a USB stick, if you like that better.
Encrypt Windows 7 with Truecrypt
If the TRD is created successfully, click Next.
Encrypt Windows 7 with Truecrypt
For better encryption, choose a “Wipe Mode” from the dropdown menu. Next.
Encrypt Windows 7 with Truecrypt
Test.
Encrypt Windows 7 with Truecrypt
OK.
Encrypt Windows 7 with Truecrypt
If you’ve followed all the steps as specified, there should be no problem here. Encrypt.
Encrypt Windows 7 with Truecrypt
It took two hours for the encryption of my test system to complete. Note that the time it takes is a function of the size of the disk being encrypted, and the wipe mode you chose. The good thing here is that you can still be using the system while Truecrypt is completing the task. Otherwise, take a walk and come back after the estimated time to completion.
Encrypt Windows 7 with Truecrypt
Finish.
Encrypt Windows 7 with Truecrypt

Encrypt Windows 7 with Truecrypt

Isolate Apache virtual hosts with suPHP

$
0
0
http://www.openlogic.com/wazi/bid/320303/isolate-apache-virtual-hosts-with-suphp


By default Apache runs all virtual hosts under the same Apache user, with no isolation between them. That makes security vulnerabilities in server-side languages such as PHP a serious threat. An attacker can compromise all websites and virtual hosts on a server as soon as he finds one site that's hosted on it that's vulnerable. To address this problem, you can deploy the Apache module suPHP, which is designed to ensure isolation between virtual hosts that support PHP.
SuPHP installs an Apache module called mod_suPHP that passes the handling of PHP scripts to the binary /usr/local/sbin/suphp, which uses the setuid flag-rwsr-xr-x.– and thereby ensures that a PHP web script runs under the user of its file owner. Thus to accomplish isolation you can create different users for each Apache virtual host and change the ownership of their web files to match that of the virtual host. Once all virtual hosts run under different users you can set strict file permissions on the web files and thus ensure that a script executed in one virtual host cannot write to or even read a file from another virtual host.

suPHP installation

Developer Sebastian Marsching provides suPHP only as a source package, licensed under the GNU GPLv2. Even though you might find suPHP as a binary installation from a third-party repository, for best compatibility and performance you should compile the software yourself. You will need the following packages:
  • apr-util-devel – APR utility library development kit
  • httpd-devel – development interfaces for the Apache HTTP server
  • gcc-c++ – C++ support to the GNU Compiler Collection
To install these in CentOS, run the command yum -y install apr-util-devel httpd-devel gcc-c++.
Download suPHP version 0.7.2 – the most recent version, released in May. Unfortunately, the officially shipped source package is not compatible with CentOS 6. Before you can compile it you need to run the following commands:
libtoolize --force                      #provides libtool support and replaces the default libtool files
aclocal #creates the aclocal.m4 file by consolidating various macro files
autoheader #creates a template file of C ‘#define’ statements
automake --force-missing --add-missing #generates Makefile.in files
autoconf #produces shell scripts for the automatic configuration
Manually specify the APR path with a command like ./configure --with-apr=/usr/bin/apr-1-config. After that run the usual make && make install to complete the installation.
A successful installation creates the following files:
  • /usr/lib/httpd/modules/mod_suphp.so – the Apache module
  • /usr/local/sbin/suphp – the suPHP binary

suPHP configuration

You configure suPHP in the file /etc/suphp.conf. Here's a sample configuration file annotated with explanations of all the directives:
[global]
;Path to logfile.
logfile=/var/log/suphp/suphp.log

;Loglevel. Info level is good for most cases but the file grows fast and should be rotated.
loglevel=info

;User Apache is running as. By default, in CentOS this is 'apache'.
webserver_user=apache

;Path all scripts have to be in. In CentOS the webroot is /var/www/html/ by default.
docroot=/var/www/html/

; Security options. suPHP will check if the executed files and folders have secure permissions.
allow_file_group_writeable=false
allow_file_others_writeable=false
allow_directory_group_writeable=false
allow_directory_others_writeable=false

;Check wheter script is within DOCUMENT_ROOT
check_vhost_docroot=true

;Send minor error messages to browser. Disable this unless you are debugging with a browser.
errors_to_browser=false

;PATH environment variable
env_path=/bin:/usr/bin

;Umask to set, specify in octal notation. Such a umask will create new files with strict permissions 700 which allow only the owner to read/write/execute a file.
umask=0077

; Minimum UID. Set this to the first uid of a web user and above the uids of system users. Check the file /etc/passwd for the uids.
min_uid=200

; Minimum GID. Similarly to uid, set this to the first gid of a web user.
min_gid=200

[handlers]
;Handler for php-scripts
x-httpd-php="php:/usr/bin/php-cgi"

;Handler for CGI-scripts
x-suphp-cgi="execute:!self"
The above options provide a high security level. Note the logfile option, which logs each script execution to a log file when the logging level is set to "info," and thereby gives you useful information about which users executes what scripts. Output looks like:
[Sat Oct 05 22:11:58 2013] [info] Executing "/var/www/html/example.com/index.php" as UID 501, GID 501
[Sat Oct 05 22:12:00 2013] [info] Executing "/var/www/html/example.org/index.php" as UID 502, GID 502
For every PHP execution suPHP reports the date and time, the full path to the executed script, and the user and group that executed it. With this information you can track each virtual host's activity.
For more options and additional information on settings, check suPHP's documentation.
Next, configure Apache to use the suPHP handler for PHP scripts. PHP settings are usually found in a separate file, such as /etc/httpd/conf.d/php.conf. Remove any previous PHP configuration and leave only the new settings:
#Load the module
LoadModule suphp_module modules/mod_suphp.so

#Add the handler
AddHandler x-httpd-php .php .php3 .php4 .php5 .phtml
suPHP_AddHandler x-httpd-php

#Enable suPHP
suPHP_Engine on

#Specify where the suphp.conf file is
suPHP_ConfigPath /etc/
Finally, create a vhost with suPHP support by editing your Apache vhost file (e.g. /etc/httpd/conf.d/example.org.conf) like this:

ServerName example.org
suPHP_UserGroup exampleuser exampleusergroup
DocumentRoot /var/www/html/example

The only part of the vhost unique to suPHP is suPHP_UserGroup, which must be present for each vhost. For the highest level of isolation, create a new user and group for each virtual host by using the command useradd -r exampleuser from the Linux command line. If the user you create is used only for suPHP, you can disable the user's ability to log in the system, which can help against threats like brute force attacks.
In the above vhost configuration, the directory /var/www/html/example (and all files and subdirectories under it) must belong to the user exampleuser and the group exampleusergroup. If they are not, suPHP will render an internal server error when you try to execute an incorrectly owned file.
You can automate the creation of a new virtual host and set up the proper files and folders by using a Bash script like this one:
#!/bin/bash
#This script expects as first argument the domain name of the script

#Remove the dot from the domain for the user (group) creation
user=`echo $1|sed "s/\.//g"`
echo "Adding user $user"
useradd -r $user
echo "Creating vhost /etc/httpd/conf.d/$1.conf"
echo "" >> /etc/httpd/conf.d/$1.conf
echo "ServerName $1" >> /etc/httpd/conf.d/$1.conf
echo "ServerAlias www.$1" >> /etc/httpd/conf.d/$1.conf
echo "suPHP_UserGroup $user $user" >> /etc/httpd/conf.d/$1.conf
echo "DocumentRoot /var/www/html/$1" >> /etc/httpd/conf.d/$1.conf
echo "
" >> /etc/httpd/conf.d/$1.conf
echo "Creating the directory /var/www/html/$1 and setting ownership"
mkdir "/var/www/html/$1"
echo "Chowning /var/www/html/$1 to $user:"
chown $user: /var/www/html/$1
echo "Checking and reloading apache"
apachectl configtest && apachectl graceful
However, you can't automate everything. Don't forget to set the correct ownership and permissions when you manually place web files into each vhost's webroot directory. The recommended file permissions are 700, which provide read/write/execute permissions only for the owner.
SuPHP is a great way to strengthen security on servers that run PHP-based websites, which is why many commercial solutions are either based on it or similar to it. However, according to the project's FAQ, suPHP is no longer actively maintained, so use it with caution.
Viewing all 1406 articles
Browse latest View live


<script src="https://jsc.adskeeper.com/r/s/rssing.com.1596347.js" async> </script>