Quantcast
Channel: Sameh Attia
Viewing all 1406 articles
Browse latest View live

Switching Monitor Profiles

$
0
0
http://www.linuxjournal.com/content/switching-monitor-profiles

It's funny, when your home office is your couch, you tend to forget how nice it can be when you dock a laptop and have all the extra screen real estate a monitor brings. For many years, I left my work laptop docked at work, and when I worked from home, I just VPNed in with a personal laptop. Lately though, I've recognized the benefits of splitting personal life and work, so I've taken to carrying my laptop with me when I go to and from the office. Because we invested in a docking station, it's relatively simple to transition between a laptop on my lap and a laptop on a desk with an extra monitor—except for one little thing: my external monitor is in portrait mode.
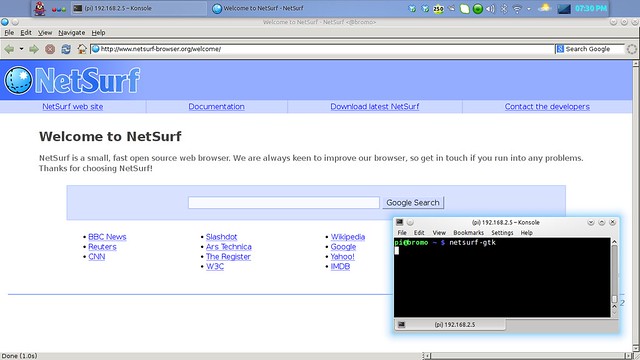
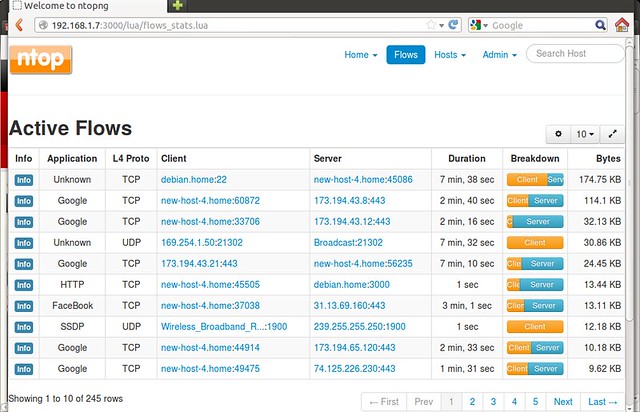
It must have been about two years ago that I started favoring widescreen monitors in portrait mode (Figure 1). Really, all I need to get work done is a Web browser and a few terminals, and I found if I keep the Web browser on the laptop screen, I can fit a nice large screen session or two in all the vertical space of a portrait-mode monitor. This makes reading man pages and other documentation nice, plus I always can split my screens vertically if I need to compare the contents of two terminals (see my "Do the Splits" column in the September 2008 issue for more information on how to do that: http://www.linuxjournal.com/article/10159). The only problem with portrait mode is that all the GUI monitor configuration tools tend not to handle portrait-mode monitors well, particularly if you want to combine them with a landscape-mode laptop screen. So, I found I needed to run a special xrandr command to set up the monitor and make sure it lined up correctly with my laptop screen. Plus, every time I transition between docked and undocked modes, I need to move my terminal windows from the large portrait-mode monitor over to a second desktop on my laptop screen. This all seemed like something a script could figure out for me, so in this article, I explain the script I use to transition from docked to undocked mode.
Figure 1. Kyle's Current Desktop Setup
Basically, my script needs to do two things when it's run. First, it needs to run the appropriate xrandr command to enable or disable the external display, and second, it needs to reset all of my windows to their default location. Although I could just have one script I run when I'm docked and another when I'm undocked, I can find out my state from the system itself, so I can keep everything within one script. I've set up a script like this on my last two work-provided laptops and on the ThinkPad X220, I was able to use a /sys file to gauge the state of the dock:

#!/bin/bash
DOCKED=$(cat /sys/devices/platform/dock.0/docked)
case "$DOCKED" in
"0")
echo undocked
;;
"1")
echo docked
;;
esac
Unfortunately, on my new laptop (a ThinkPad X230) this file no longer can detect the dock state. At first I was annoyed, but when writing this column, I realized that this made the script potentially more useful for everyone who doesn't have a docking station. My workaround was to use xrandr itself to check for the connection state of a video device my external monitor was connected to that was present only when I was docked. If you run xrandr with no other arguments, you will see a list of a number of different potential video devices on your system:

$ xrandr
Screen 0: minimum 320 x 200, current 1366 x 768, maximum 8192 x 8192
LVDS1 connected 1366x768+0+0 (normal left inverted right x axis y axis)
↪277mm x 156mm
1366x768 60.0*+
1360x768 59.8 60.0
1024x768 60.0
800x600 60.3 56.2
640x480 59.9
VGA1 disconnected (normal left inverted right x axis y axis)
HDMI1 disconnected (normal left inverted right x axis y axis)
DP1 disconnected (normal left inverted right x axis y axis)
HDMI2 disconnected (normal left inverted right x axis y axis)
HDMI3 disconnected (normal left inverted right x axis y axis)
DP2 disconnected (normal left inverted right x axis y axis)
DP3 disconnected (normal left inverted right x axis y axis)
In the above case, the laptop is not docked, so only the primary monitor (LVDS1) is connected. When I docked the device and ran the same command, I noticed that my monitor was connected to HDMI3, so I could grep for the connection state of HDMI3 to detect when I'm docked. My new skeleton script looks more like this:

#!/bin/bash
xrandr | grep -q "HDMI3 disconnected"
case "$?" in
"0")
echo undocked
;;
"1")
echo docked
;;
esac
In your case, you would compare the output of xrandr when docked (or when an external monitor is connected) and when undocked, and use that to determine which device it corresponds to.
Now that I can detect whether I'm docked, I should do something about it. The first thing I need to do is to enable output on my external monitor (HDMI3), tell xrandr that it's to the right of my laptop screen, and set it to portrait mode by telling xrandr to rotate it left:

/usr/bin/xrandr --output HDMI3 --auto --right-of LVDS1 --rotate left
This works fine; however, the way that the portrait-mode monitor and my laptop line up on the desktop makes moving a mouse between the two rather awkward. When I move from the top of the laptop screen to the far right edge, the mouse pointer moves a foot up to the top of the external monitor. Ideally, I'd like the mouse pointer to more or less be lined up when it crosses between screens, but because one monitor is landscape and the other is portrait, I need to tell xrandr to place my laptop monitor lower in the virtual desktop. Depending on your respective resolutions, this position takes some tinkering, but I found the following command lined up my two displays well:

/usr/bin/xrandr --output LVDS1 --pos 0x1152
This takes care of my screen when I'm docked, so when I'm undocked, I basically have to undo any of the above changes I've made. This means turning the HDMI3 output off and moving the position of LVDS1 back to the 0x0 coordinates:

/usr/bin/xrandr --output HDMI3 --off
/usr/bin/xrandr --output LVDS1 --pos 0x0
The complete case statement turns out to be:

#!/bin/bash
xrandr | grep -q "HDMI3 disconnected"
case "$?" in
"0") # undocked
/usr/bin/xrandr --output HDMI3 --off
/usr/bin/xrandr --output LVDS1 --pos 0x0
;;
"1") # docked
/usr/bin/xrandr --output HDMI3 --auto --right-of LVDS1
↪--rotate left
/usr/bin/xrandr --output LVDS1 --pos 0x1152
;;
esac
After I saved the script, I bound a key combination on my desktop I could press to execute it whenever I docked or undocked. Of course, ideally I would set up some sort of udev script or something like it to run the script automatically, but so far, I haven't found the right hook that worked on my laptop. The only other addition I've made is after the above case statement, I sleep for a second and then call a reset_windows shell script that uses wmctrl, much like I discussed in my November 2008 Hack and / column "Memories of the Way Windows Were" (http://www.linuxjournal.com/article/10213), only it also contains the same case statement so it moves windows one way when docked and another when not:

#!/bin/bash
xrandr | grep -q "HDMI3 disconnected"
case "$?" in
"0") # undocked
wmctrl -r 'kyle-ThinkPad-X230' -t 1
wmctrl -r 'kyle-ThinkPad-X230' -e '0,2,24,1362,362'
wmctrl -r snowball -t 1
wmctrl -r snowball -e '0,2,410,1362,328'
;;
"1") # docked
wmctrl -r 'kyle-ThinkPad-X230' -t 0
wmctrl -r 'kyle-ThinkPad-X230' -e '0,1368,0,1080,1365'
wmctrl -r snowball -t 0
wmctrl -r snowball -e '0,1368,1387,1080,512'
;;
esac
Of course, the above wmctrl commands are completely custom to my terminal titles, but it should serve as an okay guide for getting started on your own. In my case, I want to move two terminals to the second desktop when in laptop mode and to the external monitor on the first desktop when docked. Why not just combine the two scripts? Well, I want to be able to reset my windows sometimes outside of docking or undocking (this script also is bound to a different key combo). In the end, I have a simple, easy-to-modify set of scripts I can use to keep windows and my desktops exactly how I want them.

How to set up web-based network traffic monitoring system on Linux

$
0
0
http://xmodulo.com/2013/10/set-web-based-network-traffic-monitoring-linux.html

When you are tasked with monitoring network traffic on the local network, you can consider many different options to do it, depending on the scale/traffic of the local network, monitoring platforms/interface, types of backend database, etc.
ntopng is an open-source (GPLv3) network traffic analyzer which provides a web interface for real-time network traffic monitoring. It runs on multiple platforms including Linux and MacOS X. ntopng comes with a simple RMON-like agent with built-in web server capability, and uses Redis-backed key-value server to store time series statistics. You can install ntopng network traffic analyzer on any designated monitoring server connected to your network, and use a web browser to access real-time traffic reports available on the server.
In this tutorial, I will describe how to set up a web-based network traffic monitoring system on Linux by using ntopng.

Features of ntopng

  • Flow-level, protocol-level real-time analysis of local network traffic.
  • Domain, AS (Autonomous System), VLAN level statistics.
  • Geolocation of IP addresses.
  • Deep packet inspection (DPI) based service discovery (e.g., Google, Facebook).
  • Historical traffic analysis (e.g., hourly, daily, weekly, monthly, yearly).
  • Support for sFlow, NetFlow (v5/v9) and IPFIX through nProbe.
  • Network traffic matrix (who's talking to who?).
  • IPv6 support.

Install ntopng on Linux

The official website offers binary packages for Ubuntu and CentOS. So if you use either platform, you can install these packages.
If you want to build the latest ntopng from its source, follow the instructions below. (Update: these instructions are valid for ntopng 1.0. For ntopng 1.1 and higher, see the updated instructions).
To build ntopng on Debian, Ubuntu or Linux Mint:
$ sudo apt-get install libpcap-dev libglib2.0-dev libgeoip-dev redis-server wget libxml2-dev
$ tar xzf ntopng-1.0.tar.gz -C ~
$ cd ~/ntopng-1.0/
$ ./configure
$ make geoip
$ make
In the above steps, "make geoip" will automatically download a free version of GeoIP databases with wget from maxmind.com. So make sure that your system is connected to the network.
To build ntopng on Fedora:
$ sudo yum install libpcap-devel glib2-devel GeoIP-devel libxml2-devel
libxml2-devel redis wget
$ tar xzf ntopng-1.0.tar.gz -C ~
$ cd ~/ntopng-1.0/
$ ./configure
$ make geoip
$ make
To install ntopng on CentOS or RHEL, first set up EPEL repository, and then follow the same instructions as in Fedora above.

Configure ntopng on Linux

After building ntopng, create a configuration directory for ntopng, and prepare default configuration files as follows. I assume that "192.168.1.0/24" is the CIDR address prefix of your local network.
$ sudo mkir /etc/ntopng -p
$ sudo -e /etc/ntopng/ntopng.start
--local-networks "192.168.1.0/24"
--interface 1
$ sudo -e /etc/ntopng/ntopng.conf
-G=/var/run/ntopng.pid
Before running ntopng, make sure to first start redis, which is a key-value store for ntopng.
To start ntopng on Debian, Ubuntu or Linux Mint:
$ sudo /etc/init.d/redis-server restart
$ cd ~/ntopng-1.0/
$ sudo ./ntopng
To start ntopng on Fedora, CentOS or RHEL:
$ sudo service redis restart
$ cd ~/ntopng-1.0/
$ sudo ./ntopng
By default, ntopng listens on TCP/3000 port. Verify this is the case using the command below.
$ sudo netstat -nap|grep ntopng
tcp        0      0 0.0.0.0:3000            0.0.0.0:*      LISTEN     29566/ntopng

Monitor Network Traffic in Web-Based Interface

Once ntopng is successfully running, go to http://:3000 on your web browser to access the web interface of ntopng.
You will see the login screen of ntopng. Use the default username and password: "admin/admin" to log in.

Here are a few screenshots of ntopng in action.
Real-time visualization of top flows.

Live statistics of top hosts, top protocols and top AS numbers.

Real time report of active flows with DPI-based automatic application/service discovery.

Historic traffic analysis.

How to Make a YouTube Instructional Screencast Video on Linux

$
0
0
http://www.linux.com/learn/tutorials/745745-how-to-make-a-youtube-instructional-screencast-video-on-linux

A picture is worth a thousand words, and a well-crafted how-to video is darned near priceless. Linux has all the tools you need to make high-quality and useful instructional videos. We shall make a simple screencast with the wonderful Kdenlive video editor and the Audacity audio recorder and editor, and learn how to share this splendid screencast on YouTube.
All you need is your nice Linux PC with Kdenlive and Audacity installed, a good-quality microphone or headset, and a YouTube account. (Yes, there are many other free video-sharing services, and you are welcome to explore them.) YouTube is owned by Google, so Google tries to entice you into rampant sharing with everything and everyone in the world. Just say no if this is not what you want to do.
Our workflow goes like this:
  • Capture screencast with Kdenlive
  • Record soundtrack with Audacity
  • Add soundtrack to Kdenlive
  • Upload to YouTube
  • The world views your video and is happy.
Kdenlive supports most popular digital video formats, including AVI, MP4, H.264, and MOV. It supports image files such as GIF, PNG, SVG, and TIFF, and audio file formats including uncompressed PCM, Vorbis, WAV, MP3 and AC3. You can even read and edit Flash files. In short, it should handle pretty much anything you throw at it.
Your soundtrack is just as important as your video track. Please, I beg you, pay attention to your audio. Keep it clean and simple, and keep the rambling digressions, verbal tics, and distracting background noises to a minimum. I prefer a good-quality headset for making narrations because you don't have to worry about microphone placement, and you can listen to yourself over and over without driving bystanders insane.
The Kdenlive documention is outdated and tells you that you need RecordMyDesktop to make screencasts. I have Kdenlive 0.9.4, and it does not need RecordMyDesktop.
Figure 1: Default profile settings.

Making the Screencast

If you're installing Kdenlive for the first time you'll get a configuration wizard at first run. Don't worry too much about the default settings because you can change them anytime. These are the settings I use for my screencasts: HD 720p 30 fps, 1280x720 screen size. How do you know what settings to use? YouTube tells you. To set these values go to Settings > Configure Kdenlive > Project Defaults > Default Profile > HD 720p 30fps (figure 1), and set the size of your screen capture in Settings > Configure Kdenlive > Capture > Screen Grab (figure 2). You may also choose a Full Screen Capture, though it's better to stick with the dimensions specified by YouTube, because if they're different YouTube adds pillarboxes to make them fit. Your eager viewers want to see a screen filled with glorious content, not pillarboxes.
Figure 2: Screencast screen size
Figure 2: Screencast screen size.
The default YouTube video player size is 640x360 at 320p, which is small and blurry. The player has controls for small, larger, and full-screen, plus multiple quality levels. These are for your viewers only, and you can't change the defaults, which is sad because nothing looks good at 640x360 at 320p. But you still want to make videos with the higher quality settings, and you can always add some text to remind your viewers to try the better settings.

Save Your Project

Before you do anything else go to File > Save as to save your project, and remember to save it periodically.

Screen Grab

Making your screen capture is easy as pie. Go to the Record Monitor, select Screen Grab, and then hit the Record button. This opens a box with dotted borders on your screen, and everything inside this box is recorded. So all you have to do is move and size the window you want recorded inside the box. Do your thing, then when you're finished click the stop button (figure 3).
Figure 3: Making the screen grab.
Clicking Stop automatically opens the Clip Monitor so you can preview your new clip. If you like it, drag it from the Project Tree to the Video 1 track. Now you can edit your new video. There are always bits you'll want to trim; a fast way to do this is to play your clip in the Project Monitor until you get to the end of the part you want to remove. Then Pause, then press Shift+r. This cuts your clip at the point on the timeline that you stopped, so now you have two clips. Click on the one you want to delete and press the Delete key, and poof! It is gone.
You'll want to drag your remaining clip to whatever point on the timeline you want it to start, and you might want to add some nice transitions. Some simple fades are good; simply right-click on your clip and click Add Effect > Fade > Fade from black and Fade to black, and Kdenlive will automatically place them at the beginning and end.

Adding a Soundtrack

Please see Whirlwind Intro to Audacity on Linux: From Recording to CD in One Lesson to learn the basics of recording with Audacity. Export your recording as a 16-bit WAV file and then import it into Kdenlive via Project > Add Clip. Drag your new audio clip down to one of the Audio tracks. An easy way to make your narration is to play your video track and talk as it plays. With a little luck you won't have to do a lot of cleanup, and your commentary will be in sync with the video.
fig-4-audio-gap
Fig 4: Cut your track with Shift+r and drag one of the clips away from the cut to create a silent gap.
If you're a fast talker and get ahead of your video, you can easily add a space in the audio track. Simply cut your track with Shift+r, and drag one of the clips away from the cut to create a silent gap (figure 4).

Rendering Your Project

When you're happy with your edits and ready to export to your final format, click the Render button. This takes a few minutes depending on the speed of your computer and size of your project. There are presets for Web, and if you choose File Rendering you can tweak your settings (figure 5). I've gotten good results with File Rendering > H.264, Video bitrate 12000, and audio 384. H.264 is a super-compressed MPEG-4
fig-5-rendering
Fig. 5: Choose File Rendering to tweak your Web settings.
format that delivers small file sizes and good quality.

YouTube Bound

Play your new video in VLC or MPlayer or whatever you like, and if it looks good then you're ready to upload to your YouTube account. In typical Google fashion your dashboard and video manager are disorganized and complicated, but keep poking around and you'll figure it out. Before you can do anything you'll have to put your account in good standing, which means getting a code number from Google via text or email. When you prove you're not a bot by entering the code number you'll be able to upload videos.
You can upload your videos and mark them as either private or public. Google has some editing tools you might like, such as auto-fix and music soundtracks, though in my nearly-humble opinion hardly anyone does background music correctly so it's just annoying. But you might be the first to do it right!
The most useful editing tool is automatic closed-captioning. I recommend using this on all of your videos, not only for people who can't hear very well but for anyone who has to keep the volume low, and to make sure everyone understands what you're saying. The captioning tool also creates a transcript.
Another useful tool is the annotations tool, which supports speech bubbles, titles, spotlights, and labels. Of course you can do all this in Kdenlive, so you can try both.
Well, here we are at the end and it seems we've barely begun. Please share your videos and YouTube tips and tricks in the comments. And while you're at it, please share your new video tutorial with us on video.linux.com and join the 100 Linux Tutorials Campaign.

Gentoo Hardening Part 1: Introduction to Hardened Profile

$
0
0
http://resources.infosecinstitute.com/gentoo-hardening-part-1-introduction-hardened-profile-2

Introduction
In this tutorial, we’ll talk about how to harden a Linux system to make it more secure. We’ll specifically use Gentoo Linux, but the concepts should be fairly similar in other distributions as well. Since the Gentoo Linux is a source distribution (not binary, as most other Linux distributions are), there will be enough details provided to do this in your own Linux distribution, although some steps will not be the same.
If we look at the hardened Gentoo project web page located at [1], we can see a couple of projects that can be used to enhance the security of the Linux operation system; they are listed below.
  • PaX is a kernel patch that protects us from stack and heap overflows. PaX does this by using ASLR (address space layout randomization), which uses random memory locations in memory. Each shellcode must use an address to jump to embedded in it in order to gain code execution and, because the address of the buffer in memory is randomized, this is much harder to achieve. PaX adds an additional layer of protection by keeping the data used by the program in a non-executable memory region, which means an attacker won’t be able to execute the code it managed to write into memory. In order to use PaX, we have to use a PaX-enabled kernel, such as hardened-sources.
  • PIE/PIC (position-independent code): Normally, an executable has a fixed base address where they are loaded. This is also the address that is added to the RVAs in order to calculate the address of the functions inside the executable. If the executable is compiled with PIE support, it can be loaded anywhere in memory, while it must be loaded at a fixed address if compiled with no PIE support. The PIE needs to be enabled if we want to use PaX to take advantage of ASLR.
  • RELRO (relocation read-only): When we run the executable, the loaded program needs to write into some sections that don’t need to be marked as writable after the application was started. Such sections are .ctors, .dtors, .jcr, .dynamic, and .got [4]. If we mark those sections as read-only, an attacker won’t be able to use certain attacks that might be used when trying to gain code execution, such as overwriting entries in a GOT table.
  • SSP (stack-smashing protector) is used in user-mode; it protects against stack overflows by placing a canary on the stack. When an attacker wants to overflow the return EIP address on the stack, he must also overflow the randomly chosen canary. When that happens, the system can detect that the canary has been overwritten, in which case the application is terminated, thus not allowing an attacker to jump to an arbitrary location in memory and execute code from there.
  • RBAC (role-based access control): Note that RBAC is not the same as RSBAC, which we’ll present later on. The RBAC is an access control that can be used by SELinux, Grsecurity, etc. By default, the creator of a file has total control over the file, while the RBAC forces the root user to have control of the file, regardless of who created it. Therefore all users on the system must follow the RBAC rules set by administrator of the system.
Additionally, we can also use the following access control systems, which are used to control access between processes and objects. Normally, we have to choose one of the systems outlined below, because only one of the access control systems can be used at a time. Access control systems include the following:
  • SELinux (security-enhanced Linux)
  • AppArmor (application armor)
  • Grsecurity, which contains various patches that can be applied to the kernel to increase the security of a whole system. If we would like to enable Grsecurity in the kernel, we must use a Grsecurity-enabled kernel, which is hardened-sources.
  • RSBAC (rule set-based access control): We must use rsbac-sources kernel to build a kernel with rsbac support.
  • SMACK
Each of the systems mentioned above can be used to make the exploitation of your system harder for an attacker. Let’s say you’re running a vulnerable application that’s listening on some predefined port that an attacker can connect to from anywhere; we can imagine a FTP server. The installed version of the FTP server contains a vulnerability that can be triggered and exploited by using an overly long APPE FTP command. If the FTP server is not updated, an attacker can exploit the vulnerability to gain total control of the Linux system, but if we harden the system, we might prevent the attacker from doing so. In that case, the vulnerability is still presented in the vulnerable FTP server, but the attacker won’t be able to exploit it due to the security enhancements in place.
The Portage Profile
Every Gentoo installation has a Portage profile, which specifies the default USE flags for the whole system. Portage is Gentoo’s package management system, which uses many of the system files when installing a system and specific programs. All files that affect the installation of specific package are listed in the portage man page, which can be invoked by executing “man portage.” The USE flags are used to specify which functionality within each package we want to compile the package with. We can list the USE flags with “equery uses ” command, as shown below:
Want to learn more?? The InfoSec Institute Advanced Computer Forensics Training trains you on critical forensic skills that are difficult to master outside of a lab enviornment. Already know how to acquire forensically sound images? Perform file carving? Take your existing forensic knowledge further and sharpen your skills with this Advanced Computer Forensics Boot Camp from InfoSec Institute. Upon the completion of our Advanced Computer Forensics Boot Camp, students will know how to:
  • Perform Volume Shadow Copy (VSC) analysis
  • Advanced level file and data structure analysis for XP, Windows 7 and Server 2008/2012 systems
  • Timeline Analysis & Windows Application Analysis
  • iPhone Forensics
  1. # equery uses xterm
  2. [Legend : U - final flag setting for installation]
  3. [ : I - package is installed with flag ]
  4. [Colors : set, unset ]
  5. * Found these USE flags for x11-terms/xterm-285:
  6. UI
  7. - - Xaw3d : Add support for the 3d athena widget set
  8. - - toolbar : Enable the xterm toolbar to be built
  9. + + truetype : Add support forFreeTypeand/orFreeType2 fonts
  10. + + unicode : Add support forUnicode
Notice that package xterm has unicode and truetype enabled, but Xaw3d and toolbar disabled; those are the features that we can freely disable/enable, after which we need to recompile the package. By doing that, the package will be able to use Unicode characters, but if we disable the unicode USE flags, the Unicode characters won’t be supported anymore.
So, when we select a system profile, we’re actually selecting the default USE flags that will be used to build the system with. All the available profiles can be listed by issuing the “eselect profile list” command, as seen below. Notice that the default profile is the one marked with the character ‘*’?
  1. # eselect profile list
  2. Available profile symlink targets:
  3. [1] default/linux/amd64/13.0
  4. [2] default/linux/amd64/13.0/selinux
  5. [3] default/linux/amd64/13.0/desktop *
  6. [4] default/linux/amd64/13.0/desktop/gnome
  7. [5] default/linux/amd64/13.0/desktop/kde
  8. [6] default/linux/amd64/13.0/developer
  9. [7] default/linux/amd64/13.0/no-multilib
  10. [8] default/linux/amd64/13.0/x32
  11. [9] hardened/linux/amd64
  12. [10] hardened/linux/amd64/selinux
  13. [11] hardened/linux/amd64/no-multilib
  14. [12] hardened/linux/amd64/no-multilib/selinux
  15. [13] hardened/linux/amd64/x32
  16. [14] hardened/linux/uclibc/amd64
The profiles listed above have the syntaxes shown in the list below.

  • Profile number: the number of each profile embedded in the brackets [ and ].
  • Profile type: the type of profile, where the normal profiles are specified with the default keyword, while the hardened profiles are listed with hardened keyword.
  • Profile subtype: the profile subtype used for the kernel, which can be either linux or bsd.
  • Architecture: the architecture of the profile, which can be one of the listed values: x86, amd64, etc.
  • Release number: release number of the profile.
  • Target:
    target of the profile, which can be one of the values, selinux, desktop, developer, etc. The desktop target also has two subtargets kde and gnome.
All the files for profiles are available under /usr/portage/profiles/ directory. The current profile “default/linux/amd64/13.0/desktop” is located in the /usr/portage/profiles/default/linux/amd64/13.0/desktop/ directory and contains the following files.
  1. # ls /usr/portage/profiles/default/linux/amd64/13.0/desktop/ -l
  2. total 8
  3. -rw-r--r-- 1 portage portage 2Jan162013 eapi
  4. drwxr-xr-x 2 portage portage 30Jan162013 gnome
  5. drwxr-xr-x 2 portage portage 30Jan162013 kde
  6. -rw-r--r-- 1 portage portage 34Jan162013 parent
The gnome and kde represent the subprofiles, while the parent file is used to pull in additional profiles that constitutes the current profile. The parent file contains the following:
  1. # cat /usr/portage/profiles/default/linux/amd64/13.0/desktop/parent
  2. ..
  3. ../../../../../targets/desktop
In order to fully understand the profile we must pull in the parent directory as well as the “../../../../../targets/desktop” directory, which contains the following files:
  1. # ls /usr/portage/profiles/default/linux/amd64/13.0/
  2. desktop developer eapi no-multilib package.use.stable.mask parent selinux use.mask use.stable.mask x32

  3. # ls /usr/portage/profiles/targets/desktop/
  4. gnome kde make.defaults package.use
There are multiple files that can be used with each profile, but in our case the following files are used:
  • make.defaults:
  • package.use
  • package.use.stable.mask
  • use.mask
  • use.stable.mask
  • eapi
  • package.use
In addition, the referenced profiles can themselves reference other profiles, which are also pulled in. The most interesting files are make.defaults and package.use. The make.defaults contains all the default USE flags that will be used when building the system. The USE flags can be seen below.
  1. # cat /usr/portage/profiles/targets/desktop/make.defaults

  2. USE="a52 aac acpi alsa bluetooth branding cairo cdda cdr consolekit cups dbus dri dts dvd dvdr emboss encode exif fam firefox flac gif gpm gtk jpeg lcms ldap libnotify mad mng mp3 mp4 mpeg ogg opengl pango pdf png policykit ppds qt3support qt4 sdl spell startup-notification svg tiff truetype vorbis udev udisks unicode upower usb wxwidgets X xcb x264 xml xv xvid"
The package.use file is used to apply certain USE flags to specific packages, which can be seen below. The net-nds/openldap will be compiled with the minimal USE flags.
  1. # cat /usr/portage/profiles/targets/desktop/package.use | grep -v ^# | grep -v ^$

  2. /gvfs-1.14 gdu -udisks dev-libs/libxml2 python media-libs/libpng apng sys-apps/systemd gudev introspection keymap sys-fs/eudev gudev hwdb introspection keymap >=sys-fs/udev-171 gudev hwdb introspection keymap
  3. >=virtual/udev-171 gudev hwdb introspection keymap
  4. xfce-base/xfdesktop thunar
  5. net-nds/openldap minimal
If we run the “equery uses openldap” command, we’ll see that the minimal USE flag is enabled. The USE flags that will be used are presented in the picture below, where the red USE flags are enabled and blue USE flags are disabled. Notice that the minimal USE flag is red and therefore enabled.

If we edit /usr/portage/profiles/targets/desktop/package.use and comment out the “net-nds/openldap minimal” line and then rerun the “equery uses openldap” command, the minimal USE flag will be disabled, as can be seen below.

Therefore we can see how the USE flags affect the system we’re using. In order to select a hardened profile, we must run the command below to set the “hardened/linux/amd64″ profile.
  1. # eselect profile set 9
After setting the profile that we want, we can check whether the change was successful (notice that the ‘*’ character does not specify the “hardened/linux/amd64″ profile.
  1. # eselect profile list
  2. Available profile symlink targets:
  3. [1] default/linux/amd64/13.0
  4. [2] default/linux/amd64/13.0/selinux
  5. [3] default/linux/amd64/13.0/desktop
  6. [4] default/linux/amd64/13.0/desktop/gnome
  7. [5] default/linux/amd64/13.0/desktop/kde
  8. [6] default/linux/amd64/13.0/developer
  9. [7] default/linux/amd64/13.0/no-multilib
  10. [8] default/linux/amd64/13.0/x32
  11. [9] hardened/linux/amd64 *
  12. [10] hardened/linux/amd64/selinux
  13. [11] hardened/linux/amd64/no-multilib
  14. [12] hardened/linux/amd64/no-multilib/selinux
  15. [13] hardened/linux/amd64/x32
  16. [14] hardened/linux/uclibc/amd64
Note that by running the “eselect profile set 9” command we didn’t actually change anything in the system. We merely changed the profile that will be used when building and installing packages, which means the new USE flags will be used when packages are being installed. Therefore we must rebuild the system in order for the changes to take effect.
One of the important packages in the system are the ones that are actually used in building process, such as gcc, binutils, and glibc. Those packages are the heart of the Gentoo Linux system, since they are used to compile and link the packages. If we want to apply the hardened profile to those packages, we must rebuild them by issuing the emerge command.
  1. # emerge virtual/libc sys-devel/gcc sys-devel/binutils
Once the rebuilding is done, we’ll have a hardened toolchain ready to start building other packages by using the hardened profile. We also need to set the hardened gcc compiler as default. Note that we can choose gcc with both SSP and PIE enabled or disabled. We can display all available gcc versions with the “gcc-config -l” command, as seen below. The first option, which supports SSP as well as PIE, is already selected, so we don’t have to do anything.
  1. # gcc-config -l
  2. [1] x86_64-pc-linux-gnu-4.5.4 *
  3. [2] x86_64-pc-linux-gnu-4.5.4-hardenednopie
  4. [3] x86_64-pc-linux-gnu-4.5.4-hardenednopiessp
  5. [4] x86_64-pc-linux-gnu-4.5.4-hardenednossp
  6. [5] x86_64-pc-linux-gnu-4.5.4-vanilla
References:
[1] Hardened Gentoo http://www.gentoo.org/proj/en/hardened/.
[2] Security-Enhanced Linux http://en.wikipedia.org/wiki/Security-Enhanced_Linux.
[3] RSBAC http://en.wikipedia.org/wiki/RSBAC.
[4] Hardened/Toolchain https://wiki.gentoo.org/wiki/Hardened/Toolchain#RELRO.
[5] Hardened/PaX Quickstart https://wiki.gentoo.org/wiki/Project:Hardened/PaX_Quickstart.
[6] checksec.sh http://www.trapkit.de/tools/checksec.html.
[7] KERNHEAP http://subreption.com/products/kernheap/.
[8] Advanced Portage Features http://www.gentoo.org/doc/en/handbook/handbook-amd64.xml?part=3&chap=6.
[9] Elfix http://dev.gentoo.org/~blueness/elfix/.
[10] Avfs: An On-Access Anti-Virus File System http://www.fsl.cs.sunysb.edu/docs/avfs-security04/.
[11] Eicar Download, http://www.eicar.org/85-0-Download.html.
[12] Gentoo Security Handbook, http://www.gentoo.org/doc/en/security/security-handbook.xml.

How Configure an Android Development Environment on Linux

$
0
0
http://linuxaria.com/article/how-configure-an-android-development-environment-on-linux?lang=en

Original article (in spanish) posted on http://vidagnu.blogspot.it/
In this post I want to show the steps you must follow to have a Development Environment for Android in your Linux distro.
What do you need?
Let’s go !


As first thing install Java JDK 6, from the Oracle website it’s possible to download a .rpm.bin package or a .bin file, if you use an rpm based distribution such as Centos, Red hat, Fedora or Suse go for the first package, and if you have any problem check this article Install Sun/Oracle Java JDK/JRE 6u45 on Fedora 19/18, CentOS/RHEL 6.4/5.9
All the others users will have to use the .bin file, to verify that you have installed it you can use the command java -version from a terminal, you should see something similar at this:
java -version
java version "1.6.0_45"
Java(TM) SE Runtime Environment (build 1.6.0_45-b04)
Java HotSpot(TM) Server VM (build 20.6-b01, mixed mode)
Now declare the environment variable JAVA_HOME, the best way to do this it’s add these 2 lines in your ~/.bashrc file:
## export JAVA_HOME JDK ##
exportJAVA_HOME="/usr/java/jdk1.6.0_45"
and include the “bin” folder that is inside the JAVA_HOME in the PATH environment variable adding this extra line to your ~/.bashrc file:
exportPATH=$PATH:$JAVA_HOME/bin
Now proceed with the installation of Android SDK, to do it download the compressed file and unpack into /opt (or /usr/local if you prefer so), now you must create the ANDROID_HOME environment variable which should point to the folder /opt/android-sdk-linux, we must also add the directory “tools” that is within this newly created directory and contains the SDK executables in our PATH environment variable.
With this setup we have a basic framework to build applications for Android.
Now run the command “android” which will open the Android SDK Manager in which we will click on the button or link “New” to select all packages so they will be installed in our environment, this is the best time to take a coffee, as this process usually takes several minutes …
Now we need the IDE, we proceed with the unzip of ECLIPSE for Java Developers 3.7.2 in the /opt (or /usr/local) and add a new environment variable ECLIPSE that must contain /opt/eclipse.
To start Eclipse, run the command “eclipse”, the first time that you run the command it will say that you need to create your workspace which is basically a folder where you will store all the projects.
Now you just need to load the Android Plugin in Eclipse.
  1. Start Eclipse, then select Help > Install New Software.
  2. Click Add, in the top-right corner.
  3. In the Add Repository dialog that appears, enter “ADT Plugin” for the Name and the following URL for the Location:
    https://dl-ssl.google.com/android/eclipse/
  4. Click OK.If you have trouble acquiring the plugin, try using “http” in the Location URL, instead of “https” (https is preferred for security reasons).
  5. In the Available Software dialog, select the checkbox next to Developer Tools and clickNext.
  6. In the next window, you’ll see a list of the tools to be downloaded. Click Next.
  7. Read and accept the license agreements, then click Finish.If you get a security warning saying that the authenticity or validity of the software can’t be established, click OK.
  8. When the installation completes, restart Eclipse.
Upon completion you should see a new button that appear in the bar, which refer to Android, also when creating a new project you have the option of choose for Android as shown in the following screen:
android-eclipse-linux

Your visual how-to guide for SELinux policy enforcement

$
0
0
https://opensource.com/business/13/11/selinux-policy-guide

SELinux policy guide
 
We are celebrating the SELinux 10th year anversary this year. Hard to believe it. SELinux was first introduced in Fedora Core 3 and later in Red Hat Enterprise Linux 4. For those who have never used SELinux, or would like an explanation...
SElinux is a labeling system. Every process has a label. Every file/directory object in the operating system has a label. Even network ports, devices, and potentially hostnames have labels assigned to them. We write rules to control the access of a process label to an a object label like a file. We call this policy. The kernel enforces the rules. Sometimes this enforcement is called Mandatory Access Control (MAC). 
The owner of an object does not have discretion over the security attributes of a object. Standard Linux access control, owner/group + permission flags like rwx, is often called Discretionary Access Control (DAC). SELinux has no concept of UID or ownership of files. Everything is controlled by the labels. Meaning an SELinux system can be setup without an all powerful root process.
Note:SELinux does not let you side step DAC Controls. SELinux is a parallel enforcement model. An application has to be allowed by BOTH SELinux and DAC to do certain activities. This can lead to confusion for administrators because the process gets Permission Denied. Administrators see Permission Denied means something is wrong with DAC, not SELinux labels.

Type enforcement

Lets look a little further into the labels. The SELinux primary model or enforcement is called type enforcement. Basically this means we define the label on a process based on its type, and the label on a file system object based on its type.
Analogy
Imagine a system where we define types on objects like cats and dogs. A cat and dog are process types.
*all cartoons by Máirín Duffy
Image showing a cartoon of a cat and dog.
We have a class of objects that they want to interact with which we call food. And I want to add types to the food, cat_food and dog_food.
Cartoon Cat eating Cat Food and Dog eating Dog Food
As a policy writer, I would say that a dog has permission to eat dog_chow food and a cat has permission to eat cat_chow food. In SELinux we would write this rule in policy.
allow cat cat_chow:food eat; allow dog dog_chow:food eat
allow cat cat_chow:food eat;
allow dog dog_chow:food eat;
With these rules the kernel would allow the cat process to eat food labeled cat_chow and the dog to eat food labeled dog_chow.
Cartoon Cat eating Cat Food and Dog eating Dog Food
But in an SELinux system everything is denied by default. This means that if the dog process tried to eat the cat_chow, the kernel would prevent it.

Likewise cats would not be allowed to touch dog food.
Cartoon cat not allowed to eat dog fooda
Real world
We label Apache processes as httpd_t and we label Apache content as httpd_sys_content_t and httpd_sys_content_rw_t. Imagine we have credit card data stored in a mySQL database which is labeled msyqld_data_t. If an Apache process is hacked, the hacker could get control of the httpd_t process and would be allowed to read httpd_sys_content_t files and write to httpd_sys_content_rw_t. But the hacker would not be allowed to read the credit card data (mysqld_data_t) even if the process was running as root. In this case SELinux has mitigated the break in.

MCS enforcement

Analogy 
Above, we typed the dog process and cat process, but what happens if you have multiple dogs processes: Fido and Spot. You want to stop Fido from eating Spot's dog_chow.
SELinux rule
One solution would be to create lots of new types, like Fido_dog and Fido_dog_chow. But, this will quickly become unruly because all dogs have pretty much the same permissions.
To handle this we developed a new form of enforcement, which we call Multi Category Security (MCS). In MCS, we add another section of the label which we can apply to the dog process and to the dog_chow food. Now we label the dog process as dog:random1 (Fido) and dog:random2 (Spot).
Cartoon of two dogs fido and spot
We label the dog chow as dog_chow:random1 (Fido) and dog_chow:random2 (Spot).
SELinux rule
MCS rules say that if the type enforcement rules are OK and the random MCS labels match exactly, then the access is allowed, if not it is denied.
Fido (dog:random1) trying to eat cat_chow:food is denied by type enforcement.
Cartoon of Kernel (Penquin) holding leash to prevent Fido from eating cat food.
Fido (dog:random1) is allowed to eat dog_chow:random1.
Cartoon Fido happily eating his dog food
Fido (dog:random1) denied to eat spot's (dog_chow:random2) food.
Cartoon of Kernel (Penquin) holding leash to prevent Fido from eating spots dog food.
Real world
In computer systems we often have lots of processes all with the same access, but we want them separated from each other. We sometimes call this a multi-tenant environment. The best example of this is virtual machines. If I have a server running lots of virtual machines, and one of them gets hacked, I want to prevent it from attacking the other virtual machines and virtual machine images. But in a type enforcement system the KVM virtual machine is labeled svirt_t and the image is labeled svirt_image_t. We have rules that say svirt_t can read/write/delete content labeled svirt_image_t. With libvirt we implemented not only type enforcement separation, but also MCS separation. When libvirt is about to launch a virtual machine it picks out a random MCS label like s0:c1,c2, it then assigns the svirt_image_t:s0:c1,c2 label to all of the content that the virtual machine is going to need to manage. Finally, it launches the virtual machine as svirt_t:s0:c1,c2. Then, the SELinux kernel controls that svirt_t:s0:c1,c2 can not write to svirt_image_t:s0:c3,c4, even if the virtual machine is controled by a hacker and takes it over. Even if it is running as root.
We use similar separation in OpenShift. Each gear (user/app process)runs with the same SELinux type (openshift_t). Policy defines the rules controlling the access of the gear type and a unique MCS label to make sure one gear can not interact with other gears.
Watch this short video on what would happen if an Openshift gear became root.

MLS enforcement

Another form of SELinux enforcement, used much less frequently, is called Multi Level Security (MLS); it was developed back in the 60s and is used mainly in trusted operating systems like Trusted Solaris.
The main idea is to control processes based on the level of the data they will be using. A secret process can not read top secret data.
MLS is very similar to MCS, except it adds a concept of dominance to enforcement. Where MCS labels have to match exactly, one MLS label can dominate another MLS label and get access.
Analogy
Instead of talking about different dogs, we now look at different breeds. We might have a Greyhound and a Chihuahua.
Cartoon of a Greyhound and a Chihuahua
We might want to allow the Greyhound to eat any dog food, but a Chihuahua could choke if it tried to eat Greyhound dog food.
We want to label the Greyhound as dog:Greyhound and his dog food as dog_chow:Greyhound, and label the Chihuahua as dog:Chihuahua and his food as dog_chow:Chihuahua.
Cartoon of a Greyhound dog food and a Chihuahua dog food.
With the MLS policy, we would have the MLS Greyhound label dominate the Chihuahua label. This means dog:Greyhound is allowed to eat dog_chow:Greyhound and dog_chow:Chihuahua.
SELinux rule
But dog:Chihuahua is not allowed to eat dog_chow:Greyhound.
Cartoon of Kernel (Penquin) stopping the Chihahua from eating the greyhound food.  Telling him it would be a big too beefy for him.
Of course, dog:Greyhound and dog:Chihuahua are still prevented from eating cat_chow:Siamese by type enforcement, even if the MLS type Greyhound dominates Siamese.
 Cartoon of Kernel (Penquin) holding leash to prevent both dogs from eating cat food.
Real world
I could have two Apache servers: one running as httpd_t:TopSecret and another running as httpd_t:Secret. If the Apache process httpd_t:Secret were hacked, the hacker could read httpd_sys_content_t:Secret but would be prevented from reading httpd_sys_content_t:TopSecret.
However, if the Apache server running httpd_t:TopSecret was hacked, it could read httpd_sys_content_t:Secret data as well as httpd_sys_content_t:TopSecret.
We use the MLS in military environments where a user might only be allowed to see secret data, but another user on the same system could read top secret data.

Conclusion

SELinux is a powerful labeling system, controlling access granted to individual processes by the kernel. The primary feature of this is type enforcement where rules define the access allowed to a process is allowed based on the labeled type of the process and the labeled type of the object. Two additional controls have been added to separate processes with the same type from each other called MCS, total separtion from each other, and MLS, allowing for process domination.

Using TrueCrypt on Linux and Windows

$
0
0
http://dougvitale.wordpress.com/2013/11/18/using-truecrypt-on-linux-and-windows

After numerous revelations this year of the National Security Agency’s (NSA) frightening capabilities of mass spying on phone calls and Internet traffic (see, for example, PRISM), there has been a renewed interest in online privacy and the securing of our electronic data communications, such as Web and email activity. More and more Internet users are looking for solutions to keep their files, emails, and Web searches private. Help is not far off: one of the most effective ways to foil surveillance is by using encryption to make your data unreadable by other parties.
Data can be encrypted in two states – when it is in transmission through a communications network, or when it is at rest (i.e., stored on some sort of storage medium, such as a computer hard drive like the internal drive of your PC or an external USB flash drive). This blog has already covered SSH, RetroShare, and the Tor network as options for securing data in transit. Now we will look at TrueCrypt, perhaps the most popular solution for encrypting data at rest. This article will explain how TrueCrypt works and how you can utilize it on the two most popular operating systems, Microsoft Windows and Linux.
TrueCrypt logo

Jump to:


The basics of data-at-rest encryption

While technologies such as Tor and SSL/TLS protect the confidentiality of your data as it passes through computer networks (especially the Internet), they do not offer protection of the files you have stored, such as on internal and external hard drives. If an unauthorized user obtains physical access to your PC, laptop, smart phone, or USB flash drive, what then? A popular IT security maxim is: If a bad guy has unrestricted physical access to your data, it’s not your data anymore – he owns it. If access to the files on these devices is not restricted by encryption, then the intruder can easily view them. Since most of us have files which we do not wish to share with anybody or with only a select few individuals, it is recommended to lock down your computer drives with a solution like TrueCrypt. TrueCrypt and similar tools obscure your files by converting them into unreadable code which, for all intents and purposes, is undecipherable without the required key. As a result, your files will be safe from prying eyes if physical security measures of your drives are compromised (e.g., if your devices are ever stolen or seized). Not only does TrueCrypt make it simple to implement data-at-rest encryption, it’s free and easy to obtain.
↑ Up to page menu


TrueCrypt basics

Before you start to use TrueCrypt, you should be familiar with several terms which you will encounter when you install and configure it. These terms are:
Boot loader: a small program (along with a small amount of needed data) stored in read-only memory (ROM) which accesses the nonvolatile device or devices from which the operating system programs and data can be loaded into RAM. (Wikipedia)
Hard disk drive: a data storage device used for storing and retrieving digital information using rapidly rotating disks (platters) coated with magnetic material. (Wikipedia)
Hidden operating system: an instance of an operating system (for example, Windows 7 or Windows XP) that is installed in a hidden TrueCrypt volume. (TrueCrypt)
Hidden volume: a TrueCrypt volume created within another TrueCrypt volume (within the free space on the volume). (TrueCrypt)
Key: the variable used by cryptographic processes to perform encryption and decryption (i.e., to transform plain text to cipher text and vice versa). (Wikipedia)
Keyfile: A file whose content is combined with a password. Until the correct keyfile is provided, no volume that uses the keyfile can be mounted. (TrueCrypt)
Master boot record (MBR): a special type of boot sector at the very beginning of partitioned computer mass storage devices (like fixed disks or removable drives) that holds the information on how the logical partitions, containing file systems, are organized on that medium. The MBR also contains executable code to function as a loader for the installed operating system, usually by passing control over to the loader’s second stage or in conjunction with each partition’s volume boot record. (Wikipedia)
Mounting a drive: For a hard disk or any partitions with filesystems on that disk to be accessible by a computer, they must first be mounted. The mounting process “activates” the disk/filesystem, making folders and files on the readable by the operating system. If a hard drive is physically connected to a computer but not mounted, it won’t be recognized. (Wikipedia)
Partition: a logical storage unit on a single physical disk drive. Multiple partitions can act like multiple disks so that different filesystems can be used on each partition. (Wikipedia)
Password: the string of characters you have to enter to access a TrueCrypt volume. Also called a passphrase.
Volume: a single accessible storage area (logical drive) with a single file system, typically (though not necessarily) resident on a single partition of a hard disk. (Wikipedia)
↑ Up to page menu


Installing TrueCrypt on Linux

Like all software meant for use on Linux, you should always check to see if TrueCrypt is available in your Linux distribution’s software repository. If it is, you can download and install it with your distro’s package manager, whether in a shell prompt or with a graphical user interface (GUI) such as Synaptic. If TrueCrypt is not available in this manner, you can proceed to the official download page and acquire the software in tar.gz format there. Alternatively, if you know the filename of the tar.gz file, you can use the wget download manager to acquire it via a shell prompt:
64-bit operating system:
$ wget http://www.truecrypt.org/download/truecrypt-7.1a-linux-x64.tar.gz
32-bit operating system:
$ wget http://www.truecrypt.org/download/truecrypt-7.1a-linux-x86.tar.gz
Now extract the installation file from the compressed tar file:
$ tar -zxvf truecrypt-7.1a-linux-x64.tar.gz
Then launch the installer file:
# ./truecrypt-7.1a-setup-x64
or
$ sudo ./truecrypt-7.1a-setup-x64
↑ Up to page menu


Using TrueCrypt on Linux

When you launch TrueCrypt, you will see its main user interface.
TrueCrypt graphical user interface
Here is the TrueCrypt interface for setting user preferences.
Truecrypt preferences interface
The simplest way to start benefiting from TrueCrypt’s capabilities is to launch the Volume Creation Wizard and let it guide you through the process of encrypting your files.
Truecrypt Volume Creation Wizard
In Linux you also (not surprisingly) have the option to work with TrueCrypt from the non-graphical shell prompt using these command options.

TrueCrypt command options (Linux)

Description

truecrypt --auto-mount=devices|favoritesAuto mount device-hosted or favorite volumes.
truecrypt --backup-headers[=VOLUME_PATH]Backup volume headers to a file. All required options are requested from the user.
truecrypt -c or --create[=VOLUME_PATH]Create a new volume. Most options are requested from the user if not specified on command line. See also options --encryption, -k, --filesystem, --hash, -p, --random-source, --quick, --size, --volume-type. Note that passing some of the options may affect security of the volume (see option -p for more information).
Inexperienced users should use the graphical user interface to create a hidden volume. When using the text user interface, the following procedure must be followed to create a hidden volume:
1) Create an outer volume with no filesystem.
2) Create a hidden volume within the outer volume.
3) Mount the outer volume using hidden volume protection.
4) Create a filesystem on the virtual device of the outer volume.
5) Mount the new filesystem and fill it with data.
6) Dismount the outer volume.
If at any step the hidden volume protection is triggered, start again from step 1.
truecrypt -C or --change[=VOLUME_PATH]Change a password and/or keyfile(s) of a volume. Most options are requested from the user if not specified on command line. PKCS-5 PRF HMAC hash algorithm can be changed with option --hash. See also options -k, --new-keyfiles, --new-password, -p, --random-source.
truecrypt --create-keyfile[=FILE_PATH]Create a new keyfile containing pseudo-random data.
truecrypt -d or --dismount[=MOUNTED_VOLUME]Dismount a mounted volume. If MOUNTED_VOLUME is not specified, all volumes are dismounted. See below for description of MOUNTED_VOLUME.
truecrypt --delete-token-keyfilesDelete keyfiles from security tokens. See also command --list-token-keyfiles.
truecrypt --display-passwordDisplay password while typing.
truecrypt --encryption=ENCRYPTION_ALGORITHMUse specified encryption algorithm when creating a new volume.
truecrypt --exploreOpen explorer window for mounted volume.
truecrypt --export-token-keyfileExport a keyfile from a security token. See also command --list-token-keyfiles.
truecrypt -f or --forceForce mounting of a volume in use, dismounting of a volume in use, or overwriting a file. Note that this option has no effect on some platforms.
truecrypt --filesystem=TYPEFilesystem type to mount. The TYPE argument is passed to the mount command with option -t. Default type is ‘auto’. When creating a new volume, this option specifies the filesystem to be created on the new volume (only ‘FAT’ and ‘none’ TYPE is allowed). Filesystem type ‘none’ disables mounting or creating a filesystem.
truecrypt --fs-options=OPTIONSFilesystem mount options. The OPTIONS argument is passed to mount with option -o when a filesystem on a TrueCrypt volume is mounted. This option is not available on some platforms.
truecrypt -h or --helpDisplay detailed command line help.
truecrypt --hash=HASHUse specified hash algorithm when creating a new volume or changing password and/or keyfiles. This option also specifies the mixing pseudorandom function family (PRF) of the random number generator.
truecrypt --import-token-keyfilesImport keyfiles to a security token. See also option --token-lib.
truecrypt -k or --keyfiles=KEYFILE1[,KEYFILE2,KEYFILE3,...] Use specified keyfiles when mounting a volume or when changing password and/or keyfiles. When a directory is specified, all files inside it will be used (non-recursively). Multiple keyfiles must be separated by commas. Use double commas (,,) to specify a comma contained in keyfile’s name. Keyfile stored on a security token must be specified as
token://slot/SLOT_NUMBER/file/FILENAME. An empty keyfile (-k “”) disables interactive requests for keyfiles. See also options --import-token-keyfiles, --list-token-keyfiles, --new-keyfiles, --protection-keyfiles.
truecrypt -l or --list[=MOUNTED_VOLUME]Display a list of mounted volumes. If MOUNTED_VOLUME is not specified, all volumes are listed. By default, the list contains only volume path, virtual
device, and mount point. A more detailed list can be enabled by the verbose output option (-v).
truecrypt --list-token-keyfilesDisplay a list of all available security token keyfiles. See also command --import-token-keyfiles.
truecrypt --load-preferences Load user preferences.
truecrypt -m or --mount-options=OPTION1[,OPTION2,OPTION3,...]Specifies comma-separated mount options for a TrueCrypt volume as follows:
headerbak: Use backup headers when mounting a volume.
nokernelcrypto: Do not use kernel cryptographic services.
readonly|ro: Mount volume as read-only.
system: Mount partition using system encryption.
timestamp|ts: Do not restore host-file modification timestamp when a volume is dismounted (note that the operating system under certain circumstances does not alter host-file timestamps, which may be mistakenly interpreted to mean that this option does not work).
See also option --fs-options.
truecrypt --mount[=VOLUME_PATH] Mount a volume interactively. Volume path and other options are requested from the user if not specified on command line.
truecrypt [MOUNTED_VOLUME]Specifies a mounted volume. One of the following forms can be used:
1) Path to the encrypted TrueCrypt volume.
2) Mount directory of the volume’s filesystem (if mounted).
3) Slot number of the mounted volume (requires --slot).
truecrypt --new-keyfiles=KEYFILE1[,KEYFILE2,KEYFILE3,...]Add specified keyfiles to a volume. This option can only be used with command -C.
truecrypt --new-password=PASSWORDSpecifies a new password. This option can only be used with command -C.
truecrypt --non-interactiveDo not interact with the user.
truecrypt -p or --password=PASSWORDUse specified password to mount/open a volume. An empty password can also be specified (-p “”). Note that passing a password on the command line is potentially insecure as the password may be visible in the process list (see ps) and/or stored in a command history file or system logs.
truecrypt --protect-hidden=yes|noWrite-protect a hidden volume when mounting an outer volume. Before mounting the outer volume, the user will be prompted for a password to open the hidden volume. The size and position of the hidden volume is then determined and the outer volume is mounted with all sectors belonging to the hidden volume protected against write operations. When a write to the protected area is prevented, the whole volume is switched to read-only mode. Verbose list (-v -l) can be used to query the state of the hidden volume protection. Warning message is displayed when a volume switched to read-only is being dismounted.
truecrypt --protection-keyfiles=KEYFILE1[,KEYFILE2,KEYFILE3,...]Use specified keyfiles to open a hidden volume to be protected. This option may be used only when mounting an outer volume with hidden volume protected. See also options -k and --protect-hidden.
truecrypt --protection-password=PASSWORD Use specified password to open a hidden volume to be protected. This option may be used only when mounting an outer volume with hidden volume protected. See also options -p and –protect-hidden.
truecrypt --quickDo not encrypt free space when creating a device-hosted volume. This option must not be used when creating an outer volume.
truecrypt --random-source=FILEUse FILE as a source of random data (e.g., when creating a volume) instead of requiring the user to type random characters.
truecrypt --restore-headers[=VOLUME_PATH]Restore volume headers from the embedded or an external backup. All required options are requested from the user.
truecrypt --save-preferencesSave user preferences.
truecrypt --size=SIZEUse specified size in bytes when creating a new volume.
truecrypt --slot=SLOTUse specified slot number when mounting, dismounting, or listing a volume.
truecrypt -t or --textUse text user interface. Graphical user interface is used by default if available. This option must be specified as the first argument.
truecrypt --testTest internal algorithms used in the process of encryption and decryption.
truecrypt --token-lib=LIB_PATH Use specified PKCS #11 security token library.
truecrypt -v or --verboseEnable verbose output.
truecrypt --versionDisplay program version.
truecrypt --volume-properties[=MOUNTED_VOLUME]Display properties of a mounted volume.
truecrypt --volume-type=TYPEUse specified volume type when creating a new volume. TYPE can be ‘normal’ or ‘hidden’. See option -c for more information on creating hidden volumes.

TrueCrypt command line examples

Synopsis:
truecrypt [OPTIONS] COMMAND
truecrypt [OPTIONS] VOLUME_PATH [MOUNT_DIRECTORY]

Create a new volume:
truecrypt -t -c
Mount a volume:
truecrypt volume.tc /media/truecrypt1
Mount a volume as read-only, using keyfiles:
truecrypt -m ro -k keyfile1,keyfile2 volume.tc
Mount a volume without mounting its filesystem:
truecrypt --filesystem=none volume.tc
Mount a volume prompting only for its password:
truecrypt -t -k “” --protect-hidden=no volume.tc /media/truecrypt1
Dismount a volume:
truecrypt -d volume.tc
Dismount all mounted volumes:
truecrypt -d
If you experience problems trying to get TrueCrypt to work as desired on Linux, search for a solution in the Linux section of the official TrueCrypt discussion forum. You will need to create an account there to view and make posts.
↑ Up to page menu


Installing TrueCrypt on Windows

First head to the official TrueCrypt download page and download the setup file for Windows. When you launch the installer, you will be given the option to either perform a standard installation or just extract the contents of setup .exe file (if you choose the latter, you can copy the files to a USB Flash drive and run TrueCrypt in portable mode).
TrueCrypt installation options on Windows
↑ Up to page menu


Using TrueCrypt on Windows

The TrueCrypt GUI on Windows is very similar to the Linux version. There are, however, a few interesting differences. First, in the main TrueCrypt GUI on Windows you can see that the first column is called “Drive” rather than “Slot”, and potential drive letters are shown rather than numbers.
Truecrypt main interface on Windows
The Preferences interface on TrueCrypt for Windows is quite different from the Linux version.
Truecrypt preferences on Windows
You will also notice that the available options in the Volume Creation Wizard on Windows is different from what you see using Linux. Specifically, the option for “create a volume within a partition/drive” is absent; in its place are two others: “Encrypt a non-system partition/drive” and “Encrypt the system partition or entire system drive”. This discrepancy exists because “whole disk” system encryption is only available for the Windows OS.
Truecrypt Volume Creation Wizard on Windows
The TrueCrypt Beginner’s Tutorial gives a step-by-step account of enabling disk encryption using the Windows GUI. If you experience problems trying to get TrueCrypt to work as desired on Windows, search for a solution in the official TrueCrypt discussion forum. You will need to create an account there to view and make posts.

TrueCrypt command lines options on Windows

As in Linux, you can utilize TrueCrypt from a non-graphical command line environment if you wish. Sourced from the TrueCrypt Command Line Usage page.

TrueCrypt.exe command options (Windows)

Description

truecrypt.exe /a or /auto [devices | favorites]If no parameter is specified, automatically mount the volume. If devices is specified as the parameter, auto-mount all currently accessible device/partition-hosted TrueCrypt volumes. If favorites is specified as the parameter, auto-mount favorite volumes designated as “mount upon logon”. Note that /auto is implicit if /quit and /volume are specified. If you need to prevent the application window from appearing, use /quit.
truecrypt.exe /b or /beepBeep after a volume has been successfully mounted or dismounted.
truecrypt.exe /c or /cache [y | n]Enable or disable password cache, Note that turning the password cache off will not clear it (use /w to clear the password cache).
truecrypt.exe /d or /dismount [drive letter]Dismount volume specified by drive letter. When no drive letter is specified, dismounts all currently mounted TrueCrypt volumes.
truecrypt.exe /e or /exploreOpen a Windows Explorer window after a volume has been mounted.
truecrypt.exe /f or /forceForces dismount (if the volume to be dismounted contains files being used by the system or an application) and forces mounting in shared mode (i.e., without exclusive access).
truecrypt.exe /h or /history [y | n]Enables or disables saving the history of mounted volumes.
truecrypt.exe /help or /?Display command line help.
truecrypt.exe /k or /keyfiles [keyfile | search path]Specifies a keyfile or a keyfile search path. For multiple keyfiles, specify e.g.: /k c:\keyfile1.dat /k d:\KeyfileFolder /k c:\kf2. To specify a keyfile stored on a security token or smart card, use the following syntax: token://slot/SLOT_NUMBER/file/FILE_NAME.
truecrypt.exe /l or /letter [drive letter]Driver letter to mount the volume as. When /l is omitted and when /a is used, the first free drive letter is used.
truecrypt.exe /m or /mount [bk|rm|recovery|ro|sm|ts]bk or headerbak: Mount volume using embedded backup header. All volumes created by TrueCrypt 6.0 or later contain an embedded backup header (located at the end of the volume).
recovery: Do not verify any checksums stored in the volume header. This option should be used only when the volume header is damaged and the volume cannot be mounted even with the mount option headerbak.
rm or removable: Mount volume as removable medium.
ro or readonly: Mount volume as read-only.
ts or timestamp: Do not preserve container modification timestamp.
sm or system: Without pre-boot authentication, mount a partition that is within the key scope of system encryption (for example, a partition located on the encrypted system drive of another operating system that is not running). Useful e.g. for backup or repair operations.
Note: If you supply a password as a parameter of /p, make sure that the password has been typed using the standard US keyboard layout (in contrast, the GUI ensures this automatically). This is required due to the fact that the password needs to be typed in the pre-boot environment (before Windows starts) where non-US Windows keyboard layouts are not available.
truecrypt.exe format.exe /n or /noisocheckDo not verify that TrueCrypt Rescue Disks are correctly burned. Warning: never attempt to use this option to facilitate the reuse of a previously created TrueCrypt Rescue Disk. Note that every time you encrypt a system partition/drive, you must create a new TrueCrypt Rescue Disk even if you use the same password. A previously created TrueCrypt Rescue Disk cannot be reused as it was created for a different master key.
truecrypt.exe /p or /password [password]The volume password. If the password contains spaces, it must be enclosed in quotation marks (e.g., /p “My Password”). Use /p “” to specify an empty password. Warning: this method of entering a volume password may be insecure, for example, when an unencrypted command prompt history log is being saved to unencrypted disk.
truecrypt.exe /q or /quit [background|preferences]Automatically perform requested actions and exit (main TrueCrypt window will not be displayed). If preferences is specified as the parameter (e.g.,/q preferences), then program settings are loaded/saved and they override settings specified on the command line. /q background launches the TrueCrypt Background Task (tray icon) unless it is disabled in the Preferences.
truecrypt.exe /s or /silentIf /q is specified, suppresses interaction with the user (prompts, error messages, warnings, etc.). If /q is not specified, this option has no effect.
truecrypt.exe /v or /volume [volume]Path to a TrueCrypt volume to mount (do not use when dismounting). For a file-hosted volume, the path must include the filename. To mount a partition/device-hosted volume, use, for example, /v \Device\Harddisk1\Partition3 (to determine the path to a partition/device, run TrueCrypt and click ‘Select Device’). You can also mount a partition or dynamic volume using its volume name (for example, /v \\?\Volume{5cceb196-48bf-46ab-ad00-70965512253a}\). To determine the volume name use e.g. mountvol.exe. Also note that device paths are case-sensitive.
truecrypt.exe /w or /wipecacheWipes any passwords cached in the driver memory.

TrueCrypt.exe command line examples

Mount the volume d:\ myvolume as the first free drive letter, using the password prompt (the main program window will not be displayed):
truecrypt /q /v d:\myvolume
Dismount a volume mounted as the drive letter X (the main program window will not be displayed):
truecrypt /q /dx
Mount a volume called myvolume.tc using the password MyPassword, as the drive letter X. TrueCrypt will open an Explorer window and beep; mounting will be automatic:
truecrypt /v myvolume.tc /lx /a /p MyPassword /e /b
↑ Up to page menu


TrueCrypt tips and FAQs

Tips:
  • Before installing and using TrueCrypt, do a complete backup of your data and make sure the backup is valid.
  • When not using your device, shut it down. Do not simply lock the screen or go to sleep/hibernate mode.
  • Use the hidden OS feature in case you compelled to reveal your password unwillingly. The official TrueCrypt site states:
    When running, the hidden operating system appears to be installed on the same partition as the original operating system (the decoy system). However, in reality, it is installed within the partition behind it (in a hidden volume). All read/write operations are transparently redirected from the system partition to the hidden volume. Neither the operating system nor applications will know that data written to and read from the system partition is actually written to and read from the partition behind it (from/to a hidden volume). Any such data is encrypted and decrypted on the fly as usual (with an encryption key different from the one that is used for the decoy operating system).
  • Glue up Firewire, Thunderbolt, PCMCIA, etc. ports to prevent DMA attacks. A DMA attack occurs when the attacker has physical access to the device and to memory address space via physical connections like Firewire and PCMCIA. These hardware connections interface directly to the OS kernel and therefore have complete access to RAM. Special purpose hardware devices can read and write arbitrary data to a computer’s memory, including encryption keys. Example attack on Macs. (Wikipedia).
FAQs:
1. Can I be forced to provide my TrueCrypt password?
In the United Kingdom, if you do not do so you can be held criminally liable for such an offense as explained in these cases here, here, and here. US citizens should look closely at the Boucher case (decision (PDF); analysis), as well as the Judge Blackburn case in Colorado.
2. Why is TrueCrypt so difficult to crack?
Because it uses AES combined with PBKDF2 for key derivation. PBKDF2 is currently considered state of the art in passphrase expansion. It basically hashes the passphrase with a salt one thousand times to resist brute force attacks. The salt is an effective measure against rainbow tables.
3. Is there any way to defeat TrueCrypt?
Rather than defeating TrueCrypt’s cryptographic algorithms, it would be much easier to simply obtain the TrueCrypt password using illicit methods such as:
  • Evil maid attacks – occurs when an attack gains physical access to a target unbeknownst to the victim and installs malware such as keyloggers (Schneier).
  • Cold boot attacks – extract the encryption keys from RAM while the computer is still running and data is in a decrypted state (Wikipedia).
  • Rubber hose attacks – beating the person with a hose until they tell you the password, as shown here (Wikipedia).
4. I don’t like TrueCrypt/TrueCrypt doesn’t work for me. Are there any alternatives?
Have a look at Wikipedia’s comparison of disk encryption software.
↑ Up to page menu


Further reference

16s.us, TCHunt Truecrypt volume locator
Code.google.com, Cryptonite: EncFS and TrueCrypt on Android
Code.google.com, Truecrack brute-force password cracker for TrueCrypt
CryptographyEngineering.com, Let’s audit TrueCrypt (official Audit TrueCrypt)
Dailydot.com, Does being forced to decrypt a file violate the Fifth Amendment?
Delogrand.blogspot.fi, Extracting cached passphrases in Truecrypt
Github.com, TC-play TrueCrypt implementation
H-online.com, Attacking Truecrypt with TCHead
InfosecInstitute.com, Introduction to TrueCrypt
Media-addicted.de, Solid State Drives and TrueCrypt: durability and performance issues
Microsoft.com, CryptDB: Processing queries on an encrypted database (also CryptDB official)
Pingdom.com, How to secure your Google Drive with TrueCrypt (podcast)
Privacylover.com, Is there a backdoor in TrueCrypt?
Theregister.com, Brazilian banker’s crypto baffles the FBI
Truecrypt.org, TrueCrypt official FAQs
Volokh.com, 11th Circuit Finds 5th Amendment Right Against Self-Incrimination Protects Against Being Forced to Decrypt Hard Drive
YouTube.com, TrueCrypt on Kali Linux, TrueCrypt on Windows 7, and TrueCrypt on USB flash drives
ZDnet.com, Schneier research team cracks TrueCrypt (2008)

How to debug live PhoneGap apps

$
0
0
http://www.openlogic.com/wazi/bid/325805/How-to-debug-live-PhoneGap-apps


PhoneGap is a powerful tool for cross-platform mobile application development. You can debug the applications you develop with PhoneGap using a web browser or a smartphone emulator, but eventually you have to test your apps on actual devices. Doing this poses new challenges, because on these platforms you don't have access to your usual web development tools. Here are some ways to overcome this problem and debug your live app in a real user environment.
We'll be working with Android tools, because iOS developers have it easier: up to iOS 5 they could use Weinre (as we'll do; see below) or iWebInspector to remotely run a debug session. From iOS 6 onward they can use the included-by-default official Web Inspector, which obsoletes the other tools.
For testing, I wrote a simple application that allows a user to enter a city and country. It then shows the current weather for that location as provided by the Open Weather Map API. If the specified city isn't found, or if the user didn't type in a city, the application displays an alert. I created the application using PhoneGap's command-line interface, and just replaced the index.html with one of my own. I included in the code many logging messages.
The running app

The local way

Programmers usually include logging statements in their programs so they can follow the path of code execution. From JavaScript, you can generate log entries with statements such as console.log(...) and console.assert(...). A running PhoneGap application logs the output from these statements internally, and you can view them from a console. Not all console methods are available in the PhoneGap internal browser, however:
MethodDescription
console.log("a.string") or console.info("a.string")Outputs the given message to the console. It is shown as an information-level message.
console.warn("a.string")Outputs the given message as a warning, meaning a potential problem.
console.error("a.string")Outputs the given message as an error – a definite problem.
console.dir(some.object)This doesn't work (you just get a fairly useless "[object Object]" description). Check Douglas Crockford's code and write console.log(JSON.stringify(some.object)) instead.
console.assert(a.condition, "a.string")If the given condition is false, output the message as an error; otherwise, do nothing.
With Android, you could switch back and forth from your app to a console, using something like ConnectBot, to check the output of the logcat command. With a rooted phone, you can use grep as provided by BusyBox. Alternatively, you could use the catlog app, but for Android 4.1 and later, you need a rooted phone to use it.
Catlog
Catlog can show you all console output from your app.
An easier way to get at your log output uses adb, the Android Debug Bridge. Connect your smartphone to your PC and type adb shell | grep -i "web con" to see the filtered output of the log:
I/Web Console( 9938): onLoad - fired at file:///android_asset/www/index.html:24
I/Web Console( 9938): onLoad - exiting at file:///android_asset/www/index.html:26
I/Web Console( 9938): onDeviceReady - fired at file:///android_asset/www/index.html:30
W/Web Console( 9938): Alert Inform: Ready to work! at file:///android_asset/www/index.html:18
I/Web Console( 9938): onDeviceReady - exiting at file:///android_asset/www/index.html:32
I/Web Console( 9938): getWeather button clicked at file:///android_asset/www/index.html:36
I/Web Console( 9938): getWeather - location: new york city, usa at file:///android_asset/www/index.html:42
I/Web Console( 9938): getWeather - URL: http://api.openweathermap.org/data/2.5/weather?units=imperial&q=new%20york%20city%2C%20usa at file:///android_asset/www/index.html:46
I/Web Console( 9938): getWeather - AJAX call done at file:///android_asset/www/index.html:48
I/Web Console( 9938): showWeather - all OK, status 200 at file:///android_asset/www/index.html:54
I/Web Console( 9938): getWeather button clicked at file:///android_asset/www/index.html:36
I/Web Console( 9938): getWeather - location: qwertyuiop at file:///android_asset/www/index.html:42
I/Web Console( 9938): getWeather - URL: http://api.openweathermap.org/data/2.5/weather?units=imperial&q=qwertyuiop at file:///android_asset/www/index.html:46
I/Web Console( 9938): getWeather - AJAX call done at file:///android_asset/www/index.html:48
W/Web Console( 9938): showWeather - unexpected status 404 at file:///android_asset/www/index.html:63
W/Web Console( 9938): Alert Problem: Couldn't get data - check the city and country at file:///android_asset/www/index.html:18
You may want to try adb's interesting filters. In any case, with adb you can dynamically inspect all the logging your app produces, so you won't be working in the dark.
Of course working with logs and nothing else isn't so great, so let's try out a web inspector that can go beyond mere text messages.
Beware the Heisenbugs!
Heisenbugs (a portmanteau word that comes from Heisenberg, the physicist who first asserted that observing an event affects it, and "bug") are the worst kind of bugs – they seem to disappear whenever you try to find them. When you modify your program so you can debug it you can inadvertently change the conditions that lead to the bug. For example, you may modify timing conditions, or change a variable's value, and thereby make the error go away – until you remove your debugging code only to see the bug come up again! Weinre and similar tools can cause this weird behavior. Be warned, and don't give up looking if an error appears to be solved when you start debugging it.

The remote way

The local debugging method we've been seeing doesn't require modifying your source code (other than including logging statements) but doesn't lend itself to answering on-the-spot questions such as "what value does that variable have?" or "what did that function return?" In web development, you have access to all sorts of developer tools, but when you are running the app in a smartphone, you don't – but there's a solution!
Weinre, which stands for Web Inspector Remote, is a debugger designed to work remotely, over the web. It allows you to debug your PhoneGap app, which, after all, is just HTML code running on a special browser. Weinre runs on Node.js (for more conventional uses of Node.js, see Using Node.js to write RESTful web services). Installation is simple, requiring a mere sudo npm install -g weinre command. Weinre has many configuration runtime options, but you can do with weinre --boundHost -all-, which just starts Weinre running, listening to all possible clients.
WeinreThe main page for a running Weinre instance, ready for clients to connect to it.
To enable Weinre debugging, inject in your index.html page before compiling it into an app and uploading it to a device. Then, open http://your.own.server:8080/client/#your.code in your browser, fire up the app in the device, and you'll be able to run a debugging session at your browser.
Weinre connectedA remote app has connected to a Weinre server.
Useful Weinre tabs include Console, which shows you a full console, and Elements, which provides access to the underlying document. The figure below shows the output on the Console tab, which matches what we saw earlier above.
Weinre consoleThe Console tab shows all console output, and also lets you work with JavaScript.
In the console you can also execute JavaScript code (see the last line above), examine variables, and more, as if you were debugging an app at your own browser. The Elements tab lets you work with the DOM and examine all the elements and styles in your page.
Weinre ElementsThe Elements tab lets you dynamically inspect your web page.
Check the documentation for more on the other tabs: Resources, having to do with local storage; Network, dealing with XmlHttpRequest calls to servers (no other calls are shown); and Timeline, showing time spent. If you already use similar tools you'll feel right at home with Weinre.

The PhoneGap Build way

If you don't care to install Weinre at your server, you can make do by using PhoneGap's own debug service: Enter an ID, inject an script in your index.html file, and click on the given link to start debugging by using a remote Weinre instance.
PhoneGap debugPhoneGap also provides its own Weinre instance if you don't want or have one of your own.
You can also configure the PhoneGap Build service to inject the required script on its own, so when you build your app it will be ready for remote debugging: Click on your app, then click on Settings, and check the Enable Debugging box.
PhoneGap configYou can configure the PhoneGap Build Service to enable debugging on its own.
This method can cause a performance hit, but you can use it anywhere, outside your development network, so it's worth considering.

In conclusion

One last point: If you develop with Google Web Toolkit and you've read my previous articles on using GWT with PhoneGap – Create mobile apps easily with GWT and PhoneGap and Using GWT and PhoneGap for complex mobile applications– you'll be happy to hear that you can use the methods in this article with GWT+PhoneGap apps.
When it comes to debugging your PhoneGap app in the real world, you have several tools at your disposal to remotely check your code. Give them a try for your next project!

How to stitch photos together on Linux

$
0
0
http://xmodulo.com/2013/12/stitch-photos-together-linux.html

If you are an avid photographer, you will probably have several stunning panoramic photos in your portfolio. You don't have to be a professional photographer, nor need specialized equipment to create dramatic panoramic pictures. In fact, there are quite a few picture stitch apps (online or offline, desktop or mobile), which can easily create a panoramic view of a scene from two or more overlapping pictures.
In this tutorial, I will explain how to stitch photos together on Linux. For that, I am going to use panoramic photo stitching software called Hugin.
Hugin is an open-source (GPLv2) free panorama photo stitching tool. It is available on multiple platforms including Linux, Windows, OS X, and FreeBSD. Being open-source freeware does not mean that Hugin won't match up to other commercial photo stitchers in terms of features and quality. On the contrary, Hugin is extremely powerful, capable of creating a 360-degree panoramic image, and featuring various advanced photometric corrections and optimizations.

Install Hugin on Linux

To install Hugin on Debian, Ubuntu or Linux Mint:
$ sudo apt-get install hugin
To install Hugin on Fedora:
$ sudo yum install hugin

Launch Hugin

Use hugin command to launch Hugin.
$ hugin
The first thing to do is to load photos that you want to stitch together. For that, click on "Load images" button, and load (two or more) pictures to join. It should be obvious, but individual pictures need to be overlapping with each other.

First Round of Photo Stitching

After loading pictures, click on "Align" button for the first round of stitching.

Hugin will then run stitching assistant in a separate window, which analyzes common keypoints (or control points) between photos to combine the photos properly. After analysis is completed, you will see a panorama preview window, which will display panorama preview.

Switch back to the Hugin's main window. Under the "Align" button, you will see the status of photo stitching (i.e., number of control points, mean error). It will also say whether fit is good or bad.

If it says "bad" or "really bad" fit, you can go ahead and fine-tune picture alignment as demonstrated below.

Add or Remove Control Points

In the main Hugin window, go to "Control Points" tab. In this tab, Hugin shows which common control points are used to join multiple photos. It shows a pair of photos in left/right panels, and common key points between them are visualized with small boxes of the same color. You can remove any spurious points, or add new common points by hand. The more accurately matched points there are, the better quality stitching you will get. Also, if matched control points are well spread-out, they will be more helpful (than highly clustered control points).

Using the left/right arrow buttons located at the top-center, find a pair of photos which have least common control points. Given such a pair, try adding more common points by hand as follows.
Click one spot on a left-side photo, and then click on the corresponding identical spot on a right-side photo. Hugin will try to fine-tune the match automatically. Click on "Add" button at the bottom to add the matched pair. Repeat this process to add additional common points.

Other Optimizations

You can also try re-optimization. Either click on "Re-optimize" button in the toolbar, or go to "Optimizer" tab to fine-tune the optimization.

Go back to "Assistant" tab in the main Hugin window, and click on "Align" button again to see if you get a better result.
If the combined panoramic view has a wavy horizon, you can straighten out the horizon. For that, click on "Preview panorama" button in the toolbar.

Then click on "Straighten" button in the Panorama preview window.

Once you are satisfied with the stitch result, you can go ahead, and export it to an image file. For that, go to "Stitcher" tab in the Hugin's main window, and do the following.
Adjust canvas size, and amount of crop. Also, select output format (e.g., TIFF, JPEG, PNG). Finally, click on "Stitch!" button.

You will be asked to save a current project file (*.pto), and then specify output file name for the stitched photo.
It will take a couple of seconds to finalize photo stitch.
Here is the output of my experiment with Hugin. This is a beautiful panoramic view of luxury beach front in Cancun, Mexico. :-)

Vim tips and tricks for developers

$
0
0
http://www.openlogic.com/wazi/bid/326642/Vim-tips-and-tricks-for-developers


The Vim text editor provides such a vast set of features that no matter how much you know, you can still learn new and better techniques. If you're a programmer, here are some tips and tricks to help you do things such as compile your code from within Vim, or save your changes when you've edited a file but later realized that you should have opened it using sudo.
To take advantage of these tips you should have a basic understanding of Vim editor modes and understand the difference between normal and command-line modes.

Delete complete words

Suppose you're writing a program that has a function declaration like
void anExampleOfAVeryLongFunctionName(int a, char b, int *c);
and suppose you wanted to declare five more functions with the same return types and arguments. You'd probably copy and paste the existing declaration five times, delete the function name in each declaration, and replace it with the new function name. To speed things up, instead of deleting the name using the backspace key, place the cursor on the function name and enter diw to delete the whole function name in a go.
Generally speaking, use diw to delete complete words. You can also use ciw to delete complete words and leave the editor in insert mode.

Delete everything between parentheses, braces, and quotes

Suppose you have a situation similar to the first example in which you need five more function declarations with the same name and return type, but with different arguments – a practice known as function overloading.
Again, the common solution would be to copy and paste the first declaration five times, delete the individual argument lists, and replace them with new argument lists. A better solution is to move the cursor below the opening parentheses and enter the di( command to delete the complete argument list. Similarly, ci( deletes the list and leaves the editor in insert mode with the cursor positioned between the parentheses.
Along similar lines, the di" and ci" commands delete text between double quotes, and the di{ and ci{ commands delete the text between braces.

Compile code from within the editor

Programmers usually exit Vim or use a different window or tab to compile the code they've just edited, which can waste a lot of time when you do it repeatedly. However, Vim lets you run shell commands, including compiles, from within the editor by entering :! command. To compile the C program helloworld.c from within the file, for instance, you would use the command:
:! gcc -Wall helloworld.c -o helloworld
The output of the command is displayed at the command prompt. You can continue working at the command prompt or press Enter to go back to the editor. If you've already executed a command this way, you can simply type :! next time and use the up and down arrow keys to select the command.
Rarely, you may need to copy and paste the output of a command into a file you're editing into Vim. You can do that with the command
:.! command
This takes the content of the buffer displayed at the command prompt and pastes it into the code. The dot (.) between the colon and the exclamation represents the current line. If you want to dump the output at some other line, say line number 3, you can enter :3! command.

Save typing and improve accuracy with abbreviations

Programmers tend to do a lot of debugging by adding print statements. For a C program, for instance, you might add multiple printf() statements by writing one statement, copying it, pasting it elsewhere, then replacing the debugging text.
You can reduce the time this takes by creating an abbreviation for printf()– or for any text string. The following command creates the abbreviation pf for printf("\n \n");:
:ab pf printf("\n \n");
After you've created this abbreviation, whenever you type pf and press the space bar, Vim will enter the complete function call. An abbreviation declared this way lasts only for that particular editing session. To save the abbreviation so that it is available every time you work on Vim, add it (without the colon) to the file /etc/vim/vimrc.
You can also use abbreviations with opening braces, brackets, and quotes so that their closing counterparts appear automatically with a command such as :ab ( ().
To disable an abbreviation use the command
:unab abbreviation

Use % to jump between parenthesis and brace delimiters

Sometimes, while performing a code review or debugging a compilation error, you may need to match and jump between opening and closing parentheses or braces – a task that may not be easy if you have complicated conditions and densely nested code blocks. In these situations, move the cursor to an opening or closing brace or parenthesis and press %. The cursor will automatically jump to the matching delimiter.

Use . to repeat the last edit

Sometimes developers define functions by copying and pasting declarations from header files to source files, removing the trailing semicolons, and adding a function body. For instance, consider this set of declarations:
int func1(void);
int func2(void);
int func3(void);
int func4(void);
int func5(void);
Here's a trick that makes adding bodies to all these functions easier:
  • Make sure that Vim is in normal mode.
  • Move the cursor to the beginning of the declaration of func1 – that is, below the i.
  • Press A. The cursor should move past the last character in the line (;) and the editor should enter insert mode.
  • Use the backspace key to delete the semicolon.
  • Press Enter.
  • Add a pair of braces and a return statement between them.
At this stage, the declaration set should look like:
int func1(void)
{
return 0;
}
int func2(void);
int func3(void);
int func4(void);
int func5(void);
  • Press Esc to make sure that the editor is back in normal mode.
  • Press j. four times to move down to subsequent lines and make similar changes to the remaining four functions.
Generally speaking, you can use dot (.) to repeat the last edit you made to the file.

Select large number of lines using visual mode

As we have seen, programmers do a lot of copy-and-paste work within their code. Vim provides nyy and ndd commands to copy and delete n lines at a time, but counting a large number of lines is a tedious and time-consuming task. Instead, you can select lines just as you'd do in a graphical text editor by enabling visual mode in Vim.
For example, consider the following C code:
vim helloworld resized 600
To select both the main() and func1() functions, first move the cursor to the beginning of main() function, then press v to invoke visual mode. Use the down arrow key to select all the lines you want:
vim select lines resized 600
Finally, use the yy or dd commands to copy or delete the selected lines.

More tips

Here are a few more commands in normal mode that can help programmers save time:
  • Use the = command to indent a line and =G to indent a file from the current cursor position to the end of the file. You can also use gg=G to indent a complete file irrespective of the cursor position. To define the indentation width, use :set shiftwidth=numberOfSpaces.
  • Programmers who work on Image, video and audio files can use :%!xxd to convert Vim into a hex editor, and :%!xxd -r to revert back.
  • Use :w !sudo tee % to save a file that requires write permissions but that you accidentally opened without using the sudo command.
Learn these tricks and use them in your day-to-day programming work to save time. You may also want to read a few related articles on Wazi: Tips for Using Vim as an IDE, Vim Undo Tips and Tricks, and Create Your Own Syntax Highlighting in Vim.

Life cycle of a process

$
0
0
http://www.linuxuser.co.uk/features/life-cycle-of-a-process

The life cycle of processes in Linux is quite similar to that of humans. Processes are born, carry out tasks, go to sleep and finally die (or get killed)


Processes are one of the most fundamental aspects of Linux. To carry out any task in the system, a process is required. A process is usually created by running a binary program executable, which in turn gets created from a piece of code.

It is very important to understand the transition of a piece of code to a process, how a process is born, and the states that it acquires during its lifetime and death.

In this article, we will explore in detail how a piece of code is converted first into a binary executable program and then into a process, identifiers associated with a process, the memory layout of a process, different states associated with a process and finally a brief summary of the complete life cycle of a process in Linux.

So, in short, if you are new to the concept of computing processes and are interested in learning more about it, read on…

A process is nothing but an executable program in action. While an executable program contains machine instructions to carry out a particular task, it is when that program is executed (which gives birth to a corresponding process) that the task gets done. In the following section, we will start from scratch and take a look at how an executable program comes into existence and then how a process is born out of it.

From code to an executable program

In this section we will briefly discuss the transformation of a piece of code to a program and then to a process.

The life of a software program begins when the developer starts writing code for it. Each and every software program that you use is written in a particular programming language. If you are new to the term ‘code’ then you could simply think of it as a set of instructions that the software program follows for its functioning. There are various software programming languages available for writing code.

Now, once the code is written, the second step is convert it into an executable program. For code written in the C language, you have to compile it to create an executable program. The compilation process converts the instructions written in a software programming language (the code) into machine-level instructions (the program executable). So, a program executable contains machine code that can be understood by the operating system.

A compiler is used for compiling software programs. To compile C source files on Linux, the GCC compiler can be used. For example, the following command can be used to convert the C programming language source file (helloWorld.c) into an executable program (hello):
gcc -Wall helloWorld.c -o hello

This command should produce an executable program named ‘hello’ within the current working directory.

From an executable program to a process

An executable program is a passive entity that does nothing until it is run; but when it is run, a new entity is created which is nothing but a process. For example, an executable program named hello can be executed by running the command ./hello from the directory where hello is present.

Once the program is executed, you can check through the ps command that a corresponding process is created. To learn more about the ps command, read its manpage.

There are three particularly important identifiers associated with a process in Linux and you can learn about Process ID, Parent Process ID and Group ID in the boxout over the page.

You will note that a process named init is the first process that gets created in a Linux system. Its process ID is 1. All the other processes are init’s children, grandchildren and so on. The command pstree can be used to display the complete hierarchy of active processes in a Linux system.

Memory layout of a Linux process

The memory layout of a Linux process consists of the following memory segments…
Stack– The stack represents a segment where local variables and function arguments (that are defined in program code) reside. The contents on stack are stored in LIFO (last in, first out) order. Whenever a function is called, memory related to the new function is allocated on stack. As and when required, the stack memory grows dynamically but only up to a certain limit.
Memory mapping– This region is used for mapping files. The reason for this is that the input/output operations on a memory-mapped file are not processor and time expensive as compared to I/O from disk (where files are usually stored). As a result, this region is mostly used for loading dynamic libraries.
Heap– There are two main limitations of stack: one is that the stack size limit is not very high and secondly, all the variables on stack are lost once the function (in which they are defined) ends or returns. This is where the heap memory segment comes in handy. This segment allows you to allocate a very large chunk of memory that has both the same scope and lifetime as the complete program. This means that a memory allocated on heap is not deallocated until the program terminates or the programmer frees it explicitly through a function call.
BSS and data segments– The BSS segment stores those static and global variables that are not explicitly initialised, while the data segment stores those variables that are explicitly initialised to some value. Note that global variables are those which are not defined inside any function and have the same scope and lifetime as a program. The only exception are the variables that are defined inside a function but with a static keyword – their scope is limited to the function. These variables also share the same segment where the global variables reside: the BSS or the data segment.
Text segment– This segment contains all the machine-level code instructions of the program for the processor to read and execute them. You cannot modify this segment through the code, as this segment is write-protected. Any attempt to do so results in a program crash or segmentation fault.

Note: In the real world, the memory layout is actually a bit more complex, but this simplified version should give you enough idea about the concept.

Different states of a Linux process

To have a dynamic view of a process in Linux, always use the top command. This command provides a real-time view of the Linux system in terms of processes. The eighth column in the output of this command represents the current state of processes. A process state gives a broader indication of whether the process is currently running, stopped, sleeping etc. These are some important terms to understand. Let’s discuss different process states in detail.

A process in Linux can have any of the following four states…
Running– A process is said to be in a running state when either it is actually running/ executing or waiting in the scheduler’s queue to get executed (which means that it is ready to run). That is the reason that this state is sometimes also known as ‘runnable’ and represented by R.
Waiting or Sleeping– A process is said to be in this state if it is waiting for an event to occur or waiting for some resource-specific operation to complete. So, depending upon these scenarios, a waiting state can be subcategorised into an interruptible (S) or uninterruptible (D) state respectively.
Stopped– A process is said to be in the stopped state when it receives a signal to stop. This usually happens when the process is being debugged. This state is represented by T.
Zombie– A process is said to be in the zombie state when it has finished execution but is waiting for its parent to retrieve its exit status. This state is represented by Z.

Apart from these four states, the process is said to be dead after it crosses over the zombie state; ie when the parent retrieves its exit status. ‘Dead’ is not exactly a state, since a dead process ceases to exist.

A process life cycle

From the time when a process is created, to the time when it quits (or gets killed), it goes through various stages. In this section, we will discuss the complete life cycle of a Linux process from its birth to its death.

When a Linux system is first booted, a compressed kernel executable is loaded into memory. This executable creates the init process (or the first process in the system) which is responsible for creation of all the other processes in a Linux system.

A running process can create child processes. A child process can be created in two ways: through the fork() function or through exec(). If fork() is used, the process uses the address space of the parent process and runs in the same mode as that of parent. The new (child) process gets a copy of all the memory segments from the parent but keeps on using the same segments until either (parent or child) tries to modify any segment. On the other hand, if exec() is used, a new address space is assigned to the process and so a process created through exec() first enters the kernel mode. Note that the parent process needs to be in the running state (and actually being executed by the processor) in order to create a new process.

Depending upon the kernel scheduler, a running process may get preempted and put into the queue to processes ready for execution.

If a process needs to do things such as acquiring a hardware resource or a file I/O operation, then the process usually makes a system call that results in the process entering the kernel mode. Now, if the resource is busy or file I/O is taking time, then the process enters into the sleeping state. When the resource is ready or the file I/O is complete, the process receives a signal which wakes up the process and it can continue running in kernel mode or can go back to user mode. Note that there is no guarantee that the process would start executing immediately, as it purely depends on the scheduler, which might put the process into the queue of processes ready for execution.

If a process is running in debug mode (ie a debugger is attached to the process), it might receive a stop signal when it encounters a debug breakpoint. At this stage the process enters the stop state and the user gets time to debug the process: memory status, variable values etc.

A process might return or quit gracefully or might get killed by other processes. In either case, it enters into zombie state where, except for the entry of the process in the process table (maintained by kernel), there is nothing left for a process. This entry is not wiped out until the parent process fetches the return status of the process. A return status signifies whether the process did its work correctly or it encountered some error. The command echo $? can be used to fetch the status of the last command run through the command line (by default, only a return status of 0 means success). Once the process enters the zombie state, it cannot go back to any other state because there is nothing left for that process to enter into any other state.

If the parent process gets killed before the child process, then child process becomes an orphan. All the orphan processes are adopted by the init process, which means that init becomes the new parent of these processes.

How to develop cross-platform mobile apps on Linux

$
0
0
http://xmodulo.com/2013/12/develop-cross-platform-mobile-apps-linux.html

The last few years have witnessed dramatic growth of the mobile market, mostly driven by a large selection of applications. As consumers, we all hate to see some kind of market monopoly by any one platform. The more competition, the more innovation. As developers, we have mixed feelings about cross-platform development. Cross-platform development has several cons; poor platform integration, inflexible design, etc. On the other hand, we can reach a wider market with more consumers, and can offer uniform look and feel for our app across various platforms.
Today, almost all modern mobile platforms provide object-oriented APIs. Thus there is no reason not to build multi-platform apps. In this tutorial, we will walk you through the basics of cross-platform development. As a cross-platform SDK, we will use Titanium SDK from Appcelerator.

What do we need?

  • Understanding of Java
  • PC
  • Android SDK
  • Titanium SDK
Titanium as a development platform allows you to produce from a single source native apps for Apple iOS as well as Google Android. It uses Java as a primary language, and can work with HTML and JavaScript as well. It does not rely on WebUI, and is extensible. Modules can be written in Objective-C.
For people who are good at Java and HTML, Titanium is a good start in mobile development. To develop Android apps, you will need Android SDK and for iOS apps, Mac. Lucky for us, once you have a code, you can import it into Titanium on Mac, and compile it for iOS.
For Titanium SDK to work properly, we will need:
  • Oracle Java JDK 6 or 7
  • Node.js
  • Android SDK and Android NDK
  • At least 2 Gb of RAM
Download Titanium SDK from here (sign-up required).

When Titanium finishes downloading, go to download directory and extract it to /opt.
$ sudo unzip titanium.linux.gtk.x86_64.zip -d /opt
Next go to terminal, and set path.
$ echo 'export MOZILLA_FIVE_HOME=/usr/lib/mozilla'>> ~/.bashrc
$ source ~/.bashrc
Next we have to install all dependencies for Titanium SDK.
On Ubuntu or Debian, we will use apt-get:
$ sudo apt-get install libjpeg62 libwebkitgtk-1.0-0 lib32z1 lib32ncurses5 lib32bz2-1.0
On Fedora, use yum:
$ sudo yum install libjpeg62 libwebkitgtk-1.0-0 lib32z1 lib32ncurses5 lib32bz2-1.0
After installing dependencies, we have to relocate Titanium as follows.
$ sudo ln -s /opt/Titanium_Studio/TitaniumStudio /usr/local/bin/TitaniumStudio
Before we run Titanium SDK for the first time, we have to make a build directory for Titanium. Usually I have in my /home directory a folder named "builds" with sub folders for all my projects. Let us make a build directory.
$ mkdir ~/builds
With a build directory created, launch Titanium.
$ TitaniumStudio

Log in with your user account created during downloading Titanium SDK, and navigate it to your build directory.

Titanium SDK's work window is connected to your account created earlier. It provides rich information and a lot of help. On the left side, we can choose between creating a new project or importing an old project. For this tutorial, we will make a new project, so select "Create Project" tab.

In a new project window, we can choose among multiple templates. For this tutorial, we will choose a default project template.

After this, we have to name the project. Put in app id and company URL. App id is inverse from company URL and ends with .appname. Our site URL is http://xmodulo.com, and our app is named "firstapp". That makes our app id "com.xmodulo.firstapp".

With the named project, we need to select Android components. I usually select all of them.

Titanium will download and configure all needed components, as well as update old ones. After downloading and installing Android components, Titanium will automatically open a working window for our project.

A work window consists of two tabs: app.js and app editor. App.js is for coding, and app editor window is used to provide app information.
With Titanium set up, let us create some simple code in app.js window to learn Titanium's basic elements.
The most important element in Titanium is a window element. Windows are nothing complicated. You can think of a window as a container of your work. For a particular application, you can add one or more windows. The next important element is a view element which is a rectangle that can hold other elements, like tag in HTML. Also important elements are tag groups and tags. How do they work? Each tag group holds one or more tags, and each tag controls windows.

Simple app build

In this part of the tutorial, we will build a simple app with only main elements. First, let us specify some basic things, like pixels. Pixel sizes are not in standard px notation, but in percentage, and are required to be written as string.
1
2
3
4
...
top,20,
width:"50%"
...
For colors we don't use names as they are in hexa-decimal RGB code.
1
2
3
4
...
backgroundColor:"#f00",
borderColor:"#87C8FF"
...
And now using the function Titanium.UI.createWindow, we can create our first windows, and elaborate a little.
1
2
3
4
var win1 = Titanium.UI.createWindow({ 
    title:'Tab 1',
    backgroundColor:'#fff'
});
What does this code mean? It says that we pass to the createWindows function an argument with all properties. The logic behind those elements is simple.
The tagGroup is the application's root, and cannot be included in some other elements. It holds the tabs and each tab holds its own windows. Let us bring all that together, and build a simple app that demonstrates windows, tabs, and views.
1
2
// create tab group
var tabGroup = Titanium.UI.createTabGroup();
Now let us create some windows and tabs.
1
2
3
4
5
6
7
8
9
10
11
12
13
14
15
16
17
18
19
20
21
22
23
// create base UI tabs and windows
  
var win1 = Titanium.UI.createWindow({ 
    title:'I am Window 1.',
    backgroundColor:'#fff'
});
 
var tab1 = Titanium.UI.createTab({ 
    icon:'KS_nav_views.png',
    title:'Tab 1',
    window:win1
});
  
var win2 = Titanium.UI.createWindow({ 
    title:'I am Window 2',
    backgroundColor:'#fff'
});
 
var tab2 = Titanium.UI.createTab({ 
    icon:'KS_nav_views.png',
    title:'Tab 2',
    window:win2
});
With that, let us connect it all together into one.
1
2
3
4
5
6
//  add tab
tabGroup.addTab(tab1); 
tabGroup.addTab(tab2);
 
// open tab group
tabGroup.open();
After having written our code, we need to define its look. For that we will use a label element. With the label element, we can add a background wallpaper for our app, define native font and colors. Also, it allows defining the look of other elements. For our app, we will define the look of window elements. Let us make a simple label element for our app.
1
2
3
4
5
6
7
var label1 = Titanium.UI.createLabel({
    color:'#999',
    text:'I am Window 1',
    font:{fontSize:20,fontFamily:'Helvetica Neue'},
    textAlign:'center',
    width:'auto'
});
And how does the source code look together?
1
2
3
4
5
6
7
8
9
10
11
12
13
14
15
16
17
18
19
20
21
22
23
24
25
26
27
28
29
30
31
32
33
34
35
36
37
38
39
40
41
42
43
44
45
46
47
48
49
50
51
52
53
// create tab group
var tabGroup = Titanium.UI.createTabGroup();
  
// create base UI tabs and root windows
  
var win1 = Titanium.UI.createWindow({ 
    title:'Tab 1',
    backgroundColor:'#fff'
});
 
var tab1 = Titanium.UI.createTab({ 
    icon:'KS_nav_views.png',
    title:'Tab 1',
    window:win1
});
 
var label1 = Titanium.UI.createLabel({
    color:'#999',
    text:'I am Window 1',
    font:{fontSize:20,fontFamily:'Helvetica Neue'},
    textAlign:'center',
    width:'auto'
});
 
win1.add(label1);
 
var win2 = Titanium.UI.createWindow({ 
    title:'Tab 2',
    backgroundColor:'#fff'
});
 
var tab2 = Titanium.UI.createTab({ 
    icon:'KS_nav_views.png',
    title:'Tab 2',
    window:win2
});
 
var label2 = Titanium.UI.createLabel({
    color:'#999',
    text:'I am Window 2',
    font:{fontSize:20,fontFamily:'Helvetica Neue'},
    textAlign:'center',
    width:'auto'
});
 
win2.add(label2);
 
//  add tab
tabGroup.addTab(tab1);
tabGroup.addTab(tab2); 
 
// open tab group
tabGroup.open();

And this is what our simple app looks like when run in Android emulator.

This code is small and simple, but is a very good way to begin cross-platform development.

Unix: When a bash script asks "Where am I?"

$
0
0
http://www.itworld.com/operating-systems/386139/unix-when-bash-script-asks-where-am-i

When a question like "How can a bash script tell you where it's located?" pops into your head, it seems like it ought to be a very easy question to answer. We've got commands like pwd, but ... pwd tells you where you are on the file system, not where the script you are calling is located. OK, let's try again. We have echo $0. But, no, that's not much better; that command will only show you the location of the script as determined by how you or someone else called it. If the script is called with a relative pathname like ./runme, all you will see is ./runme. Obviously if you are running a script interactively, you know where it is. But if you want a script to report its location regardless of how it is called, the question gets interesting.
So as not to keep you in suspense, I'm going to provide the answer to this question up front and then follow up with some insights into why this command works as it does. To get a bash script to display its location in the file system, you can use a command like this:
echo "$( cd "$( dirname "${BASH_SOURCE[0]}" )"&& pwd )"
That's something of a "mouthful" as far a Unix commands go. What exactly is going on in this command? We're clearly echoing something and using the cd and the pwd command to provide the information. But what's going on with this command?
One thing worth noting is that the command uses two sets of parentheses. These cause the script to launch subshells. The inner subshell uses ${BASH_SOURCE[0]} which is the path to the currently executing script, as it was invoked. The outer subshell uses the cd command to move into that directory and pwd to display the location. Since these commands are subshells, nothing has changed with respect to the rest of the script. We just invoke the subshells to display the information we're looking for and then continue with the work of the script.
To get a feel for how subshells work, we can use one to run a command that changes to a different directory and displays that location. When the command is completed, we're still where we started from.
$ echo $(cd /tmp; pwd)
/tmp
$ pwd
/home/shs/bin
This is not entirely unlike what our location-reporting command is doing; it's just one level simpler.
Clearly, other vital information concerning a script can be displayed using a series of echo commands -- all related to where we are when we run the script and how we call it.
If we run a script like the "args" script shown below, the answers will reflect how the script was invoked.
#!/bin/bash

echo "arguments ----> ${@}"
echo "\$1 -----------> $1"
echo "\$2 -----------> $2"
echo "path to me ---> ${0}"
echo "parent path --> ${0%/*}"
echo "my name ------> ${0##*/}"
For the two path variables, what we see clearly depends on how we call the script -- specifically, if we use a full path name, a variable will represents the full path (such as ~), or a relative path.
$ ~/bin/args first second
arguments ----> first second
$1 -----------> first
$2 -----------> second
path to me ---> /home/shs/bin/args
parent path --> /home/shs/bin
my name ------> args
$ ./args first second
arguments ----> first second
$1 -----------> first
$2 -----------> second
path to me ---> ./args
parent path --> .
my name ------> args
You can use the location-reporting command in any script to display its full path. It will, however, follow and display symbolic links if they are used to invoke the script. Here, we see that a symlink points at our bin directory, but the script reports on the symlink:
$ ls -l scripts
lrwxrwxrwx 1 shs staff 5 Dec 7 18:36 scripts -> ./bin
$ ./scripts/args
arguments ---->
$1 ----------->
$2 ----------->
path to me ---> ./scripts/args
parent path --> ./scripts
my name ------> args
arguments ---->
$1 ----------->
$2 ----------->
path to me ---> ./scripts/args
parent path --> ./scripts
my name ------> args
When you use the location-reporting command, you get the full path for a script even if you call it with a relative path. Here's an example of a script that does nothing else:
#!/bin/bash

echo "$( cd "$( dirname "${BASH_SOURCE[0]}" )"&& pwd )"
And here's the result. We call the script with ./wru (for "where are you") and the output will look something like this. Voila! We get the full path even though we invoked the script with a relative path:
$ ./wru
/home/shs/bin
The $BASH_SOURCE variable may seem like a one that's just popped into existence, but it's actually one of a number of bash variables, many of which are likely very familiar. But, as you'd guess from the [0] included in the command above, it's an array.
A bash reference such as this will provide some additional information on this and other bash variables:
http://www.gnu.org/software/bash/manual/html_node/Bash-Variables.html

UPDATE

Thanks to readers for there feedback. Looks like any of the following commands will work to display the location of a bash script.

How to apply PCI data security standards to Linux data centers

$
0
0
http://www.openlogic.com/wazi/bid/327323/how-to-apply-pci-data-security-standards-to-linux-data-centers


The Payment Card Industry (PCI) data security standards are a set of best practices and requirements established to protect sensitive data such as payment card information. Following these standards is mandatory for merchants dealing with payment cards, but any responsible organization can benefit by using them to enhance information security.

Secure your network

To meet the PCI requirement to secure your network you should have a dedicated router/firewall that by default denies all incoming and outgoing connectivity. You should allow connections only for explicit needs.
CentOS has a strong default firewall that denies all incoming connections except those to port 22 (ssh). You can improve on its rules in two ways. First, allow only your own organization's IP addresses to connect via ssh. Edit the file /etc/sysconfig/iptables and changing the line -A INPUT -m state --state NEW -m tcp -p tcp --dport 22 -j ACCEPT to -A INPUT -s YOURIP -m state --state NEW -m tcp -p tcp --dport 22 -j ACCEPT, then restart iptables with the command service iptables restart.
You should also deny all outgoing connections except those you need. Limiting outgoing connections can limit the impact of a security compromise. Use these commands:
/sbin/iptables -A OUTPUT -o lo -j ACCEPT #accept all outgoing connections to the loopback interface, which are usually internal service calls
/sbin/iptables -A OUTPUT -p tcp \! --syn -j ACCEPT #accept any outgoing connection except new ones
/sbin/iptables -A OUTPUT -p UDP --dport 53 -j ACCEPT #accept outgoing DNS requests on UDP ports. Similarly you should add other needed services.
/sbin/iptables -A OUTPUT -j DROP #drop all connections

The above commands create rules that take effect immediately. To save them permanently in the file /etc/sysconfig/iptables, run the command service iptables save.

Protect sensitive data

The next tool you should use to protect your sensitive data is encryption. Truecrypt is an excellent open source tool for encrypting data on disk.
On CentOS you can install Truecrypt easily. First, install its only requirement, fuse-libs, with the command yum install fuse-libs. Next, download the console-only installation package for Linux, extract the package, and run the installer with the command ./truecrypt-7.1a-setup-console-x86. When it finishes you can use binary /usr/bin/truecrypt to encrypt and decrypt your sensitive files.
Suppose you want to encrypt the directory /media/encrypted. A good option is to use only a single file for storing the encrypted content so that you don't have to change your current partition table, nor your disk layout. To do this, first create a Truecrypt file with the command truecrypt -t -c /root/truecrypt.tc. You have to answer a few questions, namely:
  • Volume type – normal type is fine; the other alternative is hidden file, which is more practical for personal use than for server setup.
  • Encryption algorithm – Choices are AES-256, Serpent, and Twofish. All of them are strong and reliable. You may even want to use a combination of them so you can apply multiple layers of encryption. Thus if you chose the combination AES-Twofish-Serpent, an intruder would have to break first the AES encryption, then Twofish, and finally Serpent in order to read your data. However, the more complex the encryption, the slower the read and write response you will get from the encrypted data.
  • Hash algorithm – Choices are RIPEMD-160, SHA-512, and Whirlpool. The last is the best choice here because it's world-recognized and even adopted in the standard ISO/IEC 10118-3:2004.
  • Filesystem – with CentOS, choose a native Linux filesystem such as Linux ext4. The encrypted file's filesystem can be different from the operating system's filesystem.
  • Password – this is the most important choice. You should pick up a password that's strong (all kinds of characters) and long (more than 15 characters) to make the one that's hard to crack by brute-force attacks.
  • Keyfile path – A keyfile contains random content used for decrypting your data. It is an extra protection against brute force attacks, but it is not needed as long as you choose a strong password.
Are you with me so far? If you're not familiar with Truecrypt or encryption as a whole you may be confused by the difference between an encryption algorithm and a hash algorithm. Hashing allows you to generate the same shortened reference result every time from some given data. The result is useful for validating that the original data has not changed, and cannot be used to regenerate the original data. By contrast, encryption changes the original data in such a way that it can be restored if you have the encryption key. Truecrypt uses both hashing and encryption to protect your data.
After you complete the wizard you should have the file /root/truecrypt.tc. Create a mount point for it with the command mkdir /media/encrypted, then mount the Truecrypt file by running /usr/bin/truecrypt /root/truecrypt.tc /media/encrypted/. To dismount it run /usr/bin/truecrypt -d; you don't have to specify the mount point. The file will also be dismounted automatically when the operating system is restarted.
Truecrypt protects your data only while the Truecrypt file is not mounted. Once the file is mounted your data is readable and you have to rely on the security and permissions provided by the operating system for the data protection. That's why you should dismount the file as soon as possible after you have accessed any files you need in the encrypted file/directory.
Unfortunately, Truecrypt is not suitable if your sensitive data is stored in a database such as MySQL. MySQL requires constant access to its data files and thus it's not practical to constantly mount and dismount encrypted volumes. Instead, to encrypt MySQL data you should use MySQL's encryption functions.
By using encryption you protect your data in case of a physical theft of media. Also, if your system is compromised, encryption makes it harder for an intruder to read your data.

Manage vulnerabilities

PCI standards also require you to mitigate threats and vulnerabilities in a timely fashion. You must patch critical vulnerabilities as soon as possible and no later than one month of their discovery.
In CentOS, system updates are relatively easy and safe because of the famous Red Hat backporting update process, in which essential fixes are extracted from new versions and ported to old versions. You should regularly run yum -y update command to update your CentOS operating system and applications, but bear in mind that there is always a risk of making complex systems hiccup when you update a production system, even with backported fixes.
You should also run antivirus software. A good open source antivirus solution is ClamAV, though it lacks the real-time protection found in commercial antivirus programs.
You can install ClamAV on CentOS from the EPEL repository. First add EPEL on your CentOS source files with the command rpm -ivh http://dl.fedoraproject.org/pub/epel/6/x86_64/epel-release-6-8.noarch.rpm. Then install ClamAV with the command yum install clamav.
After you first install ClamAV, update its antivirus database with the command /usr/bin/freshclam. It's best to set this command as a cron task that runs daily, with a line such as 3 3 * * * /usr/bin/freshclam --quiet in your crontab file to run it every day at 3:03 a.m.
You should perform regular antivirus scans on directories that are exposed to external services. For example, if you have an Apache web server, you should scan its default document root /var/www/html and the /tmp directory, where temporary files may be uploaded.
Two hints here: First, run this scan automatically as a cron job. Second, email yourself the output so you can see whether there were scanning errors or viruses. You can do both with a crontab entry such as 4 4 * * * /usr/bin/clamscan /var/www/html /tmp --log /var/log/clamav/scan.log || mail -s 'Virus Report' yourmail@example.org < /var/log/clamav/scan.log. Here, if clamscan does not detect a virus or error, it exits with status 0 and no mail is sent. Otherwise, you will receive a message with the scan log.
Viruses aren't the only threat to your systems. In addition to ClamAV it's a good idea to run an auditing and hardening tool such as Lynis. Lynis checks your system for misconfiguration and security errors, and searches for popular rootkits and any evidence of your system being compromised. Once you download and extract it it's ready for use. When you run it manually you should use the argument -c to perform all of its checks, with a command like /root/lynis-1.3.5/lynis -c. Going through all the checks does not take much time or resources. If you want to schedule the command as a cron job you should use the -q option for a quiet run, which throws only warnings: /root/lynis-1.3.5/lynis -q.

Perform audits and control access

The PCI standards require from you to track every user's actions with sensitive (cardholder) data and also every action performed by privileged users. On the system level this usually means running Linux's auditd daemon such as described in the article Linux auditing 101.
Another good practice from the PCI standards is the requirement to restrict access to only those who need it. With Linux you may have situations where the usual user/group/other permissions are not sufficient to provide the required granular access control.
For example, imagine that the web file /var/www/html/config.php is owned by the user apache but needs to be read by user admin1 from the admins group and user qa1 from the QA group. To avoid granting "other" read permission you can use Linux access control lists (ACL) by using the command setfacl with the -m argument (modify) like this:
setfacl -m u:qa1:r /var/www/html/config.php
setfacl -m u:admin1:r /var/www/html/config.php
You can check the results with the command getfacl: getfacl /var/www/html/config.php. The output should be similar to this:
getfacl: Removing leading '/' from absolute path names
# file: var/www/html/config.php
# owner: apache
# group: apache
user::rw-
user:admin1:r--
user:qa1:r--
group::r--
mask::r--
other::---
As you can see, the user admin1 and qa1 here have the needed read permissions set, while others don't have any permissions and thus other users cannot read the file.

Scan the network

PCI requires you to scan your system and network for vulnerabilities. Such remote scans are to be performed by external security auditors every three months, but you can adopt this good practice and scan your network by yourself.
To learn how to scan your network, read the article BackTrack and its tools can protect your environment from remote intrusions. It explains not only how to perform a remote security scan but also how to resolve the most common vulnerabilities that such a scan may detect.

Maintain an information security policy

PCI improves information security by formalizing security roles and responsibilities in an information security policy document. Obviously, clear resource ownership ensures better care for resources. Unfortunately, many organizations neglect this practice and muddle along with unclear responsibilities for resources.
Part of this requirement is that personnel be regularly exposed to security awareness programs. This helps people remember to use information security best practices in everyday work. SANS Institute provides daily security awareness tips that you can use for this purpose.
Finally, you should create scenarios for handling security incidents. Sooner or later such incidents happen, and you should be prepared to resolve them swiftly. Security incidents may include data being stolen or a whole system being compromised. Make sure to prepare for every such unpleasant scenario specific to your organization.
As you can see, the PCI data security standards are comprehensive and versatile, and you can use them to improve the information security of your organization even if you never handle payment cards, because they are designed to protect an organization's most sensitive resources.

How to open a large text file on Linux

$
0
0
http://xmodulo.com/2013/12/open-large-text-file-linux.html

In the era of "big data", large text files (GB or more) could be commonly encountered around us. Suppose you somehow need to search and edit one of those big text files by hand. Or you could be analyzing multi-GB log files manually for specific troubleshooting purposes. A typical text editor may not be designed to deal with such large text files efficiently, and may simply get choked while attempting to open a big file, due to insufficient memory.
If you are a savvy system admin, you can probably open or touch an arbitrary text file with a combination of cat, tail, grep, sed, awk, etc. In this tutorial, I will discuss more user-friendly ways to open (and possibly edit) a large text file on Linux.

Vim with LargeFile Plugin

Vim text editor boasts of various plugins (or scripts) which can extend Vim's functionality. One such Vim plugin is LargeFile plugin.
The LargeFile plugin allows you to load and edit large files more quickly, by turning off several Vim features such as events, undo, syntax highlighting, etc.
To install the LargeFile plugin on Vim, first make sure that you have Vim installed.
On Debian, Ubuntu or Linux Mint:
$ sudo apt-get install vim
On Fedora, CentOS or RHEL:
$ sudo yum install vim-enhanced
Then download the LargFile plugin from Vim website. The latest version of the plugin is 5, and it will be saved in Vimball format (.vba extension).
To install the plugin in your home directory, you can open the .vba file with Vim as follows.
$ gunzip LargeFile.vba.gz
$ vim LargeFile.vba

Enter ":so %" and press ENTER within Vim window to install the plugin in your home directory.

After this, enter ":q" to quit Vim.
The plugin will be installed at ~/.vim/plugin/LargeFile.vim. Now you can start using Vim as usual.
What this plugin does is to turn off events, undo, syntax highlighting, etc. when a "large" file is loaded on Vim. By default, files bigger than 100MB are considered "large" by the plugin. To change this setting, you can edit ~/.vimrc file (create one if it does not exist).
To change the minimum size of large files to 10MB, add the following entry to ~/.vimrc.
let g:LargeFile=10
While the LargeFile plugin can help you speed up file loading, Vim itself still cannot handle editing an extremely large file very well, because it tries to load the entire file in memory. For example, when a 1GB file is loaded on Vim, it takes as much memory and swap space, as shown in the top output below.

So if your files are significantly bigger than the physical memory of your Linux system, you can consider other options, as explained below.

glogg Log Explorer

If all you need is "read-only" access to a text file, and you don't have to edit it, you can consider glogg, which is a GUI-based standalone log analyzer. The glogg analyzer supports filtered views of an input text file, based on extended regular expressions and wildcards.
To install glogg on Debian (Wheezy and higher), Ubuntu or Linux Mint:
$ sudo apt-get install glogg
To install glogg on Fedora (17 or higher):
$ sudo yum install glogg
To open a text file with glogg:
$ glogg test.log
glogg can open a large text file pretty fast. It took me around 12 seconds to open a 1GB log file.

You can enter a regular expression in the "Text" field, and press "Search" button. It supports case-insensitive search and auto-refresh features. After searching, you will see a filtered view at the bottom window.

Compared to Vim, glogg is much more lightweight after a file is loaded. It was using only 83MB of physical memory after loading a 1GB log file.

JOE Text Editor

JOE is a light-weight terminal based text editor released under GPL. JOE is one of few text editors with large file support, allows opening and editing files larger than memory.
Besides, JOE supports various powerful text editing features, such as non-destructive editing, search and replace with regular expression, unlimited undo/redo, syntax highlighting, etc.
To install JOE on Debian, Ubuntu or Linux Mint:
$ sudo apt-get install joe
To install JOE on Fedora, CentOS or RHEL:
$ sudo yum install joe
To open a text file for editing, run:
$ joe test.log

Loading a large file on JOE is a little bit sluggish, compared to glogg above. It took around 30 seconds to load a 1GB file. Still, that's not too bad, considering that a file is fully editable now. Once a file is loaded, you can start editing a file in terminal mode, which is quite fast.
The memory consumption of JOE is impressive. To load and edit a 1GB text file, it only takes 47MB of physical memory.

If you know any other way to open/edit a large text file on Linux, share your knowledge!

A Handy U-Boot Trick

$
0
0
http://www.linuxjournal.com/content/handy-u-boot-trick


Embedded developers working on kernels or bare-metal programs often go through several development cycles. Each time the developer modifies the code, the code has to be compiled, the ELF (Executable and Linkable Format)/kernel image has to be copied onto the SD card, and the card then has to be transferred from the PC to the development board and rebooted. In my experience as a developer, I found the last two steps to be a major bottleneck. Even copying files to the fastest SD cards is slower than copying files between hard drives and sometimes between computers across the network.
Moreover, by frequently inserting and removing the SD card from the slot, one incurs the risk of damaging the fragile connectors on the development boards. Believe me! I lost a BeagleBoard by accidentally applying too much force while holding the board and pulling out the SD card. The pressure caused the I2C bus to fail. Because the power management chip was controlled by I2C, nothing other than the serial terminal worked after that. Setting aside the cost of the board, a board failure at a critical time during a project is catastrophic if you do not have a backup board.
After losing the BeagleBoard, I hit upon the idea to load my bare-metal code over the LAN via bootp and TFTP and leave the board untouched. This not only reduced the risk of mechanically damaging my board, but it also improved on my turn-around times. I no longer needed to copy files to the SD card and move it around.
In this article, I present a brief introduction to U-Boot and then describe the necessary configurations to set up a development environment using DHCP and TFTP. The setup I present here will let you deploy and test new builds quickly with no more than rebooting the board. I use the BeagleBone Black as the target platform and Ubuntu as the development platform for my examples in this article. You may, however, use the methods presented here to work with any board that uses U-Boot or Barebox as its stage-2 bootloader.

U-Boot

U-Boot is a popular bootloader used by many development platforms. It supports multiple architectures including ARM, MIPS, AVR32, Nios, Microblaze, 68K and x86. U-Boot has support for several filesystems as well, including FAT32, ext2, ext3, ext4 and Cramfs built in to it. It also has a shell where it interactively can take input from users, and it supports scripting. It is distributed under the GPLv2 license. U-Boot is a stage-2 bootloader.
The U-Boot project also includes the x-loader. The x-loader is a small stage-1 bootloader for ARM. Most modern chips have the ability to read a FAT32 filesystem built in to the ROM. The x-loader loads the U-Boot into memory and transfers control to it. U-Boot is a pretty advanced bootloader that is capable of loading the kernel and ramdisk image from the NAND, SD card, USB drive and even the Ethernet via bootp, DHCP and TFTP.
Figure 1 shows the default boot sequence of the BeagleBone Black. This sequence is more or less applicable to most embedded systems. The x-loader and U-Boot executables are stored in the files called MLO and uboot.img, respectively. These files are stored in a FAT32 partition. The serial port outputs of the BeagleBone are shown in Listings 1–3. The x-loader is responsible for the output shown in Listing 1. Once the execution is handed over to U-Boot, it offers you a few seconds to interrupt the boot sequence, as shown in Listing 2. If you choose not to interrupt, U-Boot executes an environment variable called bootcmd. bootcmd holds the search sequence for a file called uImage. This is the kernel image. The kernel image is loaded into the memory, and the execution finally is transferred to the kernel, as shown in Listing 3.
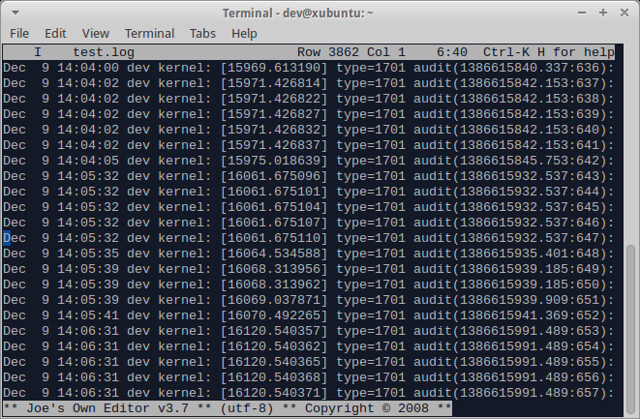
Figure 1. Boot Sequence

Listing 1. The Serial Console Output from the Stage-1 Bootloader


U-Boot SPL 2013.04-rc1-14237-g90639fe-dirty (Apr 13 2013 - 13:57:11)
musb-hdrc: ConfigData=0xde (UTMI-8, dyn FIFOs, HB-ISO Rx,
↪HB-ISO Tx, SoftConn)
musb-hdrc: MHDRC RTL version 2.0
musb-hdrc: setup fifo_mode 4
musb-hdrc: 28/31 max ep, 16384/16384 memory
USB Peripheral mode controller at 47401000 using PIO, IRQ 0
musb-hdrc: ConfigData=0xde (UTMI-8, dyn FIFOs, HB-ISO Rx,
↪HB-ISO Tx, SoftConn)
musb-hdrc: MHDRC RTL version 2.0
musb-hdrc: setup fifo_mode 4
musb-hdrc: 28/31 max ep, 16384/16384 memory
USB Host mode controller at 47401800 using PIO, IRQ 0
OMAP SD/MMC: 0
mmc_send_cmd : timeout: No status update
reading u-boot.img
reading u-boot.img

Listing 2. The Serial Console Output from the Stage-2 Bootloader


U-Boot 2013.04-rc1-14237-g90639fe-dirty (Apr 13 2013 - 13:57:11)

I2C: ready
DRAM: 512 MiB
WARNING: Caches not enabled
NAND: No NAND device found!!!
0 MiB
MMC: OMAP SD/MMC: 0, OMAP SD/MMC: 1
*** Warning - readenv() failed, using default environment

musb-hdrc: ConfigData=0xde (UTMI-8, dyn FIFOs, HB-ISO Rx,
↪HB-ISO Tx, SoftConn)
musb-hdrc: MHDRC RTL version 2.0
musb-hdrc: setup fifo_mode 4
musb-hdrc: 28/31 max ep, 16384/16384 memory
USB Peripheral mode controller at 47401000 using PIO, IRQ 0
musb-hdrc: ConfigData=0xde (UTMI-8, dyn FIFOs, HB-ISO Rx,
↪HB-ISO Tx, SoftConn)
musb-hdrc: MHDRC RTL version 2.0
musb-hdrc: setup fifo_mode 4
musb-hdrc: 28/31 max ep, 16384/16384 memory
USB Host mode controller at 47401800 using PIO, IRQ 0
Net: not set. Validating first E-fuse MAC
cpsw, usb_ether
Hit any key to stop autoboot: 0

Listing 3. The Serial Console Output from the Stage-2 Bootloader and Kernel


gpio: pin 53 (gpio 53) value is 1
Card did not respond to voltage select!
.
.
.
gpio: pin 54 (gpio 54) value is 1
SD/MMC found on device 1
reading uEnv.txt
58 bytes read in 4 ms (13.7 KiB/s)
Loaded environment from uEnv.txt
Importing environment from mmc ...
Running uenvcmd ...
Booting the bone from emmc...
gpio: pin 55 (gpio 55) value is 1
4215264 bytes read in 778 ms (5.2 MiB/s)
gpio: pin 56 (gpio 56) value is 1
22780 bytes read in 40 ms (555.7 KiB/s)
Booting from mmc ...
## Booting kernel from Legacy Image at 80007fc0 ...
Image Name: Angstrom/3.8.6/beaglebone
Image Type: ARM Linux Kernel Image (uncompressed)
Data Size: 4215200 Bytes = 4 MiB
Load Address: 80008000
Entry Point: 80008000
Verifying Checksum ... OK
## Flattened Device Tree blob at 80f80000
Booting using the fdt blob at 0x80f80000
XIP Kernel Image ... OK
OK
Using Device Tree in place at 80f80000, end 80f888fb

Starting kernel ...

Uncompressing Linux... done, booting the kernel.
[ 0.106033] pinctrl-single 44e10800.pinmux: prop pinctrl-0
↪index 0 invalid phandle
.
.
.
[ 9.638448] net eth0: phy 4a101000.mdio:01 not found on slave 1

.---O---.
| | .-. o o
| | |-----.-----.-----.| | .----..-----.-----.
| | | __ | ---'| '--.| .-'| | |
| | | | | |--- || --'| | | ' | | | |
'---'---'--'--'--. |-----''----''--''-----'-'-'-'
-' |
'---'

The Angstrom Distribution beaglebone ttyO0

Angstrom v2012.12 - Kernel 3.8.6

beaglebone login:
The search sequence defined in the bootcmd variable and the filename (uImage) are hard-coded in the U-Boot source code (see Listing 9). Listing 4 shows the formatted content of the environment variable bootcmd. The interesting parts of bootcmd are lines 19–28. This part of the script checks for the existence of a file called uEnv.txt. If the file is found, the file is loaded into the memory (line 19). Then, it is imported to the environment ready to be read or executed (line 22). After this, the script checks to see if the variable uenvcmd is defined (line 24). If it is defined, the script in the variable is executed. The uEnv.txt file is a method for users to insert scripts into the environment. Here, we'll use this to override the default search sequence and load the kernel image or an ELF file from the TFTP server.

Listing 4. Well Formatted Content of the Variable bootcmd


01 gpio set 53;
02 i2c mw 0x24 1 0x3e;
03 run findfdt;
04 mmc dev 0;
05 if mmc rescan ;
06 then
07 echo micro SD card found;
08 setenv mmcdev 0;
09 else
10 echo No micro SD card found, setting mmcdev to 1;
11 setenv mmcdev 1;
12 fi;
13 setenv bootpart ${mmcdev}:2;
14 mmc dev ${mmcdev};
15 if mmc rescan;
16 then
17 gpio set 54;
18 echo SD/MMC found on device ${mmcdev};
19 if run loadbootenv;
20 then
21 echo Loaded environment from ${bootenv};
22 run importbootenv;
23 fi;
24 if test -n $uenvcmd;
25 then
26 echo Running uenvcmd ...;
27 run uenvcmd;
28 fi;
29 gpio set 55;
30 if run loaduimage;
31 then
32 gpio set 56;
33 run loadfdt;
34 run mmcboot;
35 fi;
36 fi;
For better insight into the workings of U-Boot, I recommend interrupting the execution and dropping to the U-Boot shell. At the shell, you can see a list of supported commands by typing helpor ?. You can list all defined environment variables with the env print command. These environment variables are a powerful tool for scripting. To resume the boot sequence, you either can issue the boot command or run bootcmd. A good way to understand what the bootcmd is doing is to execute each command one at a time from the U-Boot shell and see its effect. You may replace the if...then...else...fi blocks by executing the conditional statement without the if part and checking its output by typing echo $?.

DHCP

The DHCP (Dynamic Host Configuration Protocol) is a protocol to provide hosts with the necessary information to access the network on demand. This includes the IP address for the host, the DNS servers, the gateway server, the time servers, the TFTP server and so on. The DHCP server also can provide the name of the file containing the kernel image that the host must get from the TFTP server to continue booting. The DHCP server can be set up to provide a configuration either for the entire network or on a per-host basis. Configuring the filename (Listing 5) for the entire network is not a good idea, as one kernel image or ELF file will execute only on the architecture for which it was built. For instance, the vmlinuz image built for an x86_64 will not work on a system with an ARM-based processor.

Listing 5. The Host Configuration Section for a DHCP Server


subnet 192.168.0.0 netmask 255.255.0.0 {
next-server 192.168.146.1;
option domain-name-servers 192.168.146.1;
option routers 192.168.146.1;
range 192.168.145.1 192.168.145.254;

# The BeagleBone Black 1
host BBB-1 {
next-server 192.168.146.1;
filename "/BI/uImage";
hardware ethernet C8:A0:30:B0:88:EB;
fixed-address 192.168.146.4;
}
}

Important Note:

Be extremely careful while using the DHCP server. A network must not have more than a single DHCP server. A second DHCP server will cause serious problems on the network. Other users will lose network access. If you are on a corporate or a university network, you will generate a high-priority incident inviting the IT department to come looking for you.
The Ubuntu apt repository offers two DHCP servers: isc-dhcp-server and dhcpcd. I prefer to use isc-dhcp-server.
The isc-dhcpd-server from the Ubuntu repository is pretty advanced and implements all the necessary features. I recommend using Webmin to configure it. Webmin is a Web-based configuration tool that supports configuring several Linux-based services and dæmons. I recommend installing Webmin from the apt repository. See the Webmin documentation for instructions for adding the Webmin apt repository to Ubuntu.
Once you have your DHCP server installed, you need to configure a subnet and select a pool of IP addresses to be dished out to hosts on the network on request. After this, add the lines corresponding to the host from Listing 5 into your /etc/dhcp/dhcpcd.conf file, or do the equivalent from Webmin's intuitive interface. In Listing 5, C8:A0:30:B0:88:EBcorresponds to the BeagleBone's Ethernet address. The next-server is the address of the TFTP server from which to fetch the kernel image of ELF. The /BI/uImagefilename is the name of the kernel image. Rename the image to whatever you use.

TFTP

TFTP (Trivial File Transfer Protocol) is a lightweight file-transfer protocol. It does not support authentication methods. Anyone can connect and download any file by name from the server or upload any file to the server. You can, however, protect your server to some extent by setting firewall rules to deny IP addresses out of a particular range. You also can make the TFTP home directory read-only to the world. This should prevent any malicious uploads to the server. The Ubuntu apt repository has two different TFTP servers: atftp and tftp-hpa. I recommend tftp-hpa, as development of atftphas seized since 2004.
tftpd-hpa is more or less ready to run just after installation. The default file store is usually /var/lib/tftpboot/, and the configuration files for tftp-can may be found in /etc/default/tftpd-hpa. You can change the location of the default file store to any other location of your choice by changing the TFTP_DIRECTORY option. The TFTP installation creates a user and a group called tftp. The tftp server runs as this user. I recommend adding yourself to the tftp group and changing permissions on the tftp data directory to 775. This will let you read and write to the tftp data directory without switching to root each time. Moreover, if files in the tftp data directory are owned by root, the tftp server will not be able to read and serve them over the network. You can test your server by placing a file there and attempting to get it using the tftp client:

$ tftp 192.168.146.1 -c get uImage[COMMAND]
Some common problems you may face include errors due to permission. Make sure that the files are readable by the tftp user or whichever user the tftpd runs as. Additionally, directories must have execute permission, or tftp will not be able to descend and read the content of that directory, and you'll see a "Permission denied" error when you attempt to get the file.

U-Boot Scripting

Now that you have your DHCP and TFTP servers working, let's write a U-Boot script that will fetch the kernel image and boot it. I'm going to present two ways of doing this: using DHCP and using only TFTP. As I mentioned before, running a poorly configured DHCP server will cause a network-wide disruption of services. However, if you know what you are doing and have prior experience with setting up network services, this is the simplest way to boot the board.
A DHCP boot can be initiated simply by adding or modifying the uenvcmd variable in the uEnv.txt file, as shown in Listing 6. uEnv.txt is found in the FAT32 partition of the BeagleBone Black. This partition is available to be mounted when the BeagleBone Black is connected to your computer via USB cable.

Listing 6. An Example of the uenvcmd Variable for DHCP Booting


echo Booting the BeagleBone Black from LAN (DHCP)...
dhcp ${kloadaddr}
tftpboot ${fdtaddr} /BI/${fdtfile}
setenv bootargs console=${console} ${optargs} root=${mmcroot}
↪rootfstype=${mmcrootfstype} optargs=quiet
bootm ${kloadaddr} - ${fdtaddr}
For a TFTP-only boot, you manually specify an IP address for the development board and the TFTP server. This is a much safer process, and you incur very little risk of interfering with other users on the network. As in the case of configuring to boot with DHCP, you must modify the uenvcmd variable in the uEnv.txt file. The script shown in Listing 7 is an example of how to set up your BeagleBone Black to get a kernel image from the TFTP server and pass on the execution to it.

Listing 7. An Example of uenvcmd Variable for TFTP Booting


echo Booting the BeagleBone Black from LAN (TFTP)...
env set ipaddr 192.168.146.10
env set serverip 192.168.146.1
tftpboot ${kloadaddr} /BI/${bootfile}
tftpboot ${fdtaddr} /BI/${fdtfile}
setenv bootargs console=${console} ${optargs} root=${mmcroot}
↪rootfstype=${mmcrootfstype} optargs=quiet
bootm ${kloadaddr} - ${fdtaddr}
Both Listing 6 and 7 are formatted to give a clear understanding of the process. The actual uEnv.txt file should look something like the script shown in Listing 8. For more information about U-Boot scripting, refer to the U-Boot FAQ and U-Boot Manual. The various commands in the uenvcmdvariable must be on the same line separated by a semicolon. You may notice that I place my script in uenvcmdx instead of uenvcmd. This is because test -nthrows an error to the console based on the content of the variable it is testing. Certain variable contents, especially long complicated scripts, cause the test -n to fail with an error message to the console. Therefore, I put a simple command to run uenvcmdx in uenvcmd. If you find that your script from the uEnv.txt is not being executed, look for an error on the serial console like this:

test - minimal test like /bin/sh

Usage:
test [args..]

Listing 8. An Example of uEnv.txt for TFTP Booting


optargs=quiet
uenvcmdx=echo Booting the bone from emmc...; env set ipaddr
↪192.168.146.10; env set serverip 192.168.146.1; tftpboot
↪${kloadaddr} /BI/${bootfile}; tftpboot ${fdtaddr}
↪/BI/${fdtfile}; setenv bootargs console=${console}
↪${optargs} root=${mmcroot} rootfstype=${mmcrootfstype}
↪optargs=quiet; bootm ${kloadaddr} - ${fdtaddr}
uenvcmd=run uenvcmdx
On some development boards like the BeagleBoard xM, the Ethernet port is implemented on the USB bus. Therefore, it is necessary to start the USB subsystem before attempting any network-based boot. If your development board does not hold a Flash memory on board, it may not have a MAC address either. In this case, you will have to set a MAC address before you can issue any network requests. You can do that by setting the environment variable ethaddr along with the rest of the uEnv.txt script.
An alternative but cumbersome way to change the default boot sequence is to modify the U-Boot source code. Modifying the source code gives you greater versatility for booting your development board. When you interrupt the U-Boot boot sequence, drop to the U-Boot shell and issue the env print command, you'll see a lot of environment variables that are defined by default. These environment variables are defined as macros in the source code. Modifying the source code aims at modifying these variables. As shown in Figure 1, U-Boot begins loading the kernel by executing the script in bootcmd. Hence, this is the variable that must be modified.
To begin, you'll need the source code to U-Boot from the git repository:

$ git clone git://git.denx.de/u-boot.git
Before making any modifications, I recommend compiling the unmodified source code as a sanity check:

$ make ARCH=arm CROSS_COMPILE=arm-linux-gnueabihf- distclean

$ make ARCH=arm CROSS_COMPILE=arm-linux-gnueabihf- am335x_evm_config

$ make -j 8 ARCH=arm CROSS_COMPILE=arm-linux-gnueabihf-
This most likely will work without a hitch. Now you can modify the u-Boot/include/configs/am335x_evm.h file. In this file, you'll find code similar to Listing 9. Modify this as you please and re-compile. Depending on your target board, you will have to modify a different file. The files to some common target platforms are:
  • Panda Board: u-Boot/include/configs/omap4_common.h
  • BeagleBoard: u-Boot/include/configs/omap3_beagle.h

Listing 9. Part of the u-Boot/include/configs/am335x_evm.h File Responsible for the Default Script in the bootcmd Variable


#define CONFIG_BOOTCOMMAND \
"mmc dev ${mmcdev}; if mmc rescan; then " \
"echo SD/MMC found on device ${mmcdev};" \
"if run loadbootenv; then " \
"echo Loaded environment from ${bootenv};" \
"run importbootenv;" \
"fi;" \
"if test -n $uenvcmd; then " \
"echo Running uenvcmd ...;" \
"run uenvcmd;" \
"fi;" \
"if run loaduimage; then " \
"run mmcboot;" \
"fi;" \
"fi;" \

Conclusion

I hope the instructions provided here help you create a system to develop and deploy bare-metal programs and kernel images quickly. You also may want to look into u-boot-v2, also known as Barebox. The most helpful code modification that I suggest here is to compile the U-Boot with an elaborate boot sequence that you can tailor to your needs with the least modifications. You can try out some fancy scripts to check and update firmware over LAN—I would consider that really cool. Write to me at bharath (you-know-what) lohray (you-know-what) com.

How to remote control Raspberry Pi

$
0
0
http://xmodulo.com/2013/12/remote-control-raspberry-pi.html

Once you have a fully working Raspberry Pi system, it may not be convenient for you to continue to access Raspberry Pi directly via a keyboard and HDMI/TV cable connector dedicated to Raspberry Pi. Instead, you will want to remote control "headless" Raspberry Pi from another computer. In this tutorial, I will show you how to remote control your Raspberry Pi in several different ways. Here I assume that you are running Raspbian on your Raspberry Pi. Also, note that you are not required to run desktop on Raspbian when trying any of the methods presented in this tutorial.

Method #1: Command Line Interface (CLI) over SSH

The first time you boot Raspberry Pi after writing a Raspbian image into SD Card, it will show raspi-config based configuration screen, where you can activate SSH service for auto-start. If you do not know how to configure SSH service, refer to this tutorial.
Once SSH service is activated on Raspbian, you can access your Raspberry Pi remotely by using SSH client from elsewhere.
To install SSH client on a separate Linux system, follow the instruction below.
For Centos/RHEL/Fedora:
# yum -y install openssh-clients
For Ubuntu/Debian:
$ sudo apt-get install openssh-client
For Opensuse:
# zypper in openssh
After SSH client is installed, connect to your Raspberry Pi over SSH as follows.
$ ssh pi@[rasberrypi_ip_address]

Method #2: X11 Forwarding for GUI Application over SSH

You can also run a Raspbian's native GUI application remotely through SSH session. You only need to set up the SSH server on Raspbian to forward X11 sessions. To enable X11 forwarding, you need xauth, which is already installed on Rasbian. Just re-configure the SSH server of Rasbian as follows.
Open sshd config file with a text editor.
$ sudo nano /etc/ssh/sshd_config
Add the following line in the bottom line of the configuration file.
X11Forwarding yes
Restart sshd
$ sudo /etc/init.d/ssh restart
Then on a separate host, connect to Raspberry Pi over SSH with "-X" option.
$ ssh -X pi@192.168.2.6
Finally, launch a GUI application (e.g., NetSurf GTK web browser) by entering its command over the SSH session. The GUI application will pop up on your own desktop.
$ netsurf-gtk

Method #3: X11 Forwarding for Desktop over SSH

With X11+SSH forwarding, you can actually run the entire desktop of Raspberry Pi remotely, not just standalone GUI applications.
Here I will show how to run the remote RPi desktop in the second virtual terminal (i.e., virtual terminal 8) via X11 forwarding. Your Linux desktop is running by default on the first virtual terminal, which is virtual terminal #7. Follow instructions below to get your RPi desktop to show up in your second virtual terminal.
Open your konsole or terminal, and change to root user.
$ sudo su
Type the command below, which will activate xinit in virtual terminal 8. Note that you will be automatically switched to virtual terminal 8. You can switch back to the original virtual terminal 7 by pressing CTRL+ALT+F7.
# xinit -- :1 &
After switching to virtual terminal 8, execute the following command to launch the RPi desktop remotely. Type pi user password when asked (see picture below).
# DISPLAY=:1 ssh -X pi@192.168.2.5 lxsession

You will bring to your new virtual terminal 8 the remote RPi desktop, as well as a small terminal launched from your active virtual terminal 7 (see picture below).
Remember, do NOT close that terminal. Otherwise, your RPi desktop will close immediately.
You can move between first and second virtual terminals by pressing CTRL+ALT+F7 or CTRL+ALT+F8.

To close your remote RPi desktop over X11+SSH, you can either close a small terminal seen in your active virtual terminal 8 (see picture above), or kill su session running in your virtual terminal 7.

Method #4: VNC Service

Another way to access the entire Raspberry Pi desktop remotely is to install VNC server on Rasberry Pi. Then access the desktop remotely via VNC viewer. Follow instructions below to install VNC server on your Raspberry Pi.
$ sudo apt-get install tightvncserver
After the VNC server is installed, run this command to start the server.
$ vncserver :1

This command will start VNC server for display number 1, and will ask for a VNC password. Enter a password (of up to 8 characters). If you are asked to enter a "view-only" password, just answer it no ('n'). The VNC server will make a configuration file in the current user's home directory. After that, kill the VNC server process with this command.
$ vncserver -kill :1
Next, create a new init.d script for VNC (e.g., /etc/init.d/vncserver), which will auto-start the VNC server upon boot.
$ sudo nano /etc/init.d/vncserver
### BEGIN INFO
# Provides: vncserver
# Short-Description: Start VNC Server at boot time
# Description: Start VNC Server at boot time.
### END INIT INFO

#! /bin/sh
# /etc/init.d/vncserver
export USER='pi'
eval cd ~$USER
case "$1" in
start)
su -c 'vncserver :1 -geometry 1024x768' $USER
echo "Starting vnc server for $USER";;
stop)
pkill xtightvnc
echo "vnc server stopped";;
*)
echo "usage /etc/init.d/vncserver (start|stop)"
exit 1 ;;
esac
exit 0
Modify the file permission so it can be executed.
$ sudo chmod 755 /etc/init.d/vncserver
Run the following command to install the init.d script with default run-level.
$ sudo update-rc.d vncserver defaults
Reboot your Raspberry Pi to verify that VNC server auto-starts successfully.
To access Raspberry Pi via VNC, you can run any VNC client from another computer. I use a VNC client called KRDC, provided by KDE desktop. If you use GNOME desktop, you can install vinagre VNC client. To install those VNC clients, follow the commands below.
For Centos/RHEL/Fedora:
# yum -y install vinagre (for GNOME)
# yum -y krdc (for KDE)
For Ubuntu/Debian:
$ sudo apt-get install vinagre (for GNOME)
$ sudo apt-get install krdc (for KDE)
For Opensuse:
# zypper in vinagre (for GNOME)
# zypper in krdc (for KDE)


How to set up BGP Looking Glass server on CentOS

$
0
0
http://xmodulo.com/2013/12/bgp-looking-glass-server-centos.html

This tutorial will describe how to set up a BGP Looking Glass server on CentOS. For those of you new to the concept of BGP and Looking Glass, let's start with introduction. If you are familiar with BGP, skip it over.

What is Border Gateway Protocol (BGP)?

BGP is literally the routing backbone of the Internet. As we all know it, the Internet consists of millions of interconnected networks. In the telecom industry, these millions of individual networks are referred to as Autonomous Systems (ASs). Each AS is managed under a single administrative domain (e.g., one organization or an ISP), with its own unique AS number and IP address pools aka IP prefixes. The AS number can be private (i.e., not visible publicly), and so can be the IP address pools. For example, when multiple branch offices of one company interconnect, they can use a private AS number and IP prefix for each branch office. Networks that want to use a public AS number and publicly routable IP addresses have to apply for them at a Regional Internet Registry (RIR) like ARIN, APNIC, RIPE. The RIR assigns a unique AS number and IP prefix(es) to that network.
BGP is the industry standard inter-domain routing protocol used to interconnect different ASs. All IP prefixes known to one AS are shared with neighboring ASs, thus populating the BGP routing tables of their border routers. The Internet is formed by such interconnections between millions of public ASs through BGP. So stating here again, BGP is essentially the routing backbone of the Internet.

What is Looking Glass?

Looking Glass (LG) is a web-based tool that helps network operators analyze how traffic is routed to and from a particular AS. The BGP routing table of an AS depends on what other ASs it is connected with. To be more specific, the IP prefixes learnt from neighboring ASs will populate the local BGP routing table, which will be used by the local AS to make its routing decisions.
Now assume that for troubleshooting routing or network latency related issues, we want to run ping or traceroute from a remote AS. Naturally, we do not have access to their equipment so running the test from remote locations is not feasible. However, the admins of a remote AS could set up a Looking Glass server with web-based interface, which will allow any user to run specific commands like ping, traceroute, or access the remote AS's BGP routing information, without logging in to their routers. These tests provide useful insight during network troubleshooting, as the ping or traceroute probing can be conducted from another AS's networks.

Setting Up BGP Looking Glass on CentOS

Before we start, please make sure that SELinux and firewall are tuned to permit necessary services and ports like 23, 2601, 2605, 80.
First of all, dependencies are installed. Using the Reporforge repository is recommended.
[root@lg ~]# yum install wget perl-Net-Telnet perl-Net-Telnet-Cisco perl-XML-Parser httpd
The Looking Glass will be set up using LG1. Necessary software is downloaded and extracted. The directory where the site will be stored is also created.
[root@lg ~]# cd /root
[root@lg ~]# wget http://www.version6.net/lg/lg-1.9.tar.gz
[root@lg ~]# tar zxvf lg-1.9.tar.gz
[root@lg ~]# mkdir /var/www/html/lg
Now that all files have been extracted, they are copied into the web server directory. Necessary permissions are also set.
[root@lg ~]# cd /var/www/html/lg
[root@lg lg]# cp /root/lg-1.9/lg.cgi .
[root@lg lg]# cp /root/lg-1.9/favicon.ico .
[root@lg lg]# cp /root/lg-1.9/lg.conf .
All the files must be readable.
[root@lg lg]# chmod 644 *
The lg.cgi script must be executable.
[root@lg lg]# chmod 755 lg.cgi

Tuning the Web Server

The index.html file is created for LG with necessary redirection.
[root@lg ~]# vim /var/www/html/index.html
In case DNS is set up for the Looking Glass server:
1
2
3
4
5
<html>
<head>
<metahttp-equiv="refresh"content="0;url=http://lg.example.tst/lg/lg.cgi">
</head>
</html>
Without DNS:
1
2
3
4
5
<html>
<head>
<metahttp-equiv="refresh"content="0;url=http://IP/lg.cgi">
</head>
</html>
The following parameters are modified in the web server.
[root@lg ~]# vim /etc/httpd/conf/httpd.conf
## The favicon path and the cgi script paths are defined ##
Alias /lg/favicon.ico "/var/www/html/lg/favicon.ico"
ScriptAlias /lg "/var/www/html/lg/lg.cgi"
The httpd service is started and added to startup list.
[root@lg ~]# service httpd start
[root@lg ~]# chkconfig httpd on

Adding Routers to the Looking Glass

LG supports Cisco, Juniper and Linux Quagga routers. All routers are added to /var/www/html/lg/lg.conf. Please note that the router password required is the remote login password, and NOT the privileged EXEC password aka 'enable' password.
[root@lg ~]# vim /var/www/html/lg/lg.conf
1
2
3
4
5
6
7
8
9
10
11
12
13
<Separator>Sample Routers</Separator>
 
<RouterName="Router-A">
<Title>Router-A</Title>
<URL>telnet://login:routerPassword@routerIP</URL>
</Router>
 
<RouterName="Router-B">
<Title>Router-B</Title>
<URL>telnet://login:routerPassword@routerIP</URL>
</Router>
The Looking Glass is now ready with minimum configuration. It can be accessed by entering the http://IP, or http://lg.example.tst in a web browser.
Here's a screenshot of the fresh Looking Glass.

Provisioning for IPv6

Preparing the Looking Glass for IPv6 is simple as well. The following lines are modified.
[root@lg ~]# vim /var/www/html/lg/lg.cgi
## $ipv4enabled-- is replaced with $ipv4enabled++ around line 398 ##
### Commented out $ipv4enabled-- ####
$ipv4enabled++
Then the routers that support IPv6 are specified.
[root@lg ~]# vim /var/www/html/lg/lg.conf
1
2
3
4
5
<RouterName="Router-A"EnableIPv6="Yes">
<Title>Router-A</Title>
<URL>telnet://login:routerPassword@routerIP</URL>
</Router>
Any reachable IPv4 or IPv6 address that can be used for logging in to the router can be specified here as the IP address.

Optional Configurations

The following configuration is optional. However, they can help in giving the LG a professional look.
1. Logo
The logo image is stored in /var/www/html/images.
[root@lg ~]# mkdir /var/www/html/images
[root@lg ~]# cp logo.png /var/www/html/images/logo.png
[root@lg ~]# vim /var/www/html/lg/lg.conf
1
<LogoImageAlign="center"Link="http://www.companyweb.com/">/images/logo.png</LogoImage>
2. Page Headers
The headers of the page can modified as needed.
[root@lg ~]# vim /var/www/html/lg/lg.conf
1
2
<HTMLTitle>ASXXXX IPv4 and IPv6 Looking Glass</HTMLTitle>
<ContactMail>lg@example.tst</ContactMail>
[root@lg ~]# vim /var/www/html/lg/lg.cgi
1
2
3
4
5
6
7
8
9
10
11
#### In the closing section of the HTML tag i.e. </HTML>, the following line can be added####
<I>
  Please email questions or comments to
 <AHREF="mailto:$email">$email</A>.
</I>
<P>
<P>
Powered By: <ahref="http://wiki.version6.net/LG">Looking Glass 1.9</a></P>
</CENTER>
</BODY>
</HTML>
3. Logging
Needless to say, logging is important. The log file can be created this way.
[root@lg ~]# touch /var/log/lg.log
[root@lg ~]# chown apache:apache /var/log/lg.log
[root@lg ~]# vim /var/www/html/lg/lg.conf
1
<LogFile>/var/log/lg.log</LogFile>
Now the Looking Glass is up, and ready to be used.

Looking Glass Screenshots

The following are some screenshots from the Looking Glass of AS 132267.
  • Live Looking Glass Interface

  • "show ip bgp" output

  • traceroute output

  • "show bgp ipv6" output

  • traceroute ipv6 output

  • Hope this helps.

    Manage Your Configs with vcsh

    $
    0
    0
    http://www.linuxjournal.com/content/manage-your-configs-vcsh

    If you're anything like me (and don't you want to be?), you probably have more than one Linux or UNIX machine that you use on a regular basis. Perhaps you've got a laptop and a desktop. Or, maybe you've got a few servers on which you have shell accounts. Managing the configuration files for applications like mutt, Irssi and others isn't hard, but the administrative overhead just gets tedious, particularly when moving from one machine to another or setting up a new machine.
    Some time ago, I started using Dropbox to manage and synchronize my configuration files. What I'd done was create several folders in Dropbox, and then when I'd set up a new machine, I'd install Dropbox, sync those folders and create symlinks from the configs in those directories to the desired configuration file in my home directory. As an example, I'd have a directory called Dropbox/conf/mutt, with my .muttrc file inside that directory. Then, I'd create a symlink like ~/.muttrc -> Dropbox/conf/mutt/.muttrc. This worked, but it quickly got out of hand and became a major pain in the neck to maintain. Not only did I have to get Dropbox working on Linux, including my command-line-only server machines, but I also had to ensure that I made a bunch of symlinks in just the right places to make everything work. The last straw was when I got a little ARM-powered Linux machine and wanted to get my configurations on it, and realized that there's no ARM binary for the Dropbox sync dæmon. There had to be another way.

    ...and There Was Another Way

    It turns out I'm not the only one who's struggled with this. vcsh developer Richard Hartmann also had this particular itch, except he came up with a way to scratch it: vcsh. vcsh is a script that wraps both git and mr into an easy-to-use tool for configuration file management.
    So, by now, I bet you're asking, "Why are you using git for this? That sounds way too complicated." I thought something similar myself, until I actually started using it and digging in. Using vcsh has several advantages, once you get your head around the workflow. The first and major advantage to using vcsh is that all you really need is git, bash and mr—all of which are readily available (or can be built relatively easily)—so there's no proprietary dæmons or services required. Another advantage of using vcsh is that it leverages git's workflow. If you're used to checking in files with git, you'll feel right at home with vcsh. Also, because git is powering the whole system, you get the benefit of having your configuration files under version control, so if you accidentally make an edit to a file that breaks something, it's very easy to roll back using standard git commands.

    Let's Get Started!

    I'm going to assume you're on Ubuntu 12.04 LTS or higher for this, because it makes installation easy. A simple sudo apt-get install vcsh mr git will install vcsh and its dependencies. If you're on another Linux distro, or some other UNIX derivative, you may need to check out vcsh and mr, and then build git if it's not packaged. I'm also going to assume you've got a working git server installed on another machine, because vcsh really shines for helping keep your configs synchronized between machines.
    Once you've installed vcsh and its dependencies, it's time to start using vcsh. Let's take a fairly common config file that most everyone who's ever used a terminal has—the config file for vim. This file lives in your home directory, and it's called .vimrc. If you've used vim at all before, this file will be here. I'm going to show you how to get it checked into a git repository that is under vcsh's control.
    First, run the following command to initialize vcsh's git repository for vim:

    bill@test:~$ vcsh init vim
    vcsh: info: attempting to create '/home/bill/.config/vcsh/repo.d'
    vcsh: info: attempting to create '/home/bill/.gitignore.d'
    Initialized empty Git repository in
    ↪/home/bill/.config/vcsh/repo.d/vim.git/
    I like to think of the "fake git repos" that vcsh works with to be almost like chroots (if you're familiar with that concept), as it makes things easier to work with. You're going to "enter a chroot", in a way, by telling vcsh you want to work inside the fake git repo for vim. This is done with this command:

    bill@test:~$ vcsh enter vim
    Now, you're going to add the file .vimrc to the repository you created above by running the command:

    bill@test:~$ git add .vimrc
    You're using normal git here, but inside the environment managed by vcsh. This is a design feature of vcsh to make it function very similarly to git.
    Now that your file's being tracked by the git repository inside vcsh, let's commit it by running the following git-like command:

    bill@test:~$ git commit -m 'Initial Commit'
    master (root-commit) bc84953 Initial Commit
    Committer: Bill Childers bill@test.home
    1 file changed, 2 insertions(+)
    create mode 100644 .vimrc
    Now for the really cool part. Just like standard git, you can push your files to a remote repository. This lets you make them available to other machines with one command. Let's do that now. First, you'll add the remote server. (I assume you already have a server set up and have the proper accounts configured. You'll also need a bare git repo on that server.) For example:

    bill@test:~$ git remote add origin git@gitserver:vim.git
    Next, push your files to that remote server:

    bill@test:~$ git push -u origin master
    Counting objects: 3, done.
    Compressing objects: 100% (2/2), done.
    Writing objects: 100% (3/3), 272 bytes, done.
    Total 3 (delta 0), reused 0 (delta 0)
    To git@gitserver:vim.git
    * new branch master -> master
    Branch master set up to track remote branch master from origin.
    bill@test:~$ exit
    Note the exit line at the end. This exits the "vcsh fake git repo". Now your .vimrc file is checked in and copied to a remote server! If there are other programs for which you'd like to check in configurations, like mutt, you simply can create a new repo by running vcsh init mutt, and then run through the process all over again, but this time, check your files into the mutt repository.

    Move Your Configuration to Another Machine

    To sync your configuration to another machine, you just need to install vcsh, git and mr, and then run a similar process as the steps above, except you'll do a git pull from your server, rather than a push. This is because you don't have the .vimrc file you want locally, and you want to get it from your remote git repository.
    The commands to do this are:

    bill@test2:~$ sudo apt-get install vcsh git mr
    bill@test2:~$ vcsh enter vim
    bill@test2:~$ git remote add origin git@gitserver:vim.git
    bill@test2:~$ git pull -u origin master
    From gitserver:vim
    * branch master -> FETCH_HEAD
    bill@test2:~$ exit
    Now you've got your checked-in .vimrc file on your second host! This process works, but it's a little clunky, and it can become unwieldy when you start spawning multiple repositories. Luckily, there's a tool for this, and it's called mr.

    Wrapping It All Up with mr

    If you plan on using multiple repositories with vcsh (and you should—I'm tracking 13 repositories at the moment), getting a configuration set up for mr is essential. What mr brings to the table is a way to manage all the repositories you're tracking with vcsh. It allows you to enable and disable repositories simply by adjusting one symlink per repository, and it also gives you the ability to update all your repos simply by running one easy command: mr up.
    Perhaps the best way to get started using mr is to clone the repo that the vcsh author provides. This is done with the following command:

    bill@test2:~$ vcsh clone
    ↪git://github.com/RichiH/vcsh_mr_template.git mr
    Initialized empty Git repository in
    ↪/home/bill/.config/vcsh/repo.d/mr.git/
    remote: Counting objects: 19, done.
    remote: Compressing objects: 100% (14/14), done.
    remote: Total 19 (delta 1), reused 15 (delta 0)
    Unpacking objects: 100% (19/19), done.
    From git://github.com/RichiH/vcsh_mr_template
    * new branch master -> origin/master 
    Now that you've got your mr repo cloned, you'll want to go in and edit the files to point to your setup. The control files for mr live in ~/.config/mr/available.d, so go to that directory:
    bill@test2:~/.config/mr/available.d$ ls mr.vcsh zsh.vcsh Rename the zsh.vcsh file to vim.vcsh, because you're working with vim, and change the repository path to point to your server:
    bill@test2:~/.config/mr/available.d$ mv zsh.vcsh vim.vcsh bill@test2:~/.config/mr/available.d$ vi vim.vcsh [$HOME/.config/vcsh/repo.d/vim.git] checkout = vcsh clone git@gitserver:vim.git vim Also, edit the mr.vcsh file to point to your server as well:
    bill@test2:~/.config/mr/available.d$ vi mr.vcsh [$HOME/.config/vcsh/repo.d/mr.git] checkout = vcsh clone git@gitserver:mr.git mr The mr tool relies on symlinks from the available.d directory to the config.d directory (much like Ubuntu's Apache configuration, if you're familiar with that). This is how mr determines which repositories to sync. Since you've created a vim repo, make a symlink to tell mr to sync the vim repo:
    bill@test2:~/.config/mr/available.d$ cd ../config.d bill@test2:~/.config/mr/config.d$ ls -l total 0 lrwxrwxrwx 1 bill bill 22 Jun 11 18:14 mr.vcsh -> ↪../available.d/mr.vcsh bill@test2:~/.config/mr/config.d$ ln -s ↪../available.d/vim.vcsh vim.vcsh bill@test2:~/.config/mr/config.d$ ls -l total 0 lrwxrwxrwx 1 bill bill 22 Jun 11 18:14 mr.vcsh -> ↪../available.d/mr.vcsh lrwxrwxrwx 1 bill bill 23 Jun 11 20:51 vim.vcsh -> ↪../available.d/vim.vcsh Now, set up mr to be able to sync to your git server:
    bill@test2:~/.config/mr/config.d$ cd ../.. bill@test2:~/.config$ vcsh enter mr bill@test2:~/.config$ ls mr vcsh bill@test2:~/.config$ git add mr bill@test2:\~/.config$ git commit -m 'Initial Commit' [master fa4eb18] Initial Commit Committer: Bill Childers [bill@test2.home] 3 files changed, 4 insertions(+), 1 deletion(-) create mode 100644 .config/mr/available.d/vim.vcsh create mode 120000 .config/mr/config.d/vim.vcsh bill@test2:\~/.config$ git remote add origin git@gitserver:mr.git fatal: remote origin already exists. Oh no! Why does the remote origin exist already? It's because you cloned the repo from the author's repository. Remove it, then create your own:
    bill@test2:~/.config$ git remote show origin bill@test2:~/.config$ git remote rm origin bill@test2:~/.config$ git remote add origin git@gitserver:mr.git bill@test2:~/.config$ git push -u origin master Counting objects: 28, done. Compressing objects: 100% (21/21), done. Writing objects: 100% (28/28), 2.16 KiB, done. Total 28 (delta 2), reused 0 (delta 0) To git@gitserver:mr.git * [new branch] master -> master Branch master set up to track remote branch master from origin. bill@test2:~/.config$ exit That's it! However, now that mr is in the mix, all you need to do to set up a new machine is do a vcsh clone git@gitserver:mr.git mr to clone your mr repository, then do an mr up, and that machine will have all your repos automatically.

    Conclusion

    vcsh is a very powerful shell tool, and one that takes some time to adapt your thought processes to. However, once you do it, it makes setting up a new machine (or account on a machine) a snap, and it also gives you a way to keep things in sync easily. It's saved me a lot of time in the past few months, and it's allowed me to recover quickly from a bad configuration change I've made. Check it out for yourself!

    Setting up a Remote Git Repo

    A quick note on setting up a remote git repo: you'll need to set up passwordless authentication using SSH keys (see Resources for more information). Once you have that going using a "git" user, you simply need to create a git repo as the git user. That's done easily enough, just run the command:
    git@gitserver:~$ git init --bare vim.git Initialized empty Git repository in /home/git/vim.git/ Your bare repo will be ready for your vcsh client to check in stuff!

    Resources

    vcsh Home Page: http://github.com/RichiH/vcsh
    mr Home Page: http://joeyh.name/code/mr
    vcsh Background Slides: https://raw.github.com/RichiH/talks/slides/2012/fosdem/vcsh/fosdem-2012-vcsh-talk.pdf
    How to Set Up Your Own Git Server: http://tumblr.intranation.com/post/766290565/how-set-up-your-own-private-git-server-linux
    Set Up Passwordless SSH Key-Based Authentication: http://askubuntu.com/questions/46930/how-can-i-set-up-password-less-ssh-login
     

    How to use PostgreSQL Foreign Data Wrappers for external data management

    $
    0
    0
    http://www.openlogic.com/wazi/bid/331001/how-to-use-postgresql-foreign-data-wrappers-for-external-data-management


    Often times, huge web projects use multiple programming languages and even multiple databases. While relational database management systems (RDBMS) are common, they have limitations when it comes to the management of highly variable data. For such applications, NoSQL databases are a better alternative. The PostgreSQL RDBMS now provides Foreign Data Wrappers (FDW) that let PostgreSQL query non-relational external data sources.
    FDWs are drivers that allow PostgreSQL database administrators to run queries and get data from external sources, including other SQL databases (Oracle, MySQL), NoSQL databases(MongoDB, Redis, CouchDB), text files in CSV and JSON formats, and content from Twitter. A few of the wrappers, such as the one for Kyoto Tycoon, allow PostgreSQL to handle both read and write operations on remote data.
    FDWs are based on the SQL Management of External Data (SQL/MED) standard, which supports SQL interfaces to remote data sources and objects. They have been officially supported since PostgreSQL 9.1. You can see a full list of released FDWs on the PostgreSQL wiki.

    Strengths and weaknesses of relational and NoSQL databases

    Why might you want to use FDWs when most web applications use relation databases on the back end? RDBMSes have been around for decades and are perfectly suitable to storing data whose structure is known in advance. Relational databases allow developers to create complex queries on data from multiple tables. They are secure and flexible when it comes to retrieving structured data, and they keep data consistent.
    But RDBMSes are not suitable for storing data with huge variations in record structures or many hierarchical sublevels. NoSQL database models offer more freedom in data structure, simpler management, fewer system requirements, high scalability on multiple servers, and fast performance. They allow the storage of multidimensional structures with huge amount of data. On the minus side, however, they do not always preserve data consistency.
    SQL databases maintain the properties of atomicity, consistency, isolation, and durability (ACID), which makes them a natural choice for storing important data such as financial transactions and accounts. By contrast, NoSQL databases are typically used to store less important data, such as server logs, or variable data that cannot be easily described in a structure during the design stage.
    FDWs are designed to preserve PostgreSQL security and utilize the numerous features of PostgreSQL databases while taking advantage of the performance and scalability of NoSQL databases.

    How to connect PostgreSQL with MongoDB through an FDW

    MongoDB, one popular NoSQL solution, is a document database that allows objects with different numbers of fields to be included in a database. Objects can also be nested in other objects, with no limit on the depth. Let's see how to use FDWs in PostgreSQL to access MongoDB data.
    I'll assume you have installed and configured PostgreSQL on your server. You may have the latest stable release, PostgreSQL 9.3, installed, but the latest version of the MongoDB FDW (currently mongo_fdw 2.0.0), which is developed by a third-party company, is compatible only with PotsgreSQL 9.2. The temporary lack of compatibility with the latest stable PotsgreSQL release is one of the disadvantages of this approach. While we can expect a new release of the wrapper that is compatible with PostgreSQL 9.3, there is no current information when it will be ready.
    You can install the PostgreSQL 9.2 RPM package for your architecture by running the following commands:
    wget http://yum.postgresql.org/9.2/redhat/rhel-6-i386/pgdg-centos92-9.2-6.noarch.rpm
    rpm -ivH pgdg-centos92-9.2-6.noarch.rpm
    Then use the yum search postgres command to list all the available packages for your architecture, and install them with a command like yum install postgresql92-devel postgresql92-server postgresql92-contrib.
    Initialize your PostgreSQL cluster and start the server:
    service postgresql-9.2 initdb
    Initializing database: [ OK ]
    /etc/init.d/postgresql-9.2 start
    Starting postgresql-9.2 service: [ OK ]
    Once you have your PostgreSQL database server up and running, you can log in with the special postgres user, run the command-line interface for PostgreSQL, and create a test table with some sample data – in this case a list of shops and their addresses:
    su postgres
    bash-4.1$ psql
    postgres=# CREATE TABLE shops(id serial primary key NOT NULL, name text NOT NULL, address char(50));
    postgres=# INSERT INTO shops(name, address) VALUES ('My Hardware', 'USA, NY, 5th Avenue 33'), ('My Mobile Devices', 'UK, London, Fulham Road 22'), ('My Software', 'Germany, Berlin, Rosenthaler Street 3');
    You can verify the data that you have entered through the SELECT query:
    postgres=# select * from shops;
    id | name | address
    ----+-------------------+----------------------------------------------------
    1 | My Hardware | USA, NY, 5th Avenue 33
    2 | My Mobile Devices | UK, London, Fulham Road 22
    3 | My Software | Germany, Berlin, Rosenthaler Street 3
    (3 rows)
    In an application that uses this data you might want to collect the total income from all the different types of online shops. Getting the answer might be complicated by the fact that each shop might sell totally different products, and it might be difficult to define the tables' structures during the design stage.
    Instead of trying to force the data to follow a relational structure, you can use a document database like MongoDB that better supports the storage of highly variable data.
    Create the corresponding /etc/yum.repos.d/mongodb.repo file with the configuration details for the MongoDB repository as explained in the official installation instructions. Then use the yum install mongo-10gen mongo-10gen-server command to install the latest stable release of the MongoDB server and the included tools. Start the service by entering /etc/init.d/mongod start at the command prompt.
    You can configure both PostgreSQL and MongoDB to auto-start after your system is rebooted by entering the commands chkconfig postgresql-9.2 on && chkconfig mongod on.
    Start the MongoDB command shell by typing mongo followed by the database name:
    mongo myshops
    MongoDB shell version: 2.4.8
    connecting to: myshops
    Next, enter some sample objects in the MongoDB database:
    db.orders.insert({
    "shop_id" : 1,
    "order_id" : 1,
    "customer" : "Joe D.",
    "products" : [
    { "product_id" : "SKU01", "type" : "CPU", "model" : "Intel Core i3 4340", "price" : 220 },
    { "product_id" : "SKU04", "type" : "CPU", "model" : "Intel Core i7 4770", "price" : 420 },
    { "product_id" : "SKU35", "type" : "laptop bag", "model" : "leather 1", "colour" : "black", "price" : 40 }
    ],
    "delivery_address" : {
    "country" : "USA",
    "state" : "California",
    "town" : "Yorba Linda",
    "street_address" : "Main street 23",
    "zip" : "92886",
    "mobile_phone" : "101001010101"
    }
    })
    db.orders.insert({
    "shop_id" : 2,
    "order_id" : 2,
    "customer" : "Mike A.",
    "products" : [
    { "product_id" : "SKU01", "type" : "smart phone", "model" : "Google Nexus", "price" : 400 },
    { "product_id" : "SKU05", "type" : "tablet", "model" : "iPad Air", "memory" : "16GB", "price" : 420 }
    ],
    "delivery_address" : {
    "country" : "Belgium",
    "town" : "Brussels",
    "street_address" : "1st street 2",
    "zip" : "1234",
    "mobile_phone" : "1010010143"
    }
    })
    db.orders.insert({
    "shop_id" : 2,
    "order_id" : 3,
    "customer" : "Mike A.",
    "products" : [
    { "product_id" : "SKU04", "type" : "smart phone", "model" : "HTC Hero", "condition" : "used", "price" : 20 },
    { "product_id" : "SKU05", "type" : "tablet", "model" : "iPad Air", "memory" : "16GB", "promotion" : "Christmas 20% off", "price" : 336 }
    ],
    "delivery_address" : {
    "country" : "UK",
    "town" : "London",
    "street_address" : "2nd street 22",
    "zip" : "9999",
    "mobile_phone" : "41010010143"
    }
    })
    db.orders.insert({
    "shop_id" : 3,
    "order_id" : 4,
    "customer" : "John C.",
    "products" : [
    { "product_id" : "SKU335", "type" : "book", "title" : "Learn PostgreSQL", "price" : 30 }
    ],
    "delivery_address" : {
    "country" : "Germany",
    "town" : "Koln",
    "PO_box" : "223"
    }
    })
    You can use the built-in MongoDB aggregation functionality to get the total sum for every order and store it in a separate data collection:
    var total = db.orders.aggregate( [
    { $unwind: "$products" },
    { $group: {
    _id: '$_id',
    shop_id : { $first : "$shop_id" },
    order_id : { $first : "$order_id" },
    customer : { $first : "$customer" },
    sum: { $sum: '$products.price' }
    } }
    ] );
    db.total.insert(total.result);
    To see the result:
    db.total.find().pretty().sort( { order_id: 1 } )
    {
    "_id" : ObjectId("52c47761ab2d51cfcc878609"),
    "shop_id" : 1,
    "order_id" : 1,
    "customer" : "Joe D.",
    "sum" : 680
    }
    {
    "_id" : ObjectId("52c47761ab2d51cfcc87860a"),
    "shop_id" : 2,
    "order_id" : 2,
    "customer" : "Mike A.",
    "sum" : 820
    }
    {
    "_id" : ObjectId("52c47761ab2d51cfcc87860b"),
    "shop_id" : 2,
    "order_id" : 3,
    "customer" : "Mike A.",
    "sum" : 356
    }
    {
    "_id" : ObjectId("52c47762ab2d51cfcc87860c"),
    "shop_id" : 3,
    "order_id" : 4,
    "customer" : "John C.",
    "sum" : 30
    }
    Once you have sample data stored in your PostgreSQL and MongoDB databases you are ready to bind the two through the FDW.
    First, use git to get the latest version of the FDW from the repository, then build and install the wrapper:
    cd /usr/src/
    git clone https://github.com/citusdata/mongo_fdw
    cd /usr/src/mongo_fdw/
    PATH=/usr/pgsql-9.2/bin/:$PATH make
    PATH=/usr/pgsql-9.2/bin/:$PATH make install
    Next, load the extension from the PostgreSQL command-line interface. Verify it and create a server instance for the wrapper:
    postgres=# CREATE EXTENSION mongo_fdw;
    CREATE EXTENSION
    postgres=# \dx mongo_fdw;
    List of installed extensions
    Name | Version | Schema | Description
    -----------+---------+--------+-----------------------------------------
    mongo_fdw | 1.0 | public | foreign data wrapper for MongoDB access
    (1 row)
    postgres=# CREATE SERVER mongo_server FOREIGN DATA WRAPPER mongo_fdw OPTIONS (address '127.0.0.1', port '27017');
    CREATE SERVER
    Then set up a foreign table:
    CREATE FOREIGN TABLE shops_sales
    (
    shop_id INTEGER,
    order_id INTEGER,
    customer TEXT,
    sum INTEGER
    )
    SERVER mongo_server
    OPTIONS (database 'myshops', collection 'total');
    Now you are ready to run SQL queries on the data stored in the MongoDB database. For example, you can list all the records from the table, and then run another query to find the total income for each shop and sort the result based on the shop ID.
    SELECT * FROM shops_sales;
    shop_id | order_id | customer | sum
    ---------+----------+----------+-----
    3 | 4 | John C. | 30
    2 | 2 | Mike A. | 820
    1 | 1 | Joe D. | 680
    2 | 3 | Mike A. | 356
    (4 rows)

    SELECT shops.id AS "shop ID", shops.name AS "shop name", SUM(shops_sales.sum) AS "income" FROM shops INNER JOIN shops_sales ON shops.id = shops_sales.shop_id GROUP BY shops.id ORDER BY shops.id;
    shop ID | shop name | income
    ---------+-------------------+--------
    1 | My Hardware | 680
    2 | My Mobile Devices | 1176
    3 | My Software | 30
    (3 rows)

    FDW future

    Most of the currently available FDWs support only reading from the remote data sources. Since the release of PostgreSQL 9.3, developers can create FDWs to also perform inserts, updates, and deletes on foreign data. Whether any particular FDW supports these operations depends on the developers of the corresponding wrapper.
    FDWs work as mediators between PostgreSQL databases and external data sources in different formats. You can run SQL queries on every possible source of information as long as the wrapper knows how to convert the external data to PostgreSQL format. FDWs give PostgreSQL application developers a useful tool to extract data from diverse technologies and use a single, unified way to query it.
    Viewing all 1406 articles
    Browse latest View live


    <script src="https://jsc.adskeeper.com/r/s/rssing.com.1596347.js" async> </script>