http://www.tuxarena.com/2014/10/collection-of-useful-bash-functions-and-aliases
What follows is a collection of some of the aliases and functions that I use frequently, and which I believe may be useful to others as well. I showed them here in no particular order.
And the cputemp alias:
![myinfo]()
Another quick function to shorten something like this: ps aux | grep PROCESS_NAME. (Usage: psa NAME)
The above function can be used like psa NAME, for example psa firefox, and it will list all the processes with that name.
The following is an alias to quickly download the latest winetricks script and save it in the home directory, then make it executable. If the file already exists, overwrite it:
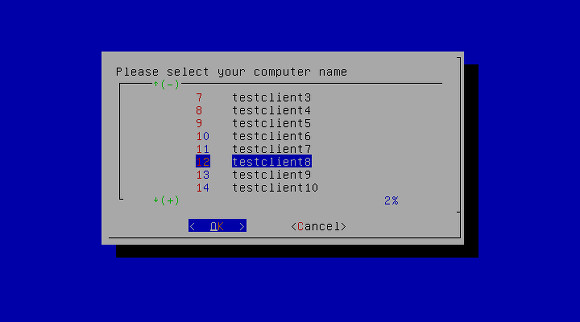
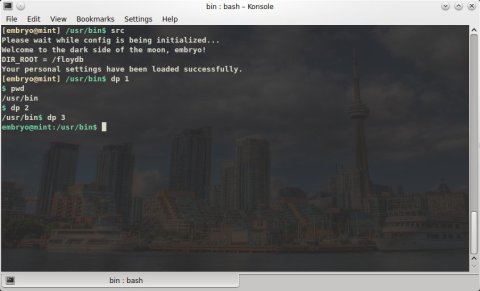
Use it as dp N, where N is 1, 2 or 3. ![dp_prompt]()
![myuptime]()
The above function will change the volume of KMix by typing kmvol N, where N is a value between 0 and 100. For example, kmvol 75 will change KMix volume to 75. It uses qdbus to do so.
Then, I define aliases for some values I need access to quickly. For example:
To show the current volume, I have this function (or even alias would work better for this):
For Amarok, in a similar way I defined this function: (Usage: amvol VALUE)
By typing amvol N I can change the Amarok volume.
You can set this script to run automatically when GNOME starts and it will cycle through all the wallpapers inside /usr/share/backgrounds every 60 seconds (change this value to something else for a different frequency - in seconds).
And finally, what follows is some Bash configuration stuff. Put this inside the $HOME/.bashrc file.
In this article I’m going to share some of the Bash aliases and functions that I use and I find pretty handy every once in a while. Aliases are composed of a word which is assigned some longer command, so whenever you type that word, it will be replaced with the longer command. Functions are usually used for anything that it is longer and not fit for an alias, and they usually perform more complicated tasks and can handle parameters as well. Here is a good explanation of both aliases and functions and how to use them. And here is a short tutorial that I wrote a while ago regarding aliases.
What follows is a collection of some of the aliases and functions that I use frequently, and which I believe may be useful to others as well. I showed them here in no particular order.
System Info
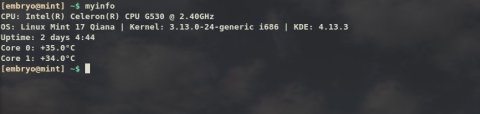
This is a function to show some system information (the KDE line will only work if KDE is installed):myinfo () {
printf "CPU: "
cat /proc/cpuinfo | grep "model name" | head -1 | awk '{ for (i = 4; i <= NF; i++) printf "%s ", $i }'
printf "\n"
cat /etc/issue | awk '{ printf "OS: %s %s %s %s | " , $1 , $2 , $3 , $4 }'
uname -a | awk '{ printf "Kernel: %s " , $3 }'
uname -m | awk '{ printf "%s | " , $1 }'
kded4 --version | grep "KDE Development Platform" | awk '{ printf "KDE: %s", $4 }'
printf "\n"
uptime | awk '{ printf "Uptime: %s %s %s", $3, $4, $5 }' | sed 's/,//g'
printf "\n"
cputemp | head -1 | awk '{ printf "%s %s %s\n", $1, $2, $3 }'
cputemp | tail -1 | awk '{ printf "%s %s %s\n", $1, $2, $3 }'
#cputemp | awk '{ printf "%s %s", $1 $2 }'
}
alias cputemp='sensors | grep Core'
Killing Processes
The next function will kill processes by name (does the same thing as pkill but with output). (Usage: kp NAME)kp () {
ps aux | grep $1 > /dev/null
mypid=$(pidof $1)
if [ "$mypid" != "" ]; then
kill -9 $(pidof $1)
if [[ "$?" == "0" ]]; then
echo "PID $mypid ($1) killed."
fi
else
echo "None killed."
fi
return;
}
psa () {
  ps aux | grep $1
}
Starting and Stopping Services
These are two aliases to start and respectively stop the Apache web server:alias runweb='sudo service apache2 restart'
alias stopweb='sudo service apache2 stop'
Download Files Quickly
This may come in handy when you have to download a file from a certain location very often (the file gets updated frequently).The following is an alias to quickly download the latest winetricks script and save it in the home directory, then make it executable. If the file already exists, overwrite it:
alias getwinetricks='wget -O $HOME/winetricks http://winetricks.org/winetricks && chmod 755 winetricks'
Disk Usage
And here is a function which will parse the output of the df command to only show disk space on /dev/sd* and /mnt/* mounted partitions: (Usage: ssd)ssd () {
echo "Device Total Used Free Pct MntPoint"
df -h | grep "/dev/sd"
df -h | grep "/mnt/"
}
System Upgrade
This is an alias to update a Ubuntu system.alias lmu='sudo apt-get update && sudo apt-get dist-upgrade'
Sometimes, even though the package list is updated properly, some public key related error may occur and the first command may exit with a non-zero status, causing the second command to not execute, in which case this may be the preferred way:alias lmu='sudo apt-get update; sudo apt-get dist-upgrade'
APT Packages
The following function is useful on a Debian/Ubuntu/Mint system to list all the packages from repositories which contain a certain pattern: (Usage: showpkg NAME)showpkg () {
apt-cache pkgnames | grep -i "$1" | sort
return;
}
Audio Aliases
The following will completely remove the tags in MP3 files:alias stripmp3='id3v2 -d *.mp3; id3v2 -s *.mp3'
And this will rip all FLAC files in the current directory to Ogg:alias ogg192='oggenc -b 192 *.flac'
Permissions
Give a file execute permissions or just read and write:alias chx='chmod 755'
alias chr='chmod 644'
Changing Directory
Will go back to the previous directory:alias back='cd "$OLDPWD"'
Listing Files
The way I prefer to have the long listing displayed as:alias lsh='ls -lhXG' # long listing, human-readable, sort by extension, do not show group info
Removing Non-Empty Directories, Read-Only Files
alias rmf='rm -rf'
Running Emacs
This alias will run Emacs without a graphical window, in a terminal:alias emw='emacs --no-window'
Compressed Files
Two aliases to uncompress GZIP and BZIP archives:alias untarz='tar -xzf'
alias untarj='tar -xjf'
Three Different Prompts
Cycle between three different prompts. Usage: dp Ndp () {
if [[ $1 -eq "1" || $# -eq "0" ]]; then
PS1="\033[01;32m$\033[00m "
elif [[ $1 -eq "2" ]]; then
PS1="${debian_chroot:+($debian_chroot)}\w\033[01;32m$\033[00m "
elif [[ $1 -eq "3" ]]; then
PS1="\033[01;32m\u@\H:${debian_chroot:+($debian_chroot)}\w\033[01;32m$\033[00m "
fi
return;
}
Uptime
Shows uptime using a shorter formula:myuptime () {
uptime | awk '{ print "Uptime:", $3, $4, $5 }' | sed 's/,//g'
return;
}

Handy KDE Functions
Here are some functions that I use for my KDE desktop. I keep a running Yakuake and a desktop Plasma widget with a terminal to quickly change the volume of KMix (the KDE audio mixer) and Amarok from the command-line. (Usage: kmvol VALUE)kmvol () {
if [ "$1" == "" ] || [ $1 -lt 0 ] || [ $1 -gt 100 ]; then
echo "Usage: kmvol N"
echo " N - integer between 0 and 100"
else
qdbus org.kde.kmix /Mixers/PulseAudio__Playback_Devices_1/alsa_output_pci_0000_00_1b_0_analog_stereo org.kde.KMix.Control.volume $1
echo "KMix volume set to $1" # set custom volume
fi
}
Then, I define aliases for some values I need access to quickly. For example:
alias kmmin='kmvol 0'
alias kmv45='kmvol 45'
alias kmv70='kmvol 70'
alias kmv80='kmvol 80'
kmshow () {
  qdbus org.kde.kmix /Mixers/PulseAudio__Playback_Devices_1/alsa_output_pci_0000_00_1b_0_analog_stereo org.kde.KMix.Control.volume
}
amvol () {
  if [ "$1" == "" ] || [ $1 -lt 0 ] || [ $1 -gt 100 ]; then
    echo "Usage: amvol N"
    echo "  N  - integer between 0 and 100"
  else
    qdbus org.kde.amarok /Player VolumeSet $1
    echo "Amarok volume set to $1"
  fi
}
Automatically Cycle GNOME Desktop Wallpaper
This is a small script which will cycle through wallpapers in a certain directory and change them every 60 seconds:while [[ 1 -eq 1 ]]; do
for i in $(echo /usr/share/backgrounds/*.jpg); do
gsettings set org.gnome.desktop.background picture-uri file:///${i}
sleep 60;
done
done
And finally, what follows is some Bash configuration stuff. Put this inside the $HOME/.bashrc file.
Colorful Manpages
To get some fancy, colorful manpages, you can put this inside your $HOME/.bashrc file (for changes to take effect source it or reset the terminal e.g. source ~/.bashrc):export LESS_TERMCAP_mb=$(printf '\e[01;31m') # enter blinking mode – red
export LESS_TERMCAP_md=$(printf '\e[01;35m') # enter double-bright mode – bold, magenta
export LESS_TERMCAP_me=$(printf '\e[0m') # turn off all appearance modes (mb, md, so, us)
export LESS_TERMCAP_se=$(printf '\e[0m') # leave standout mode
export LESS_TERMCAP_so=$(printf '\e[01;33m') # enter standout mode – yellow
export LESS_TERMCAP_ue=$(printf '\e[0m') # leave underline mode
export LESS_TERMCAP_us=$(printf '\e[04;36m') # enter underline mode – cyan
Prompt
This will set a fancy prompt (PS1):export PS1="\[\033[01;33m\][$USER@$HOSTNAME]\[\033[0;00m\] \[\033[01;32m\]\w\\$\[\033[0;00m\] "
And a greeting, to be displayed whenever Bash runs interactively (when you open a terminal for example):echo "Welcome to the dark side of the moon, $USER!"
echo -e "Today is $(date)\nUptime: $(uptime)"
echo "Your personal settings have been loaded successfully."
 Figure 1. Original Image, Kids at a Party
  Figure 2. Label Added, No Styling
  Figure 3. Caption against a Khaki Background
  Figure 4. Improved Semi-Transparent Label