Quantcast
Channel: Sameh Attia
Viewing all 1413 articles
Browse latest View live

Shell Scripting Part I: Getting started with bash scripting

$
0
0
https://www.howtoforge.com/tutorial/linux-shell-scripting-lessons

Hello. This is the first part of a series of Linux tutorials. In writing this tutorial, I assume that you are an absolute beginner in creating Linux scripts and are very much willing to learn. During the series the level will increase, so I am sure there will be something new even for more advanced users. So let's begin.

Introduction

Most of our operating systems including Linux can support different user interfaces (UI). The Graphical User Interface (GUI) is a user-friendly desktop interface that enables users to click icons to run an application. The other type of interface is the Command Line Interface (CLI) which is purely textual and accepts commands from the user. A shell, the command interpreter reads the command through the CLI and invokes the program. Most of the operating systems nowadays, provide both interfaces including Linux distributions.
When using shell, the user has to type in a series of commands at the terminal. No problem if the user has to do the task only once. However, if the task is complex and has to be repeated multiple times, it can get a bit tedious for the user. Luckily, there is a way to automate the tasks of the shell. This can be done by writing and running shell scripts. A shell script is a type of file which is composed of a series and sequence of commands that are supported by the Linux shell.

Why create shell scripts?

The shell script is a very useful tool in automating tasks in Linux OSes. It can also be used to combine utilities and create new commands. You can combine long and repetitive sequences of commands into one simple command. All scripts can be run without the need of compiling it, so the user will have a way of prototyping commands seamlessly.

I am new to Linux environment, can I still learn how to create shell scripts?

Of course! Creating shell scripts does not require complex knowledge of Linux. A basic knowledge of the common commands in the Linux CLI and a text editor will do. If you are an absolute beginner and have no background knowledge in Linux Command Line, you might find this tutorial helpful.

Creating my first shell script

The bash (Bourne-Again Shell) is the default shell in most of the Linux distributions and OS X. It is an open-source GNU project that was intended to replace the sh (Bourne Shell), the original Unix shell. It was developed by Brian Fox and was released in 1989.
You must always remember that each Linux script using bash will start with the following line:
#!/bin/bash
Every Linux script starts with a shebang (#!) line. The bang line specifies the full path /bin/bash of the command interpreter that will be used to run the script.

Hello World!

Every programming language begins with the Hello World! display. We will not end this tradition and create our own version of this dummy output in Linux scripting.
To start creating our script, follow the steps below:
Step 1: Open a text editor. I will use gedit for this example. To open gedit using the terminal, press CTRL + ALT + T on your keyboard and type gedit. Now, we can start writing our script.
Step 2: Type the following command at the text editor:
#!/bin/bash
echo "Hello World"
Step 3: Now, save the document with a file name hello.sh. Note that each script will have a .sh file extension.
Step 4: As for security reasons enforced by Linux distributions, files and scripts are not executable by default. However we can change that for our script using the chmod command in Linux CLI. Close the gedit application and open a terminal. Now type the following command:
chmod +x hello.sh
The line above sets the executable permission to the hello.sh file. This procedure has to be done only once before running the script for the first time.
Step 5: To run the script, type the following command at the terminal:
./hello.sh
Let's have another example. This time, we will incorporate displaying some system information by using the whoami and date commands to our hello script.
Open the hello.sh in our text editor and we will edit our script by typing:
#!/bin/bash
echo "Hello $(whoami) !"
echo "The date today is $(date)"
Save the changes we made in the script and run the script (Step 5 in the previous example) by typing:
./hello.sh
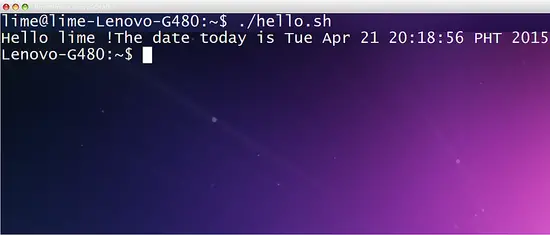
The output of the script will be:

In the previous example, the commands whoami and date were used inside the echo command. This only signifies that all utilities and commands available in the command line can also be used in shell scripts.

Generating output using printf

So far, we have used echo to print strings and data from commands in our previous example. Echo is used to display a line of text. Another commmand that can be used to display data is the printf command. The printf controls and prints data like the printf function in C.
Below is the summary of the common prinf controls:
ControlUsage
\"Double quote
\\Backslash
\bBackspace
\cProduce no further output
\eEscape
\nNew Line
\rCarriage Return
\tHorizontal tab
\vVertical Tab
Example3: We will open the previous hello.sh and change all echo to printf and run the script again. Notice what changes occur in our output.
#!/bin/bash
printf "Hello $(whoami) !"
printf "The date today is $(date)"

All lines are attached to each other because we didn't use any controls in the printf command. Therefore the printf command in Linux has the same properties as the C function printf.
To format the output of our script, we will use two of the controls in the table summary above. In order to work, the controls have to be indicated by a \ inside the quotes of the printf command. For instance, we will edit the previous content of the hello.sh into:
#!/bin/bash
printf "Hello \t $(whoami) !\n"
printf "The date today is $(date)\n"
The script outputs the following:

Conclusion

In this tutorial, you have learned the basics of shell scripting and were able to create and run shell scripts. During the second part of the tutorial I will introduce how to declare variables, accept inputs and perform arithmetic operations using shell commands.

5 Humanitarian FOSS projects to watch

$
0
0
http://opensource.com/life/15/4/5-more-humanitarian-foss-projects

Humanitarian open source software, outreached hand
Image credits : 
Photo by Jen Wike Huger
A few months ago, we profiled open source projects working to make the world a better place. In this new installment, we present some more humanitarian open source projects to inspire you.

Humanitarian OpenStreetmap Team (HOT)

Maps are vital in crises, and in places where incomplete information costs lives.
Immediately after the Haiti earthquake in 2010, the OpenStreetMap community started tracing streets and roads, place names, and any other data that could be traced from pre-earthquake materials. After the crisis, the project remained engaged throughout the recovery process, training locals and constantly improving data quality.
Whether it is tracking epidemics or improving information in a crisis, the crowdsourcing mappers at HOT are proving invaluable to aid agencies.

Literacy Bridge

Founded by Apache Project veteran Cliff Schmidt, the Literacy Bridge created the Talking Book, a portable device that could play and record audio content.
Designed to survive the rigors of sub-Saharan Africa, these devices have allowed villages to learn about and adopt modern agricultural practices, increase literacy rates, and allow villages and tribes to share their oral history more widely by recording and replaying legends and stories.

Human Rights Data Analysis Group

This project recently made headlines by analyzing the incidences of reported killings by police officers in the United States. By performing statistical analysis on records found after the fall of dictatorial regimes, the organization sheds light on human rights abuses in those countries. Its members are regularly called upon as expert witnesses in war crimes tribunals. Their website claims that they "believe that truth leads to accountability."

Sahana

Founded in the chaos of the 2004 tsunami in Sri Lanka, Sahana was a group of technologists' answer to the question: "What can we do to help?" The goal of the project has remained the same since: how can we leverage community efforts to improve communication and aid in a crisis situation? Sahana provides projects which help reunite children with their families, organize donations effectively, and help authorities understand where aid is most urgently needed.

FrontlineSMS

Where you have no internet, no reliable electricity, no roads, and no fixed line telephones, you can still find mobile phones sending SMS text messages. FrontlineSMS provides a framework to send, receive, and process text messages from a central application using a simple GSM modem or a mobile phone connected through a USB cable. The applications are widespread—central recording and analysis of medical reports from rural villages, community organizing, and gathering data related to sexual exploitation and human trafficking are just a few of the applications which have successfully used FrontlineSMS.
Do you know of other humanitarian free and open source projects? Let us know about them in the comments or send us your story.

Use Geofix to Geotag Photos in digiKam

$
0
0
http://scribblesandsnaps.com/2015/04/24/use-geofix-to-geotag-photos-in-digikam

Geofix is a simple Python script that lets you use an Android device to record the geographical coordinates of your current position. The clever part is that the script stores the obtained latitude and longitude values in the digiKam-compatible format, so you can copy the saved coordinates and use them to geotag photos in digiKam’s Geo-location module.
geofix-web
To deploy Geofix on your Android device, install the SL4A and PythonForAndroid APK packages from the Scripting Layer for Android website. Copy then the geofix.py script to the sl4a/scripts directory on the internal storage of your Android device. Open the SL4A app, and launch the script. For faster access, you can add to the homescreen an SL4A widget that links to the script.
Instead of using SL4A and Python for Android, which are all but abandoned by Google, you can opt for QPython. In this case, you need to use the geofix-qpython.py script. Copy it to the com.hipipal.qpyplus/scripts directory, and use the QPython app to launch the script.
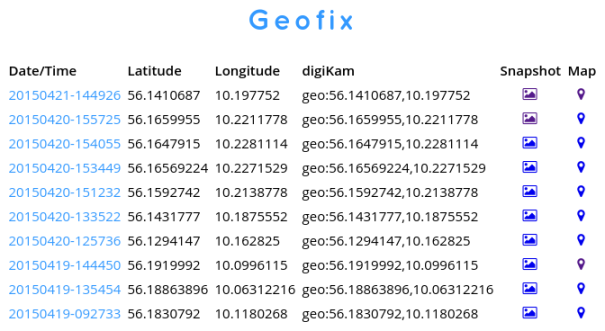
Both scripts save obtained data in the geofix.tsv tab-separated file and the geofix.sqlite database. You can use a spreadsheet application like LibreOffice Calc to open the former, or you can run the supplied web app to display data from the geofix.sqlite database in the browser. To do this, run the main.py script in the geofix-web directory by issuing the ./main.py command in the Terminal.
To geotag photos in digiKam using the data from Geofix, copy the desired coordinates in the digiKam format (e.g., geo:56.1831455,10.1182492). Select the photos you want to geotag and choose Image → Geo-location. Select the photos, right-click on the selection, and choose Paste coordinates.

Deploying a DNS Server using Docker

$
0
0
http://www.damagehead.com/blog/2015/04/28/deploying-a-dns-server-using-docker

This is the first part of a series of how-to’s where I describe setting up and using various docker containers for home and production use.
To start off this series we will use the sameersbn/binddocker image to setup a DNS server in production and host only environments.
BIND, developed by the Internet Systems Consortium, is a production-grade and by far the most popular and widely used opensource DNS server software available.

Introduction

The Domain Name System (DNS) server takes a fully qualified domain name (FQDN) such as www.example.com and returns the corresponding IP address such as 93.184.216.34.
A couple of reasons to set up a DNS server.
By setting up a local DNS server you don’t rely on your ISP’s DNS servers which are often bogged down by incoming traffic which makes responses to DNS queries take longer to get serviced.
Besides performing domain name resolutions, a BIND server also acts as a DNS cache. This means that DNS queries could get serviced from the local cache. This in turn speeds up DNS responses.
Some ISP’s block access to websites by DNS spoofing. Setting up your own DNS server can help you get around this. However, a more effective way to circumvent this type of censorship is by using the tor browser which can be installed using the sameersbn/browser-box image.
Finally and most importantly, a local DNS server will enable you to define a domain for your local network. This allows you to address machines/services on the network with a name rather than its IP address. When setting up web services whether you do it using docker or otherwise, installing a DNS server makes the setup much simpler and easier to deal with.

Setting up the image

Begin by fetching the image from the docker hub.

1
docker pull sameersbn/bind:latest
Now lets “boot” the image…

1
2
3
4
5
docker run -d --name=bind --dns=127.0.0.1 \
--publish=172.17.42.1:53:53/udp --publish=172.17.42.1:10000:10000 \
--volume=/srv/docker/bind:/data \
--env='ROOT_PASSWORD=SecretPassword'\
sameersbn/bind:latest
Here is the gist of the equivalent configuration in docker-compose.yml form.
  • -d detaches, runs the container in the background
  • --name='bind' assigns the name bind to the container
  • --dns=127.0.0.1 configures the dns of the container to 127.0.0.1
  • --publish=172.17.42.1:53:53/udp makes the DNS server accessible on 172.17.42.1:53
  • --publish=172.17.42.1:10000:10000 makes webmin accessible at https://172.17.42.1:10000
  • --volume=/srv/docker/bind:/data mounts /srv/docker/bind as a volume for persistence
  • --env='ROOT_PASSWORD=SecretPassword' sets the root password to SecretPassword
In the above command the DNS server will only be accessible to the host and other containers over the docker bridge interface (host only). If you want the DNS server to be accessible over the network you should replace --publish=172.17.42.1:53:53/udp with --publish=53:53/udp (all interfaces) or something like --publish=192.168.1.1:53:53/udp (specific interface).
From this point on 172.17.42.1 will refer to our local DNS server. Replace it with the appropriate address depending on your setup.
The sameersbn/bind image includes webmin, a web-based interface for system administration, so that you can quickly and easily configure BIND. Webmin is launched automatically when the image is started.
If you prefer configuring BIND by hand, you can turn off webmin startup by setting --env='WEBMIN_ENABLED=false' in the run command. The BIND specific configuration will be available at /srv/docker/bind/bind. To apply your configuration send the HUP signal to the container using docker kill -s HUP bind
Finally, if --env='ROOT_PASSWORD=SecretPassword' is not specified in the run command, a random password is generated and assigned for the root user which can be retrieved with docker logs bind 2>&1 | grep '^User: ' | tail -n1. This password is used while logging in to the webmin interface.

Test the DNS server

Before we go any further, lets check if our DNS server is able to resolve addresses using the unix host command.

1
host www.google.com 172.17.42.1
  • www.google.com the address to resolve
  • 172.17.42.1 the DNS server to be used for the resolution
If everything works as expected the host command should return the IP address of www.google.com.

Using the DNS server

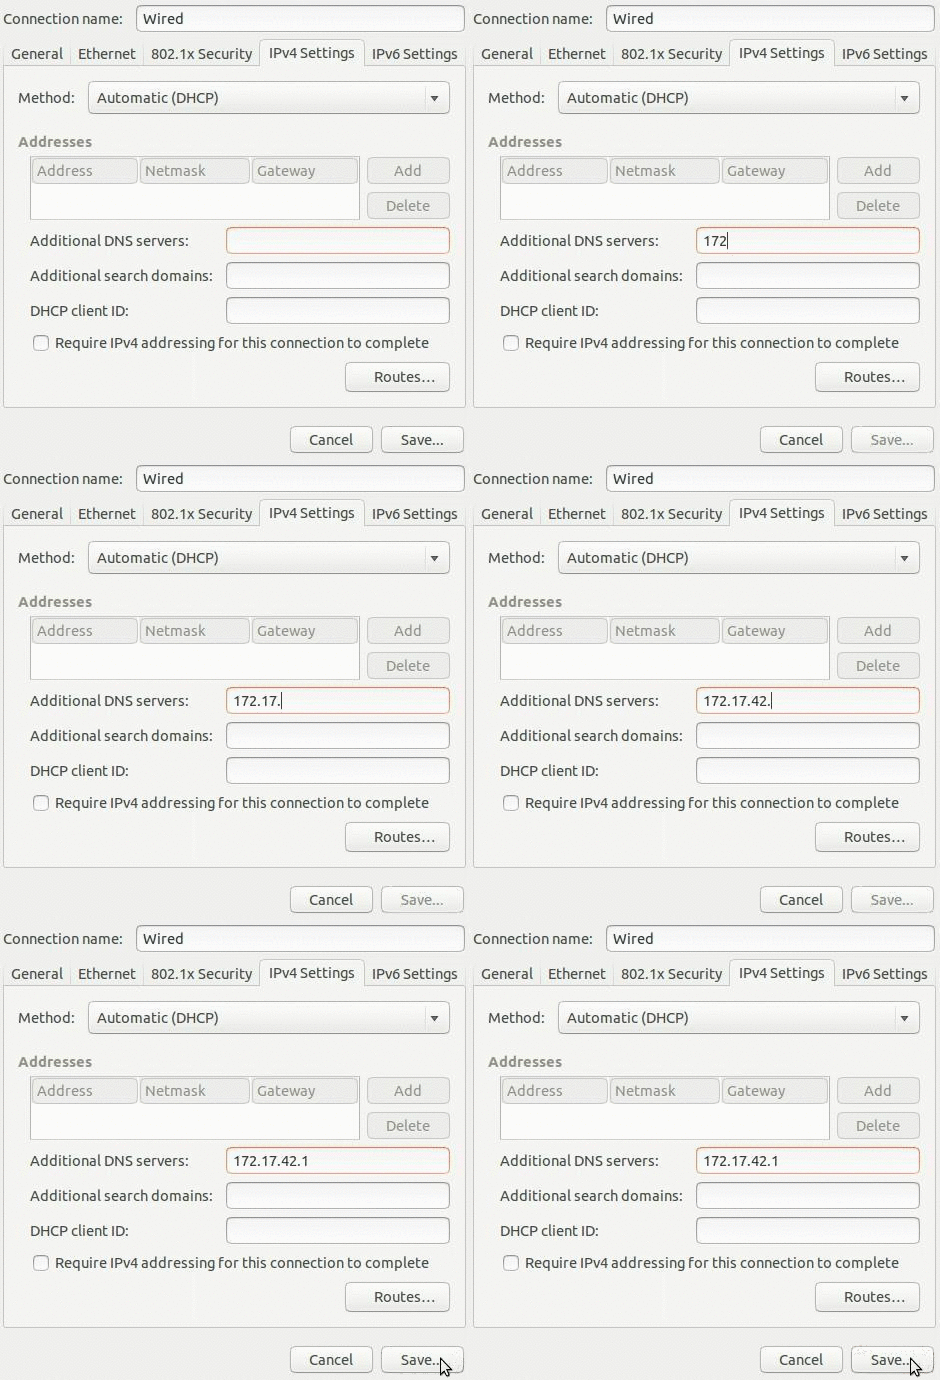
If you have setup a DNS server for your local network, you can configure your DHCP server to give out the DNS servers address in the lease responses. If you do not have a DHCP server running on your network (why?) you will have to manually configure it in the operating systems network settings.

Alternately, on linux distributions that use Network Manager (virtually every linux distribution), you can add a dnsmasq configuration (/etc/NetworkManager/dnsmasq.d/dnsmasq.conf) such that the local DNS server would be used for specific addresses, while the default DNS servers would be used otherwise.
1
2
3
4
5
6
domain-needed
all-servers
cache-size=5000
strict-order

server=/example.com/google.com/172.17.42.1
In the above example, regardless of the primary DNS configuration the DNS server at 172.17.42.1 will be used to resolve example.com and google.com addresses. This is particularly useful in host only configurations when you setup a domain to address various services on the local host without having to manually change the DNS configuration everytime you connect to a different network.
After performing the dnsmasq configuration the network manager needs to be restarted for the changes to take effect. On Ubuntu, this is achieved using the command restart network-manager
Finally, we can configure docker such that the containers are automatically configured to use our DNS server. This is done by adding --dns 172.17.42.1 to the docker daemon command. On Ubuntu, this is done at /etc/default/docker. The docker daemon needs to be restarted for these changes to take effect.

Creating a domain using webmin

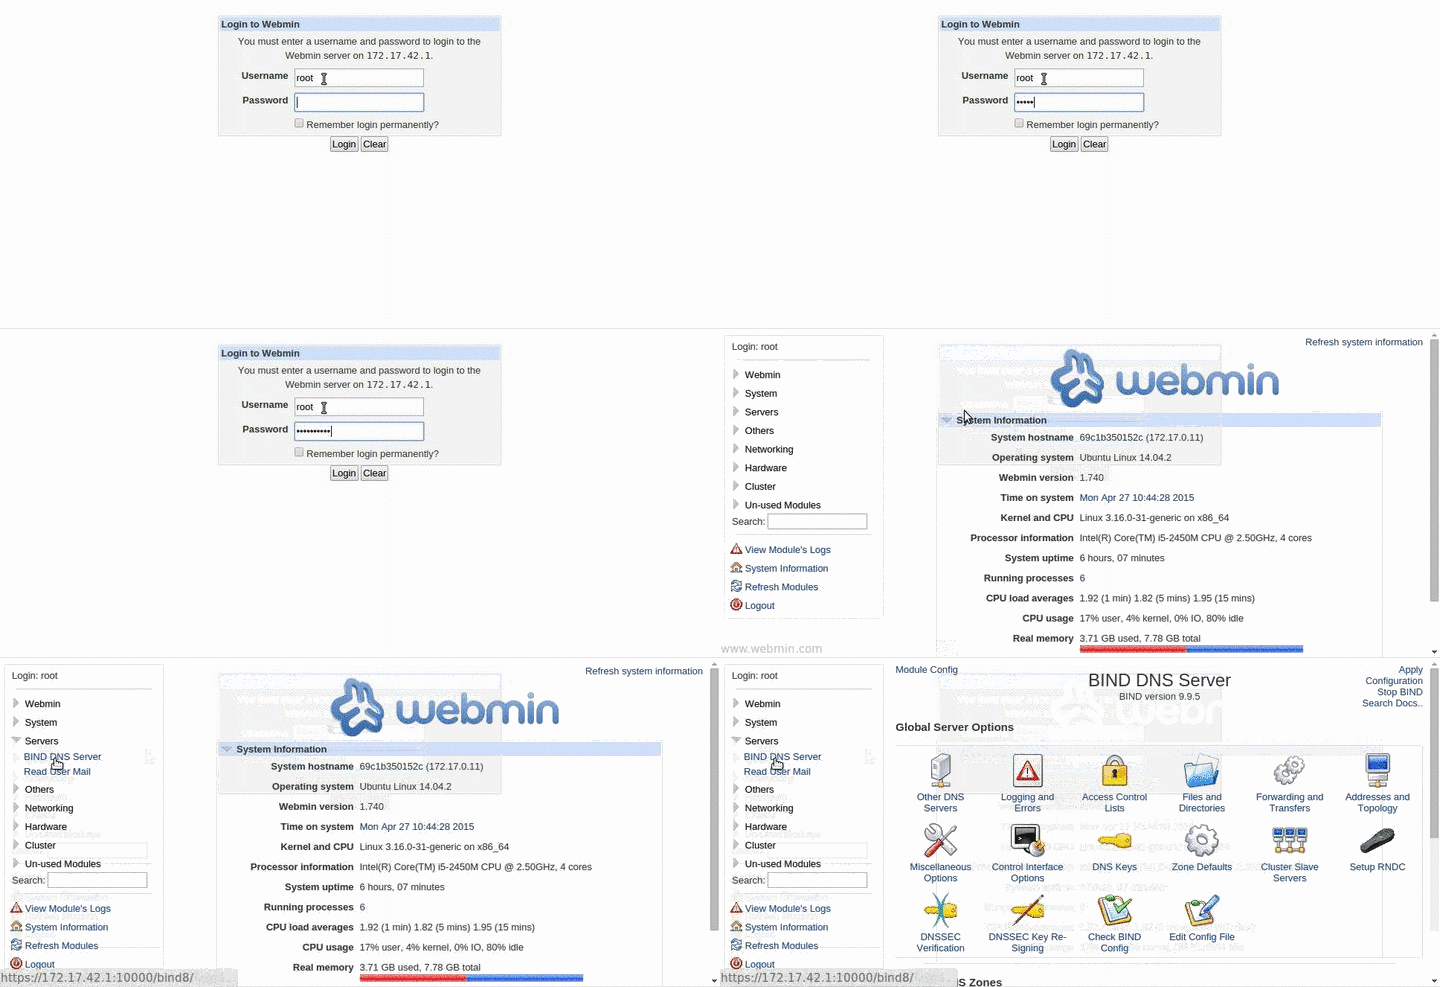
Point your web browser to https://172.17.42.1:10000 and login to webmin as user root and password SecretPassword. Once logged in click on Servers and select BIND DNS Server.

This is where we will perform the DNS configuration. Changes to the configuration can be applied using the Apply Configuration link in the top right corner of the page. We will create a domain named example.com for demonstration purposes.
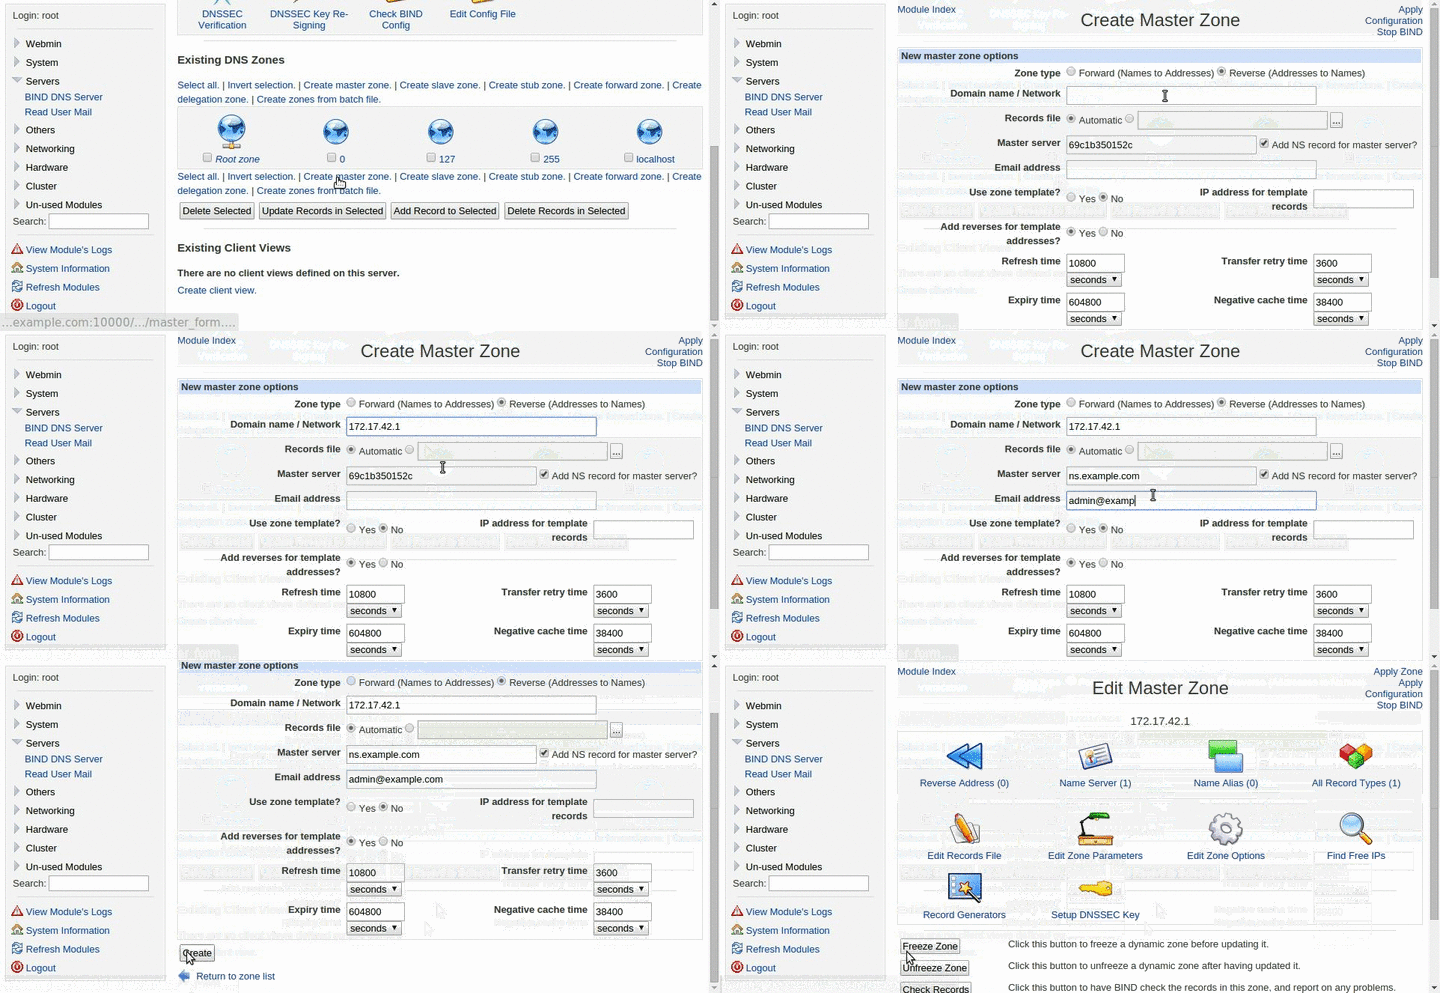
We start by creating the reverse zone 172.17.42.1. This is optional and required only if you want to be able to do reverse DNS (rDNS) lookups. A rDNS lookup returns the domain name that is associated with a given IP address. To create the zone select Create master zone and in the Create new zone dialog set the Zone type to Reverse, the Network address to your interface IP address 172.17.42.1, the Master server tons.example.com and finally set Email address to the domain administrator’s email address and select Create.

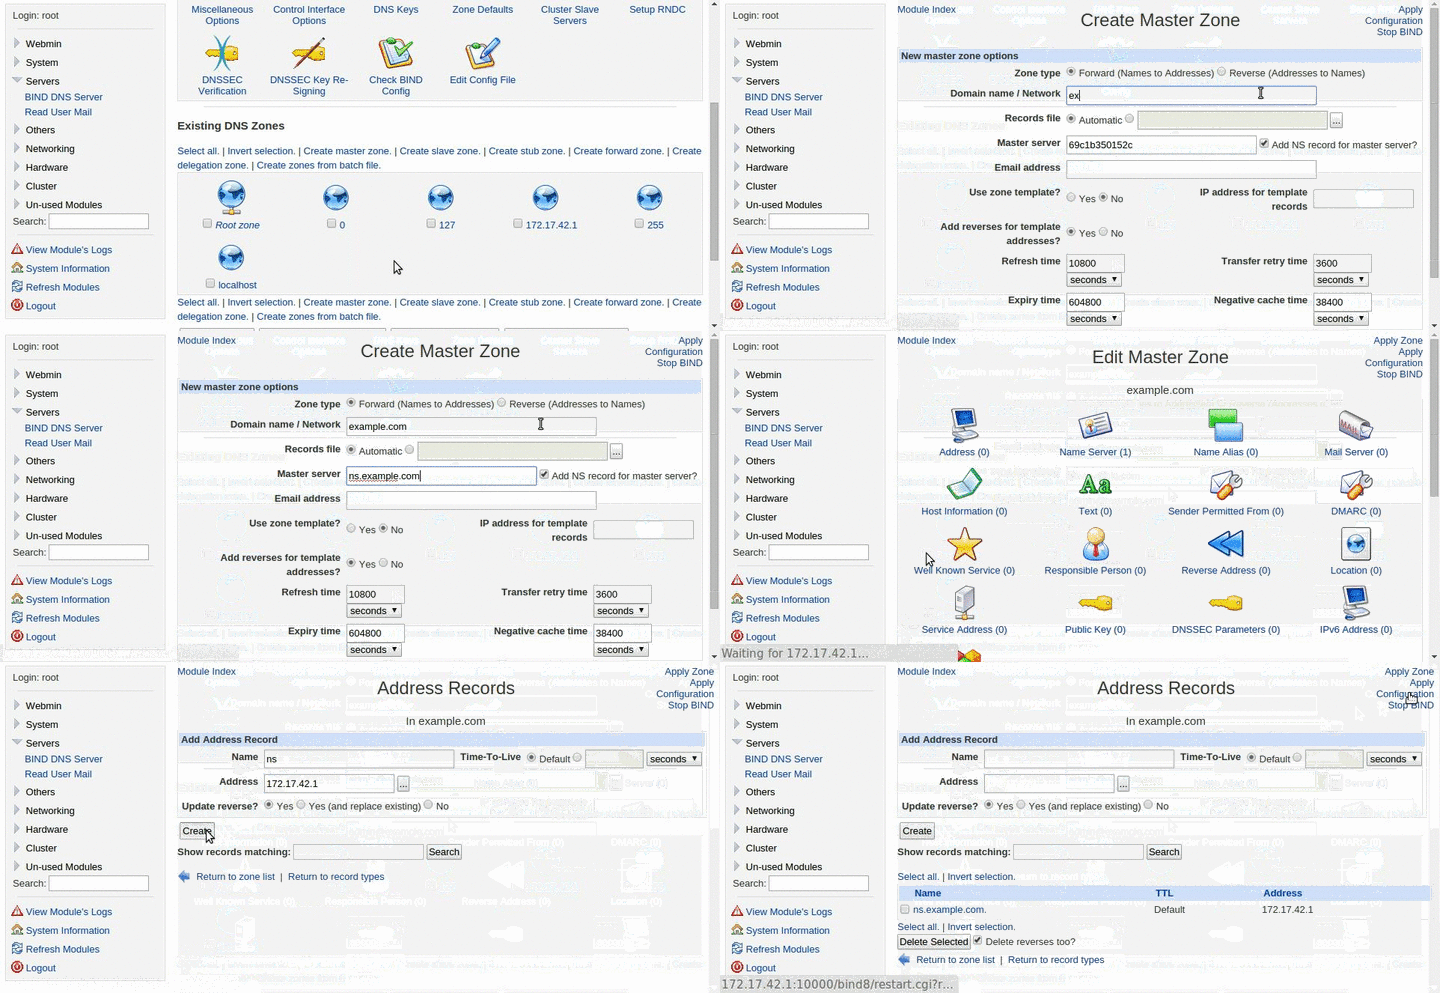
Next, we create the forward zone example.com by selecting Create master zone and in the Create new zone dialog set the Zone type to Forward, the Domain Name to example.com, the Master server to ns.example.com and set Email address to the domain administrator’s email address and select Create. Next, create the DNS entry for ns.example.com pointing to 172.17.42.1 and apply the configuration.

To complete this tutorial we will create a address (A) entry for webserver.example.com and then add a domain name alias (CNAME) entry www.example.com which will point to webserver.example.com.
To create the A entry, select the zone example.com and then select the Address option. Set the Name to webserver and the Address to 192.168.1.1. To create the CNAME entry, select the zone example.com and then select the Name Alias option. Set the Name to www and the Real Name to webserver and apply the configuration.

And now, the moment of truth…
1
2
host webserver.example.com 172.17.42.1
host www.example.com 172.17.42.1
These commands should return the DNS addresses as per our configuration. Time to find out.

And there you have it. A local DNS server with a local domain named example.com.

How to access a Linux server behind NAT via reverse SSH tunnel

$
0
0
http://xmodulo.com/access-linux-server-behind-nat-reverse-ssh-tunnel.html

You are running a Linux server at home, which is behind a NAT router or restrictive firewall. Now you want to SSH to the home server while you are away from home. How would you set that up? SSH port forwarding will certainly be an option. However, port forwarding can become tricky if you are dealing with multiple nested NAT environment. Besides, it can be interfered with under various ISP-specific conditions, such as restrictive ISP firewalls which block forwarded ports, or carrier-grade NAT which shares IPv4 addresses among users.

What is Reverse SSH Tunneling?

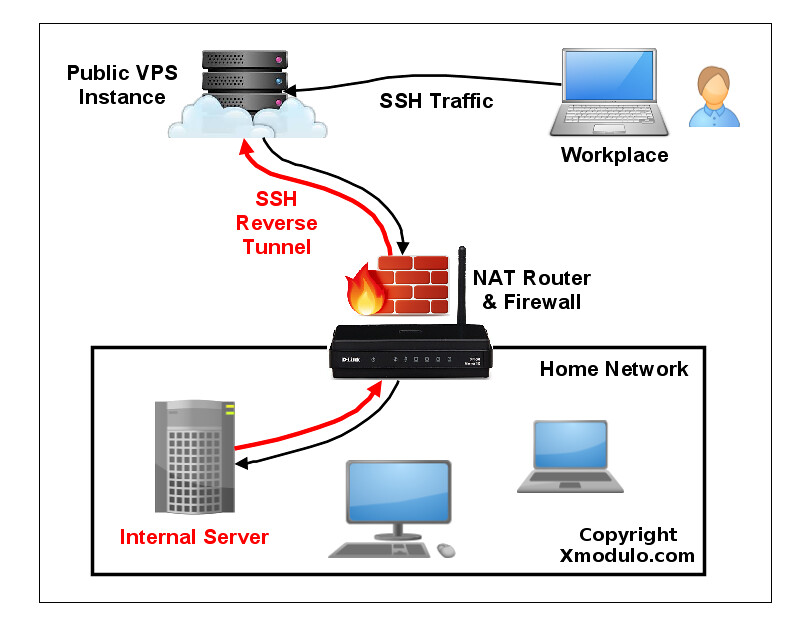
One alternative to SSH port forwarding is reverse SSH tunneling. The concept of reverse SSH tunneling is simple. For this, you will need another host (so-called "relay host") outside your restrictive home network, which you can connect to via SSH from where you are. You could set up a relay host using a VPS instance with a public IP address. What you do then is to set up a persistent SSH tunnel from the server in your home network to the public relay host. With that, you can connect "back" to the home server from the relay host (which is why it's called a "reverse" tunnel). As long as the relay host is reachable to you, you can connect to your home server wherever you are, or however restrictive your NAT or firewall is in your home network.

Set up a Reverse SSH Tunnel on Linux

Let's see how we can create and use a reverse SSH tunnel. We assume the following. We will be setting up a reverse SSH tunnel from homeserver to relayserver, so that we can SSH to homeserver via relayserver from another computer called clientcomputer. The public IP address of relayserver is 1.1.1.1.
On homeserver, open an SSH connection to relayserver as follows.
homeserver~$ ssh -fN -R 10022:localhost:22 relayserver_user@1.1.1.1
Here the port 10022 is any arbitrary port number you can choose. Just make sure that this port is not used by other programs on relayserver.
The "-R 10022:localhost:22" option defines a reverse tunnel. It forwards traffic on port 10022 of relayserver to port 22 of homeserver.
With "-fN" option, SSH will go right into the background once you successfully authenticate with an SSH server. This option is useful when you do not want to execute any command on a remote SSH server, and just want to forward ports, like in our case.
After running the above command, you will be right back to the command prompt of homeserver.
Log in to relayserver, and verify that 127.0.0.1:10022 is bound to sshd. If so, that means a reverse tunnel is set up correctly.
relayserver~$ sudo netstat -nap | grep 10022
tcp      0    0 127.0.0.1:10022          0.0.0.0:*               LISTEN      8493/sshd           
Now from any other computer (e.g., clientcomputer), log in to relayserver. Then access homeserver as follows.
relayserver~$ ssh -p 10022 homeserver_user@localhost
One thing to take note is that the SSH login/password you type for localhost should be for homeserver, not for relayserver, since you are logging in to homeserver via the tunnel's local endpoint. So do not type login/password for relayserver. After successful login, you will be on homeserver.

Connect Directly to a NATed Server via a Reverse SSH Tunnel

While the above method allows you to reach homeserver behind NAT, you need to log in twice: first to relayserver, and then to homeserver. This is because the end point of an SSH tunnel on relayserver is binding to loopback address (127.0.0.1).
But in fact, there is a way to reach NATed homeserver directly with a single login to relayserver. For this, you will need to let sshd on relayserver forward a port not only from loopback address, but also from an external host. This is achieved by specifying GatewayPorts option in sshd running on relayserver.
Open /etc/ssh/sshd_conf of relayserver and add the following line.
relayserver~$ vi /etc/ssh/sshd_conf
GatewayPorts clientspecified
Restart sshd.
Debian-based system:
relayserver~$ sudo /etc/init.d/ssh restart
Red Hat-based system:
relayserver~$ sudo systemctl restart sshd
Now let's initiate a reverse SSH tunnel from homeserver as follows.
homeserver~$ ssh -fN -R 1.1.1.1:10022:localhost:22 relayserver_user@1.1.1.1
Log in to relayserver and confirm with netstat command that a reverse SSH tunnel is established successfully.
relayserver~$ sudo netstat -nap | grep 10022
tcp      0      0 1.1.1.1:10022     0.0.0.0:*           LISTEN      1538/sshd: dev  
Unlike a previous case, the end point of a tunnel is now at 1.1.1.1:10022 (relayserver's public IP address), not 127.0.0.1:10022. This means that the end point of the tunnel is reachable from an external host.
Now from any other computer (e.g., clientcomputer), type the following command to gain access to NATed homeserver.
clientcomputer~$ ssh -p 10022 homeserver_user@1.1.1.1
In the above command, while 1.1.1.1 is the public IP address of relayserver, homeserver_user must be the user account associated with homeserver. This is because the real host you are logging in to is homeserver, not relayserver. The latter simply relays your SSH traffic to homeserver.

Set up a Persistent Reverse SSH Tunnel on Linux

Now that you understand how to create a reverse SSH tunnel, let's make the tunnel "persistent", so that the tunnel is up and running all the time (regardless of temporary network congestion, SSH timeout, relay host rebooting, etc.). After all, if the tunnel is not always up, you won't be able to connect to your home server reliably.
For a persistent tunnel, I am going to use a tool called autossh. As the name implies, this program allows you to automatically restart an SSH session should it breaks for any reason. So it is useful to keep a reverse SSH tunnel active.
As the first step, let's set up passwordless SSH login from homeserver to relayserver. That way, autossh can restart a broken reverse SSH tunnel without user's involvement.
Next, install autossh on homeserver where a tunnel is initiated.
From homeserver, run autossh with the following arguments to create a persistent SSH tunnel destined to relayserver.
homeserver~$ autossh -M 10900 -fN -o "PubkeyAuthentication=yes" -o "StrictHostKeyChecking=false" -o "PasswordAuthentication=no" -o "ServerAliveInterval 60" -o "ServerAliveCountMax 3" -R 1.1.1.1:10022:localhost:22 relayserver_user@1.1.1.1
The "-M 10900" option specifies a monitoring port on relayserver which will be used to exchange test data to monitor an SSH session. This port should not be used by any program on relayserver.
The "-fN" option is passed to ssh command, which will let the SSH tunnel run in the background.
The "-o XXXX" options tell ssh to:
  • Use key authentication, not password authentication.
  • Automatically accept (unknown) SSH host keys.
  • Exchange keep-alive messages every 60 seconds.
  • Send up to 3 keep-alive messages without receiving any response back.
The rest of reverse SSH tunneling related options remain the same as before.
If you want an SSH tunnel to be automatically up upon boot, you can add the above autossh command in /etc/rc.local.

Conclusion

In this post, I talked about how you can use a reverse SSH tunnel to access a Linux server behind a restrictive firewall or NAT gateway from outside world. While I demonstrated its use case for a home network, you must be careful when applying it for corporate networks. Such a tunnel can be considered as a breach of a corporate policy, as it circumvents corporate firewalls and can expose corporate networks to outside attacks. There is a great chance it can be misused or abused. So always remember its implication before setting it up.

How to Securely Store Passwords and Api Keys Using Vault

$
0
0
http://linoxide.com/how-tos/secure-secret-store-vault

Vault is a tool that is used to access secret information securely, it may be password, API key, certificate or anything else. Vault provides a unified interface to secret information through strong access control mechanism and extensive logging of events.
Granting access to critical information is quite a difficult problem when we have multiple roles and individuals across different roles requiring various critical information like, login details to databases with different privileges, API keys for external services, credentials for service oriented architecture communication etc. Situation gets even worse when access to secret information is managed across different platforms with custom settings, so rolling, secure storage and managing the audit logs is almost impossible. But Vault provides a solution to such a complex situation.

Salient Features

Data Encryption: Vault can encrypt and decrypt data with no requirement to store it. Developers can now store encrypted data without developing their own encryption techniques and it allows security teams to define security parameters.
Secure Secret Storage: Vault encrypts the secret information (API keys, passwords or certificates) before storing it on to the persistent (secondary) storage. So even if somebody gets access to the stored information by chance, it will be of no use until it is decrypted.
Dynamic Secrets: On demand secrets are generated for systems like AWS and SQL databases. If an application needs to access S3 bucket, for instance, it requests AWS keypair from Vault, which grants the required secret information along with a lease time. The secret information won’t work once the lease time is expired.
Leasing and Renewal: Vault grants secrets with a lease limit, it revokes the secrets as soon as lease expires which can further be renewed through APIs if required.
Revocation: Upon expiring the lease period Vault can revoke a single secret or a tree of secrets.

Installing Vault

There are two ways to use Vault.
1. Pre-compiled Vault Binary can be downloaded for all Linux flavors from the following source, once done, unzip it and place it on a system PATH where other binaries are kept so that it can be accessed/invoked easily.
Download Precompiled Vault Binary (32-bit)
Download Precompiled Vault Binary (64-bit)
Download Precompiled Vault Binary (ARM)
Download the desired precompiled Vault binary.
wget binaryUnzip the downloaded binary.
unzipCongratulations! Vault is ready to be used.
vault
2. Compiling from source is another way of installing Vault on the system. GO and GIT are required to be installed and configured properly on the system before we start the installation process.
To install GO on Redhat systems use the following command.
sudo yum install go
To install GO on Debian systems use the following commands.
sudo apt-get install golang
OR
sudo add-apt-repository ppa:gophers/go
sudo apt-get update
sudo apt-get install golang-stable
To install GIT on Redhat systems use the following command.
sudo yum install git
To install GIT on Debian systems use the following commands.
sudo apt-get install git
Once both GO and GIT are installed we start the Vault installation process by compiling from the source.
  • Clone following Vault repository into the GOPATH
https://github.com/hashicorp/vault
  • Verify if the following clone file exist, if it doesn’t then Vault wasn’t cloned to the proper path.
$GOPATH/src/github.com/hashicorp/vault/main.go
  • Run following command to build Vault in the current system and put binary in the bin directory.
make dev
path

An introductory tutorial of Vault

We have compiled Vault’s official interactive tutorial along with its output on SSH.
Overview
This tutorial will cover the following steps:
- Initializing and unsealing your Vault
- Authorizing your requests to Vault
- Reading and writing secrets
- Sealing your Vault
Initialize your Vault
To get started, we need to initialize an instance of Vault for you to work with.
While initializing, you can configure the seal behavior of Vault.
Initialize Vault now, with 1 unseal key for simplicity, using the command:
vault init -key-shares=1 -key-threshold=1
You'll notice Vault prints out several keys here. Don't clear your terminal, as these are needed in the next few steps.
Initializing SSH
Unsealing your Vault
When a Vault server is started, it starts in a sealed state. In this state, Vault is configured to know where and how to access the physical storage, but doesn't know how to decrypt any of it.
Vault encrypts data with an encryption key. This key is encrypted with the "master key", which isn't stored. Decrypting the master key requires a threshold of shards. In this example, we use one shard to decrypt this master key.
vault unseal
Unsealing SSH
Authorize your requests
Before performing any operation with Vault, the connecting client must be authenticated. Authentication is the process of verifying a person or machine is who they say they are and assigning an identity to them. This identity is then used when making requests with Vault.
For simplicity, we'll use the root token we generated on init in Step 2. This output should be available in the scrollback.
Authorize with a client token:
vault auth
Authorize SSH
Read and write secrets
Now that Vault has been set-up, we can start reading and writing secrets with the default mounted secret backend. Secrets written to Vault are encrypted and then written to the backend storage. The backend storage mechanism never sees the unencrypted value and doesn't have the means necessary to decrypt it without Vault.
vault write secret/hello value=world
Of course, you can then read this data too:
vault read secret/hello
RW_SSH
Seal your Vault
There is also an API to seal the Vault. This will throw away the encryption key and require another unseal process to restore it. Sealing only requires a single operator with root privileges. This is typically part of a rare "break glass procedure".
This way, if there is a detected intrusion, the Vault data can be locked quickly to try to minimize damages. It can't be accessed again without access to the master key shards.
vault seal
Seal Vault SSH
That is the end of introductory tutorial.

Summary

Vault is a very useful application mainly because of providing a reliable and secure way of storing critical information. Furthermore it encrypts the critical information before storing, maintains audit logs, grants secret information for limited lease time and revokes it once lease is expired. It is platform independent and freely available to download and install. To discover more about Vault, readers are encouraged to visit the official website.

How to install Shrew Soft IPsec VPN client on Linux

$
0
0
http://ask.xmodulo.com/install-shrew-soft-ipsec-vpn-client-linux.html

Question: I need to connect to an IPSec VPN gateway. For that, I'm trying to use Shrew Soft VPN client, which is available for free. How can I install Shrew Soft VPN client on [insert your Linux distro]?
There are many commercial VPN gateways available, which come with their own proprietary VPN client software. While there are also open-source VPN server/client alternatives, they are typically lacking in sophisticated IPsec support, such as Internet Key Exchange (IKE) which is a standard IPsec protocol used to secure VPN key exchange and authentication. Shrew Soft VPN is a free IPsec VPN client supporting a number of authentication methods, key exchange, encryption and firewall traversal options.
Here is how you can install Shrew Soft VPN client on Linux platforms.
First, download its source code from the official website.

Install Shrew VPN Client on Debian, Ubuntu or Linux Mint

Shrew Soft VPN client GUI requires Qt 4.x. So you will need to install its development files as part of dependencies.
$ sudo apt-get install cmake libqt4-core libqt4-dev libqt4-gui libedit-dev libssl-dev checkinstall flex bison
$ wget https://www.shrew.net/download/ike/ike-2.2.1-release.tbz2
$ tar xvfvj ike-2.2.1-release.tbz2
$ cd ike
$ cmake -DCMAKE_INSTALL_PREFIX=/usr -DQTGUI=YES -DETCDIR=/etc -DNATT=YES .
$ make
$ sudo make install
$ cd /etc/
$ sudo mv iked.conf.sample iked.conf

Install Shrew VPN Client on CentOS, Fedora or RHEL

Similar to Debian based systems, you will need to install a number of dependencies including Qt4 before compiling it.
$ sudo yum install qt-devel cmake gcc-c++ openssl-devel libedit-devel flex bison
$ wget https://www.shrew.net/download/ike/ike-2.2.1-release.tbz2
$ tar xvfvj ike-2.2.1-release.tbz2
$ cd ike
$ cmake -DCMAKE_INSTALL_PREFIX=/usr -DQTGUI=YES -DETCDIR=/etc -DNATT=YES .
$ make
$ sudo make install
$ cd /etc/
$ sudo mv iked.conf.sample iked.conf
On Red Hat based systems, one last step is to open /etc/ld.so.conf with a text editor, and add the following line.
$ sudo vi /etc/ld.so.conf
include /usr/lib/
Reload run-time bindings of shared libraries to incorporate newly installed shared libraries:
$ sudo ldconfig

Launch Shrew VPN Client

First launch IKE daemon (iked). This daemon speaks the IKE protocol to communicate with a remote host over IPSec as a VPN client.
$ sudo iked

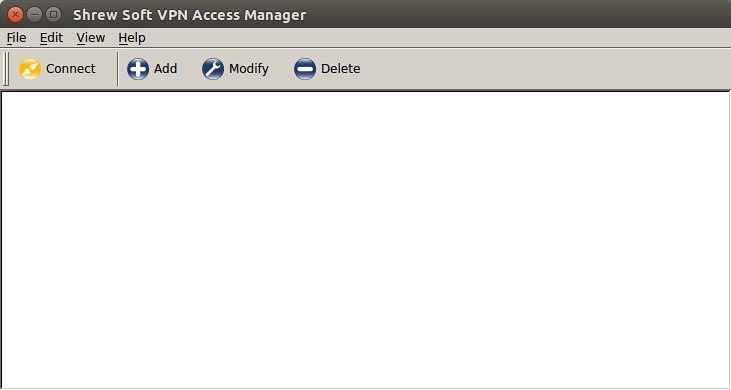
Now start qikea which is an IPsec VPN client front end. This GUI application allows you to manage remote site configurations and to initiate VPN connections.

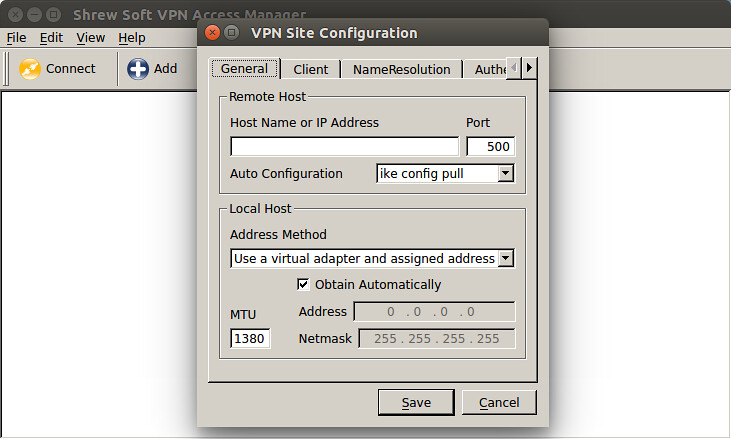
To create a new VPN configuration, click on "Add" button, and fill out VPN site configuration. Once you create a configuration, you can initiate a VPN connection simply by clicking on the configuration.

Troubleshooting

1. I am getting the following error while running iked.
iked: error while loading shared libraries: libss_ike.so.2.2.1: cannot open shared object file: No such file or directory
To solve this problem, you need to update the dynamic linker to incorporate libss_ike library. For that, add to /etc/ld.so.conf the path where the library is located (e.g., /usr/lib), and then run ldconfig command.
$ sudo ldconfig
Verify that libss_ike is added to the library path:
$ ldconfig -p | grep ike
 libss_ike.so.2.2.1 (libc6,x86-64) => /lib/libss_ike.so.2.2.1
libss_ike.so (libc6,x86-64) => /lib/libss_ike.so

HowTo Block Internet Explorer Browser With Squid Proxy Server on a Linux/Unix Server

$
0
0
http://www.cyberciti.biz/faq/howto-block-internet-explorer-browser-with-squid-proxy-server-on-a-linuxunix-server

I want to block Internet Explorer (MS-IE) browser on a squid proxy server running on a Linux or Unix-like systems. How can I block IE on a squid proxy server version 3.x?

You need to setup an acl on a squid proxy server to block Microsoft Internet Explorer or any other browser of your choice. This tutorials explains how to block
Tutorial details
DifficultyEasy (rss)
Root privilegesYes
RequirementsSquid 3.x
Estimated completion time5m
Internet Explorer browsers with Squid proxy running on a Ubuntu Linux and CentOS Linux version 6.x server. This is also useful to fix an known vulnerability coming from a specific version of browser. Please note the following acl based on user-agents and it can be spoofed easily.
Warning: Please note that third-party browser add-ons or bots can alter the user-agent string on the client side itself. So the following may not work at all.

Syntax to block squid using User-Agent header

The acl syntax is as follows tn match on User-Agent header:
acl acl_name_here browser User_Agent_Here

Step 1: Edit squid.conf

Type the following command:
sudo vi /etc/squid/squid.conf

Step 2: Enable User-agent log in squid.conf

Make sure access_log set to combined (default is squid):
access_log daemon:/var/log/squid3/access.log combined

Step 3: Update/append acl

Local acl section and append the following configuration directives to your squid.conf file:
## block all version of MSIE ##
acl block_browser browser MSIE
http_access deny block_browser
 
It is also possible to block specific version or other browsers too:
acl block_bad_browser browser MSIE.9
acl block_bad_browser browser MSIE.10
acl block_bad_browser browser Firefox
acl block_bad_browser browser Chrome/38
http_access deny block_bad_browser
 
You can also use the following syntax which is very fast:
 
acl aclname req_header header-name [-i] regex
 
Save and close the file.

Step 4: Reload squid server

To reload Squid Proxy Server without restarting squid daemon, enter:
sudo /usr/sbin/squid -k reconfigure

Step 5: Test it

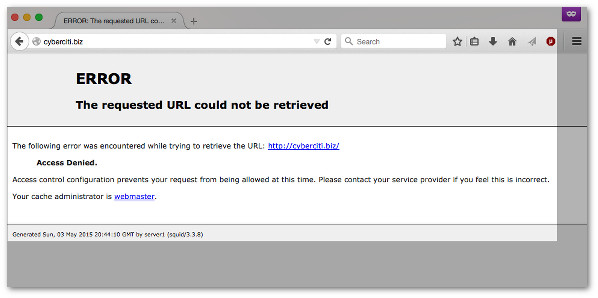
Here is a sample screen showing blocked browser:
Fig.01: Firefox is blocked using Squid 3.x
References

Three effective solutions for Google Analytics Referral spam

$
0
0
http://www.blackmoreops.com/2015/05/06/effective-solutions-for-google-analytics-referral-spam

I published this post darodar.com referrer spam and should you be worried? back in December and I am still seeing a constant influx of frustrated website owners and concerned netizens getting worried about similar spams. I happen to be one of the first to detect this spam and post about it. I didn’t pay much attention to it as referral spam or web analytics is not my primary concern when it comes to computing. Working in IT field for over a decade and specifically IT security, I have a different view on spam and how they can be stopped. I opened my Analytics account yesterday cause I saw 25% traffic increase from Facebook, Twitter and many random sources and 83% increase on the root (“/”) of the server. Well, 25% is nothing, it can happen due to a post going viral. But this wasn’t the case this time as 83% increase was specific to the root (“/”) of the server It seems, our ‘beloved’ ‘Vitaly Popov’ has started a new stream of referral spam. He’s got more crafty as I predicted in my original post. He’s now actually using Facebook, Twitter as referrals including some new domains. In this post I will show three effective solutions for Google Analytics Referral spam.

Some facts about Google Analytics Referral spam:Three effective solutions for Google Analytics Referral spam - blackMORE Ops - 5

  1. By this time you know that Ghost Google Analytics Referrals spam cannot be blocked by .htaccess or web configuration.
  2. Ghost Google Analytics Referrals spam bots doesn’t really visit your website, so no trace of IP address be found in server logs.
  3. Ghost Google Analytics Referrals spam only abuse Google Analytics.
  4. Google Analytics hasn’t done anything about it, yet (officially).
  5. Google implemented encryption for all of their AdSense traffic.
  6. Ghost Google Analytics Referrals spam only affects Google Analytics.
  7. *** Ghost Referrals spam also affecting Yandex and few other search engines.
  8. As these bots doesn’t visit your website, they have no idea what your page title is. So Analytics will show (“/”) as the page title.
  9. These Ghost Google Analytics referral spam bots only targets your primary Tracking ID i.e. ‘UA-XXXX-1′

List of known Google Analytics Referral spam domains

Click to open list containing known Google Analytics Referral spam domains:

List of 194 new Google Analytics Referral spam domains

I now have a list of another 194 spammer domains that started yesterday.

Click to open list of new 194 new Google Analytics Referral spam domains

I mean seriously? users.skynet.be? It’s good to see they have some sense of humour.
So it seems very soon filters wont be enough. Actually it’s already not enough. Despite what the Analytics experts says, you can’t go around every day to filter hundreds of domains. Yes, you could filter for .be (i.e. Belgium) domains, but that’s a whole country we are talking about. So what is the best fix?

Solution 1: Create a new Tracking ID for your website


The simplest solution is often a good place to start
– William of Ockham’s Occam’s Razor
When I started looking around for a good solution, I was surprised the amount of information’s that became available since my last post about Referral spam in December. Some were well written, some were just rubbish.
Some spammers like Semalt actually visit your website, so you can block them using usual .htaccess or web configuration. They are an easy fix:
SetEnvIfNoCase Referer semalt.com spambot=yes
Order allow,deny
Allow from all
Deny from env=spambot
But Ghost referral is a Google Analytics problem. So I found a solution using Google Analytics rather the wasting time on adding filters.

Using Google Analytics to solve it’s own problem:

Google Analytics is very limited but their help document is very clear on how to use Analytics code. According to Advanced Configuration – Web Tracking (analytics.js) you can use multiple trackers on same website (old news!). But here’s the loophole in their coding that I found:
All the spammy bots are using only the first Tracking ID i.e. 'UA-XXXX-1'. So subsequent properties under your Analytics accounts are unaffected. i.e. 'UA-XXXX-2', 'UA-XXXX-3' and so on.
I just created another property in my Analytics account, configured it same as my primary one and added that to my website.

Instruction on how to setup a property in Google Analytics

In general, you just pretty much copy paste and enable any config you had in your primary Analytics account. Creating a second property for the same website/URL doesn’t hurt anything or affects anything. It’s just another container where data is stored.

My sample original Google Analytics tracking ID

My new sample Google Analytics tracking ID

Create new combined Google Analytics Tracking ID

Google Analytics Advanced configuration, Working with Multiple Tracking Objects, shows how to create a new combined Google Analytics tracking ID and put them in your website.
In some cases you might want to send data to multiple web properties from a single page. This is useful for sites that have multiple owners overseeing sections of a site; each owner could view their own web property.
To solve this, you must create a tracking object for each web property to which you want to send data:
ga('create', 'UA-XXXX-Y', 'auto');
ga('create', 'UA-12345-6', 'auto', {'name': 'newTracker'}); // New tracker.
Once run, two tracker objects will be created. The first tracker will be the default tracking object, and not have a name. The second tracker will have the name of newTracker.
To send a pageview using both trackers, you prepend the name of the tracker to the beginning of the command, followed by a dot. So for example:
ga('send', 'pageview');
ga('newTracker.send', 'pageview'); // Send page view for new tracker.
Would send a pageview to both default and new trackers.
This explanation might be slightly convoluted for many users. Here’s mine:

My sample combined new Google Analytics Tracking ID

I’ve also forced SSL on my Google Analytics  tracking ID. This wont do any good for this particular spam, but having  some encryption is always good in the long run.

Click here to open Google's Instruction on Forcing SSL (HTTPS) on GA

This fixed everything for me. This is the best solution out there and it will continue to work until the spammers changes their code to include subsequent GA Tracking ID’s.

Solution 2: Create a filter for NULL Page Title

If you’re lazy and don’t want to create a new Analytics code, then Solution 2 is the next best option. Actually, I think this might be even better as it will get rid of any similar future spam referrals as well.
If you look closely into your Google Analytics report, you will see that all these Ghost Google Analytics Referral Spam shows Page Title as (not set).
Actually, this is not really (not set), it’s NULL value. That means these fake or Ghost Google Analytics Referral Spam bots are sending fake data using your tracking ID. But how are they going to set your Page Title?
To get Page title, a bot actually have to visit your website. Without visiting your website it will become very tough to include that bit of information (correct info, they can always use bogus data). So they’ve left that bit of info empty or NULL and when Google Analytics gets these fake data, it sets Page Title as NULL or (not set).
To create a filter for your view, select Admin > Account > Property > View > Filters.
Three effective solutions for Google Analytics Referral spam - blackMORE Ops -1
Fill up the Filter with the following information’s:
  1. Filter Name: Page Title (not set)
  2. Filter Type: Select Custom
  3. Select Exclude
  4. Filter Field: Select Page Title
  5. Filter Pattern: Put ^$ in this field. ^$ means empty or missing or NULL value.
  6. Filter Verification: Click “Verify this filter”.
    • It will show you how your filter would affect the current view’s data, based on traffic from the previous seven days.
    • Note: Verify will only work on an existing view where you have at least 7 days worth of data.
    • Verify will not work if you’ve created a new Tracking ID from Solution 1. (cause it doesn’t have enough data.)
  7. Click Save
Three effective solutions for Google Analytics Referral spam - blackMORE Ops - 2
You will see Ghost Google Analytics referral spam disappearing from your reports within few minutes and within 4 hours, your Google Analytics report will be all clear.

Solution 3: Create a filter for valid Hostnames

To implement this solution, STEP CAREFULLY or you will exclude valid traffic! You MUST identify ALL valid hostnames that may use your website tracking ID, and this could include other websites that you are tracking as part of your web ecosystem — your own domain, PayPal, your ecommerce shopping cart, and all of reserved domains (in case you decide to use them).
Start with a multi-year report showing just hostnames (Audience> Technology> Network> hostname), then identify the valid ones — the servers where I have real pages being tracked.
Three effective solutions for Google Analytics Referral spam - blackMORE Ops - 3
Then create a filter with an expression that captures all of the domains that I consider valid. For example:
www.blackmoreops.com
OR
.*blackmoreops.com|.*youtube.com|.*amazon.com|.*googleusercontent.com
Three effective solutions for Google Analytics Referral spam - blackMORE Ops - 4
This can be used as a supplementary addition to Solution 2. It’s mainly because you would never know where you are getting your traffic from and it’s a lot of work keeping this filter updated. Also as time goes, your filter will become bigger and the chance of making a mistake will increase. But it’s a good solution nevertheless.
Read more details on hostname filter here.

Conclusion

This is entirely Google’s problem and entirely their issue to resolve. I wouldn’t waste a single moment creating filters for Ghost Google Analytics referral spammers. If you want you can block spam bots that actually visit your website using .htaccess or web-server configuration etc.
The above solution works 100% right now, but it’s very easy for the spammers to modify their code to add subsequent Google Analytics Tracking ID’s. If that happens, keep an eye in here, I will come back with another solution. Share and Retweet this guide for those stressed webmasters.

How an open standard API could revolutionize banking

$
0
0
http://opensource.com/business/15/4/open-standard-api-banking

Image by : 
opensource.com
submit to reddit
The United Kingdom government has commissioned a study of the feasibility of UK banks giving customers the ability to share their transactional data with third parties via an open standard API. First mentioned alongside the autumn statement back in December, the chancellor has now outlined plans for a mandatory open banking API standard during the recent budget in March.
Increased competition and the unbundling of bank services by innovative financial tech developers is continuing to provide customers with more services. Significant changes to banking have become inevitable, and at a first glance this move could be interpreted as penalizing banks. It opens up some of the information banks had previously controlled, but making it accessible via an open standard API should strengthen their positions as a platform.
Open Bank Project founder Simon Redfern took part in the open standard API consultation. Already understanding how customers and developers would benefit, I asked Simon if the banks themselves could gain by producing open APIs that developers love to use, hence attracting new customers via useful applications.
"Exactly. This is the open banking/bank as a platform vision that the Open Bank Project supports with its open standard, open source technology, and community. For instance, a developer could build a Spanish app that connects to UK banks as well as, say, Mexican banks. It's about an open standard giving rise to more choice and utility for banking customers because developers find it easy to use internet standards such as REST and OAuth, and if it's easy to deploy to multiple banks, developers are more likely to develop for specialist markets," he said.
An open API ecosystem will have to function on more layers than a bank-to-consumer model and function as distributed economy, particularly with mashup applications where data can move in any direction. In this environment, open source gives developers the opportunity to build without hindrance and be more able to deliver the value users require. This sea change of a technically driven financial world has a myriad of implications for developers in open source software and open source data. The financial tech sector is already maturing at a fast pace, improving financial services even for those who do not use banks.
"The key thing for developers is a single unified banking API. Developers do not want to have to integrate a completely different API in order to support all of their users. That's one reason why I am building Teller. Developers integrate one API and get all the banks. The benefits to customers are innumerable," London-based developer Stevie Graham said.
Open bank data will give us the freedom to access all banks in real time and from a single view, automatically calculating the best deals in complete transparency, which will be a significant step forward for social good and give people more control over their finances. Meanwhile, financial tech incubators, accelerators, and startups are creating a more experienced talent pool of developers ready to act upon these newly available assets.
According Xignite CEO Stephane Dubois, "The role of technology in advancing the financial service industry is more critical than ever before. The use of APIs by today's banks is becoming increasingly common as they help to drive speed and cost-effectiveness compared to traditional legacy systems. There is considerable value in providing financial institutions with the tools and resources needed for adapting to technological changes, making the role of emerging API developers critical for the long-term success of today's financial institutions."
Through a self-perpetuating ecosystem of developers, the banks will continue to gather high-value data from customers through third party integration.
Trendensity owner Christian Rhodes has a pragmatic view of independent developers entering the banking sector: "Products are making it to market much quicker than banks can match. Now, instead of trying to build and push proprietary solutions, organizations are adapting to where the clients are or might be and taking the appropriate steps into an open environment."

How to block specific user agents on nginx web server

$
0
0
http://ask.xmodulo.com/block-specific-user-agents-nginx-web-server.html

Question: I notice that some robots often visit my nginx-powered website and scan it aggressively, ending up wasting a lot of my web server resources. I am trying to block those robots based on their user-agent string. How can I block specific user agent(s) on nginx web server? The modern Internet is infested with various malicious robots and crawlers such as malware bots, spambots or content scrapers which are scanning your website in surreptitious ways, for example to detect potential website vulnerabilities, harvest email addresses, or just to steal content from your website. Many of these robots can be identified by their signature "user-agent" string.
As a first line of defense, you could try to block malicious bots from accessing your website by blacklisting their user-agents in robots.txt file. However, unfortunately this works only for "well-behaving" robots which are designed to obey robots.txt. Many malicious bots can simply ignore robots.txt and scan your website at will.
An alternative way to block particular robots is to configure your web server, such that it refuses to serve content to requests with certain user-agent strings. This post explains how to block certain user-agent on nginx web server.

Blacklist Certain User-Agents in Nginx

To configure user-agent block list, open the nginx configuration file of your website, where the server section is defined. This file can be found in different places depending on your nginx setup or Linux distribution (e.g., /etc/nginx/nginx.conf, /etc/nginx/sites-enabled/, /usr/local/nginx/conf/nginx.conf, /etc/nginx/conf.d/).
server {
listen 80 default_server;
server_name xmodulo.com;
root /usr/share/nginx/html;

....
}
Once you open the config file with the server section, add the following if statement(s) somewhere inside the section.
server {
listen 80 default_server;
server_name xmodulo.com;
root /usr/share/nginx/html;

# case sensitive matching
if ($http_user_agent ~ (Antivirx|Arian) {
return 403;
}


# case insensitive matching
if ($http_user_agent ~* (netcrawl|npbot|malicious)) {
return 403;
}


....
}
As you can guess, these if statements match any bad user-string with regular expressions, and return 403 HTTP status code when a match is found. $http_user_agent is a variable that contains the user-agent string of an HTTP request. The '~' operator does case-sensitive matching against user-agent string, while the '~' operator does case-insensitive matching. The '|' operator is logical-OR, so you can put as many user-agent keywords in the if statements, and block them all.
After modifying the configuration file, you must reload nginx to activate the blocking:
$ sudo /path/to/nginx -s reload
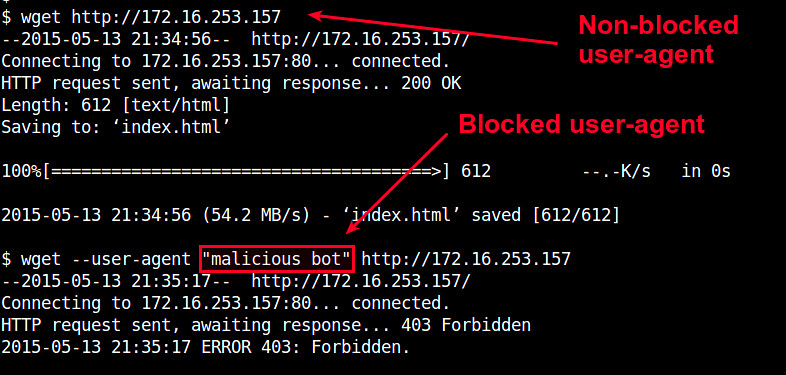
You can test user-agent blocking by using wget with "--user-agent" option.
$ wget --user-agent "malicious bot" http://

Manage User-Agent Blacklist in Nginx

So far, I have shown how to block HTTP requests with a few user-agents in nginx. What if you have many different types of crawling bots to block?
Since the user-agent blacklist can grow very big, it is not a good idea to put them all inside your nginx's server section. Instead, you can create a separate file which lists all blocked user agents. For example, let's create /etc/nginx/useragent.rules, and define a map with all blocked user agents in the following format.
$ sudo vi /etc/nginx/useragent.rules
map $http_user_agent $badagent {
default 0;
~*malicious 1;
~*backdoor 1;
~*netcrawler 1;
~Antivirx 1;
~Arian 1;
~webbandit 1;
}
Similar to the earlier setup, '~*' will match a keyword in case-insensitive manner, while '~' will match a keyword using a case-sensitive regular expression. The line that says "default 0" means that any other user-agent not listed in the file will be allowed.
Next, open an nginx configuration file of your website, which contains http section, and add the following line somewhere inside the http section.
http {
.....
include /etc/nginx/useragent.rules
}
Note that this include statement must appear before the server section (this is why we add it inside http section).
Now open an nginx configuration where your server section is defined, and add the following if statement:
server {
....

if ($badagent) {
return 403;
}


....
}
Finally, reload nginx.
$ sudo /path/to/nginx -s reload
Now any user-agent which contains a keyword listed in /etc/nginx/useragent.rules will be automatically banned by nginx.

Tweak your touchpad to taste in Linux

$
0
0
http://www.techrepublic.com/article/tweak-your-touchpad-to-taste-in-linux

If you've upgraded to the latest iteration of Ubuntu (or any distribution with a new kernel), you may have discovered your touchpad less than ideal. Jack Wallen has the fix.
Synclient
I few months ago, I added a Logitech T650 touchpad to my desktop setup. After a firmware update (one that had to be done via Windows--shame on you Logitech), the touchpad worked flawlessly under Ubuntu 14.10. Single-tap, double-tap, scrolling, and some gestures made my daily grind a little bit less, well, grindy.
But then I opted to make the leap to Ubuntu 15.04 and, out of nowhere, the touchpad wasn't working nearly as well. What happened? Oddly enough, the latest kernel finally received built-in support for touch devices. This means that users will no longer have to struggle to get those touchpads to work. However, this came at a cost. Out of the box, the touchpad is nowhere near efficient enough to work. It's slow, tapping doesn't always work as well, and scrolling isn't always what you'd hope it to be.
Thankfully, there's a way to adjust this. In fact, you can now adjust that touchpad to so perfectly fit your taste that you might wind up spending days dialing it to perfection. This tweaking is done via a command line tool called synclient. There is a GUI for the tool, called gpointing-device-settings, but it doesn't offer nearly as many options as the command line tool. The only caveat to using the command line tool is that there are so many options. For example:
  • LeftEdge=113
  • RightEdge=2719
  • TopEdge=127
  • BottomEdge=2237
  • FingerLow=2
  • FingerHigh=3
  • MaxTapTime=180
  • MaxTapMove=162
  • MaxDoubleTapTime=180
  • SingleTapTimeout=180
  • ClickTime=100
  • EmulateMidButtonTime=0
  • EmulateTwoFingerMinZ=56
  • EmulateTwoFingerMinW=7
Don't worry... many of those options you won't really touch. In fact, for average use, there are only a specific few that you'll have to bother with.
Speaking of which, how do you bother with them? Simple. You use the synclient command. With this command, you can adjust the sensitivity of every option (or enable/disable an option) on the fly. Say the cursor on your touchpad is too slow. You can adjust the minimum and maximum speed (both are important), from the command line like so:
synclient MinSpeed=1
synclient MaxSpeed=4
Those settings will immediately take effect.
The primary settings you'll want to focus on are:
  • FingerHigh--maximum amount of pressure required to register a tap
  • FingerLow--minimum amount of pressure required to register a tap
  • MaxSpeed--maximum speed of the cursor
  • MinSpeed--minimum speed of the cursor
  • AccelFactor--acceleration factor to get from MinSpeed to MaxSpeed
  • CoastingSpeed--how fast the pointer coasts to a stop
There are a ton of other options. Take a look at this page for a description of every available customization for synclient.

Creating a script

Like with most things Linux, if you want something to work outside of the standard, you can choose numerous routes to success. One such route is with a script. This is what I've done to make sure my fine-tuned touch settings always take effect upon rebooting or logging in.
Prior to doing this, you'll need to have played around with your synclient settings to get it exactly how you want it. Once you've done that, issue the command:
synclient -l > touchsettings
This will create a new file (called touchsettings) with all of your current synclient settings. The only problem with this file, is that each setting will be in the form:
MinSpeed = 1
You have to alter every line, in this newly created file, to look like:
synclient MinSpeed=1
At the beginning of the file, you also need to add the following line:
#!/bin/bash
See Figure A for a full example.
Figure A
Figure A
An example of the touchsettings file.
Save the file (we'll call it touchsettings) and give it executable permissions with the command:
chmod u+x touchsettings
You can run this single command to set all of your synclient settings. Now, all you have to do is go into the Startup Applications tool and add the touchsettings script to run at login (which startup applications tool will depend on your distribution). You might even want to move the touchsettings file into /usr/local/bin so the command can be run globally. If you do this, you'll also need to change the ownership of the command for the user, like so:
chown jlwallen.jlwallen /usr/local/bin/touchsettings
Now, you can run the command which touchsettings and see the script listed in /usr/local/bin.
It will take some time to get your touchpad tweaked to perfection. After a weekend of making slight adjustments, I managed to get my touchpad working exactly how I wanted it. It would be nice if the gpointing-devices-settings GUI would offer as much in the way of settings as the synclient command tool. Now that the latest kernel offers better support for such devices, I'm certain a solid GUI tool will come soon.
Do you prefer to tweak your desktops to perfection with GUI tools, command line tools, or a combination of both? Share your preference in the discussion thread below.

Infinite BusyBox with systemd

$
0
0
http://www.linuxjournal.com/node/1338711?utm_source=feedburner&utm_medium=feed&utm_campaign=Feed%3A+linuxjournalcom+%28Linux+Journal+-+The+Original+Magazine+of+the+Linux+Community%29&hootPostID=b66b3eb849d4698dd512beafb71b7602

Lightweight virtual containers with PID 1.
In this article, I demonstrate a method to build one Linux system within another using the latest utilities within the systemd suite of management tools. The guest OS container design focuses upon BusyBox and Dropbear for the userspace system utilities, but I also work through methods for running more general application software so the containers are actually useful.
This tutorial was developed on Oracle Linux 7, and it likely will run unchanged on its common brethren (Red Hat, CentOS, Scientific Linux), and from here forward, I refer to this platform simply as V7. Slight changes may be necessary on other systemd platforms (such as SUSE, Debian or Ubuntu). Oracle's V7 runs only on the x86_64 platform, so that's this article's primary focus.

Required Utilities

Red Hat saw fit to remove the long-included BusyBox binary from its V7 distribution, but this easily is remedied by downloading the latest binary directly from the project's Web site. Since the /home filesystem gets a large amount of space by default when installing V7, let's put it there for now. Run the commands below as root until indicated otherwise:

cd /home
wget http://busybox.net/downloads/binaries/latest/busybox-x86_64
You also can get a binary copy of the Dropbear SSH server and client from this location:

wget http://landley.net/aboriginal/downloads/
↪binaries/extras/dropbearmulti-x86_64
For this article, I used the following versions:
  • BusyBox v1.21.1.
  • Dropbear SSH multi-purpose v2014.63.
These are static binaries that do not link against shared objects—nothing else is required to run them, and they are ideal for building a new UNIX-ish environment quickly.

Build a chroot

The chroot system call and the associated shell utility allow an arbitrary subdirectory somewhere on the system to be declared as the root for all child processes. The commands below populate the "chroot jail", then lock you in. Note that the call to chroot needs your change to the SHELL environment variable below, as you don't have bash inside the jail (and it's likely the default value of $SHELL):

export SHELL=/bin/sh
mkdir /home/nifty
mkdir /home/nifty/bin
cd /home/nifty/bin
cp /home/busybox-x86_64 /home/dropbearmulti-x86_64 .
chmod 755 busybox-x86_64 dropbearmulti-x86_64
./busybox-x86_64 --list | awk '{print "ln -s
↪busybox-x86_64 " $0}' | sh
chroot /home/nifty
export PATH=/bin
ls -l
###(try some commands)
exit
Take some time to explore your shell environment after you launch your chroot above before you exit. Notice that you have a /bin directory, which is populated by soft links that resolve to the BusyBox binary. BusyBox changes its behavior depending upon how it is called—it bundles a whole system of utility programs into one convenient package.
Try a few additional UNIX commands that you may know. Some that work are vi, uname, uptime and (of course) the shell that you are working inside. Commands that don't work include ps, top and netstat. They fail because they require the /proc directory (which is dynamically provided by the Linux kernel)—it has not been mounted within the jail.
Note that few native utilities will run in the chroot without moving many dependent libraries (objects). You might try copying bash or gawk into the jail, but you won't be able to run them (yet). In this regard, BusyBox is ideal, as it depends upon nothing.

Build a Minimal UNIX System and Launch It

The systemd suite includes the eponymous program that runs as PID 1 on Linux. Among many other utilities, it also includes the nspawn program that is used to launch containers. Containers that are created by nspawn fix most of the problems with chroot jails. They provide /proc, /dev, /run and otherwise equip the child environment with a more capable runtime.
Next, you are going to configure a getty to run on the console of the container that you can use to log in. Being sure that you have exited your chroot from the previous step, run the following commands as root:

mkdir /home/nifty/etc
mkdir /home/nifty/root
echo 'NAME="nifty busybox container"'>
↪/home/nifty/etc/os-release
cd /home/nifty
ln -s bin sbin
ln -s bin usr/bin
echo 'root::0:0:root:/root:/bin/sh'>
↪/home/nifty/etc/passwd
echo 'console::respawn:/bin/getty 38400 /dev/console'>
↪/home/nifty/etc/inittab
tar cf - /usr/share/zoneinfo | (cd /home/nifty; tar xvpf -)
systemd-nspawn -bD /home/nifty
After you have executed the nspawn above, you will be presented with a "nifty login" prompt. Log in as root (there is no password—yet), and try a few more commands. You immediately will notice that psand top work, and there is now a /proc.
You also will notice that the processes that appear in the child container also appear on the host system, but different PIDs will be assigned between the parent and child.
Note that you'll also receive the message: "The kernel auditing subsystem is known to be incompatible with containers. Please make sure to turn off auditing with 'audit=0' on the kernel command line before using systemd-nspawn. Sleeping for 5s..." The audit settings don't seem to impact the BusyBox container login, but you can adjust your kernel command line in your grub configuration (at least to silence the warning and stop the delay).

Running Dropbear SSH in Your Container

It's best if you configure a non-root user of your system and forbid network root logins. The reasoning will become clear when I address container security.
Run all of these commands as root within the container:

cd /bin
ln -s dropbearmulti-x86_64 dropbear
ln -s dropbearmulti-x86_64 ssh
ln -s dropbearmulti-x86_64 scp
ln -s dropbearmulti-x86_64 dropbearkey
ln -s dropbearmulti-x86_64 dropbearconvert
Above, you have established the names that you need to call Dropbear, both the main client and server, and the sundry key generation and management utilities.
You then generate the host keys that will be used by this container, placing them in a new directory /home/nifty/etc/dropbear (as viewed by the host):

mkdir /etc/dropbear
dropbearkey -t rsa -f /etc/dropbear/dropbear_rsa_host_key
dropbearkey -t dss -f /etc/dropbear/dropbear_dss_host_key
dropbearkey -t ecdsa -f /etc/dropbear/dropbear_ecdsa_host_key
Various directories are then created that you will need shortly:

mkdir -p /var/log/lastlog
mkdir /home
mkdir /var/run
mkdir /tmp
mkdir /var/tmp
chmod 01777 /tmp /var/tmp
You then create the inittab, which will launch syslogd and Dropbear once at startup (in addition to the existing getty that is respawned whenever it dies):

echo ::sysinit:/bin/syslogd >> /etc/inittab
echo '::sysinit:/bin/dropbear -w -p 2200'>> /etc/inittab
Next, you add a shadow file and create a password for root:

echo root:::::::: > /etc/shadow
chmod 600 /etc/shadow
echo root:x:0: > /etc/group
passwd -a x root
Note that the BusyBox passwd call used here generated an MD5 hash—there is a $1$ prefix in the second field of /etc/shadow for root. Additional hashing algorithms are available from this version of the passwd utility (the options -a s will generate a $5$ SHA256 hash, and -a sha512 will generate a $6$ hash). However, Dropbear seems to be able to work only with $1$ hashes for now.
Finally, add a new user to the system, and then halt the container:

adduser -h /home/luser -D luser
passwd -a x luser

halt
You should see container shutdown messages that are similar to a system halt.
When you next start your container, it will listen on socket 2200 for connections. If you want remote hosts to be able to connect to your container from anywhere on the network, run this command as root on the host to open a firewall port:

iptables -I INPUT -p tcp --dport 2200 --syn -j ACCEPT
The port will be open only until you reboot. If you'd like the open port to persist across reboots, use the firewall-config command from within the X Window System (set the port on the second tab in the GUI).
In any case, run the container with the previous nspawn syntax, then try to connect from another shell within the parent host OS with the following:

ssh -l luser -p 2200 localhost
You should be able to log in to the luser account under a BusyBox shell.

Executing Programs with Runtime Dependencies

If you copy various system programs from /bin or /usr/bin into your container, you immediately will notice that they don't work. They are missing shared objects that they need to run.
If you had previously copied the gawk binary in from the host:

cp /bin/gawk /home/nifty/bin/
you would find that attempts to execute it fail with "gawk: not found" errors (on the host, there usually will be explicit complaints about missing shared objects, which are not seen in the container).
You easily can make most of the 64-bit libraries available with an argument to nspawn that establishes a bind mount:

systemd-nspawn -bD /home/nifty --bind-ro=/usr/lib64
Then, from within the container, run:

cd /
ln -s usr/lib64 lib64
You then will find that many 64-bit binaries that you copy in from the host will run (running /bin/gawk -V returns "GNU Awk 4.0.2"—an entire Oracle 12c instance is confirmed to run this way). The read-only library bind mount also has the benefit of receiving security patches immediately when they appear on the host.
There is a significant security problem with this, however. The root user in the container has the power to mount -o remount,rw /usr/lib64 and, thus, gain write access to your host library directories. In general, you cannot give root to a container user that you don't know and trust—among other problems, these mounts can be abused.
You also might be tempted to mount the /usr/lib directory in the same manner. The difficulty you will find is that the systemd binary will be found under that directory tree, and nspawn will try to execute it in preference to BusyBox init. Enabling 32-bit runtime support likely will involve more directory and mounting gymnastics than was required for /usr/lib64.
And now, I'm going off on a tangent.

systemd Service Files

You will need to call on the host PID 1 (systemd) directly to launch your container in an automated manner, potentially at boot. To do this, you need to create a service file.
Because there is a dearth of clear discussion on moving inittab and service functions into systemd, I'll cover all the basic uses before creating a service file for the container.
Start by configuring a telnet server. The telnet protocol is not secure, as it transmits passwords in clear text. Don't practice these examples on a production server or with sensitive information or accounts.
Classical telnetd is launched by the inetd superserver, both of which are implemented by BusyBox. Let's configure inetd for telnet on port 12323. Run the following as root on the host:

echo '12323 stream tcp nowait root
↪/home/nifty/bin/telnetd telnetd -i -l
/home/nifty/bin/login'>> /etc/inetd.conf
After the configuring above, if you manually launch the inetd contained in BusyBox, you will be able to telnet to port 12323. Note that the V7 platform does not include a telnet client by default, so you either can install it with yum or use the BusyBox client (which the example below will do). Unless you open up port 12323 on your firewall, you will have to telnet to localhost.
Make sure any inetd that you started is shut down before proceeding to create an inetd service file below:

echo '[Unit]
Description=busybox inetd
#After=network-online.target
Wants=network-online.target

[Service]
#ExecStartPre=
#ExecStopPost=
#Environment=GZIP=-9

#OPTION 1
ExecStart=/home/nifty/bin/inetd -f
Type=simple
KillMode=process

#OPTION 2
#ExecStart=/home/nifty/bin/inetd
#Type=forking

#Restart=always
#User=root
#Group=root

[Install]
WantedBy=multi-user.target'>
↪/etc/systemd/system/inetd.service

systemctl start inetd.service
After starting the inet service above, you can check the status of the dæmon:

[root@localhost ~]# systemctl status inetd.service
inetd.service - busybox inetd
Loaded: loaded (/etc/systemd/system/inetd.service; disabled)
Active: active (running) since Sun 2014-11-16 12:21:29 CST;
↪28s ago
Main PID: 3375 (inetd)
CGroup: /system.slice/inetd.service
↪3375 /home/nifty/bin/inetd -f

Nov 16 12:21:29 localhost.localdomain systemd[1]: Started
↪busybox inetd.
Try opening a telnet session from a different console:

/home/nifty/bin/telnet localhost 12323
You should be presented with a login prompt:

Entering character mode
Escape character is '^]'.

S
Kernel 3.10.0-123.9.3.el7.x86_64 on an x86_64
localhost.localdomain login: jdoe
Password:
Checking the status again, you see information about the connection and the session activity:

[root@localhost ~]# systemctl status inetd.service
inetd.service - busybox inetd
Loaded: loaded (/etc/systemd/system/inetd.service; disabled)
Active: active (running) since Sun 2014-11-16 12:34:04 CST;
↪7min ago
Main PID: 3927 (inetd)
CGroup: /system.slice/inetd.service
↪3927 /home/nifty/bin/inetd -f
↪4076 telnetd -i -l /home/nifty/bin/login
↪4077 -bash
You can learn more about systemd service files with the man 5 systemd.service command.
There is an important point to make here—you have started inetd with the "-f Run in foreground" option. This is not how inetd normally is started—this option is commonly used for debugging activity. However, if you were starting inetd with a classical inittab entry, -f would be useful in conjunction with "respawn". Without -f, inetd immediately will fork into the background; attempting to respawn forking dæmons will launch them repeatedly. With -f, you can configure init to relaunch inetd should it die.
Another important point is stopping the service. With a foreground dæmon and the KillMode=process setting in the service file, the child telnetd services are not killed when the service is stopped. This is not the normal, default behavior for a systemd service, where all the children will be killed.
To see this mass kill behavior, comment out the OPTION 1 settings in the service file (/etc/systemd/system/inetd.service), and enable the default settings in OPTION 2. Then execute:

systemctl stop inetd.service
systemctl daemon-reload
systemctl start inetd.service
Launch another telnet session, then stop the service. When you do, your telnet sessions will all be cut with "Connection closed by foreign host." In short, the default behavior of systemd is to kill all the children of a service when a parent dies.
The KillMode=process setting can be used with the forking version of inetd, but the "-f Run in foreground" in the first option is more specific and, thus, safer.
You can learn more about the KillMode option with the man 5 systemd.killcommand.
Note also that the systemctl status output included the word "disabled". This indicates that the service will not be started at boot. Pass the enable keyword to systemctl for the service to set it to launch at boot (the disable keyword will undo this).
Make some note of the commented options above. You may set environment variables for your service (here suggesting a compression quality), specify a non-root user/group and commands to be executed before the service starts or after it is halted. These capabilities are beyond the direct features offered by the classical inittab.
Of course, systemd is capable of spawning telnet servers directly, allowing you to dispense with inetd altogether. Run the following as root on the host to configure systemd for BusyBox telnetd:

systemctl stop inetd.service

echo '[Unit]
Description=mytelnet

[Socket]
ListenStream=12323
Accept=yes

[Install]
WantedBy=sockets.target'>
↪/etc/systemd/system/mytelnet.socket

echo '[Unit]
Description=mytelnet

[Service]
ExecStart=-/home/nifty/bin/telnetd telnetd -i -l
↪/home/nifty/bin/login
StandardInput=socket'>
↪/etc/systemd/system/mytelnet@.service

systemctl start mytelnet.socket
Some notes about inetd-style services:
  • The socket is started, rather than the service, when inetd services are launched. Similarly, they are enabled to set them to launch at boot.
  • The @ character in the service file indicates this is an "instantiated" service. They are used when a number of similar services are launched with a single service file (getty being the prime example—they also work well for Oracle database instances).
  • The - prefix above in the path to the telnet server indicates that systemd should not pay attention to any stats return codes from the process.
  • In the client telnet sessions, the command cat /proc/self/cgroup will return detailed connection information for the IP addresses involved.
At this point, I have returned from my long-winded tangent, so now let's build a service file for the container. Run the following as root on the host:

echo '[Unit]
Description=nifty container

[Service]
ExecStart=/usr/bin/systemd-nspawn -bD /home/nifty
KillMode=process'> /etc/systemd/system/nifty.service
Be sure that you have shut down any other instances of the nifty container. You optionally can disable the console getty by commenting/removing the first line of /home/nifty/etc/inittab. Then use PID 1 to launch your container directly:

systemctl start nifty.service
If you check the status of the service, you will see the same level of information that you previously saw on the console:

[root@localhost ~]# systemctl status nifty.service
nifty.service - nifty container
Loaded: loaded (/etc/systemd/system/nifty.service; static)
Active: active (running) since Sun 2014-11-16 14:06:21 CST;
↪31s ago
Main PID: 5881 (systemd-nspawn)
CGroup: /system.slice/nifty.service
↪5881 /usr/bin/systemd-nspawn -bD /home/nifty

Nov 16 14:06:21 localhost.localdomain systemd[1]: Starting
↪nifty container...
Nov 16 14:06:21 localhost.localdomain systemd[1]: Started
↪nifty container.
Nov 16 14:06:26 localhost.localdomain systemd-nspawn[5881]:
↪Spawning namespace container on /home/nifty
↪(console is /dev/pts/4).
Nov 16 14:06:26 localhost.localdomain systemd-nspawn[5881]:
↪Init process in the container running as PID 5883.

Memory and Disk Consumption

BusyBox is a big program, and if you are running several containers that each have their own copy, you will waste both memory and disk space.
It is possible to share the "text" segment of the BusyBox memory usage between all running programs, but only if they are running on the same inode, from the same filesystem. The text segment is the read-only, compiled code of a program, and you can see the size like this:

[root@localhost ~]# size /home/busybox-x86_64
text data bss dec hex filename
942326 29772 19440 991538 f2132 /home/busybox-x86_64
If you want to conserve the memory used by BusyBox, one way would be to create a common /cbin that you attach to all containers as a read-only bind mount (as you did previously with lib64), and reset all the links in /bin to the new location. The root user could do this:

systemctl stop nifty.service

mkdir /home/cbin
mv /home/nifty/bin/busybox-x86_64 /home/cbin
mv /home/nifty/bin/dropbearmulti-x86_64 /home/cbin
cd /
ln -s home/cbin cbin
cd /home/nifty/bin
for x in *; do if [ -h "$x" ]; then rm -f "$x"; fi; done
/cbin/busybox-x86_64 --list | awk '{print "ln -s
↪/cbin/busybox-x86_64 " $0}' | sh
ln -s /cbin/dropbearmulti-x86_64 dropbear
ln -s /cbin/dropbearmulti-x86_64 ssh
ln -s /cbin/dropbearmulti-x86_64 scp
ln -s /cbin/dropbearmulti-x86_64 dropbearkey
ln -s /cbin/dropbearmulti-x86_64 dropbearconvert
You also could arrange to bind-mount the zoneinfo directory, saving a little more disk space in the container (and giving the container patches for time zone data in the bargain):

cd /home/nifty/usr/share
rm -rf zoneinfo
Then the service file is modified to bind /cbin and /usr/share/zoneinfo (note the altered syntax for sharing /cbin below, when the paths differ between host and container):

echo '[Unit]
Description=nifty container

[Service]
ExecStart=/usr/bin/systemd-nspawn -bD /home/nifty
--bind-ro=/home/cbin:/cbin --bind-ro=/usr/share/zoneinfo
KillMode=process'> /etc/systemd/system/nifty.service

systemctl daemon-reload

systemctl start nifty.service
Now any container using the BusyBox binary from /cbin will share the same inode. All versions of the BusyBox utilities running in those containers will share the same text segment in memory.

Infinite BusyBox

It might interesting to launch tens, hundreds, or even thousands of containers at once. You could launch the clones by making copies of the /home/nifty directory, then adjusting the systemd service file. To simplify, you will place your new containers in /home/nifty1, /home/nifty2, /home/nifty3 ... using integer suffixes on the directories to differentiate them.
Please make sure that you have disabled kernel auditing to remove the five-second delay when launching containers. At the very least, press e at the grub menu at boot time, and add the audit=0 to your kernel command line for a one-time boot.
I'm going to return to the subject of systemd "instantiated services" that I touched upon with the telnetd service file that replaced inetd. This technique will allow you to use one service file to launch all of your containers. Such a service has an @ character in the filename that is used to refer to a particular, differentiated instance of a service, and it allows the use of the %i placeholder within the service file for variable expansion. Run the following on the host as root to place your service file for instantiated containers:

echo '[Unit]
Description=nifty container # %i

[Service]
ExecStart=/usr/bin/systemd-nspawn -bD /home/nifty%i
↪--bind-ro=/home/cbin:/cbin --bind-ro=/usr/share/zoneinfo
KillMode=process'> /etc/systemd/system/nifty@.service
The %i above first adjusts the description, then adjusts the launch directory for the nspawn. The content that will replace the %i is specified on the systemctl command line.
To test this, make a directory called /home/niftyslick. The service file doesn't limit you to numeric suffixes. You will adjust the SSH port after the copy. Run this as root on the host:

cd /home
mkdir niftyslick
(cd nifty; tar cf - .) | (cd niftyslick; tar xpf -)
sed "s/2200/2100/"< nifty/etc/inittab > niftyslick/etc/inittab

systemctl start nifty@slick.service
Bearing this pattern in mind, let's create a script to produce these containers in massive quantities. Let's make a thousand of them:

cd /home
for x in $(seq 1 999)
do
mkdir "nifty${x}"
(cd nifty; tar cf - .) | (cd "nifty${x}"; tar xpf -)
sed "s/2200/$((x+2200))/"< nifty/etc/inittab >
↪nifty${x}/etc/inittab
systemctl start nifty@${x}.service
done
As you can see below, this test launches all containers:

$ ssh -l luser -p 3199 localhost
The authenticity of host '[localhost]:3199 ([::1]:3199)'
↪can't be established.
ECDSA key fingerprint is 07:26:15:75:7d:15:56:d2:ab:9e:
↪14:8a:ac:1b:32:8c.
Are you sure you want to continue connecting (yes/no)? yes
Warning: Permanently added '[localhost]:3199' (ECDSA)
↪to the list of known hosts.
luser@localhost's password:
~ $ sh --help
BusyBox v1.21.1 (2013-07-08 11:34:59 CDT) multi-call binary.

Usage: sh [-/+OPTIONS] [-/+o OPT]... [-c 'SCRIPT'
↪[ARG0 [ARGS]] / FILE [ARGS]]

Unix shell interpreter

~ $ cat /proc/self/cgroup
10:hugetlb:/
9:perf_event:/
8:blkio:/
7:net_cls:/
6:freezer:/
5:devices:/
4:memory:/
3:cpuacct,cpu:/
2:cpuset:/
1:name=systemd:/machine.slice/machine-nifty999.scope
The output of systemctl will list each of your containers:

# systemctl
...
machine-nifty1.scope loaded active running Container nifty1
machine-nifty10.scope loaded active running Container nifty10
machine-nifty100.scope loaded active running Container nifty100
machine-nifty101.scope loaded active running Container nifty101
machine-nifty102.scope loaded active running Container nifty102
...
More detail is available with systemctl status:

machine-nifty10.scope - Container nifty10
Loaded: loaded (/run/systemd/system/machine-nifty10.scope;
↪static)
Drop-In: /run/systemd/system/machine-nifty10.scope.d
↪90-Description.conf, 90-Slice.conf,
↪90-TimeoutStopUSec.conf
Active: active (running) since Tue 2014-11-18 23:01:21 CST;
↪11min ago
CGroup: /machine.slice/machine-nifty10.scope
↪2871 init
↪2880 /bin/syslogd
↪2882 /bin/dropbear -w -p 2210

Nov 18 23:01:21 localhost.localdomain systemd[1]:
↪Starting Container nifty10.
Nov 18 23:01:21 localhost.localdomain systemd[1]:
↪Started Container nifty10.
The raw number of containers that you can launch with this approach is more directly impacted by kernel limits than general disk and memory resources. Launching the containers above used no swap on a small system with 2GB of RAM.
After you have investigated a few of the containers and their listening ports, the easiest and cleanest way to get all of your containers shut down is likely a reboot.

Container Security

A number of concerns are raised with these features:
1) Since BusyBox and Dropbear were not installed with the RPM host package tools, updates to them will have to be loaded manually. It will be important to check from time to time if new versions are available and if any security flaws have been discovered. If it is necessary to load new versions, the binaries should be copied to all containers that are potentially used, which should then be restarted (especially if a security issue is involved).
2) Control of the root user in the container cannot be passed to an individual that you do not trust. For a particular example, if the lib64/cbin/zoneinfo bind mounts above are used, the container root user can issue the command:

mount -o remount,rw /usr/lib64
at which point the container root will have full write privileges on your 64-bit libraries, container bin or zoneinfo. The systemd-nspawn man page goes even further, with the warning:
Note that even though these security precautions are taken systemd-nspawn is not suitable for secure container setups. Many of the security features may be circumvented and are hence primarily useful to avoid accidental changes to the host system from the container. The intended use of this program is debugging and testing as well as building of packages, distributions and software involved with boot and systems management.
The crux is that untrusted users cannot have the container root, any more than you would give them full system root. The container root will have the CAP_SYS_ADMIN privilege, which allows full control of the system. If you want to isolate non-root users further, the container environment does limit non-root users' visibility into host activities, as they cannot see the full process table.
3) Note that the BusyBox su and passwd utilities above do not work when installed in the manner outlined here. They lack the appropriate filesystem permissions. To fix this, chmod u+s busybox-x86_64could be executed, but this is also distasteful from a security perspective. Removing the links and copying the BusyBox binary to su and passwd before applying the setuid privilege might be better, but only slightly. It would be best if su was unavailable and another mechanism was found for password changes.
4) The -w argument to the Dropbear SSH server above prevents root logins from the network. It is somewhat distasteful, from a security perspective, to relax this limitation. The net effect is that root is locked out of active use in the container when -w is forced, and su/passwd do not have setuid. If it is at all possible to live with such an arrangement for your container, try to do so, as the security is much improved.

systemd Controversy

There is a high degree of hostility toward systemd from users of Linux. This hostility is divided into two main complaints:
  • The classic inittab from UNIX System V should not be changed because it is well understood.
  • Increasing features are bundled into systemd that bring dangerous complexity to a critical system process.
Toward the first point, nostalgia for legacy systems is not always misguided, but it cannot be allowed to hinder progress unreasonably. A classic System V init is not able to nspawn and has far less control over processes running on a system. The features delivered by systemd surely justify the inconvenience of change in many situations.
Toward the second point, much thought was placed into the adoption of the architecture of systemd by skilled designers from diverse organizations. Those most critical of the new environment should acknowledge the technical success of systemd as it is adopted by the majority of the Linux community.
In any case, the next decade will see popular Linux server distributions equipped with systemd, and competent administrators will not have the option of ignoring it. It is unfortunate that the introduction of systemd did not include more guidance for the user community, but the new features are compelling and should not be overlooked.

Pro tip: Take back control of resolv.conf

$
0
0
http://www.techrepublic.com/article/pro-tip-take-back-control-of-resolv-conf

If you're tired of your Linux system's resolv.conf file being overwritten, Jack Wallen has the solution for you.
Resolv
Long ago, you could setup a Linux box and edit the /etc/resolv.conf file knowing the changes would stick. That made it incredibly simple to manage what DNS servers would be used by the machine. Fast-forward to now, and a manual edit of that same file will only be overwritten anytime you restart networking or reboot the machine.
Fortunately, this is Linux, so taking back control of the resolv.conf file isn't much of a challenge... when you know what to look for. Let me serve as your guide in this quest. With a little work at the command line, you'll be able to dictate exactly what goes into that resolv.conf file without issue.
Let's take care of this.

Disable overwriting of resolv.conf

Modern Linux distributions use a system called dnsmasq to write the DNS address into resolv.conf. No matter how many times you write that file, if you don't disable dnsmasq, it'll always be overwritten with this familiar line:
nameserver 127.0.1.1
To avoid this, you must open up the file /etc/NetworkManager/NetworkManager.conf and comment out the line:
dns=dnsmasq
So the new line should look like:
# dns=dnsmasq
Now, kill the running dnsmasq with the command:
sudo killall -9 dnsmasq
At this point, you can hand edit that resolv.conf file all you want, knowing a reboot will not overwrite your changes.

Manually entering network information

If you want to take this one step farther, open up your /etc/network/interfaces file and enter the required information for your networking device. Let's create an entry for eth0 that will set it with a static IP address and OpenDNS DNS servers. Here's what the entry will look like:
iface eth0 inet static address 192.168.1.10 netmask 255.255.255.0 gateway 192.168.1.0 dns-search attlocal.net dns-nameservers 208.67.220.220, 208.67.222.222
Note: You'll want to set your dns-search to match your provider. The name of your network interface (in the example above, eth0) will depend on your setup.
If you're using a desktop distribution, you might be better served working with the graphical network configuration tool (usually resides in the panel on the desktop), instead of manually entering the interface information.
Now, restart networking and the changes should stick. If you're using Ubuntu, the command to restart networking is sudo /etc/init.d/networking restart. If you don't want to restart networking, you can tell resolv.conf to regenerate (to test the changes) with the command:
sudo resolvconf -u
You now have regained control of your /etc/resolv.conf file. It will no longer be overwritten when your network or system restarts.
Do you prefer to take manual control over your systems, or do you trust the platform to take care of business for you? Let us know in the discussion thread below.

How to monitor user login history on CentOS with utmpdump

$
0
0
http://www.itsprite.com/how-to-monitor-user-login-history-on-centos-with-utmpdump-2

Keeping, maintaining and analyzing logs (i.e., accounts of events that have happened during a certain period of time or are currently happening) are among the most basic and essential tasks of a Linux system administrator. In case of user management, examining user logon and logout logs (both failed and successful) can alert us about any potential security breaches or unauthorized use of our system. For example, remote logins from unknown IP addresses or accounts being used outside working hours or during vacation leave should raise a red flag.
On a CentOS system, user login history is stored in the following binary files:
  • /var/run/utmp (which logs currently open sessions) is used by who and w tools to show who is currently logged on and what they are doing, and also by uptime to display system up time.
  • /var/log/wtmp (which stores the history of connections to the system) is used by last tool to show the listing of last logged-in users.
  • /var/log/btmp (which logs failed login attempts) is used by lastb utility to show the listing of last failed login attempts.

In this post I’ll show you how to use utmpdump, a simple program from the sysvinit-tools package that can be used to dump these binary log files in text format for inspection. This tool is available by default on stock CentOS 6 and 7. The information gleaned from utmpdump is more comprehensive than the output of the tools mentioned earlier, and that’s what makes it a nice utility for the job. Besides, utmpdump can be used to modify utmp or wtmp, which can be useful if you want to fix any corrupted entries in the binary logs.

How to Use Utmpdump and Interpret its Output

As we mentioned earlier, these log files, as opposed to other logs most of us are familiar with (e.g., /var/log/messages, /var/log/cron, /var/log/maillog), are saved in binary file format, and thus we cannot use pagers such as less or more to view their contents. That is where utmpdump saves the day.
In order to display the contents of /var/run/utmp, run the following command:
1
# utmpdump/var/run/utmp

To do the same with /var/log/wtmp:
1
# utmpdump/var/log/wtmp

and finally with /var/log/btmp:
1
# utmpdump/var/log/btmp

As you can see, the output formats of three cases are identical, except for the fact that the records in the utmp and btmpare arranged chronologically, while in the wtmp, the order is reversed.
Each log line is formatted in multiple columns described as follows. The first field shows a session identifier, while the second holds PID. The third field can hold one of the following values: ~~ (indicating a runlevel change or a system reboot), bw (meaning a bootwait process), a digit (indicates a TTY number), or a character and a digit (meaning a pseudo-terminal). The fourth field can be either empty or hold the user name, reboot, or runlevel. The fifth field holds the main TTY or PTY (pseudo-terminal), if that information is available. The sixth field holds the name of the remote host (if the login is performed from the local host, this field is blank, except for run-level messages, which will return the kernel version). The seventh field holds the IP address of the remote system (if the login is performed from the local host, this field will show 0.0.0.0). If DNS resolution is not provided, the sixth and seventh fields will show identical information (the IP address of the remote system). The last (eighth) field indicates the date and time when the record was created.

Usage Examples of Utmpdump

Here are a few simple use cases of utmpdump.
1. Check how many times (and at what times) a particular user (e.g., gacanepa) logged on to the system between August 18 and September 17.
1
# utmpdump/var/log/wtmp |grep gacanepa

If you need to review login information from prior dates, you can check the wtmp-YYYYMMDD (or wtmp.[1…N]) and btmp-YYYYMMDD (or btmp.[1…N]) files in /var/log, which are the old archives of wtmp and btmp files, generated by logrotate.
2. Count the number of logins from IP address 192.168.0.101.
1
# utmpdump/var/log/wtmp |grep 192.168.0.101

3. Display failed login attempts.
1
# utmpdump/var/log/btmp

In the output of /var/log/btmp, every log line corresponds to a failed login attempt (e.g., using incorrect password or a non-existing user ID). Logon using non-existing user IDs are highlighted in the above impage, which can alert you that someone is attempting to break into your system by guessing commonly-used account names. This is particularly serious in the cases when the tty1 was used, since it means that someone had access to a terminal on your machine (time to check who has keys to your datacenter, maybe?).
4. Display login and logout information per user session.
1
# utmpdump/var/log/wtmp

In /var/log/wtmp, a new login event is characterized by ‘7’ in the first field, a terminal number (or pseudo-terminal id) in the third field, and username in the fourth. The corresponding logout event will be represented by ‘8’ in the first field, the same PID as the login in the second field, and a blank terminal number field. For example, take a close look at PID 1463 in the above image.
  • On [Fri Sep 19 11:57:40 2014 ART] the login prompt appeared in tty1.
  • On [Fri Sep 19 12:04:21 2014 ART], user root logged on.
  • On [Fri Sep 19 12:07:24 2014 ART], root logged out.
On a side note, the word LOGIN in the fourth field means that a login prompt is present in the terminal specified in the fifth field.
So far I covered somewhat trivial examples. You can combine utmpdump with other text sculpting tools such as awk, sed,grep or cut to produce filtered and enhanced output.
For example, you can use the following command to list all login events of a particular user (e.g., gacanepa) and send the output to a .csv file that can be viewed with a pager or a workbook application, such as LibreOffice’s Calc or Microsoft Excel. Let’s display PID, username, IP address and timestamp only:
1
# utmpdump/var/log/wtmp |grep-E"\[7].*gacanepa"|awk-vOFS=","'BEGIN {FS="] "}; {print $2,$4,$7,$8}'|sed-e's/\[//g'-e's/\]//g'

As represented with three blocks in the image, the filtering logic is composed of three pipelined steps. The first step is used to look for login events ([7]) triggered by user gacanepa. The second and third steps are used to select desired fields, remove square brackets in the output of utmpdump, and set the output field separator to a comma.
Of course, you need to redirect the output of the above command to a file if you want to open it later (append “> [name_of_file].csv” to the command).

In more complex examples, if you want to know what users (as listed in /etc/passwd) have not logged on during the period of time, you could extract user names from /etc/passwd, and then run grep the utmpdump output of /var/log/wtmp against user list. As you see, possibility is limitless.
Before concluding, let’s briefly show yet another use case of utmpdump: modify utmp or wtmp. As these are binary log files, you cannot edit them as is. Instead, you can export their content to text format, modify the text output, and then import the modified content back to the binary logs. That is:
1
2
3
# utmpdump /var/log/utmp > tmp_output
&lt;modify tmp_output using a text editor&gt;
# utmpdump -r tmp_output > /var/log/utmp
This can be useful when you want to remove or fix any bogus entry in the binary logs.
To sum up, utmpdump complements standard utilities such as who, w, uptime, last, lastb by dumping detailed login events stored in utmp, wtmp and btmp log files, as well as in their rotated old archives, and that certainly makes it a great utility.
Via:http://xmodulo.com/monitor-user-login-history-centos-utmpdump.html

Encrypting and decrypting files with password in Linux

$
0
0
http://www.blackmoreops.com/2015/05/07/encrypting-files-with-password

Sometimes you need to send a file containing sensitive information across to someone over internet and you started thinking, “Gee, I’ve got some pretty sensitive information in the file. How can I send it securely?” There are many ways to send encrypted files. A good way for encrypting files is using a long password with GPG or GNU Privacy Guard (GnuPG or GPG) tool. Once you’ve encrypted the file, you can do few things.Encrypting Decrypting files with password in Linux - blackMORE Ops - 3
  1. Put the file in an FTP or Web server the requires a second set of username and passwords.
  2. To further secure, you can put a firewall rule to allow a single IP/Network to access that location.
  3. Send the file via email as an attachment.
  4. Send the file via encrypted email. (double encryption). We will look into email encryption soon.
  5. Create a torrent file and send it securely as a private torrent if the file is too big. (i.e. movies, large files etc.)
So the possibilities are endless. GnuPG or GPG works in Windows, Linux, Mac (any iOS devices), Android, Blackberry etc. In short GnuPG or GPG is supported on all platforms and that’s what makes it such a good encryption tool.

GNU Privacy Guard (GnuPG or GPG)

GnuPG is a hybrid encryption software program in that it uses a combination of conventional symmetric-key cryptography for speed, and public-key cryptography for ease of secure key exchange, typically by using the recipient’s public key to encrypt a session key which is only used once. This mode of operation is part of the OpenPGP standard and has been part of PGP from its first version.
GnuPG encrypts messages using asymmetric keypairs individually generated by GnuPG users. The resulting public keys may be exchanged with other users in a variety of ways, such as Internet key servers. They must always be exchanged carefully to prevent identity spoofing by corrupting public key “owner” identity correspondences. It is also possible to add a cryptographic digital signature to a message, so the message integrity and sender can be verified, if a particular correspondence relied upon has not been corrupted.

Downloan GnuPG

You can download GnuPG for the following Operating systems from this Download GnuPG link.
  1. Windows
  2. OS X
  3. Debian
  4. RPM
  5. Android
  6. VMS (OpenVMS)
  7. RISC OS
  8. *BSD
  9. *NIX
  10. AIX
  11. HPUX
  12. IRIX
  13. Solaris, SunOS
List of supported Operating systems can be found in GnuPG Supported Operating Systems list.
Apart from these, most operating systems have their own implementation of GnuPG which are supported by each other as the underlying encryption and decryption works in a similar way.

Encrypting files in Linux

To encrypt a single file, use command gpg as follows:
root@kali:~# gpg -c secretfilename
To encrypt secretfilename.txt file, type the command:
root@kali:~# gpg -c secretfilename.txt
Sample output:
Enter passphrase:
Repeat passphrase:
Encrypting files with password in Linux - blackMORE Ops - 1
This will create a secretfilename.txt.gpg file. GnuPG or GPG help doco below:

GnuPG or GPG help menu

If you ever forgot your password (passphrase), you cannot recover the data as it use very strong encryption.

Decrypt a file

To decrypt file use the gpg command as follow:
root@kali:~# gpg secretfilename.txt.gpg
Sample outputs:
gpg secretfilename.txt.gpg
gpg: CAST5 encrypted data
Enter passphrase:

Decrypting files with password in Linux - blackMORE Ops - 2

Decrypt file and write output to file secretfilename.txt you can run command:
root@kali:~# gpg secretfilename.txt.gpg –o secretfilename.txt

Famous usage of GnuPG

In May 2014, The Washington Post reported on a 12-minute video guide “GPG for Journalists” posted to Vimeo in January 2013 by a user named anon108. The Post identified anon108 as fugitive NSA leaker Edward Snowden, who it said made the tutorial—”narrated by a digitally disguised voice whose speech patterns sound similar to those of Snowden”—to teach journalist Glenn Greenwald email encryption. Greenwald said that he could not confirm the authorship of the video.

Conclusion

As you can see, GnuPG does have real life usage and in many cases it was used in both legal and illegal activities. I won’t go in to discuss about the legality of the usage, but if you are ever in the need of sending and transferring a file that requires encryption, then GnuPG or GPG is definitely a worthy tool to consider for encrypting files in Linux, Unix, Windows or any known platforms.
Hope you’ve enjoyed this little guide. Please share and RT.

How to view threads of a process on Linux

$
0
0
http://ask.xmodulo.com/view-threads-process-linux.html

Question: My program creates and executes multiple threads in it. How can I monitor individual threads of the program once they are created? I would like to see the details (e.g., CPU/memory usage) of individual threads with their names. Threads are a popular programming abstraction for parallel execution on modern operating systems. When threads are forked inside a program for multiple flows of execution, these threads share certain resources (e.g., memory address space, open files) among themselves to minimize forking overhead and avoid expensive IPC (inter-process communication) channel. These properties make threads an efficient mechanism for concurrent execution.
In Linux, threads (also called Lightweight Processes (LWP)) created within a program will have the same "thread group ID" as the program's PID. Each thread will then have its own thread ID (TID). To the Linux kernel's scheduler, threads are nothing more than standard processes which happen to share certain resources. Classic command-line tools such as ps or top, which display process-level information by default, can be instructed to display thread-level information.
Here are several ways to show threads for a process on Linux.

Method One: PS

In ps command, "-T" option enables thread views. The following command list all threads created by a process with .
$ ps -T -p

The "SID" column represents thread IDs, and "CMD" column shows thread names.

Method Two: Top

The top command can show a real-time view of individual threads. To enable thread views in the top output, invoke top with "-H" option. This will list all Linux threads. You can also toggle on or off thread view mode while top is running, by pressing 'H' key.
$ top -H

To restrict the top output to a particular process and check all threads running inside the process:
$ top -H -p

Method Three: Htop

A more user-friendly way to view threads per process is via htop, an ncurses-based interactive process viewer. This program allows you to monitor individual threads in tree views.
To enable thread views in htop, launch htop, and press to enter htop setup menu. Choose "Display option" under "Setup" column, and toggle on "Three view" and "Show custom thread names" options. Presss to exit the setup.

Now you will see the follow threaded view of individual processes.

Get into Docker – A Guide for Total Newbies

$
0
0
https://www.voxxed.com/blog/2015/05/get-into-docker-a-guide-for-total-newbies

Have you heard about Docker? Most likely. If not, don’t worry, I’ll try to summarise it for you. Docker is probably one of the hottest technologies at the moment. It has the potential to revolutionise the way we build, deploy and distribute applications. At the same time, it’s already having a huge impact in the development process.

In some cases, the development environments can be so much complicated, that it’s hard to keep the consistency between the different team members. I’m pretty sure that most of us already suffered from the syndrome “Works on my Machine”, right? One way to deal with the problem is to build Virtual Machines (VM) with everything set up so you can distribute them through your team. But VM’s are slow, large and you cannot access them if they are not running.

What is Docker?

Docker LogoShort answer: it’s like a lightweight VM. In practice, it’s not the case, since Docker is different from a regular VM. Docker creates a container for your application, packaged with all of the required dependencies and ready to run. These containers run on a shared Linux kernel, but they are isolated from each other. This means that you don’t need the usual VM operating system, giving a considerable performance boost and shrinking the application size.
Let’s dig a little more into detail:

Docker Image

A Docker Image is a read only template used to create the Docker containers. Each image is built with a series of layers composing your final image. If you need to distribute something using Ubuntu and Apache, you start with a base Ubuntu image and add Apache on top. If you later want to upgrade to a Tomcat instance, you just add another layer to your image. Instead of distributing the entire image as you would with a VM, you just release the update.

Docker Registry

The Docker registry also called Docker Hub is a Docker Image repository. It’s the same concept of Maven repositories for Java libraries. Download or upload images and you are good to go. The Docker Hub already contains a huge number of images ready to use, from simple Unix distributions, to full blown application servers.

Docker Container

A Docker Container is the runtime component of the Docker Image. You can spin multiple containers from the same Docker Image in an isolated context. Docker containers can be run, started, stopped, moved, and deleted.

How do I start?

You need to install Docker of course. Please refer to the installation guides of Docker. They are pretty good and I had no problem installing the software. Make sure you follow the proper guide to your system.

Our first Docker Container

After installing Docker, you can immediately type in your command line:
docker run -it -p 8080:8080 tomcat
You should see the following message:
Unable to find image ‘tomcat:latest’ locally
And a lot of downloads starting. Like Maven, when you build an application, it downloads the required libraries to run Tomcat, by reaching out to Docker Hub. It takes a while to download. (Great, one more thing to download the Internet. Luckily we can use ZipRebel, to download it quickly).
After everything is downloaded, you should see the Tomcat instance booting up, and you can access it by going to http://localhost:8080 in Linux boxes. For Windows and Mac users is slightly more complicated. Since Docker only works in a Linux environment, to be able to use it in Windows and Mac you need boot2docker (which you should have from the installation guide). This is in fact a VM that runs Docker on Linux completely from memory. To access the Docker containers you need to refer to this VM IP. You can get the IP with the command: boot2docker IP.
Explaining the command:
docker runThe command to create and start a new Docker container.
-itTo run in interactive mode, so you can see the after running the container.
-p 8080:8080This is to map the internal container port to the outside host, usually your machine. Port mapping information can only be set on the container creation. If you don’t specify it, you need to check which port Docker assigned
tomcatName of the image to run. This is linked to the Docker tomcat repository. This holds the instructions, so Docker knows how to run the server.
Remember that if you stop and run again the same command, you are creating and running a new container.

Multiple Containers

You can run multiple Tomcat instances by issuing the following commands:
docker run -d -p 8080:8080 --name tomcat tomcat
docker run -d -p 9090:8080 --name web tomcat
These create two Tomcat containers named tomcat and web. Just remember to change the port mapping and the name. Adding a name is useful to control the container. If not, Docker will randomly generate one for you.
The -d instructs Docker to run the container in the background. You can now control your container with the following commands:
docker psSee a list of all the running Docker containers. Add -a to see all the containers.
docker stop webStops the container named web.
docker start webStarts the container named web.
docker rm webRemove the container named web.
docker logs webShows the container named web logs.

Connecting to the Container

If you execute the command docker exec -it tomcat bash, you will be able to connect to the container shell and explore the environment. You can for instance, verify the running processes with ps -ax.
radcortez:~ radcortez$ docker exec -it web bash
root@75cd742dc39e:/usr/local/tomcat# ps -ax
PID TTY STAT TIME COMMAND
1 ? Ssl+ 0:05 /usr/bin/java -Djava.util.logging.config.file=/usr/local/tomcat/conf/logging.properties -Djava.util.logging.manager=org.apache.juli.ClassLoaderLogManager -Djava.endorsed.dirs=
47 ? S 0:00 bash
51 ? R+ 0:00 ps -ax
root@75cd742dc39e:/usr/local/tomcat#

Interacting with the Container

Let’s add a file to the container:
echo "radcortez"> radcortez
Exit the container, but keep it running. Execute docker diff web. You are going to see a bunch of files related to the tomcat temporary files, plus the file we just added. This command evaluates the file system differences between the running container and the origin image.

Conclusion

We’ve only scratched the surface of Docker capabilities. It’s still soon to tell if Docker will become a mandatory tool. Currently it’s receiving major adoption from big players like Google, Microsoft and Amazon. Docker may end up failing in the end, but it sure opened up an old discussion which doesn’t have a clear answer yet.
Stay tuned for additional posts. I plan to write a post about creating your own Docker Images.

Using Hiera with Puppet

$
0
0
http://www.linuxjournal.com/content/using-hiera-puppet

With Hiera, you can externalize your systems' configuration data and easily understand how those values are assigned to your servers. With that data separated from your Puppet code, you then can encrypt sensitive values, such as passwords and keys.
Separating code and data can be tricky. In the case of configuration management, there is significant value in being able to design a hierarchy of data—especially one with the ability to cascade through classifications of servers and assign one or several options. This is the primary value that Hiera provides—the ability to separate the code for "how to configure the /etc/ntp.conf" from the values that define "what ntp servers should each node use". In the most concise sense, Hiera lets you separate the "how" from the "what".
The idea behind separating code and data is more than just having a cleaner Puppet environment; it allows engineers to create more re-usable Puppet modules. It also puts your variables in one place so that they too can be re-used, without importing manifests across modules. Hiera's use cases include managing packages and versions or using it as a Node Classifier. One of the most compelling use cases for Hiera is for encrypting credentials and other sensitive data, which I talk about later in this article.
Puppet node data originally was managed through node inheritance, which is no longer supported, and subsequently through using a params.pp module subclass. Before Hiera, it was necessary to modify the params.pp module class locally within the module, which frequently damaged the re-usability of the module. params.pp still is used in modules today, but as of Puppet version 3, Hiera is not only the default, but also the first place checked for variable values. When a variable is defined in both Hiera and a module, Hiera takes precedence by default. As you'll see, it's easy to use a module with params.pp and store some or all of the variable data in Hiera, making it easy to migrate incrementally.
To get started using Hiera with your existing Puppet 3 implementation, you won't have to make any significant changes or code migrations. You need only a hierarchy file for Hiera and a yaml file with a key/value pair. Here is an example of a Hiera hierarchy:

hiera.yaml:

:backends:
- yaml
:yaml:
:datadir: /etc/puppet/hieradata
:hierarchy:
- "node/%{::fqdn}"
- "environment/%{::env}/main"
- "environment/%{::env}/%{calling_module}"
- defaults
And a yaml file:

/etc/puppet/hieradata/environment/prod/main.yaml:
---
$nginx::credentials::basic_auth: 'password'
Hiera can have multiple back ends, but for now, let's start with yaml, which is the default and requires no additional software. The :datadir:is just the path to where the hierarchy search path should begin, and is usually a place within your Puppet configuration. The :hierarchy:section is where the core algorithm of how Hiera does its key/value lookups is defined. The :hierarchy: is something that will grow and change over time, and it may become much more complex than this example.
Within each of the paths defined in the :hierarchy:, you can reference any Puppet variable, even $operatingsystem and $ipaddress, if set. Using the %{variable} syntax will pull the value.
This example is actually a special hierarchical design that I use and recommend, which employs a fact assigned to all nodes called @env from within facter. This @envvalue can be set on the hosts either based on FQDN or tags in EC2 or elsewhere, but the important thing is that this is the separation of one large main.yaml file into directories named prod, dev and so on, and, therefore, the initial separation of Hiera values into categories.
The second component of this specific example is a special Hiera variable called %{calling_module}. This variable is unique and reserved for Hiera to indicate that the yaml filename to search will be the same as the Puppet module that is performing the Hiera lookup. Therefore, the way this hierarchy will behave when looking for a variable in Puppet is like:

$nginx::credentials::basic_auth
First, Hiera knows that it's looking in /etc/puppet/hieradata/node for a file named .yaml and for a value for nginx::credentials::basic_auth. If either the file or the variable isn't there, the next step is to look in /etc/puppet/hieradata/environment//main.yaml, which is a great way to have one yaml file with most of your Hiera values. If you have a lot of values for the nginx example and you want to separate them for manageability, you simply can move them to the /etc/puppet/hieradata/environment//nginx.yaml file. Finally, as a default, Hiera will check for the value in defaults.yaml at the top of the hieradata directory.
Your Puppet manifest for this lookup should look something like this:

modules/nginx/manifests/credentials.pp


class nginx::credentials (
basic_auth = 'some_default',
){}
This class, when included, will pull the value from Hiera and can be used whenever included in your manifests. The value set here of some_default is just a placeholder; Hiera will override anything set in a parameterized class. In fact, if you have a class you are thinking about converting to pull data from Hiera, just start by moving one variable from the class definition in {} to a parameterized section in (), and Puppet will perform a Hiera lookup on that variable. You even can leave the existing definition intact, because Hiera will override it. This kind of Hiera lookup is called Automatic Parameter Lookup and is one of several ways to pull data from Hiera, but it's by far the most common in practice. You also can specify a Hiera lookup with:

modules/nginx/manifests/credentials.pp


class nginx::credentials (
basic_auth = hiera('nginx::credentials::basic_auth'),
){}
These will both default to a priority lookup method in the Hiera data files. This means that Hiera will return the value of the first match and stop looking further. This is usually the only behavior you want, and it's a reasonable default. There are two lookup methods worth mentioning: hiera_array and hiera_hash. hiera_array will find all of the matching values in the files of the hierarchy and combine them in an array. In the example hierarchy, this would enable you to look up all values for a single key for both the node and the environment—for example, adding an additional DNS search path for one host's /etc/resolv.conf. To use a hiera_array lookup, you must define the lookup type explicitly (instead of relying on Automatic Parameter Lookup):

modules/nginx/manifests/credentials.pp


class nginx::credentials (
basic_auth = hiera_array('nginx::credentials::basic_auth'),
){}
A hiera_hash lookup works in the same way, only it gathers all matching values into a single hash and returns that hash. This is often useful for an advanced create_resources variable import as well as many other uses in an advanced Puppet environment.
Perhaps Hiera's most powerful feature is the ability to pull data from a variety of back-end storage technologies. Hiera back ends are too numerous to list, but they include JSON, Redis, MongoDB and even HTTP to create a URL-driven Puppet value API. Let's take a look at two useful back ends: Postgres and hiera-eyaml.
To start with the psql back end, you need to install the hiera-psql gem on your Puppet master (or each node if you're using masterless Puppet runs with Puppet apply), with a simple hiera.yaml file of:

:hierarchy:
* 'environment/%{env}'
* default
:backends:
* psql
:psql:
:connection:
:dbname: hiera
:host: localhost
:user: root
:password: password
You can do lookups on a local Postgres installation with a single database called hiera with a single table called config with three columns: Path, Key and Value.

path key value

'environment/prod''nginx::credentials::basic_auth''password'
This is extremely useful if you want to expose your Hiera data to custom in-house applications outside Puppet, or if you want to create a DevOps Web console or reports.
Storing credentials in Puppet modules is a bad idea. If you store credentials in Puppet and your manifests on an external code repository, you're not only unable to share those manifests with developers with less-secure access, but you're obviously exposing vital security data outside the organization, and possibly in violation of various types of compliance. So how do you encrypt sensitive data in Puppet while keeping your manifests relevant and sharable? The answer is with hiera-eyaml.
Tom Poulton created hiera-eyaml to allow engineers to do just that: encrypt only the sensitive string of data inside the actual file rather than encrypting the entire file, which also can be done with hiera-gpg (a very useful encryption gem but not covered in this article).
To get started, install the hiera-eyaml gem, and generate a keypair on the Puppet master:

$ eyaml createkeys
Then move the keys to a secure location, like /etc/puppet/secure/keys. Your hiera.yaml configuration should look something like this:

hiera.yaml:
---
:backends:
- eyaml
- yaml
:yaml:
:datadir: /etc/puppet/hieradata
:eyaml:
:datadir: /etc/puppet/hieradata
:extension: 'yaml' # <- -="" .yaml="" :hierarchy:="" :pkcs7_private_key:="" :pkcs7_public_key:="" all="" be="" calling_module="" can="" code="" defaults="" env="" environment="" files="" fqdn="" main="" named="" node="" path="" private_key.pkcs7.pem="" public_key.pkcs7.pem="" so="" to="">->
To encrypt values, you need only the public key, so distribute it to anyone who needs to create encrypted values:

$ eyaml encrypt -s 'password'
This will generate an encrypted block that you can add as the value in any yaml file:

main.yaml:
nginx::credentials::user: slackey #cleartext example value
nginx::credentials::basic_auth : > #encrypted example value
ENC[PKCS7,Y22exl+OvjDe+drmik2XEeD3VQtl1uZJXFFF2Nn
/HjZFXwcXRtTlzewJLc+/gox2IfByQRhsI/AgogRfYQKocZg
IZGeunzwhqfmEtGiqpvJJQ5wVRdzJVpTnANBA5qxeA==] 
Editing encrypted values in place is one of the coolest features of the hiera-eyaml back end. eyaml edit opens a copy of the eyaml file in your editor of choice and automatically decrypts all of the values in the file. Here you can modify the values just as though they were plain text. When you exit the editor by saving the file, it automatically encrypts all of the modified values and saves the new file in place. You can see that the unencrypted plain text is marked to allow the eyaml tool to identify each encrypted block, along with the encryption method that originally was used. This is used to make sure that the block is encrypted again only if the clear text value has changed and is encrypted using the original encryption mechanism:
nginx::credentials::user: user1 nginx::credentials::basic_auth : DEC(1)::PKCS7[very secret password]! Blocks and strings of encrypted text can get rather onerous once you have more than a hundred entries or so. Because these yaml files are meant to be modified by humans directly, you want them to be easy to navigate. In my experience, it makes sense to keep your encrypted values in a separate file, such as a secure.yaml, with a hierarchy path of:
:hierarchy: - "node/%{::fqdn}" - "environment/%{::env}/secure" - "environment/%{::env}/main" - "environment/%{::env}/%{calling_module}" This isn't necessary, as each value is encrypted individually and can be distributed safely to other teams. It may work well for your environment, however, because you can store the encrypted files in a separate repository, perhaps in a different Git repository. Only the private keys need to be protected on the Puppet master. I also recommend having separate keys for each environment, as this can give more granular control over who can decrypt different datafiles in Hiera, as well as even greater security separation. One way to do this is to name the keys with the possible values for the @env fact, and include that in the path of the hierarchy. You'll need to encrypt values with the correct key, and this naming convention makes it easy to tell which one is correct:
:pkcs7_private_key: /path/to/private_key.pkcs7.pem-%{::env} :pkcs7_public_key: /path/to/public_key.pkcs7.pem-%{::env} When using Hiera values within Puppet templates, either encrypted or not, you must be careful to pull them into the class that contains the templates instead of calling the values from within the template across classes—for example, in the template mytest.erb in a module called mymodule:
mytest.erb: ... username: user1 passwd: <%= scope.lookupvar('nginx::credentials::basic_auth') %> ↪#don't do this ... Puppet may not have loaded a value into nginx::credentials::basic_authyet because of the order of operations. Also, if you are using the %calling_module Hiera variable, the calling module in this case would be mymodule, and not nginx, so it would not find the value in the nginx.yaml file, as one might expect.
To avoid these and other issues, it's best to import the values into the mymodule class and assign local values:
mymodule.pp: class mymodule { include nginx::credentials $basic_auth = "${nginx::credentials::basic_auth}" file { '/etc/credentials/boto_cloudwatch.cfg': content => template ("mymodule/mytest.erb"), } And then reference the local value from the template:
mytest.erb: ... username: user1 passwd: <%= @basic_auth %> You're now ready to start introducing encrypted Hiera values gradually into your Puppet environment. Maybe after you separate data from your Puppet code, you can contribute some of your modules to the PuppetForge for others to use!

Resources

Docs—Hiera 1 Overview: https://docs.puppetlabs.com/hiera/1
"First Look: Installing and Using Hiera": http://puppetlabs.com/blog/first-look-installing-and-using-hiera
TomPoulton/hiera-eyaml: https://github.com/TomPoulton/hiera-eyaml
dalen/hiera-psql: https://github.com/dalen/hiera-psql
"Encrypting sensitive data in Puppet": http://www.theguardian.com/info/developer-blog/2014/feb/14/encrypting-sensitive-data-in-puppet
 

Command Line Tool to Monitor Linux Containers Performance

$
0
0
http://linoxide.com/how-tos/monitor-linux-containers-performance

ctop is a new command line based tool available to monitor the processes at the container level. Containers provide operating system level virtualization environment by making use of the cgroups resource management functionality. This tool collects data related to memory, cpu, block IO and metadata like owner, uptime etc from cgroups and presents it in a user readable format so that one can quickly asses the overall health of the system. Based on the data collected, it tries to guess the underlying container technology.  ctop is useful in detecting who is using large amounts of memory under low memory situations.

Capabilities

Some of the capabilities of ctop are:
  • Collect metrics for cpu, memory and blkio
  • Gather information regarding owner, container technology, task count
  • Sort the information using any column
  • Display the information using tree view
  • Fold/unfold cgroup tree
  • Select and follow a cgroup/container
  • Select a timeframe for refreshing the displayed data
  • Pause the refreshing of data
  • Detect containers that are based on systemd, Docker and LXC
  • Advance features for Docker and LXC based containers
    • open / attach a shell for further diagnosis
    • stop / kill container types

Installation

ctop is written using Python and there are no other external dependencies other than having to use Python version 2.6 or greater (with built-in cursor support).   Installation using Python's pip is the recommended method. Install pip if not already done and install ctop using pip.
Note: The examples shown in this article are from an Ubuntu (14.10) system
$ sudo apt-get install python-pip
Installing ctop using pip:
poornima@poornima-Lenovo:~$ sudo pip install ctop
[sudo] password for poornima:
Downloading/unpacking ctop
Downloading ctop-0.4.0.tar.gz
Running setup.py (path:/tmp/pip_build_root/ctop/setup.py) egg_info for package ctop
Installing collected packages: ctop
Running setup.py install for ctop
changing mode of build/scripts-2.7/ctop from 644 to 755
changing mode of /usr/local/bin/ctop to 755
Successfully installed ctop
Cleaning up...
If using pip is not an option, you can also install it directly from the github using wget:
poornima@poornima-Lenovo:~$ wget https://raw.githubusercontent.com/yadutaf/ctop/master/cgroup_top.py -O ctop
--2015-04-29 19:32:53-- https://raw.githubusercontent.com/yadutaf/ctop/master/cgroup_top.py
Resolving raw.githubusercontent.com (raw.githubusercontent.com)... 199.27.78.133
Connecting to raw.githubusercontent.com (raw.githubusercontent.com)|199.27.78.133|:443... connected.
HTTP request sent, awaiting response... 200 OK Length: 27314 (27K) [text/plain]
Saving to: ctop
100%[======================================>] 27,314 --.-K/s in 0s
2015-04-29 19:32:59 (61.0 MB/s) - ctop saved [27314/27314]
poornima@poornima-Lenovo:~$ chmod +x ctop
You might get an error message while launching ctop if cgroup-bin package is not installed.  It can be resolved by installing the required package.
poornima@poornima-Lenovo:~$ ./ctop
[ERROR] Failed to locate cgroup mountpoints.
poornima@poornima-Lenovo:~$ sudo apt-get install cgroup-bin
Here is a sample output screen of ctop:
ctop output
ctop screen

Usage options

ctop [--tree] [--refresh=] [--columns=] [--sort-col=] [--follow=] [--fold=, ...] ctop (-h | --help)
Once you are inside the ctop screen, use the up (↑) and down(↓) arrow keys to navigate between containers. Clicking on any container will select that particular container. Pressing q or Ctrl+C quits the container.
Let us now take a look at how to use each of the options listed above.
-h / --help  - Show the help screen
poornima@poornima-Lenovo:~$ ctop -h
Usage: ctop [options]
Options:
-h, --help show this help message and exit
--tree show tree view by default
--refresh=REFRESH Refresh display every
--follow=FOLLOW Follow cgroup path
--columns=COLUMNS List of optional columns to display. Always includes
'name'
--sort-col=SORT_COL Select column to sort by initially. Can be changed
dynamically.
--tree - Display tree view of the containers
By default, list view is displayed
Once you are inside the ctop window, you can use the F5 button to toggle tree / list view.
--fold= - Fold the cgroup path in the tree view.
   This option needs to be used in combination with --tree.
Eg:   ctop --tree --fold=/user.slice
ctop --fold output
Output of 'ctop --fold'
Inside the ctop window, use the + / - keys to toggle child cgroup folding.
Note: At the time of writing this article, pip repository did not have the latest version of ctop which supports '--fold' option via command line.
--follow= - Follow/Highlight the cgroup path.
Eg: ctop --follow=/user.slice/user-1000.slice
As you can see in the screen below, the cgroup with the given path "/user.slice/user-1000.slice" gets highlighted and makes it easier for the user to follow it even when the display position gets changed.
'ctop --follow' output
Output of 'ctop --follow'
You can also use the 'f' button to allow the highlighted line to follow the selected container. By default, follow is off.
--refresh= - Refresh the display at the given rate. Default 1 sec
This is useful in changing the refresh rate of the display as per user requirement.  Use the 'p' button to pause the refresh and select the text.
--columns= - Can limit the display to selected . 'name' should be the first entry followed by other columns. By default, the columns include owner, processes,memory, cpu-sys, cpu-user, blkio, cpu-time.
Eg: ctop --columns=name,owner,type,memory
'ctop --column' output
Output of 'ctop --column'
-sort-col= - column using which the displayed data should be sorted. By default it is sorted using cpu-user
Eg: ctop --sort-col=blkio
If there are additional containers supported like Docker and LXC, following options will also be available:
press 'a' - attach to console output
press 'e' - open a shell in the container context
press 's'– stop the container (SIGTERM)
press 'k' - kill the container (SIGKILL)
ctop is currently in active development by Jean-Tiare Le Bigot. Hopefully we would see more features in this tool like our native top command :-).
Viewing all 1413 articles
Browse latest View live


<script src="https://jsc.adskeeper.com/r/s/rssing.com.1596347.js" async> </script>