Quantcast
Channel: Sameh Attia
Viewing all 1407 articles
Browse latest View live

It's Easier to Ask Forgiveness...

$
0
0
http://www.linuxjournal.com/content/its-easier-ask-forgiveness?utm_source=feedburner&utm_medium=feed&utm_campaign=Feed%3A+linuxjournalcom+%28Linux+Journal+-+The+Original+Magazine+of+the+Linux+Community%29&hootPostID=a8f8dba3e92f9640c81db86b05610060

...than to understand Linux permissions! Honestly though, that's not really true. Linux permissions are simple and elegant, and once you understand them, they're easy to work with. Octal notation gets a little funky, but even that makes sense once you understand why it exists.
Users and Groups:
First I need to address that Linux does have ACL support for file and folder permissions. It's not how things work by default, however, and ACLs were added to address the fine controls needed for some situations. Most Linux systems rely on standard POSIX permissions. That's what I'm covering here.
Every file has an owner and a group membership. If you type ls -l, you'll see the owner and group on all the files and folders in your current directory. POSIX permissions allow you to control read, write and execute abilities for the user, group and a third set of users, "other". Using those three aspects on three different sets of users allows for some fairly complex "who can do what" on a filesystem.
Figure 1 shows an example of what a file listing looks like. I've separated the different sections showing which fields are which. Note the first field is usually either a "d" or a "-"; the former appears on directories, and the latter appears on regular files. For files, the permissions make straightforward sense. If the "read" bit is turned on, it means that user (user, group or other) can read the contents of the file. If the "write" bit is set, it can be written to, and if the "execute" bit is set, the file can be executed. Execute bits are usually set on binary files or on scripts you want to run directly.
Figure 1. Example File Listing
On folders, the permissions work almost the same: read means the ability to see what files are in the folder, and write is the ability to save a file into the folder. Execute is a little less obvious. When the "execute" bit is set, it means the user or group can change into the directory. So the cd command will work as long as you have execute access to a folder.
Changing Permissions:
Although Linux systems usually come with fairly sane standards for what permissions files are created with, it's often necessary to change them. For that, you use the chmod tool. The format is to use:

chmod u+rw,g-r,o+rwx file.txt
Granted, that's a fairly complex example, but let's break it down. The letters before the + or - are u for user, g for group and o for other. Then you either add or take away (+ or -) whichever aspects you desire. It's not required to specify all three user definitions, and they can be lumped together like this:

chmod ugo+rw file.txt
It's also possible to leave "ugo" off if you want to change user, group and other at the same time. So the following examples all do the same thing:

chmod ugo-rw file.txt
chmod -rw file.txt
chmod u-rw,g-rw,o-rw file.txt
Although the "ugo" format is fairly robust, it's sometimes very complicated to craft the string of pluses and minuses to get the exact permissions string you want. That's where octal notation comes into play. It's a little more confusing, but far more convenient once understood.
Octal Notation:
In Figure 2, you can see I've shown the numeric value of each permission bit. By simply adding the numbers, it's possible to create any possibility of permissions with three numbers. Figure 3 shows a few examples of how those can be figured out.
Figure 2. Numeric Value of Each Permission Bit
Figure 3. Creating Permissions
So with octal notation, the following two chmod statements are functionally the same:

chmod ug+rw,ug-x,o+r,o-wx file.txt
chmod 662 file.txt
Although it's not a requirement to use octal notation for setting permissions, it's usually the way it's done.
I urge you to play with chmod a bit until you get the results you expect when using octal notation. Then, just for fun, see if you can string together a bunch of pluses and minuses to get the same results!
Linux permissions are simple, elegant and allow for some very flexible file-sharing options on a filesystem. We use them most often when installing Web applications, because the Web server runs as a particular user, and that user (or group) needs to have access to the files it's attempting to serve.

Linux grep command with 14 different examples

$
0
0
http://www.linuxtechi.com/linux-grep-command-with-14-different-examples

Overview :

Linux like operating system provides a searching tool known as grep (global regular expression print). grep command is useful for searching the content of one more files based on the pattern. A pattern may be a single character, bunch of characters, single word or a sentence.
When we execute the grep command with specified pattern, if its is matched, then it will display the line of file containing the pattern without modifying the contents of existing file.
In this tutorial we will discuss 14 different examples of grep command
Example:1 Search the pattern (word) in a file
Search the “linuxtechi” word in the file /etc/passwd file
root@Linux-world:~# grep linuxtechi /etc/passwd
linuxtechi:x:1000:1000:linuxtechi,,,:/home/linuxtechi:/bin/bash
root@Linux-world:~#
Example:2 Search the pattern in the multiple files.
root@Linux-world:~# grep linuxtechi /etc/passwd /etc/shadow /etc/gshadow
/etc/passwd:linuxtechi:x:1000:1000:linuxtechi,,,:/home/linuxtechi:/bin/bash
/etc/shadow:linuxtechi:$6$DdgXjxlM$4flz4JRvefvKp0DG6re:16550:0:99999:7:::/etc/gshadow:adm:*::syslog,linuxtechi
/etc/gshadow:cdrom:*::linuxtechi
/etc/gshadow:sudo:*::linuxtechi
/etc/gshadow:dip:*::linuxtechi
/etc/gshadow:plugdev:*::linuxtechi
/etc/gshadow:lpadmin:!::linuxtechi
/etc/gshadow:linuxtechi:!::
/etc/gshadow:sambashare:!::linuxtechi
root@Linux-world:~#
Example:3 List the name of those files which contain a specified pattern using -l option.
root@Linux-world:~# grep -l linuxtechi /etc/passwd /etc/shadow /etc/fstab /etc/mtab
/etc/passwd
/etc/shadow
root@Linux-world:~#
Example:4 Search the pattern in the file along with associated line number(s) using the -n option
root@Linux-world:~# grep -n linuxtechi /etc/passwd
39:linuxtechi:x:1000:1000:linuxtechi,,,:/home/linuxtechi:/bin/bash
root@Linux-world:~#
root@Linux-world:~# grep -n root /etc/passwd /etc/shadow
grep-n-root
Example:5 Print the line excluding the pattern using -v option
List all the lines of the file /etc/passwd that does not contain specific word “linuxtechi”.
root@Linux-world:~# grep -v linuxtechi /etc/passwd
grep-v-option
Example:6 Display all the lines that starts with specified pattern using ^ symbol
Bash shell treats carrot symbol (^) as a special character which marks the beginning of line or a word. Let’s display the lines which starts with “root” word in the file /etc/passwd.
root@Linux-world:~# grep ^root /etc/passwd
root:x:0:0:root:/root:/bin/bash
root@Linux-world:~#
Example: 7 Display all the lines that ends with specified pattern using $ symbol.
List all the lines of /etc/passwd that ends with “bash” word.
root@Linux-world:~# grep bash$ /etc/passwd
root:x:0:0:root:/root:/bin/bash
linuxtechi:x:1000:1000:linuxtechi,,,:/home/linuxtechi:/bin/bash
root@Linux-world:~#
Bash shell treats dollar ($) symbol as a special character which marks the end of line or word.
Example:8 Search the pattern recursively using -r option
root@Linux-world:~# grep -r linuxtechi /etc/
/etc/subuid:linuxtechi:100000:65536
/etc/group:adm:x:4:syslog,linuxtechi
/etc/group:cdrom:x:24:linuxtechi
/etc/group:sudo:x:27:linuxtechi
/etc/group:dip:x:30:linuxtechi
/etc/group:plugdev:x:46:linuxtechi
/etc/group:lpadmin:x:115:linuxtechi
/etc/group:linuxtechi:x:1000:
/etc/group:sambashare:x:131:linuxtechi
/etc/passwd-:linuxtechi:x:1000:1000:linuxtechi,,,:/home/linuxtechi:/bin/bash
/etc/passwd:linuxtechi:x:1000:1000:linuxtechi,,,:/home/linuxtechi:/bin/bash
............................................................................
Above command will search linuxtechi in the “/etc” directory recursively.
Example:9 Search all the empty or blank lines of a file using grep
root@Linux-world:~# grep ^$ /etc/shadow
root@Linux-world:~#
As there is no empty line in /etc/shadow file , so nothing is displayed.
Example:10 Search the pattern using ‘grep -i’ option.
-i option in the grep command ignores the letter case i.e it will ignore upper case or lower case letters while searching
Lets take an example , i want to search “LinuxTechi” word in the passwd file.
nextstep4it@localhost:~$ grep -i LinuxTechi /etc/passwd
linuxtechi:x:1001:1001::/home/linuxtechi:/bin/bash
nextstep4it@localhost:~$
Example:11 Search multiple patterns using -e option
For example i want to search ‘linuxtechi’ and ‘root’ word in a single grep command , then using -e option we can search multiple patterns .
root@Linux-world:~# grep -e "linuxtechi" -e "root" /etc/passwd
root:x:0:0:root:/root:/bin/bash
linuxtechi:x:1000:1000:linuxtechi,,,:/home/linuxtechi:/bin/bash
root@Linux-world:~#
Example:12 Getting Search pattern from a file using “grep -f”
First create a search pattern file “grep_pattern” in your current working directory. In my case i have put the below contents.
root@Linux-world:~# cat grep_pattern
^linuxtechi
root
false$
root@Linux-world:~#
Now try to search using grep_pattern file.
root@Linux-world:~# grep -f grep_pattern /etc/passwd
grep-f-option
Example:13 Count the number of matching patterns using -c option
Let take the above example , we can count the number of matching patterns using -c option in grep command.
root@Linux-world:~# grep -c -f grep_pattern /etc/passwd
22
root@Linux-world:~#
Example:14 Display N number of lines before & after pattern matching
a) Display Four lines before patten matching using -B option
root@Linux-world:~# grep -B 4 "games" /etc/passwd
grep-B-option
b) Display Four lines after pattern matching using -A option
root@Linux-world:~# grep -A 4 "games" /etc/passwd
grep-A-option
c) Display Four lines around the pattern matching using -C option
root@Linux-world:~# grep -C 4 "games" /etc/passwd
grep-C-option

Varnish Goes Upstack with Varnish Modules and Varnish Configuration Language

$
0
0
http://highscalability.com/blog/2015/5/6/varnish-goes-upstack-with-varnish-modules-and-varnish-config.html

This is a guest post by Denis Brækhus and Espen Braastad, developers on the Varnish API Engine from Varnish Software. Varnish has long been used in discriminating backends, so it's interesting to see what they are up to.
Varnish Software has just released Varnish API Engine, a high performance HTTP API Gateway which handles authentication, authorization and throttling all built on top of Varnish Cache. The Varnish API Engine can easily extend your current set of APIs with a uniform access control layer that has built in caching abilities for high volume read operations, and it provides real-time metrics.
Varnish API Engine is built using well known components like memcached, SQLite and most importantly Varnish Cache. The management API is written in Python. A core part of the product is written as an application on top of Varnish using VCL (Varnish Configuration Language) and VMODs (Varnish Modules) for extended functionality.
We would like to use this as an opportunity to show how you can create your own flexible yet still high performance applications in VCL with the help of VMODs.

VMODs (Varnish Modules)

VCL is the language used to configure Varnish Cache. When varnishd loads a VCL configuration file, it will convert it into C code, compile it and then load it dynamically. It is therefore possible to extend functionality of VCL by inlining C code directly into the VCL configuration file, but the preferred way to do it since Varnish Cache 3 has been to use Varnish Modules, or VMODs for short, instead.
The typical request flow in a stack containing Varnish Cache is:
fig showing normal varnish workflow
The client sends HTTP requests which are received and processed by Varnish Cache. Varnish Cache will decide to look up the requests in cache or not, and eventually it may fetch the content from the backend. This works very well, but we can do so much more.
The VCL language is designed for performance, and as such does not provide loops or external calls natively. VMODs, on the other hand, are free of these restrictions. This is great for flexibility, but places the responsibility for ensuring performance and avoiding delays on the VMOD code and behaviour.
The API Engine design illustrates how the powerful combination of VCL and custom VMODs can be used to build new applications. In Varnish API Engine, the request flow is:
fig showing workflow with sqlite and memcached VMODs
Each request is matched against a ruleset using the SQLite VMOD and a set of Memcached counters using the memcached VMOD. The request is denied if one of the checks fail, for example if authentication failed or if one of the request limits have been exceeded.

Example application

The following example is a very simple version of some of the concepts used in the Varnish API Engine. We will create a small application written in VCL that will look up the requested URL in a database containing throttling rules and enforce them on a per IP basis.
Since testing and maintainability is crucial when developing an application, we will use Varnish's integrated testing tool: varnishtest. Varnishtest is a powerful testing tool which is used to test all aspects of Varnish Cache. Varnishtest's simple interface means that developers and operation engineers can leverage it to test their VCL/VMOD configurations.
Varnishtest reads a file describing a set of mock servers, clients, and varnish instances. The clients perform requests that go via varnish, to the server. Expectations can be set on content, headers, HTTP response codes and more. With varnishtest we can quickly test our example application, and verify that our requests are passed or blocked as per the defined expectations.
First we need a database with our throttle rules. Using the sqlite3 command, we create the database in /tmp/rules.db3 and add a couple of rules.
$ sqlite3 /tmp/rules.db3 "CREATE TABLE t (rule text, path text);"
$ sqlite3 /tmp/rules.db3 "INSERT INTO t (rule, path) VALUES ('3r5', '/search');"
$ sqlite3 /tmp/rules.db3 "INSERT INTO t (rule, path) VALUES ('15r3600', '/login');"
These rules will allow 3 requests per 5 seconds to /search and 15 requests per hour to /login. The idea is to enforce these rules on a per IP basis.
For the sake of simplicity, we’ll write the tests and VCL configuration in the same file, throttle.vtc. It is, however, possible to include separate VCL configuration files using include statements in the test files, to separate VCL configuration and the different tests.
The first line in the file is optionally used to set the name or the title of the test.
varnishtest "Simple throttling with SQLite and Memcached"
Our test environment consists of one backend, called s1. We will first expect one request to a URL without a rule in the database.
server s1 {
  rxreq
  expect req.url == "/"
  txresp
We then expect 4 requests to /search to arrive according to our following expectations. Note that the query parameters are slightly different, making all of these unique requests.
  rxreq
  expect req.url == "/search?id=123&type=1"
  expect req.http.path == "/search"
  expect req.http.rule == "3r5"
  expect req.http.requests == "3"
  expect req.http.period == "5"
  expect req.http.counter == "1"
  txresp
  rxreq
  expect req.url == "/search?id=123&type=2"
  expect req.http.path == "/search"
  expect req.http.rule == "3r5"
  expect req.http.requests == "3"
  expect req.http.period == "5"
  expect req.http.counter == "2"
  txresp
  rxreq
  expect req.url == "/search?id=123&type=3"
  expect req.http.path == "/search"
  expect req.http.rule == "3r5"
  expect req.http.requests == "3"
  expect req.http.period == "5"
  expect req.http.counter == "3"
  txresp
  rxreq
  expect req.url == "/search?id=123&type=4"
  expect req.http.path == "/search"
  expect req.http.rule == "3r5"
  expect req.http.requests == "3"
  expect req.http.period == "5"
  expect req.http.counter == "1"
  txresp
} -start
Now it is time to write the mini-application in VCL. Our test environment consists of one varnish instance, called v1. Initially, the VCL version marker and the VMOD imports are added.
varnish v1 -vcl+backend {
  vcl 4.0;
  import std;
  import sqlite3;
  import memcached;
VMODs are usually configured in vcl_init, and this is true for sqlite3 and memcached as well. For sqlite3, we set the path to the database and the field delimiter to use on multi column results. The memcached VMOD can have a wide variety of configuration options supported by libmemcached.
  sub vcl_init {
      sqlite3.open("/tmp/rules.db3", "|;");
      memcached.servers("--SERVER=localhost --BINARY-PROTOCOL");
  }
In vcl_recv, the incoming HTTP requests are received. We start by extracting the request path without query parameters and potential dangerous characters. This is important since the path will be part of the SQL query later. The following regex will match the req.url from the beginning of the line up until any of the characters ? & ; “ ‘ or whitespace.
  sub vcl_recv {
      set req.http.path = regsub(req.url, {"^([^?&;"' ]+).*"}, "\1");
The use of {""} in the regular expression enables handling of the " character in the regular expression rule. The path we just extracted is used when the rule is looked up in the database. The response, if any, is stored in req.http.rule.
      set req.http.rule = sqlite3.exec("SELECT rule FROM t WHERE path='" + req.http.path + "' LIMIT 1");
If we get a response, it will be on the format RnT, where R is the amount of requests allowed over a period of T seconds. Since this is a string, we need to apply more regex to separate those.
      set req.http.requests = regsub(req.http.rule, "^([0-9]+)r.*$", "\1");
      set req.http.period = regsub(req.http.rule, "^[0-9]+r([0-9]+)$", "\1");
We do throttling on this request only if we got proper values from the previous regex filters.
      if (req.http.requests != ""&& req.http.period != "") {
Increment or create a Memcached counter unique for this client.ip and path with the value 1. The expiry time we specify is equal to the period in the throttle rule set in the database. This way, the throttle rules can be flexible regarding time period. The return value is the new value of the counter, which corresponds to the amount of requests this client.ip has done this path in the current time period.
          set req.http.counter = memcached.incr_set(
              req.http.path + "-" + client.ip, 1, 1, std.integer(req.http.period, 0));
Check if the counter is higher than the limit set in the database. If it is, then abort the request here with a 429 response code.
          if (std.integer(req.http.counter, 0) > std.integer(req.http.requests, 0)) {
              return (synth(429, "Too many requests"));
          }
      }
  }
In vcl_deliver we set response headers showing the throttle limit and status for each request which might be helpful for the consumers.
  sub vcl_deliver {
      if (req.http.requests && req.http.counter && req.http.period) {
          set resp.http.X-RateLimit-Limit = req.http.requests;
          set resp.http.X-RateLimit-Counter = req.http.counter;
          set resp.http.X-RateLimit-Period = req.http.period;
      }
  }
Errors will get the same headers set in vcl_synth.
  sub vcl_synth {
      if (req.http.requests && req.http.counter && req.http.period) {
          set resp.http.X-RateLimit-Limit = req.http.requests;
          set resp.http.X-RateLimit-Counter = req.http.counter;
          set resp.http.X-RateLimit-Period = req.http.period;
      }
  }
The configuration is complete, and it is time to add some clients to verify that the configuration is correct. First we send a request that we expect to be unthrottled, meaning that there are no throttle rules in the database for this URL.
client c1 {
  txreq -url "/"
  rxresp
  expect resp.status == 200
  expect resp.http.X-RateLimit-Limit ==
  expect resp.http.X-RateLimit-Counter ==
  expect resp.http.X-RateLimit-Period ==
} -run
The next client sends requests to a URL that we know is a match in the throttle database, and we expect the rate-limit headers to be set. The throttle rule for /search is 3r5, which means that the three first requests within a 5 second period should succeed (with return code 200) while the fourth request should be throttled (with return code 429).
client c2 {
  txreq -url "/search?id=123&type=1"
  rxresp
  expect resp.status == 200
  expect resp.http.X-RateLimit-Limit == "3"
  expect resp.http.X-RateLimit-Counter == "1"
  expect resp.http.X-RateLimit-Period == "5"
  txreq -url "/search?id=123&type=2"
  rxresp
  expect resp.status == 200
  expect resp.http.X-RateLimit-Limit == "3"
  expect resp.http.X-RateLimit-Counter == "2"
  expect resp.http.X-RateLimit-Period == "5"
  txreq -url "/search?id=123&type=3"
  rxresp
  expect resp.status == 200
  expect resp.http.X-RateLimit-Limit == "3"
  expect resp.http.X-RateLimit-Counter == "3"
  expect resp.http.X-RateLimit-Period == "5"
  txreq -url "/search?id=123&type=4"
  rxresp
  expect resp.status == 429
  expect resp.http.X-RateLimit-Limit == "3"
  expect resp.http.X-RateLimit-Counter == "4"
  expect resp.http.X-RateLimit-Period == "5"
} -run
At this point, we know that requests are being throttled. To verify that new requests are allowed after the time limit is up, we add a delay here before we send the next and last request. This request should succeed since we are in a new throttle window.
delay 5;
client c3 {
  txreq -url "/search?id=123&type=4"
  rxresp
  expect resp.status == 200
  expect resp.http.X-RateLimit-Limit == "3"
  expect resp.http.X-RateLimit-Counter == "1"
  expect resp.http.X-RateLimit-Period == "5"
} -run
To execute the test file, make sure the memcached service is running locally and execute:
$ varnishtest example.vtc
#     top  TEST example.vtc passed (6.533)
Add -v for verbose mode to get more information from the test run.
Requests to our application in the example will receive the following response headers. The first is a request that has been allowed, and the second is a request that has been throttled.
$ curl -iI http://localhost/search
HTTP/1.1 200 OK
Age: 6
Content-Length: 936
X-RateLimit-Counter: 1
X-RateLimit-Limit: 3
X-RateLimit-Period: 5
X-Varnish: 32770 3
Via: 1.1 varnish-plus-v4
$ curl -iI http://localhost/search
HTTP/1.1 429 Too many requests
Content-Length: 273
X-RateLimit-Counter: 4
X-RateLimit-Limit: 3
X-RateLimit-Period: 5
X-Varnish: 32774
Via: 1.1 varnish-plus-v4
The complete throttle.vtc file outputs timestamp information before and after VMOD processing, to give us some data on the overhead introduced by the Memcached and SQLite queries. Running 60 requests in varnishtest on a local vm with Memcached running locally returned the following timings pr operation (in ms):
  • SQLite SELECT, max: 0.32, median: 0.08, average: 0.115
  • Memcached incr_set(), max: 1.23, median: 0.27, average: 0.29
These are by no means scientific results, but hints to performance that should for most scenarios prove to be fast enough. Performance is also about the ability to scale horizontally. The simple example provided in this article will scale horizontally with global counters in a pool of Memcached instances if needed.
fig showing horizontally scaled setup

Further reading

There are a number of VMODs available, and the VMODs Directory is a good starting point. Some highlights from the directory are VMODs for cURL usage, Redis, Digest functions and various authentication modules.
Varnish Plus, the fully supported commercial edition of Varnish Cache, is bundled with a set of high quality, support backed VMODs. For the open source edition, you can download and compile the VMODs you require manually.

Related Articles

Why tools like Docker, Vagrant, and Ansible are hotter than ever

$
0
0
http://opensource.com/business/15/5/why-Docker-Vagrant-and-Ansible

Tools in a tool box
Image credits : 
Photo by Peter (CC BY-SA 2.0), modified by Rikki Endsley
The complexity of application stacks keeps going up. Way, way up. Application stacks have always been complicated, but never like this. There are so many services, so many tools, so much more compute power available, so many new techniques to try, and always the desire, and the pressure, to solve problems in newer and cooler and more elegant ways. With so many toys to play with, and more coming every day, the toy chest struggles to contain them all.
If you're not familiar with stackshare.io, have a look at it. It's a great resource to see which pieces companies are using to build their applications. In addition to being useful, it also can be pretty entertaining.
Spend a few minutes browsing through some of the stacks out there and you'll see that some of the technology collections people have assembled are fascinating. Here's an example I particularly like: (deep breath) EC2 S3 Qubole MongoDB Memecached Redis Django Hadoop nginx Cassandra MySQL Google Analytics SendGrid Route53 Testdroid Varnish Zookeeper.
So that's web server, web application server, caching proxy server, discovery service, a few services-as-a-service, and six"databases" of various flavors and functions. (All of it either open source or proprietary service, of course. There tends to be very little in between anymore.)
It's highly unlikely that anyone ever stood in front of a whiteboard and wrote WE NEED SIX DATABASES!!! with a purple dry erase pen, but that's how things happen when your infrastructure expands rapidly to meet business demand. A developer decides that a new tool is best, rightly or wrongly, and that tool makes its way into production. At that moment, the cool new tool instantly becomes a legacy application, and you have to deal with it until you refactor it (ha!) or until you quit to go do something else and leave the next poor sucker to deal with it.

How to cope

So how can developers possibly cope with all of this complexity? Better than one might expect, as it turns out.
That awesome nextgen location-aware online combo gambling/dating/sharing economy platform is going to require a lot of different services and components. But every grand plan has a simple beginning, and every component of any ultrascalable mega-solution starts its life as a few chunks of code somewhere. For most teams, that somewhere is a few humble developer laptops, and a git repository to bind them.
We talk about the cloud revolution, but we tend to talk less about the laptop revolution. The developer laptop of today, combined with advances in virtualization and containerization, now allow complex multi-system environments to be fully modeled on a laptop. Multiple "machines" can now be a safe default, because these multiple, separate "machines" can all be trivially instantiated on a laptop.
The upshot: The development environment for a complex, multisystem application stack can now be reliably and repeatably installed on a single laptop, and changes to any of the environment, or all of the environment, can be easily shared among the whole team, so that everyone can rebuild identical environments quickly. For example, ceph-ansible is a tool to deploy and test a multi-node Ceph cluster on a laptop, using multiple VMs, built by Vagrant and orchestrated by Ansible, all with a single command: vagrant up. Ceph developers are using this tool right now.
This kind of complex multi-node deployment is already becoming commonplace, and it means that modeling the relationships between machines is now just as important as managing what's on those individual machines.
Docker and Vagrant are successful because they are two simple ways of saying, "This is what's on this machine, and here's how to start it." Ansible is successful with both because it's a simple way of saying, "This is how these machines interact, and here's how to start them." Together, they allow developers to build complex multi-machine environments, in a way that allows them to be described and rebuilt easily.
It's often said that DevOps, at its heart, is a conversation. This may be true, but it's a conversation that's most successful when everyone speaks the same language. Vagrant, Docker, and Ansible are seeing success because they allow people to speak the same languages of modeling and deployment.

Introducing FIDO: Automated Security Incident Response

$
0
0
http://techblog.netflix.com/2015/05/introducing-fido-automated-security.html


We're excited to announce the open source release of FIDO (Fully Integrated Defense Operation - apologies to the FIDO Alliance for acronym collision), our system for automatically analyzing security events and responding to security incidents.

Overview

The typical process for investigating security-related alerts is labor intensive and largely manual. To make the situation more difficult, as attacks increase in number and diversity, there is an increasing array of detection systems deployed and generating even more alerts for security teams to investigate.

Netflix, like all organizations, has a finite amount of resources to combat this phenomenon, so we built FIDO to help. FIDO is an orchestration layer that automates the incident response process by evaluating, assessing and responding to malware and other detected threats.

The idea for FIDO came from a simple proof of concept a number of years ago. Our process for handling alerts from one of our network-based malware systems was to have a help desk ticket created and assigned to a desktop engineer for follow-up - typically a scan of the impacted system or perhaps a re-image of the hard drive. The time from alert generation to resolution of these tickets spanned from days to over a week. Our help desk system had an API, so we had a hypothesis that we could cut down resolution time by automating the alert-to-ticket process. The simple system we built to ingest the alerts and open the tickets cut the resolution time to a few hours, and we knew we were onto something - thus FIDO was born.

Architecture and Operation

This section describes FIDO's operation, and the following diagram provides an overview of FIDO’s architecture.


Detection

FIDO’s operation begins with the receipt of an event via one of FIDO’s detectors. Detectors are off the shelf security products (e.g. firewalls, IDS, anti-malware systems) or custom systems that detect malicious activities or threats. Detectors generate alerts or messages that FIDO ingests for further processing. FIDO provides a number of ways to ingest events, including via API (the preferred method), SQL database, log file, and email. FIDO supports a variety of detectors currently (e.g. Cyphort, ProtectWise, CarbonBlack/Bit9) with more planned or under development.

Analysis and Enrichment

The next phase of FIDO operation involves deeper analysis of the event and enrichment of the event data with both internal and external data sources. Raw security events often have little associated context, and this phase of operation is designed to supplement the raw event data with supporting information to enable more accurate and informed decision making.

The first component of this phase is analysis of the event’s target - typically a computer and/or user (but potentially any targeted resource). Is the machine a Windows host or a Linux server? Is it in the PCI zone? Does the system have security software installed and the latest patches? Is the targeted user a Domain Administrator? An executive? Having answers to these questions allows us to better evaluate the threat and determine what actions need to be taken (and with what urgency). To gather this data, FIDO queries various internal data sources - currently supported are Active Directory, LANDesk, and JAMF, with other sources under consideration.

In addition to querying internal sources, FIDO consults external threat feeds for information relevant to the event under analysis. The use of threat feeds help FIDO determine whether a generated event may be a false positive or how serious and pervasive the issue may be. Another way to think of this step is ‘never trust, always verify.’ A generated alert is simply raw data - it must be enriched, evaluated, and corroborated before actioning. FIDO supports several threats feeds, including ThreatGrid and VirusTotal, with additional feeds under consideration.

Correlation and Scoring

Once internal and external data has been gathered about a given event and its target(s), FIDO seeks to correlate the information with other data it has seen and score the event to facilitate ultimate disposition. The correlation component serves several functions - first - have multiple detectors identified this same issue? If so, it could potentially be a more serious threat. Second - has one of your detectors already blocked or remediated the issue (for example - a network-based malware detector identifies an issue, and a separate host-based system repels the same item)? If the event has already been addressed by one of your controls, FIDO may simply provide a notification that requires no further action. The following image gives a sense of how the various scoring components work together.

Scoring is multi-dimensional and highly customizable in FIDO. Essentially, what scoring allows you to do is tune FIDO’s response to the threat and your own organization’s unique requirements. FIDO implements separate scoring for the threat, the machine, and the user, and rolls the separate scores into a total score. Scoring allows you to treat PCI systems different than lab systems, customer service representatives different than engineers, and new event sources different than event sources with which you have more experience (and perhaps trust). Scoring leads into the last phase of FIDO’s operation - Notification and Enforcement.

Notification and Enforcement

In this phase, FIDO determines and executes a next action based on the ingested event, collected data, and calculated scores. This action may simply be an email to the security team with details or storing the information for later retrieval and analysis. Or, FIDO may implement more complex and proactive measures such as disabling an account, ending a VPN session, or disabling a network port. Importantly, the vast majority of enforcement logic in FIDO has been Netflix-specific. For this reason, we’ve removed most of this logic and code from the current OSS version of FIDO. We will re-implement this functionality in the OSS version when we are better able to provide the end-user reasonable and scalable control over enforcement customization and actions.

Open Items & Future Plans

Netflix has been using FIDO for a bit over 4 years, and while it is meeting our requirements well, we have a number of features and improvements planned. On the user interface side, we are planning for an administrative UI with dashboards and assistance for enforcement configuration. Additional external integrations planned include PAN, OpenDNS, and SentinelOne. We're also working on improvements around correlation and host detection. And, because it's now OSS, you are welcome to suggest and submit your own improvements!
-Rob Fry, Brooks Evans, Jason Chan

Practical Python programming for non-engineers

$
0
0
http://opensource.com/life/15/5/practical-python-programming-non-engineers

Real python in the graphic jungle
Image credits : 
Photo by Jen Wike Huger, CC BY-SA; Original photo by Torkild Retvedt
"Learn to code" is the new mantra for the 21st century. What’s often lost in that statement is exactly what makes programming so useful if you’re not planning to switch careers and become a software engineer. Just because we’re surrounded by computers doesn’t mean the average person needs to be able to reprogram their smart fridge.
But programming skills can help solve uncommon, user-specific problems. Office workers, students, administrators, and anyone who uses a computer has encountered tedious tasks. Maybe they need to rename a few hundred files. Perhaps they need to send out notifications each time a particular website updates. Or maybe they need to copy several hundred rows from an Excel spreadsheet into a webform.
These problems are too specific for commercial software to solve, but with some programming knowledge, users can create their own solutions. Learning to code can turn users into power users.

Dealing with files

For example, say you have a folder full of hundreds of files. Each one is named something like Apr2015.csv, Mar2015.csv, Feb2015.csv, and so on, going all the way back to 1980. You have to sort these files by year. But the automatic sorts available to you won’t work; you can’t sort them alphabetically. You could rename each file so that the year comes first and replace all the months with numbers so that an automatic sort would work, but renaming hundreds of files would be brain-meltingly boring and also take hours.
Here’s a Python program that took me about 15 minutes to write that does the job instead:
import os, shutil

monthMapping = {'Jan': '1', 'Feb': '2', 'Mar': '3', 'Apr': '4', 'May': '5', 'Jun': '6', 'Jul': '7', 'Aug': '8', 'Sep': '9', 'Oct': '10', 'Nov': '11', 'Dec': '12'}

for filename in os.listdir():
    monthPart = filename[:3]
    yearPart = filename[3:7]
    newFilename = yearPart + '_' + monthMapping[monthPart] + '.csv'
    print('Renaming ' + filename + ' to ' + newFilename)
    #shutil.move(filename, newFilename)
Python is an ideal language for beginners because of its simple syntax. It’s not a series of cryptic 1’s and 0’s; you’ll be able to follow along without any programming experience. Let’s go through this program step by step.
First, Python’s os and shutil modules have functions that can do the filesystem work we need. We don’t have to write that code ourselves, we just import those modules on the first line. Next, a variable named monthMapping contains a dictionary that maps the month abbreviation to the month number. If 'Apr' is the month abbreviation, monthMapping['Apr'] will give us the month number.
The for loop runs the code on each file in the current directory, or folder. The os.listdir() function returns the list of files.
The first three letters of the filename will be stored in a variable named monthPart. This just makes the code more readable. Similarly, the years in the filename are stored in a variable named yearPart.
The newFilename variable will be created from yearPart, an underscore, the month number (as returned from monthMapping[monthPart]), and the .csv file extension. It’s helpful to display output on the screen as the program runs, so the next line prints the new filename.
The final line calls the shutil module’s move() function. Normally, this function moves a file to a different folder with a different name, but by using the same folder it just renames each file. The # at the start of the line means that the entire line is a comment that is ignored by Python. This lets you run the program without it renaming the files so you can check that the printed output looks correct. When you’re ready to actually rename the files, you can remove the # and run the program again.

Computer time is cheap / software developer time is expensive

This program takes less than a second to rename hundreds of files. But even if you have to process gigabytes of data you don’t need to be able to write "elegant" code. If your code takes 10 hours to run instead of 2 hours because you aren’t an algorithms expert, that’s still a lot faster than finding a software developer, explaining your requirements to them, negotiating a contract, and then verifying their work. And it will certainly be faster than processing all this data by hand. In short, don’t worry about your program’s efficiency: computer processing time is cheap; it’s developer time that’s expensive.

More Python

My new book, Automate the Boring Stuff with Python, from No Starch Press, is released under a Creative Commons license and teaches beginning programmers how to write Python code to take care of boring tasks. It skips the abstract computer science approach and focuses on practical application. You can read the complete book online. Ebook and print editions are available from Amazon, nostarch.com, and in bookstores.
Many programming tutorials use examples like calculating Fibonacci numbers or solving the "8 Queens" chess problem. Automate the Boring Stuff with Python teaches you code to solve real-world problems. The first part of the book is a general Python tutorial. The second part of the book covers things like reading PDF, Word, Excel, and CSV files. You’ll learn how to scrape data off of web sites. You’ll be able to launch programs according to a schedule and send out automatic notifications by email or text message. If you need to save yourself from tedious clicking and typing, you’ll learn how to write programs that control the keyboard and mouse for you.

RTFM? How to write a manual worth reading

$
0
0
http://opensource.com/business/15/5/write-better-docs

No swimming sign with alligator biting it
Image credits : 
submit to reddit
Definition: RTFM (Read The F'ing Manual). Occasionally it is ironically rendered as Read The Fine Manual, a phrase uttered at people who have asked a question that we, the enlightened, feel is beneath our dignity to answer, but not beneath our dignity to use as an opportunity to squish a newbie's ego.
Have you noticed that the more frequently a particular open source community tells you to RTFM, the worse the FM is likely to be? I've been contemplating this for years, and have concluded that this is because patience and empathy are the basis of good documentation, much as they are the basis for being a decent person.
First, some disclaimers.
Although I've been doing open source documentation for almost 20 years, I have no actual training. There are some people that do, and there are some amazing books out there that you should read if you care about this stuff.
First, I'd recommend Conversation and Community, by Anne Gentle. And if you're looking for a conference about this stuff, there are two that I'd suggest: Write The Docs and OpenHelp.
The title of this essay comes from Kathy Sierra, who in a presentation years ago had a slide that said, "If you want them to RTFM, make a better FM." But how do we go about doing that?
There's common wisdom in the open source world: Everybody knows that the documentation is awful, that nobody wants to write it, and that this is just the way things are. But the truth is that there are lots of people who want to write the docs. We just make it too hard for them to participate. So they write articles on Stack Overflow, on their blogs, and on third-party forums. Although this can be good, it's also a great way for worst-practice solutions to bloom and gain momentum. Embracing these people and making them part of the official documentation effort for your project has many advantages.
Unlike writing fiction, where the prevailing advice is just start writing, when it comes to technical writing, you need to plan a bit. Before you start, there are several questions you should ask.

Who?

The first of these is who?. Who are you writing to? Some professional tech writers create personas so that when they are writing, they can think to themselves, "What would Monica need to know in this situation?" or "What kind of problem is Marcus likely to have around this topic?" and then write accordingly.
At this point in the process, remembering that not all of your audience consists of young, white, English-speaking men who grew up watching Monty Python is critical.

Exhibit A: Python documentation

Python documentation is riddled with Monty Python references:
Screenshot of Python documentation with Monty Python skit references
Now, don't mistake me: Python documentation, is, for the most part, awesome. But there's one complaint I have with it—the inside jokes. The Monty Python humor runs through all of the documentation, and this is a double-edged sword. Inside jokes form a sense of community, because you get the joke, and so you're on the inside. Except when you're not. In which case, inside jokes point out starkly that you're not on the inside. Tread carefully here. Consider including a reference guide that explains the jokes, and, in the case of dead parrots, points to a YouTube video:
The same goes for colloquialisms.

Exhibit B: PHP documentation

In this example from the PHP docs, the English saying, finding a needle in a haystack, is referenced in an effort to make the example more understandable. If you are a native English speaker, the example is great because it makes obvious which argument is which. For readers who are not native English speakers, however, the example points out that they are not the target audience, which can have a chilling effect on bringing new people into your community.

Where?

The next question to ask is where?. Yes, you need to have documentation on your project website, but where else is the conversation already happening? Except in rare cases, other sites, such as StackOverflow, are the de facto documentation for your project. And if you care about actually helping your users, you need to go where they are. If they're asking questions on Twitter, Facebook, or AOL, you need to go there, answer their questions there, and give them pointers back to the official documentation so that they know where to look next time.
You can't control where people are having their conversations, and attempts to do so will be seen as being out of touch with your audience. (While I'm on the topic, they're not your audience, anyway.)
Once, when I worked for a former employer, we discovered that our audience was having their conversations on Facebook, rather than on our website. Those in power decided that we had to stop this, and we put up our own internal social site. And then we told everyone that they had to use it—instead of Facebook—when discussing our organization. I suspect you can guess how well that worked out for us.
But you're doing the same thing when you ignore the audience on StackOverflow, Twitter, and various third-party websites, because they're not in the right place.

What?

On to the mechanics. What should you be writing?

Scope

The first thing you must decide (and, yes, you need to decide this, because there's not necessarily one right answer) is what your document scope is. That is: What topics are you willing to cover? The implication, of course, is that everything else is out of scope, and should be pushed to someone else's documentation.
For example, on the Apache Web Server documentation, we have a document called Getting Started, which covers what you need to know before you get started. The goal of the document is to draw a line saying what is outside of the scope of the documentation, while also pointing people to resources that do in fact cover those things in great depth. Thus, the HTTP specification, the inner workings of DNS, and content matters (such as HTML and CSS) are firmly outside of the scope of the documentation, but everyone using the Apache Web Server needs to know these things.

Types of docs

Once you've determined the scope, and who you're writing to, there are several different kinds of documents that you can write for them. Anne Gentle categorizes them like this:

Start here

Like the Getting Started document I mentioned previously, this is the place where you tell users what they need to know before they even get started.

Reference guide

The reference guide is comprehensive and usually pretty dry. This is where terms are defined, functions' input and output are explained, and examples are given. The tone is factual and to the point. There's not much discussion, or conversation. The voice is usually impersonal.

Tutorials

Tutorials hold your hand and lead you down the path. They show you each step, and occasionally sit down on a bench by the path to explain the rationale for a particular step. They are very conversational, sometimes even chatty. The voice is personal; you are speaking to a particular person, defined in the earlier persona phase.

Learning/understanding

Often linked to from the tutorials, the learning/understanding documents dig deeper. They investigate the why and the how of a particular thing. Why was a certain decision made? How was it implemented in the code? What does the future look like for this thing? How can you help create that future? These documents are sometimes better done as blog posts than as part of the formal documentation, as they can be a serious distraction to people that are just trying to solve a problem.

Cookbook/recipe

There's a reason that the Cookbooks are often the best selling part of the O'Reilly technical book catalog. People want solutions, and they want them now. The recipe, or cookbook section of your document, should provide cut-and-paste best-practice solutions to common problems. They should be accompanied by an explanation, but you should understand that most of the cookbook users will cut and paste the solution, and that'll be the end of it for them.
A large part of your audience only cares about solving their immediate problem, because that's all they're getting paid to do, and you need to understand that this is a perfectly legitimate need. When you assemble your new Ikea desk, you don't care why a particular screw size was selected, you just want the instructions, and you expect them to work.
So it's critical that examples have been tested. No matter how trivial an example is, you must test it and make sure it does the expected thing. Many frustrating hours have been spent trying to figure out why an example in the docs doesn't work, when a few minutes of testing would have revealed that a colon should have been a semicolon.
Recipes should also promote the best practice, not merely the simplest or fastest solution. And never tell them how not to do it, because they'll just cut and paste that, and then be in a worse fix than when they started.
One of my favorite websites is There, I Fixed It, which showcases the ingenuity of people who solve problems without giving much thought to the possible ramifications of their solution—they just want to solve the problem.

Error messages

Yes, error messages are documentation, too. Helpful error messages that actually point to the solution save countless hours of hunting and frustration.
Consider these two error messages:
`ERROR. FORBIDDEN`
and
`Access forbidden by file permissions. (ERRNO 03425)`
The first is alarming, but unhelpful, and will require a great deal of poking around to figure out why it was forbidden. The second tells you that it has to do with file permissions, and has the added benefit of an error number that you can Google for the many articles that detail how to fix the problem.

Philosophy

This entire line of thought came out of years of enduring technical support channels—IRC, email, formal documentation, Usenet, and much more. We, those who hold the answers, seem to want to make it hard for the new person. After all, we walked uphill in the snow to school, and back, with bare feet, remember? We figure out how to make things work by reading the code and experimenting. Why should we make it any easier for these kids? They should be forced to earn it, same as we did, right?
The technology world is getting more complicated every day. The list of things that you're expected to know grows all the time, and nobody can be an expert in everything. Expecting that everyone do all of their homework and ask smart questions is not merely unreasonable, it's becoming impossible.
Compassionate tech support—and better documentation—is the only way for people to use your software effectively. And, if they can't get their answers in a reasonable amount of time, they'll use a different solution that has a better paved on-ramp.
In the first edition of his Programming Perl book, Larry Wall, creator of the Perl programming language and father of that community, joked about the three virtues of a programmer: laziness, impatience, and hubris:
The explanation of this joke is well worth reading, but keep in mind that these are the virtues of a programmer, in their role as a programmer, relating to a computer. In a 1999 book, Open Sources: Voices from the Open Source Revolution, Larry explained that as a person, relating to other people, the three virtues we should aspire to are: diligence, patience, and humility.
When we're helping people with technical problems, impatience is perceived as arrogance. "My time is more important than your problem." Hubris is perceived as belittling. And laziness? Well, that's just laziness.
Being patient and kind, helping people move at their own pace (even when it feels slow), is perceived as respect. Welcoming people at whatever level they are, and patiently helping them move up to the next level, is how you build your community.
Don't make people feel stupid: This must be a core goal.
Even if everyone else in the world is a jerk, you don't have to be.

Learning bash scripting for beginners

$
0
0
http://www.cyberciti.biz/open-source/learning-bash-scripting-for-beginners

Bash (Bourne-Again SHell) is a Linux and Unix-like system shell or command language interpreter. It is a default shell on many operating systems including Linux and Apple OS X.
If you have always used a graphic user interface like KDE or Gnome or MS-Windows or Apple OS X, you are likely to find bash shell confusing. If you spend some time with the bash shell prompt and it will be difficult for you to go back.
Learn bash
Here are a list of tutorials and helpful resources to help you learn bash scripting and bash shell itself.

1.BASH Programming - Introduction HOW-TO : This tutorials intends to help you to start programming basic-intermediate shell scripts. It does not intend to be an advanced document.
2.Advanced Bash-Scripting Guide : An in-depth exploration of the art of shell scripting. A must read to master bash shell scripting for all Unix users.
3.Learn Bash In Y Minutes : A quick tour of bash programming language.
4.BASH Frequently Asked Questions : Greg's Wiki includes answers to many bash programming problems in Q & A format.
5.Linux Shell Scripting Tutorial : A beginners bash shell scripting handbook for new Linux users, sysadmins and school students studying Linux/Unix or computer science.
6.Bash Hackers Wiki : This wiki provide human-readable documentation and information for bash includes tons of examples.
7.Google's Shell Style Guide : A thorough and general purpose understanding of bash programming by Google.
8.bash -- Standard Shell : A thorough understanding of bash programming for Gentoo developers by Gentoo project.
10.Bash By Examples Part I, II, and III : Fundamental programming in the BASH where you will learn how to program in bash by example.
11.Bash Guide for Beginners : This is a practical guide which, while not always being too serious, tries to give real-life instead of theoretical examples.
12.Unix Shells: Bash vs Fish vs Ksh vs Tcsh vs Zsh : Great comparison cheat sheet for various Unix shells.
13.General coding style guide : This will help to make your code more readable.
14.Better bash scripting in 15 minutes : These tips and tricks will make you better at bash shell scripting.
15.Defensive bash programming : Learn how to defend your bash programs from braking, and keep the code tidy and clean with these useful tips.
Have a favorite online bash tutorial or new books? Let's hear about it in the comments below.

Secure SSH with Google Authenticator Two-Factor Authentication on CentOS 7

$
0
0
https://www.howtoforge.com/tutorial/secure-ssh-with-google-authenticator-on-centos-7

SSH access is always critical and you might want to find ways to improve the security of your SSH access. In this article we will see how we can secure SSH with simple two factor authentication by using Google Authenticator. Before using it you have to integrate the SSH daemon on your server with Google Authenticator one time password protocol TOTP and another restriction is that you must have your android phone with you all the time or at least the time you want SSH access. This tutorials is written for CentOS 7.
First of all we will install the open source Google Authenticator PAM module by executing the following command on the shell.
 yum install google-authenticator 

This command will install Google authenticator on you Centos 7 Server. The next step is to get the verification code. It's a very simple command to get the verification code and scratch codes by just answering simple questions of server which he will ask you. You can do that step by running the following command:
 google-authenticator 
You will get an output like the following screenshot which is being displayed to help you step by step as this step is very important and crucial. Write down the emergency scratch codes somewhere safe, they can only be used one time each, and they're intended for use if you lose your phone.

Now download Google authenticator application on your Mobile phone, the app exists for Android and Iphone. Well I have Android so I will download it from Google Play Store where I searched it out just by typing "google authenticator".
The next step is to change some files which we will start by first changing /etc/pam.d/sshd. Add the following line to the bottom of line:
 auth required pam_google_authenticator.so 

Change the next file which is /etc/ssh/sshd_config. Add the following line in the file and if its already placed then change the parameter to "yes":
 ChallengeResponseAuthentication yes 

Now restart the service of ssh by the following command:
 service sshd restart 
Last step is to test the service by connecting with SSH to the server to see if it will require verification code. You can see the following screenshot which shows the verification code that keeps on changing time after time and you have to login with it:

So we have successfully configured SSH authentication based on Google Authenticator. Now your SSH is secure and no brute attack can invade your server unless someone has your verification code which will require access to your phone as well.

Links

Linux/Unix: OpenSSH Multiplexer To Speed Up OpenSSH Connections

$
0
0
http://www.cyberciti.biz/faq/linux-unix-osx-bsd-ssh-multiplexing-to-speed-up-ssh-connections

How can I multiplex SSH sessions by setting up a master session and then having subsequent sessions go through the master to speed up my ssh connection on a Linux or Unix-like operating systems?

Multiplexing is nothing but send more than one ssh connection over a single connection. OpenSSH can reuse an existing TCP connection for multiple concurrent SSH sessions. This results into reduction of the overhead of creating new TCP connections. First, you need to set a ControlMaster to open a Unix domain socket locally.
Tutorial details
DifficultyIntermediate (rss)
Root privilegesNo
RequirementsOpenSSH client+server
Estimated completion time5m
Rest of all your ssh commands connects to the ControlMaster via a Unix domain socket. The ControlMaster provides us the following benefits:
  1. Use existing unix socket
  2. No new TCP/IP connection
  3. No need to key exchange
  4. No need for authentication and more

How to setup up multiplexing

Edit $HOME/.ssh/config, enter:
vi ~/.ssh/config
Append the following configuration:
Host *
ControlMaster auto
ControlPath ~/.ssh/master-%r@%h:%p.socket
ControlPersist 30m
Here is another example:
Host server1
HostName server1.cyberciti.biz
Port 2222
ControlPath ~/.ssh/ssh-mux-%r@%h:%p
ControlMaster auto
ControlPersist 10m
Save and close the file. Where,
  • Host * or Host server1 : Start ssh configuration.
  • HostName server1.cyberciti.biz : The real hostname
  • ControlPath ~/.ssh/ssh-mux-%r@%h:%p : Specify the path to the control unix socket used for connection sharing as described above. The variables '%r', '%h', '%p' refer to remote ssh username, remote ssh host, and remote ssh port respectively. You need to set all of these three variables.
  • ControlMaster auto : Enables the sharing of multiple sessions over a single network connection. When set to yes, ssh will listen for connections on a control socket specified using the ControlPath argument. When set to auto, ssh will try to use a master connection but fall back to creating a new one if one does not already exist.
  • ControlPersist 10m : Specifies that the master connection should remain open in the background for 10 minutes. With no client connections, the backgrounded master connection will automatically terminate after it has remained idle for 10 minutes.

How do I use it?

Simply start running ssh commands:
$ ssh user@host
$ ssh root@v.server1
$ ssh nixcraft@192.168.1.219

How do I verify that Multiplexer is working?

Use any one of the following command to verify that Multiplexer is working properly:
$ lsof -U | grep master
OR
$ ssh -O check root@v.server1
Sample outputs:
Fig.01: SSH Multiplexing Check The Status of The Connection

Can I tell master connection not to accept further multiplexing requests?

Yes, use the following syntax:
$ ssh -O stop host
$ ssh -O stop root@v.server1

Pass the exit option instead of stop to cancel all existing connections, including the master connection:
$ ssh -O exit host
$ ssh -O exit root@v.server1

How do I the port forwarding?

The syntax is as follows to forward port 3128 on the local host to port 3128 on the remote host using -L:
ssh -O forward -L 3128:localhost:3128 v.server1
You can also specifies the location of a control socket for connection sharing:
ssh -O forward -L 3128:localhost:3128 -S $HOME/.ssh/master-root@v.server1:22 v.server1
See ssh_config man page for more information.

MySQL Incremental Backup - Point In Time Backup and Recovery of InnoDB and MyIsam Databases

$
0
0
https://www.howtoforge.com/tutorial/mysql-incremental-backup-point-in-time-recovery

Doing incremental backups is an important requirement for large production databases. Without a safe incremental backup, you can not tell yourself that you have a reliable production database. Because you must have enough data in order to recover your database in emergency cases. After some search on Internet, I could not find any tool that can do a complete incremental backup for MyISAM and InnodB in a mixed environment were applications use both database engines simultaneously (maybe I am not an expert searcher on Google and Internet). So I decided to write this one, but to avoid wasting time and benefit from other open-source solutions, I preferred to add this feature to -automysqlbackup- script that is the best script for full backup in simplicity and widespread use.

Mechanism

We use the Post- and Pre feature of automysqlbackup to do an incremental backup. Before starting a full backup, mysql-backup-pre executes a query to lock the whole database during backup process because we have to freeze the binlog to avoid any change while backup is running. The binlog name and position may not change during backup. The binary log position is very crucial in the subsequent incremental backup process and will be used as a starting point to begin the next incremental backup. After finishing the full backup, mysql-backup-post removes the database lock.
Lock Query: FLUSH TABLES WITH READ LOCK; SELECT SLEEP(86400)
Find Lock Queries:mysql -u[username] -p[pass] -e "show processlist" | grep "SELECT SLEEP(86400)" | awk '{print $1}'

Requirements

  • root privileges to install package and update mysql.conf
  • mysql-community-client package
  • installation automysqlbackup and mysql-incremental

Installation

Install mysql-community-client package for your distro.
Note: after the MySQL installation you must have the 'mysqlshow' command.
Install automysqlbackup:
download the package from https://sourceforge.net/projects/automysqlbackup/
tar -xzf [PathYouSavedTarFile] -C /tmp/
cd /tmp/
./install.sh
During installation of automysqlbackup, you will be asked about path of automysqlbackup.conf and its binary, you can leave defaults without any change.
rm /etc/automysqlbackup/myserver.conf
Install the mysql-incremental: Download the package from https://sourceforge.net/projects/mysqlincrementalbackup/
cd /tmp
wget http://downloads.sourceforge.net/project/mysqlincrementalbackup/mysql-incremental.tar.gz
tar xfz mysql-incremental.tar.gz
cp mysql-incremental /etc/automysqlbackup/
chmod 755 /etc/automysqlbackup/mysql-incremental
cp mysql-backup-post /etc/automysqlbackup/
chmod 755 /etc/automysqlbackup/mysql-backup-post
cp mysql-backup-pre /etc/automysqlbackup/
chmod 755 /etc/automysqlbackup/mysql-backup-pre
Update the automysqlbackup.conf:
Find below parameters, uncomment and change them:
        CONFIG_mysql_dump_username='Mysql user name. It must has privileges to get Lock'
CONFIG_mysql_dump_password='Password'
CONFIG_backup_dir='The backup directory you want to store full and incremental backup'
CONFIG_db_names=('databaseName1''databaseName2' )
CONFIG_db_month_names=('databaseName1''databaseName2' )
CONFIG_mysql_dump_master_data=2
CONFIG_prebackup="/etc/automysqlbackup/mysql-backup-pre"
CONFIG_postbackup="/etc/automysqlbackup/mysql-backup-post"

Update my.cnf:

Edit the MySQL configuration file:
nano /etc/mysql/my.cnf
1- BinLog Format
Due to some limitation on STATEMENT format, my recommendation is to set ROW based format. For more information please see the 'troubleshoot' section in this howto. You can check the type of binary log format by executing "select @@binlog_format;" query. To modify logbin format , you must add binlog_format = ROW to mysql.conf or my.cnf .
2- binlog_do_db
You must specify the databases that you intend to have the related changes in the binary log. Please note if you do not specify any database, any change on any database will be logged into binary log. In this case, if you chose STATEMENT format, maybe you have some trouble when restoring from incremental backup and binlog files. You can add databases to this option:
binlog_do_db = DATABASENAME1
binlog_do_db = DATABASENAME2
3- expire_logs_days
To have binary log files for a longer time, you can increase this parameter to a higher value. My recommendation is 60 days. So you must add or change it to "expire_logs_days = 60".
4- log-bin
The directory where the binary logs will be stored. In old MySQL versions, mysql-incremenetal might not be able to find the correct path. So if you get an error about this after executing mysql-incremental, you must update mysql-incremental script and set the binary log path.
5- log_slave_updates
If you are setting up mysql-incremental backup on a slave server, you must enable this option. Normally, a slave does not log updates to its own binary log as they were received from a master server. This option tells the slave to log the updates performed by its SQL threads to its own binary log. http://dev.mysql.com/doc/refman/5.1/en/replication-options-slave.html#option_mysqld_log-slave-updates

Run automysqlbackup

Run automysqlbackup manually to have at least one full backup from your specified databases.
automysqlbackup
After executing the command successfully, check the /[BackupDirInAutomysqlbackup]/status/backup_info file for the newly added information about the daily backup. For error details, check /var/log/Backup_Post_Pre_log . The backup file will be stored in the directory /[BackupDirInAutomysqlbackup]/daily/[DatabaseName]/ .

Run mysql-incremental

Run mysql-incremental manually now to have at least one hourly backup.
mysql-incremental
In case of an error, the details are logged in the file "/var/log/Backup_Incremental_Log" . The incremental backup files will be stored in the directory /[BackupDirInAutomysqlbackup]/IncrementalBackup/ .

Edit the root crontab

You can schedule mysql-incremental for more than one hour. You can find the total time of full backup from backup_status and then based on that value you set an accurate schedule time. Of course mysql-incremental backup does have a mechanism to find any running full backup before start, so there is no concern about conflict between incremental and full backup.
crontab -e
5 00 * * * root /usr/local/bin/automysqlbackup
25 * * * * root /etc/automysqlbackup/mysql-incremental

Restore Database

In order to restore up to a specific time (point in time recovery), first you must restore one full daily backup and then restore sequentially related incremental backup files. To clarify more, here is the steps to recover testDB database. In sample scenario we intend to recover our data up to 2015-5-01 at 2 AM. we have set /backup as our main backup dir and testDB as our target database:
1- mysql -u root -p DatabaseName < /backup/daily/testDB/daily_DatabaseName_2015-05-16_00h05m_Saturday.sql.gz
2- mysql -u root -p DatabaseNAme < /backup/IncrementalBackup/2015-5-01_Incremental/testDB/testDB_IncrementalBackup_2015-5-01_00h25m.1
3- mysql -u root -p DatabaseNAme < /backup/IncrementalBackup/2015-5-01_Incremental/testDB/testDB_IncrementalBackup_2015-5-01_01h25m.2
4- mysql -u root -p DatabaseNAme < /backup/IncrementalBackup/2015-5-01_Incremental/testDB/testDB_IncrementalBackup_2015-5-01_02h25m.3

Important notes and Troubleshooting

MySQL supports different formats for the binary log. Some Mysql versions use 'statement-based' as binlog format that this type of binlog does have some limitations that we must pay close attention to it when we intent to use it in incremental backup procedure. When mysql is set to statement-base format, it does not able to filter correctly based on databases. If you set 'USE or \u' to change database and then update another database which is not included in binlog-do-db, the statement will be logged in binlog file that it is not desirable state! and will expose some issue when restoring based on specific database and also if you change to another database that is not included in binlog-do-db, and update a database which is included in binlog-do-db, the statement will not logged to binlog file. our purpose from adding databases to binlog-do-db is to filter based on database,but it does not work as expected. If USE or \u is not executed before running queries, mysqlbinlog can not extract 'update queries' related to one database. We will explain more this issue with below scenarioes:
databases: 
- binlog
- person (table)
- binlog2
- person (table)

binlog-do-db=binlog2 (it is supposed only change of this database are logged to binlog file)
--------Scenario 1---------
\u binlog2
insert into person (data) values ('17') ---> loged in binlog *desired state*
insert into binlog.person (data) values ('25'); ---> logged in binlog (target database is 'binlog' ) *undesired state*
--------Scenario 2---------
\u binlog
insert into person (data) values ('17') ---> is not logged in binlog *desired state*
insert into binlog2.person (data) values ('25'); ---> is not logged in binlog (target database is 'binlog2' ) *undesired state* because the binlog2 database
is begin changed, so we want to have this change,but it will not logged in logbin file
--------Scenario 3---------
if you just connect to database without any USE or \u statement, all of updates on any databases will be logged, but mysqlbinlog can not able to filter
based on specific database, so that is not desirable state for our purpose in incremental backup. Using USE or \u before executing update queries, is very
important. Because mysqlbinlog finds update queries based on USE statement in binlog file.

Work around for the mentioned issue

1) By defining users on databases in a way that each user only has access to one database to update (application user) and when connection to database, the name of database must be specified. Of course most of applications do have a config file that the credentials and name of database are set in it, so in that case you will not have a cross-access on databases and there will not be concern on using "\USE or \u".
2) If you use row-based binlog format, so all of mentioned issue will be gone. in other words,row-based format is much more proper method for binlog. https://dev.mysql.com/doc/refman/5.1/en/replication-options-binary-log.html

Log Files

I did try to log everything in a log file so you can find enough information in the logs:
/var/log/Backup_Post_Pre_log/var/log/Backup_Incremental_Log/[SpecifiedBackupDirInAutomysqlbackup.conf]/status/backup_info
The file "backup_info" contains the detailed info about the backup and when the backup finished (Times are in Unix Time format). It contains the binlog name and position of the timepoint the backup started, the type of backup, number of backups since the last full backup and the duration of the backup.
Sample backup_info:
1431043501,mysql-bin.000026,120,Daily,2015-05-08,0,24
1431044701,mysql-bin.000026,120,Hourly,2015-05-08,1,1
Here are description of the different values:
 1th) 1431043501 : indicates the time when the backup has been finished. You can run date --date @1431043501 command on the server the backup has been done to view it in human readable format.
2th) Mysql-bin.000026 : indicates the binary log name that backup up to this file has been done.
3th) 120 : indicates the position of binlog that backup up to this position in binary log has been done.
4th) Daily/Hourly: indicates type of backup. Daily does mean the full backup by automysqlbackup script and Hourly is done by mysql-incremental script.
5th) 2015-05-08: The date that backup has been done. This date will be used in creating directory for incremental backup and also as a base for restore hourly backups. In restoring procedure, first a full backup is restored and then sequentially other incremental backup are restored.
6th) 0 : indicates number of backups from previous full backup. 0 does mean the backup is full and others mean hourly. This number is very important in restoring procedure.
7th) 24: The backup duration in second.

Bug Report

You can report bugs or give your suggestions and reviews at https://sourceforge.net/projects/mysqlincrementalbackup .

How to easily convert your videos on Linux

$
0
0
https://www.howtoforge.com/tutorial/how-to-convert-videos-on-linux

There are many ways to convert a video file on a Linux system, but using a tool with a graphical user interface is imperative for those who want to do it easily and in a more user friendly way. Thankfully, there are many open source GUI tools that could do the job just fine and you can find some specialization here and there if you look closely.
My choices for this post are Curlew and Handbrake, two easy to use video converters that can do a lot more than just that, and in the same time two different approaches aimed for different tastes and needs.

Curlew Media Converter

What I love most about Curlew is the way it speaks to the user through its clear main screen design. All function buttons are prominently placed on the top, using large icons that leave no doubts for their meaning. You can quickly figure out how to start with Curlew adding your file and then going down on your first option which is where the power of this bird is hidden.
The list of available formats, screen and device presets is impressive
I'm sure you'll find what you're looking for in the seemingly endless list of Curlew's supported formats, but I'll admit that navigating it is not done in the best way possible. At this point though, I should say that the current latest version of the software is just 0.1.22.3 so details like this one will be taken care of soon hopefully.
What is already here though is the advanced options where the rest of the usefulness of this tool is hidden. There you can set the desired audio and video codec to be used in the conversion, the audio and video bitrates, FPS and Aspect Ratio, implement subtitles from a file into the video and even crop or pad it.
Advanced options cover almost any regular user modern need with success.
Curlew is not (yet) a highly sophisticated, advanced video converter that gives tons of options to the user, but it is what most of you will need to get your files converted and edited fast and easily to proceed with other more joyful moments of your life. If converting videos is a joyful moment for you though, you should take a look at my second choice.

Install Curlew on Ubuntu Linux

Open a shell window and run the commands below to install Curlew:
sudo -s
add-apt-repository ppa:jon-severinsson/ffmpeg
add-apt-repository ppa:noobslab/apps
apt-get update
apt-get install curlew
exit

Handbrake Video Transcoder

Handbrake comes with a different user interface design approach that looks more structured. There aren't as many formats supported as in Curlew, but you can find what you want more easily if you're looking for a device conversion through the Presets menu on the right.
And then you can dive deep into Handbrake's settings to accurately set bitrate options, codec profiles, specific framerates, play with audio channels, import subtitles and even write tags for your output file. Croping and filter applying is done by pressing this “Picture Settings” button on the top that will open a dedicated window with controls and preview.
All these options are deeper than the corresponding in Curlew, and there are additional options for things that aren't found in Curlew at all. The leap though lies in the advanced menu that incorporates settings that may prove useful when looking to do specialized corrections and touches to the result.
Take Psychovisual Rate Distortion for example, the algorithm that dramatically improves apparent detail and sharpness in the picture, or the Adaptive Quantization Strength that you can increase to take bits away from edges and complex areas to get a finer detailed picture.
Both applications have their own strengths and weaknesses. Curlew supports more formats, it's faster to use and looks way less complicated than Handbrake, but it is still in early development and some things may still be clunky. Truly advanced options is out of the questions too.
Handbrake on the other side is more mature and feature-rich, its individual tools go deeper in the tasks and is certainly able to cover much more advanced needs than Curlew. It may terrify a regular user initially, but you can work things out after giving it a try (or two).

Install Handbrake on Ubuntu Linux

Open a shell window on your desktop and execute the following commands on the shell:
sudo -s
add-apt-repository ppa:stebbins/handbrake-releases
apt-get update
apt-get install handbrake-gtk handbrake-cli
exit

Links

SSH ProxyCommand example: Going through one host to reach another server

$
0
0
http://www.cyberciti.biz/faq/linux-unix-ssh-proxycommand-passing-through-one-host-gateway-server

How do I use and jump through one server to reach another using ssh on a Linux or Unix-like systems? Is it possible to connect to another host via an intermediary so that the client can act as if the connection were direct using ssh?

You can jump host using ProxyCommand.
Tutorial details
DifficultyEasy (rss)
Root privilegesNo
Requirementsssh
Estimated completion time5m
Some times you can only access a remote server via ssh by first login into an intermediary server (or firewall/jump host). So you first login into to the intermediary server and then ssh to another server. You need to authenticate twice and the chain can be long and is not limited to just two hosts.

Sample setup

     +-------+       +----------+      +-----------+
| Laptop| <---> | Jumphost | <--> | FooServer |
+-------+ +----------+ +-----------+
OR
+-------+ +----------+ +-----------+
| Laptop| <---> | Firewall | <--> | FooServer |
+-------+ +----------+ +-----------+
192.168.1.5 121.1.2.3 10.10.29.68
-->--->-->--->
I can can only access a remote server named 'FooServer' via ssh by first login into an intermediary server called 'Jumphost'. First, login to Jumphost:
$ ssh vivek@Jumphost
Next, I must ssh through the intermediary system as follows:
$ ssh vivek@FooServer

Passing through a gateway or two

Instead of typing two ssh command, I can type the following all-in-one command. This is useful for connecting to FooServer via firewall called 'Jumphost' as the jump host:
$ ssh -tt Jumphost ssh -tt FooServer
$ ssh -tt vivek@Jumphost ssh -tt vivek@FooServer
$ ssh -tt vivek@Jumphost ssh -tt vivek@FooServer command1 arg1 arg2
$ ssh -tt vivek@Jumphost ssh -tt vivek@FooServer htop
$ ssh -tt vivek@Jumphost ssh -tt vivek@FooServer screen -dR

Where,
  • The -t option passed to the ssh command force pseudo-tty allocation. This can be used to execute arbitrary screen-based programs on a remote machine. Multiple -tt options force tty allocation, even if ssh has no local tty.

Say hello to the ProxyCommand

The syntax is:
$ ssh -o ProxyCommand='ssh firewall nc remote_server1 22' remote_server1
$ ssh -o ProxyCommand='ssh vivek@Jumphost nc FooServer 22' vivek@FooServer
##########################################
## -t option is needed to run commands ###
##########################################
$ ssh -t -o ProxyCommand='ssh vivek@Jumphost nc FooServer 22' vivek@FooServer htop

The netcat (nc) command is needed to set and establish a TCP pipe between Jumphost (or firewall) and FooServer. Now, my laptop (local system) is connected to Jumphost it now connected FooServer. In this example, the utility netcat (nc) is for reading and writing network connections directly. It can be used to pass connections to a 2nd server such as FooServer.

Update ~/.ssh/config file

Edit the $HOME/.ssh/config file using a text editor such as vi, enter:
$ vi ~/.ssh/config
Append the following configuration:
 
Host fooserver
HostName FooServer
User vivek
ProxyCommand ssh vivek@Jumphost nc %h %p
 
Save and close the file. Where,
  1. Host fooserver : Set nickname of your choice.
  2. HostName FooServer : Set the real remote server/host name.
  3. User vivek : Set the real user name for remote server/host.
  4. ProxyCommand ssh vivek@Jumphost nc %h %p : Specifies the command to use to connect to the server. In this example, I'm using nc command. Any occurrence of %h will be substituted by the host name to connect, %p by the port, and %r by the remote user name.
To test enter:
$ ssh fooserver
To see the details, pass the -v option to the ssh command. Here is another snippet:
 
Host server1
HostName v.server1
User root
Port 22
ProxyCommand ssh root@v.backup2 nc %h %p %r
 
Now, run:
$ ssh -v server1
Sample outputs:
OpenSSH_6.2p2, OSSLShim 0.9.8r 8 Dec 2011
debug1: Reading configuration data /Users/veryv/.ssh/config
debug1: /Users/veryv/.ssh/config line 1: Applying options for server1
debug1: Reading configuration data /etc/ssh_config
debug1: /etc/ssh_config line 20: Applying options for *
debug1: /etc/ssh_config line 102: Applying options for *
debug1: Executing proxy command: exec ssh root@v.backup2 nc v.server1 22 root
debug1: permanently_drop_suid: 501
debug1: identity file /Users/veryv/.ssh/id_rsa type 1
debug1: identity file /Users/veryv/.ssh/id_rsa-cert type -1
debug1: identity file /Users/veryv/.ssh/id_dsa type -1
debug1: identity file /Users/veryv/.ssh/id_dsa-cert type -1
debug1: Enabling compatibility mode for protocol 2.0
debug1: Local version string SSH-2.0-OpenSSH_6.2
debug1: Remote protocol version 2.0, remote software version OpenSSH_6.6.1p1 Ubuntu-2ubuntu2
debug1: match: OpenSSH_6.6.1p1 Ubuntu-2ubuntu2 pat OpenSSH*
debug1: SSH2_MSG_KEXINIT sent
debug1: SSH2_MSG_KEXINIT received
debug1: kex: server->client aes128-ctr hmac-md5-etm@openssh.com none
debug1: kex: client->server aes128-ctr hmac-md5-etm@openssh.com none
debug1: SSH2_MSG_KEX_DH_GEX_REQUEST(1024<1024 279="" accepts="" allowed="" and="" authentication="" authentications="" blen="" by="" can="" continue:="" correct="" d2:07:84:79:21:a7:84:84:14:ef:f1:7a:84:a5:a1:7s="" debug1:="" expecting="" found="" host="" id_rsa="" in="" is="" key.="" key:="" key="" keyboard-interactive="" known="" known_hosts:37="" matches="" method:="" next="" not="" offering="" password="" pkalg="" public="" publickey="" received="" roaming="" rsa="" sent="" sers="" server="" signature="" span="" ssh-rsa="" ssh2_msg_kex_dh_gex_group="" ssh2_msg_kex_dh_gex_init="" ssh2_msg_kex_dh_gex_reply="" ssh2_msg_newkeys="" ssh2_msg_service_accept="" ssh2_msg_service_request="" ssh="" ssh_rsa_verify:="" style="color: #009900;" succeeded="" that="" the="" v.server1="" veryv="">Authenticated to v.server1 (via proxy).1024>
debug1: channel 0: new [client-session] debug1: Requesting no-more-sessions@openssh.com debug1: Entering interactive session. debug1: Sending environment. Welcome to Ubuntu 14.04.2 LTS (GNU/Linux 3.13.0-52-generic x86_64) * Documentation: https://help.ubuntu.com/ Last login: Sun May 17 15:41:26 2015 from 10.70.203.66

The sftp syntax

The syntax is as follows:
 
sftp -o 'ProxyCommand=ssh %h nc firewall.nixcraft.net.in 22' \
-o 'HostKeyAlias=firewall.nixcraft.net.in' \
vivek@server1.nixcraft.net.in
 
See man pages for more info: ssh(1), ssh_config(5), nc(1)

16 cat command examples for beginners in Linux

$
0
0
http://www.linuxtechi.com/cat-command-examples-for-beginners-in-linux

cat stands for Concatenate. Cat is the basic command when we start learning Linux/Unix, as the name suggest it is used to create new file ,concatenate files and display the output of files on the standard output.
In this post we will discuss 16 different examples of cat command which will be useful for the beginners.
Basic Syntax of cat command :
# cat
Some of basic options are listed below that can be used in cat command
cat-command-options
Example:1 Create a new file using ‘cat > {file_name}’
Let’s suppose i want to create a new file with name ‘linux_world’. Type the following cat command followed by the text you want in to insert in the file. Make sure you type ‘Ctrl-d’ at the end to save the file.
[root@linuxtechi ~]# cat > linux_world
Hi this is my first file in linux.
Linux always rocks
Thanks
[root@linuxtechi ~]#
Example:2 View the Contents of a File.
To display or view the contents of a file using cat command use the below syntax
# cat {file_name}
Let’s display the contents of linux_world file.
[root@linuxtechi ~]# cat linux_world
Hi this is my first file in linux.
Linux always rocks
Thanks
root@linuxtechi ~]#
Example:3 View the Contents of Multiple Files
[root@linuxtechi ~]# cat linux_world linux_distributions /etc/fstab
Above command will display output of three files on the terminal.
Example:4 Display the output of a file using page wise.
For example if we have a big file whose contents can’t be display at once on the screen , in that case we can use more and less command with cat to view the contents page wise.
[root@linuxtechi ~]# cat /etc/passwd | more
[root@linuxtechi ~]# cat /etc/passwd | less
Example:5 cat command without filename arguments
if we don’t specify any arguments in the cat command then it will read the inputs from the keyboard attached to the system. Type some text after entering the cat command.
[root@linuxtechi ~]# cat
Ubuntu Linux Rocks at desktop Level
Now press ‘Ctrl-d‘ to inform cat that it has reached end of file (EOF). In this case it will display the line of text twice because it copies std input to std output.
[root@linuxtechi ~]# cat
Ubuntu Linux Rocks at desktop Level
[root@linuxtechi ~]#
Example:6 Display the contents of a file with Line Numbers
[root@linuxtechi ~]# cat -n linux_world
1 Hi this is my first file in linux.
2 Linux always rocks
3 Thanks
[root@linuxtechi ~]#
In case if your file has blank lines , then above command will also display the number of blank lines as well, so to remove the numbering of blank lines , we can use ‘-b‘ option in place of ‘-n’ in the above command.
Example:7 Copy the contents of One file to Another file.
Using greater than ‘>‘ symbol in cat command we can copy the contents of one file to another , example is shown below :
[root@linuxtechi ~]# cat linux_world > linux_text
[root@linuxtechi ~]#
Example:8 Appending the contents of one file to another.
Using double greater than symbol ‘>>‘ in cat command we can append the contents of one file to another. Example is shown below :
[root@linuxtechi ~]# cat /etc/passwd >> linux_text
[root@linuxtechi ~]#
Above Command will append the contents of /etc/passwd file to linux_text file at the end. Now we can verify the contents of linux_text file.
cat-command-more
Example:9 Redirecting the output of multiple files into a Single File.
[root@linuxtechi ~]# cat linux_world linux_distributions /etc/fstab > linux_merge_text
Above command will merge the output of 3 files into a single file ‘linux_merge_text’.
cat_merge_option
Example:10 Getting input using standard input operator.
[root@linuxtechi ~]# cat < linux_distributions
RHEL
CentOS
Fedora
Ubuntu
SuSE
Linux Mint
[root@linuxtechi ~]#
Above cat command is getting input from the file using std input operator ‘<‘
Example:11 Sorting the output of multiple files into a single file
[root@linuxtechi ~]# cat linux_text linux_distributions /etc/passwd | sort > linux_sort
By default sorting will done on the alphabetic order, if you want the sorting on basis of number then use ‘-n’ option in the sort command.
Example:12 Insert $ at end of each line using -E option
[root@linuxtechi ~]# cat -E linux_world
Hi this is my first file in linux.$
Linux always rocks$
Thanks$
[root@linuxtechi ~]#
Above command will insert ‘$’ at the end of each line in the output.
Example:13 Show the tab space in the file as ‘^I’ using -T option.
Let’s create a file with some tab spaces.
cat-file-tab-space
Now display these tab spaces as ^I
cat-with-T-option
Example:14 Squeeze blank repeated lines using -s option
Let’s take am example of file ‘linux_blank’ , which consists of multiple repeated blank lines.
file-with-blank-space
Now remove the blank repeated lines in the output using below command.
[root@linuxtechi ~]# cat -s linux_blank 
test

test1
test2

test3

test4
[root@linuxtechi ~]#
Example:15 View the Contents in Reverse Order
tac is the reverse of cat command. tac will display the output in revers order example is shown below
[root@linuxtechi ~]# tac linux_world
Thanks
Linux always rocks
Hi this is my first file in linux.
[root@linuxtechi ~]#
Example:16 Display non-printing characters using -v option.
-v option in the cat command is used to show the non-printing characters in the output. This option become useful when we are suspecting the CRLF ending lines, in that case it will show ^M at the end of each line.
[root@linuxtechi tmp]# cat test_file
hi there
[root@linuxtechi tmp]# cat -v test_file
hi there^M
[root@linuxtechi tmp]#
Hope this post will help Linux/Unix beginners. Please share you feedback and Comments.

How to do simple screencasting on Linux

$
0
0
https://www.howtoforge.com/tutorial/ubuntu-linux-screencast

There are many screencasting solutions for Linux users to choose from nowadays and more tools pop out every day to cover this special need. Although many suffer from performance issues, especially when used to capture in game action, there are many good pieces of software like the simple to use and versatile Simple Screen Recorder (http://www.maartenbaert.be/simplescreenrecorder/)
GUI tools are nice but things can always be better when using the terminal. This would increase performance even further and bring you to a deeper understanding of what you are asking the system to do. It's easy and fairly simple so let's get started.
To capture your desktop you will need the popular FFmpeg set of libraries installed in your system. To do so open your distribution's package manager and search for the package “ffmpeg”. Ubuntu users can use the following commands on a terminal:
sudo apt-get install ffmpeg
and then
sudo apt-get update
After that you are ready to go right away. What you need is to determine a few parameters that will act as a guide for ffmpeg. These parameters include the size of the video, the type of the exported file, the quality, the frame rate and the sound capture. The command goes like this:
ffmpeg -video_size (desired resolution) -framerate (number) -f x11grab i 0.0 (start from the point 0.0) newfilename.mp4
So if I want to capture a video that represents a box at the center of my screen and take an avi file as an output I would put something like 500x500 after the -video_size and i: 0.0+300,300 that means put the top left corner of the capturing box in x=300 and y=300 on my screen. For the avi you would simple put filename.avi in the end of the command. As simple as that :)

Pressing the 'q' button will stop the capturing and save the file.
Now what if you want the sound to be captured too? That is easy using ALSA with FFmpeg. All you need to do is simply add this line: '-f alsa -ac 2 -i puls' to the previous command and before the newfilename that is in the end. This will add sound to your capturing and you can use the following parameters for more advanced sound related options: -ac: Channels, -ar: Audio sample rate, -ab: Audio bitrate
For those of you who want to do this for gaming you should better first capture the video and then encode it instead of doing both at the same time which is more system-streching. To improve the situation you can add the -vcodec parameter to your command followed by a supported codec and then -preset ultrafast. Here's a list of the supported video and audio codecs (https://www.ffmpeg.org/general.html#Video-Codecs)
Other options of x11grab that is what allows us to capture a region of our x11 display include the '-follow_mouse' and the 'show_region' arguments. The follow mouse guidesthe capturing area according to the mouse movements and can be either centered or with a pixel tollerance area. It is written like this in our command: '-follow_mouse centered' or '-follow_mouse 500' (mouse cursor can move inside a 500 pixel area before the context is moved).
The show_region shows what part of the whole screen is actually grabbed by ffmpeg. This can be useful in some cases and it is enabled by adding the following in our command: -show_region 1

How to replicate a MySQL database on Linux

$
0
0
http://xmodulo.com/replicate-mysql-database-linux.html

Database replication is a technique where a given database is copied to one or more locations, so that the reliability, fault-tolerance or accessibility of the database can be improved. Replication can be snapshot-based (where entire data is simply copied over to another location), merge-based (where two or more databases are merged into one), or transaction-based (where data updates are periodically applied from master to slaves).
MySQL replication is considered as transactional replication. To implement MySQL replication, the master keeps a log of all database updates that have been performed. The slave(s) then connect to the master, read individual log entries, and perform recorded updates. Besides maintaining a transaction log, the master performs various housekeeping tasks, such as log rotation and access control. When new transactions occur and get logged on the master server, the slaves commit the same transactions on their copy of the master database, and update their position in the master server's transaction log. This master-to-slave replication process is done asynchronously, which means that the master server doesn't have to wait for the slaves to catch up. If the slaves are unable to connect to the master for a period of time, they will download and execute all pending transactions when connectivity is re-established.
Database replication allows one to have an exact copy of a live database of a master server at another remote server (slave server) without taking the master server offline. In case the master server is down or having any trouble, one can temporarily point database clients or DNS resolver to the slave server's IP address, achieving transparent failover. It is must be noted that MySQL replication is not a backup solution. For example, if an unintended DELETE command gets executed in the master server by accident, the same transaction will mess up all slave servers.
In this article, we will demonstrate master-slave based MySQL replication on two Linux computers. Let's assume that the IP addresses of master/slave servers are 192.168.2.1 and 192.168.2.2, respectively.

Setting up a Master MySQL Server

This part will explain the steps needed on the master server.
First, log in to MySQL, and create test_repl database.
$ mysql -u root -p
mysql> CREATE DATABASE test_repl;
Next, create a table inside test_repl database, and insert three sample records.
mysql> USE test_repl;
mysql> CREATE TABLE employee (EmployeeID int, LastName varchar(255), FirstName varchar(255), Address varchar(255), City varchar(255));
mysql> INSERT INTO employee VALUES(1,"LastName1","FirstName1","Address1","City1"),(2,"Lastname2","FirstName2","Address2","City2"),(3,"LastName3","FirstName3","Address3","City4");
After exiting the MySQL server, edit my.cnf file using your favorite text editor. my.cnf is found under /etc, or /etc/mysql directory.
# nano /etc/my.cnf
Add the following lines under [mysqld] section.
1
2
3
4
5
6
[mysqld]
server-id=1
log-bin=master-bin.log
binlog-do-db=test_repl
innodb_flush_log_at_trx_commit=1
sync_binlog=1
The server-id option assigns an integer ID (ranging from 1 to 2^23) to the master server. For simplicity, ID 1 and 2 are assigned to the master server and the slave server, respectively. The master server must enable binary logging (with log-bin option), which will activate the replication. Set the binlog-do-db option to the name of a database which will be replicated to the slave server. The innodb_flush_log_at_trx_commit=1 and sync_binlog=1 options must be enabled for the best possible durability and consistency in replication.
After saving the changes in my.cnf, restart mysqld daemon.
# systemctl restart mysqld
or:
# /etc/init.d/mysql restart
Log in to the master MySQL server, and create a new user for a slave server. Then grant replication privileges to the new user.
mysql> CREATE USER repl_user@192.168.2.2;
mysql> GRANT REPLICATION SLAVE ON *.* TO repl_user@192.168.2.2 IDENTIFY BY 'repl_user_password';
mysql> FLUSH PRIVILEGES;
A new user for the slave server is repl_user, and its password is repl_user_password. Note that the master MySQL server must not bind to the loopback interface since a remote slave server needs to log in to the master server as repl_user. Check this tutorial to change MySQL server's binding interface.
Finally, check the master server status by executing the following command on the server.
mysql> SHOW MASTER STATUS;

Please note that the first and second columns (e.g., master-bin.000002 and 107) will be used by the slave server to perform master-to-slave replication.

Setting up a Slave MySQL Server

Now it's time to set up the configuration of a slave MySQL server.
First, open my.cnf on a slave server using your favorite text editor, and add the following entries under [mysqld] section.
# nano /etc/my.cnf
1
2
3
4
5
6
7
8
9
10
11
server-id   = 2
master-host = 192.168.2.1
master-connect-retry    = 60
master-user = repl_user
master-password = repluser
master-info-file    = mysql-master.info
relay-log-index = /var/lib/mysql/slave-relay-bin.index
relay-log-info-file= /var/lib/mysql/mysql-relay-log.info
relay-log   = /var/lib/mysql/slave-relay-bin
log-error   = /var/lib/mysql/mysql.err
log-bin = /var/lib/mysql/slave-bin
Save the changes in my.cnf, and restart mysqld daemon.
# systemctl restart mysqld
or:
# /etc/init.d/mysql restart
Log in into the slave MySQL server, and type the following commands.
mysql> CHANGE MASTER TO MASTER_HOST='192.168.2.1', MASTER_USER='repl_user', MASTER_PASSWORD='repl_user_password', MASTER_LOG_FILE='master-bin.000002', MASTER_LOG_POS=107;
mysql> SLAVE START;
mysql> SHOW SLAVE STATUS \G;
With the above commands, the local MySQL server becomes a slave server for the master server at 192.168.2.1. The slave server then connects to the master server as repl_user user, and monitors master-bin.000002 binary log file for replication.

The above screenshot shows the status of the slave server. To find out whether replication is successful, take a note of three fields in the status output. First, the Master_Host field is supposed to show the IP address of the master server. Second, the Master_User field must display the user name created on the master server for replication. Finally, the Slave_IO_Running should display "Yes".
When the slave server starts working, it will automatically read the database log in the master server, and create the same table(s) and entries if they are not found in the slave. The screenshot below shows that the slave server has the same entries in the employee table as the master server (see the red square). When the city value is updated from the master server, the change is automatically replicated to the slave server (see the yellow square).

Replace SourceForge with these Better Alternatives

$
0
0
http://www.linuxlinks.com/article/20150606161447912/Alternatives.html

SourceForge is a long established web-based service that offers source code repository, downloads mirrors, bug tracker and other features. It acts as a centralized location for software developers to control and manage free and open-source software development.
SourceForge has been recently touting controversy with a bizarre move to added bundled commercial projects with 'unmaintained' code from open source projects; in particular GIMP was affected. Following media outrage, SourceForge has since vowed to discontinue this practice, although there remain other practices that are questionable to open source developers, such as the transfer of project pages they deem are inactive, and malvertising. Is it time for developers to look elsewhere to host projects? Fortunately, there are some excellent alternatives.

GitHub

GitHub
GitHub is currently the world’s largest, and most popular code hosting site. It is web-based and uses Git, an open-source version control system that was started by Linus Torvalds, the principal force behind the Linux kernel.
GitHub provides distributed revision control and source code management (SCM) functionality of Git as well as adding its own features. It offers a web-based graphical interface and desktop as well as mobile integration. It also gives developers access control and several collaboration features.
Features include:
  • Integrated issue tracking
  • Powerful collaboration - pull requests, commit comments, compare view
  • Other collaborative tools include wikis, task management, bug tracking, and feature requests
  • Web hosting
  • GitHub Flavored Markdown for formatting text
  • Syntax highlighted code & rendered data supporting over 200 programming languages
  • Binary downloads
  • Manage teams within organizations
  • Free public repos
  • SSL, HTTPS, and SSH data transmission and two-factor authentication are core elements of security at GitHub
  • Applications and tools that integrate with GitHub
Testimony to its popularity, GitHub has over 23 million repositories.
Website: github.com

Bitbucket

Bitbucket
Bitbucket is a Git and Mercurial based source code management and collaboration solution in the cloud. Bitbucket is written in Python using the Django web framework.
Features include:
  • Simple to set up and use even for teams new to Git or Mecurial
  • Pull requests, commit histories, and code reviews
  • Hold discussions right in the source code with inline comments
  • Good user interface and tools
  • Issue tracking
  • Wiki
  • Web hosting
  • Binary downloads
  • Free public repositories
  • Unlimited private repositories
  • Integrates with many APIs and services
Bitbucket restricts you to work with only 5 people for free.
Website: bitbucket.org

GitLab

GitLab
GitLab is a web-based Git repository manager with code reviews, issue tracking, activity feeds, wikis. GitLab is close to GitHub, but GitLab is released under an open source license (MIT license).
GitLab is used by more than 100,000 organizations, and can cope with 25,000 users on a single server. A subscription gives you access to the company's support team and to GitLab Enterprise Edition that contains extra features aimed at larger organizations.
Features include:
  • Beautifully designed
  • Group your repositories
  • Source code search
  • Fine grained permission management
  • Contributor statistics
  • Import from Bitbucket, GitHub, anywhere
Website: about.gitlab.com

Fossil

Fossil
Fossil is a simple, high-reliability, distributed software configuration management system. It is released as a single self-contained stand-alone executable. Being distributed, Fossil requires no central server.
Features include:
  • Built-in and intuitive web interface reducing project tracking complexity
  • Uses ordinary HTTP (or HTTPS or SSH) for network communications, so it works fine from behind restrictive firewalls
  • CGI/SCGI Enabled
  • Supports "autosync" mode which helps to keep projects moving forward by reducing the amount of needless forking and merging
  • Content is stored using an enduring file format in an SQLite database so that transactions are atomic
Fossil is free software released under the 2-clause BSD license.
Website: fossil-scm.org


Debian/Ubuntu Linux: Restrict an SSH user session to a specific directory by setting chrooted jail

$
0
0
http://www.cyberciti.biz/faq/debian-ubuntu-restricting-ssh-user-session-to-a-directory-chrooted-jail

I setup a web-server. I need to grant a user ssh access but I do not trust users. How can I limit user session to a specific directory such as /home/httpd/$USERNAME? How do I set up a ssh chroort jail on a Linux operating systems?

You can interactive shell with special root directory on a Linux or Unix-like systems. You can set the pathname (such as /home/httpd/foo) of a directory to chroot to after authentication. All components of the pathname must be root owned directories that are not writable by any other user or group. After the chroot, sshd changes the working directory to the user's home directory.
Tutorial details
DifficultyAdvanced (rss)
Root privilegesYes
RequirementsOpenSSH
Estimated completion time20m

Say hello to ChrootDirectory directive

From the sshd_config man page:
The ChrootDirectory must contain the necessary files and directo ries to support the user's session. For an interactive session this requires at least a shell, typically sh(1), and basic /dev nodes such as null(4), zero(4), stdin(4), stdout(4), stderr(4), arandom(4) and tty(4) devices. For file transfer sessions using "sftp", no additional configuration of the environment is necessary if the in-process sftp server is used, though sessions which use logging do require /dev/log inside the chroot directory.
You may grant a user ssh access, whom you do not completely trust. You can limit what that user can see or run only ls, date, and internal bash commands by setting up a SSH chroot jail. Let us see how to create the chrooted jail for OpenSSH server on a Debain or Ubuntu Linux server. The following tutorial is tested on a Debian Linux server v8.1:
# lsb_release -a
Sample outputs:
Fig.01: Finding Linux distro version and name command

1. Login as the root user

Type any one of the following command:
$ su -
OR
$ sudo -s

2. Create the chroot jail

I'm going to set /home/jails/ directory to restrict an ssh user session to this directory:
# D=/home/jails
# mkdir -p $D

As per the sshd man page you need following files too:
# ls -l /dev/{null,zero,stdin,stdout,stderr,random,tty}
Sample outputs:
crw-rw-rw- 1 root root 1, 3 Jun 11 03:11 /dev/null
crw-rw-rw- 1 root root 1, 8 Jun 11 03:11 /dev/random
lrwxrwxrwx 1 root root 15 Jun 11 03:11 /dev/stderr -> /proc/self/fd/2
lrwxrwxrwx 1 root root 15 Jun 11 03:11 /dev/stdin -> /proc/self/fd/0
lrwxrwxrwx 1 root root 15 Jun 11 03:11 /dev/stdout -> /proc/self/fd/1
crw-rw-rw- 1 root tty 5, 0 Jun 11 04:43 /dev/tty
crw-rw-rw- 1 root root 1, 5 Jun 11 03:11 /dev/zero
To create required /dev nodes entries use the following mknod command:
# mkdir -p $D/dev/
# mknod -m 666 $D/dev/null c 1 3
# mknod -m 666 $D/dev/tty c 5 0
# mknod -m 666 $D/dev/zero c 1 5
# mknod -m 666 $D/dev/random c 1 8

3. Set permissions

Type the following command so that the chroot $D directory, and all its components, must be owned by root user and not writable by any non-root user or group:
# chown root:root $D
# chmod 0755 $D

Verify it:
# ls -ld $D
Sample outputs:
drwxr-xr-x 2 root root 4096 Jun 11 03:14 /home/jails

4. Install bash shell in $D

Type the following command to create bin directory in $D path:
# mkdir -p $D/bin
Copy /bin/bash to $D/bin/ directory:
# cp -v /bin/bash $D/bin
Sample outputs:
‘/bin/bash’ -> ‘/home/jails/bin/bash’
Copy required shared libs to $D directory. The syntax is as follows to find out what bash needed:
# ldd /bin/bash
Sample outputs:
 linux-vdso.so.1 (0x00007ffdbb1bc000)
libncurses.so.5 => /lib/x86_64-linux-gnu/libncurses.so.5 (0x00007f1349bc6000)
libtinfo.so.5 => /lib/x86_64-linux-gnu/libtinfo.so.5 (0x00007f134999c000)
libdl.so.2 => /lib/x86_64-linux-gnu/libdl.so.2 (0x00007f1349797000)
libc.so.6 => /lib/x86_64-linux-gnu/libc.so.6 (0x00007f13493ee000)
/lib64/ld-linux-x86-64.so.2 (0x00007f1349e0d000)
Copy highlighted files one-by-one as follows using the cp command:
# mkdir -p $D/lib/
# mkdir -p $D/lib64/
# mkdir -p $D/lib/x86_64-linux-gnu/
# cp -v /lib/x86_64-linux-gnu/{libncurses.so.5,libtinfo.so.5,libdl.so.2,libc.so.6} $D/lib/

Sample outputs:
‘/lib/x86_64-linux-gnu/libncurses.so.5’ -> ‘/home/jails/lib/libncurses.so.5’
‘/lib/x86_64-linux-gnu/libtinfo.so.5’ -> ‘/home/jails/lib/libtinfo.so.5’
‘/lib/x86_64-linux-gnu/libdl.so.2’ -> ‘/home/jails/lib/libdl.so.2’
‘/lib/x86_64-linux-gnu/libc.so.6’ -> ‘/home/jails/lib/libc.so.6’
Next, copy /lib64/ld-linux-x86-64.so.2 to /lib64/ directory:
# cp -v /lib64/ld-linux-x86-64.so.2 $D/lib64/
Sample outputs:
‘/lib64/ld-linux-x86-64.so.2’ -> ‘/home/jails/lib64/ld-linux-x86-64.so.2’
Finally, copy /lib/x86_64-linux-gnu/libnss_files*, enter:
# cp -va /lib/x86_64-linux-gnu/libnss_files* $D/lib/x86_64-linux-gnu/

5. Add user to the the system

You also need to copy /etc/passwd, and /etc/group files to $D/etc/ directory:
# mkdir -p $D/etc/
Add a user called tom and jerry:
# adduser tom
# adduser jerry

Sample outputs:
Fig.02: Add a user on a Debian Linux 8 server

Finally, copy updated /etc/{passwd,group} files to $D/etc/ directory:
# cp -vf /etc/{passwd,group} $D/etc/
Sample outputs:
‘/etc/passwd’ -> ‘/home/jails/etc/passwd’
‘/etc/group’ -> ‘/home/jails/etc/group’
Warning: if you add or delete or made any changes to the user or password in /etc/passwd file, recopy /etc/{passwd,group} files again by running the following two commands:
D=/home/jails
cp -vf /etc/{passwd,group} $D/etc/

6. Configure sshd

Edit /etc/ssh/sshd_config file, enter:
# vi /etc/ssh/sshd_config
Append the following two directives:
##  Apply the chrooted jail to the user called tom and jerry ##
Match User tom,jerry
ChrootDirectory /home/jails
## Allow sftp to chrooted jail ##
ForceCommand internal-sftp
 

7. Restart sshd service

For Debian Linux version 8.x, enter:
# systemctl restart ssh.service
For Debian version 7.x and older, enter:
# /etc/init.d/ssh restart

8. Test it

The syntax is:
 
ssh user@sever
ssh user@sever-ip-here
ssh tom@localhost
 
Sample outputs:
tom@localhost's password:
Last login: Thu Jun 11 04:32:32 2015 from localhost
Could not chdir to home directory /home/tom: No such file or directory
-bash-4.3$ ls
-bash: ls: command not found
-bash-4.3$ date
-bash: date: command not found
-bash-4.3$ pwd
/
-bash-4.3$

9. Install additional commands

The tom user now able to log into the server but can not run other commands such as ls, date, and so on. The user is restricted to /bin/bash only. If you need ls or any other commands, you need to install them in /home/jails/ directory as I did for /bin/bash. The easiest way is as follows:
# cd /root/
wget http://www.cyberciti.biz/files/lighttpd/l2chroot.txt
# mv l2chroot.txt l2chroot
# chmod +x l2chroot
# vi l2chroot

Find BASE line and change it as follows:
BASE="/home/jails"
Save and close the file. Install /bin/ls in $D/bin/ directory:
# cp -v /bin/ls $D/bin/
# cp -v /bin/date $D/bin/
# /root/l2chroot /bin/ls
# /root/l2chroot /bin/date

Create $D/home/tom and $D/home/jerry directories:
# mkdir -p $D/home/{tom,jerry}
# chown -R tom:tom $D/home/tom/
# chown -R jerry:jerry $D/home/jerry/
# chmod -R 0700 $D/home/tom/
# chmod -R 0700 $D/home/jerry/

10. Verify and test it again

The syntax is as follows for sftp command:
sftp user@server
sftp user@server-ip-here
sftp tom@server1.cyberciti.biz

Sample outputs:
tom@server1.cyberciti.biz's password:
Connected to server1.cyberciti.biz.
sftp> pwd
Remote working directory: /home/tom
sftp> ls
sftp> cd /home
sftp> ls
jerry tom
sftp> pwd
Remote working directory: /home
sftp> ls -l
drwx------ 2 jerry jerry 4096 Jun 11 08:55 jerry
drwx------ 2 tom tom 4096 Jun 11 08:53 tom
sftp> cd jerry
sftp> pwd
Remote working directory: /home/jerry
sftp> ls
remote readdir("/home/jerry"): Permission denied
sftp> ls
remote readdir("/home/jerry"): Permission denied
sftp> put /etc/resolv.conf .
Uploading /etc/resolv.conf to /home/jerry/.
remote open("/home/jerry/."): Permission denied
sftp> cd /home/tom
sftp> put /etc/resolv.conf .
Uploading /etc/resolv.conf to /home/tom/./resolv.conf
/etc/resolv.conf 100% 70 0.1KB/s 00:00
sftp> ls -l
-rw-r--r-- 1 tom tom 70 Jun 11 09:01 resolv.conf
sftp> quit

How do I map users web-server (DocumentRoot) to /home/jails/ directory?

Say, /home/httpd/tom_web is DocumentRoot for tom user, then:
# mkdir $D/home/tom/web
# mount --bind /home/httpd/tom_web $D/home/tom/web
## update fstab file so that it can mount after server reboot ##
# echo "/home/httpd/tom_web/ $D/home/tom/web none bind">> /etc/fstab

How to defrag your Linux system

$
0
0
https://www.howtoforge.com/tutorial/linux-filesystem-defrag

There is a common misconception among GNU/Linux users that our systems never ever need to be defragmented. This stems from the success of the journalized filesystems used by most distributions including EXT2,3 and 4, JFS, ZFS, XFS, ReiserFS and BTRFS. All of these boast smart ways and techniques in regards to the files allocation in the disks, minimizing the fragmentation problem to a point that there is practically no reason to defrag even after many years of installing and uninstalling applications and libraries in the same system. Fragmentation though can still be an issue though, especially for users that use space limited disks that may not offer many file allocation options.
Here's a bulk description of how the (Linux) file allocation procedure works: files are stored in multiple places in the disk, leaving huge unwritten space between them, allowing them to grow unobstructed over time if needed. This is in contrary to filesystems like the Windows' NTFS which places files next to each other consecutively. If the disk gets more crowded and a file needs more space to grow by staying in one piece, Linux filesystems attempt to re-write it completely on another sector that has enough space to store it as a whole. This way, everything is kept clean, tidy and in one piece each. Confined space though, causes this file “maneuvering” to get more challenging with time. Here's how to deal with this problem and how to actually defrag your Linux system.
Now, the first thing that you'll need to do is get a defragment tool installed. There are many defragmenters available for Linux filesystems but I will use “e4defrag” as it is one that will most probably be already installed in your system. Using this tool, you can determine if you have fragmented files and how serious this fragmentation is. To do this, open a terminal and type: sudo e4defrag -c /location or /dev/device. Below, I have scanned my /home folder for fragmented files and actually found five of them. My fragmentation score though is quite low so defragging won't do much different in my system's performance in that case. If this outputs a score over “30”, then defragging would be a good idea.
At first, I will demonstrate how to defrag using e4defrag, by defragging my fragmented files one by one. The e4defrag program is part of the e2fsprogs package which should already be installed on your computer. In case the program is missing, install it with this command on Ubuntu:
sudo apt-get install e2fsprogs
To do this I use the following command:
sudo e4defrag
followed by the location and name of the file as shown in the screenshot below:
This is good when you have to defrag just a couple of files like I did, but if you want to defrag your whole system then you should first unmount all partitions and run the following command:
sudo e4defrag /dev/*
If you want to perform defrag without unmounting, then:
sudo e4defrag /
would be a safe choice.
Since many users nowadays use SSDs and not HDDs, it is important to note that the defragmentation procedure is only beneficial for the later. If you own an SSD, there is simply no point in worrying about fragmented files as those disks can access their storage randomly, wheres HDDs access sequentially. Defragging your SSD will only increase the read/write count and thus reduce the lifetime of your disk. SSD owners should convey their interest on the TRIM function instead, which is not covered in this tutorial.

Gettin' Sticky with It

$
0
0
http://www.linuxjournal.com/content/gettin-sticky-it

In last month's issue, I talked about Linux permissions (see "It's Better to Ask Forgiveness..." in the May 2015 UpFront section). I could have covered SUID, GUID and sticky bit in the same article, but it seemed like a lot to cover in one sitting. So in this article, I describe the special permissions on a Linux system. Where standard permissions are fairly intuitive, the special permissions don't make a lot of sense at first. Once you understand what they do, however, they're really not too complicated.
But There's No Room for More Permissions!
When you learned to set read, write and execute bits on files and folders, you probably realized that you used all the available "spots" for permissions. So when manipulating special permissions, you sort of re-use existing permission bits. It functions just like any other permission attribute, but they're represented a bit oddly.
Every section of the permissions string (user, group, other) has an additional "special" permission bit that can be set just like rwx. The indication for whether those bits are set is shown on the execute section of the string. For example:
  • If the SUID (Set User ID) permission is set, the execute bit on the user section shows an s instead of an x.
  • If the GUID (Group User ID) permission is set, the execute bit on the group section shows an s instead of an x.
  • If the sticky bit is set, the execute bit on the other section shows a t instead of an x.
Confused yet? Here are a few examples:
  • -rwsrw-rw-— SUID is set on this file.
  • drw-rwsrw-— GUID is set on this folder.
  • drw-rw-r-t— sticky bit is set on this folder.
  • -rwSr--r--— SUID is set on this file, but the user execute bit is not.
Note that in the last example the S is uppercase. That's the way you can tell whether the execute bit underneath is set. If the SUID bit is lowercase, it means the execute bit is set. If it's uppercase, it means the SUID bit is set, but the executable bit is not.
What Do They Do?
Unlike standard permissions, special permissions change the way files and folders function, as opposed to controlling access. They also function differently depending on whether they're assigned to files or folders. Let's take a look at them one at a time.
SUID: the SUID bit is applied to executable programs. Once it is set, the program executes with the permissions and abilities of the user who owns the file. As you can imagine, this can be an enormous security risk! If a file is owned by root and has the SUID bit set, anyone who executes it has the same permissions as the root user. As scary as it sounds, there are a few valid use cases for such things. One perfect example is the ping program. In order to access the network hardware required to ping hosts, a user needs to have root access to system. In order for all users to be able to use ping, it's set with the SUID bit, and everyone can execute it with the same system permission that root has. Check it out on your system by typing ls -l /bin/ping. You should see the SUID bit set!
Setting the SUID bit on folders has no effect.
GUID: the GUID set on executable files has a similar effect to SUID, except that instead of using the permissions of the user who owns the file, it executes with the permissions of the group membership. This isn't used very often, but in certain multi-user environments, it might be desirable.
Mainly, GUID is used on a folder. If the GUID bit is set on a folder, files created inside that folder inherit the same group membership of the folder itself. This is particularly useful in group collaborations. Normally when someone creates a file, it has the group membership of that user's primary group. Inside a GUID folder, the user still owns the file, but the group membership is set automatically so others in the group can access the files.
Sticky bit: first off, I have no idea why the sticky bit is represented by a t instead of an s. I've searched high and low, and asked many people. No one seems to know. Maybe a Linux Journal reader knows the answer and will enlighten me. (If so, I'll include it in the Letters to the Editor section.) Anyway, the sticky bit is another special permission that is used on folders. In fact, it has no effect at all if it's set on a file.
Folders that have the sticky bit set add a layer of protection for files created within them. Normally in a folder accessible by multiple people, anyone can delete anyone else's files. (Even if they don't have write access to the files!) With the sticky bit set, only the user who owns the file can delete it. It seems like a subtle thing, but when you consider a folder like the /tmp folder on a multi-user Linux system, you can see how important the sticky bit can be! In fact, if it weren't for the sticky bit, the /tmp folder on your system would be like the Wild Wild West, and nefarious gunslingers could delete other people's files willy nilly. You can see the sticky bit set on your system by typing ls -l / | grep tmp.
Assigning Special Permissions
Applying the special permissions to a file or folder is exactly like assigning regular permissions. You use the chmod tool—for example:
  • chmod u+s file.txt— adds the SUID permission to file.txt.
  • chmod g-s file.txt— removes the GUID permission from file.txt.
  • chmod o+t folder— adds the sticky bit to the "folder" directory.
Special permissions can be assigned right alongside regular permissions as well, so things like this are perfectly fine:

chmod ug+rw,u+s,ugo-x file.txt
And just like standard permissions, it's possible (and often preferable) to assign special permissions using octal notation. In order to do that, you use the fourth field. When assigning permissions like this:

chmod 755 file.txt
there's a fourth field that if left off, is assumed to be zero. So this is actually the same as the above example:

chmod 0755 file.txt
That preceding zero is the field that assigns special permissions. If you leave it off, it's assumed to be zero, and no special permissions are assigned. Knowing it's there, however, should make it fairly easy to understand how to use it. If you read last month's article on permissions that included understanding octal notation, just apply that concept to special permissions. Figure 1 shows how it breaks down.
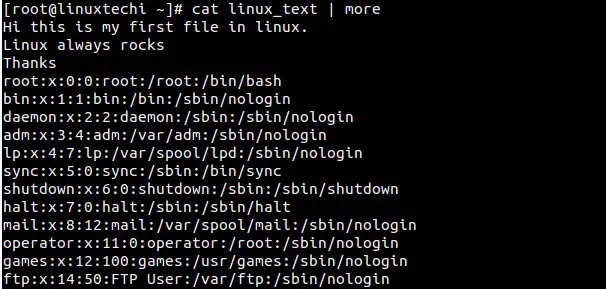
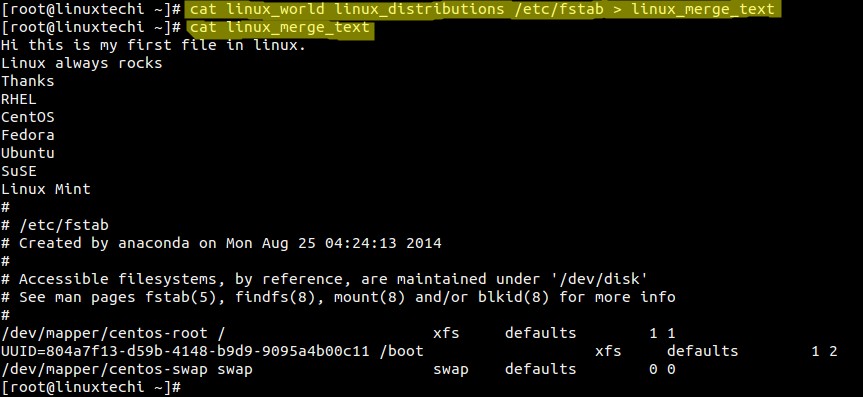
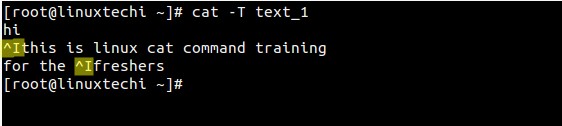
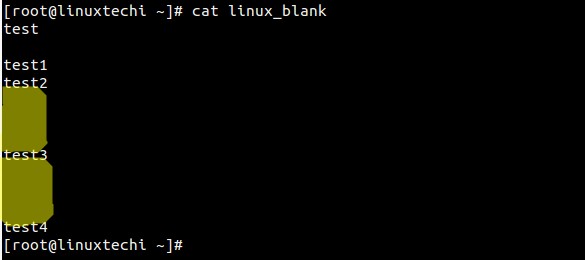
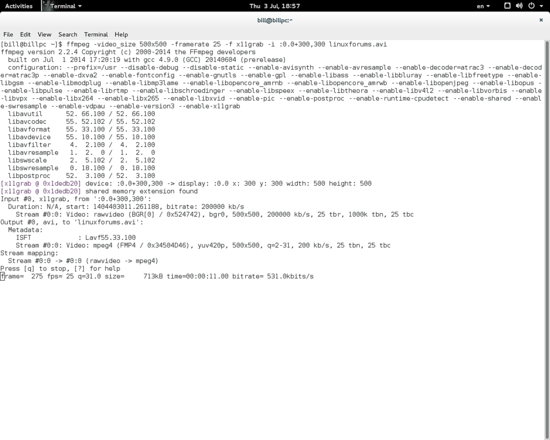
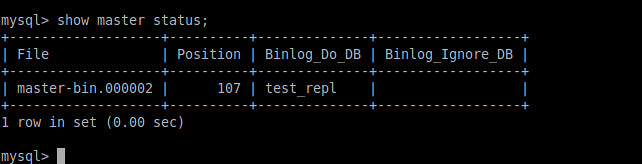
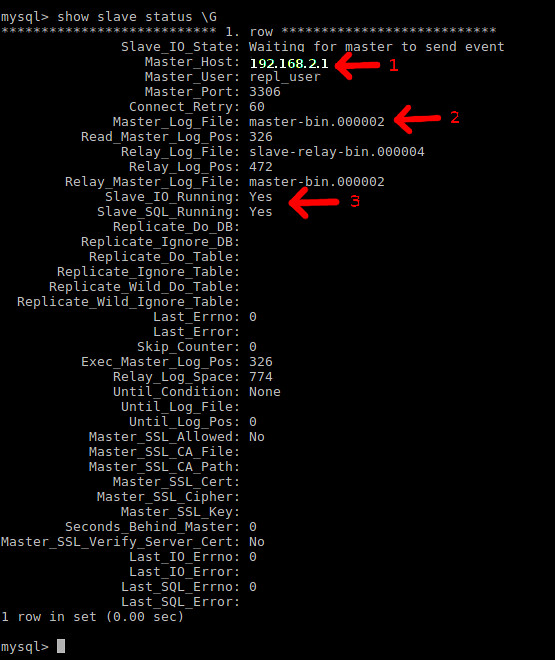
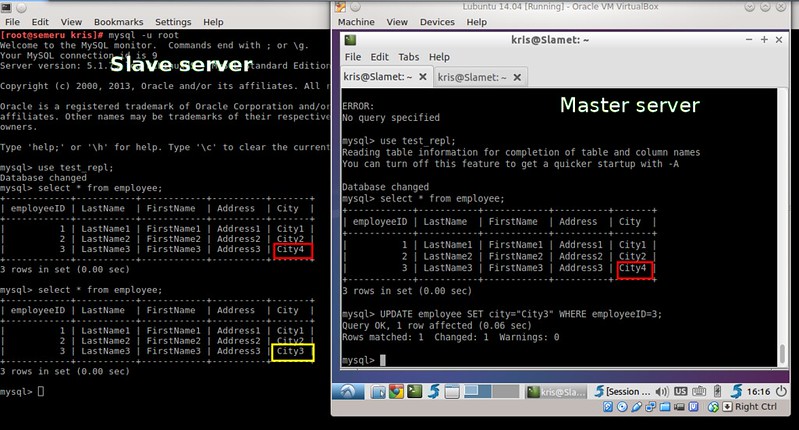
Figure 1. Octal Notation
So in order to assign a folder read/write access for user and groups along with the GUID bit, you would type:

chmod 2770 foldername
And, the resulting permission string (seen by typing ls -l) would show the following (note the lowercase s— remember what that means?):

drwxrws--- foldername
Just like standard permissions, if you want to set multiple special permissions, you just add the values. In order to set SUID and sticky bit, you would set the fourth octal field to 5. Usually, only a single special permission is set on any particular file or folder, but with octal notation, you have the option to set them in any way you see fit.
Hopefully these two articles clear up any misconceptions about Linux permissions. More complicated access controls are available with ACLs, but for most use cases, the standard permission strings are all you need to control access to files and folders on your system.
Viewing all 1407 articles
Browse latest View live


<script src="https://jsc.adskeeper.com/r/s/rssing.com.1596347.js" async> </script>