Thanks to Edward Snowden releasing the documents regarding NSA spying activity, we now have an idea of just how vulnerable we are when we are online. The worst part is that it is not only the NSA that is spying on people. There are many governments working to enact laws that would allow them to watch and store information from their citizen’s online activity, as well as what they say over phone calls and write in text messages. While it seems like a dystopian world described by George Orwell is, in fact, upon us, there are still ways that you can protect yourself from the all-seeing eyes of Big Brother.
Encryption is one best ways to protect your online behavior, data, and communication. While this method is very effective, it usually flags you to the NSA and other organizations, inviting them to monitor you more closely.
There have been changes to the guidelines surrounding data collection by the NSA. However, the rules and guidelines still allow the NSA to collect and examine the data. The encrypted data is stored until the NSA decrypts it and discards any uninteresting data. For non-US citizens, all of the collected data is allowed to be kept permanently, but for practical reasons, the data that is encrypted will be processed first.
The reality is that if more people used encryption for day-to-day browsing, encrypted data would be less of a red flag. This would make the NSA’s and other surveillance organizations around the world job much harder, as it would take an exorbitant amount of time to decrypt all the data.
Is Encryption Secure?
Since more people started using encryption, the NSA has been working to decrypt the data in a shorter amount of time. At the same time, there are new encryption types that are being worked on to protect data. Encryption is never going to be perfectly secure, but lengthening the amount of time it takes to decrypt the data can help to protect it for a longer time. Let’s look at what is affecting the security of encrypted code.
NIST
National Institute of Standards and Technology (NIST) works with the NSA to develop new ciphers. They have also developed and/or certified RSA, SHA-1, SHA-2, and AES.
Knowing that the NSA has worked to weaken and leave backdoors into many of the international encryption standards, you should question the integrity and strength of the cipher algorithms that NIST creates or certifies.
NIST denies that they have done anything wrong, as well as invited the public to participate in many upcoming events about encryption related standards. However, both of these moves are just ploys to raise public confidence in their work.
![Combination Padlock]()
Nearly all trust in NIST was destroyed when news was released that the NSA weakened the Dual Elliptic Curve algorithm, which was NIST’s certified standard for cryptographic programs, twice.
There could also have been a deliberate back door in the Dual Elliptic Curve algorithm. In 2006, at Eindhoven University of Technology, researchers noted that it was simple to launch an attack from any ordinary computer.
While there are many concerns with NIST, many of the industry leaders still have these algorithms in their cryptographic libraries. One major reason for this is that they have to be compliant with NIST standards to obtain contracts from the US government.
With just about every industry in the world using NIST-certified standards, it is rather chilling to think about all the data that is at risk. There is the possibility that the reason we rely so heavily on these standards is that most cryptographic experts are not willing to face the problems in their field.
Key Length of the Encryption
The key length of a cipher is the simplest and crudest way of calculating how long the cipher would take to decrypt. Most times, the cipher is made up of zeros and ones. At the same time, the simplest and crudest way of breaking ciphers is the exhaustive key searches method or brute force attacks. This method tries every combination of the cipher until the right combination is found.
![Computer Chip]()
Anyone can break ciphers, but modern ciphers are more complex than traditional ones. The NSA still has problems decrypting data by just using the method of exhaustive key search. In the past, before the leaks from Edward Snowden, it was assumed that decrypting a 128-bit encryption was nearly impossible to do with brute force. Further to this, that it would be at least another 100 years before it was possible using Moore’s Law.
This theory still holds some truth; however, the amount of resources that the NSA puts into cracking all types of encryption has shaken many encryption expert’s faith of this prediction. This has also lead to system administrators scrambling to update and upgrade the key lengths of their ciphers.
With the reality of quantum computing becoming available in the near future, we also have to face the reality that encrypted data could be a thing of the past. The reason for this is that quantum computers will be exponentially faster and more powerful compared to any other computer in existence. In just a few hours or days after the release of quantum computers, all the suites and ciphers will become redundant.
There is a theory that posits that the issue will be fixed by the creation of quantum encryption. This is not going to be the case for some time, however, since quantum computers will be very expensive when they are released. This price tag means that only well-funded businesses and wealthy governments will have this technology. Therefore, at the current time, having strong encryption can still protect your data.
We should note that both the NSA and the United States government use 265-bit for sensitive data, along with 128-bit for all other data. This method uses AES, which we will discuss later because it has many problems of its own
Ciphers
The key length is the amount of numbers that are involved in an encryption, whereas the cipher is the mathematic algorithm that is used. The strength, or lack thereof, of the cipher’s algorithms is what allows the encryption to be broken.
The most commonly used ciphers that you are likely to have encountered are AES and Blowfish. There is also RSA, which is used to decrypt and encrypt ciphers’ keys. There is also SHA-1 and SHA-2, which are used to authenticate encrypted data and connections.
AES is considered to be the most secure cipher for use in VPNs and is used by the United States government. While AES seems reliable and secure, you should be using more than just AES to protect yourself.
What Can You Do To Improve Your Privacy?
Knowing that nearly all types of encryption can be broken if someone was motivated enough, we can better protect our privacy. Even though not all the recommendations will work perfectly every time, they will improve your online privacy overall.
Anonymizing Internet Use
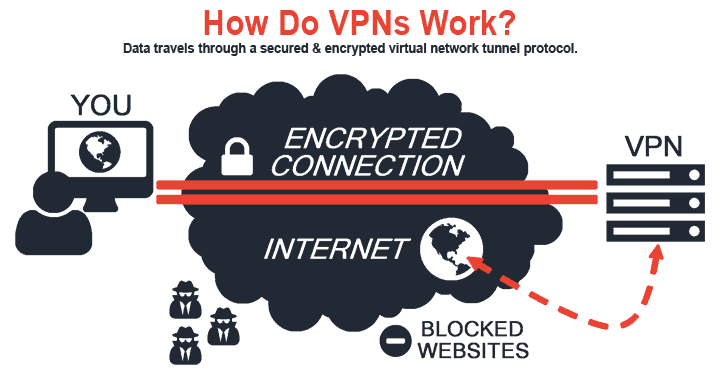
There are two popular ways in which you can anonymize your use of the internet: using a VPN or using the Tor network. Both hide your internet use from your Internet Service Provider (ISP) and the government. They also hide your location and identity from the websites and services that you visit and use.
While these technologies sound like they serve similar purposes, there is only a tiny amount of overlap. They are used for very different purposes and are coded very differently.
VPNs![Girl Using Computer]()
Most people use VPNs to hide their internet usage from their ISP and the government. They can also be used to avoid censorship, to “geo-spoof” in order to access the websites of other countries, as well to protect you from hackers when using public Wi-Fi hotspots.
Depending on the VPN that you are using, you may have to sign up and pay for the service, most setting you back about $5 to $10 per month. While a VPN provides you with a high level of internet privacy, they do not provide any level of anonymity, reason being that the VPN provider knows what you are doing online.
Check out VPNMentor’s top VPNs here.Tor Network
If you require a high degree of anonymity online, the Tor network is a great option. However, you lose a lot of the usability of the internet that we use daily. The Tor Network is free to use and is a useful system, as you do not provide your information to anyone. This has made it a popular anti-censorship tool. There are governments that have tried to block the Tor Network, but they have not always been successful.
Using VPN and Tor Together
If you are willing to do some work, you can use Tor and a VPN at the same time. You will need to find a VPN that supports Tor and install the VPN using their guide.
![Tor]()
More Ways to Stay Anonymous Online
Tor and VPNs are the most known and popular ways to stay anonymous and avoid censorship, but there are many other ways to do this. The use of proxy servers has become a popular option, but they provide about the same level of anonymity as a VPN.
Psiphon, 12P, Lahana, and JonDonym are all services that could be of interest. Most of these can be used with a VPN and/or Tor for higher levels of security.
Stop Using Search Engines That Track You
Many of the most widely used search engines store information about you. This is especially true for Google. The information that is stored includes your
IP address, the time and date you use the website, the search terms, and your computer’s Cookie ID.
The gathered information is then transmitted to the web page owner and the owners of any advertising on the website. This allows these advertisers to collect data on you while you surf the internet. The collected data is then used to create a profile about you, which they use to create targeted advertisements based on your internet history..
Along with giving this data to the website and advertising owners, search engines have to hand over the collected information to courts and governments. This is only done if the information is requested, but these requests are becoming more often.
However, some search engines do not collect data on their users. One of the most popular is DuckDuckGo. Along with not collecting your data, this non-tracking search engine avoids the ‘filter bubble’. Many search engines will use your past search terms and other information, like your social media, to profile you. They do this to order the results in a way that puts the websites that are most likely to interest you first. In some cases, this produces search results based on your believed point of view, known as a ‘filter bubble’. Therefore, the alternative options and viewpoints are downgraded, which makes them hard to find. Filter bubbles are dangerous as they limit knowledge and confirm prejudices.
Clearing Your Google Search History
If you are worried about the information that Google is keeping about you, you can clear your Google search history, if you have a Google account. This is not going to stop anyone from spying on you or gathering information on you, but it limits Google’s ability to profile you. Regardless of whether you plan to switch to a non-tracking search engine or stay with Google, you should clear your search history from time to time.
This is simple to do; you simply need to sign into your Google account on www.google.com/history. After logging in, you will find a list of your previous searches. From here, you can select the items that you would like to remove and click the ‘Remove Items’ button.
Anonymity While Making Online Purchases
The first step towards improving your online privacy is paying anonymously. You will still need to provide an address for physical items, so you will not perfectly anonymous online. Even if you are going to switch to just buying local goods, and pay for the items with cash, you are not fully anonymous.
Luckily, the use of Bitcoin and other online services is becoming more common.
Bitcoin
Bitcoin is the largest op
![Bitcoin]()
en source and decentralized virtual currency at the moment. It operates using a type of peer-to-peer technology, which is conducive to online anonymity since no middle man is involved. There are many debates about if investing in Bitcoins is wise or not. Bitcoin acts like any other currency (meaning it has the potential to lose or gain value at any time) and can be used to buy items and traded as normal currency online. It is not yet ubiquitous, but more businesses are starting to accept it as a valid form of payment.
Other Forms of Anonymous Payment
If buying Bitcoins is not for you, another option is to use pre-paid credit cards from one of many online stores. There are also many options for crypto-currencies other than Bitcoin, but Bitcoin is the most stable as well as the most popular.
Securing Your Browser
The NSA is not the only entity that wants your information; there are also advertisers. They often use sneaky methods to track you, putting a profile together so they can advertise their items to you, or even sell the information that they have on you.
Many people who use the internet know about HTTP cookies. Clearing HTTP cookies is very simple, and most browsers have a Private Browsing mode, such as Chrome’s Incognito Mode. Using this mode stops the browser from saving the internet history and blocks the HTTP cookies. Using this tactic is a good idea when you are browsing the internet, and a step in the right direction, but it is not enough to fully stop the tracking.
Clear Your DNS cache
To speed up your browsing, browsers cache website IP addresses that are received from your DNS server. It is very simple to clean the DNS cache. Windows uses the command: ipconfig /flushdns in the command prompt. OSX 10.5 and above uses the command: dscacheuitl –flushcache in the Terminal. OSX 10.4 and below uses the command: lookup –flushcache in the Terminal.
Flash Cookies
Flash Cookies are used for some insidious purposes and are sometimes not blocked by disabling cookies. Flash Cookies track in a similar manner to regular cookies. Flash Cookies can be located and manually deleted. CCleaner is one of the best options of removing Flash Cookies, along with other trash that is on your computer.
Since most people now know about Flash Cookies and Zombie Cookies, the use of these cookies is on the decline. There are also many browsers that block them when you choose to block cookies. However, they are still a threat even with their lower numbers.
More Internet Tracking Technologies
Due to the amount of money that can be made on the internet by companies tracking their users, more sophisticated and devious methods have been developed in the last few years.
ETags
ETags are markers used by browsers to track the changes in resources at specific URLs. Comparing the changes in the markets allows a website to track you and create a fingerprint. ETags have also been used create respawning HTML and HTTP cookies, which will also track your browsing.
ETags are nearly impossible to detect, so there is no reliable method of prevention. Cache clearing after every website and turning off your cache can work. However, these methods are time-consuming and have negative effects on browsing experience. Firefox has an add-on called Secret Agent that prevents ETag tracking.
History Stealing![Stealing]()
This is where truly scary form of tracking comes in. History stealing exploits the way that the internet is designed, allowing any website to find out your whole browsing history. This is done using a very complicated method and is very bad news since it is nearly impossible to prevent. The information that is found can be used with profiles on social networks to create a profile about you.
There is some good news, however, in that it that while it can be very effective, it is not reliable. Using a VPN or Tor to mask your IP address makes it much harder to find your identity using just web behavior.
Browser Fingerprinting
Brower Fingerprinting looks at the configuration of your browser by accessing your operating system to track and uniquely identify the user. The major problem with this is that the more measures you use to avoiding tracking, the more unique you become for browser fingerprinting.
To avoid browser fingerprinting, you should use the most common operating system and browser that you can. This will, however, leave you open for other types of attacks, as well as limit the functionally of the computer. For mos, this is not very practical.
HTML Web Storage
Web Storage is built into HTML5, which is used for most websites. The problem with web storage is that it is much better at storing information than cookies. The stored information is not allowed to be monitored or selectively removed, as cookies are.
For all internet browsers, web storage is enabled by default. If you are using Internet Explorer or Firefox, you can simply turn off web storage. You can also use the add-on Better Privacy for Firefox, which removes the web storage information automatically. The Click and Clean extension and Google NotScripts can be used for Google Chrome.
![Email]()
Securing Emails
While most of the email providers’ use SSL encryption for the connection between your computer, the email servers and the other person’s computer, Google has worked to fix the weaknesses that SSL has.
The problem is that many email providers are handing over information to the NSA, especially Microsoft and Google. At the moment, it looks like the smaller email providers are not doing this as of yet. However, with the NSA and other government surveillance extending their reach, this will most likely change in the near future.
The simplest solution to this growing problem of email encryptions is to encrypt email in a way that enables only the sender and the recipient to decrypt. This can be hard to implement since all of your contacts would have to be willing to implement this. It is simply not a feasible option at this point.
Another problem with encrypted emails is not everything is encrypted. The email address of the sender and recipient, the time and date when the email was sent, and the subject line are all not encrypted. The only data that is encrypted are the attachments and the message body. This information can be very damaging in the wrong hands..
If you are worried about the NSA spying on you, encrypting your email more than it already is not a good idea. The NSA is most likely going to store that email and your other emails until they have the time to decrypt and read them.
Encrypting Your Emails with GNU Privacy Guard
If you want to encrypt your emails, there are many programs that can help you do so. The most famous is Pretty Good Privacy or PGP; however, GNU Privacy Guard or GPG is recommended, as Symantec now owns PGP.
GPG is open source and is compatible with PGP. It is available on Linux, OSX, and Windows. While the program uses a command line interface, there are versions that are more sophisticated for Mac called GTGtools and Windows called Gpg4win. There is also EnigMail, which adds the functions of GPG to SeaMonkey and Thunderbird email clients.
Encrypting Webmail
Hushmail was, for a long time, considered the best service for encrypted webmail as it used PGP encryption in it’s web-based email service. The problem is that during 2007, the owners used a backdoor to gather emails from three accounts. The data was then sent to the Canadian Courts.
All the web-based services can be modified to capture their user’s decryption key. It is recommended that you use desktop services like GPG.
Encrypting Gmail
If you are using Gmail, you can use Encrypted Communication, which is a Firefox extension. This extension provides 265-bit AES encryption. After the extension is installed, you can just write the email. Once you have finished the email, you can simply right-click on the text and select “Encrypted Communication.” You will need to input a password that the recipient knows, so the message can be decrypted. You should be transmitting the password using a communication method other than email.
A more secure option is Mailvelope. This service provides full OpenPGP encryption on email services like Hotmail, Gmail, GMX, and Yahoo!, using Chrome and Firefox.
Check out our blog on creating an (practically) uncrackable password here.![Cloud]()
Cloud Storage
With internet speeds becoming faster, the price of cloud-based storage have become cheaper. This has also led to reduced memory requirements for most devices, and more devices using cloud storage. While cloud storage has been a great move, the question is still how secure the cloud is. Most of the big providers of cloud storage have worked with the NSA in the past. This includes Dropbox, Amazon, Apple, Google, and Microsoft. Most also state in their ToCs that they reserve the right to investigate all uploaded files, and will hand over the files to authorities if they receive a court order. While this is not going to affect most people, the idea of someone looking through our files is creepy, to say the least.
If you want to make sure that your files in the cloud are secure, there are some basic approaches that you can use.
Manually Encrypt the Files before Uploading
The most secure and simple method is to manually encrypt the files, and there are many programs that you can use to do so. The major advantage of this method is that you can use all Cloud storage services without having to worry about your files. As long as you do not upload your encryption keys, your files are safe.
The downside comes in with some of the encryption software needing to be online to decrypt your files. This is the case with Wuala and SpiderOak.
There is also the option to use a less mainstream cloud base. There are many cloud storage providers, and with the technology getting cheaper, there will be more in the future.
Use Cloud Services that Automatic Encrypts
There are some Cloud services that will automatically encrypt the files before they are uploaded to the Cloud. The changes that are made to folders or files are synced with the local versions, then secured and uploaded to the Cloud. There is the chance that the provider has the decryption key, so your data is still at risk; however, this risk is not as high as other Cloud service providers.
Wuala and SpiderOak have apps for Android and iOS. This allows for easy syncing of files to all your mobile devices and computers. There is a small security issue due to the fact that both store your password to authenticate you and direct your files. Wuala uses the same password to decrypt and encrypt files when you are using your mobile device. However, both services delete your password after your session is completed.
There is also Mega, which is been high-profile since it is owned by by Kin Dotcom. The service offers 50GB of free encrypted space. Mega uses whatever web browser you have to encrypt your files before they are uploaded, then decrypts the files after they are downloaded. This is one of the most convenient options, but Mega is not as secure as the other methods that we have covered.
Cloudless Syncing With BitTorrent Sync
BitTorrent Sync is free, and was released to the public after a long public testing phase. It is designed to be a replacement for Dropbox. However, BitTorrent Sync does not store files in the Cloud to sync them.
It is very simple to use, you just need to select the files that you want to share, then BitTorrent Sync will give you a password for them. After you have the password, you can link that folder to another device’s folder as long as BitTorrent Sync is installed. You can do this with any number of folders using the same method. The encryption protocol that is used is P2P 256-bit AES.
While BitTorrent Sync is easy to use and free, its limitations mean that it is not a true Cloud-based service, and cannot be used to store data for long periods of time. Depending on your ISP, you could be charged for the extra bandwidth that you are using.
Anti-Malware, Antivirus and Firewall Software
Anti-Malware
There is a huge amount of malicious code on the internet; this commonly known as Malware. If you are a not Windows user, you do not really need to worry about Malware. However, if you do use Windows, it is advisable to have anti-malware software installed. Bitdefender comes installed on all versions of Windows that are newer than Vista. There is also Malwarebytes and Spybot Search and Destroy, both of which are free.
![Virus]()
Antivirus
This is the first program that you should install on a new computer, or after a clean install of an Operating System. Viruses can not only mess up your computer, but also have to potential to allow hackers into your computer and give them access to everything that is on your computer. They can also install keyloggers, which can record all your keypresses, enabling your banking information to be stolen.
While most people believe that hackers work for themselves, most of the best hackers in the world work for their country’s government. The Syrian government had a virus created and launched called Blackshade to spy on the people of Syria.
Most people have antivirus software on their computers, but most do not have antiviruses on their phones. At the moment, there are far fewer viruses on mobile devices than on computer. However, with smartphones and tablets becoming more powerful, we could see more attacks in the future. Phones with open-source systems, such as Android phones, are more susceptible than those with closed-source systems, such as iOS (Apple) phones.
![Firewall]() Firewall
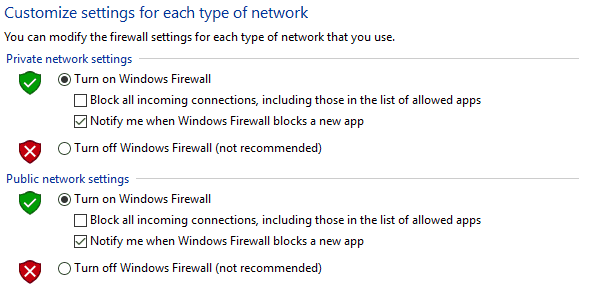
Firewall
A firewall on a personal computer monitors the network traffic and can be configured to allow or disallow traffic to your computer. Firewalls can be a pain from time to time, but they are important because they work to ensure that no program or other software is accessing your computer. The problem is that firewalls have a hard time determining what programs are safe, and which ones are malicious. However, once you have them set up, they are simple to use.
Securing Your Voice Conversations
Before we talk about anything else, we should make it clear that all regular phone calls are not secure, and there is no way to make them secure. Governments around the world are working to record all their citizen’s phone conversations. Unlike using the internet and sending emails, which can usually can be protected to at least some extent, phone calls cannot be protected in any way.
There are disposable and anonymous ‘burner phones’ on the market; the problem is that unless you are only calling other ‘burner phones, data will be collected, which makes those phones very suspicious.
Encryption of VoIP
If you want privacy during a voice conversation, you will need to use an encrypted VoIP. A VoIP allows you to make phone calls using the Internet. In the last few years, VoIPs have become popular, due to the fact that they provide free or cheap calling to anywhere in the world. Skype is the largest VoIP provider in the world. However, Skype is a perfect example of the problem that most of these services have, because there is a middleman that can hand over the conversations to the government. This has happened in the past with Skype, as Microsoft owns Skype and gives the NSA a backdoor into Skype conversations.
Like with email, a VoIP needs end-to-end encryption. This does not allow outside sources into the conversation, meaning that the conversation is private. Many popular VoIP services like Jitsi have built-in chat features, and many are designed to offer most of the features of Skype, making them a great replacement.
Do Not Have a Cellphone
While most people cannot bear to be without their cellphones for more than a few minutes, if you do not want to tracked, you need get rid of your cellphone. Unless you have an early-era cell phone, your cell phone is tracking you, and it’s not just Google Now and GPS tracking your cell phone. It’s also the phone providers and the cellular towers. If you really do not want to be tracked, you will need to leave your cell phone at home, or you can buy a RFID signal-blocking bag. You can also stop Google Now from tracking by turning off your Google History.
![Lock]()
How Much Is Privacy Worth?
This question is worth considering. All the measures described above take time and effort to use every day, and some can bring special attention from the NSA. Additionally, some of the precautions we suggested taking could cause you to lose some of the cooler functions from web-based services that need cookies and other data to perform well.
Google Now is one of the best examples of information being used for good. Google Now is software that can anticipate the information that you need, effectively acting as a “personal assistant” of sorts. Google Glass was designed to use the Google Now software, so it could store information to provide you with better recommendations in the future.
At the moment, interesting and exciting developments of how we interact with computers are reliant upon on allowing all your data to be stored and researched by a company. By using privacy protection when we are online, we turn off this technology.
The question of ‘how much is privacy worth?’ is going to be an ongoing discussion as more powerful technology is developed. There will always be a cost for privacy, so you need to know what compromises you are willing to make, as well as which you are not. While privacy is a basic human right, technology has made it harder to maintain it. Businesses and governments are always gathering data to learn more about you. In summation, even taking basic security measures can help protect you, and could force change in the future.


 A less secure alternative is to hide all folders containing sensitive information. On windows, just right click a folder and navigate to its Properties. In the Attributes tab, enable the “Hidden” option.


 Though a bit cumbersome at times, Two Factor Authentication has saved me more than once.


 The first time I saw a privacy screen in action, the look on my face must have been awesome.


 en source and decentralized virtual currency at the moment. It operates using a type of peer-to-peer technology, which is conducive to online anonymity since no middle man is involved. There are many debates about if investing in Bitcoins is wise or not. Bitcoin acts like any other currency (meaning it has the potential to lose or gain value at any time) and can be used to buy items and traded as normal currency online. It is not yet ubiquitous, but more businesses are starting to accept it as a valid form of payment.


 Firewall


 We’ll show you, how to redirect a domain. URL redirection, also called URL forwarding, is a World Wide Web technique for making a web page available under more than one URL address. When a web browser attempts to open a URL that has been redirected, a page with a different URL is opened. There are few ways to redirect a domain and it depends on the web server used etc. In this tutorial we are going to show you, how to redirect a domain with Apache web server and URL redirection with NGINX web server.


 The
The 

