Quantcast
Channel: Sameh Attia
Viewing all 1413 articles
Browse latest View live

Why and How to Edit Your Sudoers File in Linux

$
0
0
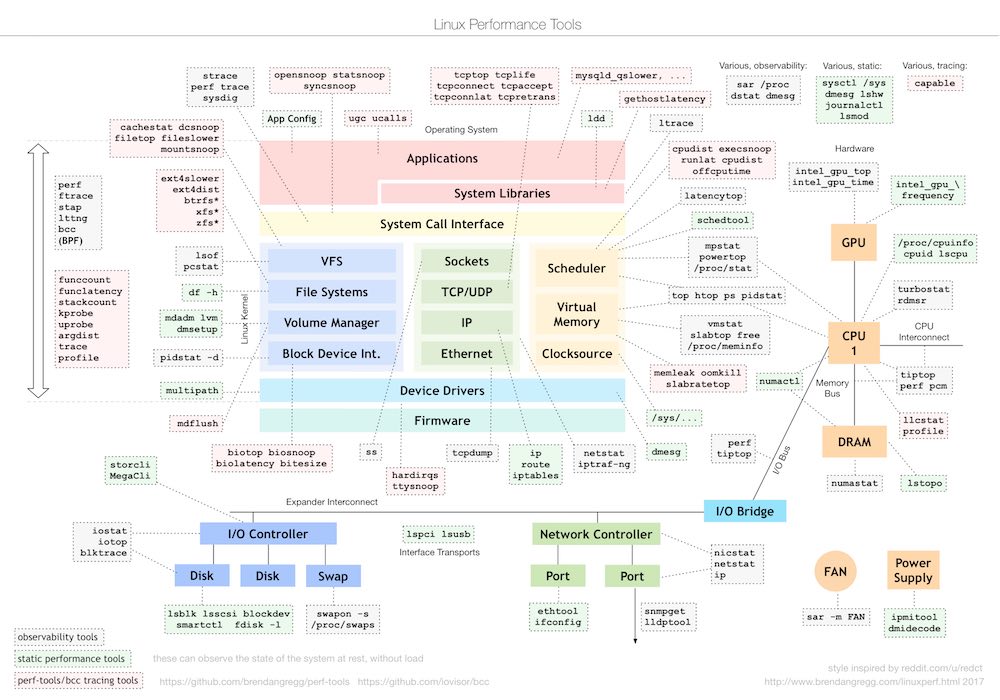
https://www.maketecheasier.com/edit-sudoers-file-linux

Within your Linux or macOS system, there’s a file called “sudoers” which controls the deepest levels of your permissions system. It permits or denies users from gaining super-user access and holds some special preferences for sudo.
The sudoers file is a text file that lives at “/etc/sudoers.” It controls how sudo works on your machine. You are probably familiar with sudo’s primary role of elevating your current account’s privileges to root, the superuser on all Unix-based systems. This permits your users to execute commands that would be otherwise prohibited.
When you first install Linux (or macOS), the first and default user will be auto-added to the sudoers file so it can run administrative tasks with the sudo command. However, if you create a new user account, it will not have the superuser permission by default. If you need to grant it superuser permission, you will need to edit the sudoers file and add this user account to it.
Never edit the sudoers file in a normal text editor. This can lead to simultaneous editing and corrupted files, potentially denying any admin access. Sudoers must be edited by running visudo in Terminal, like so:
edit-sudoers-file-change-sudo-timeout-visudo-command
Note that you need to use sudo to run visudo. This will open the sudoers file in the default text editor in Terminal (by default, nano).
edit-sudoers-file-change-sudo-timeout-sudoer-file-in-vim
The sudoers file’s main job is defining which users can use sudo for what. It also holds some simple preferences, which we can adjust first to get a feel for how visudo works.

Change the sudo timeout

By default, entering your sudo password elevates your permissions until you close the shell or exit. This can be insecure, and some might prefer entering their password each time they use sudo.
1. Run sudo visudo as mentioned above.
2. Press Alt + / to navigate to the end of the document. If you are using Vi or Vim, press Shift + G instead.
edit-sudoers-file-change-sudo-timeout-jump-to-end
3. Create a new line at the bottom of the document and add the following line:
edit-sudoers-file-change-sudo-timeout-add-default-timeout
This will set your sudo timeout to zero seconds, so you’ll have sudo permissions for zero seconds after you execute the first command. If you prefer a different interval, enter that value in seconds instead.
You can also set the timeout to “-1,” which gives you an infinite grace period. Don’t do that. It’s a handy way to accidentally nuke your system one day.
4. Press Ctrl + o to save and Ctrl + x to exit.

Limit who can use sudo and for what

The main purpose of the sudoers file is to control which users can run sudo. Without sudo, users can’t elevate their permissions. If you have multiple users accessing the same system through shells, you can control their access by setting values in sudo.
Every sudoers file will have the following line:
This permits the root user on ALL hosts using ALL users to execute ALL commands. ALL is a special value in the sudoers file meaning “no restrictions.” The syntax is as below:
If you want to add another user as root, simply copy the root line and change the user like so:
For more control, you could add a line like the following, which would only permit the “alexander” user to run apt-get update.
Put a “%” in front of the user, and it will define a group. The line below would allow every user in the group “admin” to have root-level permissions. This would be the group as defined by your OS permission groups.

Change the visudo editor

Depending on what version of Linux you’re running, there are two primary ways to change the editor.
For Ubuntu, you’ll want to run the Terminal command below:
You’ll see something like the following:
If you wanted to select vim as your visudo editor from the default of nano, you would press its selection number 3 then press Enter.
For other flavors of Linux, you’ll want to add a new line to your “~./bashrc” file as seen below:
Then save out the file. That would set your visudo editor to vim.
The sudoers file isn’t something you’ll typically need to mess with on single user systems. But system administrators will have more than enough reason to explore its inner workings.

Bash Globbing Tutorial

$
0
0
https://linuxhint.com/bash_globbing_tutorial

Bash does not support native regular expressions like some other standard programming languages. The Bash shell feature that is used for matching or expanding specific types of patterns is called globbing. Globbing is mainly used to match filenames or searching for content in a file. Globbing uses wildcard characters to create the pattern. The most common wildcard characters that are used for creating globbing patterns are described below.

Question mark – (?)

‘?’ is used to match any single character. You can use ‘?’ for multiple times for matching multiple characters.
Example-1:
Suppose, you want to search those text filenames whose names are 4 characters long and extension is .txt. You can apply globbing pattern by using ‘?’ four times to do this task.
Find out the list of all files and folder of the current directory.
$ ls–l
Run the following command search those files whose names are four characters long and unknown.
$ ls -l ????.txt

Example-2:
Suppose, you want to search those document files whose names are 8 characters long, first 4 characters are f, o, o and t and extension is doc. Run the following command with globbing pattern to search the files.
$ ls-l foot????.doc

Example-3:
Suppose, you know the filename is ‘best’ and extension is 3 characters long, but don’t know the extension. Run the following command by using ‘?’ to search all files with the name ‘test’ having any extension of three characters long.
$ ls-l best.???

Asterisk – (*)

‘*’ is used to match zero or more characters. If you have less information to search any file or information then you can use ‘*’ in globbing pattern.
Example -1:
Suppose, you want to search all files of ‘pl’ extension. Run the following command using ‘*’ to do that task.
$ ls-l*.pl

Example-2:
Suppose, you know the starting character of the filename only which is ‘a’. Run the following command using ‘*’ to search all files of the current directory whose names are started with ‘a’.
$ ls-l a*.*

Example-3:
You can apply ‘*’ in bash script for various purposes without searching files. Create a bash file named ‘check.sh’ with the following script. Here, when the user will type ‘y’ or ‘Y’ or ‘yes’ or ‘Yes’ then ‘confirmed’ will print and when the type will type ‘n’ or ‘N’ or ‘no’ or ‘No’ then  ‘Not confirmed’ will print.
#!/bin/bash
echo"Do you want to confirm?"
read answer
case$answerin
[Yy]*)  echo"confirmed.";;
[Nn]*)  echo"Not confirmed.";;
*)echo"Try again.";;
esac
Run the script.
$ bash check.sh

Square Bracket – ([])

‘[]’ is used to match the character from the range. Some of the mostly used range declarations are mentioned below.
All uppercase alphabets are defined by the range as, [:upper:] or [A-Z] .
All lowercase alphabets are defined by the range as, [:lower:] or [a-z].
All numeric digits are defined by the range as, [:digit:] or [0-9].
All uppercase and lower alphabets are defined by the range as, [:alpha:] or [a-zA-z].
All uppercase alphabets, lowercase alphabet and digits are defined by the range as, [:alnum:] or [a-zA-Z0-9]
Example -1:
Run the following command to search all files and folders whose name contains p or q or r or s.
$ ls-l[p-s]*

Example-2:
Run the following command to search all files and folders whose name starts with any digit from 1 to 5.
$ ls-l[1-5]*

Caret – (^)

You can use ‘^’ with square bracket to define globbing pattern more specifically. ‘^’ can be used inside or outside of square bracket. ‘^’ is used outside the square bracket to search those contents of the file that starts with a given range of characters. ‘^’ is used inside the square bracket to show all content of the file by highlighting the lines start with a given range of characters . You can use different types of globbing patterns for searching particular content from a file. ‘grep’ command is used for content searching in bash. Suppose, you have a text file named ‘list.txt’ with the following content. Test the following examples for that file.
Apple
4000
Banana
700
Orange
850
Pear
9000
Jackdruit
Example – 1:
Run the following command to search those lines from list.txt file that starts with P or Q or R.
$ grep '^[P-R]' list.txt

Example – 2:
Run the following command to highlight those lines from list.txt file that starts with A or B or C.
$ grep '[^A-C]' list.txt

Exclamatory Sign – (!)

You can use ‘!’ inside the range pattern. It works same as the use of ‘^’ symbol outside the range pattern. Some examples of using ‘!’ sign are given below.
Example – 1:
Run the following command to show those lines from list.txt file that starts with ‘P’ or Q or R.
$ grep [!P-R] list.txt

Example – 2:
Run the following command to show those lines from list.txt file that starts with any digit from 4 to 8.
$ grep [!4-8] list.txt

Dollar Sign – ($)

‘$’ is used to define the ending character. If you know want to search information based on last character then you can use ‘$’ in globbing pattern.
Example – 1:
Run the following command to search those lines from list.txt file that ends with ‘a’.
$ grep a$ list.txt

Example – 2:
Run the following command to search those lines from list.txt file that end with the number 50.
$ grep 50$ list.txt

Curly bracket – ({})

‘{}’ can be used to match filenames with more than one globbing patterns. Each pattern is separated by ‘,’ in curly bracket without any space. Some examples are given below.
Example – 1:
Run the following command to search those files whose names are 5 characters long and the extension is ‘sh’ or the last two characters of the files are ‘st’ and the extension is ‘txt’.
$ ls -l {?????.sh,*st.txt}

Example – 2:
Run the following command to delete all files whose extensions are ‘doc’ or ‘docx’.
$ rm{*.doc,*.docx}

Logical OR – ( | )

‘|’ sign is also used for applying more than one condition or globbing pattern. Each pattern is separated by ‘|’ symbol in the command.
Example – 1:
Run the following command to search the filenames with four characters long having ‘bash’ extension or the filename having any number of characters with ‘sh’ extension.
$ ls-l ????.bash|ls-l*.sh
Example – 2:
Create a bash file named ‘menu.bash’ and add the following script. If the user type 1 or S then it will print “Searching text”. If the user type 2 or R then it will print “Replacing text”. If the user type 3 or D then it will print “Deleting text”. It will print “Try again” for any other input.
#!/bin/bash
echo"Select any option from the menu:"
read answer
case$answerin
1| S )  echo"Searching text";;
2| R )  echo"Replacing text";;
3| D )  echo"Deleting text";;
*)echo"Try again.";;
esac
Run the script.
$ bash menu.bash

CONCLUSION

Some of the most commonly used globbing patterns are explained in this tutorial by using very simple examples. I hope after practicing the above examples, the concept of globbing will be clear to you and you will be able to apply it in bash commands and scripts successfully.

15 command-line aliases to save you time

$
0
0
https://opensource.com/article/18/8/time-saving-command-line-aliases

Some aliases are included by default in your installed Linux distro.

Image by : 
opensource.com
x

Get the newsletter

Join the 85,000 open source advocates who receive our giveaway alerts and article roundups.
Linux command-line aliases are great for helping you work more efficiently. Better still, some are included by default in your installed Linux distro.
This is an example of a command-line alias in Fedora 27:
The command alias shows the list of existing aliases. Setting an alias is as simple as typing: alias new_name="command"
Here are 15 command-line aliases that will save you time:
  1. To install any utility/application:
    alias install="sudo yum install -y"
    Here, sudo and -y are optional as per user’s preferences:
  2. To update the system:
    alias update="sudo yum update -y"
  3. To upgrade the system:
    alias upgrade="sudo yum upgrade -y"
  4. To change to the root user:
    alias root="sudo su -"
  5. To change to "user," where "user" is set as your username:
    alias user="su user"
  6. To display the list of all available ports, their status, and IP:
    alias myip="ip -br -c a"
  7. To ssh to the server myserver:
    alias myserver="ssh user@my_server_ip”
  8. To list all processes in the system:
    alias process="ps -aux"
  9. To check the status of any system service:
    alias sstatus="sudo systemctl status"
  10. To restart any system service:
    alias srestart="sudo systemctl restart"
  11. To kill any process by its name:
    alias kill="sudo pkill"
  12. To display the total used and free memory of the system:
    alias mem="free -h"
  13. To display the CPU architecture, number of CPUs, threads, etc. of the system:
    alias cpu="lscpu"
  14. To display the total disk size of the system:
    alias disk="df -h"
  15. To display the current system Linux distro (for CentOS, Fedora, and Red Hat):
    alias os="cat /etc/redhat-release"

Linux cut Command Explained for Beginners (with Examples)

$
0
0
https://www.howtoforge.com/linux-cut-command

In Linux, if you want to print a file's content on stdout, the first command that comes to mind is cat. However, there may be times when the requirement is to remove certain part of the file and print only the rest of the content. You'll be glad to know there exists a tool - dubbed cut - that lets you do this.
In this article, we will discuss this tool using some easy to understand examples. But before we do that, it's worth mentioning that all examples in this article have been tested on an Ubuntu 18.04 LTS machine.

Linux cut command

The cut command in Linux lets users remove sections from each line of files. Following is its syntax:
cut OPTION... [FILE]...
Here's what the man page says about this utility:
       Print selected parts of lines from each FILE to standard output.

       With no FILE, or when FILE is -, read standard input.
And following are some Q&A-styled examples that should give you a good idea on how this utility works.

Q1. How to use the cut command?

The cut command expects user to provide a list of bytes, characters, or fields. You can provide bytes using the -b command line option.
For example, suppose there's a file named file1.txt that contains the following line:
abcdefghijklmnopqrstuvwxyz
And you want to only display the first three bytes. Then in this case, you can use the -b option in the following way:
cut file1.txt -b1,2,3
The output will be:
abc
You can also specify a range:
cut file1.txt -b1-10
Following is the output produced in this case:
abcdefghij
Moving on, you can also use hyphen (-) with a number to tell the cut command to either display all bytes after the byte at that number or all bytes before the byte at that number.
For example, the following command will make sure that all bytes including and after the one at number 5 are displayed.
cut file1.txt -b5-
And the following command will display the first 5 bytes:
cut file1.txt -b-5
How to use the cut command

Q2. How to deal with characters?

Sometimes, the file you pass to the cut command contains characters that are more than one byte in size. In that case, it's advisable to use the -c option which lets the tool correctly understand which characters you want to display or remove.
For example, ♣ is a special character that occupies multiple bytes. So if you want to use the cut command on a text stream that contains these kind of characters, then it's better to use -c instead of -b. Functionality wise, both -c and -b work in similar way.

Q3. How cut works with delimiters?

You can also make the cut command work with delimiters. For this, you can use the -d command line option.
For example, suppose the input file contains comma-separated fields:
Howtoforge, HTF, howtoforge.com
FaqForge, FF, faqforge.com
And you want only first and third entries, then this can be done in the following way:
cut file1.txt -d, -f1,3
Note that the -f option lets you choose the fields you wanna display.

Conclusion

So you see, the cut command has the potential to save a lot of your time if the task involves selective output of a file's content. Here, in this tutorial, we have discussed some basic command line options this tool offers. To learn more, head to the tool's man page.

How to install and configure FreeIPA on Red Hat Linux

$
0
0
https://linuxconfig.org/how-to-install-and-configure-freeipa-on-red-hat-linux

Objective

Our objective is to install and configure a standalone FreeIPA server on Red Hat Enterprise Linux.

Operating System and Software Versions

  • Operating System: Red Hat Enterprise Linux 7.5
  • Software: FreeIPA 4.5.4-10

Requirements

Privileged access to the target server, available software repository.

Difficulty

MEDIUM

Conventions

  • # - requires given linux commands to be executed with root privileges either directly as a root user or by use of sudo command
  • $ - given linux commands to be executed as a regular non-privileged user

Introduction

FreeIPA is mainly a directory service, where you can store information about your users, and their rights regarding login, become root, or just run a specific command as root on your systems that are joined your FreeIPA domain, and many more. Although this is the main feature of the service, there are optional components that can be very useful, like DNS and PKI - this makes FreeIPA an essential infrastructural part of a Linux-based system. It has a nice web-based GUI, and powerful command line interface.

In this tutorial we will see how to install and configure a standalone FreeIPA server on a Red Hat Enterprise Linux 7.5. Note however, that in a production system you are advised to create at least one more replica to provide high availability. We'll be hosting the service on a virtual machine with 2 CPU cores and 2 GB of RAM - on a large system you might want to add some more resources. Our lab machine runs RHEL 7.5, base install. Let's get started.

To install and configure a FreeIPA server is pretty easy - the gotcha is in the planning. You should think about what parts of the software stack you want to use, and what is the environment you want to run these services. As FreeIPA can handle DNS, if you are building a system from scratch, it might be useful give a whole DNS domain to FreeIPA, where all client machines will be calling the FreeIPA servers for DNS. This domain can be a subdomain of your infrastructure, you can even set a subdomain only for the FreeIPA servers - but think this trough carefully, as you can not change the domain later. Don't use an existing domain, FreeIPA needs to think it is the master of the given domain (the installer will check if the domain can be resolved, and if it has a SOA record other then itself).

PKI is another question: if you already have a CA (Certificate Authority) in your system, you might want to setup FreeIPA as a subordinate CA. With the help of Certmonger, FreeIPA have the ability to automatically renew client certificates (like a web server's SSL certificate), which can come in handy - but if the system has no Internet-facing service, you may not need the PKI service of FreeIPA at all. It all depends on the use case.

In this tutorial the planning is already done. We want to build a new testing lab, so we'll install and configure all features of FreeIPA, including DNS and PKI with a self-signed CA certificate. FreeIPA can generate this for us, no need to create one with tools like openssl.


Requirements

What should be set up first is a reliable NTP source for the server (FreeIPA will act as an NTP server too, but needs a source naturally), and an entry in the server's /etc/hosts file pointing to itself:

# cat /etc/hosts
127.0.0.1 localhost localhost.localdomain localhost4 localhost4.localdomain4
::1 localhost localhost.localdomain localhost6 localhost6.localdomain6

192.168.122.147 rhel7.ipa.linuxconfig.org rhel7
And the hostname provided in the hosts file MUST be the FQDN of the machine.

# hostname
rhel7.ipa.linuxconfig.org
This is an important step, don't miss it. The same hostname needed in the network file:

# grep HOSTNAME /etc/sysconfig/network
HOSTNAME=rhel7.ipa.linuxconfig.org

Installing packages

The software needed is included in the Red Hat Enterprise Linux server ISO image or subscription channel, no additional repositories needed. In this demo there is a local repository set which have the contents of the ISO image. The software stack is bundled together, so a single yum command will do:

# yum install ipa-server ipa-server-dns
On a base install, yum will provide a long list of dependencies, including Apache Tomcat, Apache Httpd, 389-ds (the LDAP server), and so on. After yum finishes, open the ports needed on the firewall:

# firewall-cmd --add-service=freeipa-ldap
success
# firewall-cmd --add-service=freeipa-ldap --permanent
success


Setup

Now let's setup our new FreeIPA server. This will take time, but you only needed for the first part, when the installer asks for parameters. Most parameters can be passed as arguments to the installer, but we’ll not give any, this way we can benefit from the previous settings.
# ipa-server-install

The log file for this installation can be found in /var/log/ipaserver-install.log
==============================================================================
This program will set up the IPA Server.

This includes:
* Configure a stand-alone CA (dogtag) for certificate management
* Configure the Network Time Daemon (ntpd)
* Create and configure an instance of Directory Server
* Create and configure a Kerberos Key Distribution Center (KDC)
* Configure Apache (httpd)
* Configure the KDC to enable PKINIT

To accept the default shown in brackets, press the Enter key.

WARNING: conflicting time&date synchronization service 'chronyd' will be disabled
in favor of ntpd

## we'll use the integrated DNS server
Do you want to configure integrated DNS (BIND)? [no]: yes

Enter the fully qualified domain name of the computer
on which you're setting up server software. Using the form
.
Example: master.example.com.

## pressing 'enter' means we accept the default in the bracelets
## this is the reason we set up the proper FDQN for the host

Server host name [rhel7.ipa.linuxconfig.org]:

Warning: skipping DNS resolution of host rhel7.ipa.linuxconfig.org
The domain name has been determined based on the host name.

## now we don't have to type/paste domain name
## and the installer don’t need to try setting the host’s name

Please confirm the domain name [ipa.linuxconfig.org]:

The kerberos protocol requires a Realm name to be defined.
This is typically the domain name converted to uppercase.

## the Kerberos realm is mapped from the domain name
Please provide a realm name [IPA.LINUXCONFIG.ORG]:
Certain directory server operations require an administrative user.
This user is referred to as the Directory Manager and has full access
to the Directory for system management tasks and will be added to the
instance of directory server created for IPA.
The password must be at least 8 characters long.

## Directory Manager user is for the low-level operations, like creating replicas
Directory Manager password:
## use a very strong password in a production environment!
Password (confirm):

The IPA server requires an administrative user, named 'admin'.
This user is a regular system account used for IPA server administration.

## admin is the "root" of the FreeIPA system – but not the LDAP directory
IPA admin password:
Password (confirm):

Checking DNS domain ipa.linuxconfig.org., please wait ...
## we could setup forwarders, but this can be set later as well
Do you want to configure DNS forwarders? [yes]: no
No DNS forwarders configured
Do you want to search for missing reverse zones? [yes]: no

The IPA Master Server will be configured with:
Hostname: rhel7.ipa.linuxconfig.org
IP address(es): 192.168.122.147
Domain name: ipa.linuxconfig.org
Realm name: IPA.LINUXCONFIG.ORG

BIND DNS server will be configured to serve IPA domain with:
Forwarders: No forwarders
Forward policy: only
Reverse zone(s): No reverse zone

Continue to configure the system with these values? [no]: yes

## at this point the installer will work on its own,
## and complete the process in a few minutes. The perfect time for coffee.

The following operations may take some minutes to complete.
Please wait until the prompt is returned.

Configuring NTP daemon (ntpd)
[1/4]: stopping ntpd ...
The output of the installer is rather long, you can see as all components configured, restarted, and verified. At the end of the output, there some steps needed for full functionality, but not for the installation process itself.
... The ipa-client-install command was successful

==============================================================================
Setup complete

Next steps:
1. You must make sure these network ports are open:
TCP Ports:
* 80, 443: HTTP/HTTPS
* 389, 636: LDAP/LDAPS
* 88, 464: kerberos
* 53: bind
UDP Ports:
* 88, 464: kerberos
* 53: bind
* 123: ntp

2. You can now obtain a kerberos ticket using the command: 'kinit admin'
This ticket will allow you to use the IPA tools (e.g., ipa user-add)
and the web user interface.

Be sure to back up the CA certificates stored in /root/cacert.p12
These files are required to create replicas. The password for these
files is the Directory Manager password
As the installer points out, be sure to backup the CA cert, and open additional needed ports on the firewall.

Now let's enable home directory creation on login:
# authconfig --enablemkhomedir –-update


Verification

We can start testing if we have a working service stack. Let's test if we can get a Kerberos ticket for the admin user (with the password given to the admin user during install):
# kinit admin
Password for admin@IPA.LINUXCONFIG.ORG
:
# klist
Ticket cache: KEYRING:persistent:0:0
Default principal: admin@IPA.LINUXCONFIG.ORG

Valid starting Expires Service principal
2018-06-24 21.44.30 2018-06-25 21.44.28 krbtgt/IPA.LINUXCONFIG.ORG@IPA.LINUXCONFIG.ORG
The host machine is enrolled into our new domain, and the default rules grant ssh access to the above-created admin user to all enrolled host. Let's test if these rules work as expected by opening ssh connection to localhost:
# ssh admin@localhost
Password:
Creating home directory for admin.
Last login: Sun Jun 24 21:41:57 2018 from localhost
$ pwd
/home/admin
$ exit
Let's check the status of the whole software stack:

# ipactl status
Directory Service: RUNNING
krb5kdc Service: RUNNING
kadmin Service: RUNNING
named Service: RUNNING
httpd Service: RUNNING
ipa-custodia Service: RUNNING
ntpd Service: RUNNING
pki-tomcatd Service: RUNNING
ipa-otpd Service: RUNNING
ipa-dnskeysyncd Service: RUNNING
ipa: INFO: The ipactl command was successful
And - with the Kerberos ticket acquired earlier - ask for information about the admin user using the CLI tool:

# ipa user-find admin
--------------
1 user matched
--------------
User login: admin
Last name: Administrator
Home directory: /home/admin
Login shell: /bin/bash
Principal alias: admin@IPA.LINUXCONFIG.ORG
UID: 630200000
GID: 630200000
Account disabled: False
----------------------------
Number of entries returned 1
----------------------------


And finally, login to the web-based management page using the admin user's credentials (the machine running the browser must be able to resolve the name of the FreeIPA server). Use HTTPS, the server will redirect if plain HTTP is used. As we installed a self-signed root certificate, the browser will warn us about it.

FreeIPA login page
Login page of the FreeIPA WUI
The default page after login shows the list of our users, where now only the admin user appears.

FreeIPA user list
The default page after login is the userlist in FreeIPA WUI


With this we completed our goal, we have a running FreeIPA server ready to be populated with users, hosts, certificates, and various rules.

How To Use A Swap File Instead Of A Swap Partition On Linux

$
0
0
https://www.linuxuprising.com/2018/08/how-to-use-swap-file-instead-of-swap.html

This article explains how to transition from having a swap partition to a swap file. If you don't need to disable any existing swap partition and all you need is to create a swap file and activate it, simply skip steps 1 and 2.

On my Ubuntu 18.04 desktop I had a fairly large swap partition which I wanted to use for other purposes, and move the swap to a file. Ubuntu 18.04 already uses a swap file by default instead of a swap partition, however, I upgraded to the latest Ubuntu version instead of making a clean install, so my system continued to use a swap partition. Therefore I had to move the swap to a file myself.

As a result, the instructions below were tested on my Ubuntu 18.04 desktop. They should work on any Linux distribution though.

It's important to mention that you can't use a swap file with a BTRFS filesystem (thanks to Isaac for mentioning this in the comments).

Also, hibernating (to disk) will no longer work out of the box when using a swap file. This can be done but I can't test it because resuming from hibernation didn't work on my system previously to switching to a swapfile so I just gave up on using hibernation. What's more, most Linux distributions use suspend (to RAM) instead of hibernate (to disk) by default anyway. If you need to enable hibernation with a swapfile, there's some info here. Suspend (to ram) is not affected by this.


How to Move Swap To A File On Your Linux Filesystem


1. Turn off your current swap partition.

To see the active swap partition, run:

swapon -s

The command output looks like this in my case:

Filename    Type        Size       Used   Priority
/dev/sda5 partition 15624188 0 -2

Now you can turn off the current swap device using this command:

sudo swapoff /dev/sdXX

Where /dev/sdXX is the device listed by the swapon -s command (under the Filename section - /dev/sda5 in my case from the example above), so make sure to replace it with your swap partition.

2. Remove your old swap entry from the /etc/fstab file.

To remove the old swap entry, open the /etc/fstab file as root with a text editor, and remove the swap line. Do not modify anything else in the /etc/fstab file! Changing anything else in this file may prevent your system from booting!

You can open the file with Nano editor from the command line, like this:

sudo nano /etc/fstab

And remove the entry containing your swap partition information (you can also just comment out the line by adding a # in front of it). As an example, in my case the swap entry looks like this:

UUID=d1b17f9c-9c5e-4471-854a-3ccaf358c30b none swap sw 0 0

As you can see, the swap entry should contain swap and sw - that's how you know which line to remove (or comment out).

Then press Ctrl + O, then Enter to save the file. To exit Nano editor after you've saved the file press Ctrl + X.

3. Create a swap file.

To create a swap file of 1GB use this command:

sudo dd if=/dev/zero of=/swapfile bs=1024 count=1048576

Where:

  • /swapfile is the path and name of the swap file. You can change this to something else.
  • the number after count (1048576) equals 1GB. Increase it if you want to use a larger swap file. For example, multiply this number by 5 if you want to use a 5GB swap file (so use 5242880 as the count= value for a 5GB swap file).

If you use a different swap file name and path, make sure to use that instead of /swapfile in all the instructions that follow below.

4. Set the swap file permission to 600.

Use this so other users won't be able to read your swap file, which may contain sensitive information.

To set the swap file permission to 600, use this command:

sudo chmod 600 /swapfile

5. Format the newly created file as swap:

sudo mkswap /swapfile

6. Enable the newly created swap file:

sudo swapon /swapfile

To verify if the new swap file is in use, run:

swapon -s

It should output something like this:

Filename    Type   Size      Used   Priority
/swapfile file 5242876 0 -2

7. Add the newly created swap file to /etc/fstab.

To use the new swap file each time you boot, you'll need to add it to the /etc/fstab file. Open /etc/fstab with a text editor (as root) like Nano:

sudo nano /etc/fstab

And in this file add the following line:

/swapfile none swap sw 0 0

To save the file (if you've used Nano command line editor) press Ctrl + O, then Enter. To exit Nano editor after you've saved the file press Ctrl + X. Again, remember to not modify anything else in the /etc/fstab file! Changing anything else in this file may prevent your system from booting!

8. This step is required for Ubuntu and Debian-based Linux distributions (I'm not sure if others need this too).

You need to edit the /etc/initramfs-tools/conf.d/resume file and comment out (add a # at the beginning of the line) the RESUME=UUID=... line. In my case, not doing this resulted in about 15-20 seconds of extra boot time. The systemd-analyze blame command didn't give any info as to why that's happening so I had to dig quite a bit to find out this is what's causing the boot delay.

Luckily I noticed a "Gave up waiting for suspend/resume device" message being displayed for a very brief moment while booting, which can be caused by not having the correct swap UUID in /etc/initramfs-tools/conf.d/resume.

This file is used when resuming from hibernation, and it caused boot delays because we no longer have a swap partition.

To comment out this line in /etc/initramfs-tools/conf.d/resume, all you have to do is run the command below:

sudo sed -i 's/^RESUME=UUID/#RESUME=UUID/g' /etc/initramfs-tools/conf.d/resume

You'll also need to update initramfs and after that you're done:

update-initramfs -u

Add GUIs to your programs and scripts easily with PySimpleGUI

$
0
0
https://opensource.com/article/18/8/pysimplegui

Create a custom GUI in under five minutes.

web development and design, desktop and browser
Image credits : 
x

Get the newsletter

Join the 85,000 open source advocates who receive our giveaway alerts and article roundups.
Few people run Python programs by double-clicking the .py file as if it were a .exe file. When a typical user (non-programmer types) double-clicks an .exe file, they expect it to pop open with a window they can interact with. While GUIs, using tkinter, are possible using standard Python installations, it's unlikely many programs do this.
What if it were so easy to open a Python program into a GUI that complete beginners could do it? Would anyone care? Would anyone use it? It's difficult to answer because to date it's not been easy to build a custom GUI.
There seems to be a gap in the ability to add a GUI onto a Python program/script. Complete beginners are left using only the command line and many advanced programmers don't want to take the time required to code up a tkinter GUI.

GUI frameworks

There is no shortage of GUI frameworks for Python. Tkinter, WxPython, Qt, and Kivy are a few of the major packages. In addition, there are a good number of dumbed-down GUI packages that "wrap" one of the major packages, including EasyGUI, PyGUI, and Pyforms.
The problem is that beginners (those with less than six weeks of experience) can't learn even the simplest of the major packages. That leaves the wrapper packages as a potential option, but it will still be difficult or impossible for most new users to build a custom GUI layout. Even if it's possible, the wrappers still require pages of code.
PySimpleGUI attempts to address these GUI challenges by providing a super-simple, easy-to-understand interface to GUIs that can be easily customized. Even many complex GUIs require less than 20 lines of code when PySimpleGUI is used.

The secret

What makes PySimpleGUI superior for newcomers is that the package contains the majority of the code that the user is normally expected to write. Button callbacks are handled by PySimpleGUI, not the user's code. Beginners struggle to grasp the concept of a function, and expecting them to understand a call-back function in the first few weeks is a stretch.
With most GUIs, arranging GUI widgets often requires several lines of code… at least one or two lines per widget. PySimpleGUI uses an "auto-packer" that automatically creates the layout. No pack or grid system is needed to lay out a GUI window.
Finally, PySimpleGUI leverages the Python language constructs in clever ways that shorten the amount of code and return the GUI data in a straightforward manner. When a widget is created in a form layout, it is configured in place, not several lines of code away.

What is a GUI?

Most GUIs do one thing: collect information from the user and return it. From a programmer's viewpoint, this could be summed up as a function call that looks like this:
button, values = GUI_Display(gui_layout)
What's expected from most GUIs is the button that was clicked (e.g., OK, cancel, save, yes, no, etc.) and the values input by the user. The essence of a GUI can be boiled down to a single line of code.
This is exactly how PySimpleGUI works (for simple GUIs). When the call is made to display the GUI, nothing executes until a button is clicked that closes the form.
There are more complex GUIs, such as those that don't close after a button is clicked. Examples include a remote control interface for a robot and a chat window. These complex forms can also be created with PySimpleGUI.

Making a quick GUI

When is PySimpleGUI useful? Immediately, whenever you need a GUI. It takes less than five minutes to create and try a GUI. The quickest way to make a GUI is to copy one from the PySimpleGUI Cookbook. Follow these steps:
  • Find a GUI that looks similar to what you want to create
  • Copy code from the Cookbook
  • Paste it into your IDE and run it
Let's look at the first recipe from the book.


import PySimpleGUI as sg


# Very basic form.  Return values as a list

form = sg.FlexForm('Simple data entry form')  # begin with a blank form


layout = [

          [sg.Text('Please enter your Name, Address, Phone')],

          [sg.Text('Name', size=(15, 1)), sg.InputText('name')],

          [sg.Text('Address', size=(15, 1)), sg.InputText('address')],

          [sg.Text('Phone', size=(15, 1)), sg.InputText('phone')],

          [sg.Submit(), sg.Cancel()]

         ]


button, values = form.LayoutAndRead(layout)


print(button, values[0], values[1], values[2])


It's a reasonably sized form.
If you just need to collect a few values and they're all basically strings, you could copy this recipe and modify it to suit your needs.
You can even create a custom GUI layout in just five lines of code.


import PySimpleGUI as sg


form = sg.FlexForm('My first GUI')


layout = [ [sg.Text('Enter your name'), sg.InputText()],

           [sg.OK()] ]


button, (name,) = form.LayoutAndRead(layout)


Making a custom GUI in five minutes

If you have a straightforward layout, you should be able create a custom layout in PySimpleGUI in less than five minutes by modifying code from the Cookbook.
Widgets are called elements in PySimpleGUI. These elements are spelled exactly as you would type them into your Python code.

Core elements


Text

InputText

Multiline

InputCombo

Listbox

Radio

Checkbox

Spin

Output

SimpleButton

RealtimeButton

ReadFormButton

ProgressBar

Image

Slider

Column


Shortcut list

PySimpleGUI also has two types of element shortcuts. One type is simply other names for the exact same element (e.g., T instead of Text). The second type configures an element with a particular setting, sparing you from specifying all parameters (e.g., Submit is a button with the text "Submit" on it)


T = Text

Txt = Text

In = InputText

Input = IntputText

Combo = InputCombo

DropDown = InputCombo

Drop = InputCombo


Button shortcuts

A number of common buttons have been implemented as shortcuts. These include:


FolderBrowse

FileBrowse

FileSaveAs

Save

Submit

OK

Ok

Cancel

Quit

Exit

Yes

No


There are also shortcuts for more generic button functions.


SimpleButton

ReadFormButton

RealtimeButton


These are all the GUI widgets you can choose from in PySimpleGUI. If one isn't on these lists, it doesn't go in your form layout.

GUI design pattern

The stuff that tends not to change in GUIs are the calls that set up and show a window. The layout of the elements is what changes from one program to another. Here is the code from the example above with the layout removed:


import PySimpleGUI as sg


form = sg.FlexForm('Simple data entry form')

# Define your form here (it's a list of lists)

button, values = form.LayoutAndRead(layout)


The flow for most GUIs is:
  • Create the form object
  • Define the GUI as a list of lists
  • Show the GUI and get results
These are line-for-line what you see in PySimpleGUI's design pattern.

GUI layout

To create your custom GUI, first break your form down into rows, because forms are defined one row at a time. Then place one element after another, working from left to right.
The result is a "list of lists" that looks something like this:


layout = [  [Text('Row 1')],

            [Text('Row 2'), Checkbox('Checkbox 1', OK()), Checkbox('Checkbox 2'), OK()] ]


This layout produces this window:

Displaying the GUI

Once you have your layout complete and you've copied the lines of code that set up and show the form, it's time to display the form and get values from the user.
This is the line of code that displays the form and provides the results:
button, values = form.LayoutAndRead(layout)
Forms return two values: the text of the button that is clicked and a list of values the user enters into the form.
If the example form is displayed and the user does nothing other than clicking the OK button, the results would be:


button == 'OK'

values == [False, False]


Checkbox elements return a value of True or False. Because the checkboxes defaulted to unchecked, both the values returned were False.

Displaying results

Once you have the values from the GUI, it's nice to check what values are in the variables. Rather than printing them out using a print statement, let's stick with the GUI idea and output the data to a window.
PySimpleGUI has a number of message boxes to choose from. The data passed to the message box is displayed in a window. The function takes any number of arguments. You can simply indicate all the variables you want to see in the call.
The most commonly used message box in PySimpleGUI is MsgBox. To display the results from the previous example, write:
MsgBox('The GUI returned:', button, values)

Putting it all together

Now that you know the basics, let's put together a form that contains as many of PySimpleGUI's elements as possible. Also, to give it a nice appearance, we'll change the "look and feel" to a green and tan color scheme.


import PySimpleGUI as sg


sg.ChangeLookAndFeel('GreenTan')


form = sg.FlexForm('Everything bagel', default_element_size=(40, 1))


column1 = [[sg.Text('Column 1', background_color='#d3dfda', justification='center', size=(10,1))],

           [sg.Spin(values=('Spin Box 1', '2', '3'), initial_value='Spin Box 1')],

           [sg.Spin(values=('Spin Box 1', '2', '3'), initial_value='Spin Box 2')],

           [sg.Spin(values=('Spin Box 1', '2', '3'), initial_value='Spin Box 3')]]

layout = [

    [sg.Text('All graphic widgets in one form!', size=(30, 1), font=("Helvetica", 25))],

    [sg.Text('Here is some text.... and a place to enter text')],

    [sg.InputText('This is my text')],

    [sg.Checkbox('My first checkbox!'), sg.Checkbox('My second checkbox!', default=True)],

    [sg.Radio('My first Radio!     ', "RADIO1", default=True), sg.Radio('My second Radio!', "RADIO1")],

    [sg.Multiline(default_text='This is the default Text should you decide not to type anything', size=(35, 3)),

     sg.Multiline(default_text='A second multi-line', size=(35, 3))],

    [sg.InputCombo(('Combobox 1', 'Combobox 2'), size=(20, 3)),

     sg.Slider(range=(1, 100), orientation='h', size=(34, 20), default_value=85)],

    [sg.Listbox(values=('Listbox 1', 'Listbox 2', 'Listbox 3'), size=(30, 3)),

     sg.Slider(range=(1, 100), orientation='v', size=(5, 20), default_value=25),

     sg.Slider(range=(1, 100), orientation='v', size=(5, 20), default_value=75),

     sg.Slider(range=(1, 100), orientation='v', size=(5, 20), default_value=10),

     sg.Column(column1, background_color='#d3dfda')],

    [sg.Text('_' * 80)],

    [sg.Text('Choose A Folder', size=(35, 1))],

    [sg.Text('Your Folder', size=(15, 1), auto_size_text=False, justification='right'),

     sg.InputText('Default Folder'), sg.FolderBrowse()],

    [sg.Submit(), sg.Cancel()]

     ]


button, values = form.LayoutAndRead(layout)

sg.MsgBox(button, values)


This may seem like a lot of code, but try coding this same GUI layout directly in tkinter and you'll quickly realize how tiny it is.
The last line of code opens a message box. This is how it looks:
Each parameter to the message box call is displayed on a new line. There are two lines of text in the message box; the second line is very long and wrapped a number of times
Take a moment and pair up the results values with the GUI to get an understanding of how results are created and returned.

Adding a GUI to Your Program or Script

If you have a script that uses the command line, you don't have to abandon it in order to add a GUI. An easy solution is that if there are zero parameters given on the command line, then the GUI is run. Otherwise, execute the command line as you do today.
This kind of logic is all that's needed:


if len(sys.argv) == 1:

        # collect arguments from GUI

else:

    # collect arguements from sys.argv


The easiest way to get a GUI up and running quickly is to copy and modify one of the recipes from the PySimpleGUI Cookbook.
Have some fun! Spice up the scripts you're tired of running by hand. Spend 5 or 10 minutes playing with the demo scripts. You may find one already exists that does exactly what you need. If not, you will find it's simple to create your own. If you really get lost, you've only invested 10 minutes.

Resources

Installation

PySimpleGUI works on all systems that run tkinter, including Raspberry Pi, and it requires Python 3
pip install PySimpleGUI

Documentation

Linux Performance

$
0
0
http://www.brendangregg.com/linuxperf.html


Linux Performance

hi-res: observability + static + perf-tools/bcc (svg)

slides: observability

slides: static, benchmarking, tuning

sar, perf-tools, bcc/BPF:

Images license: creative commons Attribution-ShareAlike 4.0.
This page links to various Linux performance material I've created, including the tools maps on the right. The first is a hi-res version combining observability, static performance tuning, and perf-tools/bcc (see discussion). The remainder were designed for use in slide decks and have larger fonts and arrows, and show: Linux observability tools, Linux benchmarking tools, Linux tuning tools, and Linux sar. For even more diagrams, see my slide decks below.

Tools

Documentation

Talks

In rough order of recommended viewing or difficulty, intro to more advanced:

1. Linux Systems Performance (PerconaLive 2016)

This is my summary of Linux systems performance in 50 minutes, covering six facets: observability, methodologies, benchmarking, profiling, tracing, and tuning. It's intended for people who have limited appetite for this topic.
A video of the talk is on percona.com, and the slides are on slideshare or as a PDF.

For a lot more information on observability tools, profiling, and tracing, see the talks that follow.

2. Linux Performance 2018 (PerconaLive 2018)

This was a 20 minute keynote summary of recent changes and features in Linux performance in 2018.
A video of the talk is on youtube, and the slides are on slideshare or as a PDF.

3. Linux Performance Tools (Velocity 2015)

At Velocity 2015, I gave a 90 minute tutorial on Linux performance tools, summarizing performance observability, benchmarking, tuning, static performance tuning, and tracing tools. I also covered performance methodology, and included some live demos. This should be useful for everyone working on Linux systems. If you just saw my PerconaLive2016 talk, then some content should be familiar, but with many extras: I focus a lot more on the tools in this talk.
A video of the talk is on youtube (playlist; part 1, part 2) and the slides are on slideshare or as a PDF.

This was similar to my SCaLE11x and LinuxCon talks, however, with 90 minutes I was able to cover more tools and methodologies, making it the most complete tour of the topic I've done. I also posted about it on the Netflix Tech Blog.

4. How Netflix Tunes EC2 Instances for Performance (AWS re:Invent, 2017)

Instead of performance observability, this talk is about tuning. I begin by providing Netflix background, covering instance types and features in the AWS EC2 cloud, and then talk about Linux kernel tunables and observability.
A video of the talk is on youtube and the slides are on slideshare:

5. Container Performance Analysis (DockerCon, 2017)

At DockerCon 2017 in Austin, I gave a talk on Linux container performance analysis, showing how to find bottlenecks in the host vs the container, how to profiler container apps, and dig deeper into the kernel.
A video of the talk is on youtube and the slides are on slideshare.

6. Broken Linux Performance Tools (SCaLE14x, 2016)

At the Southern California Linux Expo (SCaLE 14x), I gave a talk on Broken Linux Performance Tools. This was a follow-on to my earlier Linux Performance Tools talk originally at SCaLE11x (and more recently at Velocity as a tutorial). This broken tools talk was a tour of common problems with Linux system tools, metrics, statistics, visualizations, measurement overhead, and benchmarks. It also includes advice on how to cope (the green "What You Can Do" slides).
A video of the talk is on youtube and the slides are on slideshare or as a PDF.

7. Using Linux perf at Netflix (Kernel Recipes, 2017)

At Kernel Recipes 2017 I gave an updated talk on Linux perf at Netflix, focusing on getting CPU profiling and flame graphs to work. This talk includes a crash course on perf_events, plus gotchas such as fixing stack traces and symbols when profiling Java, Node.js, VMs, and containers.
A video of the talk is on youtube and the slides are on slideshare:

There's also an older version of this talk from 2015, which I've posted about. To learn more about flame graphs, see my flame graphs presentation.

8. Give me 15 minutes and I'll change your view of Linux tracing (LISA, 2016)

I gave this demo at USENIX/LISA 2016, showing ftrace, perf, and bcc/BPF. A video is on youtube.
This was the first part of a longer talk on Linux 4.x Tracing Tools: Using BPF Superpowers. See the full talk video and talk slides.

9. Performance analysis superpowers with Linux eBPF (O'Reilly Velocity, 2017)

This talk covers using enhanced BPF (aka eBPF) features added to the Linux 4.x series for performance analysis, observability, and debugging. The front-end used in this talk is bcc (BPF compiler collection), an open source project that provides BPF interfaces and a collection of tools.
A video of the talk is on youtube, and the slides are on slideshare or as a PDF.

10. Linux Performance Analysis: New Tools and Old Secrets (ftrace) (LISA 2014)

At USENIX LISA 2014, I gave a talk on the new ftrace and perf_events tools I've been developing: the perf-tools collection on github, which mostly uses ftrace: a tracer that has been built into the Linux kernel for many years, but few have discovered (practically a secret).
A video of the talk is on youtube, and the slides are on slideshare or as a PDF. In a post about this talk, I included some more screenshots of these tools in action.

11. Performance Checklists for SREs (SREcon, 2016)

At SREcon 2016 Santa Clara, I gave the closing talk on performance checklists for SREs (Site Reliability Engineers). The later half of this talk included Linux checklists for incident performance response. These may be useful whether you're analyzing Linux performance in a hurry or not.
A video of the talk is on youtube and usenix, and the slides are on slideshare and as a PDF. I included the checklists in a blog post.

Resources

Other resources (not by me) I'd recommend for the topic of Linux performance:

Last updated: 30-Apr-2018
Copyright 2018 Brendan Gregg, all rights reserved

9 Useful Examples of Touch Command in Linux

$
0
0
https://linuxhandbook.com/touch-command

Learn to use touch command in Linux with these useful and practical examples.

Touch command in Linux

Touch command in Linux is used for changing file timestamps however one of the most common usages of touch command includes creating a new empty file.
With the touch command, you can change access, modify and change time of files and folders in Linux. You can update the timestamps or modify them to a date in the past.
The syntax for touch command is quite simple:
touch [option] file
Touch command syntax

What are file timestamps in Linux, again?

I have written about timestamps in Linux in detail in an earlier article. I would recommend reading it for a better and clearer understanding. For the sake of a quick recall, I’ll list the timestamps here:
  • access time – last time when a file was accessed 
  • modify time – last time when a file was modified 
  • change time – last time when file metadata (file permission, ownership etc) was changed  
You can see the timestamps of a file using the stat command in the following manner:
stat abhi.txt 
File: abhi.txt
Size: 10 Blocks: 8 IO Block: 4096 regular file
Device: 10305h/66309d Inode: 11940163 Links: 1
Access: (0644/-rw-r--r--) Uid: ( 1000/abhishek) Gid: ( 1000/abhishek)
Access: 2018-09-02 14:12:24.476483367 +0530
Modify: 2018-09-02 14:12:24.476483367 +0530
Change: 2018-09-02 14:12:24.476483367 +0530
Birth: -

9 Practical examples of touch command in Linux

Touch command examples in Linux
Now let’s see how to use the touch command with some simple but useful examples.

1. Create an empty  file

As I mentioned earlier, this is the most common use of touch command. All you have to do is to use touch with the file name.
touch 
This will create an empty file if the file doesn’t exist.
touch empty_file
ls -l empty_file
-rw-r--r-- 1 abhishek abhishek 0 Sep 2 14:37 empty_file
But what if the file already exists? In that case, it will update all three timestamps of the file to the current time.

2. Create multiple empty files

You can use touch to create more than one empty file as well. Just provide the names of the files you want to create.
touch 
If you think it’s tiring to write all filenames, you can auto-generate filenames in this way:
touch new-file-{1..10}.txt
This will create new-file-1.txt, new-file-2.txt upto new-file-10.txt.

3. Avoid creating a file with touch if it doesn’t exist

Touch will update the timestamps of input file if it exists and will create an empty file if the input file does not exist.
But what if you don’t want touch to create a new empty file? You want it to update the timestamps of the file but if the file doesn’t exist, it should not be created.
You can use the touch command with -c option in such cases:
touch -c 
Remember: Touch will create a new empty file if it doesn’t exist else it will modify the timestamps of the existing file. You can stop the creation of a new file with the -c option. 

4. Change all timestamps of a file

If you use touch on an existing file, it will change access, modify and change time of that file.
For example, I have this file named sherlock.txt with the following timestamps:
stat sherlock.txt 
File: sherlock.txt
Size: 356 Blocks: 8 IO Block: 4096 regular file
Device: 10305h/66309d Inode: 11928277 Links: 1
Access: (0777/-rwxrwxrwx) Uid: ( 1000/abhishek) Gid: ( 1000/abhishek)
Access: 2018-08-25 09:44:56.092937000 +0530
Modify: 2018-08-09 09:41:05.028309000 +0530
Change: 2018-08-25 09:44:56.096937182 +0530
If I use touch on this command, all timestamps will be changed to the current timestamps.
touch sherlock.txt 
stat sherlock.txt
File: sherlock.txt
Size: 356 Blocks: 8 IO Block: 4096 regular file
Device: 10305h/66309d Inode: 11928277 Links: 1
Access: (0777/-rwxrwxrwx) Uid: ( 1000/abhishek) Gid: ( 1000/abhishek)
Access: 2018-09-02 15:22:47.017037942 +0530
Modify: 2018-09-02 15:22:47.017037942 +0530
Change: 2018-09-02 15:22:47.017037942 +0530
Birth: -
Note: You should not be bothered with ctime (change time). It’s a system property and cannot/shouldn’t be controlled by the user. Your focus should be on access and modify time.

5. Update only access time of file

You may not always want to change all the timestamps of a file. If you just want to change the access time of a file, you can use the -a option with touch.
touch -a sherlock.txt 
stat sherlock.txt
File: sherlock.txt
Size: 356 Blocks: 8 IO Block: 4096 regular file
Device: 10305h/66309d Inode: 11928277 Links: 1
Access: (0777/-rwxrwxrwx) Uid: ( 1000/abhishek) Gid: ( 1000/abhishek)
Access: 2018-09-02 15:29:08.796926093 +0530
Modify: 2018-09-02 15:22:47.017037942 +0530
Change: 2018-09-02 15:29:08.796926093 +0530
Birth: -

6. Update only modify time of file

If you just want to update the modify time of a file to the current timestamp, use the -m option of touch command.
touch -m sherlock.txt 
stat sherlock.txt
File: sherlock.txt
Size: 356 Blocks: 8 IO Block: 4096 regular file
Device: 10305h/66309d Inode: 11928277 Links: 1
Access: (0777/-rwxrwxrwx) Uid: ( 1000/abhishek) Gid: ( 1000/abhishek)
Access: 2018-09-02 15:29:08.796926093 +0530
Modify: 2018-09-02 15:31:25.770866881 +0530
Change: 2018-09-02 15:31:25.770866881 +0530
Birth: -

7. Use timestamps of another file

You can also use the timestamps of another file as a reference with the -r option in the following manner:
touch -r 
This will set the access and modify time of the target file same as the access and modify time of the source file.

8. Set specific access and modification time 

You might have noticed that in almost all the cases (except the reference file one), the timestamps are changed to the current timestamp.
But you are not bound with that. Touch allows you to set access and modification time to a past or future date. You can use the -t option and a timestamp in the following format:
[[CC]YY]MMDDhhmm[.ss]
  • CC – First two digits of a year
  • YY – Second two digits of a year
  • MM – Month of the year (01-12)
  • DD – Day of the month (01-31)
  • hh – Hour of the day (00-23)
  • mm – Minute of the hour (00-59)
  • ss – Seconds (00-59) 
In the above case, CC is optional. In fact, CCYY is optional as well, it will take the current year in that case. Similarly, seconds are optional as well, it defaults to 00.
Let me show you an example by changing the timestamp to 12021301 i.e., 12th month, second day, 13th hour and first minute of the current year:
touch -t 12021301 agatha.txt 
stat agatha.txt
File: agatha.txt
Size: 457 Blocks: 8 IO Block: 4096 regular file
Device: 10305h/66309d Inode: 11928279 Links: 1
Access: (0777/-rwxrwxrwx) Uid: ( 1000/abhishek) Gid: ( 1000/abhishek)
Access: 2018-12-02 13:01:00.000000000 +0530
Modify: 2018-12-02 13:01:00.000000000 +0530
Change: 2018-09-02 15:59:47.588680901 +0530
Birth: -
If you try to enter an invalid date, you’ll see an error. You’ll also notice that change time is using the current timestamp, not the same as access and modify. It’s because it’s system property.

9. Change timestamp of a symbolic link

You can also use touch command with symbolic links. You just have to use the -h option while dealing with symbolic links. The rest stays the same as the regular files.
touch -h 
I hope you find these touch command examples in Linux helpful. If you have any questions or suggestions, do let me know.

8 great Python libraries for side projects

$
0
0
https://opensource.com/article/18/9/python-libraries-side-projects

These Python libraries make it easy to scratch that personal project itch.

Image by : 
WOCinTech Chat. Modified by Opensource.com. CC BY-SA 4.0
x

Get the newsletter

Join the 85,000 open source advocates who receive our giveaway alerts and article roundups.
We have a saying in the Python/Django world: We came for the language and stayed for the community. That is true for most of us, but something else that has kept us in the Python world is how easy it is to have an idea and quickly work through it over lunch or in a few hours at night.
This month we're diving into Python libraries we love to use to quickly scratch those side-project or lunchtime itches.

To save data in a database on the fly: Dataset

Dataset is our go-to library when we quickly want to collect data and save it into a database before we know what our final database tables will look like. Dataset has a simple, yet powerful API that makes it easy to put data in and sort it out later.
Dataset is built on top of SQLAlchemy, so extending it will feel familiar. The underlying database models are a breeze to import into Django using Django's built-in inspectdb management command. This makes working with existing databases pretty painless.

To scrape data from web pages: Beautiful Soup

Beautiful Soup (BS4 as of this writing) makes extracting information out of HTML pages easy. It's our go-to anytime we need to turn unstructured or loosely structured HTML into structured data. It's also great for working with XML data that might otherwise not be readable.

To work with HTTP content: Requests

Requests is arguably one of the gold standard libraries for working with HTTP content. Anytime we need to consume an HTML page or even an API, Requests has us covered. It's also very well documented.

To write command-line utilities: Click

When we need to write a native Python script, Click is our favorite library for writing command-line utilities. The API is straightforward, well thought out, and there are only a few patterns to remember. The docs are great, which makes looking up advanced features easy.

To name things: Python Slugify

As we all know, naming things is hard. Python Slugify is a useful library for turning a title or description into a unique(ish) identifier. If you are working on a web project and you want to use SEO-friendly URLs, Python Slugify makes this easier.

To work with plugins: Pluggy

Pluggy is relatively new, but it's also one of the best and easiest ways to add a plugin system to your existing application. If you have ever worked with pytest, you have used pluggy without knowing it.

To convert CSV files into APIs: Datasette

Datasette, not to be confused with Dataset, is an amazing tool for easily turning CSV files into full-featured read-only REST JSON APIs. Datasette has tons of features, including charting and geo (for creating interactive maps), and it's easy to deploy via a container or third-party web host.

To handle environment variables and more: Envparse

If you need to parse environment variables because you don't want to save API keys, database credentials, or other sensitive information in your source code, then envparse is one of your best bets. Envparse handles environment variables, ENV files, variable types, and even pre- and post-processors (in case you want to ensure that a variable is always upper or lower case, for instance).

Do you have a favorite Python library for side projects that's not on this list? Please share it in the comments.

5 tips to improve productivity with zsh

$
0
0
https://opensource.com/article/18/9/tips-productivity-zsh

The zsh shell offers countless options and features. Here are 5 ways to boost your efficiency from the command line.

computer screen
Image by : 
opensource.com
x

Get the newsletter

Join the 85,000 open source advocates who receive our giveaway alerts and article roundups.
The Z shell known as zsh is a shell for Linux/Unix-like operating systems. It has similarities to other shells in the sh (Bourne shell) family, such as as bash and ksh, but it provides many advanced features and powerful command line editing options, such as enhanced Tab completion.
It would be impossible to cover all the options of zsh here; there are literally hundreds of pages documenting its many features. In this article, I'll present five tips to make you more productive using the command line with zsh.

1. Themes and plugins

Through the years, the open source community has developed countless themes and plugins for zsh. A theme is a predefined prompt configuration, while a plugin is a set of useful aliases and functions that make it easier to use a specific command or programming language.
The quickest way to get started using themes and plugins is to use a zsh configuration framework. There are many available, but the most popular is Oh My Zsh. By default, it enables some sensible zsh configuration options and it comes loaded with hundreds of themes and plugins.
A theme makes you more productive as it adds useful information to your prompt, such as the status of your Git repository or Python virtualenv in use. Having this information at a glance saves you from typing the equivalent commands to obtain it, and it's a cool look. Here's an example of Powerlevel9k, my theme of choice:

zsh_theme_small.png

zsh Powerlevel9K theme
The Powerlevel9k theme for zsh
In addition to themes, Oh My Zsh bundles tons of useful plugins for zsh. For example, enabling the Git plugin gives you access to a number of useful aliases, such as:


$ alias|grep-igit|sort-R|head-10

g=git

ga='git add'

gapa='git add --patch'

gap='git apply'

gdt='git diff-tree --no-commit-id --name-only -r'

gau='git add --update'

gstp='git stash pop'

gbda='git branch --no-color --merged | command grep -vE "^(\*|\s*(master|develop|dev)\s*$)" | command xargs -n 1 git branch -d'

gcs='git commit -S'

glg='git log --stat'


There are plugins available for many programming languages, packaging systems, and other tools you commonly use on the command line. Here's a list of plugins I use in my Fedora workstation:
git golang fedora docker oc sudo vi-mode virtualenvwrapper

2. Clever aliases

Aliases are very useful in zsh. Defining aliases for your most-used commands saves you a lot of typing. Oh My Zsh configures several useful aliases by default, including aliases to navigate directories and replacements for common commands with additional options such as:


ls='ls --color=tty'

grep='grep  --color=auto --exclude-dir={.bzr,CVS,.git,.hg,.svn}'


In addition to command aliases, zsh enables two additional useful alias types: the suffix alias and the global alias.
A suffix alias allows you to open the file you type in the command line using the specified program based on the file extension. For example, to open YAML files using vim, define the following alias:
alias-s{yml,yaml}=vim
Now if you type any file name ending with yml or yaml in the command line, zsh opens that file using vim:


$ playbook.yml

# Opens file playbook.yml using vim


A global alias enables you to create an alias that is expanded anywhere in the command line, not just at the beginning. This is very useful to replace common filenames or piped commands. For example:
alias-gG='| grep -i'
To use this alias, type G anywhere you would type the piped command:


$ ls-l G do

drwxr-xr-x.  5 rgerardi rgerardi 4096 Aug  714:08 Documents

drwxr-xr-x.  6 rgerardi rgerardi 4096 Aug 2414:51 Downloads


Next, let's see how zsh helps to navigate the filesystem.

3. Easy directory navigation

When you're using the command line, navigating across different directories is one of the most common tasks. Zsh makes this easier by providing some useful directory navigation features. These features are enabled with Oh My Zsh, but you can enable them by using this command:
setopt  autocd autopushd \ pushdignoredups
With these options set, you don't need to type cd to change directories. Just type the directory name, and zsh switches to it:


$ pwd

/home/rgerardi

$ /tmp

$ pwd

/tmp


To move back, type -:
Zsh keeps the history of directories you visited so you can quickly switch to any of them. To see the list, type dirs -v:


$ dirs-v

0      ~

1      /var/log

2      /var/opt

3      /usr/bin

4      /usr/local

5      /usr/lib

6      /tmp

7      ~/Projects/Opensource.com/zsh-5tips

8      ~/Projects

9      ~/Projects/ansible

10      ~/Documents


Switch to any directory in this list by typing ~# where # is the number of the directory in the list. For example:


$ pwd

/home/rgerardi

$ ~4

$ pwd

/usr/local


Combine these with aliases to make it even easier to navigate:


d='dirs -v | head -10'

1='cd -'

2='cd -2'

3='cd -3'

4='cd -4'

5='cd -5'

6='cd -6'

7='cd -7'

8='cd -8'

9='cd -9'


Now you can type d to see the first ten items in the list and the number to switch to it:


$ d

0      /usr/local

1      ~

2      /var/log

3      /var/opt

4      /usr/bin

5      /usr/lib

6      /tmp

7      ~/Projects/Opensource.com/zsh-5tips

8      ~/Projects

9      ~/Projects/ansible

$ pwd

/usr/local

$ 6

/tmp

$ pwd

/tmp


Finally, zsh automatically expands directory names with Tab completion. Type the first letters of the directory names and TAB to use it:


$ pwd

/home/rgerardi

$ p/o/z (TAB)

$ Projects/Opensource.com/zsh-5tips/


This is just one of the features enabled by zsh's powerful Tab completion system. Let's look at some more.

4. Advanced Tab completion

Zsh's powerful completion system is one of its hallmarks. For simplification, I call it Tab completion, but under the hood, more than one thing is happening. There's usually expansion and command completion. I'll discuss them together here. For details, check this User's Guide.
Command completion is enabled by default with Oh My Zsh. To enable it, add the following lines to your .zshrc file:


autoload -U compinit

compinit


Zsh's completion system is smart. It tries to suggest only items that can be used in certain contexts—for example, if you type cd and TAB, zsh suggests only directory names as it knows cd does not work with anything else.
Conversely, it suggests usernames when running user-related commands or hostnames when using ssh or ping, for example.
It has a vast completion library and understands many different commands. For example, if you're using the tar command, you can press Tab to see a list of files available in the package as candidates for extraction:


$ tar-xzvf test1.tar.gz test1/file1 (TAB)

file1 file2


Here's a more advanced example, using git. In this example, when typing TAB, zsh automatically completes the name of the only file in the repository that can be staged:


$ ls

original  plan.txt  zsh-5tips.md  zsh_theme_small.png

$ git status

On branch master

Your branch is up to date with 'origin/master'.


Changes not staged for commit:

  (use "git add ..." to update what will be committed)

  (use "git checkout -- ..." to discard changes in working directory)


        modified:   zsh-5tips.md


no changes added to commit (use "git add" and/or "git commit -a")

$ git add(TAB)

$ git add zsh-5tips.md


It also understands command line options and suggests only the ones that are relevant to the subcommand selected:


$ git commit - (TAB)

--all                 -a      -- stage all modified and deleted paths

--allow-empty                  -- allow recording an empty commit

--allow-empty-message          -- allow recording a commit with an empty message

--amend                        -- amend the tip of the current branch

--author                       -- override the author name used in the commit

--branch                       -- show branch information

--cleanup                      -- specify how the commit message should be cleaned up

--date                         -- override the author date used in the commit

--dry-run                      -- only show the list of paths that are to be committed or not, and any untracked

--edit                -e      -- edit the commit message before committing

--file                -F      --read commit message from given file

--gpg-sign            -S      -- GPG-sign the commit

--include             -i      -- update the given files and commit the whole index

--interactive                  -- interactively update paths in the index file

--message             -m      -- use the given message as the commit message

... TRUNCATED ...


After typing TAB, you can use the arrow keys to navigate the options list and select the one you need. Now you don't need to memorize all those Git options.
There are many options available. The best way to find what is most helpful to you is by using it.

5. Command line editing and history

Zsh's command line editing capabilities are also useful. By default, it emulates emacs. If, like me, you prefer vi/vim, enable vi bindings with the following command:
$ bindkey -v
If you're using Oh My Zsh, the vi-mode plugin enables additional bindings and a mode indicator on your prompt—very useful.
After enabling vi bindings, you can edit the command line using vi commands. For example, press ESC+/ to search the command line history. While searching, pressing n brings the next matching line, and N the previous one. Most common vi commands work after pressing ESC such as 0 to jump to the start of the line, $ to jump to the end, i to insert, a to append, etc. Even commands followed by motion work, such as cw to change a word.
In addition to command line editing, zsh provides several useful command line history features if you want to fix or re-execute previous used commands. For example, if you made a mistake, typing fc brings the last command in your favorite editor to fix it. It respects the $EDITOR variable and by default uses vi.
Another useful command is r, which re-executes the last command; and r , which executes the last command that contains the string WORD.
Finally, typing double bangs (!!) brings back the last command anywhere in the line. This is useful, for instance, if you forgot to type sudo to execute commands that require elevated privileges:


$ less/var/log/dnf.log

/var/log/dnf.log: Permission denied

$ sudo!!

$ sudoless/var/log/dnf.log


These features make it easier to find and re-use previously typed commands.

Where to go from here?

These are just a few of the zsh features that can make you more productive; there are many more. For additional information, consult the following resources:
An Introduction to the Z Shell
A User's Guide to ZSH
Archlinux Wiki
zsh-lovers
Do you have any zsh productivity tips to share? I would love to hear about them in the comments below.

​Hollywood goes open source

$
0
0
https://www.zdnet.com/article/hollywood-goes-open-source

Out of 200 of the most popular movies of all time, the top 137 were either visual-effects driven or animated. What did many of these blockbusters have in common? They were made with open-source software.

That was the message David Morin, chairman of the Joint Technology Committee on Virtual Production, brought to The Linux Foundation's Open Source Summit in Vancouver, Canada. To help movie makers bring rhyme and reason to open-source film-making, The Linux Foundation had joined forces with The Academy of Motion Picture Arts and Sciences to form the Academy Software Foundation.

The academy is meant to be a neutral forum for open-source developers both in the motion picture and broader media industries to share resources and collaborate on technologies for image creation, visual effects, animation, and sound. The founding members include Blue Sky Studios, Cisco, DreamWorks Animation, Epic Games, Google Cloud, Intel, Walt Disney Studios, and Weta Digital. It's a true marriage of technology and media-driven businesses.
You know those names. You probably don't know the name of the open-source, special-effects programs, such as Alembic, OpenColorIO, or Ptex, but Morin said, "they're very instrumental in the making of movies".

And they're more important than you think. "The last Fast and the Furious movie, for instance, while it looks like a live-action movie, when you know how it was made, it's really by-and-large a computer generated movie," Morin said. "When Paul Walker passed away in the middle of production, he had to be recreated for the duration of the movie."

The Academy of Motion Picture Arts and Sciences, which you know best from the Oscars, started looking into organizing the use of open-source in the movies in 2016. The group did so because while open-source software was being used more and more, it came with problems. These included:
  • Versionitis: As more libraries were being used it became harder to coordinate software components. A production pipeline, which had been perfected for a 2016 movie, is likely to have out-of-date components for a 2018 film.
  • Organization: While volunteers tried to track these changes, they didn't have the funding or resources needed to go beyond recording changes.
  • Funding: Many open-source programs had lost their maintainers due to getting jobs elsewhere or for lack of funding.
  • Licensing: As all open-source developers know, sooner or later licensing becomes an issue. That's especially true in the motion-picture industry, which is hyper aware of copyright and other intellectual property (IP) issues.
So, the overall mission is to increase the quality and quantity of open-source contributions by developing a governance model, legal framework, and community infrastructure that makes it easier to both develop and use open-source software.
In more detail, the goals are:
  • Provide a neutral forum to coordinate cross-project efforts, establish best practices, and share resources across the motion picture and broader media industries.
  • Develop an open continuous integration (CI) and build infrastructure to enable reference builds from the community and alleviate issues caused by siloed development.
  • Provide individuals and organizations with a clear path for participation and code contribution.
  • Streamline development for build and runtime environments through the sharing of open-source build configurations, scripts, and recipes.
  • Provide better, more consistent licensing through a shared licensing template.
Developers interested in learning more or contributing can join Academy Software Foundation mailing list.
Morin added, "In the last 25 years, software engineers have played an increasing role in the most successful movies of our time. The Academy Software Foundation is set to provide funding, structure, and infrastructure for the open-source community, so that engineers can continue to collaborate and accelerate software development for movie making and other media for the next 25 years."
Rob Bredow, SVP, executive creative director, and head of Industrial Light & Magic, said, "Developers and engineers across the industry are constantly working to find new ways to bring images to life, and open source enables them to start with a solid foundation while focusing on solving unique, creative challenges rather than reinventing the wheel."
If you'd like to get into the movie business, now's your chance. "We're welcoming all the help we can get to set up the foundation," Morin concluded. "Writing code today is perhaps the most powerful activity that you can do to make movies. If you're interested, don't hesitate to join us."
Related Stories:

How To Limit Network Bandwidth In Linux Using Wondershaper

$
0
0
https://www.ostechnix.com/how-to-limit-network-bandwidth-in-linux-using-wondershaper


Limit Network Bandwidth In Linux Using Wondershaper
This tutorial will help you to easily limit network bandwidth and shape your network traffic in Unix-like operating systems. By limiting the network bandwidth usage, you can save unnecessary bandwidth consumption’s by applications, such as package managers (pacman, yum, apt), web browsers, torrent clients, download managers etc., and prevent the bandwidth abuse by a single or multiple users in the network.  For the purpose of this tutorial, we will be using a command line utility named Wondershaper. Trust me, it is not that hard as you may think. It is one of the easiest and quickest way ever I have come across to limit the Internet or local network bandwidth usage in your own Linux system. Read on.
Please be mindful that the aforementioned utility can only limit the incoming and outgoing traffic of your local network interfaces, not the interfaces of your router or modem. In other words, Wondershaper will only limit the network bandwidth in your local system itself, not any other systems in the network. These utility is mainly designed for limiting the bandwidth of one or more network adapters in your local system. Hope you got my point.
Let us see how to use Wondershaper to shape the network traffic.

Limit Network Bandwidth In Linux Using Wondershaper

Wondershaper is simple script used to limit the bandwidth of your system’s network adapter(s). It limits the bandwidth iproute’s tc command, but greatly simplifies its operation.
Installing Wondershaper
To install the latest version, git clone wondershaoer repository:
$ git clone  https://github.com/magnific0/wondershaper.git
Go to the wondershaper directory and install it as show below
$ cd wondershaper
$ sudo make install
And, run the following command to start wondershaper service automatically on every reboot.
$ sudo systemctl enable wondershaper.service
$ sudo systemctl start wondershaper.service
You can also install using your distribution’s package manager (official or non-official) if you don’t mind the latest version.
Wondershaper is available in AUR, so you can install it in Arch-based systems using AUR helper programs such as Yay.
$ yay -S wondershaper-git
On Debian, Ubuntu, Linux Mint:
$ sudo apt-get install wondershaper
On Fedora:
$ sudo dnf install wondershaper
On RHEL, CentOS, enable EPEL repository and install wondershaper as shown below.
$ sudo yum install epel-release
$ sudo yum install wondershaper
Finally, start wondershaper service automatically on every reboot.
$ sudo systemctl enable wondershaper.service
$ sudo systemctl start wondershaper.service
Usage
First, find the name of your network interface. Here are some common ways to find the details of a network card.
$ ip addr
$ route
$ ifconfig
Once you find the network card name, you can limit the bandwidth rate as shown below.
$ sudo wondershaper -a  -d  -u 
For instance, if your network card name is enp0s8 and you wanted to limit the bandwidth to 1024 Kbps for downloads and 512 kbps for uploads, the command would be:
$ sudo wondershaper -a enp0s8 -d 1024 -u 512
Where,
  • -a : network card name
  • -d : download rate
  • -u : upload rate
To clear the limits from a network adapter, simply run:
$ sudo wondershaper -c -a enp0s8
Or
$ sudo wondershaper -c enp0s8
Just in case, there are more than one network card available in your system, you need to manually set the download/upload rates for each network interface card as described above.
If you have installed Wondershaper by cloning its GitHub repository, there is a configuration named wondershaper.conf exists in /etc/conf.d/ location. Make sure you have set the download or upload rates by modifying the appropriate values(network card name, download/upload rate) in this file.
$ sudo nano /etc/conf.d/wondershaper.conf
[wondershaper]
# Adapter
#
IFACE="eth0"

# Download rate in Kbps
#
DSPEED="2048"

# Upload rate in Kbps
#
USPEED="512"
Here is the sample before Wondershaper:
wondershaper 1
Before enabling Wondershaper
After enabling Wondershaper:
wondershaper 2
After enabling wondershaper
As you can see, the download rate has been tremendously reduced after limiting the bandwidth using WOndershaper in my Ubuntu 18.o4 LTS server.
For more details, view the help section by running the following command:
$ wondershaper -h
Or, refer man pages.
$ man wondershaper
As far as tested, Wondershaper worked just fine as described above. Give it a try and let us know what do you think about this utility.
And, that’s all for now. Hope this was useful. More good stuffs to come. Stay tuned.
Cheers!
Resource:

What is serverless?

$
0
0
https://enterprisersproject.com/article/2018/9/what-serverless

Let’s examine serverless and Functions-as-a-Service (FaaS), how they fit together, and where they do and don’t make sense

By
CIO digital transformation
You likely have heard the term serverless (and wondered why someone thought it didn’t use servers). You may have heard of Functions-as-a-Service (FaaS) – perhaps in the context of Lambda from Amazon Web Services, introduced in 2014. You’ve probably encountered event-driven programming in some form. How do all these things fit together and, more importantly, when might you consider using them? Read on.
Servers are still involved; developers just don’t need to think about them in a traditional way.
Let’s start with FaaS. With FaaS, you write code to accomplish some specific task and upload the code for our function to a FaaS provider. The public cloud provider or on-premise platform then does everything else necessary to provision, run, scale, and manage the code. As a developer, you don’t need to do anything other than write your code and wire it up to other functions and services. FaaS provides programmers with an abstraction that allows them to focus on just writing code that takes action in response to events rather than interacting with the underlying server (whether bare metal, virtualized, or containerized).
[ Struggling to explain containers to non-techies? Read also: How to explain containers in plain English. ]
Now enter event-driven programming. Functions run in response to external events. It could be a call generated by a mouse click in a web app. But it could also be in response to some other action. For example, uploading a media file could trigger custom code that transcodes the file into a variety of formats.
Serverless then describes a set of architectural patterns that build on FaaS. Serverless combines custom FaaS code with common back-end services (such as databases and authentication) connected primarily through an event-driven execution model. From the perspective of a developer, these services are all managed by a third-party (whether an ops team or an external provider). Of course, servers are still involved; developers just don’t need to think about them in a traditional way.

Why serverless?

Serverless is an emerging technology area. There’s a lot of interest in the technology and approach although it’s early on and has yet to appear on many enterprise IT radar screens. To understand the interest, it’s useful to consider serverless from both operations and developer perspectives.
PaaS and FaaS are best thought of as being on a continuum rather than being entirely discrete.
For operations teams, one of the initial selling points of FaaS on public clouds was its pricing model. By paying only for an ephemeral (typically stateless) function while it was executing, you “didn’t pay for idle.” In general, while this aspect of serverless is still important to some, it’s less emphasized today. As a broader concept that brings in a wide range of services of which FaaS is just one part, the FaaS pricing model by itself is less relevant.
However, pricing model aside, serverless also allows operations teams to provide developers with a self-service platform and then get out of the way. This is a concept that has been present in platforms like OpenShift from the beginning. Serverless effectively extends the approach for certain types of applications.
The arguably more important aspect of serverless is increased developer productivity. This has two different aspects.
The first is that, as noted earlier, FaaS abstracts away many of the housekeeping details associated with server provisioning and management that are often just overhead for developers. In practice, this may not appear all that different to developers than a Platform-as-a-Service (PaaS). FaaS can even use containers under the covers just like a PaaS typically does. PaaS and FaaS are best thought of as being on a continuum rather than being entirely discrete.
The second is that, by offering common managed services out of the box, developers don’t need to constantly recreate them for new applications.

Where does serverless fit?

Serverless targets specific architectural patterns. As described earlier, it’s more or less wedded to a programming model in which functions and services react to each other in an event-driven and largely asynchronous way. Functions themselves are generally expected to be stateless, handle single tasks, and finish quickly. The fact that the interactions between services and functions are all happening over the network also means that the application as a whole should be fairly tolerant of latencies in these interactions.
You can think of FaaS as both simplifying and limiting.
While there are overlaps between the technologies used by FaaS, microservices, and even coarser-grained architectural patterns, you can think of FaaS as both simplifying and limiting. FaaS requires you to be more prescriptive about how you write applications.
Although serverless was originally most associated with public cloud providers, that comes with a caveat. Serverless, as implemented on public clouds, has a high degree of lock-in to a specific cloud vendor. This is true to some degree even with FaaS, but serverless explicitly encourages bringing in a variety of cloud provider services that are incompatible to varying degrees with other providers and on-premise solutions.
As a result, there’s considerable interest in and work going into open source implementations of FaaS and serverless, such as Knative and OpenWhisk, so that users can write applications that are portable across different platforms.
[ What's next for portable apps? Read also: Disrupt or be disrupted: 3 trends enabling next-level IT agility. ]

The speedy road ahead

Building more modern applications is a top priority for IT executives as part of their digital transformation journeys; it’s seen as the key ingredient to moving faster. To that end, organizations across a broad swath of industries are seeking ways to create new applications more quickly. Doing so involves both making traditional developers more productive and seeking ways to lower the barriers to software development for a larger pool of employees.
Serverless is an important emerging service implementation architecture that will be a good fit for certain types of applications. It will coexist with, rather than replace, architecture alternatives such as microservices used with containers and even just virtual machines. All of these architectural choices support a general trend toward simplifying the developer experience and making developers more productive.

Linux lsattr Command Tutorial for Beginners (with Examples)

$
0
0
https://www.howtoforge.com/linux-lsattr-command

We recently discussed chattr, a command that you can use to change file attributes on a Linux file system. To list file attributes, there's a separate command, dubbed lsattr. In this tutorial, we will discuss this tool using some easy to understand examples.
But before we do that, it's worth mentioning that all examples mentioned in this article have been tested on an Ubuntu 18.04 LTS machine.

Linux lsattr command

As already mentioned in the introduction part above, the lsattr command in Linux lists file attributes on stdout. Following is its syntax:
lsattr [ -RVadlpv ] [ files...  ]
Here's how the tool's man page defines it:
       lsattr lists the file attributes on a second extended file system.
Following are some Q&A-styled examples that should give you a good idea on how the command works.

Q1. How to use lsattr command?

Basic usage is quite simple. Just execute 'lsattr' without any command line options. Of course, you need to provide a file name as input.
Here's an example:
lsattr file1.txt
And here's the output:
--------------e--- file1.txt
In addition to 'e' (in the output above), there can be several other letters in the output. Following excerpt (taken from chattr man page) should give you a better idea:
       The  letters 'aAcCdDeijPsStTu' select the new attributes for the files:
       append only (a), no atime updates (A), compressed (c), no copy on write
       (C), no dump (d), synchronous directory updates (D), extent format (e),
       immutable (i), data journalling  (j),  project  hierarchy  (P),  secure
       deletion  (s),  synchronous  updates  (S),  no tail-merging (t), top of
       directory hierarchy (T), and undeletable (u).

       The following attributes are read-only, and may be listed by  lsattr(1)
       but  not  modified by chattr: encrypted (E), indexed directory (I), and
       inline data (N).

Q2. How to make lsattr recursively work on directories?

This can be done using the -R command line option.
For example:
lsattr -R Downloads/HTF-review/
Here's the output the above command produced on my system:
How to make lsattr recursively work on directories
Note that if you want to display all files in directories (including .) use the -a command line option.

Q3. How to make lsattr treat directories as normal files?

By default, if you provide a directory name/path as input to lsattr, it produces information related to files contained in that directory.
How to make lsattr treat directories as normal files
However, if you want, you can force lsattr to treat directory as a file, and produce file attribute information for it. This you can do using the -d command line option.
lsattr -d option

Q4. How to make lsattr list file's project and version number?

This can be done using the -p and -v command line options. Following screenshot shows both these options in action:
How to make lsattr list file's project and version number

Conclusion

Agreed, lsattr might not fall into the category of most used commands, but if you use chattr, then it's a must-know command. Here, in this tutorial, we have discussed the majority of the command line options it offers. To learn more about the lsattr command, head to its man page.

5 Tips for Managing Privileged Access

$
0
0
https://www.esecurityplanet.com/applications/tips-for-privileged-access-management-pam.html

Download our in-depth report: The Ultimate Guide to IT Security Vendors
SHARE
Share it on Twitter 
Share it on Facebook 
Share it on Google+
Share it on Linked in 
Email 
Access to applications, servers and network resources is the cornerstone of enterprise IT, which is all about enabling connectivity. Not every account should have full access to everything in an enterprise, however, which is where super user or privileged accounts come into play.
With a privileged account, a user has administrative access to enterprise resources, a capability that should be closely guarded. As fans of Marvel Comics know well, with great power comes great responsibility. Privileged access management (PAM) is a way to limit access to those critical assets and prevent data breaches.
PAM and identity and access management (IAM) are similar security technologies, but the difference between what the two protect is night and day: IAM gives general users access to front-end systems, while PAM gives admins and other privileged users access to back-end systems. Think of it this way: A front-end user might be able to change or add data in a database; a back-end user has access to the entire database, thus the need for greater security.
So how should an organization protect its privileged accounts? That's a question that Paul Lanzi, co-founder and COO at Remediant, tackled in a session at the Black Hat USA conference in August. Lanzi outlined five steps that organizations can take to secure privileged access, based on experience deploying PAM across over 500,000 endpoints.

1. Beware local accounts

Once a user gets administrative rights for a system, more often than not, the user will create a secondary or local account that still has full access but isn't properly identified in a directory system like Active Directory.
"Discovering all the local accounts is often the most surprising thing for security teams because they assume all the accounts listed in Active Directory are domain accounts," Lanzi said. "In fact, the way that Active Directory works, you can have local accounts, and that's often where little pockets of privileged access hide out."
Lesson: Monitor for local admin accounts.

2. Stay tuned

Administrative rights are always changing. Lanzi said that every one of the enterprises he has worked with has at some point done an Active Directory cleanup project. What typically happens, however, is even after a directory cleanup, there tends to be a reversion, with old accounts coming back.
"Over time, admins tend to accrete more and more privileged access, it never really goes away," Lanzi said.
Lesson: Continuously monitor privileged accounts.

3. Session recording is not a panacea

While continuous monitoring of privileged access is important, the flip side of that is that some organizations will have session recording for every action performed by a privileged account.
Few if any enterprises actually look at the privileged account session recordings. What ends up happening in Lanzi's experience is that the session recording feature will end up slowing down some types of operations.
Just like a home DVR (digital video recorder), he noted that no one really watches what they record with session recording. Hackers also generally can easily bypass session recording with different techniques.
Lesson: Session recording has marginal utility.

4. Focus on access, not credentials

There is a movement in IT toward using fewer passwords in favor of using additional forms of strong authentication.
As such, password vault solutions are of limited utility, as simple credentials are not the only way that access is being granted.
Lesson: Focus on access instead of just credentials, which are going to get compromised.

5. Watch for lateral movement

One of the most common things that attackers do when exploiting an organization is to exploit one set of credentials and then move laterally.
"Privileged access should be the bulwark against lateral movement in the enterprise," Lanzi said.
Lesson: Use PAM solutions to control account access and limit the risk of lateral movement.

Two open source alternatives to Flash Player

$
0
0
https://opensource.com/alternatives/flash-media-player

Adobe will end support for Flash Media Player in 2020, but there are still a lot of Flash videos out there that need to be watched. Here are two open source alternatives that are trying to help.

light bulb
Image by : 
Internet Archive Book Images. Modified by Opensource.com. CC BY-SA 4.0
x

Get the newsletter

Join the 85,000 open source advocates who receive our giveaway alerts and article roundups.
In July 2017, Adobe sounded the death knell for its Flash Media Player, announcing it would end support for the once-ubiquitous online video player in 2020. In truth, however, Flash has been on the decline for the past eight years following a rash of zero-day attacks that damaged its reputation. Its future dimmed after Apple announced in 2010 it would not support the technology, and its demise accelerated in 2016 after Google stopped enabling Flash by default (in favor of HTML5) in the Chrome browser.
Even so, Adobe is still issuing monthly updates for the software, which has slipped from being used on 28.5% of all websites in 2011 to only 4.4.% as of August 2018. More evidence of Flash’s decline: Google director of engineering Parisa Tabriz said the number of Chrome users who access Flash content via the browser has declined from 80% in 2014 to under eight percent in 2018. Although few* video creators are publishing in Flash format today, there are still a lot of Flash videos out there that people will want to access for years to come. Given that the official application’s days are numbered, open source software creators have a great opportunity to step in with alternatives to Adobe Flash Media Player. Two of those applications are Lightspark and GNU Gnash. Neither are perfect substitutions, but help from willing contributors could make them viable alternatives.

Lightspark

Lightspark is a Flash Player alternative for Linux machines. While it’s still in alpha, development has accelerated since Adobe announced it would sunset Flash in 2017. According to its website, Lightspark implements about 60% of the Flash APIs and works on many leading websites including BBC News, Google Play Music, and Amazon Music.
Lightspark is written in C++/C and licensed under LGPLv3. The project lists 41 contributors and is actively soliciting bug reports and other contributions. For more information, check out its GitHub repository.

GNU Gnash

GNU Gnash is a Flash Player for GNU/Linux operating systems including Ubuntu, Fedora, and Debian. It works as standalone software and as a plugin for the Firefox and Konqueror browsers.
Gnash’s main drawback is that it doesn’t support the latest versions of Flash files—it supports most Flash SWF v7 features, some v8 and v9 features, and offers no support for v10 files. It’s in beta release, and since it’s licensed under the GNU GPLv3 or later, you can help contribute to modernizing it. Access its project page for more information.

Want to create Flash?

*Just because most people aren't publishing Flash videos these days, that doesn't mean there will never, ever be a need to create SWF files. If you find yourself in that position, these two open source tools might help:
  • Motion-Twin ActionScript 2 Compiler (MTASC): A command-line compiler that can generate SWF files without Adobe Animate (the current iteration of Adobe's video-creator software).
  • Ming: A library written in C that can generate SWF files. It also contains some utilities you can use to work with Flash files. 

Clearly, there’s an opening for open source software to take Flash Player’s place in the broader market. If you know of another open source Flash alternative that’s worth a closer look (or needs contributors), please share it in the comments. Or even better, check out the great Flash-free open source tools for working with animation.

3 top open source JavaScript chart libraries

$
0
0
https://opensource.com/article/18/9/open-source-javascript-chart-libraries

Charts and other visualizations make it easier to convey information from your data.

books on shelves in a library, colorful
Image credits : 
x

Get the newsletter

Join the 85,000 open source advocates who receive our giveaway alerts and article roundups.
Charts and graphs are important for visualizing data and making websites appealing. Visual presentations make it easier to analyze big chunks of data and convey information. JavaScript chart libraries enable you to visualize data in a stunning, easy to comprehend, and interactive manner and improve your website's design.
In this article, learn about three top open source JavaScript chart libraries.

1. Chart.js

Chart.js is an open source JavaScript library that allows you to create animated, beautiful, and interactive charts on your application. It's available under the MIT License.
With Chart.js, you can create various impressive charts and graphs, including bar charts, line charts, area charts, linear scale, and scatter charts. It is completely responsive across various devices and utilizes the HTML5 Canvas element for rendering.
Here is example code that draws a bar chart using the library. We'll include it in this example using the Chart.js content delivery network (CDN). Note that the data used is for illustration purposes only.


<!DOCTYPE html>

<html>

<head>

  <script src="https://cdnjs.cloudflare.com/ajax/libs/Chart.js/2.5.0/Chart.min.js"></script>

</head>


<body>


    <canvas id="bar-chart" width=300" height="150">


As you can see from this code, bar charts are constructed by setting type to bar. You can change the direction of the bar to other types—such as setting type to horizontalBar.
The bars' colors are set by providing the type of color in the backgroundColor array parameter.
The colors are allocated to the label and data that share the same index in their corresponding array. For example, "Latin America," the second label, will be set to "blue" (the second color) and 4 (the second number in the data).
Here is the output of this code.

2. Chartist.js

Chartist.js is a simple JavaScript animation library that allows you to create customizable and beautiful responsive charts and other designs. The open source library is available under the WTFPL or MIT License.
The library was developed by a group of developers who were dissatisfied with existing charting tools, so it offers wonderful functionalities to designers and developers.
After including the Chartist.js library and its CSS files in your project, you can use them to create various types of charts, including animations, bar charts, and line charts. It utilizes SVG to render the charts dynamically.
Here is an example of code that draws a pie chart using the library.


<!DOCTYPE html>

<html>

<head>


    <link href="https//cdn.jsdelivr.net/chartist.js/latest/chartist.min.css" rel="stylesheet" type="text/css"/>


    <style>

        .ct-series-a .ct-slice-pie {

            fill: hsl(100,20%,50%);/* filling pie slices */

            stroke: white;/*giving pie slices outline */         

            stroke-width: 5px; /* outline width */

          }


          .ct-series-b .ct-slice-pie {

            fill: hsl(10,40%,60%);

            stroke: white;

            stroke-width: 5px;

          }


          .ct-series-c .ct-slice-pie {

            fill: hsl(120,30%,80%);

            stroke: white;

            stroke-width: 5px;

          }


          .ct-series-d .ct-slice-pie {

            fill: hsl(90,70%,30%);

            stroke: white;

            stroke-width: 5px;

          }

          .ct-series-e .ct-slice-pie {

            fill: hsl(60,140%,20%);

            stroke: white;

            stroke-width: 5px;

          }


    </style>

     </head>


<body>


    <div class="ct-chart ct-golden-section"></div>


    <script src="https://cdn.jsdelivr.net/chartist.js/latest/chartist.min.js"></script>


    <script>


      var data ={

            series:[45,35,20]

            };


      var sum =function(a, b){return a + b };


      new Chartist.Pie('.ct-chart', data,{

        labelInterpolationFnc:function(value){

          returnMath.round(value / data.series.reduce(sum)*100)+'%';

            }

              });

     </script>

</body>

</html>


Instead of specifying various style-related components of your project, the Chartist JavaScript library allows you to use various pre-built CSS styles. You can use them to control the appearance of the created charts.
For example, the pre-created CSS class .ct-chart is used to build the container for the pie chart. And, the .ct-golden-section class is used to get the aspect ratios, which scale with responsive designs and saves you the hassle of calculating fixed dimensions. Chartist also provides other classes of container ratios you can utilize in your project. For styling the various pie slices, you can use the default .ct-series-a class. The letter a is iterated with every series count (a, b, c, etc.) such that it corresponds with the slice to be styled.
The Chartist.Pie method is used for creating a pie chart. To create another type of chart, such as a line chart, use Chartist.Line.
Here is the output of the code.

3. D3.js

D3.js is another great open source JavaScript chart library. It's available under the BSD license. D3 is mainly used for manipulating and adding interactivity to documents based on the provided data.
You can use this amazing 3D animation library to visualize your data using HTML5, SVG, and CSS and make your website appealing. Essentially, D3 enables you to bind data to the Document Object Model (DOM) and then use data-based functions to make changes to the document.
Here is example code that draws a simple bar chart using the library.


<!DOCTYPE html>

<html>

<head>


    <style>

    .chart div {

      font: 15px sans-serif;

      background-color: lightblue;

      text-align: right;

      padding:5px;

      margin:5px;

      color: white;

      font-weight: bold;

    }


    </style>

     </head>


<body>


    <div class="chart"></div>


    <script src="https://cdnjs.cloudflare.com/ajax/libs/d3/5.5.0/d3.min.js"></script>


    <script>


      var data =[342,222,169,259,173];


      d3.select(".chart")

        .selectAll("div")

        .data(data)

          .enter()

          .append("div")

          .style("width",function(d){return d +"px";})

          .text(function(d){return d;});


    </script>

</body>

</html>


The main concept in using the D3 library is to first apply CSS-style selections to point to the DOM nodes and then apply operators to manipulate them—just like in other DOM frameworks like jQuery.
After the data is bound to a document, the .enter() function is invoked to build new nodes for incoming data. All the methods invoked after the .enter() function will be called for every item in the data.
Here is the output of the code.

Wrapping up

JavaScript charting libraries provide you with powerful tools for implementing data visualization on your web properties. With these three open source libraries, you can enhance the beauty and interactivity of your websites.
Do you know of another powerful frontend library for creating JavaScript animation effects? Please let us know in the comment section below.

How to use HTML5 server-sent events

$
0
0
https://linuxconfig.org/how-to-use-html5-server-sent-events

Objective

After reading this tutorial you should be able to understand and take advantage of HTML5 server-sent events.

Requirements

  • No particular requirements needed

Difficulty

EASY

Conventions

  • # - requires given linux command to be executed with root privileges either directly as a root user or by use of sudo command
  • $ - given linux command to be executed as a regular non-privileged user

Introduction

Server-sent events is an HTML5 technology which allows a client to automatically monitor event notifications from a server, and react as needed. This technology is very useful to notify live events, to implement, for example, a live messaging application or a news feed. In this tutorial we will see how to implement this technology using PHP and javascript.

A simple example

For the sake of this tutorial, we will work with a list of "animals" that will be displayed in a simple html page. While in a real-world application the data would have been stored and retrieved from a database, in this case, for simplicity, we will use a php array. What we want to obtain is a real-time notification of the changes in the animal list, so that we can update our html page accordingly, without having to refresh it.

The Server side code

To begin with, let's populate our little array of animals in the animals.php file (we are working in the root directory of our web server VirtualHost):


$animals=["cat","dog","cow","zebra","snake"];
Save and close the file as animals.php. Now, for the most important part: we have to write the script which will emit the message that will be lately used by our client-side javascript code. With a lot of fantasy we will name the script script.php. The code is very simple, here it is:


header("Cache-Control: no-cache");
header("Content-Type: text/event-stream");

// Require the file which contains the $animals array
require_once"animals.php";

// Encode the php array in json format to include it in the response
$animals=json_encode($animals);

echo"data: $animals"."\n\n";
flush();
The first thing to notice here is that we called the header function in Lines 2-3: this is a function used to send raw http headers. In this case we call it two times: the first in Lines 2 to setup the Cache-control header field and specify caching directives (no page caching), the second in Lines 3, to set the Content-Type to text/event-stream. Those headers setup is necessary for our script to work correctly. It's also important to notice that to work correctly, the header function must always be called before any other output is created.

After setting up the html headers, we just used the require_once statement in Lines 6 to require the content of the animals.php file, which contains the array we wrote before. In a real-case scenario, this would have been replaced by a SQL query to retrieve such information from a database.

Finally in Lines 9-11, we sent our response to the client: the json-encoded"animals" array. A very important thing to notice: Server Side Events format requires each response sent by the server to be prefixed by the data: string and followed by two newline characters. In this case we used the \n newline character because we are running on a unix-like platform; to ensure cross-platform compatibility we would have used the PHP_EOL constant.

It's even possible to break the response message on multiple lines: in this case each line, as said before, must start with "data:" and must be followed by a single newline character. The additional newline is required only on the last line.

The server can also control how often the client should try to reconnect (default is 3 seconds), and the name of the event (default is "message") sent to the client. To customize the former, we must use the retry directive followed by the desired interval of time, expressed in milliseconds. For example, to setup an interval of 1 second:
echo "retry: 1000\n";
Notice that even here, a trailing newline is required. To change the event name, instead, we must use the event directive:
echo "event: customevent\n";
The default event is "message": this is important because the event must be specified in the client javascript code when adding the event listener, as we will see in a moment.

After sending our response we called the flush function: this is needed to ouput the data to the client.

Client side code

First thing we are going to do client side is to prepare our html file with the list of available animals:


<html>
<body>
<ulid="availableAnimals">

<li></li>

</ul>

<scriptsrc="/script.js"></script>

</body>
</html>
This is really some basic html with a little bit of php to display the list of animals at the moment of the page loading and to include our .js file (script.js), but will server our purpose. Now, let's see how actually we can use Server side events. The first thing we have to do is to instantiate an Event source object. In our javascript file, write:

let eventSource =newEventSource('script.php');
As you can see, we passed the path to our server script as an argument in the EventSource object constructor. This object will open a connection to the server. Now, we must add an event listener, so that we can perform some actions when a message is received from the server:

let eventSource =newEventSource('script.php');

eventSource.addEventListener("message",function(event){
let data = JSON.parse(event.data);
let listElements = document.getElementsByTagName("li");

for(let i =0; i < listElements.length; i++){
let animal = listElements[i].textContent;
if(!data.includes(animal)){
listElements[i].style.color ="red";
}
}
});
When a message is received, we use the JSON.parse method in Line 4 to transform the data sent by the server (a string, contained in the data property of the event object), into a javascript array. After that we loop in Lines 7-11 through all the elements with the
  • tag, which are the elements of our list of animals: if some element does not appear to be anymore in the array sent by the server, the color of the text contained in the list is changed to red, because the "animal" is no longer available (a better solution would have been to only include the changed or missing element name in the server response, but our purpose here is just to demonstrate how the technology works). The change in the page will happen in real time, so no need to refresh. You can observe how our page takes advantage of server sent events, in the video below:


    As you can see, as soon as the "cat" is removed from the "animals" array (our source of data) the element displayed in the html page is modified, to reflect that change.

    The stream of data between the server and the client can be interrupted by using the close method of the eventSource object:
    eventSource.close()
    To handle connection open, and error events, dedicated event listeners can be added to the object.
  • 8 Linux commands for effective process management

    $
    0
    0
    https://opensource.com/article/18/9/linux-commands-process-management

    Manage your applications throughout their lifecycles with these key commands.

    Command line prompt
    Image by : 
    opensource.com
    x

    Get the newsletter

    Join the 85,000 open source advocates who receive our giveaway alerts and article roundups.
    Generally, an application process' lifecycle has three main states: start, run, and stop. Each state can and should be managed carefully if we want to be competent administrators. These eight commands can be used to manage processes through their lifecycles.

    Starting a process

    The easiest way to start a process is to type its name at the command line and press Enter. If you want to start an Nginx web server, type nginx. Perhaps you just want to check the version.


    alan@workstation:~$ nginx


    alan@workstation:~$ nginx -v

    nginx version: nginx/1.14.0


    Viewing your executable path

    The above demonstration of starting a process assumes the executable file is located in your executable path. Understanding this path is key to reliably starting and managing a process. Administrators often customize this path for their desired purpose. You can view your executable path using echo $PATH.


    alan@workstation:~$ echo $PATH

    /usr/local/sbin:/usr/local/bin:/usr/sbin:/usr/bin


    WHICH

    Use the which command to view the full path of an executable file.


    alan@workstation:~$ which nginx                                                    

    /opt/nginx/bin/nginx


    I will use the popular web server software Nginx for my examples. Let's assume that Nginx is installed. If the command which nginx returns nothing, then Nginx was not found because which searches only your defined executable path. There are three ways to remedy a situation where a process cannot be started simply by name. The first is to type the full path. Although, I'd rather not have to type all of that, would you?


    alan@workstation:~$ /home/alan/web/prod/nginx/sbin/nginx -v

    nginx version: nginx/1.14.0


    The second solution would be to install the application in a directory in your executable's path. However, this may not be possible, particularly if you don't have root privileges. The third solution is to update your executable path environment variable to include the directory where the specific application you want to use is installed. This solution is shell-dependent. For example, Bash users would need to edit the PATH= line in their .bashrc file.
    PATH="$HOME/web/prod/nginx/sbin:$PATH"
    Now, repeat your echo and which commands or try to check the version. Much easier!


    alan@workstation:~$ echo$PATH

    /home/alan/web/prod/nginx/sbin:/usr/local/sbin:/usr/local/bin:/usr/sbin:/usr/bin


    alan@workstation:~$ which nginx

    /home/alan/web/prod/nginx/sbin/nginx


    alan@workstation:~$ nginx -v                                               

    nginx version: nginx/1.14.0


    Keeping a process running

    NOHUP

    A process may not continue to run when you log out or close your terminal. This special case can be avoided by preceding the command you want to run with the nohup command. Also, appending an ampersand (&) will send the process to the background and allow you to continue using the terminal. For example, suppose you want to run myprogram.sh.
    nohup myprogram.sh &
    One nice thing nohup does is return the running process's PID. I'll talk more about the PID next.

    Manage a running process

    Each process is given a unique process identification number (PID). This number is what we use to manage each process. We can also use the process name, as I'll demonstrate below. There are several commands that can check the status of a running process. Let's take a quick look at these.

    PS

    The most common is ps. The default output of ps is a simple list of the processes running in your current terminal. As you can see below, the first column contains the PID.


    alan@workstation:~$ ps

    PID TTY          TIME CMD

    23989 pts/0    00:00:00 bash

    24148 pts/0    00:00:00 ps


    I'd like to view the Nginx process I started earlier. To do this, I tell ps to show me every running process (-e) and a full listing (-f).


    alan@workstation:~$ ps -ef

    UID        PID  PPID  C STIME TTY          TIME CMD

    root         1     0  0 Aug18 ?        00:00:10 /sbin/init splash

    root         2     0  0 Aug18 ?        00:00:00 [kthreadd]

    root         4     2  0 Aug18 ?        00:00:00 [kworker/0:0H]

    root         6     2  0 Aug18 ?        00:00:00 [mm_percpu_wq]

    root         7     2  0 Aug18 ?        00:00:00 [ksoftirqd/0]

    root         8     2  0 Aug18 ?        00:00:20 [rcu_sched]

    root         9     2  0 Aug18 ?        00:00:00 [rcu_bh]

    root        10     2  0 Aug18 ?        00:00:00 [migration/0]

    root        11     2  0 Aug18 ?        00:00:00 [watchdog/0]

    root        12     2  0 Aug18 ?        00:00:00 [cpuhp/0]

    root        13     2  0 Aug18 ?        00:00:00 [cpuhp/1]

    root        14     2  0 Aug18 ?        00:00:00 [watchdog/1]

    root        15     2  0 Aug18 ?        00:00:00 [migration/1]

    root        16     2  0 Aug18 ?        00:00:00 [ksoftirqd/1]

    alan     20506 20496  0 10:39 pts/0    00:00:00 bash

    alan     20520  1454  0 10:39 ?        00:00:00 nginx: master process nginx

    alan     20521 20520  0 10:39 ?        00:00:00 nginx: worker process

    alan     20526 20506  0 10:39 pts/0    00:00:00 man ps

    alan     20536 20526  0 10:39 pts/0    00:00:00 pager

    alan     20564 20496  0 10:40 pts/1    00:00:00 bash


    You can see the Nginx processes in the output of the ps command above. The command displayed almost 300 lines, but I shortened it for this illustration. As you can imagine, trying to handle 300 lines of process information is a bit messy. We can pipe this output to grep to filter out nginx.


    alan@workstation:~$ ps -ef |grep nginx

    alan     20520  1454  0 10:39 ?        00:00:00 nginx: master process nginx

    alan     20521 20520  0 10:39 ?        00:00:00 nginx: worker process


    That's better. We can quickly see that Nginx has PIDs of 20520 and 20521.

    PGREP

    The pgrep command was created to further simplify things by removing the need to call grep separately.


    alan@workstation:~$ pgrep nginx

    20520

    20521


    Suppose you are in a hosting environment where multiple users are running several different instances of Nginx. You can exclude others from the output with the -u option.


    alan@workstation:~$ pgrep -u alan nginx

    20520

    20521


    PIDOF

    Another nifty one is pidof. This command will check the PID of a specific binary even if another process with the same name is running. To set up an example, I copied my Nginx to a second directory and started it with the prefix set accordingly. In real life, this instance could be in a different location, such as a directory owned by a different user. If I run both Nginx instances, the ps -ef output shows all their processes.


    alan@workstation:~$ ps -ef |grep nginx

    alan     20881  1454  0 11:18 ?        00:00:00 nginx: master process ./nginx -p /home/alan/web/prod/nginxsec

    alan     20882 20881  0 11:18 ?        00:00:00 nginx: worker process

    alan     20895  1454  0 11:19 ?        00:00:00 nginx: master process nginx

    alan     20896 20895  0 11:19 ?        00:00:00 nginx: worker process


    Using grep or pgrep will show PID numbers, but we may not be able to discern which instance is which.


    alan@workstation:~$ pgrep nginx

    20881

    20882

    20895

    20896


    The pidof command can be used to determine the PID of each specific Nginx instance.


    alan@workstation:~$ pidof /home/alan/web/prod/nginxsec/sbin/nginx

    20882 20881


    alan@workstation:~$ pidof /home/alan/web/prod/nginx/sbin/nginx

    20896 20895


    TOP

    The top command has been around a long time and is very useful for viewing details of running processes and quickly identifying issues such as memory hogs. Its default view is shown below.


    top - 11:56:28 up 1 day, 13:37,  1 user,  load average: 0.09, 0.04, 0.03

    Tasks: 292 total,   3 running, 225 sleeping,   0 stopped,   0 zombie

    %Cpu(s):  0.1 us,  0.2 sy,  0.0 ni, 99.7 id,  0.0 wa,  0.0 hi,  0.0 si,  0.0 st

    KiB Mem : 16387132 total, 10854648 free,  1859036 used,  3673448 buff/cache

    KiB Swap:        0 total,        0 free,        0 used. 14176540 avail Mem


      PID USER      PR  NI    VIRT    RES    SHR S  %CPU %MEM     TIME+ COMMAND

    17270 alan      20   0 3930764 247288  98992 R   0.7  1.5   5:58.22 gnome-shell

    20496 alan      20   0  816144  45416  29844 S   0.5  0.3   0:22.16 gnome-terminal-

    21110 alan      20   0   41940   3988   3188 R   0.1  0.0   0:00.17 top

        1 root      20   0  225564   9416   6768 S   0.0  0.1   0:10.72 systemd

        2 root      20   0       0      0      0 S   0.0  0.0   0:00.01 kthreadd

        4 root       0 -20       0      0      0 I   0.0  0.0   0:00.00 kworker/0:0H

        6 root       0 -20       0      0      0 I   0.0  0.0   0:00.00 mm_percpu_wq

        7 root      20   0       0      0      0 S   0.0  0.0   0:00.08 ksoftirqd/0


    The update interval can be changed by typing the letter s followed by the number of seconds you prefer for updates. To make it easier to monitor our example Nginx processes, we can call top and pass the PID(s) using the -p option. This output is much cleaner.


    alan@workstation:~$ top -p20881 -p20882 -p20895 -p20896


    Tasks:   4 total,   0 running,   4 sleeping,   0 stopped,   0 zombie

    %Cpu(s):  2.8 us,  1.3 sy,  0.0 ni, 95.9 id,  0.0 wa,  0.0 hi,  0.0 si,  0.0 st

    KiB Mem : 16387132 total, 10856008 free,  1857648 used,  3673476 buff/cache

    KiB Swap:        0 total,        0 free,        0 used. 14177928 avail Mem


      PID USER      PR  NI    VIRT    RES    SHR S  %CPU %MEM     TIME+ COMMAND

    20881 alan      20   0   12016    348      0 S   0.0  0.0   0:00.00 nginx

    20882 alan      20   0   12460   1644    932 S   0.0  0.0   0:00.00 nginx

    20895 alan      20   0   12016    352      0 S   0.0  0.0   0:00.00 nginx

    20896 alan      20   0   12460   1628    912 S   0.0  0.0   0:00.00 nginx


    It is important to correctly determine the PID when managing processes, particularly stopping one. Also, if using top in this manner, any time one of these processes is stopped or a new one is started, top will need to be informed of the new ones.

    Stopping a process

    KILL

    Interestingly, there is no stop command. In Linux, there is the kill command. Kill is used to send a signal to a process. The most commonly used signal is "terminate" (SIGTERM) or "kill" (SIGKILL). However, there are many more. Below are some examples. The full list can be shown with kill -L.


     1) SIGHUP       2) SIGINT       3) SIGQUIT      4) SIGILL       5) SIGTRAP

     6) SIGABRT      7) SIGBUS       8) SIGFPE       9) SIGKILL     10) SIGUSR1

    11) SIGSEGV     12) SIGUSR2     13) SIGPIPE     14) SIGALRM     15) SIGTERM


    Notice signal number nine is SIGKILL. Usually, we issue a command such as kill -9 20896. The default signal is 15, which is SIGTERM. Keep in mind that many applications have their own method for stopping. Nginx uses a -s option for passing a signal such as "stop" or "reload." Generally, I prefer to use an application's specific method to stop an operation. However, I'll demonstrate the kill command to stop Nginx process 20896 and then confirm it is stopped with pgrep. The PID 20896 no longer appears.


    alan@workstation:~$ kill -9 20896


    alan@workstation:~$ pgrep nginx

    20881

    20882

    20895

    22123


    PKILL

    The command pkill is similar to pgrep in that it can search by name. This means you have to be very careful when using pkill. In my example with Nginx, I might not choose to use it if I only want to kill one Nginx instance. I can pass the Nginx option -sstop to a specific instance to kill it, or I need to use grep to filter on the full ps output.


    /home/alan/web/prod/nginx/sbin/nginx -s stop


    /home/alan/web/prod/nginxsec/sbin/nginx -s stop


    If I want to use pkill, I can include the -f option to ask pkill to filter across the full command line argument. This of course also applies to pgrep. So, first I can check with pgrep -a before issuing the pkill -f.


    alan@workstation:~$ pgrep -a nginx

    20881 nginx: master process ./nginx -p /home/alan/web/prod/nginxsec

    20882 nginx: worker process

    20895 nginx: master process nginx

    20896 nginx: worker process


    I can also narrow down my result with pgrep -f. The same argument used with pkill stops the process.


    alan@workstation:~$ pgrep -f nginxsec

    20881


    alan@workstation:~$ pkill -f nginxsec


    The key thing to remember with pgrep (and especially pkill) is that you must always be sure that your search result is accurate so you aren't unintentionally affecting the wrong processes.
    Most of these commands have many command line options, so I always recommend reading the man page on each one. While most of these exist across platforms such as Linux, Solaris, and BSD, there are a few differences. Always test and be ready to correct as needed when working at the command line or writing scripts.
    Viewing all 1413 articles
    Browse latest View live


    <script src="https://jsc.adskeeper.com/r/s/rssing.com.1596347.js" async> </script>