Linux administrators have to be aware of existing users in the Linux
system for different reasons, like finding out their roles or
privileges.
This all requires knowledge of the commands, which help us list all the current users on the Linux system.
Today, we will learn different ways to list users in Linux, with or without a home directory.
Method 1: Reading the Passwd File
The generic way to list users is by reading the content of the passwd file. For example, the cat command can be used along with a passwd file path, as shown below.
cat /etc/passwd
Below is the behavior of the above command.
The cat command also lists all other information related to the users, which might be unnecessary to you.
For that, use the awk command to list the username from the passwd file, as shown below.
Just like the awk command, which ignores all the other details except the username, you can use the compgen command to do the same job without writing a long line of code, as shown below.
compgen -u
Below is the behavior of the above command.
Method 3: Using the Getent Command
Just like the cat command, getent includes all the other details. You can use this command to do the same job without specifying the passwd path, as shown below.
getent passwd
Below is the behavior of the above command.
Method 4: Filtering Users Based on Home Directory
From
the above-mentioned commands, you might be thinking that they were
listing all users created manually by you or by services.
It is
true that users are frequently unable to distinguish between users that
they manually created and those that the services created.
To solve this problem, we can list users with the home directory located at the /home/ path using the awk command, as shown below.
The above command only lists the users with a home directory created using the adduser command.
As you can see, I have created two users, "ubuntushell" and "test", manually with their home directory using the adduser command.
Final Thought
A
GUI application is available on the market to do the same job, which I
have not listed. After all, Linux without a terminal is insolent work,
according to me.
How to Create a Video from Images with FFmpeg (and Add Audio)
FFmpeg
is a powerful open-source multimedia framework that allows users to
convert, edit, and process audio and video files. One of its most useful
features is the ability to create a video from a sequence of images. This guide will walk you through the process of generating a high-quality video from images and adding background audio for a professional touch.
Table of Contents
Why Use FFmpeg for Image to Video Conversion?
FFmpeg
is lightweight, efficient, and works on almost any operating system. It
supports various image and video formats, making it ideal for:
Creating time-lapse videos from sequential images.
Converting slideshow presentations into video formats.
Automating video creation for social media or presentations.
Step 1: Prepare Your Images
Before running FFmpeg, ensure your images are properly formatted:
Number them sequentially (e.g., 1.jpg, 2.jpg, 3.jpg, … 100.jpg).
Place them in the same directory.
Ensure they have the same resolution to avoid scaling issues.
Step 2: Create a Video from Images with FFmpeg
Run the following FFmpeg command to generate a video from the images:
I
have been using this command to convert the images to video with audio.
FFmpeg has a vast number of options. For more FFmpeg command examples.
please visit the following link:
FFmpeg
is an incredibly versatile tool for creating videos from images.
Whether you're making slideshows, animations, or time-lapse videos,
these FFmpeg commands ensure a smooth workflow with high-quality
results.
In this guide, we’ll explore how to automatically restart a failed service on non-systemd systems using SysVinit and Upstart.
1. Restarting Services Automatically with SysVinit
SysVinit is one of the oldest init systems, commonly used in distributions like Debian and CentOS before the transition to systemd.
Step 1: Install and Configure monit
monit is a lightweight, open-source utility that monitors services and automatically restarts them when they fail.
# On Debian/Ubuntu
sudo apt update
sudo apt install monit

# On CentOS/RHEL
sudo yum install monit
Step 2: Configure Monit to Monitor a Service
Edit the Monit configuration file:
sudo nano /etc/monit/monitrc
Add a service definition:
# Example: Monitor Apache service
check process apache2 with pidfile /var/run/apache2/apache2.pid
    start program = "/etc/init.d/apache2 start"
    stop program = "/etc/init.d/apache2 stop"
    if failed port 80 protocol http then restart
    if 5 restarts within 5 cycles then timeout
Explanation of the above service definition:
check process apache2– Defines the service to monitor.
start/stop program– Commands to start and stop the service.
if failed port 80– Restarts if the HTTP port becomes unreachable.
Next, enable, start, and verify the status of monit.
Automatically restarting failed services on non-systemd systems requires a bit more manual setup, but tools like monit, Upstart, or cron scripts can efficiently handle service failures and keep your applications running smoothly.
If you’re still using a non-systemd system, it might be worth
considering an upgrade to a systemd-based distribution for easier
service management.
Fd: The Find Command Alternative For Mastering File Search In Linux
Supercharge Your File and Directory Searches with fd Command: The Ultimate File Search Tool for Linux.
Written by skPublished:Updated:3541 views23 mins read
0 comments8
In this detailed tutorial, we will discuss what is fd, key differences between the fd and find command. We will also learn how to install and use fd command to efficiently search files and directories in Linux.
Table of Contents
Introduction
When
it comes to managing files on a computer, finding specific files or
directories quickly and efficiently can be a common task.
Whether
you're a developer looking for a specific code file, a system
administrator searching for log files, or a regular user trying to
locate a document, having a reliable and user-friendly file search tool
can greatly simplify the process. One such tool that has gained
popularity among Linux users is "fd".
Designed as a user-friendly alternative to the traditional find command, fd provides a more intuitive and efficient method for searching files and directories.
What is fd Command?
fd
is a program that helps you find files and directories in your
computer's file system. It's designed to be a simple, fast, and
easy-to-use alternative to the "find" command. While it may not have all the advanced features of "find," it offers convenient and practical options for most common uses.
fd is written in Rust,
a programming language known for its focus on speed and reliability. It
aims to provide an efficient and user-friendly way to search for files
and directories on your Linux system.
Key Differences Between fd and find Command
The key difference between the fd and find commands is as follows:
Syntax: The fd command has a simpler and more intuitive syntax compared to the "find" command. Instead of using lengthy command syntax like "find -iname 'PATTERN'", you can directly use "fd PATTERN" to search for files.
Patterns:
fd supports both regular expressions and glob-based patterns by
default. This allows you to use flexible and powerful patterns to match
file names or patterns of your choice.
Speed:
fd is designed to be very fast. It achieves this by parallelizing the
process of traversing directories, resulting in quicker search results
compared to "find".
Colors: Similar to the "ls"
command, fd uses colors to highlight different types of files. This
makes it easier to visually identify different file types in the search
results.
Parallel Execution: fd supports
parallel execution of commands. This means it can perform multiple
search operations simultaneously, further improving performance in
certain scenarios.
Smart Case: By default, fd
performs case-insensitive searches. However, if your search pattern
contains an uppercase character, it automatically switches to
case-sensitive mode. This smart behavior helps in more accurate
searches.
Ignoring Hidden and Git-Ignored Files:
fd ignores hidden directories and files by default, so they won't
appear in the search results. Additionally, it also ignores patterns
specified in your .gitignore file, making it convenient when working with Git repositories.
Command Name Length: The name of the fd command is 50% shorter than the "find" command. This makes it easier to type and remember when using the tool.
Overall, fd aims to provide a simpler, faster, and more user-friendly alternative to "find"
by offering intuitive syntax, advanced pattern matching, speed
optimizations, visual enhancements, and convenient default behaviors.
Install fd in Linux
To install fd on different Linux distributions, follow the specific instructions provided below:
Note: The binary name for Debian is fdfind, so it's recommended to create a symbolic link to fd.
If the directory $HOME/.local/bin does not exist, you can create it and add it to your $PATH environment variable. Here are the steps to do so:
Check if the directory $HOME/.local/bin already exists by running the following command:
$ ls $HOME/.local/bin
If the directory does not exist and the command from the previous
step returns an error, create the directory using the following command:
$ mkdir -p $HOME/.local/bin
Next, you need to add the directory to your $PATH environment variable. Edit your shell configuration file, such as ~/.bashrc, ~/.bash_profile, or ~/.zshrc, depending on the shell you are using.
Open the shell configuration file in a text editor:
$ nano ~/.bashrc
Add the following line at the end of the file:
export PATH="$HOME/.local/bin:$PATH"
Save the file and exit the text editor. In Nano, you can do this by pressing Ctrl + X, then Y, and finally Enter.
To apply the changes, either restart your terminal or run the following command:
$ source ~/.bashrc
Now, the directory $HOME/.local/bin has been created (if it didn't exist before), and it has been added to your $PATH environment variable. This means that any executable files placed in $HOME/.local/bin will be accessible from anywhere in your system by simply typing their names in the terminal.
Note: The binary name for Ubuntu is fdfind, so it's recommended to create a symbolic link to fd.
On Ubuntu (for older versions):
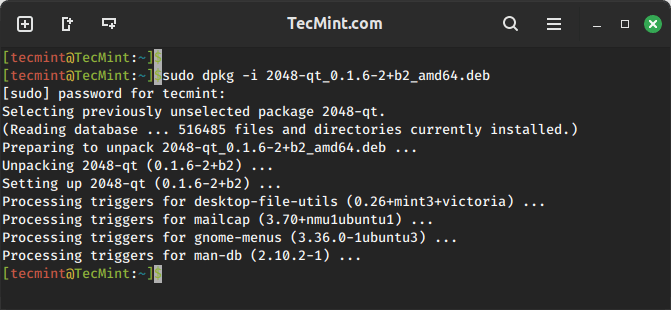
Download the latest .deb package from the release page and install it using dpkg package manager like below:
$ sudo dpkg -i fd_8.7.0_amd64.deb # Adapt the version number and architecture accordingly
On FreeBSD:
# pkg install fd-find
From source (using Rust's package manager cargo):
Since fd is written in Rust, you can install it using cargo package manager. Just make sure Rust is installed on your Linux system. And then run the following command to install fd using cargo:
$ cargo install fd-find
These instructions should guide you through the installation process of fd on your chosen Linux distribution.
Mastering File Search with fd Command in Linux
1. Getting Help
Before start using fd command, you need to understand the various command line options provided by fd.
To get a summary of all the available command line options for fd, you have two options:
For a brief and concise help message, you can run fd -h in the terminal.
Display fd Command Help
If you prefer a more detailed version of the help message, you can run fd --help.
2. Basic Search
The fd command is specifically designed to search for entries (files and directories) in your filesystem. The simplest way to use fd is by providing it with a single argument, which is the search pattern.
Let us try a simple search.
Example 1:
For instance, let's say you want to find an old script of yours that includes the word "file" in its name. You can run fd file
in the terminal. This command will search the current directory and all
its subdirectories recursively for any entries that contain the pattern
"file".
$ fd file
In the given example, the command fd file is used to search for entries containing the word "file" in their names.
file1
file2
testdir/file3
testdir/file4
Basic Search with fd Command
Here's an explanation of the example results:
file1 and file2: These are two files found in the current directory that have "file" in their names. They match the search pattern "file".
testdir/file3 and testdir/file4:
These are two files found within the subdirectory "testdir". They also
have "file" in their names and match the search pattern "file".
Overall, the fd
command, when executed with the search pattern "file", searches the
current directory and its subdirectories recursively. It returns a list
of files that contain the specified pattern in their names.
Example 2:
Let
us try a different example with more sub-directories and files. Suppose
you want to find any files or directories related to recipes. You can
use fd with the search pattern "recipe" as follows:
$ fd recipe
When
you execute this command, fd will recursively search the current
directory and its subdirectories for any entries that contain the
pattern "recipe". Here's a sample example of the search results:
In this example, fd found the directory "Recipes" in the "Documents" folder, a text file named "chocolate-cake-recipe.txt" within the "Recipes" directory, a subdirectory called "pasta-recipes" within "Recipes", and a picture file named "recipe-book-cover.jpg" in the "Pictures/Food" directory. These entries all match the search pattern "recipe".
3. Regular Expression Search
We can perform regular expression search with fd command. A regular expression allows us to define complex patterns to search for specific entries.
Example 1:
Take a look at the following example:
$ cd /etc/
$ fd '^x.*rc$'
In the given example, the fd command is used with a regular expression search pattern. The search pattern is specified as ^x.*rc$, which means it should start with "x" and end with "rc".
Sample output for the above command is given below:
X11/xinit/xinitrc: This entry is found in the /etc
directory. It matches the regular expression search pattern as it
starts with "x" and ends with "rc". It represents a file named xinitrc located within the X11/xinit directory.
X11/xinit/xinputrc: This entry is found in the /etc
directory. It matches the regular expression search pattern as it
starts with "x" and ends with "rc". It represents a file named xinputrc located within the X11/xinit directory.
X11/xinit/xserverrc: This entry is also found in the /etc
directory. It matches the regular expression search pattern as it
starts with "x" and ends with "rc". It corresponds to a file named xserverrc located within the X11/xinit directory.
In this example, the fd command searches the /etc directory (as indicated by cd /etc) and its subdirectories for entries that match the specified regular expression pattern ^x.*rc$. The ^ represents the start of the line, .* matches any characters in between, and $
denotes the end of the line. Therefore, any entries that start with "x"
and end with "rc" are considered matches and included in the search
results.
Example 2:
Let's consider a different example for a regular expression search using the fd command.
Suppose
you want to find all files that contain numbers in their names. You can
use a regular expression to accomplish this. Here's an example:
$ fd '[0-9]+'
In this case, we are using the regular expression [0-9]+, which represents a sequence of one or more digits. Here is the output of the above command:
In this example, the fd command searches the current directory and its subdirectories using the regular expression [0-9]+. It returns all the files that have one or more digits in their names. The search results include files such as file1.txt, file2.jpg, document_2021.docx, and report_123.pdf, which match the specified regular expression pattern.
By using regular expressions with fd,
you can create flexible and powerful search patterns to find entries
that meet specific criteria, such as containing numbers, specific
characters, or following certain patterns.
4. Search Files and Directories in a Specific Directory
When you want to search in a specific directory using the fd command, you can provide that directory as a second argument after the search pattern.
Here's an example for searching in a specific directory using the fd command:
Suppose you want to search for files with the extension ".log" in the "var/log" directory. You can use the following command:
$ fd .log /var/log
In this example, we are searching for entries that have the ".log" extension within the "/var/log" directory.
These files are found within the "/var/log" directory and its subdirectories, and they have the ".log" extension.
By providing the target directory as the second argument to fd,
you can narrow down the search to that specific directory. This allows
you to search within a particular location of interest, making it easier
to find relevant entries within a large filesystem.
5. List All Files Recursively
To list all files recursively using the fd
command, you can call it without any arguments. This is particularly
helpful for quickly getting an overview of all entries (files and
directories) in the current directory, similar to using ls -R command.
For example, if you run fd
without any additional arguments, it will display all the entries
within the current working directory recursively. The output might look
like this:
To list all files in a specific directory, you can use a catch-all pattern such as . or ^ along with the directory path. For instance, running fd . testdir/ will provide a list of all files within the testdir/ directory, including its subdirectories.
When we want to search for files with a specific file extension, we can use the -e (or --extension) option with the fd command. This is useful when we are interested in files of a particular type.
Here's an example for searching files with a specific file extension using the fd command:
Let's say you are working on a project and want to find all Python script files (files with the ".py" extension) within the project directory and its subdirectories. You can use the following command:
$ fd -e py
Running this command in the project directory will search for files with the ".py" extension.
These files are the Python script files found within the project directory and its subdirectories.
The -e option can also be combined with a search pattern. For instance, running the command:
$ fd -e docx file
will search for files with the extension ".docx" that also contain the pattern "file". The output might look like:
file5.docx
testdir/file6.docx
These files match the search criteria: they have the ".docx" extension and contain the pattern "file".
By utilizing the -e option with fd and specifying the desired file extension, you can conveniently search for and locate files of a particular type.
7. Searching for a Particular File Name
If you want to search for a file with an exact match to the search pattern, you can use the -g (or --glob) option with the fd command.
For instance, let's say you want to find a file named "ssh_host_rsa_key.pub" within the "/etc" directory and its subdirectories. You can run the following command:
$ fd -g ssh_host_rsa_key.pub /etc
In this example, the fd command will search for a file that has an exact match to the provided search pattern "ssh_host_rsa_key.pub" within the "/etc" directory.
The output for this command will be:
/etc/ssh/ssh_host_rsa_key.pub
This file matches the exact search pattern "ssh_host_rsa_key.pub" and is found within the "/etc" directory.
By utilizing the -g option with fd,
you can search for files that have an exact name match, making it
easier to locate specific files within a given directory and its
subdirectories.
8. Search for Hidden Files
By default, when using the fd
command, it does not search hidden directories and does not display
hidden files in the search results. However, if you want to change this
behavior, you can make use of the -H (or --hidden) option.
Example 1:
Take a look at the following example.
$ fd bash
This
command should return all files that match the search pattern "bash".
But it didn't return any such files in my Debian 12 system.
Now let us run the same command again with -H flag and see what happens.
$ fd -H bash
.bash_history
.bash_logout
.bashrc
Searching for Hidden Files with fd Command
Now we see some output. This command searches for files and directories that match the search pattern "bash" and includes hidden entries in the search results.
Example 2:
Now, we will see another example. Let us search for all files with the extension ".txt" within the testdir directory (including its subdirectories) using command:
$ fd . -e txt testdir/
It doesn't return anything in my system. Now let us run the same command with -H flag.
$ fd . -H -e txt testdir/
testdir/.secret.txt
Search Hidden Files
See? Now it displays a hidden file named secret.txt.
9. Search for Ignored Files
If you are working in a directory that contains Git repositories or is a Git repository itself, fd has a default behavior of not searching folders and not displaying files that match any patterns specified in the .gitignore file. However, you can change this behavior by using the -I (or --no-ignore) option.
For instance, consider the following example:
$ fd num_cpu
In this case, fd
is searching for files or directories that contain the pattern
"num_cpu". However, if there are any matches within folders or files
that are ignored by Git according to the .gitignore file, they will not be displayed in the search results.
To override this behavior and include the ignored files and folders in the search results, you can use the -I option, like so:
$ fd -I num_cpu
With this command, fd
will search for files or directories that match the pattern "num_cpu",
regardless of whether they are ignored by Git. The search result may
include files or folders that were previously excluded due to Git's
ignore rules.
If you want to search for all files and directories, including hidden entries and those ignored by Git, you can combine the -H (or --hidden) and -I (or --no-ignore) options:
$ fd -HI search_pattern
By using the -HI option together, fd
will search for all files and directories, displaying both hidden
entries and those ignored by Git. This allows you to perform a
comprehensive search that includes all files and directories within the
specified search pattern.
10. Combine fd with other Commands
Instead of simply displaying the search results, you may often need to perform actions on them. fd offers two methods for executing external commands on each search result:
The -x (or --exec) option allows you to run an external command individually for each search result in parallel.
The -X (or --exec-batch) option executes the external command once with all the search results as arguments.
Here are some examples to illustrate their usage.
Example 1:
Let's
say you want to find all text files within a directory and perform a
word count on each file. You can achieve this using the -x (or --exec) option with the wc command:
$ fd -e docx -x wc -w
In this example, fd searches for files with the .docx extension. The -x option is used to execute the external command wc -w for each search result. The wc command with the -w option is used to count the number of words in each file.
Each line shows the word count followed by the file name.
By utilizing the -x option and specifying the external command (wc -w
in this case), you can perform actions on each search result
individually. This enables you to automate various tasks or apply
operations to multiple files found by fd.
Example 2:
Here's the additional example for converting all *.jpg files to *.png files using the fd command:
$ fd -e jpg -x sh -c "convert {} {.}.png"
In this example, fd searches for files with the .jpg extension. The -x option is used to execute the external command sh -c, allowing us to run a shell command with multiple arguments. The shell command consists of the following part:
convert {} {.}.png is the command executed for each *.jpg file found. The convert command is a popular image conversion utility, and {} represents the matched file name. {.} is used to extract the file name without the extension, and png is appended to convert the file to the *.png format.
By running this command, each *.jpg file found by fd will be converted to the *.png format using the convert command.
Please make sure to have the necessary dependencies, such as the ImageMagick package, installed for the convert command to work properly.
11. Exclude Specific Files and Directories
To exclude specific files or directories during a search, you can utilize the -E (or --exclude) option with the fd
command. This option allows you to specify an arbitrary glob pattern as
an argument to exclude certain entries from the search results.
For example, if you want to exclude files with the .docx extension from the search, you can run the following command:
$ fd -E '*.docx' ...
In this example, fd will perform the search while excluding any files that match the *.docx glob pattern. The ... represents the current directory.
By using the -E option with fd
and providing a glob pattern, you can easily exclude specific file
types or directories from the search results, narrowing down the scope
of your search to focus on the desired entries.
12. Search and Delete Files
You can utilize fd to delete files and directories that match your search pattern. If you only want to remove files, you can use the --exec-batch (or -X) option to invoke the rm command. Here's an example to recursively remove all .docx files:
$ fd -H '^\docx$' -tf -X rm
In this example, fd searches for .docx files, and the -H option ensures hidden files are included. The -tf option is used to display the file path relative to the current directory. The -X rm part executes the rm command on each matched file.
It's recommended to run fd without -X rm first if you are uncertain. Alternatively, you can use the interactive mode of rm by adding the -i option:
$ fd -H '^\.docx$' -tf -X rm -i
With this command, you will be prompted to confirm the deletion of each file.
Always
exercise caution when using deletion commands to avoid unintentional
removal of important files. Make sure to review the search results
before executing commands that delete files and directories.
13. Use fd Command with other Programs
You can integrate fd with other programs. For instance, you can utilize fd in combination with xargs or parallel to perform command execution on the search results.
Although fd has its own built-in options for command execution (-x/--exec and -X/--exec-batch), you can still use it with xargs if you prefer.
Here's an example:
$ fd -0 -e docx | xargs -0 wc -l
Sample output for the above command:
  0 ./document_2023.docx
  0 ./file6.docx
  4 ./testdir/file5.docx
  4 total
In this example, fd is used to search for files with the .docx extension (-e docx). The -0 option is used with both fd and xargs to separate the search results and input by the NULL character (\0) instead of newlines. This ensures proper handling of filenames that may contain spaces or other special characters.
The output of fd is then passed as input to xargs, which in turn executes the wc -l command on each file. The wc -l command counts the number of lines in each file.
Frequently Asked Questions
Q: What is fd?
A: fd is a command-line tool in Linux used for finding files and directories in a fast and user-friendly manner.
Q: How does fd differ from the find command?
A: fd offers a more intuitive syntax, faster performance, and sensible defaults compared to find. It ignores hidden files by default, integrates with Git ignore patterns, and provides a simpler and faster search experience.
Q: Is fd an alternative to the find command?
A2: fd is a simpler and more intuitive alternative to the find
command. It provides opinionated defaults, faster performance due to
parallelized directory traversal, and features like colored output and
pattern matching.
Q: How do I install fd?
A: The installation method for fd depends on your Linux distribution. For example, you can install fd in Fedora using sudo dnf install fd. Refer to the official documentation or package manager instructions specific to your distribution.
Q: Can fd search using regular expressions?
A: Yes, fd treats the search pattern as a regular expression by default. You can perform more complex searches using regular expressions.
Q: Can fd exclude hidden files and directories from the search results?
A: Yes, by default, fd ignores hidden files and directories.
Q: How to include hidden files and directories using fd in search results?
A: You can use the -H or --hidden option to include hidden files in search results.
Q: How can I exclude specific files or directories from the search?
A: Use the -E or --exclude option followed by a glob pattern to exclude specific files or directories from the search results.
Q: Can I execute commands on the search results using fd?
A: Yes, fd provides options like -x and -X to execute external commands on the search results. You can also combine fd with tools like xargs or parallel for more flexibility.
Q: Is fd faster than the find command?
A: Yes, fd is generally faster than find due to its parallelized directory traversal and optimized search algorithms. You can refer the benchmark results in this link- https://github.com/sharkdp/fd#benchmark
Q: Can fd be used with other programs for command execution on search results?
A: Yes, you can utilize fd in combination with other programs like xargs or parallel to perform command execution on the search results.
Conclusion
The fd
command is a user-friendly and efficient tool for finding files and
directories in Linux. With its intuitive syntax, fast performance, and
helpful features like pattern matching and filtering, fd simplifies file searches and enhances command-line productivity.
Linux Problem-Solving Scenarios: Real-World Challenges & Solutions
Linux is a powerful and reliable operating system,
but even seasoned users encounter unexpected problems. Whether it’s a
deleted file, a forgotten root password, or a sluggish system, knowing
how to troubleshoot efficiently is key to becoming a true Linux expert.
This guide presents real-world Linux problem-solving scenarios along
with step-by-step solutions, which are common among system
administrators, developers, and everyday Linux users.
Scenario 1: You Accidentally Deleted an Important File
You accidentally deleted an important file using the rm command, and now you need to recover it. Unlike Windows and macOS, Linux does not have a built-in “Recycle Bin” for files deleted from the terminal.
Your recovery options depend on the filesystem in use.
For EXT3/EXT4 Filesystems
Use extundelete, which is an open-source utility designed to recover deleted files from ext3 and ext4 filesystems in Linux.
Run testdisk and follow the interactive prompts to restore lost files.
sudo testdisk
Prevention Tips:
Use trash-cli: Instead of rm, use trash-cli to send files to a recoverable trash bin.
sudo apt install trash-cli
trash-put myfile.txt
Enable regular backups: Set up rsync or Timeshift to automatically back up important files.
Scenario 2: Recovering a Forgotten Root Password
You forgot your root password and can’t perform administrative tasks,
which means you can’t install software, change system settings, or
access critical files.
You can reset the root password by booting into recovery mode or modifying the GRUB bootloader.
Using Recovery Mode (Ubuntu/Debian)
First, reboot your system and hold Shift during startup to access the GRUB menu, then select “Advanced options” → “Recovery mode” and choose “Drop to root shell prompt“.
Here, remount the root filesystem as writable and reset the root password.
mount -o remount,rw /
passwd root
Reboot the system.
reboot
Using rd.break (RHEL/CentOS/Fedora)
First, reboot your system, press e at the GRUB menu and find the line starting with linux and add rd.break at the end.
Next, mount the root filesystem and reset the root password.
mount -o remount,rw /sysroot
chroot /sysroot
passwd root
Use SSH keys instead of passwords for authentication.
Scenario 3: You Installed a Package, but It’s Not Working
You installed a package, but it says “command not found” when you try to run it, which usually happens when the binary isn’t in your system’s PATH, the package isn’t installed correctly, or there’s a missing dependency.
The solution is, first you need to verify that the package is installed or not.
Next, check if the command is in your system PATH.
which package-name
echo $PATH
If the binary is in a non-standard location, add it to PATH:
export PATH=$PATH:/usr/local/bin
Prevention Tips:
Restart the terminal or run hash -r after installing new packages.
Use package managers like Snap or Flatpak, which handle dependencies better.
Scenario 4: Your System is Running Out of Disk Space
Your system displays a “No space left on device” error, preventing software updates, logging, and normal operations.
Here’s how to reclaim disk space and keep your system running smoothly.
Step 1: Check Disk Usage
The solution is, first you need to check how much space is used on each partition on your system using the df command.
df -h
Step 2: Find and Delete Large Files
Next, locate the largest files consuming space by running du command, which will scan your system and list the top 10 largest files or directories. Delete unnecessary files using rm or move them to an external drive.
du -ah / | sort -rh | head -10
Step 3: Remove Unnecessary Logs
Logs are essential for troubleshooting and monitoring system
activity, but they can grow rapidly and consume a significant amount of
disk space.
Over time, old logs may no longer be needed, making them prime candidates for cleanup.
sudo journalctl --vacuum-time=2d  # Deletes logs older than 2 days
sudo apt autoclean                # Removes outdated package files
Step 4: Remove Old Kernels (Ubuntu/Debian)
When you update your system, especially on Ubuntu or Debian-based distributions, new versions of the Linux kernel are often installed.
However, the old kernels are not automatically removed and over time,
these old kernels can accumulate and take up a significant amount of
disk space.
Removing them is a safe and effective way to free up space without affecting your system’s functionality.
sudo apt autoremove --purge
Prevention Tips:
Set Up Log Rotation: Use logrotate to automatically manage log file sizes and retention periods.
Monitor Disk Usage: Install tools like ncdu to track disk usage and identify space hogs.
Regular Cleanups: Schedule periodic cleanups to remove temporary files, caches, and unused packages.
Scenario 5: Your Server is Suddenly Unresponsive
You are managing a Linux server, and suddenly, it stops responding and you try connecting via SSH,
but the connection times out or refuses to establish. You might even
notice that the server is still powered on, but it doesn’t react to any
commands.
This situation can be caused by various issues, including:
Disk I/O bottlenecks, where the system is overloaded with read/write operations.
Kernel panics or system crashes.
Network failures, preventing remote access.
To restore control, follow these troubleshooting steps.
Step 1: Access the Server Locally or via TTY
If SSH isn’t working, try accessing the server directly or through a TTY session:
On a physical machine, use the local console.
On a virtual machine, use the hypervisor’s console.
For Linux systems, switch to another TTY session using Ctrl + Alt + F2 (or F3, F4, etc.).
Step 2: Check System Load
Once logged in, check the system’s load and resource usage, which
will show the system’s load averages over 1, 5, and 15 minutes. A load
value higher than the number of CPU cores indicates high demand.
uptime
Next, use top or htop to monitor processes in real time:
top
Or
htop
Look for processes consuming excessive CPU or memory.
Step 3: Identify and Kill Runaway Processes
To identify the most resource-intensive processes, run:
ps aux --sort=-%cpu | head
This lists the top CPU-consuming processes, where you can find a problematic process, and terminate it using:
kill -9 PID
Replace PID with the process ID of the problematic application.
Step 4: Check System Logs
If the system is still responsive, check logs for errors:
sudo tail -f /var/log/syslog
Or
sudo dmesg | tail
These commands display recent system messages and kernel logs, which can help identify hardware or software issues.
Step 5: Reboot Safely Using SysRq
If the system is completely frozen, use the SysRq key combination to reboot safely:
echo b > /proc/sysrq-trigger
This triggers a safe reboot, ensuring data integrity by syncing disks and unmounting filesystems.
Conclusion
Troubleshooting is an essential skill for every Linux user. Whether
it’s recovering deleted files, resetting passwords, or fixing system
errors, knowing the right commands can save time and frustration.
Do you have your own troubleshooting tips? Share them in the comments! Let’s build a helpful Linux community together.
Have you ever wondered just how much power your computer is using? With energy costs going up, it’s good to know. That’s why Naveen Kulandaivelu, a robotics and machine learning engineer, created WattWise. It’s a real time power monitoring cli tool that runs in your computer’s terminal and helps you track power usage.
Table of Contents
What is WattWise?
WattWise is a lightweight, opensource, command-line tool to monitor the power usage of your system in real-time.
WattWise Dashboard
WattWise leverages smart plugs (primarily TP-Link Kasa) to gather real-time power data and presents it in a user-friendly terminal-based dashboard.
Initially,
the developer created it to track the power usage of his
high-performance workstation. The future goal of this project is to
automatically throttle CPU and GPU performance based on electricity
pricing (Time-of-Use) and system load, aiming to reduce energy costs
during peak hours.
The power monitoring functionality is currently available, while the automatic power management features are under development.
Features
Here are some cool things WattWise can do right now:
1. Real-time power monitoring
It shows you the current power your system is using in watts (that's the amount of power) and amperes (that's the electrical current).
2. Multiple connection options
You can connect WattWise directly to your TP-Link Kasa smart plugs or even through Home Assistant if you use that smart home platform. This gives you flexibility in how you get the power data.
3. Colour-coded display
To make it super easy to understand, the power usage is shown with colours.
If it's green, you're using less than 300 watts;
yellow means you're between 300 and 1200 watts;
and red pops up if you're going over 1200 watts.
It's a quick way to see if your system is working hard!
4. Historical data
WattWise
can even show you charts of your power usage over time right in the
terminal. It uses simple block characters so it works on pretty much any
terminal. This helps you see trends and how your power consumption
changes.
5. Simple command-line interface
Don't worry if you're not a super techy person! The commands are straightforward.
For example, just typing wattwise can give you a quick view, and wattwise --watch keeps monitoring in real-time with those cool charts.
6. Raw output
If
you're into scripting and want to use the power data in other tools,
WattWise can even output just the raw wattage number using the --raw flag.
7. Configurable refresh
You can even tell WattWise how often you want it to check the power usage, say every 5 seconds with wattwise --watch --interval 5.
Why Was WattWise Created?
Naveen built a powerful workstation for tasks like AI work. But using a high-performance system means higher electricity bills.
He had TP-Link Kasa smart plugs in his home. These plugs can measure electricity use. The Kasa app and Home Assistant could show the data, but switching between apps was inconvenient.
He wanted something that worked inside the terminal. That’s how WattWise was born.
How to get WattWise?
WattWise is open-source and free to use! You can grab it from GitHub. There are a couple of ways to install it: Using Pip or Using Docker.
Please note that WattWise requires Python 3.8 or later. For Docker usage, you will need to have Docker installed on your system.
Also,
note that the power management features, which include automatic
throttling, currently require Linux systems with appropriate CPU/GPU
frequency control capabilities.
For easier Docker usage, you can also create a bash alias as described in the documentation:
Add the following line to your ~/.bashrc or ~/.zshrc file:
alias wattwise='docker run -it --rm --network host \
  -v ~/.config/wattwise:/root/.config/wattwise \
  -v ~/.local/share/wattwise:/root/.local/share/wattwise \
  wattwise'
After adding the alias, you'll need to source your bash configuration (e.g., source ~/.bashrc or source ~/.zshrc) for the alias to take effect.
You can then use the wattwise command directly, just like the normal command:
wattwise
wattwise --watch
Here's the visual demonstration of WattWise:
Monitor Your PC's Power Usage Using WattWise
Future Plans
While the current version is great for monitoring, Naveen's original idea was even more ambitious.
Since his electricity provider uses Time-of-Use (ToU) pricing– meaning electricity costs more during peak hours – he wanted WattWise to be able to automatically adjust his computer's performance based on these prices.
Imagine this: during those expensive peak hours, WattWise could automatically reduce the speed of his CPU and maybe even his GPUs.
This would use less power and save him some money. Then, when the prices drop, it could go back to full speed.
Naveen
has even done some testing that showed reducing his CPU speed could
save around 225 watts. That can add up! The plan is to use some clever
tech, like a Proportional-Integral (PI) controller, to manage this power and performance balancing act.
Current Limitations
It's still a work in progress, and there are a few things to keep in mind:
Right now, it only supports one smart plug at a time.
It only works with TP-Link Kasa smart plugs that can monitor energy usage (like the EP25).
For the power management features (the automatic throttling), you'll need a Linux system with the ability to control CPU/GPU frequencies.
The automatic power optimiser part isn't fully ready yet– the current open-source version on GitHub is mostly the monitoring dashboard.
What's next for WattWise?
Naveen has lots of ideas for the future, including:
Supporting multiple smart plugs and showing combined power usage.
Adding compatibility for more brands of smart plugs.
Improving the visualisations and maybe even allowing you to export the data.
Integrating with other power management tools.
Making the predictions for power usage even smarter.
Naveen's goal with WattWise was simple:
to solve his own problem of wanting to monitor his power-hungry
workstation from the terminal he always has open. The idea of
automatically saving money during peak electricity hours is just a
fantastic bonus.
The dashboard part of WattWise is open-source under the MIT license. So, if you're interested, feel free to check out the official WattWise GitHub Repository. You can also contribute your own ideas and help make it even better!
How to Verify Debian and Ubuntu Packages Using MD5 Checksums
Have you ever wondered why a given binary or package installed on
your system does not work according to your expectations, meaning it
does not function correctly as it is supposed to, or perhaps it cannot
even start at all?
While downloading packages, you may face challenges such as unsteady
network connections or unexpected power blackouts. This can result in
the installation of a corrupted package.
Considering this an important factor in maintaining uncorrupted
packages on your system, it is therefore a vital step to verify the
files on the file system against the information stored in the package.
In this article, we will explain how to verify the MD5 checksums of installed packages on Debian-based distributions such as Ubuntu and Mint.
How to Verify Installed Packages Against MD5 Checksums
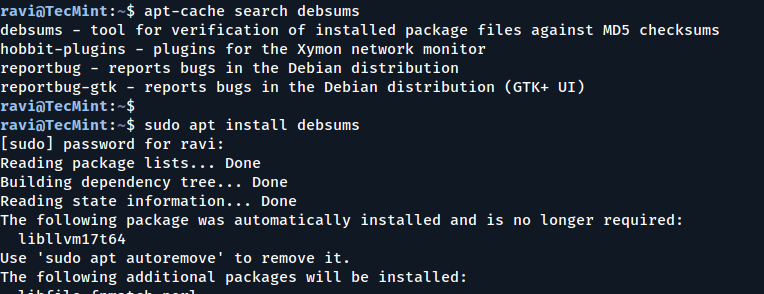
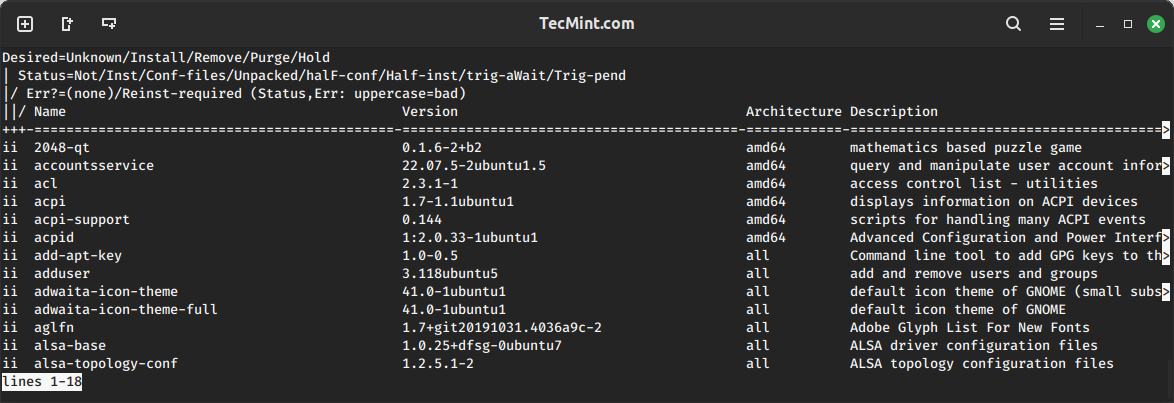
On Debian/Ubuntu systems, you can use the debsums
tool to check the MD5 sums of installed packages. If you want to know
more about the debsums package before installing it, you can use the apt-cache command as follows:
Now it’s time to learn how to use the debsums tool to verify the MD5 sum of installed packages.
Note: I have used sudo with all the commands below, because certain files may not have read permissions for regular users.
Understanding the Output of debsums
The output from the debsums command shows you the file location on the left and the check results on the right.
There are three possible results you can get:
OK– indicates that a file’s MD5 sum is good.
FAILED– shows that a file’s MD5 sum does not match.
REPLACED– means that the specific file has been replaced by a file from another package.
When you run it without any options, debsums checks every file on your system against the stock MD5 sum files.
sudo debsums
Verify MD5 Checksums of Installed Packages
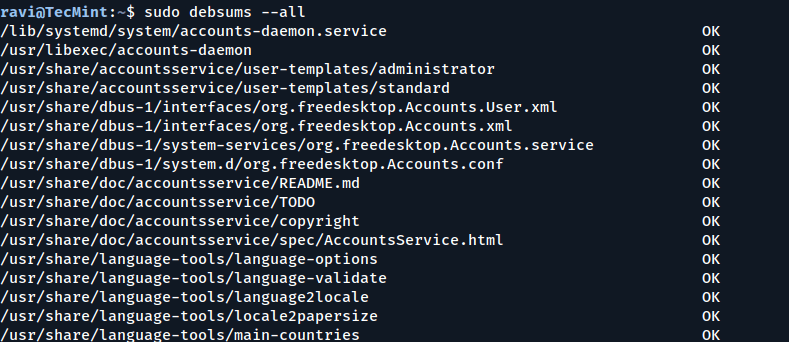
Checking MD5 Sums of All Files for Changes
To enable checking every file and configuration file for changes, include the -a or --all option.
sudo debsums --all
Check Every File and Configuration for Changes
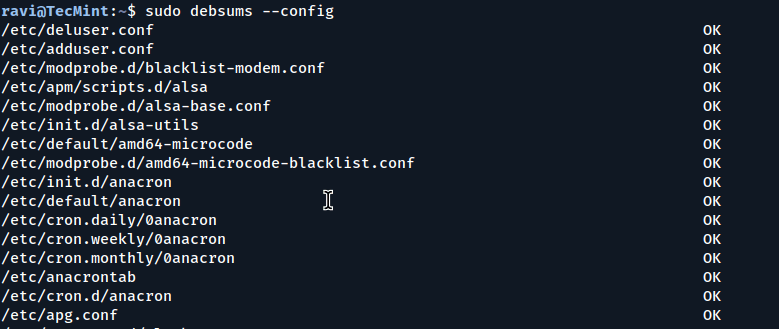
Checking MD5 Sums of Only Configuration Files
It is also possible to check only the configuration files, excluding all other package files, by using the -e or --config option.
sudo debsums --config
Check MD5 Sums of Configuration Files
Displaying Only Changed Files
To display only the changed files in the output of debsums, use the -c or --changed option.
sudo debsums --changed
Checking for Modified Files
Listing Missing MD5 Sums of Files
To display files that do not have MD5 sum information, use the -l or --list-missing option. On my system, this command does not show any files.
sudo debsums --list-missing
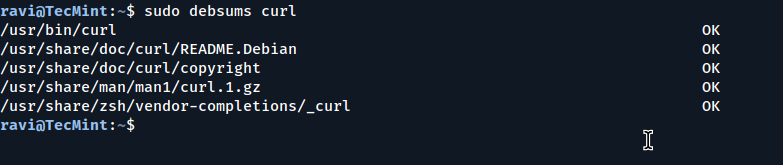
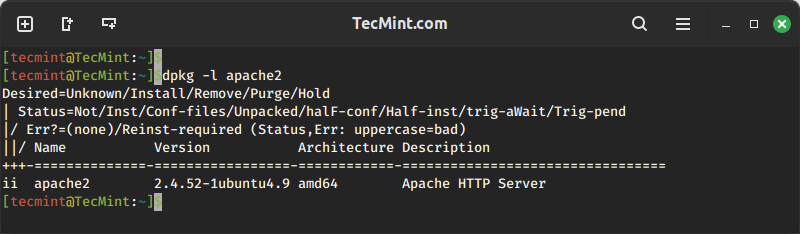
Verify the MD5 Sum of a Single Package
You can also verify the MD5 sum of a single package by specifying its name.
sudo debsums curl
Verify MD5 Checksums of Single Package
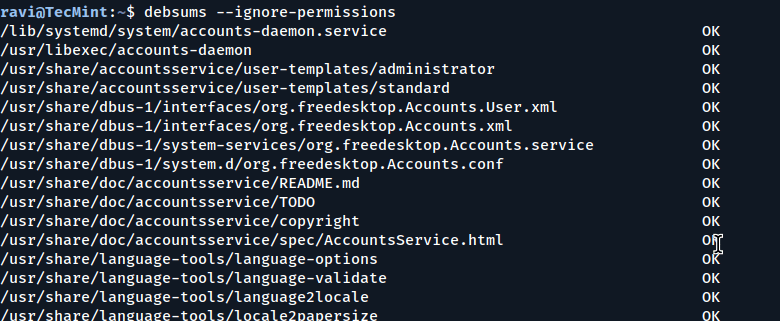
Ignoring File Permission Errors in Debsums
Assuming that you are running debsums as a regular user without sudo, you can treat permission errors as warnings by using the --ignore-permissions option:
debsums --ignore-permissions
Using Debsums Without Sudo Privileges
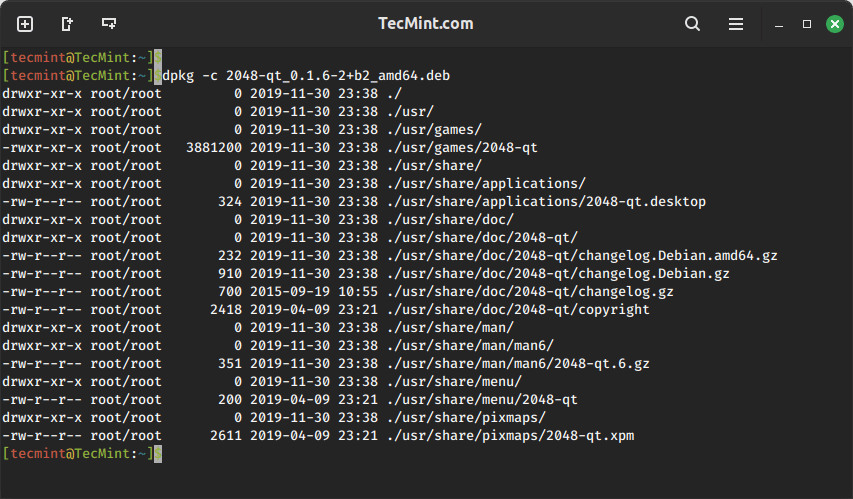
How to Generate MD5 Sums from .Deb Files
The -g option tells debsums to generate MD5 sums from the .deb contents.
Here are the additional options you can use:
missing– instructs debsums to generate MD5 sums from the .deb for packages that don’t provide one.
all– directs debsums to ignore the on-disk sums and use the one present in the .deb file, or generate one from it if none exists.
keep– tells debsums to write the extracted/generated sums to /var/lib/dpkg/info/package.md5sums file.
nocheck– means the extracted/generated sums are not checked against the installed package.
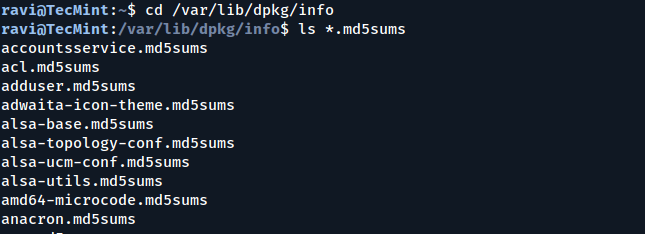
When you look at the contents of the /var/lib/dpkg/info/ directory, you will see MD5 sums for various files that packages include, as shown below:
cd /var/lib/dpkg/info
ls *.md5sums
Listing MD5 Sum Files from Installed Packages
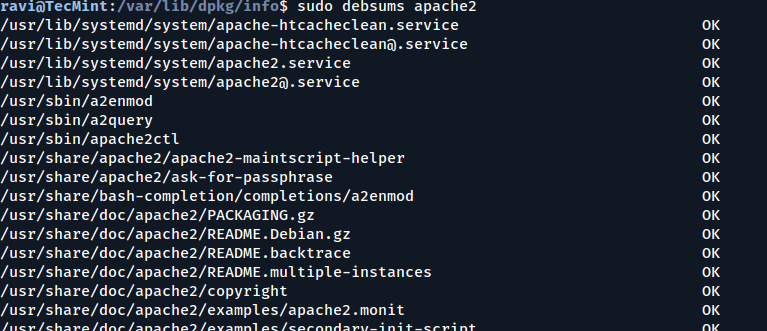
You can generate an MD5 sum for the apache2 package by running the following command:
sudo debsums --generate=missing apache2
Since the apache2 package on my system already has MD5 sums, it will show the same output as running.
sudo debsums apache2
Generating MD5 Sums for a Specific Package
For more interesting options and usage information, look through the debsums man page:
man debsums
Conclusion
In this article, we shared how to verify installed Debian/Ubuntu
packages against MD5 checksums. This can be useful to avoid installing
and executing corrupted binaries or package files on your system by
checking the files on the file system against the information stored in
the package.
For any questions or feedback, feel free to use the comment form
below. You can also offer one or two suggestions to make this post
better.
How to Set the Default Text Editor in csh and tcsh
Choosing your default text editor is an important part of customizing
your Unix or BSD system environment. Whether you are editing
configuration files or writing scripts, having your preferred editor
available by default can make your workflow much more efficient. In this
guide, we will explore how to set the default text editor in the C
shell (csh) and the TENEX C shell (tcsh), both temporarily and
permanently.
The default shell in systems like FreeBSD and PC-BSD is often the C
shell (csh), making this information especially useful for *BSD users.
Although Linux users typically work with bash, zsh, or other shells,
knowing how to configure csh or tcsh remains valuable for certain
environments or legacy systems.
Setting the Default Text Editor Temporarily
If you want to set the default text editor for just the current
session, you can do so by setting the VISUAL and EDITOR environment
variables. Here is how you can temporarily set nano as the default editor:
The VISUAL and EDITOR environment variables are both used by programs to determine which editor to launch. While VISUAL is often prioritized for visual editors (like nano or vim), EDITOR
is used more generally. Setting both variables to the same value helps
prevent inconsistencies across different programs and scripts that rely
on these variables.
Remember that setting the editor this way is temporary. Once you close the shell or log out, these settings will be lost.
Making the Default Editor Permanent
To make your preferred text editor setting permanent across shell sessions, you need to add the setenv commands to your shell configuration file. In csh and tcsh, this is typically the ~/.cshrc file, or the ~/.tcshrc file if you are using tcsh.
After editing the configuration file, either log out and log back in, or reload the configuration by sourcing the file manually:
$ source ~/.cshrc
or
$ source ~/.tcshrc
This will apply your new settings immediately without the need to restart the terminal.
Why Setting Both VISUAL and EDITOR Matters
You might wonder why it’s necessary to set both VISUAL and EDITOR.
Some programs respect only one of these environment variables, and
different programs may prioritize them differently. For example, crontab -e may use EDITOR, while a graphical program that launches a terminal editor may check VISUAL first. Setting both ensures consistent behavior across the system.
Moreover, if you prefer using more advanced editors like vim or simpler ones like nano,
setting both variables avoids confusion, especially when dealing with
scripts, cron jobs, version control systems, or remote server
administration tasks.
Conclusion
Customizing your environment by setting the default text editor in
csh and tcsh is a straightforward but important step for anyone using
BSD or similar Unix systems. By setting both VISUAL and EDITOR
environment variables—temporarily for a session or permanently for all
future sessions—you ensure a smoother and more predictable editing
experience.
Remember to always set both variables to the same path to avoid
inconsistencies and unexpected behavior. Whether you are a seasoned
system administrator or a beginner exploring *BSD systems, mastering
these small configuration tweaks can significantly enhance your
productivity and comfort.
How to Use diff3 Command for File Merging in Linux
The diff3 command in Linux is a helpful tool that compares three files
and shows their differences, which is mainly useful for programmers and
system administrators who work with multiple versions of the same file
and need to merge them, or identify changes between different versions.
In this article, we’ll go through the basics of using the diff3 command, its common options, and a few examples to understand how it works in Linux.
What is the diff3 Command?
diff3 is a tool that compares three files line by line,
identifies the differences, and displays them in a format that’s easy to
understand.
It can be used to:
Find differences between the three files.
Automatically merge changes from different files.
Handle conflicts that occur when merging file versions.
The diff3 command is similar to the diff command or sdiff command
but works with three files instead of two, which is particularly useful
when you have multiple contributors working on the same file, and you
need to merge their changes into a single version.
Basic Syntax of diff3 Command
The basic syntax of the diff3 command is:
diff3 [options] file1 file2 file3
Explanation of the above command.
file1: The first version of the file.
file2: The second version of the file.
file3: The third version of the file.
Commonly Used Options
Following are some commonly used options of diff3 Command:
-e: Create an ed script that can be used to apply changes to a file.
-m: Automatically merge the files.
-A: Include all changes from all files.
-E: Attempt to merge files even if conflicts are found.
-3: Show only changes that differ between all three files.
Finding Differences Between Files in Linux
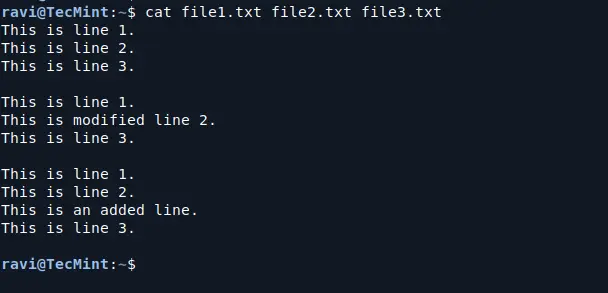
Let’s say you have three files: file1.txt, file2.txt, and file3.txt.
Each file contains a slightly different version of the same content,
and you want to compare them to see where the differences lie.
Example Files
To compare these three files, you can use the following command:
diff3 file1.txt file2.txt file3.txt
Compare Files for Differences
Here’s what this output means:
1:2c: This shows that in file1.txt, the change occurs at line 2, and the content of line 2 is This is line 2..
2:2c: This shows that in file2.txt, the change also happens at line 2, but the content of that line has been modified to This is modified line 2..
3:2,3c: This shows that in file3.txt,
there are changes in lines 2 and 3. Line 2 remains the same (This is
line 2.), but line 3 is an additional line that states: This is an added
line..
Merging Files with diff3 in Linux
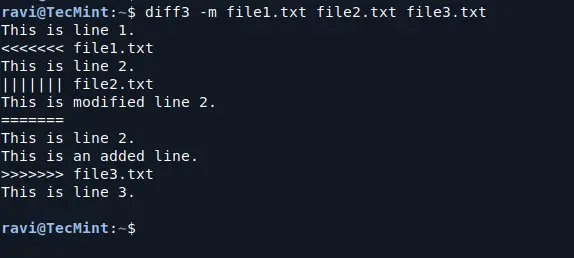
If you want to merge the three files and create a new file with all the changes, you can use the -m option:
diff3 -m file1.txt file2.txt file3.txt
This will output the merged content with conflict markers showing where there are conflicting changes.
Merging Files in Linux
Here’s what this output means:
<<<<<<< file1.txt: This marks the beginning of a conflict and shows the version from file1.txt.
||||||| file2.txt: This line shows the content from file2.txt (middle file in the comparison).
=======: This separates the conflicting lines.
>>>>>>> file3.txt: This marks the version from file3.txt and the end of the conflict block.
You can manually edit this to keep the changes you want.
Applying Changes from Multiple Files to One with diff3
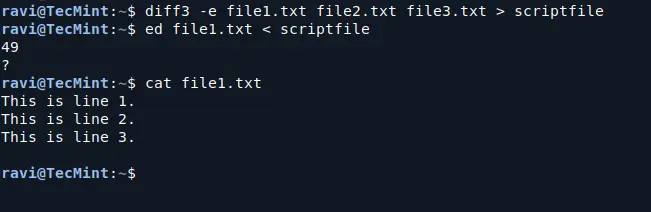
You can also use diff3 to create an ed script that applies changes from file2.txt and file3.txt to file1.txt. This can be done using the -e option:
This command creates a file named scriptfile that contains the generated ed script, which you can use the ed command to apply the script from scriptfile to file1.txt.
ed file1.txt < scriptfile
This will modify file1.txt according to the changes specified in the scriptfile, you can verify by the following cat command to see if the changes have been applied:
cat file1.txt
Resolving Conflicts with diff3 Command
This is helpful if you want to automate the merging of files using scripts.
Resolving Conflicts in diff3 Merges
When using diff3 for merging, conflicts may arise when
there are differences between all three files at the same location.
These conflicts are marked in the output, and you’ll need to manually
resolve them.
To resolve conflicts, open the file that contains the conflict markers.
Edit the file to remove the unwanted lines and keep the changes you want.
After resolving the conflict, save the file.
Conclusion
The diff3 command is a powerful tool for comparing and
merging three files in Linux, which is particularly useful for handling
multiple versions of the same file and resolving conflicts when merging
changes.
By understanding its basic usage and options, you can effectively manage file versions and collaborate with others on projects.
In this article, we shall uncover how to find processes using a powerful and resourceful Linux utility called fuser.
What is a fuser in Linux?
fuser is a simple yet powerful command-line utility
intended to locate processes based on the files, directories, or sockets
a particular process is accessing. In short, it helps a system user
identify which processes are using specific files or sockets.
Find Running Processes of a Directory (Verbose Output)
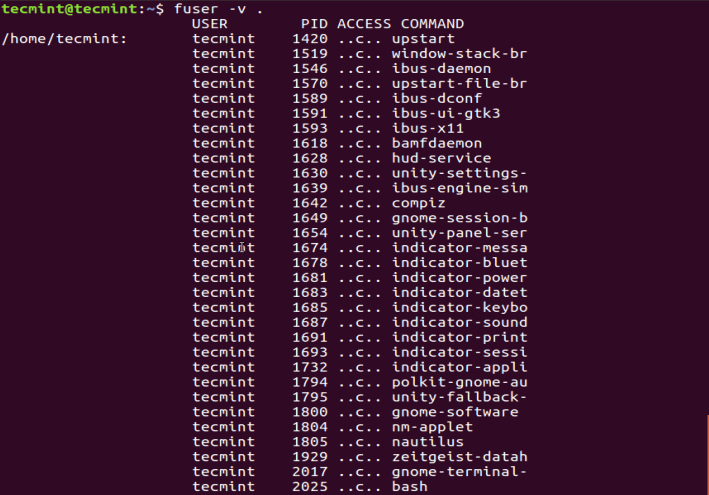
For a more detailed and clear output, enable the -v or --verbose as follows. In the output, fuser prints out the name of the current directory, then columns of the process owner (USER), process ID (PID), the access type (ACCESS), and command (COMMAND) as in the image below.
fuser -v .
List of Running Processes of the Directory
Under the ACCESS column, you will see access types signified by the following letters:
c– current directory.
e– an executable file being run.
f– open file, however, f is left out in the output.
F– open file for writing, F is as well excluded from the output.
r– root directory.
m– mmap’ed file or shared library.
Find Which Process is Accessing a File or Filesystem
To determine which processes are accessing your ~/.bashrc file, run:
fuser -v -m .bashrc
The -m NAME or --mount NAME option shows all processes accessing the given file or directory. If you pass a directory as NAME, it automatically appends a / to reference the file system mounted on that directory.
Check Which Process is Using Your ~/.bashrc File
Find Which Process is Using a Specific Port
Another practical use case is identifying which process is using a
specific network port, which is especially useful for debugging service
conflicts.
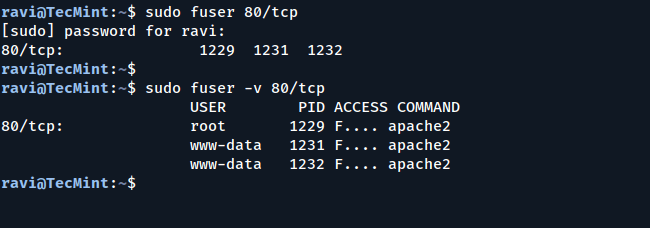
sudo fuser 80/tcp
OR
sudo fuser -v 80/tcp
This shows the PID of the process using TCP port 80. Add -v for detailed output.
Find Which Process is Using a Specific Port
How to Kill and Signal Processes Using fuser
To kill all processes accessing a file or socket, use the -k or --kill option.
sudo fuser -k .
To interactively kill a process, where you are asked to confirm your
intention to kill the processes accessing a file or socket, make use of -i or --interactive option.
sudo fuser -ki .
Interactively Kill Process in Linux
The two previous commands will kill all processes accessing your current directory; the default signal sent to the processes is SIGKILL, except when -SIGNAL is used.
List All Available Signals in Linux
You can list all the signals using the -l or –-list-signals options as below.
sudo fuser --list-signals
List All Kill Process Signals
Send a Specific Signal to Processes
Therefore, you can send a signal to processes as in the next command, where SIGNAL is any of the signals listed in the output above.
sudo fuser -k -SIGNAL
For example, to send the HUP (hang up) signal to processes accessing /boot.
sudo fuser -k -HUP /boot
For advanced usage and more details, check the fuser manual page.
man fuser
Conclusion
The fuser command might not be the first tool that comes to mind when managing processes, but it’s a hidden gem for any Linux user
or system admin. It’s perfect for finding out which processes are using
specific files, directories, or ports – and gives you the power to deal
with them directly.
If you’re working with files, directories, or network services on a Linux system, learning how to use fuser is 100% worth your time.
How to Detect Bad Sectors or Bad Blocks on Linux Hard Drives
Let’s start by defining a bad sector/bad block, it is a section on a disk drive or flash memory that can no longer be read from or written to, which usually happens due to permanent physical damage on the disk surface or failing flash memory transistors.
As more bad sectors build up, they can seriously impact your storage
device’s performance, reduce its capacity, or even lead to complete
hardware failure.
It is also important to note that the presence of bad blocks should
alert you to start thinking of getting a new disk drive or simply mark
the bad blocks as unusable.
Therefore, in this article, we will go through the necessary steps
that can enable you to determine the presence or absence of bad sectors
on your Linux disk drive or flash memory using certain disk scanning utilities.
That said, below are the methods:
1. Check for Bad Sectors Using the badblocks Tool
The badblocks
tool lets you scan a storage device, like a hard disk or external
drive, for bad sectors. Devices are usually listed as files like /dev/sdc or /dev/sda.
Step 1: List All Disks and Partitions
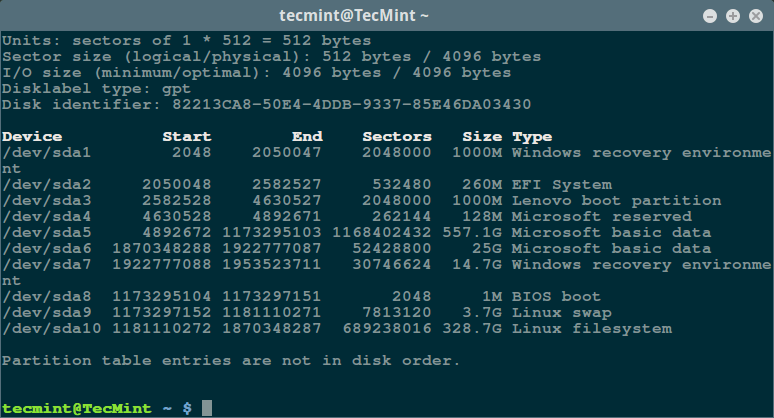
Firstly, use the fdisk command with superuser privileges to display information about all your disk drives or flash memory plus their partitions:
sudo fdisk -l
List Linux Filesystem Partitions
This will help you identify the correct device name to scan.
Step 2: Scan for Bad Blocks
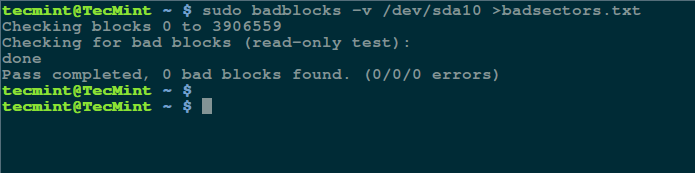
Then scan your Linux disk drive to check for bad sectors/blocks by typing:
sudo badblocks -v /dev/sda10 > badsectors.txt
Scan Hard Disk Bad Sectors in Linux
In the command above, badblocks is scanning device /dev/sda10 (remember to specify your actual device) with the -v enabling it to display details of the operation. In addition, the results of the operation are stored in the file badsectors.txt by means of output redirection.
In case you discover any bad sectors on your disk drive, unmount the
disk and instruct the operating system not to write to the reported
sectors as follows.
Step 3: Mark Bad Sectors as Unusable
You will need to employ e2fsck (for ext2/ext3/ext4 file systems) or fsck command with the badsectors.txt file and the device file as in the command below.
For ext2/ext3/ext4 File Systems:
sudo e2fsck -l badsectors.txt /dev/sda10
For Other File Systems:
sudo fsck -l badsectors.txt /dev/sda10
2. Scan Disk Health with Smartmontools (Recommended)
This method is more reliable and efficient for modern disks (ATA/SATA
and SCSI/SAS hard drives and solid-state drives) which ship in with a S.M.A.R.T
(Self-Monitoring, Analysis and Reporting Technology) system that helps
detect, report and possibly log their health status, so that you can
figure out any impending hardware failures.
Step 1: Install smartmontools in Linux
You can install smartmontools by running the command below:
Once the installation is complete, use smartctl, which controls the S.M.A.R.T system integrated into a disk. You can look through its man page or help page as follows:
man smartctl
smartctl -h
Step 3: Run a Basic Health Test
Now execute the smartctrl command and name your specific device as an argument, as in the following command, the flag -H or --health is included to display the SMART overall health self-assessment test result.
sudo smartctl -H /dev/sda10
Check Linux Hard Disk Health
The result above indicates that your hard disk is healthy and may not experience hardware failures anytime soon.
Optional: View Full SMART Report
For an overview of disk information, use the -a or --all option to print out all SMART information concerning a disk and -x or --xall which displays all SMART and non-SMART information about a disk.
sudo smartctl -a /dev/sda10
Or even more comprehensive:
$ sudo smartctl -x /dev/sda10
Wrapping Up
In this guide, we explored how to identify and manage bad sectors on
Linux drives using badblocks and smartmontools. Keeping tabs on your
storage health is crucial—and these tools make it pretty
straightforward.
If you have any questions, feedback, or suggestions, feel free to
reach out in the comment section below. And as always, stay tuned to
Tecmint for more Linux tips and tutorials!
How to Delete All Files in a Folder Except Certain Extensions
Sometimes, you may find yourself in a situation where you need to delete all files in a directory
or simply clean up a directory by removing all files except those with a
specific extension (e.g., files ending with a particular type).
In this article, we will show you how to delete files in a directory, excluding certain file extensions or types, using the rm, find, and globignore commands.
Before we move any further, let us start by briefly having a look at
one important concept in Linux – filename pattern matching, which will
enable us to deal with our issue at hand.
In Linux, a shell pattern is a string that consists of the following special characters, known as wildcards or metacharacters:
*– matches zero or more characters
?– matches any single character
[seq]– matches any character in seq
[!seq]– matches any character not in seq
There are three possible methods we shall explore here, and these include:
Delete Files Using Extended Pattern Matching Operators
The
extended pattern matching operators are listed below. In this case,
pattern-list refers to one or more filenames, separated using the | character:
*(pattern-list)– matches zero or more occurrences of the specified patterns
?(pattern-list)– matches zero or one occurrence of the specified patterns
+(pattern-list)– matches one or more occurrences of the specified patterns
@(pattern-list)– matches one of the specified patterns
!(pattern-list)– matches anything except one of the given patterns
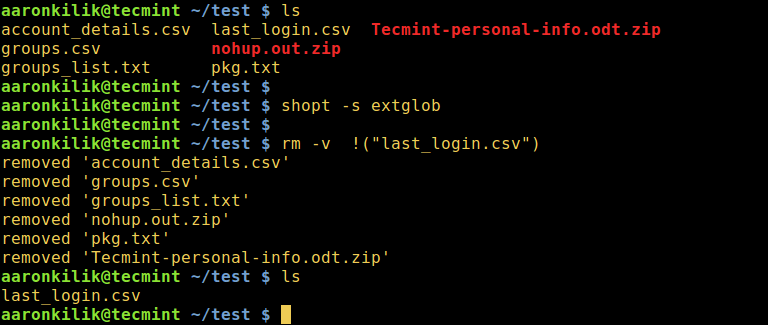
To use them, enable the extglob shell option as follows:
shopt -s extglob
1. To delete all files in a directory except a specific file, type the following command:
rm -v !("filename")
Delete All Files Except One File in Linux
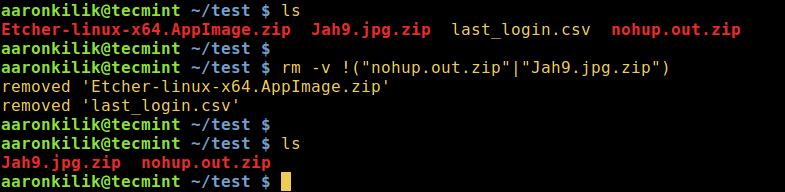
2. To delete all files with the exception of filename1 and filename2:
rm -v !("filename1"|"filename2")
Delete All Files Except a Few Files in Linux
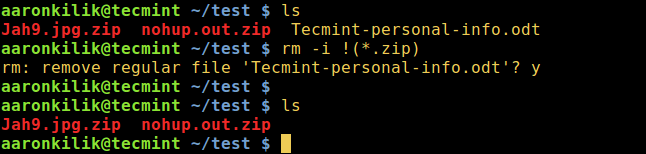
3. To remove all files except for .zip files, interactively:
rm -i !(*.zip)
Delete All Files Except Zip Files in Linux
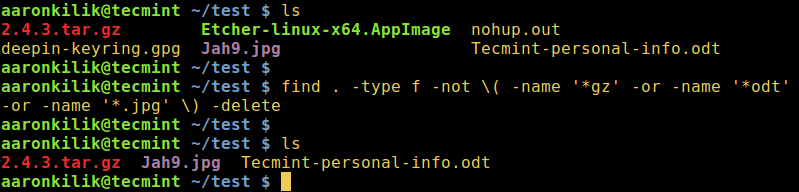
4. To delete all files except for .zip and .odt files while displaying the actions being performed:
rm -v !(*.zip|*.odt)
Delete All Files Except Certain File Extensions
Once you have all the required commands, turn off the extglob shell option like so:
shopt -u extglob
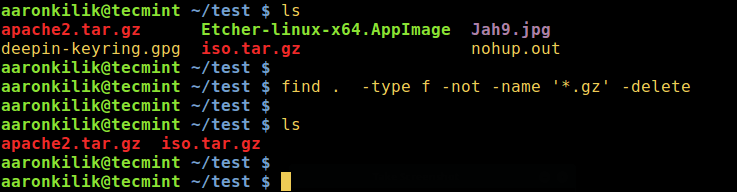
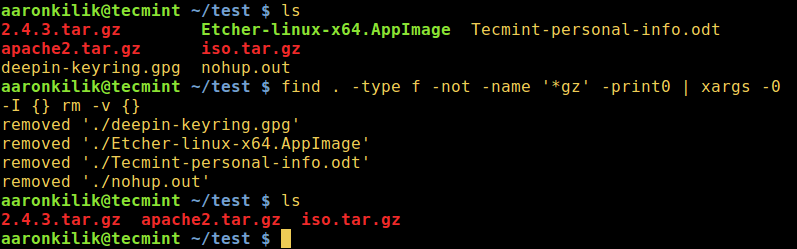
Delete Files Using Linux find Command
Under this method, we can use find command exclusively with appropriate options or in conjunction with the xargs command by employing a pipeline as in the forms below:
This last approach, however, only works with bash. Here, the GLOBIGNORE variable stores a colon-separated pattern-list (filenames) to be ignored by pathname expansion.
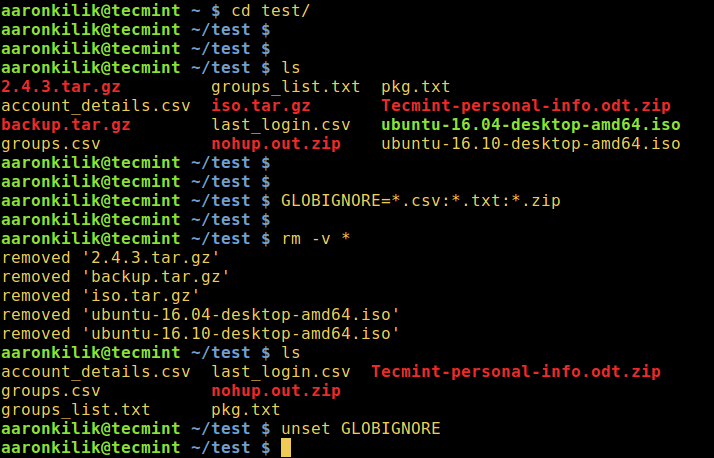
To employ this method, move into the directory that you wish to clean up, then set the GLOBIGNORE variable as follows:
cd test
GLOBIGNORE=*.odt:*.iso:*.txt
In this instance, all files other than .odt, .iso, and .txt files with be removed from the current directory.
Now run the command to clean up the directory:
rm -v *
Afterwards, turn off GLOBIGNORE variable:
$ unset GLOBIGNORE
Delete Files Using Bash GLOBIGNORE Variable
Note: To understand the meaning
of the flags employed in the commands above, refer to the man pages of
each command we have used in the various illustrations.
Conclusion
These are a few simple and effective ways to delete files in Linux,
keeping only those with specific extensions or filenames intact. If you
know of any other useful command-line techniques for cleaning up
directories, feel free to share them in the feedback section below.
5 Best Tools to Monitor and Debug Disk I/O Performance in Linux
Brief: In this guide, we will discuss the best tools for monitoring and debugging disk I/O activity (performance) on Linux servers.
A key performance metric
to monitor on a Linux server is disk I/O (input/output) activity, which
can significantly impact several aspects of a Linux server,
particularly the speed of saving to or retrieving from disk, of files or
data (especially on database servers). This has a ripple effect on the
performance of applications and services.
1. iostat – Shows Device Input and Output Statistics
iosat is one of the many terminal-based system monitoring utilities
in the sysstat package, which is a widely used utility designed for
reporting CPU statistics and I/O statistics for block devices and
partitions.
To use iostat on your Linux server, you need to install the sysstat package on your Linux system by running the applicable command for your Linux distribution.
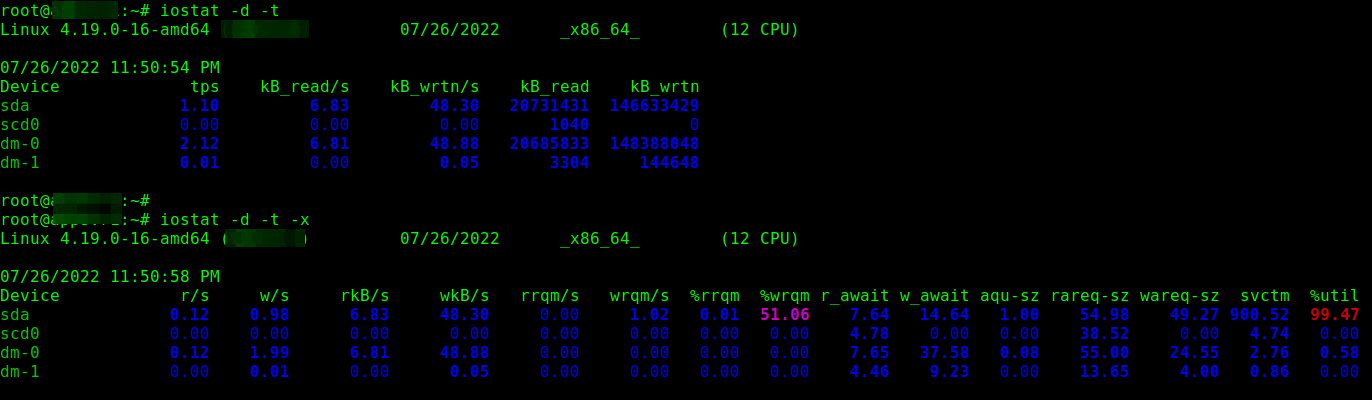
To show a simple device utilization report, run iostat with the -d
command line option. Usually, the first report provides statistics
about the time since the system startup (boot time), and each subsequent
report is concerned with the time since the previous report.
Use the -x for an extended statistics report and the -t
flag to enable time for each report. Besides, If you wish to eliminate
devices without any activity in the report output, add the -z flag:
iostat -d -t
OR
iostat -d -x -t
iostat – Monitor Device Statistics in Linux
To display statistics in kilobytes per second as opposed to blocks per second, add the -k flag, or use the -m flag to display stats in megabytes per second.
iostat -d -k
OR
iostat -d -m
iostat can also display continuous device reports at x second intervals. For example, the following command displays reports at two-second intervals:
iostat -d 2
Related to the previous command, you can display n number of reports at x second intervals. The following command will display 10 reports at two-second intervals.
iostat -d 2 10
Alternatively, you can save the report to a file for later analysis.
iostat -d 2 10 > disk_io_report.txt &
For more information about the report columns, read the iostat man page:
man iostat
2. sar – Show Linux System Activity
sar is another useful utility that ships with the sysstat
package, intended to collect, report, or save system activity
information. Before you can start using it, you need to set it up as
follows.
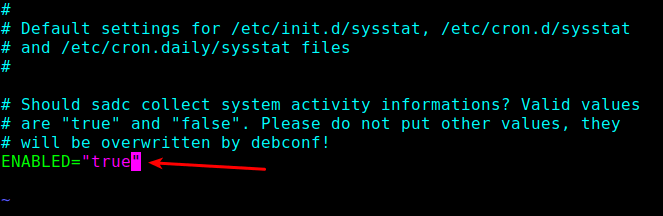
First, enable it to collect data in the /etc/default/sysstat file.
vi /etc/default/sysstat
Look for the following line and change the value to “true” as shown.
ENABLED="true"
Enable Sar in Linux
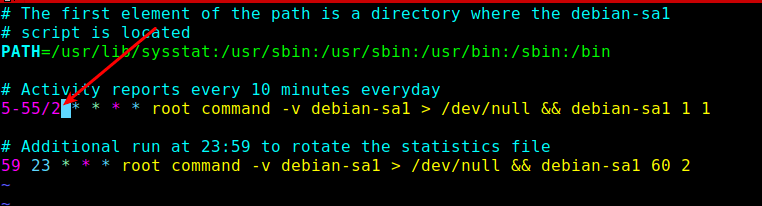
Next, you need to reduce the data collection interval defined in the sysstat cron jobs. By default, it is set to every 10 minutes, you can lower it to every 2 minutes.
You can do this in the /etc/cron.d/sysstat file:
# vi /etc/cron.d/sysstat
Configure Sar Cron in Linux
Save the file and close it.
Finally, enable and start the sysstat service using the following systemctl command:
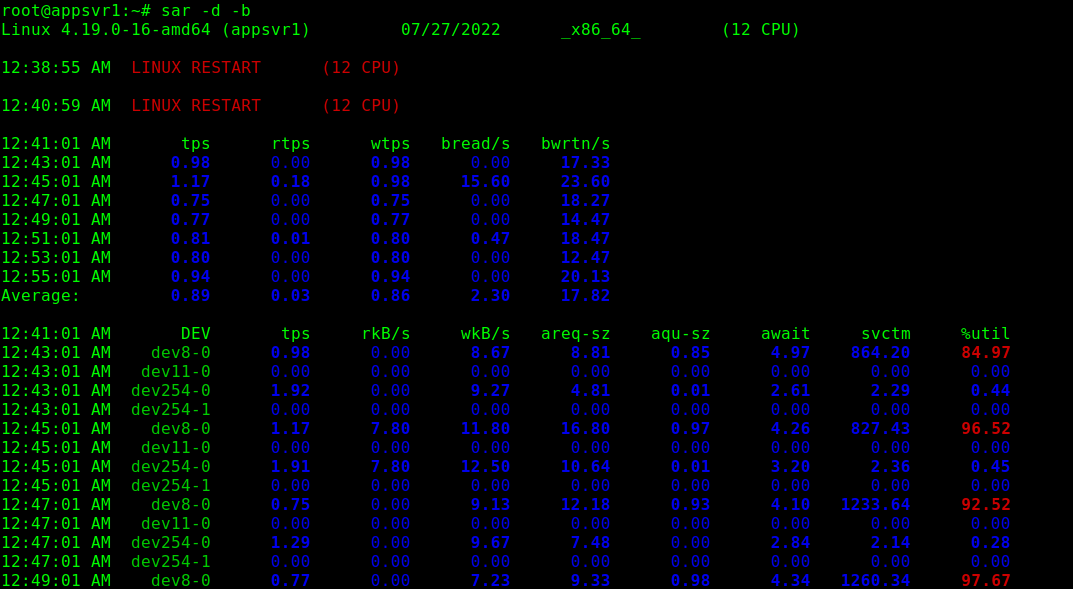
Next, wait for 2 minutes to start viewing sar reports. Use the sar command and the -b command line option to report I/O and transfer rate statistics and -d to report activity for each block device as shown.
sar -d -b
Sar – Monitor Linux System Activity
3. iotop – Monitor Linux Disk I/O Usage
Similar to the top monitoring tool in terms of design, iotop is a simple utility that enables you to monitor disk I/O activity and usage on a per-process basis.
You can get it installed on your Linux server as follows (remember to run the appropriate command for your Linux distribution):
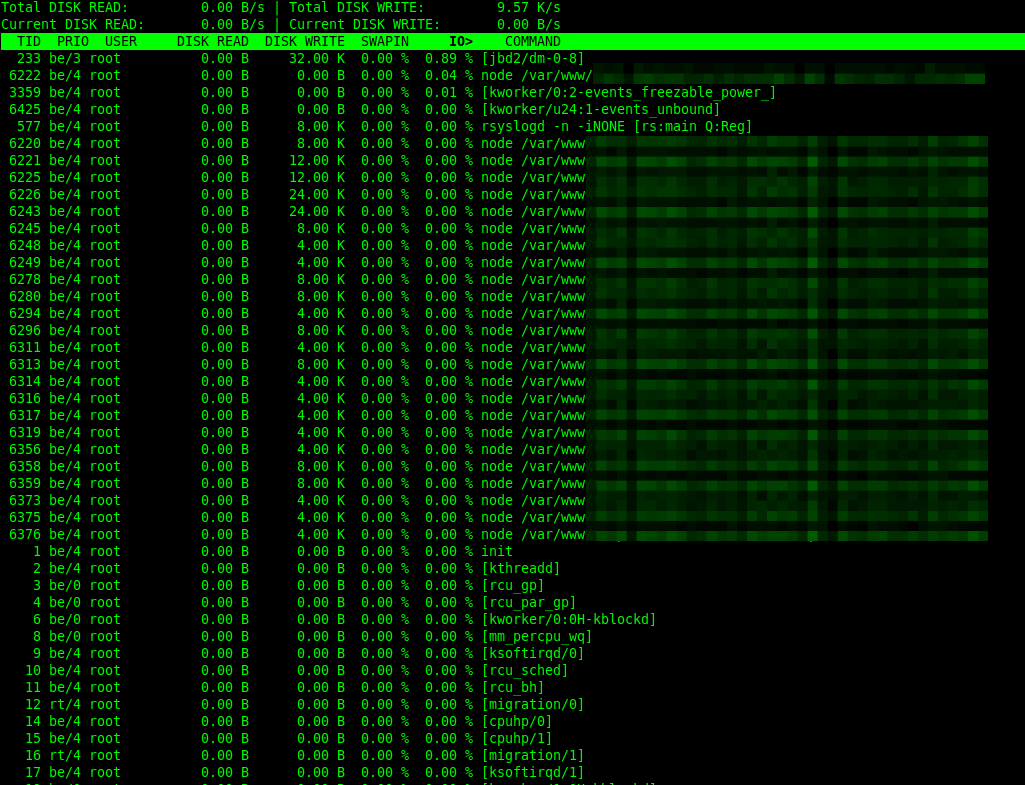
To monitor per-process I/O activity, you can run iotop without any arguments as follows. By default, the delay between iterations is 1 second. You can change this using the -d flag.
iotop
OR
iotop -d 2
iotop – Monitor Linux Disk Usage
iotop will by default display all threads of a process. To change this behavior so that it only shows processes, use the -P command line option.
iotop -P
Also, using the -a option, you can instruct it to display accumulated I/O as opposed to showing bandwidth. In this mode, iotop shows the amount of I/O processes performed since iotop was invoked.
dstat is a powerful all-in-one replacement for older tools like vmstat, iostat, netstat,
and others. It provides real-time stats for various system
resources—including CPU, disk, memory, and network—in a clean,
color-coded format.
To install dstat, use the relevant command for your Linux distro:
sudo apt install dstat             # On Debian, Ubuntu, and Mint
sudo yum install dstat             # On RHEL, CentOS, Fedora, Rocky Linux, AlmaLinux
sudo emerge -a sys-process/dstat   # On Gentoo Linux
sudo apk add dstat                 # On Alpine Linux
sudo pacman -S dstat               # On Arch Linux
sudo zypper install dstat          # On OpenSUSE
To run it with default settings (which includes CPU, disk, and network I/O):
dstat
If you want to focus only on disk activity, use:
dstat -d
You can also mix and match different options. For example, to monitor CPU, memory, and disk:
dstat -cdm
To log output to a CSV file for later analysis:
dstat -cdm --output system_stats.csv
dstat is super flexible and great for getting a quick, holistic view of your system in real time.
5. atop – Advanced System and Process Monitor
atop is like top,
but on steroids, which gives you detailed, per-process resource usage,
including disk I/O, memory, CPU, and network, making it great for
in-depth analysis, especially when diagnosing performance issues over
time.
Install it using your distro’s package manager:
sudo apt install atop             # On Debian, Ubuntu, and Mint
sudo yum install atop             # On RHEL, CentOS, Fedora, Rocky Linux, AlmaLinux
sudo emerge -a sys-process/atop   # On Gentoo Linux
sudo apk add atop                 # On Alpine Linux
sudo pacman -S atop               # On Arch Linux
sudo zypper install atop          # On OpenSUSE
To launch it:
atop
By default, it updates every 10 seconds. You can change the interval like this:
atop 2
One of its best features is that, it records data to a log file automatically (usually in /var/log/atop/).
atop -r /var/log/atop/atop_YYYYMMDD
It’s especially useful for tracing performance issues after they’ve already happened.
That’s all we had for you! We would like to know your thoughts about
this guide or the above tools. Leave a comment via the feedback form
below.
You can also inform us about tools that you think are missing in this list, but deserve to appear here.
15 Useful ‘dpkg’ Commands for Debian and Ubuntu Users [With Examples]
Debian GNU/Linux is the backbone of several popular Linux distributions like Knoppix, Kali, Ubuntu, Mint,
and more. One of its strongest features is its robust package
management system, which makes installing, removing, and managing
software a breeze.
Debian and its derivatives use a variety of package managers such as dpkg, apt, apt-get, aptitude, synaptic, tasksel, dselect, dpkg-deb, and dpkg-split. each serving a different purpose.
Let’s quickly go over the most common ones before diving deeper into the dpkg command.
Common Debian-Based Package Managers
Command
Description
apt
apt, short for Advanced Package Tool, is used in Debian-based systems to install, remove, and update software packages.
aptitude
aptitude is a text-based front-end to apt, great for those who prefer a terminal-based interface with menus.
synaptic
synaptic is a graphical package manager that makes it easy to install, upgrade, and uninstall packages even for novices.
tasksel
tasksel allows users to install all packages related to a specific task (like a desktop environment or a LAMP server).
dselect
dselect is a menu-driven package management tool initially used during the first install, and is now replaced with aptitude.
dpkg-deb
Used for working directly with .deb archives – creating, extracting, and inspecting them.
dpkg-split
dpkg-split is useful for splitting and merging
large files into chunks of smaller files to be stored on media of
smaller sizes, such as floppy disks.
dpkg is the main package management program in Debian and Debian-based systems, used to install, build, remove, and manage packages. aptitude is the primary front-end to dpkg.
Some of the most commonly used dpkg commands, along with their usages, are listed here:
1. Install a Package on Ubuntu
To install a package using dpkg, you need to download .deb package file from the following official package repository sites for Debian and Ubuntu-based distributions.
Once downloaded, you can install it using the -i option followed by the name of the .deb package file.
sudo dpkg -i 2048-qt_0.1.6-2+b2_amd64.deb
Install the Deb Package
2. List Installed Packages on Ubuntu
To view and list all the installed packages, use the “-l” option along with the command.
dpkg -l
List Installed Debian Packages
To view a specific package installed or not, use the option “-l” along with the package name. For example, check whether the apache2 package is installed or not.
dpkg -l apache2
Check Package Installation
3. Remove a Package on Ubuntu
To remove the “.deb” package, we must specify the package name “2048-qt” with the “-r” option, which is used to remove/uninstall a package.
sudo dpkg -r 2048-qt
Remove Deb Package
You can also use ‘p‘ option in place of ‘r' which will remove the package along with the configuration file. The ‘r‘ option will only remove the package and not the configuration files.
[root@tecmint~]# dpkg -p flashpluginnonfree
4. View Contents of a .deb Package
To view the content of a particular .deb package, use the “-c” option, which will display the contents of a deb package in long-list format.
dpkg -c 2048-qt_0.1.6-2+b2_amd64.deb
View Contents of Deb Package
5. Check Status of Deb Package Installation
Using “-s” option with the package name will display whether a deb package is installed or not.
dpkg -s 2048-qt
Check Deb Package Installation
6. List Files Installed by Deb Package
To list the location of all the files installed by a particular package, use the -L option as shown.
dpkg -L 2048-qt
List Files Installed by Deb Package
7. Install Multiple Debian Packages from a Directory
Recursively install all .deb files found in specified directories and all of their subdirectories, use the '-R' and '--install' options.
For example, to install all '.deb' packages from the directory named ‘debpackages‘.
sudo dpkg -R --install debpackages
Install All Deb Packages
8. Extract Contents of a Deb Package
To extract the contents of a .deb package but does not configure the package, use the --unpack option.
sudo dpkg --unpack 2048-qt_0.1.6-2+b2_amd64.deb
Extract Contents of Deb Package
9. Reconfigure a Unpacked Deb Package
To configure a package that has been unpacked but not yet configured, use the “--configure” option as shown.
sudo dpkg --configure flashplugin-nonfree
10. Updating Package Information in System Database
The “–-update-avail” option replaces the old information
with the available information for the package file in the package
management system’s database.
sudo dpkg --update-avail package_name
11. Delete Information of Package
The action “--clear-avaial” will erase the current information about what packages are available.
sudo dpkg –-clear-avail
12. Forget Uninstalled and Unavailable Packages
The dpkg command with the option “–forget-old-unavail” will automatically forget uninstalled and unavailable packages.
sudo dpkg --forget-old-unavail
13. Display dpkg Licence
dpkg --licence
14. Display dpkg Version
The “--version” argument will display the dpkg version information.
dpkg –version
15. View dpkg Help
The “--help” option will display a list of available options of the dpkg command.
dpkg –help
That’s all for now. I’ll soon be here again with another interesting
article. If I’ve missed any commands in the list, do let me know via
comments.
Till then, stay tuned and keep connected to Tecmint. Like and share with us and help us spread. Don’t forget to mention your valuable thoughts in a comment.
How to Use Systemd to Run Bash Scripts at Boot in Linux
A few days ago, I came across a CentOS 8 32-bit
distro and decided to test it on an old 32-bit machine. After booting
up, I realized there was a bug causing the network connection to drop.
Every time I rebooted, I had to manually bring the network back up,
which led me to wonder: How can I automate this process with a script
that runs every time the system boots?
The solution is straightforward, and today, I’ll show you how to do this using systemd service units, but before we jump into that, let’s first take a quick look at what a service unit is and how it works.
In this article, we’ll cover the basics of systemd service units, their relationship with “targets,”
and how to set up a service unit to run a script at boot. I’ll keep
things simple, focusing on the practical steps, so you’ll have
everything you need to know to tackle this on your own.
What is a Systemd Service Unit?
In simple terms, a service unit in systemd is a
configuration file that defines how a service should behave on your
system. It could be something like a network service, a program, or even
a script that needs to run when your computer boots or at a specific
point during the boot process.
These service units are grouped into targets, which can be seen as milestones or stages in the boot process. For example, when your system reaches the multi-user target (runlevel 3), certain services will be started. You can think of these targets as “collections” of services that work together at various stages of the boot sequence.
If you’d like to see the services running in a particular target (for example, graphical.target), you can use the systemctl command:
systemctl --type=service
This will show you all active services in your current target. Some
services run continuously, while others start up once and then exit.
List All Active Services
Checking the Status of a Service
If you’re curious about a particular service, you can use systemctl status to see whether it’s active or inactive:
systemctl status firewalld.service
This command checks the status of the firewalld service. You’ll notice that it’s active, meaning it’s running, and enabled, which means it will start automatically on the next boot.
You can also stop a service temporarily (until the next boot) using:
systemctl stop firewalld.service
systemctl status firewalld.service
This will stop the firewalld service for this session, but won’t prevent it from starting up next time.
Check Status of Service
Enabling and Disabling Services
To ensure a service starts automatically on boot, you need to enable
it, which will create a symbolic link in the appropriate target’s wants
folder:
systemctl enable firewalld.service
To disable it, you would simply run:
systemctl disable firewalld.service
Enabling and Disabling Systemd Services
Creating a Custom Service Unit
To set up a service that runs a script at boot, we’ll create a new service unit under the /etc/systemd/system directory, here you’ll see existing service unit files and folders for different targets.
cd /etc/systemd/system
ls -l
Existing Service Unit Files
Let’s create our own service unit called connection.service using Vim or your preferred text editor to create it:
vim connection.service
Or
vi connection.service
Add the following content to the file.
[Unit]
Description=Bring up network connection
After=network.target

[Service]
ExecStart=/root/scripts/conup.sh

[Install]
WantedBy=multi-user.target
Explanation:
[Unit]: The unit’s metadata. We’ve given it a description and told it to run after network.target, meaning it will only execute after the network has been initialized.
[Service]: This section defines the command to execute when the service starts. In this case, it runs the script conup.sh.
[Install]: This section tells systemd that the service
should be loaded at the multi-user target, which is the standard
runlevel for most systems.
Now, enable the service so it will start automatically on the next boot:
systemctl enable connection.service
You can confirm that it has been enabled by checking the multi-user.target.wants directory:
ls -l multi-user.target.wants/
The symbolic link to connection.service should now be present. However, we still need to create the script that this service will run.
Verify Service Unit File
Creating the Script
Let’s now create the conup.sh script that will bring the network connection up.
cd /root
mkdir scripts
cd scripts
vi conup.sh
Add the following line to bring the network up, here the script uses the nmcli command to bring the network connection on the enp0s3 interface up.
#!/bin/bash
nmcli connection up enp0s3
Don’t forget to make the script executable.
chmod +x conup.sh
At this point, the service is ready to go.
SELinux Contexts (For RHEL/CentOS Users)
If you’re using a RHEL-based system
(like CentOS or Rocky Linux), don’t forget about SELinux, which can
block scripts from running if the correct security context isn’t
applied.
To temporarily set the context so the system treats the script as a regular executable, use:
chcon -t bin_t /root/scripts/conup.sh
However, this change won’t survive a reboot or file relabeling.
To make it permanent, use:
semanage fcontext -a -t bin_t "/root/scripts/conup.sh"
restorecon -v /root/scripts/conup.sh
This step ensures the script continues to run properly even after reboots or SELinux policy reloads.
Testing the Service
To test it without rebooting, you can start it manually.
systemctl start connection.service
If everything is set up correctly, the service will execute the script, and your network connection should be restored.
Alternatively, if you wrote a simpler script like touch /tmp/testbootfile, you can check if the file was created in /tmp to confirm the service is running as expected.
Conclusion
By now, you should have a good understanding of systemd service units
and how to create and manage them on your system. You’ve also automated
a common task – bringing up the network connection on boot using a
simple service unit.
Hopefully, this guide helps you get more comfortable with managing
services, targets, and scripts in systemd, making your system more
automated and efficient.
Keylogging, short for “keystroke logging” is the process of recording the keys struck on a keyboard, usually without the user’s knowledge.
Keyloggers can be implemented via hardware or software:
Hardware keyloggers intercept data at the physical level (e.g., between the keyboard and computer).
Software keyloggers, like LogKeys, capture keystrokes through the operating system.
This article explains how to use a popular open-source Linux keylogger called LogKeys
for educational or testing purposes only. Unauthorized use of
keyloggers to monitor someone else’s activity is unethical and illegal.
What is LogKeys?
LogKeys is an open-source keylogger for Linux that
captures and logs keyboard input, including characters, function keys,
and special keys. It is designed to work reliably across a wide range of Linux systems without crashing the X server.
LogKeys also correctly handles modifier keys like Alt and Shift, and is compatible with both USB and serial keyboards.
While there are numerous keylogger tools available for Windows, Linux has fewer well-supported options. Although LogKeys
has not been actively maintained since 2019, it remains one of the more
stable and functional keyloggers available for Linux as of today.
Installation of Logkeys in Linux
If you’ve previously installed Linux packages from a tarball (source), you should find installing the LogKeys package straightforward.
However, if you’ve never built a package from source before, you’ll
need to install some required development tools first, such as C++ compilers and GCC libraries, before proceeding.
Installing Prerequisites
Before building LogKeys from source, ensure your system has the required development tools and libraries installed:
First, download the latest LogKeys source package using the wget command, then, extract the ZIP archive and navigate into the extracted directory:
wget https://github.com/kernc/logkeys/archive/master.zip
unzip master.zip
cd logkeys-master/
or clone the repository using Git, as shown below:
git clone https://github.com/kernc/logkeys.git
cd logkeys
Next, run the following commands to build and install LogKeys:
./autogen.sh         # Generate build configuration scripts
cd build                  # Switch to build directory
../configure              # Configure the build
make                      # Compile the source code
sudo make install         # Install binaries and man pages
If you encounter issues related to keyboard layout or character encoding, regenerate your locale settings:
sudo locale-gen
Usage of LogKeys in Linux
Once LogKeys is installed, you can begin using it to monitor and log keyboard input using the following commands.
Start Keylogging
This command starts the keylogging process, which must be run with
superuser (root) privileges because it needs access to low-level input
devices. Once started, LogKeys begins recording all keystrokes and saves them to the default log file: /var/log/logkeys.log.
Note: You won’t see any output in the terminal; logging runs silently in the background.
sudo logkeys --start
Stop Keylogging
This command terminates the keylogging process that was started earlier, which is important to stop LogKeys when you’re done, both to conserve system resources and to ensure the log file is safely closed.
sudo logkeys --kill
Get Help / View Available Options
The follwing command will displays all available command-line options and flags you can use with LogKeys.
logkeys --help
Useful options include:
--start : Start the logger
--kill : Stop the logger
--output <file> : Specify a custom log output file
--no-func-keys : Don’t log function keys (F1-F12)
--no-control-keys : Skip control characters (e.g., Ctrl+C, Backspace)
View the Logged Keystrokes
The cat command displays the contents of the default log file where LogKeys saves keystrokes.
sudo cat /var/log/logkeys.log
You can also open it with a text editor like nano or less:
sudo nano /var/log/logkeys.log
or
sudo less /var/log/logkeys.log
Uninstall LogKeys in Linux
To remove LogKeys from your system and clean up the installed binaries, manuals, and scripts, use the following commands:
cd build
sudo make uninstall
This will remove all files that were installed with make install, including the logkeys binary and man pages.
Conclusion
LogKeys is a powerful keylogger for Linux that
enables users to monitor keystrokes in a variety of environments. Its
compatibility with modern systems and ease of installation make it a
valuable tool for security auditing, parental control testing, and
educational research.
However, it’s crucial to emphasize that keylogging should only be
used in ethical, lawful contexts—such as with explicit user consent or
for personal system monitoring. Misuse can lead to serious legal
consequences. Use responsibly and stay informed.
Running
Python scripts is one of the most common tasks in automation. However,
managing dependencies across different systems can be challenging.
That’s where Docker comes in. Docker lets you package your Python script
along with all its required dependencies into a container, ensuring it
runs the same way on any machine. In this step-by-step guide, we’ll walk
through the process of creating a real-life Python script and running
it inside a Docker container.
Why Use Docker for Python Scripts
When you’re working with Python scripts, things can get messy/complex
very fast. Different projects need different libraries, and what runs
on your machine might break on someone else’s. Docker solves that by
packaging your script and its environment together. So instead of saying
“It works on my machine”, you can be sure it works the same everywhere.
It also keeps your system clean. You don’t have to install every
Python package globally or worry about version conflicts. Everything
stays inside the container.
If you’re deploying or handing your script off to someone else,
Docker makes that easy, too. No setup instructions, no “install this and
that”. Just one command, and it runs.
Write the Python Script
Let’s create a project directory to keep your Python script and Dockerfile. Once created, navigate into this directory using the cd command:
mkdir docker_file_organizer
cd docker_file_organizer
Create a script named “organize_files.py” to scan a directory and group files into folders based on their file extensions:
nano organize_files.py
Paste the following code into the “organize_file.py” file. Here, we use two pre-built Python modules, named os and shutil, to handle files and create directories dynamically:
if __name__ =="__main__": organize_by_extension(SOURCE_DIR)
In this script, we organize files in a given directory based on their extensions. We use the os
module to list the files, check if each item is a file, extract its
extension, and create folders named after those extensions (if they
don’t already exist). Then, we use the shutil module to move each file into its corresponding folder. For each move, we print a message showing the file’s new location.
Create the Dockerfile
Now, create a Dockerfile to define the environment in which your script will run:
We use this Dockerfile to create a container with Python, add our
script to it, and make sure the script runs automatically when the
container starts:
Build the Docker Image
Before you can build the Docker image, you need to install Docker first. After that, run the following command to package everything into a Docker image:
sudodocker build -t file-organizer .
It reads our Dockerfile and puts together the Python setup and our script so they’re ready to run in a single container image:
Create a Sample Folder with Files
To see our script in action, we create a test folder named
“sample_files” with a few files of different types. We created these
files just to make the folder a bit messy and see how our Python script
handles it:
Finally, we run our Docker container and mount the sample folder into it. The -v
flag mounts your local “~/sample_files” directory to the “/files”
directory in the container, which allows the Python script to read and
organize files on your host machine:
docker run --rm-v ~/sample_files:/files file-organizer
Here, we use the --rm option to remove the container automatically after it finishes running, which saves disk space:
In the end, we use the tree command to check if the files have been sorted into folders based on their extensions:
tree sample_files
Note: The tree command isn’t pre-installed on most systems. You can easily install it using a package manager like apt on Ubuntu, brew on macOS, and so on.
Final Thoughts
With your Python script running inside Docker, you’re all set to take
full advantage of a clean, portable, and consistent development setup.
You can easily reuse this containerized workflow for other automation
tasks, share your script without worrying about dependencies, and keep
your system clutter-free. As a next step, consider exploring how to
build multi-script Docker images, schedule containers with cron jobs, or integrate your scripts with other tools like Git, Jenkins, or even cloud platforms to streamline your automation and deployment process.