We’re always searching for something – the file where we wrote that recipe (Python or baking); the comment in 100,000 lines of code that points to an unfinished module; the log entry about an iffy connection. Regular expressions (abbreviated as regexps hereafter, but you’ll also see regex and re) are a codified method of searching which, to the unenlightened, suggests line noise. Yet, despite a history that stretches back to Ken Thompson’s 1968 QED editor, they’re still a powerful tool today, thanks to grep – ‘global regular expression print’. Using grep exposes only the limited Basic Regular Expressions (BRE); grep -E (or egrep) gives Extended Regular Expressions (ERE). For other languages, most adopt PCRE (Perl Compatible Regular Expressions), developed in 1997, by Philip Hazel, and understood by many languages, though not always implemented in exactly the same way. We’ll use grep -P when we need to access these. Emacs has its own regexp style but, like grep, has a -P option to use Perl-compatible regexps. This introduction is mostly aimed at searching from the shell, but you should easily be able to adapt it to standalone Perl scripts, and other languages which use PCRE. Even the simplest regexp can make you more productive at the command line
Resources
Your favourite editor Perl 5.10 (or later)
Step-by-step
Step 01 Word up! You’re probably used to searching a text file for occurrences of a word with grep – in that case, the word is the regular expression. More complicated regexps are simply concise ways for searching for parts of words, or character strings, in particular positions. Step 02 Reserved character Some characters mean special things in regexp pattern matching: . * [ ] ^ $ \ in Basic Regular Expressions. The ‘.’ matches any character, so using it above doesn’t just find the full stop unless grep’s -F option is used to make the string entirely literal. Step 03 Atlantic crossing Extended Regular Expressions add ? | { } ( ) to the metacharacters. grep -E or egrep lets you use them, as above, where ‘standardise|standardize’ can match British or American (and ‘Oxford’) spellings of ‘standardise’. Step 04 Colourful? ‘|’ gives a choice between the two characters in the parentheses – standardi(s|z)e – saving unnecessary typing. Another way to find both British and American spellings is ‘?’ to indicate one or zero of the preceding element, such as the u in colour. Step 05 Mmmmm, cooooool The other quantifiers are + for at least one of the preceding regexps (‘_+’ finds lines with at least one underscore) and * for zero or more (coo*l matches col, cool, coooooooool, but not cl, useful for different spellings of mmmmmmmmm or zzzzzzzzzz). Step 06 No number Feeling confident? Good, time for more goodies. [0-9] is short for [0123456789] and matches any element in the square brackets. The ^ inside the brackets is a negation, here matching any non-number but the other ^? … Step 07 Start to finish The ^ matches the expression at the beginning of the line; a $ matches the end. Now you can sort your document.text from text.doc and find lines beginning with # or ending in a punctuation mark other than a period. Step 08 A to Z Guide The range in [] can be anything from the ASCII character set, so [ \t\r\n\v\f] indicates the whitespace characters (tab, newline et al). [^bd]oom$ matches all words ending in ‘oom’, occurring at the end of the line, except boom and doom. Step 09 POSIX classes The POSIX classes for character ranges save a lot of the [A-Za-z0-9], but perhaps most useful is the non-POSIX addition of [:word:] which matches [A-Za-z0-9_], the addition of underscore helping to match identifiers in many programming languages. Step 10 ASCII style Where character classes aren’t implemented, knowledge of ASCII’s underpinnings can save you time: so [ -~] is all printable ASCII characters (character codes 32-127) and its inverse [^ -~] is all non-printable ASCII characters. Step 11 Beyond grep Find and Locate both work well with regexps. In The Linux Command Line (reviewed in LUD 111), William Shotts gave the great example of find . -regex ‘.*[^-_./0-9a-zA-Z].*’ to find filenames with embedded spaces and other nasties. Step 12 Nice one Cyril
Speaking of non-standard characters, while [:alpha:] depends on your locale settings, and may only find ASCII text, you can still search for characters of other alphabets – from accented French and Welsh letters to the Greek or Russian alphabet. Step 13 Ranging repeat While {4} would match the preceding element if it occurred four times, putting in two numbers gives a range. So, [0-9]{1,3} in the above screenshot finds one-, two- or three- digit numbers – a quick find for dotted quads, although it won’t filter out 256-999. Step 14 Bye bye, IPv4 FOSDEM was all IPv6 this year, so let’s not waste any more time on IPv4 validation, as the future may actually be here. As can be seen in this glimpse of IPv6 validators, despite some Perl ‘line noise’, it boils down to checking appropriate amounts of hex. Step 15 Validation By now regexps should be looking a lot less like line noise, so it’s time to put together a longer one, just building from some of the simpler parts. A common programming task, particularly with web forms, is validating input is in the correct format – such as dates. In this case we’re looking at validating dates, eg for date-of-birth (future dates could then be filtered using current date). Note that (0[1-9]|[12][0-9]|3[01]) checks numbers 01-31, but won’t prevent 31st February. Step 16 Back to basics Now we have the basics, and can string them together, don’t neglect the grep basics – here we’re looking at how many attempts at unauthorised access were made by SSH in a given period. An unnecessary pipe replaced with grep -c. Step 17 Why vi? Whatever your position in the venerable and affectionate vi/Emacs war, there will be times and servers where vi is your only tool, so grab yourself a cheat-sheet. Vi and vim mostly follow BRE. Here we see one of the \< \> word boundaries. Step 18 Boundary guard As well as ^ and $ for line ends, word boundaries can be matched in regexps with \b – enabling matches on, say, ‘hat’ without matching ‘chatter’. The escape character, \, is used to add a number of extra elements, such as \d for numerical digit. Step 19 Literally meta Speaking of boundaries, placing \Q \E around a regexp will treat everything within as literals rather than metacharacters – meaning you can just quote a part of the regexp, unlike grep -F where everything becomes a literal. Step 20 Lazy = good Time to think about good practice. * is a greedy operator, expanding something like <.*> by grabbing the last closing tag and anything between, including further tags. <.*?> is non- greedy (lazy), taking the first closing tag. Step 21 Perl -pie Aside from grep, Perl remains the most comfortable fit with regexps, as is far more powerful than the former. With perl -pie on the command line, you can perform anything from simple substitutions on one or more files, to… Step 22 Perl one-liner …counting the empty lines in a text file (this from Krumin’s Perl One-Liners, see next month’s book reviews). /^$/ matches an empty line; note Perl’s use of // to delimit a regexp; ,, could also be used if / is one of the literals used. Step 23 A regexp too far Now you know the basics, you can build slightly more complicated regexps – but, as Jeff Atwood said: “Regular expressions are like a particularly spicy hot sauce – to be used in moderation and with restraint, only when appropriate.” Step 24 Tagged offender Finally, know the limitations of regexps. Don’t use on HTML, as they don’t parse complex languages well. Here the legendary StackOverflow reply by Bob Ince to a query on their use with HTML expresses the passion this question engenders.
Apache is still the most popular HTTP server on the Web. Let's see how to set up Apache securely on a CentOS server to host multiple virtual websites. We will use example.com as our primary site for demonstration purposes, and site-a.example.com and site-b.example2.com as virtual sites, with the latter running on port 8000. Apache is available in official CentOS repositories, so you can install it as root with the command yum install httpd. Start the httpd service and make sure that it is added to the system startup settings:
service httpd restart
chkconfig httpd on
You can verify whether Apache is running with the command #netstat -tulpn | grep httpd. If it's running, you should see output similar to
tcp 0 0 :::80 :::* LISTEN PID/httpd
By default, Apache serves TCP traffic on port 80 for HTTP and port 443 for the secure HTTPS protocol. Apache's initialization script is at /etc/init.d/httpd, while configuration files are stored under /etc/httpd/. By default the document root directory is /var/www/, while log files are stored under /var/log/httpd/ directory. We'll store files for our primary site in /var/www/html, and virtual host files in /var/www/site-a and /var/www/site-b. Before working on the primary site, make sure that the server's host name is defined. Edit /etc/httpd/conf/httpd.conf, look for ServerName, and modify the line:
ServerName www.example.com:80
Save the file and restart the service. Every website needs an index file, which generally contains both text and code written in HTML, PHP, or another web scripting language. For this example just create the index file manually at /var/www/html/index.html. You can then access the primary site by pointing a browser to www.example.com.
Hosting multiple sites
Sometimes you might want to host multiple sites on the same Apache server. For example, if your company needs separate websites for each department or if you want to set up multiple web applications, hosting each site on separate physical servers may not be the best option. In such cases you can host multiple sites on a single Apache server, and each of the sites can run with its own customized settings. Apache supports name-based and IP-based virtual hosting. Name-based virtual hosts are disabled by default. To enable name-based virtual hosting, edit Apache's httpd.conf configuration file and uncomment the line with NameVirtualHost:
NameVirtualHost *:80
This parameter tells Apache to enable name-based hosting and listen on port 80 for any possible name. You can use a specific name instead of the asterisk wildcard character. Each virtual host needs a valid DNS entry to work. To set up DNS on a production site, you must add DNS records in the authoritative DNS server. Generally, the primary website should be configured using an A record and the virtual hosts should be configured using CNAME records. Enabling virtual hosts overrides the primary website unless you declare the primary website as a virtual host as well. The first declared virtual host has the highest priority. Any site that does not have a proper definition defaults to the first defined virtual host, so if site-a.example.com or site-b.example2.com are not properly configured, or if people try to access site-c.example.com and get directed to this Apache server, they will view www.example.com. Edit /etc/httpd/conf/httpd.conf and make sure that ServerName www.example.com is the first virtual host defined:
## start of virtual host definition ##

 ServerAdmin admin@example.com
 DocumentRoot /var/www/html/
 ServerName www.example.com
 ## Custom log files can be used. Apache will create the log files automatically. ##
 ErrorLog logs/www.example.com-error_log
 CustomLog logs/www.example.com-access_log common

## end of virtual host definition ##
To set up the other virtual hosts, first create index.html files for the sites at /var/www/site-a and /var/www/site-b, then add the virtual host definitions to httpd.conf, and finally restart the httpd service:
## start of virtual host definition ##

 ServerAdmin admin@example.com
 DocumentRoot /var/www/site-a/
 ServerName site-a.example.com
 ## Custom log files can be used. Apache will create the log files automatically. ##
 ErrorLog logs/site-a.example.com-error_log
 CustomLog logs/site-a.example.com-access_log common

## End of virtual host definition ##

## start of virtual host definition ##

 ServerAdmin admin@example2.com
 DocumentRoot /var/www/site-b/
 ServerName site-b.example2.com
 ## Custom log files can be used. Apache will create the log files automatically. ##
 ErrorLog logs/site-b.example2.com-error_log
 CustomLog logs/site-b.example2.com-access_log common

## End of virtual host definition ##
In some cases, system administrators set up web applications on random ports to increase the security of the services, and users have to manually add the port in the URL to gain access to the web site. We've done that here – we set up site-b to run on port 8000. We therefore have to modify the Apache configuration file, adding a Listen line to httpd.conf:
Listen 80
Listen 8000
Since this is the first virtual host defined under port 8000, any other virtual host running on 8000 that lacks a proper definition will default to site-b.example2.com:8000. Restart the Apache service for the changes to take effect.
Hardening the server against flooding attacks
Though they may live behind a firewall, HTTP servers generally are open to the public, which makes them available to attackers as well, who may attempt denial of service (DoS) attacks by flooding a server with requests. Fully hardening both Linux and Apache against attacks is beyond the scope of this article, but one way to secure a web server against a flood of requests is to limit the number of active connections for a source IP address, which you can do by changing a setting in the iptables packet filter. Although you should set the number of active sessions for a production server based on actual traffic, in this tutorial we will limit the number of concurrent connections to around 250 per five minutes for each source IP address:
service iptables stop
rmmod xt_recent
modprobe xt_recent ip_pkt_list_tot=255
service iptables start
rmmod removes the module xt_recent from the kernel. modprobe adds the module to the kernel again with modified parameters, changing the value of ip_pkt_list_tot from its default of 100 to 255. With the updated parameter, we will create a script that modifies iptables to institute some basic security best practices. Feel free to adapt it to your needs, but make sure that the rules are compatible with your organization's security policy.
## Flush all old rules so that we can start with a fresh set ##
iptables -F

## Delete the user-defined chain 'HTTP_WHITELIST' ##
iptables -X HTTP_WHITELIST

## Create the chain 'HTTP_WHITELIST' ##
iptables -N HTTP_WHITELIST

## Define all new HTTP connections as 'HTTP' for future use within iptables ##
iptables -A INPUT -p tcp --dport 80 -m state --state NEW -m recent --set --name HTTP

## Send all new HTTP connections to the chain 'HTTP_WHITELIST' ##
iptables -A INPUT -p tcp --dport 80 -m state --state NEW -j HTTP_WHITELIST

## Log all HTTP connections. Limit connections to 250 per five minutes; drop any exceeding the limit ##
iptables -A INPUT -p tcp --dport 80 -m state --state NEW -m recent --update --seconds 300 --hitcount 250 --rttl --name HTTP -j ULOG --ulog-prefix HTTP_flood_check
iptables -A INPUT -p tcp --dport 80 -m state --state NEW -m recent --update --seconds 300 --hitcount 250 --rttl --name HTTP -j DROP
Make the script executable, then run it:
chmod +x firewall-script
./firewall-script
You might also want to add some trusted IP addresses or subnet to be excluded from the iptables check. For that, create a whitelisting script:
Now the firewall will allow no more than 250 concurrent connections per five minutes to the Apache server for each source IP address, while trusted IP addresses can have an infinite number of parallel connections. Of course there are many other ways you can modify Apache's configuration and secure your sites, but the information here should be enough to get you started.
Unix tools make it easy to find strings in files, but what if you want to find specific whole words, more complex text patterns, or every instance of a word?
April 20, 2014, 6:45 PM— Basic Unix commands make it easy to determine whether files contain particular strings. Where would we be without commands like grep? But sometimes when using grep, you can get answers that under- or overreport the presence of what you are looking for. Take a very simple grep command for an example.
$ grep word mybigfile | wc -l
98
Commands like this tell you how many lines contain the word you are looking for, but not necessarily how many times that word appears in the file. After all, the word "word" might appear twice or more times in a single line and yet will only be counted once. Plus, if the word could be part of longer words (like "word" is a part of the word "password" and the word "sword"), you might even get some false positives. So you can't depend on the result to give you an accurate count or even if the word you are looking for appears at all unless, of course, if the word you are looking just isn't going to be part of another word -- like, maybe, chicken.
Trick #1: grep with -w
If you want to be sure that you count only the lines containing "word", you can add the -w option with your grep command. This option tells grep to only look for "word" when it's a word on its own, not when it is part of another word.
$ grep -w word mybigfile | wc -l
54
Trick #2: looping through every word
To be sure that you count every instance of the word you are looking for, you might elect to use some technique that examines every word in a file independently. The easiest way to do this is to use a bash for command. After all, any time you use a for command, such as for letter in a b c d e, the command loops once for every argument provided. And, if you use a command such as for letter in `cat mybigfile`, it will loop through every word (i.e., every piece of text on every line) in the file.
$count=0
$ for word in `cat mybigfile`
> do
>   if [ $word == "word" ]; then
>      count=`expr $count + 1`
>   fi
> done
$ echo $count
71
If you need to do this kind of thing often -- that is, look for particular words in arbitrary files, then you might want to commit the operation to a script so that you don't have to type the looping and if commands time and time again. Here's an example script that will prompt you for the word you are looking for and the file you want to look through if you don't choose to provide them on the command line.
#!/bin/bash

if [ $# -le 2 ]; then
    echo -n "look for> "
    read lookfor
    echo -n "file> "
    read filename
else
    lookfor=$1
    filename=$2
fi

for w in `cat $filename`
do
  if [ $w == "$lookfor" ]; then
    count=`expr $count + 1`
  fi
done

echo $count
Trick #3: Looking for patterns
More interesting than looking for some specific word is the challenge of looking for various patterns in particular files.
Maybe you need to answer questions like "Does this file contain anything that looks like phone numbers, social security numbers, or IP addresses?". And maybe you need to grab a list of what phone numbers, social security numbers, or IP addresses might be contained in the file -- or just verify that none are included. When looking for patterns, I like to rely on the powers of Perl. Some patterns are relatively easy to construct. Others take a lot more effort. Take, for example, the patterns below. The first represents a social security number -- 3 digits, followed by a hyphen, followed by 2 digits, followed by a hyphen, followed by 4 digits. That's easy. The last represents an IP address (IPv4) with 1 to 3 digits in each of four positions, separated by dots. Phone numbers, on the the other hand, can take a number of different forms. For example, you might need the preceding 1. You might separate the portions of the number with hyphens or dots. The middle expression tries to capture all the possible permutations, but even this doesn't cover the possible expressions of international numbers.
International numbers might work with [+]?([0-9]*[\.\s\-\(\)]|[0-9]+){3,24} though I'm not sure than I can vouch for all the possible expressions of these numbers as I'm not one who ever makes international calls. The Perl script below looks for IP addresses in whatever file is provided as an argument. By using the "while pattern exists" logic in line 12, it captures multiple IP addresses on a single line if they exist. Each identified IP address is then removed from the line so that the next can be captured in the subsequent pass through the loop. When all addresses have been identified, we move to the next line from the text file.
#!/usr/bin/perl -w

if ( $#ARGV >= 0 ) {
    open FILE,"<$ARGV[0]" or die;
} else {
    print "ERROR: file required\n";
    exit 1;
}

my %IP=();

while (  ) {
    while ( /\d{1,3}\.\d{1,3}\.\d{1,3}\.\d{1,3}/ ) {
        ($ipaddr)=/(\d{1,3}\.\d{1,3}\.\d{1,3}\.\d{1,3})/;
        if ( exists $IP{$ipaddr} ) {
            $IP{$ipaddr}++;
        } else {
            $IP{$ipaddr}=1;
        }
        s/$ipaddr//;  # remove captured phone number from line
    }
}

# display list of captured IP addresses and # of occurrences
foreach my $key ( keys %IP )
{
    print "$key $IP{$key}\n";
}
This script stuffs all the identified IP addresses into a hash and counts how many times each appears.
So, it tells you not just what IP addresses show up in the file, but how many times each appears. Notice how it uses the exists test to determine whether an IP address has been seen and captured earlier before it decides to create a new hash entry or increment the count for an existing one.
Wrap-Up
Identifying text of interest from arbitrary files in generally an easy task as long as you can distinguish what you are looking for and not miss counting instances when more than one appears on the same line.
You can spend 50-60 hours a week managing your Unix servers and responding to your users' problems and still feel as if you're not getting much done or you can adopt some good work habits that will both make you more successful and prepare you for the next round of problems.
April 05, 2014, 6:41 PM— Unix admins generally work a lot of hours, juggle a large set of priorities, get little credit for their work, come across as arrogant by admins of other persuasions, tend to prefer elegant solutions to even the simplest of problems, take great pride in their ability to apply regular expressions to any challenge that comes their way, and are inherently lazy -- at least they're constantly on the lookout for ways to type fewer characters even when they're doing the most routine work. While skilled and knowledgeable, they could probably get a whole lot more done and get more credit for their work if they adopted some habits akin to those popularized in the 1989 book by Stephen R. Covey -- The 7 Habits of Highly Effective People. In that light, here are some habits for highly successful Unix administration.
Habit 1: Don't wait for problems to find you
One of the best ways to avoid emergencies that can throw your whole day out of kilter is to be on the alert for problems in their infancy. I have found that installing scripts on the servers that report unusual log entries, check performance and disk space statistics, report application failures or missing processes, and email me reports when anything looks "off" can be of considerable value. The risks are getting so much of this kind of email that you don't actually read it or failing to notice when these messages stop arriving or start landing in your spam folder. Noticing what messages *aren't* arriving is not unlike noticing who from your team of 12 or more people hasn't shown up for a meeting.
Being proactive, you are likely to spot a number of problems long before they turn into outages and before you users notice the problems or find that they can no longer get their work done. It's also extremely beneficial if you have the resources needed to plan for disaster. Can you fail over a service if one of your primary servers goes down? Can you rely on your backups to rebuild a server environment quickly? Do you test your backups periodically to be sure they are complete and usable? Preparing disaster recovery plans for critical services (e.g., the mail service could be migrated to the spare server in the data center and the NIS+ service has been set up with a replica) can keep you from scrambling and wasting a lot of time when the pressure is on.
Habit 2: Know your tools and your systems
Probably the best way to recognize that one of your servers is in trouble is to know how that server looks under normal conditions. If a server typically uses 50% of its memory and starts using 99%, you're going to want to know what is different. What process is running now that wasn't before? What application is using more resources than usual? Be familiar with a set of tools for looking into performance issues, memory usage, etc. I use and encourage others to use the sar command routinely, both to see what's happening now on a system and to look back in time to get an idea when the problems began. One of the scripts that I run on my most critical servers sends me enough data that I can get a quick view of the last week or two of performance measures. It's also a good idea to be practiced with all of the commands that you might need to run when a problem occurs. Can you construct a find command that helps you identify suspect files, large files, files with permissions problems? Knowing how to use a good debugger can also be a godsend when you need to analyze a process. Knowing how to check network connections can also be an important thing to do when your systems might be under attack.
Habit 3: Prioritize, prioritize, prioritize
Putting first things first is something of a no brainer when it comes to how you organize your work, but sometimes selecting which priority problem qualifies as "first" may be more difficult than it seems. To properly prioritize your tasks, you should consider the value to be derived from the fix. For me, this often involves how many people are affected by the problem, but it also involves who is affected. Your CEO might have to be counted as equivalent to 1,000 people in your development staff. Only you (or your boss) can make this decision. You also need to consider how much they're affected. Does the problem imply that they can't get any work done at all or is it just an inconvenience? Another critical element in prioritizing your tasks is how long a problem will take to resolve. Unless the problem that I'm working on is related to an outage, I try to "whack out" those that are quick to resolve. For me, this is analogous to the "ten items or fewer" checkout at the supermarket. If I can resolve a problem in a matter of minutes and then get back to the more important problem that is likely to take me the rest of the day to resolve, I'll do it. You can devise your own numbering system for calculating priorities if you find this "trick" to be helpful, but don't let it get too complicated. Maybe your "value" ratings should only go from 1 (low) to 5 (critical), your number of people might go from 1 (an individual) to 5 (everybody), and your time required might be 1 (weeks), 2 (days), 3 (hours) or 4 (minutes). But some way to quantify and defend your priotities is always a good idea.
value * # people affected * time req'd = priority (highest # = highest priority)
3 * 2 * 2 = 12 problem #1
5 * 1 * 4 = 20 problem #2
Problem #2 would get to the top of your list in this scenario.
Habit 4: Perform post mortems, but don't get lost in them
Some Unix admins get far too carried away with post mortems. It's a good idea to know why you ran into a problem, but maybe not something that rates too many hours of your time. If a problem you encountered was a very serious, high profile problem, and could happen again, you should probably spend the time to understand exactly what happened. Far less serious problems might not warrant that kind of scrutiny, so you should probably put a limit on how much time you devote to understanding the cause of a problem that was fairly easily resolved and had no serious consequences. If you do figure out why something broke, not just what happened, it's a good idea to keep some kind of record that you or someone else can find if the same thing happens months or years from now. As much as I'd like to learn from the problems I have run into over the years, I have too many times found myself facing a problem and saying "I've seen this before ..." and yet not remembered the cause or what I had done to resolve the problem. Keeping good notes and putting them in a reliable place can save you hours of time somewhere down the line. You should also be careful to make sure your fix really works. You might find a smoking gun only to learn that what you thought you fixed still isn't working. Sometimes there's more than one gun. Try to verify that any problem you address is completely resolved before you write it off. Sometimes you'll need your end user to help with this. Sometimes you can su to that user's account and verify the fix yourself (always my choice).
Habit 5: Document your work
In general, Unix admins don't like to document the things that they do, but some things really warrant the time and effort. I have built some complicated tools and enough of them that, without some good notes, I would have to retrace my steps just to remember how one of these processes works. For example, I have some processes that involve visual basic scripts that run on a windows virtual server and send data files to a Unix server that reformats the files using Perl, preparing them to be ingested into an Oracle database. If someone else were to take over responsibility for this setup, it might take them a long time to understand all the pieces, where they run, what they're doing, and how they fit together. In fact, I sometimes have to stop and ask myself "wait a minute; how does this one work?" Some of the best documentation that I have prepared for myself outlines the processes and where each piece is run, displays data samples at each stage in the process and includes details of how and when each process runs.
Habit 6: Fix the problem AND explain
Good Unix admins will always be responsive to the people they are supporting, acknowledge the problems that have been reported and let their users know when they're working on them. If you take the time to acknowledge a problem when it's reported, inform the person reporting the problem when you're actually working on the problem, and let the user know when the problem has been fixed, your users are likely to feel a lot less frustrated and will be more appreciative of the time you are spending helping them. If, going further, you take the time to explain what was wrong and why the problem happened, you may allow them to be more self-sufficient in the future and they will probably appreciate the insights that you've provided.
Habit 7: Make time for yourself
As I've said in other postings, you are not your job. Taking care of yourself is an important part of doing a good job. Don't chain yourself to your desk. Walk around now and then, take mental breaks, and keep learning -- especially things that interest you. If you look after your well being, renew your energy, and step away from your work load for brief periods, you're likely to be both happier and more successful in all aspects of your life.
HTTPS protocol is used more and more in today’s web. While this may be good for privacy, it leaves modern network administrator without any means to prevent questionable or adult contents from entering his/her network. Previously it was assumed that this problem does not have a decent solution. Our how-to guide will try to prove otherwise. This guide will tell you how to set up Squid on CentOS / RedHat Linux for transparent filtering of HTTP and HTTPS traffic with help of Diladele Web Safety ICAP server, which is a commercial solution for Linux, BSD and MacOS. The Linux installer of Diladele Web Safety used in this tutorial contains fully featured keys which remain valid for 3 month period, so you can test its full features during this trial period.
Assumptions and Requirements
In this tutorial, I will assume the following. You have a network with IP addresses from 192.168.1.0 subnet, network mask is 255.255.255.0, and all workstations are set to use 192.168.1.1 as default gateway. On this default gateway, you have two NICs - one facing LAN with IP address 192.168.1.1, the other is plugged in into ISP network and gets its public Internet address through DHCP. It is also assumed your gateway has CentOS or RedHat Linux up and running.
Step 1. Update and Upgrade
Before going further, run the following script to upgrade your system to the most recent state.
Diladele Web Safety has sophisticated a web administrator console to easily manage filtering settings and policies. This Web UI is built using Python Django web framework, and requires Apache web server to function correctly. Run the following script to install them.
1
2
3
4
5
6
7
8
9
10
11
12
13
14
15
16
17
18
19
20
21
22
23
24
25
26
#!/bin/bash
set-e
# all web packages are installed as root
if[[ $EUID -ne0 ]]; then
echo"This script must be run as root"1>&2
exit1
fi
# install python libs
yum installpython-setuptools python-ldap
# install python django for web ui
easy_install django==1.5
# install apache web server to run web ui
yum installhttpd php mod_wsgi
# make apache autostart on reboot
chkconfig httpd on
# this fixes some apache errors when working with python-django wsgi
# qlproxy installed everything needed for apache, so just restart
service httpd restart
Step 4. Install Required Build Tools
To be able to perform HTTP/HTTPS transparent filtering, we need to get the latest version of Squid (the one that comes with CentOS / RedHat by default is too outdated), and rebuild it from source. The following script installs all build tools required.
After build finishes, install Squid. It is advisable to uncomment the lines which generate your own root certification authority. Default installation of Diladele Web Safety does have its own ca, but trusting it may pose serious security risk if your devices are used by users outside of your network.
1
2
3
4
5
6
7
8
9
10
11
12
13
14
15
16
17
18
19
20
21
22
23
24
25
26
27
28
29
30
31
32
33
34
35
36
37
38
39
40
41
42
43
#!/bin/bash
# stop on every error
set-e
# install RPMs as root
if[[ $EUID -ne0 ]]; then
echo"This script must be run as root"1>&2
exit1
fi
# detect current architecture (default assumes x86_64)
ARCH_1=`uname-m`
ARCH_2="amd64"
ARCH_3="lib64"
if[[ $ARCH_1 == 'i686']]; then
ARCH_2="i386"
ARCH_3="lib"
fi
pushdrpmbuild/RPMS/$ARCH_1
yum localinstall -y squid-3.4.4-0.el6.$ARCH_1.rpm
popd
# set up the ssl_crtd daemon
if[ -f /bin/ssl_crtd]; then
rm-f /bin/ssl_crtd
fi
ln-s /usr/$ARCH_3/squid/ssl_crtd/bin/ssl_crtd
/bin/ssl_crtd-c -s /var/spool/squid_ssldb
chown-R squid:squid /var/spool/squid_ssldb
# uncomment to regenerate certificates for SSL bumping if you do not like defaults
Step 8. Transparently Redirect HTTPS Traffic to Squid
Transparent filter for HTTP and HTTPS traffic will be implemented by redirecting traffic to ports 80 and 443 to Squid using iptables. This implies that the box with Squid acts as default gateway for your LAN. Please note this is only one way to implementing transparent filtering. Other possible solutions are described in Squid’s Wiki.
1
2
3
4
5
6
7
8
9
10
11
12
13
14
15
16
17
18
19
20
21
22
23
24
25
26
27
28
29
30
31
32
33
34
35
36
37
38
39
40
41
42
43
44
45
46
47
48
49
50
51
52
53
54
55
56
57
58
59
60
61
62
63
64
65
66
67
68
69
70
71
72
73
74
#!/bin/bash
# firewall setup should be done as root
if[[ $EUID -ne0 ]]; then
echo"This script must be run as root"1>&2
exit1
fi
# check kernel forwarding is enabled
enabled=`cat/proc/sys/net/ipv4/ip_forward`
if[[ $enabled -ne1 ]]; then
echo"Kernel forwarding seems to be disabled, enable it in /etc/sysctl.conf, reboot and rerun this script"1>&2
exit1
fi
# set the default policy to accept first (not to lock ourselves out from remote machine)
iptables -P INPUT ACCEPT
# flush all current rules from iptables
iptables -F
# allow pings from eth0 and eth1 for debugging purposes
iptables -A INPUT -p icmp -j ACCEPT
# allow access for localhost
iptables -A INPUT -i lo -j ACCEPT
# accept packets belonging to established and related connections
iptables -A INPUT -m state --state ESTABLISHED,RELATED -j ACCEPT
# allow ssh connections to tcp port 22 from eth0 and eth1
iptables -A INPUT -p tcp --dport 22 -j ACCEPT
# allow connection from LAN to ports 3126, 3127 and 3128 squid is running on
iptables -A FORWARD -m state --state ESTABLISHED,RELATED -j ACCEPT
iptables -A FORWARD -j REJECT --reject-with icmp-host-prohibited
# enable NAT for clients within LAN
iptables -t nat -A POSTROUTING -o eth1 -j MASQUERADE
# set default policies for INPUT, FORWARD (drop) and OUTPUT (accept) chains
iptables -P INPUT DROP
iptables -P FORWARD DROP
iptables -P OUTPUT ACCEPT
# list created rules
iptables -L -v
# save the rules so that after reboot they are automatically restored
/sbin/serviceiptables save
# enable the firewall
chkconfig iptables on
# and reboot machine
reboot
Check if HTTPS is Transparently Filtered
Please note, in order for HTTPS filtering to function correctly, we must install the proxy certificate from /etc/opt/quintolabs/qlproxy/myca.der into Trusted Root Certification on all workstations in our network. The following screenshots show that HTTPS requests were decrypted and filtered transparently. Browsing to Google and searching for an adult term (e.g. NSFW), we get the HTTPS request filtered and blocked transparently.
Resume
We now have the default gateway in our network capable of transparently filtering HTTP and HTTPS traffic. All workstations in our network trust the root certificate from proxy, and thus get their HTTPS request decrypted and filtered. Browsing environment in our network became much safer.
While full hardware virtualization such as KVM, Xen or Hyper-V is great at running fully isolated instances of multiple operating systems on a physical host, it comes with various overheads in terms of performance, resource, and provisioning time. Depending on your use cases, full machine virtuailization may actually not be necessary. An alternative lightweight virtualization approach is so-called Linux Containers (LXC), which provides operating system level virtualization. Without the overhead of running virtual machines, LXC allows you to run multiple instances of full Linux operating system within lightweight container sandbox. Containers can be very useful when you set up a reproducible development/test environment or deploy applications within secure sandboxes. Docker is an open-source tool which was developed to facilitate the deployment of Linux containers. Docker is fast becoming a de-facto standard for container technologies, being embraced in major Linux distros such as Ubuntu and Red Hat. In this tutorial, I am going to demonstrate how to manage Linux containers with Docker on Ubuntu 14.04. Note that instructions may be slightly different for earlier versions of Ubuntu. At this time, the Docker package available on Ubuntu only supports 64-bit systems. To run it on 32-bit machine, you will need to build 32-bit version of Docker from source.
Install Docker
Installing Docker is easy with apt-get command.
$ sudo apt-get install docker.io
To allow non-root user to run Docker, add yourself to docker group. The command below will allow the current user to run Docker without root permission.
$ sudo usermod -a -G docker $USER
Log out and then re-login to activate group membership change. Next, edit the Docker configuration file to update the location of the Docker binary.
$ sudo vi /etc/default/docker.io
DOCKER="/usr/bin/docker.io"
Restart Docker service.
$ sudo service docker.io restart
Manage Docker Containers
If you want to start a new Docker container of Ubuntu operating system, first pull Ubuntu Docker image first. The command below will download Docker image over a network.
$ docker pull ubuntu
You can start a Ubuntu Docker in an interactive mode as follows. The last argument "/bin/bash" is the command that will be executed inside a container once it is launched, in this case, a simple bash shell.
$ docker run -i -t ubuntu /bin/bash
The above command will launch a Ubuntu container immediately (which is the beauty of containers!), and give you a shell prompt inside the container. At this point, you should be able to access a full Ubuntu operating system inside a sandboxed environment. To exit a Docker container, type "exit" at the prompt inside the container. You can launch containers in different flavors. For example, to start a Fedora container:
$ docker.io run -i -t fedora /bin/bash
If a Fedora Docker image is not available locally, the command will automatically download the image first, and then launch a Docker. If you want to launch a container with a particular distro release, you can also do that. For example, to start a Ubuntu 13.04 Docker:
$ docker.io run -i -t ubuntu:13.04 /bin/bash
Container Networking
Docker uses Linux bridge to interconnect containers with each other, and to connect them to external networks. After installing Docker, you should see docker0 Linux bridge created automatically by default. Every container you create will be connected to docker0 bridge interface.
Custom Linux Bridge
If you want, you can use a custom Linux bridge to interconnect containers. For that, you can create a custom bridge and configure it as follows. You can assign a separate subnet to the bridge, and have Dockers assigned IP addresses from the subnet. I am going to use 10.0.0.0/24 as a Docker subnet.
Skylable has released LibreS3, an open source implementation of the Amazon S3 service, suitable for installing on private servers in a datacenter. LibreS3 uses Skylable SX, a "reliable, fully distributed cluster solution", on the back end for deduplication and replication. LibreS3 joins a growing list of alternative, open source storage solutions available to the enterprise today. At first pass, Skylable may seem like another flash in the pan, but the team behind LibreS3 and Skylable SX are open source veterans. The team was the original developers behind ClamAV, one of the most popular anti-virus solutions in the world. The open source pedigree of the Skylable team grants confidence that the team will continue to deliver on a complex and challenging project. Recreating the Amazon S3 service, with most of the API available to third-party tools is no small task, but it is something that the modern datacenter desperately needs. Once the conversation about a web hosting environment gets to the point where shared, centralized storage is going to be needed, the number of options drops drastically. For Linux, the two main players in the game are either NFS, or CIFS through Samba, and since NFS is natively supported, that's normally where I've seen the system steered. Other options are normally clustered filesystems, which, honestly, I avoid like the plague. Clustered filesystems sound like a great idea, until the daemons you need experience a network hiccup and fence each other off. In the worst of scenarios I've seen, the applications couldn't be started after a reboot because the proprietary clustering software that managed the shared filesystem had decided that the node in question wasn't just rebooted for maintenance, but was malfunctioning, and couldn't be trusted as part of the cluster. Introducing that level of complexity into an already inherently complex system is asking for trouble. NFS, while a much easier and safer solution, also comes with its own level of challenges. NFS can be slow, there are almost always permissions problems, and it can be considered a security risk. Shared filesystems sound like a much better solution than they actually are. Which is where Skylable and LibreS3 come into play. If you write your application to depend on a call to an S3 bucket to retrieve a file, instead of a call to the local filesystem, you've just opened up your application to a much, much easier path to scaling and upgrading. Your storage can be scaled up completely separately from your application, and your application is no longer reliant on the restrictions inherent in an NFS setup. In my mind, the fact that LibreS3 has a backend storage engine that does dedupication and replication is just the icing on the cake. I'm not an advocate for throwing new technology into production right away, not without a period of vetting the software first, but LibreS3 has me intrigued. We will be keeping a close eye on this project, and perhaps putting together a small test cluster, as it is shown in this short video, putting together a three node cluster in ten minutes. If you are building a private cloud infrastructure, you may wish to keep tabs on LibreS3 and Skylable as well.
Launching a private cloud on open source software might seem like a daunting task, but fortunately, the OpenStack community is working hard to provide resources and tutorials to make it easier for people of all skill levels. In addition to the official documentation, and books like the one we profiled from O'Reilly, there are several other great howtos out there to help you get through whatever your next step might be. The rate at which tutorial posts are published is almost overwhelming, not that this is a bad thing! Here are some of the best tutorials we came across in the past month, along with a short summary of each.
A group of guides to better navigate the basics of OpenStack. Each guide covers the essential parts of how to install and use the core OpenStack components.
To access your individual instances from the outside world, you need to assign them a public IP address. Keeping track of a few IPs is easy enough, but as your cloud grows, it can be hard to stick to your original plan for floating IP allocation. This guide offers some help on growing your floating IP pool on an established cloud installation.
Security and server hardening on OpenStack is split across two parts in this guide. Rather that focusing on hardening your images, this tutorial takes a different approach which might be easier to manage. Part one looks at using cloud-init and user data to harden an instance. Part two uses Heat templates to conduct the hardening.
Learn how to install multi-nodes in OpenStack with this guide. So you've managed to get OpenStack up and running on a single test node. Congratulations! The next step is harnessing the power of the datacenter by making your installation span multiple physical machines. This tutorial, along with its 30 minute video, will help with that next step.
Finally, if you missed the live event on Tuesday, Steve Gordon hosted an excellent Google Hangout on OpenStack Heat. Steve ran through some of the new features available in the Icehouse release and showed how they work. This 38 minute video looks at both new options for templating, non-template based feature additions, and includes a Q&A at the end. We've embedded the video below, as there is no written guide to go along with this one.
Want to stay on top of tutorials as they are published? One great resource we love at Opensource.com is the OpenStack Weekly Newsletter. You can catch it on the official OpenStack blog or have it sent to your inbox every week by subscribing to the OpenStack community listserv.
Containers, a different, lightweight take on virtualization, has finally gone mainstream with Linux Containers (LXC) and Docker -- and that spells big changes for server farms, data centers, and the cloud.
Once upon a time, if you ran a data center, you used virtual machine (VM) management programs (i.e., hypervisors) There was no other practical choice. This dates all the way back to the good old IBM 360 mainframe days with CP-67/CMS in 1967. Today, our data centers and clouds run more advanced hypervisors. Amazon Web Services (AWS), for example, is made up of nearly half-a-million Linux servers running the Xen hypervisor, while Microsoft's Azure cloud relies upon its Hyper-V hypervisor.
That's all well and good, but hypervisor support takes up a lot of system resources -- every VM runs not merely a full copy of an operating system, but a virtual copy of all the hardware that the operating system needs to run. That's great for using otherwise unused memory or CPU cycles, but say you're running multiple VMs and your users want more VMs -- more I tell you! -- then the fact that these fat VMs take up a lot of RAM and clock time starts to be troublesome. That's where containers (a different take on virtualization) comes in. Advocates for containers argue that you don't need a full copy of the operating system, never mind virtual representations of the hardware. Isn't just enough of the operating system and system resources for just the program itself all you really need for your server applications? It turns out container fans were right. You can use one copy of an operating system to run multiple containers, each with an instance of an application, and this vastly reduces the system resources to run them. So how does this container magic work? While its theory isn't as old as hypervisors, it does go back to the year 2000 and FreeBSD Jails. This was, and is, a way for users, usually the system administrator, to run programs in a sandbox. This Jail had access to the operating system kernel but other than that it could only get to a very limited set of other system resources. For example, a FreeBSD jail typically only has access to a preassigned Internet Protocol (IP) network address. Since then, containers theory and practice has come a long way. Oracle Solaris, for example, has a similar concept called Zones. While virtualization techniques in Linux, such as Xen and Linux Kernel Machine (LKM) have gotten all the headlines, companies such as Parallels, Google, and Docker have been working in such open-source projects as OpenVZ and LXC (Linux Containers) to make containers work well and securely. Related: Docker challenges virtualization market with containers Over time all of these efforts have consolidated into LXC. With LXC, applications can run in their own container. Each container shares a common Linux system kernel, but unlike a VM there's no attempt made to abstract the hardware. Mind you, from the containerized applications' viewpoint the program still has its own file system, storage, CPU, RAM, and access to external devices. LXC is designed to "create an environment as close as possible as a standard Linux installation but without the need for a separate kernel." To do this, containers use the following Linux kernel features: * AppArmor and SELinux profiles * Seccomp policies * Control groups (cgroups) * Kernel namespaces (ipc, uts, mount, pid, network and user) Containers may also, as they do in Red Hat Enterprise Linux (RHEL), use Libvirt to define containers. It's those first two items that really made containers good for practical use. Even as recently as 2011, the Libvirt developer, Daniel Berrange wrote in a blog post: "LXC is not yet secure. If I want real security I will use KVM." But while Container security has improved since then, you should never permit any application in a container run as root and you need to be on the alert for buggy system calls. The last thing you want is a zero-day vulnerability in your containers' base Linux kernel being use to pry open all your containers. Cgroups and kernel namespaces were essential for the modern day container. The first provided an easy way to manage and monitor process resources allocation. With them, you can control the maximum amount of system resources, such as memory, CPU cycles, and disk and network throughput, that each container is allowed. Namespaces are helpful in isolating process groups from each other. By themselves namespaces don't provide enough security, but they're useful in managing containers' access to network devices and other shared external resources. Programs such as Docker are built on top of LXC to automate "the deployment of any application as a lightweight, portable, self-sufficient container that will run virtually anywhere." Besides simply making it much easier to deploy a program to a container, James Bottomley, CTO of Server Virtualization at Parallels and a top Linux kernel developer, has observed that programs like Docker allow you "to create a containerized app on your laptop and deploy it to the cloud. Containers gives you instant app. portability. In theory, you can do this with hypervisors, but in reality there's a lot of time spent getting VMs right. If you're an app developer and use containers you can leave worrying about all the crap to others." The one big thing that hypervisors can do, that containers can't do is create VMs that use different operating systems and kernels. You can, for example, use VMware vSphere to run instances of Ubuntu Linux 14.04 and Windows Server 2012 simultaneously. In LXC, all containers must use the same operating system and kernel. So, you can't mix and match containers the way you can VMs. So why should you bother with containers? For one simple reason: You can stick a lot more containers on a single server than you can VMs. How many more? Try two to three times more. For example, Google uses containers all the time. If anyone knows about how to get the most bang from their servers, it's Google. As Bottomley said, "Google invested in containers early on. Anything you do on Google today is done in a container -- whether it's Search, Gmail, Google Docs -- you get a container of your own for each service." Google has open-sourced its own container stack, lmctfy (Let Me Contain That For You), if you'd like to see how Google does it. Some experts, such as Stéphane Graber, one of the LXC project's leaders, believes that, "lmctfy isn't a full fledged container technology, Google rather confusingly uses "containers" to really mean "cgroups". lmctfy is a userspace tool and library to easily create and manage cgroups, nothing else. You won't get a full container, in the non-Google sense of the term, by using it." And so we finally arrive at why containers are important for businesses: They enable you to make much more effective use of your server hardware. At day's end, containers are not important for their technology, they're important because they can substantially help your bottom line.
The Heartbleed Bug is a serious vulnerability in the popular OpenSSL cryptographic software library. This weakness allows stealing the information protected, under normal conditions, by the SSL/TLS encryption used to secure the Internet. SSL/TLS provides communication security and privacy over the Internet for applications such as web, email, instant messaging (IM) and some virtual private networks (VPNs). This guide is specifically designed to show how to detect exploit openSSL Heartbleed vulnerability using Nmap and Metasploit on Kali Linux. The Heartbleed bug allows anyone on the Internet to read the memory of the systems protected by the vulnerable versions of the OpenSSL software. This compromises the secret keys used to identify the service providers and to encrypt the traffic, the names and passwords of the users and the actual content. This allows attackers to eavesdrop on communications, steal data directly from the services and users and to impersonate services and users. A fixed version of OpenSSL was released on April 7, 2014, at the same time as Heartbleed was publicly disclosed. At that time, some 17 percent (around half a million) of the Internet’s secure web servers certified by trusted authorities were believed to be vulnerable to the attack, allowing theft of the servers’ private keys and users’ session cookies and passwords. Heartbleed is registered in the Common Vulnerabilities and Exposures system as CVE-2014-0160.
The bug was named by an engineer at the firm Codenomicon, a Finnish cybersecurity company, which also created the bleeding heart logo, and launched the domain Heartbleed.com to explain the bug to the public. According to Codenomicon, Neel Mehta first reported the bug to OpenSSL, but both Google and Codenomicon discovered it independently. Codenomicon reports April 3 as their date of discovery of the bug and as their date of notification of NCSC-FI (formerly known as CERT-FI) for vulnerability coordination.
Affected and non-affected OpenSSL versions
Bug was introduced to OpenSSL in December 2011 and has been out in the wild since OpenSSL release 1.0.1 on 14th of March 2012. OpenSSL 1.0.1g released on 7th of April 2014 fixes the bug.
OpenSSL 1.0.1 through 1.0.1f (inclusive) are vulnerable
OpenSSL 1.0.1g is NOT vulnerable
OpenSSL 1.0.0 branch is NOT vulnerable
OpenSSL 0.9.8 branch is NOT vulnerable
The vulnerable versions have been out there for over two years now and they have been rapidly adopted by modern operating systems. A major contributing factor has been that TLS versions 1.1 and 1.2 came available with the first vulnerable OpenSSL version (1.0.1) and security community has been pushing the TLS 1.2 due to earlier attacks against TLS.
Affected operating systems?
Some operating system distributions that have shipped with potentially vulnerable OpenSSL version:
Debian Wheezy (stable), OpenSSL 1.0.1e-2+deb7u4
Ubuntu 12.04.4 LTS, OpenSSL 1.0.1-4ubuntu5.11
CentOS 6.5, OpenSSL 1.0.1e-15
Fedora 18, OpenSSL 1.0.1e-4
OpenBSD 5.3 (OpenSSL 1.0.1c 10 May 2012) and 5.4 (OpenSSL 1.0.1c 10 May 2012)
FreeBSD 10.0 – OpenSSL 1.0.1e 11 Feb 2013
NetBSD 5.0.2 (OpenSSL 1.0.1e)
OpenSUSE 12.2 (OpenSSL 1.0.1c)
Operating system distribution with versions that are not vulnerable:
That’s a lot of system’s that are vulnerable. We all thought Linux is secured and open source being the bearer of security flag, apparently not anymore!
This attack in UNDETECTABLE
Exploitation of this bug does not leave any trace of anything abnormal happening to the logs. Some Intrusion detection and Intrusion prevention systems can pick up this attack but they need to have specific rules. With SSL deemed safe, not many organization would actually implement that. That means many secured system vulnerable. It affects 32 bit and 64 bit systems alike. There is no total of 64 kilobytes limitation to the attack, that limit applies only to a single heartbeat. Attacker can either keep reconnecting or during an active TLS connection keep requesting arbitrary number of 64 kilobyte chunks of memory content until enough secrets are revealed. This means, an attacker can attack both 32 and 64 bit systems alike, can repeat this attack as many times they want and no one will know as the connection is deemed safe and no logs will be generated about an attack. This is PROBABLY the worst bug that was discovered in any system. It is also speculated that NSA, CIA and many security organizations were aware of this vulnerability and abused this till now. While this can not be confirmed, but the possibilities are really scary!
What we are going to do in this guide?
This guide will demonstrate the following:
How to setup a openSSL Heartbleed vulnerable system with Apache and SSL.
How to scan for openSSL Heartbleed vulnerable system with Nmap.
How to exploit openSSL Heartbleed vulnerability with MetaSploit on Kali Linux.
Scanning is quite easy, you just need to find a target and use Nmap to scan it. Offensive Security’s MetaSploit is another fantastic tool to use to exploit this vulnerability. Together, they can be used to exploit any vulnerable system.
Our setup
Because I can’t directly show how to exploit a live target (and most common target’s are already being patched).. I will demonstrate this using the following method:
Target System:
Freshly installed Kali Linux version 1.0.6 (it is vulnerable).
OpenSSL version 1.0.1e built before April 7 2014. (that’s when the fix was released)
Setup Apache Web server.
Enable SSL support on Apache Web server.
Attacking System
Kali 1.0.6 fully updated and upgraded (specifically MetaSploit and Nmap)
Setup Target system
Login to target Kali Linux box (running a freshly installed Kali Linux 1.0.6) without any update or upgrade.
Enable SSL Module
Enable SSL module and restart apache as directed:
a2enmod ssl
service apache2 restart
Create a SSL Key
Change directory to /etc/apache2
cd /etc/apache2
Create a SSL directory
mkdir ssl
Go into that directory
cd ssl
Now run the following command to create a SSL file with 2048 bit encryption
State or Province Name (full name) [Some-State]:ACT
Locality Name (eg, city) []:Canberra
Organization Name (eg, company) [Internet Widgits Pty Ltd]:blackMORE Operations
Organizational Unit Name (eg, section) []: LEAVE EMPTY and PRESS Enter
Common Name (e.g. server FQDN or YOUR name) []:kali.blackmoreops.com
Email Address []: LEAVE EMPTY and PRESS Enter
Once done check out your certificate and key with list command:
ls
Setup Apache web server to use SSL certificate
Now we need to configure Apache web server to use the SSL certificate. To do that, we need to edit /etc/apache2/sites-available/default-ssl file. First of all, let’s find out what’s our IP Address. To do that, type in the following command.
ifconfig
As you can see, IP address on my Vulnerable Kali Linux machine is 192.168.1.81. We will use this IP address to setup our Vulnerable Apache web server with SSL support.
vi /etc/apache2/sites-available/default-ssl
As highlighted in the image above, add the ServerName 192.168.1.81:443 just after ServerAdmin line. In your case, Change 192.168.1.81 to your Vulnerable Kali Linux’s IP.
Scroll down this document and ensure Next, ensure that SSLEngine is ON. See screenshot above.
SSLEngine on
You also need to change SSLCertificateFile and SSLCertificateKeyFile to point to your newly created SSL certificate and key file. In my case, the name of the SSL was blackmoreops.crt and KEY file was blackmoreops.key.
Activate Virtual Host and reload Apache configuration
Now activate your newly created the Apache Web server Virtual Host and reload Apache configuration
a2ensite default-ssl
service apache2 reload
Test Apache SSL certificate from browser
Open IceWeasel and browse to https://192.168.1.81/
Now that the SSL is self-signed (well, why would anyone trust US, we are trying to hack anyway!) we get a security warning in IceWeasel. Click on I Understand the Risks button and then Add Exception button.
Just out of curiosity, click on View Button on Next window. This will show us the actual certificate.
Here’s the certificate.
Well, that’s good then. We can now accept this certificate. Click on Confirm Security Exception and following is what you’ll get
Awesome! Our vulnerable target Kali Linux, Apache Web Server and SSL certificate .. everything is working as expected.
Exploit openSSL Heartbleed vulnerability from attacking system
Now log to your Attack machine running Kali Linux 1.0.6 with fully upgraded till date.
Detecting Heartbleed vulnerable system using Nmap on Kali Linux
Run the following command from your Attacking Kali Linux machine to confirm if your target machine is vulnerable to SSL HeartBleed bug:
nmap -sV --script=ssl-heartbleed 192.168.1.81
ssl-heartbleed script is part of the new Nmap update. This makes scanning very easy. From the output below, we can see that the target machine (which is running a freshly installed Kali Linux 1.0.6 with no updates) is vulnerable.
Now let’s move on to the fun part, how to attack and Exploit openSSL Heartbleed vulnerability using Metasploit on Kali Linux.
Attack and Exploit Heartbleed vulnerable system using MetaSploit
Metasploit was created by HD Moore in 2003 as a portable network tool. Metasploit can be used to test the vulnerability of computer systems or to break into remote systems. Like many information security tools, Metasploit can be used for both legitimate and unauthorized activities. Ensure your Attacking Kali Linux machine is fully updated and upgraded. That’s enough taking, lets start MetaSploit. In case those who are not familiar, you also need to start the following two services before you start MetaSploit:
service postgresql start
service metasploit start
Once these two services are up and running start MetaSploit using the following command:
msfconsole
Now load openssl_heartbleed module using the following command:
use auxiliary/scanner/ssl/openssl_heartbleed
Use show options command to see configurable options
show options
Set the following two options:
set RHOSTS 192.168.1.81
RHOSTS: It is the target machines IP range. In my case, it was 192.168.1.81. Set your own target machine’s IP here. We are not setting RPORT cause it’s already set to 443 (which is what our target system Apache HTTPS server is running on). Here’ I will set another flag which is not presented in show options windows. Enable verbose mode by typing in the following command:
set verbose true
I am setting verbose because I want to see what goes on when I attack my target machine. Now let’s attack the target machine. Type in the following command to start the attack process:
exploit
And we have some Printable info leaked from SSL session. Play around with the options to get familiar with it.
Conclusion
This is just the tip of the iceberg. You need to repeat this attack many many many times and the more you attack the more information will be leaked. How many times you need to attack? Let’s look into the Heartbleed challenge set up by CloudFlare.
The first was submitted at 4:22:01PST by Fedor Indutny (@indutny). He sent at least 2.5 million requests over the span of the challenge, this was approximately 30% of all the requests we saw.
The second was submitted at 5:12:19PST by Ilkka Mattila of NCSC-FI using around 100 thousand requests.
Well, 2.5 million and 100 thousand requests will get you private key for the SSL. Once you have the private key, you can decrypt every messages (username, password, anything! that was encrypted with the SSL certificate). Though 2.5 million requests seems absurd, for a busy server it’s nothing and like I said before, it’s undetectable. You can keep doing it from behind a proxy server or a TOR network without revealing your true identity. Thanks for reading. Please share this article and like/follow us on Facebook and Twitter.
Posted on by Dan Nanni5 Comments Suppose you are a go to person among your friends and family when it comes to Linux related questions. Someone asked you how to install and configure a tool, and you wanted to show the procedures. How would you do that if he or she is not in front of you? There could be various ways (e.g., by documenting and emailing the procedures, or explaining verbally over the phone, etc), but probably the most clearcut solution would be to demonstrate it yourself. If the demonstration only requires a terminal, then the best way would be use terminal screencast or terminal session recorder. In this tutorial, I am going to demonstrate how to record and replay a terminal session on Linux. There are several online services (e.g., showterm.io or asciinema.org) which allow you to record and share your terminal sessions on the web. However, if you want privacy, or want to archive the recordings locally, I would recommend TermRecord. TermRecord is an open-source tool written in Python, which records a terminal session into a standalone HTML file. Since the HTML-formatted output file is self-contained, anyone can replay the captured terminal session using a web browser, which is cross-platform.
Install TermRecord on Linux
TermRecord is available as a Python package, so you can install the package with pip command. First, install pip on your Linux system. Then, install TermRecord as follows.
$ sudo pip install TermRecord
Record a Terminal Session with TermRecord
Recording a terminal session with TermRecord is easy. Simply run the command below to start recording.
$ TermRecord -o /path/to/output_html
For example, to save the current terminal session in /tmp/session.html:
$ TermRecord -o /tmp/session.html
Then any subsequent commands that are typed from the terminal will be saved to the output HTML file. The output file will also store timing information, so that the whole terminal session can be replayed in the same speed as you are typing. If you want to stop the recording, simply type "exit" and press ENTER. If you open up the HTML output on a web browser, you can play, pause or restart the stored session. You can also adjust the replay speed, i.e., speed up or slow down the session replay as you like. Here is a sample terminal screencast generated by TermRecord.
The linux ip command is similar to ifconfig, but more powerful and is intended to be a replacement for it. With ip you have the advantage of performing several network administration tasks with only one command. ifconfig is one of the deprecated command within net-tools that has not been maintained for many years. The functionalities of many commands is retained with more features under iproute2 suite.
To install ip download the iproute2 suite utilityhere, however most Linux distributions will come with the iproute2 tools pre-installed.
You can also use use git to download the source code:
To set an IP address for your computer, the command ip can be used as follows:
$ sudo ip addr add 192.168.0.193/24 dev wlan0
Note that the IP address has a prefix, for example /24. This is used in classless inter-domain routing (CIDR) to show the subnet mask used. In this case the subnet mask is 255.255.255.0.
After you have set the IP address confirm with show, whether the the changes have taken effect.
$ ip addr show wlan0
You can also use the same procedure to delete an IP address by just replacing add with del.
$ sudo ip addr del 192.168.0.193/24 dev wlan0
Show Routing Table Entry
The route object of ip command also helps you to see the route packets will take in your network as set in your routing table. The first entry is the default route which you can change as you prefer.
In this example there are several routes. These are a result of having a several devices connected through different network interface. These include WIFI, Ethernet and a point to point link.
$ ip route show
Suppose now that you have an IP address which you need to know the route packets will take. You can use route option as follows:
$ ip route get 10.42.0.47
Changing The Default Route
To change the default route, the ip command can be used as follows:
$ sudo ip route add default via 192.168.0.196
Show Network Statistics
The ip command can also be used to show the statistics of the various network interfaces. To do this you can use the ip command with the option -s and then specify the network device.
$ ip -s link
When you need to get information about a particular network interface, add the option ls followed by the name of the network interface. The option -s when used more than once gives you more information about that particular interface. This can be very useful especially when trouble shooting errors in network connectivity.
$ ip -s -s link ls p2p1
ARP Entries
Address Resolution Protocol (ARP) is used to translate an IP address to its corresponding physical address, commonly known as MAC address. With ip command you can view the MAC address of the devices connected in your LAN by using the option neigh or neighbour.
$ ip neighbour
Monitor Netlink Messages
It is also possible to view netlink messages with ip command. The monitor option allows you to see the state of your network devices. For instance a computer on your LAN could be categorized as REACHABLE or STALE depending on its status. The command can be used as follows:
$ ip monitor all
Activate and Deactivate Network Interface
To activate an particular interface you can use the ip command with options up and down, almost similar to how ifconfig is used.
In this example you can see the routing table entry when the ppp0 interface is activated and after it is deactivated and activated once again. The interface can be wlan0 or eth0. Change ppp0 to whatever interface is available in your case.
$ sudo ip link set ppp0 down
$ sudo ip link set ppp0 up
Getting Help
In case you get stuck and do not know how a particular option works you can use the help option. The man page does not give a lot of information on how to use the ip options and this is where help comes to the rescue.
For example, to know more about the route option:
$ ip route help
Conclusion
The command ip is a must have tool for network administrators and all Linux users alike. It is time to move from ifconfig, especially when you are writing scripts.
- See more at: http://linoxide.com/linux-command/use-ip-command-linux/#sthash.41VNrWkn.dpuf
Privacy Badger is a new tool from the Electronic Frontier Foundation designed to stop creepy online tracking. It’s an extension for Firefox and Chrome that “automatically detects and blocks spying ads around the Web, and the invisible trackers that feed information to them.” It is still in alpha stage, so the EFF is asking for you help to test it and report any issue that you encounter. From the EFF article announcing Privacy Badger”
Privacy Badger is a browser-add on tool that analyzes sites to detect and disallow content that tracks you in an objectionable, non-consensual manner. When you visit websites, your copy of Privacy Badger keeps note of the “third-party” domains that embed images, scripts and advertising in the pages you visit. If a third-party server appears to be tracking you without permission, by using uniquely identifying cookies to collect a record of the pages you visit across multiple sites, Privacy Badger will automatically disallow content from that third-party tracker. In some cases a third-party domain provides some important aspect of a page’s functionality, such as embedded maps, images, or fonts. In those cases, Privacy Badger will allow connections to the third party but will screen out its tracking cookies. Advertisers and other third-party domains can unblock themselves in Privacy Badger by making a strong commitment to respect Do Not Track requests. By including this mechanism, Privacy Badger not only protects users who install it, but actually provides incentives for better privacy practices across the entire Web. So users who install Privacy Badger not only get more privacy and a better browsing experience for themselves, but actually contribute to making the Web as a whole better for everyone.
You may install Privacy Badger in Firefox and Chromium using the same method you use to install any other extension. When installed and functioning, Privacy Badger has three states. Red means block the tracker. Yellow (Yellow) means that cookies or referers are not sent to the tracker. Green means the tracker is unblocked (probably because the third party does not appear to be tracking you) Screenshot showing the three states of Privacy Badger.
If you are on a quest to get rid of your desktop environment and do everything from the console, well good luck with that. However, if you are a bit more serious, and would like to learn to do a new thing from the terminal, what about mastering spreadsheets? Sure, LibreOffice or any office suite of your choice may do it very well in the first place, but sometimes using a pick up truck to go to the kitchen is not the most appropriate path. What I mean by that is that it happens that you may need to create a quick spreadsheet with just a few simple formulas, but nothing so complicated that you need all the power of a traditional office suite. Plus, if your system is a bit old, or if you are running a lot of applications in the background, you may have to wait a few dozens of seconds watching that splash screen load. On the other hand, a spreadsheet application in the console is fast, simple, and efficient. Among the magical software that will allow you to do that, I propose you sc, anagram for “spreadsheet calculator.”
Install sc on Linux
The sc package is available in the universe repo for Debian-based distros such as Debian, Ubuntu or Linux Mint, so installation on such systems is easy:
$ sudo apt-get install sc
On Archlinux, check out the AUR. For other distros, you can download its source, and build it.
Basic Usage of sc
As usual, the first screen is always the scariest. But good news: a lot of the shortcuts for sc are inspired by those of vim (or I guess it's bad news if you only know Emacs). So you can move around with the traditional hjkl keys:
'h' for left
'j' for down
'k' for up
'l' for left
Or just use the arrow keys if you are not afraid of being burn for heresy. The second thing you might want to do in a spreadsheet is to enter some numerical value. I was a little thrown off at first because the insertion mode is a bit different here. To enter a numerical value in the selected cell press '=', then your value. To enter some text instead, type '<', then your text. If you need to save your work at any time, use:
P[name].sc
to dump your work into a .sc file. Conversely,
G[name]
will retrieve your work. If you haven't guessed by yourself, the command 'q' serves to quit the program. But what we all want is to create some formulas. Just like in any traditional spreadsheet, start with '=' sign and refer to the other cells by their coordinate. For example, to do the sum of the first two cells of the first row, do:
=A0+B0
To copy the content of a cell, get the cursor over it and press 'ma'. Then go to an empty cell and do 'ca'. Finally, using the last technique and our earlier example, we can extend the formula to add the values of two adjacent cells with:
[#]ca
where [#] is just the number of cells we want to extend the formula to. As you may have noticed, this is just like in vim, where you do [#][command] to repeat a command a certain number of times. In our previous example:
3ca
will extend the addition formula to the next 3 cells in the row, giving them the values of B0+C0, C0+D0, and D0+E0 respectively.
Advance Usage of sc
If you know your vim shortcuts, you will be able to make the most out of sc after a few experiments: Use 'c' to refer to a column. So 'dc' and 'yc' to delete and yank the current column respectively. Use 'r' to refer to a row. Same idea here, 'dr' and 'yr' to delete and yank the current row. The command 'g' to move to a particular line in vim also works in sc with the syntax:
g[coordinate of a cell]
For example, 'gC22' to go straight to the cell C22. I said earlier that 'ma' was to mark a cell. To be exact, it stores the content of the cell into the variable a, that you can then copy with 'ca'. Alternatively, you can use any other letter to refer to a different variable: 'mb', 'mc', 'md', etc. Check out more by typing '?' at anytime from the interface. To conclude, sc is another one of these programs which will make people debate over its utility. Is a console spreadsheet calculator obsolete, now that our computers are powerful enough to run LibreOffice or whatever? Or on the contrary, should we stick to the basics for simple tasks and not waste resources? I also heard good things about oleo, which does sensibly the same thing, but never tried it myself. Is it a viable alternative to sc?
Lately Docker has emerged as a key technology for deploying applications in the cloud environment. Compared to traditional hardware virtualization, Docker-based container sandbox provides a number of advantages for application deployment environment, such as lightweight isolation, deployment portability, ease of maintenance, etc. Now Red Hat is steering community efforts in streamlining the management and deployment of Docker containers. Not only for the cloud environment, Docker can also be quite useful for end users, especially when you want to test out particular software under a specific Linux environment. You can easily spin up a Docker container for the target environment, install and test the software in it, and then throw away the container once you are done. The whole process from beginning to end is quite efficient, and you can avoid messing up your end system all along. In this tutorial, I am going to describe how to create and manage Docker containers on CentOS or Fedora. Note that Docker is supported only on 64-bit host systems at this time. If you want to try out Docker on Ubuntu, refer to this tutorial.
After installing Docker on CentOS or Fedora, you need to add yourself to docker group to be able to run Docker as a non-root user. Use this command for that:
$ sudo usermod -a -G docker $USER
Log out, and log back in to activate the group change. At this point, you should be able to run docker command as a unprivileged user.
Basic Usage of Docker
To start a new Docker container, you need to decide which Docker image to use for the container. You can search the official Docker image index which lists publicly available Docker images. The Docker index includes Linux base images managed by Docker team (e.g., Ubuntu, Debian, Fedora, CentOS), as well as user-contributed custom images (e.g., MySQL, Redis, WordPress). For example, to start a Ubuntu container in the interactive mode, run the following command. The last argument '/bin/bash' is to be executed inside a container upon its launch.
The first time you run the above command, it will download available Ubuntu docker image(s) over networks, and then boot up a Docker container using the image. A Ubuntu container will boot up instantly, and you will see a console prompt inside the container. You can access a full-fledged Ubuntu operating system inside the container sandbox. If you type 'exit' at the prompt, you will get out of the container, and it will be stopped. To get a list of all containers (including stopped ones), run:
$ docker ps -a
CONTAINER ID        IMAGE               COMMAND             CREATED              STATUS              PORTS               NAMES
6a08a0b2bb4c        ubuntu:14.04        /bin/bash           About a minute ago   Exit 0                                  cocky_ritchie
To re-start a stopped container in daemon mode:
$ docker start [container-id]
To remove a stopped container:
$ docker rm [container-id]
To attach to a background-running container in order to view or interact with the container:
$ docker attach [container-id]
You can freely customize a running container (e.g., installing new software). If you want to save the changes in the current container, first get out of the container's interactive mode by typing "exit" at the prompt. Then save the changed image as a different image by using this command:
$ docker commit [container-id] [new-image-name]
To get the container ID of your container, you can use "docker ps -a" command as described earlier. Once you have created a new image like this, you can launch a new container off of this image. You can also download any public container images (e.g., ubuntu, bowery/mysql) and store them in a local repository as follows.
$ docker pull [image name]
To view all locally downloaded/saved container images:
$ docker images
You can choose a specific image to boot a container from:
$ docker run -i -t [image-id] /bin/bash
To remove a container image from the local repository:
Logical Volume Manager (LVM) is a versatile disk management system that can easily be used in Linux or similar operating systems. Traditional partitions are created in fixed sizes, and resizing them is a tedious process. On the other hand, LVM creates and manages "logical" volumes off of physical hard disks, and provides administrators the flexibility to extend and shrink logical volumes easily on demand without damaging stored data. Additional hard disks can be added to LVM at will, further increasing existing logical volumes. LVM does not need reboot as long as the kernel is aware of the existence of a partition. LVM uses a hierarchical structure as it can be seen in the following diagram. At the top, we have physical volumes. One or more physical volumes are used to create a volume group. Logical volumes are then created from these volume groups. As long as there is space available in the volume group, we can create logical volumes from the volume group. File system is created on these logical volumes, which are then mounted and accessible in the operating system.
LVM Test Scenario
This tutorial will describe how to use LVM to create and manage LVM volumes in Linux. The tutorial will be divided into two parts. In the first part, we will create several logical volumes on one hard disk, and mount them in /lvm-mount directory. We will then resize the created volumes. In the second part, we will add additional volumes created from a second hard disk to LVM.
Preparing Disk Partitions
Disk partitions are created using fdisk. We will create three partitions of 1 GB each, though identical sized partitions are not mandatory. Also, the partitions are created as type '8e' to make them compatible with LVM.
# fdisk /dev/sdb
Command (m for help): n## new
Command action
   e   extended
   p   primary partition (1-4)
p## primary

Partition number (1-4): 1## partition number
First cylinder (1-1044, default 1):  ## hit enter
Last cylinder, +cylinders or +size{K,M,G} (1-1044, default 1044): +1G## size

Command (m for help): t## change type
Selected partition 1
Hex code (type L to list codes): 8e## code for LVM
Changed system type of partition 1 to 8e (Linux LVM)
We repeat the same steps to create two other partitions. After the partitions are created, we should get an output similar to this:
# fdisk -l
   Device Boot      Start         End      Blocks   Id  System
/dev/sdb1               1         132     1060258+  8e  Linux LVM
/dev/sdb2             133         264     1060290   8e  Linux LVM
/dev/sdb3             265         396     1060290   8e  Linux LVM
Preparing Physical Volumes
The newly created partitions are used to store physical volumes. LVM can work with different sized physical volumes.
Physical volumes can be verified using the following command. The following section contains partial output. "/dev/sdb2" is a new physical volume of "1.01 GiB".
# pvdisplay
  --- NEW Physical volume ---
  PV Name               /dev/sdb2
  VG Name
  PV Size               1.01 GiB
  Allocatable           NO
  PE Size               0
  Total PE              0
  Free PE               0
  Allocated PE          0
  PV UUID               jszvzz-ENA2-g5Pd-irhV-T9wi-ZfA3-0xo092
Physical volumes can be deleted using the following command.
# pvremove /dev/sdb1
Preparing Volume Groups
The following command creates a volume group named 'volume-group1' by using the physical volumes /dev/sdb1, /dev/sdb2 and /dev/sdb3.
Volume groups can be verified using the following command.
# vgdisplay
  --- Volume group ---
VG Name               volume-group1
  System ID
  Format                lvm2
  Metadata Areas        3
  Metadata Sequence No  1
  VG Access             read/write
  VG Status             resizable
  MAX LV                0
  Cur LV                0
  Open LV               0
  Max PV                0
  Cur PV                3
  Act PV                3
  VG Size               3.02 GiB
  PE Size               4.00 MiB
  Total PE              774
  Alloc PE / Size       0 / 0
Free  PE / Size       774 / 3.02 GiB
  VG UUID               bwd2pS-fkAz-lGVZ-qc7C-TaKv-fFUC-IzGNBK
We can view used/total size of the volume group from the output. Logical volumes take the space of the volume group. As long as there is free space available in the volume group, we can create logical volumes. Volume groups can be deleted using the following command.
# vgremove volume-group1
Creating Logical Volumes
The following command creates a logical volume named 'lv1' of size 100MB. We are using small sized partitions to reduce processing time. The logical volume will take its space from the volume group defined earlier.
# lvcreate -L 100M -n lv1 volume-group1
Logical volumes can be verified using the command lvdisplay.
# lvdisplay
  --- Logical volume ---
LV Name                /dev/volume-group1/lv1
VG Name                volume-group1
  LV UUID                YNQ1aa-QVt1-hEj6-ArJX-I1Q4-y1h1-OFEtlW
  LV Write Access        read/write
  LV Status              available
  # open                 0
LV Size                100.00 MiB
  Current LE             25
  Segments               1
  Allocation             inherit
  Read ahead sectors     auto
  - currently set to     256
  Block device           253:2
Now that the logical volume is ready, we can format and mount the logical volume like any other ext2/3/4 partition.
# mkfs.ext4 /dev/volume-group1/lv1 # mkdir /lvm-mount # mount /dev/volume-group1/lv1 /lvm-mount/
Once the logical volume is mounted, we can access it by reading/writing to the mount point /lvm-mount/. To create and mount additional logical volumes, we can repeat this process. Finally, we can delete any logical volume with lvremove.
The ability to resize a logical volume is the best part about using LVM. This section will discuss how we can expand an existing logical volume. We will be expanding the previously created logical volume 'lv1' to 200 MB. Note that after resizing a logical volume, we also need to resize the file system to match. This extra step varies depending on which file system is created in the volume. In this tutorial, we created ext4 file system on 'lv1', so the instruction here focused on ext4 file system (it is compatible with ext2/3 file system as well). The sequence of the commands is important. First, we unmount the volume.
# umount /lvm-mount/
Then, the size of the volume is set to be 200M.
# lvresize -L 200M /dev/volume-group1/lv1
Next, the disk is checked for errors.
# e2fsck -f /dev/volume-group1/lv1
After that, the ext4 information is updated.
# resize2fs /dev/volume-group1/lv1
The logical volume should be extended to 200 MB by now. We can verify it by checking the LV status.
# lvdisplay
  --- Logical volume ---
LV Name                /dev/volume-group1/lv1
VG Name                volume-group1
  LV UUID                9RtmMY-0RIZ-Dq40-ySjU-vmrj-f1es-7rXBwa
  LV Write Access        read/write
  LV Status              available
  # open                 0
LV Size                200.00 MiB
  Current LE             50
  Segments               1
  Allocation             inherit
  Read ahead sectors     auto
  - currently set to     256
  Block device           253:2
Now the logical volume can be mounted again, and be used just like any partition.
Shrinking an LVM Volume
This section will cover the method of reducing the size of an LVM. The sequence of the commands is important. Again, this instruction is valid for ext2/3/4 file system. Note that reducing the size of the logical volume to a value less than stored data will end in loss of data. First, the volume is unmounted.
# umount /dev/volume-group1/lv1
Then, the volume is checked for errors.
# e2fsck -f /dev/volume-group1/lv1
Next, the ext4 information is updated.
# resize2fs /dev/volume-group1/lv1 100M
After that, the logical volume is reduced.
# lvresize -L 100M /dev/volume-group1/lv1
WARNING: Reducing active logical volume to 100.00 MiB
  THIS MAY DESTROY YOUR DATA (filesystem etc.)
Do you really want to reduce lv1? [y/n]: y
  Reducing logical volume lv1 to 100.00 MiB
  Logical volume lv1 successfully resized
Finally, the updated size of the logical volume is verified.
# lvdisplay
--- Logical volume ---
LV Name                /dev/volume-group1/lv1
VG Name                volume-group1
  LV UUID                9RtmMY-0RIZ-Dq40-ySjU-vmrj-f1es-7rXBwa
  LV Write Access        read/write
  LV Status              available
  # open                 0
LV Size                100.00 MiB
  Current LE             25
  Segments               1
  Allocation             inherit
  Read ahead sectors     auto
  - currently set to     256
  Block device           253:2
Expanding a Volume Group
This section will cover the method of expanding a volume group by adding a new physical volume to the volume group. Let us assume that our volume group 'volume-group1' is full, and needs to be expanded. Our current hard disk (sdb) does not have any spare partitions, and we have added another hard disk (sdc). We will see how we can expand the volume group by adding a partition from sdc. To check the current state of VG.
# vgdisplay volume-group1
  --- Volume group ---
  VG Name               volume-group1
  System ID
  Format                lvm2
  Metadata Areas        3
  Metadata Sequence No  8
  VG Access             read/write
  VG Status             resizable
  MAX LV                0
  Cur LV                1
  Open LV               0
  Max PV                0
  Cur PV                3
  Act PV                3
VG Size               3.02 GiB
  PE Size               4.00 MiB
  Total PE              774
  Alloc PE / Size       25 / 100.00 MiB
  Free  PE / Size       749 / 2.93 GiB
  VG UUID               bwd2pS-fkAz-lGVZ-qc7C-TaKv-fFUC-IzGNBK
First, we create a 2 GB partition sdc1 of type LVM (8e) as explained earlier in the tutorial.
# fdisk /dev/sdc
Command (m for help): n
Command action
   e   extended
   p   primary partition (1-4)
p
Partition number (1-4): 1
First cylinder (1-1044, default 1):
Using default value 1
Last cylinder, +cylinders or +size{K,M,G} (1-1044, default 1044): +2G

Command (m for help): t
Selected partition 1
Hex code (type L to list codes): 8e
Changed system type of partition 1 to 8e (Linux LVM)

Command (m for help): w
The partition table has been altered!
Then, we create a physical volume /dev/sdc1.
# pvcreate /dev/sdc1
Now that the physical volume is ready, we can simply add it to the existing volume group 'volume-group1'.
# vgextend volume-group1 /dev/sdc1
We can verify it using vgdisplay.
# vgdisplay
  --- Volume group ---
VG Name               volume-group1
  System ID
  Format                lvm2
  Metadata Areas        4
  Metadata Sequence No  9
  VG Access             read/write
  VG Status             resizable
  MAX LV                0
  Cur LV                1
  Open LV               0
  Max PV                0
  Cur PV                4
  Act PV                4
VG Size               5.03 GiB
  PE Size               4.00 MiB
  Total PE              1287
  Alloc PE / Size       25 / 100.00 MiB
  Free  PE / Size       1262 / 4.93 GiB
  VG UUID               bwd2pS-fkAz-lGVZ-qc7C-TaKv-fFUC-IzGNBK
Note that although we have used a separate disk for demonstration, any disk of type '8e' can be used for expanding a volume group. To sum up, LVM is a very powerful tool for creating and managing resizable partitions. In this tutorial, we have seen how dynamic partitions can be created and used using LVM. We have also seen the method of expanding/reducing the logical volumes and volume groups, and adding new hard disks to LVM. Hope this helps.
We can program our humble Bash prompt to display all kinds of useful information, and pretty it up as well. We're sitting there staring at our computers all day long, so why not make it look nice? We will learn how to quickly test new configurations and quickly reverse them, how to make nice colors, how to display different types of information, customize it for different users, and make a multi-line prompt. Configuring a different prompt for SSH sessions is one of my favorites, because it has saved me from many an error due to running a command in the wrong terminal. A dull life without broken servers is not too much to ask. Just add these lines to the ~/.bashrc of your user on the remote machine:
if [ -n "$SSH_CLIENT" ]; then text=" ssh-session"
fi
export PS1='\[\e[1;32m\]\u@\h:\w${text}$\[\e[m\] '
Then load your changes without logging out:
$ source ~/.bashrc
Now open an SSH session from another machine and you will see something like figure 1.
Figure 1: New SSH session prompt in bold green.
You can even do all of this over SSH so you don't have to get up.
Colors
Of course you may choose from a multitude of splendid ANSI colors. You can find ANSI color code charts all over the place. These are the basic colors:
0;30m   Black
0;31m   Red
0;32m   Green
0;33m   Yellow
0;34m   Blue
0;35m   Purple
0;36m   Cyan
0;37m   White
0 is normal font. Change the 0 to 1 for bold, 4 for underline, and 5 for slow blink. In the SSH example text=" ssh-session" is whatever text string you want, and the text label is also arbitrary, as long as it matches ${text}. The Bash shell supports a lot of special characters for customizing the prompt. For example, \u is the username, and \h is the hostname. Other useful special characters are:
\d : the date in "Weekday Month Date" format
\t : the current time in 24-hour HH:MM:SS format
\w : the current working directory
\s : the name of the shell
\n : newline
\[ : begin a sequence of non-printing characters, for embedding a terminal control sequence into the prompt
\] : end a sequence of non-printing characters
Your custom prompt sequences are hard to read because of all the escapes, but you'll get the hang of it with a little practice. Note how the whole sequence is enclosed in single quotes, and it starts after PS1=. \u@\h: is an example of how to insert punctuation marks after the special characters. Literal punctuation marks are not escaped. You can insert spaces in the same manner; for example, see the closing color code, \[\e[m\] ', which has a space after last square bracket. This creates a space after the dollar sign. This example also shows how to reset the font color back to the terminal default. In the next example you'll see how to set a custom font color on right side of the prompt. This example creates a pleasant cyan prompt with date and time (figure 2). Note also how you can add square brackets around the prompt, or any part of it, by enclosing the special characters with un-escaped brackets:
$ PS1='\[\e[1;34m\][\d \t \u@\h \w]\$\[\e[m\] '
Figure 2: A pleasant cyan prompt with date and time.
Putting a color code at the end, like \[\e[0;31m\], sets a custom color on anything you type, and everything else that appears after the prompt.
Multi-line Prompt
Most terminals are 80 characters wide, so you run out of room when you have a long prompt. So why not break up the lines? You can with our old friend the newline special character, \n:
This creates a nice prompt with the username, current directory, and time and date (figure 4). It has an arrow to indicate there is another line, and it terminates in a proper dollar sign for an unprivileged user.
Figure 4: A nice multi-line prompt.
Root Prompt
The root prompt is indicated by the hash mark, #. As long as we're making fancy prompts, why not make one for the root user too? Add these lines to both your ~/.bashrc, and to root's/root/.bashrc:
if [ $(id -u) -eq 0 ];
then
    PS1='\[\e[1;36m\][\d \t \u@\h \w]\$\[\e[m\] '
else
    PS1='\[\e[1;33m\][\d \t \u@\h \w]\$\[\e[m\] '
fi
You can either sudo or su to root, then source ~/.bashrc, and enjoy root's new fancy prompt. You can fancy up root's prompt just like for any user. A quick way to check any user's ID number is with the ID command: $ id -u
If there is not a ~/.bashrc then create one. On most distros it is sourced from ~/.profile, which you can verify by looking for something like these lines in ~/.profile:
# if running bash
if [ -n "$BASH_VERSION" ]; then
    # include .bashrc if it exists
    if [ -f "$HOME/.bashrc" ]; then
 . "$HOME/.bashrc"
    fi
fi
If your particular flavor of Linux does not use ~/.profile, then look for ~/.bash_profile or ~/.bash_login. If it doesn't have those then you have a weird Linux, and must consult your distro documentation to find out what to do. Feeling lost? You can output your current prompt settings:
$ echo $PS1
There are something like a billion and twelve ways to mess with your Bash prompt, so visit the Bash Reference Manual to learn all about it.
Basic Linux Filesystems tutorial : ext2,ext3,ext4,JFS & XFS
The original Linux system used a simple filesystem that mimicked the functionality of the Unix filesystem. In this tutorial we will discuss basic file system used in Linux.
The ext Filesystem
The original filesystem introduced with the Linux operating system is called the extended filesystem (or just ext for short). It provides a basic Unix- like filesystem for Linux, using virtual directories to handle physical devices, and storing data in fixed-length blocks on the physical devices.
The ext filesystem uses a system called inodes to track information about the files stored in the virtual directory. The inode system creates a separate table on each physical device, called the inode table , to store the file information. Each stored file in the virtual directory has an entry in the inode table. The extended part of the name comes from the additional data that it tracks on each file, which consists of:
The file name
The file size
The owner of the file
The group the file belongs to
Access permissions for the file
Pointers to each disk block that contains data from the file
Linux references each inode in the inode table using a unique number (called the inode number ), assigned by the filesystem as data files are created. The filesystem uses the inode number to identify the file rather than having to use the full file name and path.
The ext2 Filesystem
The original ext filesystem had quite a few limitations, such as limiting files to only 2GB in size. Not too long after Linux was first introduced, the ext filesystem was upgraded to create the second extended filesystem, called ext2 . As you can guess, the ext2 filesystem is an expansion of the basic abilities of the ext filesystem, but maintains the same structure. The ext2 filesystem expands the inode table format to track additional information about each file on the system.
The ext2 inode table adds the created, modified, and last accessed time values for files to help system administrators track file access on the system. The ext2 filesystem also increases the maximum file size allowed to 2TB (then in later versions of ext2, that was increased to 32TB) to help accommodate large files commonly found in database servers. In addition to expanding the inode table, the ext2 filesystem also changed the way in which files are stored in the data blocks. A common problem with the ext filesystem was that as a file is written to the physical device, the blocks used to store the data tend to be scattered throughout the device (called fragmentation ). Fragmentation of data blocks can reduce the performance of the filesystem, as it takes longer to search the storage device to access all of the blocks for a specific file.
The ext2 filesystem helps reduce fragmentation by allocating disk blocks in groups when you save a file. By grouping the data blocks for a file, the filesystem doesn't have to search all over the physical device for the data blocks to read the file. The ext2 filesystem was the default filesystem used in Linux distributions for many years, but it, too, had its limitations. The inode table, while a nice feature that allows the filesystem to track additional information about files, can cause problems that can be fatal to the system. Each time the filesystem stores or updates a file, it has to modify the inode table with the new information. The problem is that this isn't always a fluid action.
If something should happen to the computer system between the file being stored and the inode table being updated, the two would become out of sync. The ext2 filesystem is notorious for easily becoming corrupted due to system crashes and power outages. Even if the file data is stored just fine on the physical device, if the inode table entry wasn't completed, the ext2 filesystem wouldn't even know that the file existed! It wasn't long before developers were exploring a different avenue of Linux filesystems.
Journaling Filesystems
Journaling filesystems provide a new level of safety to the Linux system. Instead of writing data directly to the storage device and then updating the inode table, journaling filesystems write file changes into a temporary file (called the journal ) first. After data is successfully written to the storage device and the inode table, the journal entry is deleted.
If the system should crash or suffer a power outage before the data can be written to the storage device, the journaling filesystem just reads through the journal file and processes any uncommitted data left over.
There are three different methods of journaling commonly used in Linux, each with different levels of protection. These are shown in below Table.
Journaling Filesystem Methods
Method
Description
Data mode
Both inode and file data are journaled. Low risk of losing data, but poor performance.
Ordered mode
Only inode data written to the journal, but not removed until file data is successfully written. Good compromise between performance and safety.
Writeback mode
Only inode data written to the journal, no control over when the file data is written. Higher risk of losing data, but still better than not using journaling.
Limitation:
The data mode journaling method is by far the safest for protecting data, but it is also the slowest. All of the data written to a storage device must be written twice, once to the journal, then again to the actual storage device. This can cause poor performance, especially for systems that do a lot of data writing. Over the years, a few different journaling filesystems have appeared in Linux. The following sections describe the popular Linux journaling filesystems available.
The Extended Linux Journaling Filesystems
The same group that developed the ext and ext2 filesystems as part of the Linux project also created journaling versions of the filesystems. These journaling filesystems are compatible with the ext2 filesystem, and it's easy to convert back and forth between them. There are currently two separate journaling filesystems based on the ext2 filesystem.
The ext3 Filesystem
The ext3 filesystem was added to the Linux kernel in 2001, and up until recently was the default filesystem used by just about all Linux distributions. It uses the same inode table structure as the ext2 filesystem, but adds a journal file to each storage device to journal the data written to the storage device. By default, the ext3 filesystem uses the ordered mode method of journaling, only writing the inode information to the journal file, but not removing it until the data blocks have been successfully written to the storage device. You can change the journaling method used in the ext3 filesystem to either data or writeback modes with a simple command line option when creating the filesystem.
While the ext3 filesystem added basic journaling to the Linux filesystem, there were still a few things it lacked. For example, the ext3 filesystem doesn't provide any recovery from accidental deletion of files, there's no built-in data compression available (although there is a patch that can be installed separately that provides this feature), and the ext3 filesystem doesn't support encrypting files. For those reasons developers in the Linux project choose to continue work on improving the ext3 filesystem.
The ext4 Filesystem
The result of expanding the ext3 filesystem was (as you probably guessed) the ext4 filesystem. The ext4 filesystem was officially supported in the Linux kernel in 2008, and is now the default filesystem used in most popular Linux distributions, such as Fedora and Ubuntu.
In addition to support compression and encryption, the ext4 filesystem also supports a feature called extents .Extents allocate space on a storage device in blocks, and only store the starting block location in the inode table. This helps save space in the inode table by not having to list all of the data blocks used to store data from the file.
The ext4 filesystem also incorporates block preallocation . If you want to reserve space on a storage device for a file that you know will grow in size, with the ext4 filesystem it's possible to allocate all of the expected blocks for the file, not just the blocks that physically exist. The ext4 filesystem fills in the reserved data blocks with zeroes, and knows not to allocate them for any other file.
The Reiser Filesystem
In 2001, Hans Reiser created the first journaling filesystem for Linux, called ReiserFS . The ReiserFS filesystem only supports writeback journaling mode, writing only the inode table data to the journal file. Because it writes only the inode table data to the journal, the ReiserFS filesystem is one of the fastest journaling filesystems in Linux.
Two interesting features incorporated into the ReiserFS filesystem are that you can resize an existing filesystem while it's still active, and that it uses a technique called tailpacking , which stuffs data from one file into empty space in a data block from another file. The active filesystem resizingfeature is great if you have to expand an already created filesystem to accommodate more data.
The Journaled Filesystem(JFS)
Possibly one of the oldest journaling filesystems around, the Journaled File System (JFS) was developed by IBM in 1990 for its AIX flavor of Unix. However, it wasn't until its second version that it was ported to the Linux environment.
Note :The official IBM name of the second version of the JFS filesystem is JFS2, but most Linux systems refer to it as just JFS.
The JFS filesystem uses the ordered journaling method, storing only the inode table data in the journal, but not removing it until the actual file data is written to the storage device. This method is a compromise between the speed of the ReiserFS and the integrity of the data mode journaling method.
The JFS filesystem uses extent-based file allocation, allocating a group of blocks for each file written to the storage device. This method provides for less fragmentation on the storage device. Outside of the IBM Linux offerings, the JFS filesystem isn't popularly used, but you may run into it in your Linux journey.
The XFS Filesystem
The XFS journaling filesystem is yet another filesystem originally created for a commercial Unix system that made its way into the Linux world. Silicon Graphics Incorporated (SGI) originally created XFS in 1994 for its commercial IRIX Unix system. It was released to the Linux environment for common use in 2002.
The XFS filesystem uses the writeback mode of journaling, which provides high performance but does introduce an amount of risk because the actual data isn't stored in the journal file. The XFS filesystem also allows online resizing of the filesystem, similar to the ReiserFS filesystem, except XFS filesystems can only be expanded and not shrunk.
Your server appearing pretty slow could be many things from wrong configs, scripts and dodgy hardware – but sometimes it could be because someone is flooding your server with traffic known as DoS ( Denial of Service ) or DDoS ( Distributed Denial of Service ). Denial-of-service attack (DoS attack) or Distributed Denial-of-service attack (DDoS attack) is an attempt to make a machine or network resource unavailable to its intended users. This attack generally target sites or services hosted on high-profile web servers such as banks, credit card payment gateways, and even root nameservers. DoS attacks are implemented by either forcing the targeted computer to reset, or consuming its resources so that it can no longer provide its services or obstructs the communication media between the users and the victim so that they can no longer communicate adequately. In this small article you’ll see how to check if your server is under attack from the Linux Terminal with the netstat command
From the man page of netstat “netstat – Print network connections, routing tables, interface statistics, masquerade connections, and multicast memberships” Some examples with explanation
netstat-na
This display all active Internet connections to the server and only established connections are included.
netstat-an|grep :80|sort
Show only active Internet connections to the server on port 80, this is the http port and so it’s useful if you have a web server, and sort the results. Useful in detecting a single flood by allowing you to recognize many connections coming from one IP.
netstat-n-p|grep SYN_REC |wc-l
This command is useful to find out how many active SYNC_REC are occurring on the server. The number should be pretty low, preferably less than 5. On DoS attack incidents or mail bombs, the number can jump to pretty high. However, the value always depends on system, so a high value may be average on another server.
netstat-n-p|grep SYN_REC |sort-u
List out the all IP addresses involved instead of just count.
Show and list IP address and its connection count that connect to port 80 on the server. Port 80 is used mainly by HTTP web page request.
How to mitigate a DOS attack
Once that you have found the IP that are attacking your server you can use the following commands to block their connection to your server:
iptables -A INPUT 1-s$IPADRESS-j DROP/REJECT
Please note that you have to replace $IPADRESS with the IP numbers that you have found with netstat. After firing the above command, KILL all httpd connections to clean your system and than restart httpd service by using the following commands:
killall-KILL httpd

service httpd start           #For Red Hat systems
/etc/init/d/apache2 restart   #For Debian systems
Setting up Web servers is fairly simple. In fact, it's so simple that once the server is set up, we often don't think about it anymore. It wasn't until I had a very large Web site rollout fail miserably that I started to research a method for load-testing servers before releasing a Web site to production. There are many, many options for load-testing a Web site. Some are commercial, and some are specific to a particular type of Web server (there are a few SharePoint-specific load testers, for example), but I struggled to find a simple "simulate a bunch of traffic" method to see how a server would handle load. As is usually the case, many months after I needed the tool, I stumbled across it. A very simple, yet powerful tool named Siege is available in most distributions. Developed by Joe Dog Software, Siege does exactly what's on the tin: it lays siege to your Web server. It has lots of options and features, but by simply specifying a Web URL, Siege will launch a ton of generated hits on your server to see how it performs. To try Siege, you can search your software repository, or head over to http://www.joedog.org/siege-home to get the program directly from the developer. My little Raspberry Pi server didn't crash while under siege, but it certainly was taxed!

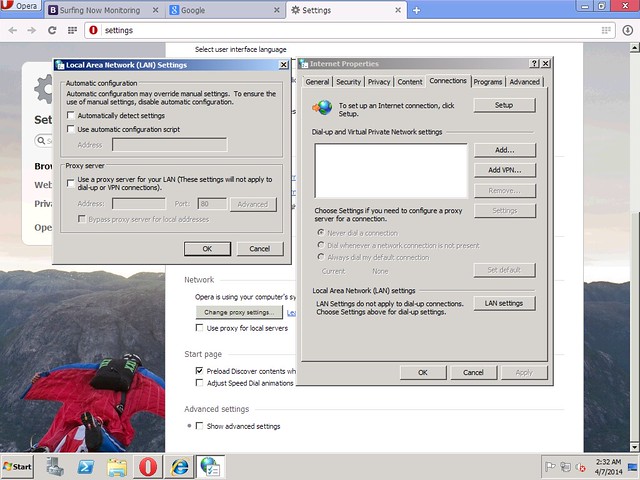
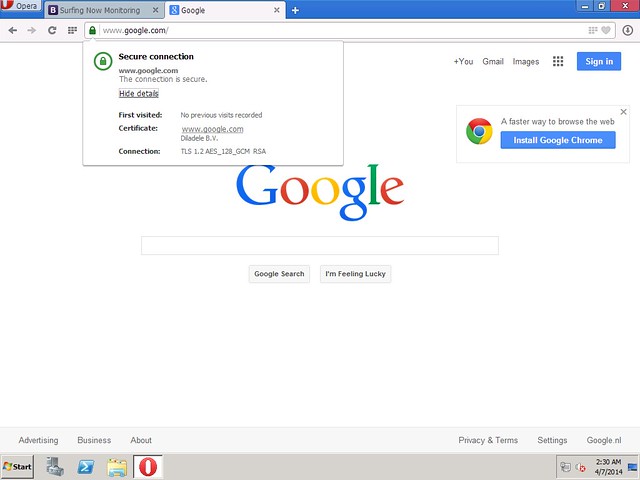
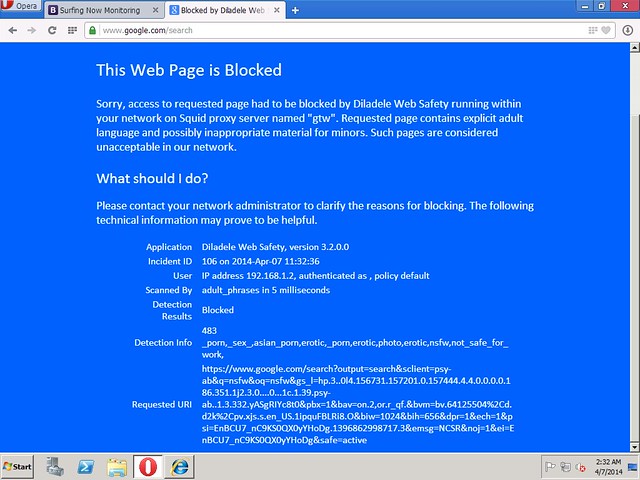
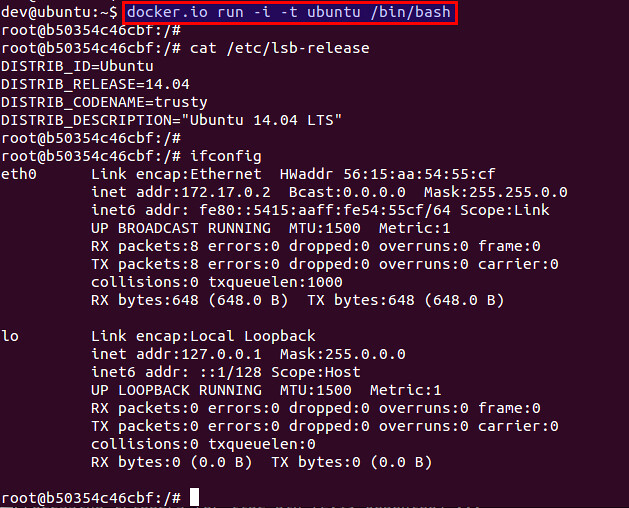
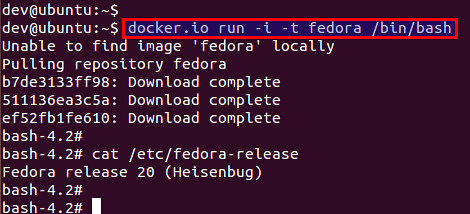
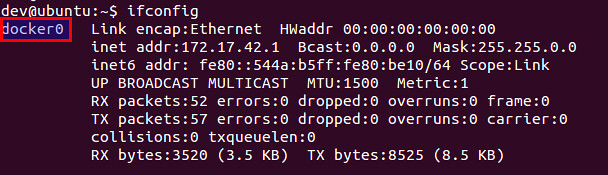


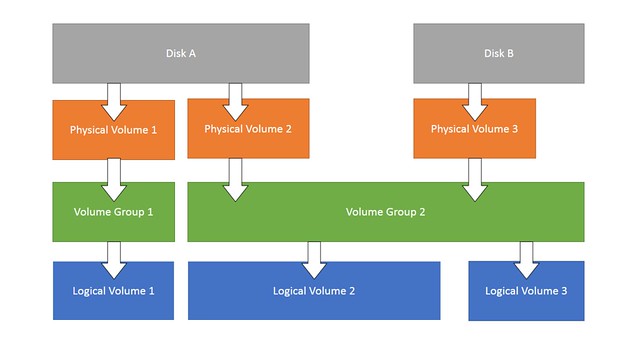


 My little Raspberry Pi server didn't crash while under siege, but it certainly was taxed!