Quantcast
Channel: Sameh Attia
Viewing all 1417 articles
Browse latest View live

How to Share Files Between User Accounts on Windows, Linux, or OS X

$
0
0
http://www.howtogeek.com/189508/how-to-share-files-between-user-accounts-on-windows-linux-or-os-x

shared-computer-with-shared-files
Your operating system provides each user account with its own folders when you set up several different user accounts on the same computer. Shared folders allow you to share files between user accounts.
This process works similarly on Windows, Linux, and Mac OS X. These are all powerful multi-user operating systems with similar folder and file permission systems.

Windows

RELATED ARTICLE
HTG Explains: Why Every User On Your Computer Should Have Their Own User Account
Multiple user accounts were once impractical to use on Windows, but they aren’t anymore. If multiple people use your computer... [Read Article]
On Windows, the “Public” user’s folders are accessible to all users. You’ll find this folder under C:\Users\Public by default. Files you place in any of these folders will be accessible to other users, so it’s a good way to share music, videos, and other types of files between users on the same computer.
public-folder-on-windows-7
RELATED ARTICLE
How to Get Your Libraries Showing in the Navigation Pane on Windows 8.1
One of the first things we noticed in the Windows 8.1 Preview was that the Libraries link was missing from... [Read Article]
Windows even adds these folders to each user’s libraries by default. For example, a user’s Music library contains the user’s music folder under C:\Users\NAME\as well as the public music folder under C:\Users\Public\. This makes it easy for each user to find the shared, public files. It also makes it easy to make a file public — just drag and drop a file from the user-specific folder to the public folder in the library.
Libraries are hidden by default on Windows 8.1, so you’ll have to unhide them to do this.
move-file-to-public-library-folder
These Public folders can also be used to share folders publically on the local network. You’ll find the Public folder sharing option under Advanced sharing settings in the Network and Sharing Control Panel.
public-folder-network-sharing-settings
You could also choose to make any folder shared between users, but this will require messing with folder permissions in Windows. To do this, right-click a folder anywhere in the file system and select Properties. Use the options on the Security tab to change the folder’s permissions and make it accessible to different user accounts. You’ll need administrator access to do this.

Linux

RELATED ARTICLE
HTG Explains: How Do Linux File Permissions Work?
If you’ve been using Linux for some time (and even OS X) you’ll probably have come across a “permissions” error.... [Read Article]
This is a bit more complicated on Linux, as typical Linux distributions don’t come with a special user folder all users have read-write access to. The Public folder on Ubuntu is for sharing files between computers on a network.
You can use Linux’s permissions system to give other user accounts read or read-write access to specific folders. The process below is for Ubuntu 14.04, but it should be identical on any other Linux distribution using GNOME with the Nautilus file manager. It should be similar for other desktop environments, too.
Locate the folder you want to make accessible to other users, right-click it, and select Properties. On the Permissions tab, give “Others” the “Create and delete files” permission. Click the Change Permissions for Enclosed Files button and give “Others” the “Read and write” and “Create and Delete Files” permissions.
create-shared-user-data-folder-on-ubuntu-linux
Other users on the same computer will then have read and write access to your folder. They’ll find it under /home/YOURNAME/folder under Computer. To speed things up, they can create a link or bookmark to the folder so they always have easy access to it.

Mac OS X

Mac OS X creates a special Shared folder that all user accounts have access to. This folder is intended for sharing files between different user accounts. It’s located at /Users/Shared.
To access it, open the Finder and click Go > Computer. Navigate to Macintosh HD > Users > Shared. Files you place in this folder can be accessed by any user account on your Mac.
mac-os-x-shared-folder

These tricks are useful if you’re sharing a computer with other people and you all have your own user accounts — maybe your kids have their own limited accounts. You can share a music library, downloads folder, picture archive, videos, documents, or anything else you like without keeping duplicate copies.

Docker: Lightweight Linux Containers for Consistent Development and Deployment

$
0
0
http://www.linuxjournal.com/content/docker-lightweight-linux-containers-consistent-development-and-deployment

Take on "dependency hell" with Docker containers, the lightweight and nimble cousin of VMs. Learn how Docker makes applications portable and isolated by packaging them in containers based on LXC technology.
Imagine being able to package an application along with all of its dependencies easily and then run it smoothly in disparate development, test and production environments. That is the goal of the open-source Docker project. Although it is still not officially production-ready, the latest release (0.7.x at the time of this writing) brought Docker another step closer to realizing this ambitious goal.
Docker tries to solve the problem of "dependency hell". Modern applications often are assembled from existing components and rely on other services and applications. For example, your Python application might use PostgreSQL as a data store, Redis for caching and Apache as a Web server. Each of these components comes with its own set of dependencies that may conflict with those of other components. By packaging each component and its dependencies, Docker solves the following problems:
  • Conflicting dependencies: need to run one Web site on PHP 4.3 and another on PHP 5.5? No problem if you run each version of PHP in a separate Docker container.
  • Missing dependencies: installing applications in a new environment is a snap with Docker, because all dependencies are packaged along with the application in a container.
  • Platform differences: moving from one distro to another is no longer a problem. If both systems run Docker, the same container will execute without issues.

Docker: a Little Background

Docker started life as an open-source project at dotCloud, a cloud-centric platform-as-a-service company, in early 2013. Initially, Docker was a natural extension of the technology the company had developed to run its cloud business on thousands of servers. It is written in Go, a statically typed programming language developed by Google with syntax loosely based on C. Fast-forward six to nine months, and the company has hired a new CEO, joined the Linux Foundation, changed its name to Docker Inc., and announced that it is shifting its focus to the development of Docker and the Docker ecosystem. As further indication of Docker's popularity, at the time of this writing, it has been starred on GitHub 8,985 times and has been forked 1,304 times. Figure 1 illustrates Docker's rising popularity in Google searches. I predict that the shape of the past 12 months will be dwarfed by the next 12 months as Docker Inc. delivers the first version blessed for production deployments of containers and the community at large becomes aware of Docker's usefulness.
Figure 1. Google Trends Graph for "Docker Software" for Past 12 Months

Under the Hood

Docker harnesses some powerful kernel-level technology and puts it at our fingertips. The concept of a container in virtualization has been around for several years, but by providing a simple tool set and a unified API for managing some kernel-level technologies, such as LXCs (LinuX Containers), cgroups and a copy-on-write filesystem, Docker has created a tool that is greater than the sum of its parts. The result is a potential game-changer for DevOps, system administrators and developers.
Docker provides tools to make creating and working with containers as easy as possible. Containers sandbox processes from each other. For now, you can think of a container as a lightweight equivalent of a virtual machine.
Linux Containers and LXC, a user-space control package for Linux Containers, constitute the core of Docker. LXC uses kernel-level namespaces to isolate the container from the host. The user namespace separates the container's and the host's user database, thus ensuring that the container's root user does not have root privileges on the host. The process namespace is responsible for displaying and managing only processes running in the container, not the host. And, the network namespace provides the container with its own network device and virtual IP address.
Another component of Docker provided by LXC are Control Groups (cgroups). While namespaces are responsible for isolation between host and container, control groups implement resource accounting and limiting. While allowing Docker to limit the resources being consumed by a container, such as memory, disk space and I/O, cgroups also output lots of metrics about these resources. These metrics allow Docker to monitor the resource consumption of the various processes within the containers and make sure that each gets only its fair share of the available resources.
In addition to the above components, Docker has been using AuFS (Advanced Multi-Layered Unification Filesystem) as a filesystem for containers. AuFS is a layered filesystem that can transparently overlay one or more existing filesystems. When a process needs to modify a file, AuFS creates a copy of that file. AuFS is capable of merging multiple layers into a single representation of a filesystem. This process is called copy-on-write.
The really cool thing is that AuFS allows Docker to use certain images as the basis for containers. For example, you might have a CentOS Linux image that can be used as the basis for many different containers. Thanks to AuFS, only one copy of the CentOS image is required, which results in savings of storage and memory, as well as faster deployments of containers.
An added benefit of using AuFS is Docker's ability to version container images. Each new version is simply a diff of changes from the previous version, effectively keeping image files to a minimum. But, it also means that you always have a complete audit trail of what has changed from one version of a container to another.
Traditionally, Docker has depended on AuFS to provide a copy-on-write storage mechanism. However, the recent addition of a storage driver API is likely to lessen that dependence. Initially, there are three storage drivers available: AuFS, VFS and Device-Mapper, which is the result of a collaboration with Red Hat.
As of version 0.7, Docker works with all Linux distributions. However, it does not work with most non-Linux operating systems, such as Windows and OS X. The recommended way of using Docker on those OSes is to provision a virtual machine on VirtualBox using Vagrant.

Containers vs. Other Types of Virtualization

So what exactly is a container and how is it different from hypervisor-based virtualization? To put it simply, containers virtualize at the operating system level, whereas hypervisor-based solutions virtualize at the hardware level. While the effect is similar, the differences are important and significant, which is why I'll spend a little time exploring the differences and the resulting differences and trade-offs.
Virtualization:
Both containers and VMs are virtualization tools. On the VM side, a hypervisor makes siloed slices of hardware available. There are generally two types of hypervisors: "Type 1" runs directly on the bare metal of the hardware, while "Type 2" runs as an additional layer of software within a guest OS. While the open-source Xen and VMware's ESX are examples of Type 1 hypervisors, examples of Type 2 include Oracle's open-source VirtualBox and VMware Server. Although Type 1 is a better candidate for comparison to Docker containers, I don't make a distinction between the two types for the rest of this article.
Containers, in contrast, make available protected portions of the operating system—they effectively virtualize the operating system. Two containers running on the same operating system don't know that they are sharing resources because each has its own abstracted networking layer, processes and so on.
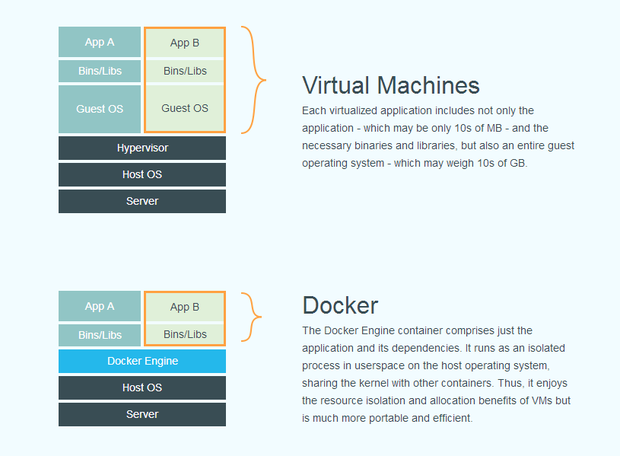
Operating Systems and Resources:
Since hypervisor-based virtualization provides access to hardware only, you still need to install an operating system. As a result, there are multiple full-fledged operating systems running, one in each VM, which quickly gobbles up resources on the server, such as RAM, CPU and bandwidth.
Containers piggyback on an already running operating system as their host environment. They merely execute in spaces that are isolated from each other and from certain parts of the host OS. This has two significant benefits. First, resource utilization is much more efficient. If a container is not executing anything, it is not using up resources, and containers can call upon their host OS to satisfy some or all of their dependencies. Second, containers are cheap and therefore fast to create and destroy. There is no need to boot and shut down a whole OS. Instead, a container merely has to terminate the processes running in its isolated space. Consequently, starting and stopping a container is more akin to starting and quitting an application, and is just as fast.
Both types of virtualization and containers are illustrated in Figure 2.
Figure 2. VMs vs. Containers
Isolation for Performance and Security:
Processes executing in a Docker container are isolated from processes running on the host OS or in other Docker containers. Nevertheless, all processes are executing in the same kernel. Docker leverages LXC to provide separate namespaces for containers, a technology that has been present in Linux kernels for 5+ years and is considered fairly mature. It also uses Control Groups, which have been in the Linux kernel even longer, to implement resource auditing and limiting.
The Docker dæmon itself also poses a potential attack vector because it currently runs with root privileges. Improvements to both LXC and Docker should allow containers to run without root privileges and to execute the Docker dæmon under a different system user.
Although the type of isolation provided is overall quite strong, it is arguably not as strong as what can be enforced by virtual machines at the hypervisor level. If the kernel goes down, so do all the containers. The other area where VMs have the advantage is their maturity and widespread adoption in production environments. VMs have been hardened and proven themselves in many different high-availability environments. In comparison, Docker and its supporting technologies have not seen nearly as much action. Docker in particular is undergoing massive changes every day, and we all know that change is the enemy of security.
Docker and VMs—Frenemies:
Now that I've spent all this time comparing Docker and VMs, it's time to acknowledge that these two technologies can actually complement each other. Docker runs just fine on already-virtualized environments. You obviously don't want to incur the cost of encapsulating each application or component in a separate VM, but given a Linux VM, you can easily deploy Docker containers on it. That is why it should not come as a surprise that the officially supported way of using Docker on non-Linux systems, such as OS X and Windows, is to install a Precise64 base Ubuntu virtual machine with the help of Vagrant. Simple detailed instructions are provided on the http://www.docker.io site.
The bottom line is that virtualization and containers exhibit some similarities. Initially, it helps to think of containers as very lightweight virtualization. However, as you spend more time with containers, you come to understand the subtle but important differences. Docker does a nice job of harnessing the benefits of containerization for a focused purpose, namely the lightweight packaging and deployment of applications.

Docker Repositories

One of Docker's killer features is the ability to find, download and start container images that were created by other developers quickly. The place where images are stored is called a registry, and Docker Inc. offers a public registry also called the Central Index. You can think of the registry along with the Docker client as the equivalent of Node's NPM, Perl's CPAN or Ruby's RubyGems.
In addition to various base images, which you can use to create your own Docker containers, the public Docker Registry features images of ready-to-run software, including databases, content management systems, development environments, Web servers and so on. While the Docker command-line client searches the public Registry by default, it is also possible to maintain private registries. This is a great option for distributing images with proprietary code or components internally to your company. Pushing images to the registry is just as easy as downloading. It requires you to create an account, but that is free as well. Lastly, Docker Inc.'s registry has a Web-based interface for searching for, reading about, commenting on and recommending (aka "starring") images. It is ridiculously easy to use, and I encourage you to click the link in the Resources section of this article and start exploring.

Hands-On with Docker

Docker consists of a single binary that can be run in one of three different ways. First, it can run as a dæmon to manage the containers. The dæmon exposes a REST-based API that can be accessed locally or remotely. A growing number of client libraries are available to interact with the dæmon's API, including Ruby, Python, JavaScript (Angular and Node), Erlang, Go and PHP.
The client libraries are great for accessing the dæmon programmatically, but the more common use case is to issue instructions from the command line, which is the second way the Docker binary can be used, namely as a command-line client to the REST-based dæmon.
Third, the Docker binary functions as a client to remote repositories of images. Tagged images that make up the filesystem for a container are called repositories. Users can pull images provided by others and share their own images by pushing them to the registry. Registries are used to collect, list and organize repositories.
Let's see all three ways of running the docker executable in action. In this example, you'll search the Docker repository for a MySQL image. Once you find an image you like, you'll download it, and tell the Docker dæmon to run the command (MySQL). You'll do all of this from the command line.
Figure 3. Pulling a Docker Image and Launching a Container
Start by issuing the docker search mysql command, which then displays a list of images in the public Docker registry that match the keyword "mysql". For no particular reason other than I know it works, let's download the "brice/mysql" image, which you do with the docker pull brice/mysql command. You can see that Docker downloaded not only the specified image, but also the images it was built on. With the docker images command, you list the images currently available locally, which includes the "brice/mysql" image. Launching the container with the -doption to detach from the currently running container, you now have MySQL running in a container. You can verify that with the docker ps command, which lists containers, rather than images. In the output, you also see the port on which MySQL is listening, which is the default of 3306.
But, how do you connect to MySQL, knowing that it is running inside a container? Remember that Docker containers get their own network interface. You need to find the IP address and port at which the mysqld server process is listening. The docker inspect provides a lot of info, but since all you need is the IP address, you can just grep for that when inspecting the container by providing its hash docker inspect 5a9005441bb5 | grep IPAddress. Now you can connect with the standard MySQL CLI client by specifying the host and port options. When you're done with the MySQL server, you can shut it down with docker stop 5a9005441bb5.
It took seven commands to find, download and launch a Docker container to get a MySQL server running and shut it down after you're done. In the process, you didn't have to worry about conflicts with installed software, perhaps a different version of MySQL, or dependencies. You used seven different Docker commands: search, pull, images, run, ps, inspect and stop, but the Docker client actually offers 33 different commands. You can see the full list by running docker help from the command line or by consulting the on-line manual.
Before exercising Docker in the above example, I mentioned that the client communicates with the dæmon and the Docker Registry via REST-based Web services. That implies that you can use a local Docker client to interact with a remote dæmon, effectively administering your containers on a remote machine. The APIs for the Docker dæmon, Registry and Index are nicely documented, illustrated with examples and available on the Docker site (see Resources).

Docker Workflow

There are various ways in which Docker can be integrated into the development and deployment process. Let's take a look at a sample workflow illustrated in Figure 4. A developer in our hypothetical company might be running Ubuntu with Docker installed. He might push/pull Docker images to/from the public registry to use as the base for installing his own code and the company's proprietary software and produce images that he pushes to the company's private registry.
The company's QA environment in this example is running CentOS and Docker. It pulls images from the public and private registries and starts various containers whenever the environment is updated.
Finally, the company hosts its production environment in the cloud, namely on Amazon Web Services, for scalability and elasticity. Amazon Linux is also running Docker, which is managing various containers.
Note that all three environments are running different versions of Linux, all of which are compatible with Docker. Moreover, the environments are running various combinations of containers. However, since each container compartmentalizes its own dependencies, there are no conflicts, and all the containers happily coexist.
Figure 4. Sample Software Development Workflow Using Docker
It is crucial to understand that Docker promotes an application-centric container model. That is to say, containers should run individual applications or services, rather than a whole slew of them. Remember that containers are fast and resource-cheap to create and run. Following the single-responsibility principle and running one main process per container results in loose coupling of the components of your system. With that in mind, let's create your own image from which to launch a container.

Creating a New Docker Image

In the previous example, you interacted with Docker from the command line. However, when creating images, it is far more common to create a "Dockerfile" to automate the build process. Dockerfiles are simple text files that describe the build process. You can put a Dockerfile under version control and have a perfectly repeatable way of creating an image.
For the next example, please refer to the "PHP Box" Dockerfile (Listing 1).

Listing 1. PHP Box


# PHP Box
#
# VERSION 1.0

# use centos base image
FROM centos:6.4

# specify the maintainer
MAINTAINER Dirk Merkel, dmerkel@vivantech.com

# update available repos
RUN wget http://dl.fedoraproject.org/pub/epel/6/x86_64/
↪epel-release-6-8.noarch.rpm; rpm -Uvh epel-release-6-8.noarch.rpm

# install some dependencies
RUN yum install -y curl git wget unzip

# install Apache httpd and dependencies
RUN yum install -y httpd

# install PHP and dependencies
RUN yum install -y php php-mysql

# general yum cleanup
RUN yum install -y yum-utils
RUN package-cleanup --dupes; package-cleanup --cleandupes;
↪yum clean -y all

# expose mysqld port
EXPOSE 80

# the command to run
CMD ["/usr/sbin/apachectl", "-D", "FOREGROUND"]
Let's take a closer look at what's going on in this Dockerfile. The syntax of a Dockerfile is a command keyword followed by that command's argument(s). By convention, command keywords are capitalized. Comments start with a pound character.
The FROM keyword indicates which image to use as a base. This must be the first instruction in the file. In this case, you will build on top of the latest CentOS base image. The MAINTAINER instruction obviously lists the person who maintains the Dockerfile. The RUN instruction executes a command and commits the resulting image, thus creating a new layer. The RUN commands in the Dockerfile fetch configuration files for additional repositories and then use Yum to install curl, git, wget, unzip, httpd, php-mysql and yum-utils. I could have combined the yum installcommands into a single RUN instruction to avoid successive commits.
The EXPOSE instruction then exposes port 80, which is the port on which Apache will be listening when you start the container.
Finally, the CMD instruction will provide the default command to run when the container is being launched. Associating a single process with the launch of the container allows you to treat a container as a command.
Typing docker build -t php_box . on the command line will now tell Docker to start the build process using the Dockerfile in the current working directory. The resulting image will be tagged "php_box", which will make it easier to refer to and identify the image later.
The build process downloads the base image and then installs Apache httpd along with all dependencies. Upon completion, it returns a hash identifying the newly created image. Similar to the MySQL container you launched earlier, you can run the Apache and PHP image using the "php_box" tag with the following command line: docker run -d -t php_box.
Let's finish with a quick example that illustrates how easy it is to layer on top of an existing image to create a new one:

# MyApp
#
# VERSION 1.0

# use php_box base image
FROM php_box

# specify the maintainer
MAINTAINER Dirk Merkel, dmerkel@vivantech.com

# put my local web site in myApp folder to /var/www
ADD myApp /var/www
This second Dockerfile is shorter than the first and really contains only two interesting instructions. First, you specify the "php_box" image as a starting point using the FROM instruction. Second, you copy a local directory to the image with the ADD instruction. In this case, it is a PHP project that is being copied to Apache's DOCUMENT_ROOT folder on the images. The result is that the site will be served by default when you launch the image.

Conclusion

Docker's prospect of lightweight packaging and deploying of applications and dependencies is an exciting one, and it is quickly being adopted by the Linux community and is making its way into production environments. For example, Red Hat announced in December support for Docker in the upcoming Red Hat Enterprise Linux 7. However, Docker is still a young project and is growing at breakneck speed. It is going to be exciting to watch as the project approaches its 1.0 release, which is supposed to be the first version officially sanctioned for production environments. Docker relies on established technologies, some of which have been around for more than a decade, but that doesn't make it any less revolutionary. Hopefully this article provided you with enough information and inspiration to download Docker and experiment with it yourself.

Docker Update

As this article was being published, the Docker team announced the release of version 0.8. This latest deliverable adds support for Mac OS X consisting of two components. While the client runs natively on OS X, the Docker dæmon runs inside a lightweight VirtualBox-based VM that is easily managed with boot2docker, the included command-line client. This approach is necessary because the underlying technologies, such as LXC and name spaces, simply are not supported by OS X. I think we can expect a similar solution for other platforms, including Windows.
Version 0.8 also introduces several new builder features and experimental support for BTRFS (B-Tree File System). BTRFS is another copy-on-write filesystem, and the BTRFS storage driver is positioned as an alternative to the AuFS driver.
Most notably, Docker 0.8 brings with it many bug fixes and performance enhancements. This overall commitment to quality signals an effort by the Docker team to produce a version 1.0 that is ready to be used in production environments. With the team committing to a monthly release cycle, we can look forward to the 1.0 release in the April to May timeframe.

Resources

Main Docker Site: https://www.docker.io
Docker Registry: https://index.docker.io
Docker Registry API: http://docs.docker.io/en/latest/api/registry_api
Docker Index API: http://docs.docker.io/en/latest/api/index_api
Docker Remote API: http://docs.docker.io/en/latest/api/docker_remote_api

Top 4 open source LDAP implementations

$
0
0
http://www.opensource.com/business/14/5/top-4-open-source-ldap-implementations


When you want to set up an application, most likely you will need to create an administrative account and add users with different privileges. This scenario happens frequently with content management, wiki, file sharing, and mailing lists as well as code versioning and continuous integration tools. When thinking about user and group centralization, you will need to select an application that fits your needs.
If the application can connect to a Single Sign On server, users happy will be happy to remember only one password.
In the proprietary landscape of directory servers, Active Directory is the dominant tool, but there are directory servers that can also satisfy your needs. The LDAP protocol is the base for all the directory servers, independently of how they are implemented. This protocol is an industry standard and allows you to create, search, modify, and delete your users or groups. And, if the application is able to connect to an LDAP server, you will not have to be concerned with understanding the protocol.

OpenLDAP

The most famous LDAP server, which you can find already packaged in many Linux distributions, is OpenLDAP. It released under the OpenLdap Public Licence, with good documentation and worldwide commercial support. With OpenLDAP you can secure the communication and define privileges for your users. Being a command line tool, you can consider setting up phpLDAPAdmin, which is a web application that allows you to see and modify the structure of your organization within your browser. If you find setting up and configuring OpenLDAP difficult, you may find ApacheDS and OpenDJ easier as they are both LDAP servers running on Java.

ApacheDS

ApacheDS respects the latest version of the LDAP protocol, and it is released under the Apache license. Although you can use the OpenLDAP command line, ApacheDS is shipped together with Apache Directory Studio, a client application, which allows you to easily manage your users and groups. For the setup, ApacheDS provides different installers for Windows, Mac OS X, and Linux. Further, if you are looking for an open source Identity Server, you might discover that the WSO2 Identity Server has ApacheDS built in to manage users.

OpenDJ

OpenDJ is a fork of former project, OpenDS, and has similar roots as the Oracle Unified Directory, as it was inherited from Sun Microsystems. After Sun was acquired by Oracle in 2010, OpenDJ was designed to replace Sun Directory Server. OpenDJ is released under the CDDL license and, like OpenLDAP, has good documentation and worldwide commercial support. OpenDJ is in active development, and ongoing activity is reflected in the roadmap. The OpenDJ team provides not only a client application to manage the server but also OpenAM, which provides Single Sign On, authorization, federation, and more.

389 Directory Server

The 389 Directory server is a Red Hat product (also provided under the name Red Hat Directory Server on top of the Red Hat Enterprise distribution). It is mostly licensed with GPL, having other components under different licenses. The directory server is in active development and it is packaged for Fedora and Red Hat distribution although you can obtain it for other Linux distributions as well. The 389 Directory Server has also a graphical interface that can be used for administration. If you need more services like Certification Autority and authentication and integration with Active Directory check out FreeIPA which is based on 389.

How to change MAC address in Linux?

$
0
0
http://www.blackmoreops.com/2013/11/20/how-to-change-mac-address-in-linux


How to change MAC address in Linux - blackMORE Ops

Changing MAC address in Linux

This guide takes you through step by step procedures on How to change MAC address in Linux. I’ve tried to make it generic to cover most Linux distroes. If you have a different option, please comment and I will include it in my guide.
Under GNU/Linux, the MAC address of a network interface card (NIC) can be changed by following the procedures below.
NOTE: MAC addresses used within this article are provided for example only. Substitute according to your requirements.
NOTE: Commands below MUST be executed with root privileges (e.g. prepended with sudo if required), in order for things to work!
All example are for eth0 interface. If you have a different interface you can find them easily with the following command
ifconfig -a
I’ve also used /etc/init.d/networking to make it more generic. Experienced users can also try the following command
service networking stop
service networking start

Temporarily change MAC Address

Do the following from command line to change you MAC address temporarily. This way it will revert back to original MAC when you reboot your machine.
 /etc/init.d/networking stop
ifconfig eth0 hw ether 02:01:02:03:04:08
/etc/init.d/networking start

Test

Try the following in Terminal to confirm if your MAC address has been changed:
ifconfig eth0
The above should work on Debian, Ubuntu, and similar distributions. Alternatively, under RHEL/Fedora and possibly other GNU/Linux distributions (incl. CentOS and Scientific Linux), to disable and restart networking, one must stop and start /etc/init.d/network instead of /etc/init.d/networking.
If you have iproute2 utilities installed, you may prefer to use the “ip” command, as follows:
/etc/init.d/network stop
ip link set eth0 address 02:01:02:03:04:08
/etc/init.d/network start
To confirm your setting, you may prefer to execute ip link ls eth0 or ip addr ls eth0 instead of ifconfig eth0.
NOTE: You may not be able do this if using a DSL modem (depending on modem vendor or ISP).

Permanently change MAC Address

Now let move to make these changes permanent. Following guide is to enable your change survive a Reboot.
In openSUSE and other SUSE-based systems (SUSE enterprise desktop\server, etc.) you can make changes permanent” across reboots by adding an appropriate entry to the /etc/sysconfig/network/ifcfg-ethN file (ifcfg-eth0 for the first Ethernet interface config file, ifcfg-eth1– for the second, etc.):
LLADDR=12:34:56:78:90:ab
In Red Hat Enterprise Linux (RHEL) and other similar systems (Fedora, CentOS, etc.) an easy way to make changes permanent across reboots is to add an appropriate entry to the /etc/sysconfig/network-scripts/ifcfg-ethN file (ifcfg-eth0 for the first Ethernet interface config file, ifcfg-eth1– for the second, etc.):
MACADDR=12:34:56:78:90:ab
Note: in the file is a value HWADDR– This is not the same thing. Use MACADDR for permanent changes.
from CentOSInterface Configuration Files
The HWADDRdirective is useful for machines with multiple NICs to ensure that the interfaces are assigned the correct device names regardless of the configured load order for each NIC’s module. This directive should not be used in conjunction with MACADDR.”

The MACADDRdirective is used to assign a MAC address to an interface, overriding the one assigned to the physical NIC. This directive should not be used in conjunction with HWADDR.”
Upper and lower case letters are accepted when specifying the MAC address, because the network function converts all letters to upper case.
You can test changes without restarting the system by executing:
service network restart
(WARNING: doing this will break all existing network connections!)
On Debian, Ubuntu, and similar systems, place the following in the appropriate section of /etc/network/interfaces (within an iface stanza, e.g., right after the gateway line) so that the MAC address is set when the network device is started:
hwaddress ether 02:01:02:03:04:08
On Gentoo you may achieve the same result by adding an entry to the global configuration file /etc/conf.d/net for each Ethernet card. Example for the eth0 device:
mac_eth0="12:34:56:78:90:ab"
You can also use the tool GNU MACChangerapt-get install macchanger to change the MAC address under GNU/Linux.
To change MAC address during boot time with MACChanger, add the following line to your /etc/network/interfaces (example for the eth0 interface):
pre-up macchanger -m 12:34:56:78:90:AB eth0
Thanks for reading.

Be a kernel hacker Write your first Linux Kernel module

$
0
0
http://www.linuxvoice.com/be-a-kernel-hacker

Ever wanted to start hacking the kernel? Don’t have a clue how to begin? Let us show you how it’s done…

Linux
Voice
Tutorial
Valentine
Sinitsyn
Kernel programming is often seen as a black magic. In Arthur C Clarke’s sense, it probably is. The Linux kernel is quite different from its user space: many abstractions are waived, and you have to take extra care, as a bug in you code affects the whole system. There is no easy way to do floating-point maths, the stack is fixed and small, and the code you write is always asynchronous so you need to think about the concurrency. Despite all of this though, the Linux kernel is just a very large and complex C program that is open for everyone to read, learn and improve, and you too can be a part of it.
The easiest way to start kernel programming
is to write a module – a piece of code that
can be dynamically loaded into the kernel.
Probably the easiest way to start kernel programming is to write a module – a piece of code that can be dynamically loaded into the kernel and removed from it. There are limits to what modules can do – for example, they can’t add or remove fields to common data structures like process descriptors. But in all other ways they are full-fledged kernel-level code, and they can always be compiled into the kernel (thus removing all the restrictions) if needed. It is fully possible to develop and compile a module outside the Linux source tree (this is unsurprisingly called an out-of-tree build), which is very convenient if you just want to play a bit and do not wish to submit your changes for inclusion into the mainline kernel.
In this tutorial, we’ll develop a simple kernel module that creates a /dev/reverse device. A string written to this device is read back with the word order reversed (“Hello World” becomes “World Hello”). It is a popular programmer interview puzzle, and you are likely to get some bonus points when you show the ability to implement it at the kernel level as well. A word of warning before we start: a bug in your module may lead to a system crash and (unlikely, but possible) data loss. Be sure you’ve backed up all your important data before you start, or, even better, experiment in a virtual machine.

Avoid root if possible

By default, /dev/reverse is available to root only, so you’ll have to run your test programs with sudo. To fix this, create a /lib/udev/rules.d/99-reverse.rules file that contains:
SUBSYSTEM=="misc", KERNEL=="reverse", MODE="0666"
Don’t forget to reinsert the module. Making device nodes accessible to non-root users is generally not a good idea, but it is quite useful during development. This is not to mention that running test binaries as root is not a good idea either.

A module’s anatomy

As most of the Linux kernel modules are written in C (apart from low-level architecture-specific parts), it is recommended that you keep your module in a single file (say, reverse.c). We’ve put the full source code on GitHub– and here we’ll look at some snippets of it. To begin, let’s include some common headers and describe the module using predefined macros:
#include
#include
#include
 
MODULE_LICENSE("GPL");
MODULE_AUTHOR("Valentine Sinitsyn ");
MODULE_DESCRIPTION("In-kernel phrase reverser");
Everything is straightforward here, except for MODULE_LICENSE(): it is not a mere marker. The kernel strongly favours GPL-compatible code, so if you set the licence to something non GPL-compatible (say, “Proprietary”), certain kernel functions will not be available to your module.

When not to write a kernel module

Kernel programming is fun, but writing (and especially debugging) kernel code in a real-world project requires certain skills. In general, you should descend to the kernel level only if there is no other way to solve your problem. Chances are you can stay in the userspace if:
  • You develop a USB driver – have a look at libusb.
  • You develop a filesystem – try FUSE.
  • You are extending Netfilter – libnetfilter_queue may help you then.
Generally, native kernel code will perform better, but for many projects this performance loss isn’t crucial.
Since kernel programming is always asynchronous, there is no main() function that Linux executes sequentially to run your module. Instead, you provide callbacks for various events, like this:
static int __init reverse_init(void)
{
    printk(KERN_INFO "reverse device has been registered\n");
    return 0;
}
 
static void __exit reverse_exit(void)
{
    printk(KERN_INFO "reverse device has been unregistered\n");
}
 
module_init(reverse_init);
module_exit(reverse_exit);
Here, we define functions to be called on the module’s insertion and removal. Only the first one is required. For now, they simply print a message to the kernel ring buffer (accessible from the userspace via the dmesg command); KERN_INFO is a log level (note there is no comma). __init and __exit are attributes – the pieces of metadata attached to functions (or variables). Attributes are rarely seen in userspace C code but are pretty common in the kernel. Everything marked with __init is recycled after the initialisation (remember the old “Freeing unused kernel memory…” message?). __exit denotes functions that are safe to optimise out when the code is built statically into the kernel. Finally, the module_init() and module_exit() macros set reverse_init() and reverse_exit() functions as lifecycle callbacks for our module. The actual function names aren’t important; you can call them init() and exit() or start() and stop(), if you wish. They are declared static and hence invisible outside your module. In fact, any function in the kernel is invisible unless explicitly exported. However, prefixing your functions with a module name is a common convention among kernel programmers.
These are bare bones – let’s make things more interesting. Modules can accept parameters, like this:
# modprobe foo bar=1
The modinfo command displays all parameters accepted by the module, and these are also available under /sys/module//parameters as files. Our module will need a buffer to store phrases – let’s make its size user-configurable. Add the following three lines just below MODULE_DESCRIPTION():
static unsigned long buffer_size = 8192;
module_param(buffer_size, ulong, (S_IRUSR | S_IRGRP | S_IROTH));
MODULE_PARM_DESC(buffer_size, "Internal buffer size");
Here, we define a variable to store the value, wrap it into a parameter, and make it readable by everyone via sysfs. The parameter’s description (the last line) appears in the modinfo’s output.
As the user can set buffer_size directly, we need to sanitise it in reverse_init(). You should always check the data that comes outside the kernel – if you don’t, you are opening yourself to kernel panics or even security holes.
static int __init reverse_init()
{
    if (!buffer_size)
        return -1;
    printk(KERN_INFO
        "reverse device has been registered, buffer size is %lu bytes\n",
        buffer_size);
    return 0;
}
Non-zero return value from a module init function indicates a failure.

Navigation

The Linux kernel is the ultimate source for everything you may need when developing modules. However, it’s quite big, and you may have trouble trying to find what you are after. Luckily, there are tools that make it easier to navigate large codebases. First of all, there is Cscope – a venerable tool that runs in a terminal. Simply run make cscope && cscope in the kernel sources top-level directory. Cscope integrates well with Vim and Emacs, so you can use it without leaving the comfort of your favorite editor.
If terminal-based tools aren’t your cup of tea, visit http://lxr.free-electrons.com. It is a web-based kernel navigation tool with not quite as many features as Cscope (for example, you can’t easily find usages for the function), but it still provides enough for the quick lookups.
Now it’s time to compile the module. You will need the headers for the kernel version you are running (linux-headers or equivalent package) and build-essential (or analogous). Next, it’s time to create a boilerplate Makefile:
obj-m += reverse.o
all:
    make -C /lib/modules/$(shell uname -r)/build M=$(PWD) modules
clean:
    make -C /lib/modules/$(shell uname -r)/build M=$(PWD) clean
Now, call make to build your first module. If you typed everything correctly, you will find reverse.ko in the current directory. Insert it with sudo insmod reverse.ko, and run:
$ dmesg | tail -1
[ 5905.042081] reverse device has been registered, buffer size is 8192 bytes
Congratulations! However, for now this line is telling lies – there is no device node yet. Let’s fix it.

Miscellaneous devices

In Linux, there is a special character device type called “miscellaneous” (or simply “misc”). It is designed for small device drivers with a single entry point, and is exactly what we need. All misc devices share the same major number (10), so the one driver (drivers/char/misc.c) can look after all of them, and they are distinguished by their minor numbers. In all other senses, they are just normal character devices.
To register a minor number (and an entry point) for the device, you declare struct misc_device, fill its fields (note the syntax), and call misc_register() with a pointer to this structure. For this to work, you will also need to include the linux/miscdevice.h header file:
static struct miscdevice reverse_misc_device = {
    .minor = MISC_DYNAMIC_MINOR,
    .name = "reverse",
    .fops = &reverse_fops
};
static int __init reverse_init()
{
    ...
    misc_register(&reverse_misc_device);
    printk(KERN_INFO ...
}
Here, we request a first available (dynamic) minor number for the device named “reverse”; th ellipsis indicates omitted code that we’ve already seen. Don’t forget to unregister the device on the module’s teardown:
static void __exit reverse_exit(void)
{
    misc_deregister(&reverse_misc_device);
    ...
}
The ‘fops’ field stores a pointer to a struct file_operations (declared in linux/fs.h), and this is the entry point for our module. reverse_fops is defined as:
static struct file_operations reverse_fops = {
    .owner = THIS_MODULE,
    .open = reverse_open,
    ...
    .llseek = noop_llseek
};
Again, reverse_fops contains a set of callbacks (also known as methods) to be executed when userspace code opens a device, reads from it, writes to it or closes the file descriptor. If you omit any of these, a sensible fallback will be used instead. That’s why we explicitly set the llseek method to noop_llseek(), which (as the name implies) does nothing. The default implementation changes a file pointer, and we don’t want our device to be seekable now (this will be your home assignment for today).

I open at the close

Let’s implement the methods. We’ll allocate a new buffer for each file descriptor opened, and free it on close. This is not really safe: if a userspace application leaks descriptors (perhaps intentionally), it may hog the RAM, and render the system unusable. You should always think about these possibilities in the real world, but for the tutorial, it’s acceptable.
We’ll need a structure to describe the buffer. The kernel provides many generic data structures: linked lists (which are double-linked), hash tables, trees and so on. However, buffers are usually implemented from scratch. We will call ours “struct buffer”:
struct buffer {
    char *data, *end, *read_ptr;
    unsigned long size;
};
data is a pointer to the string this buffer stores, and end is the first byte after the string end. read_ptr is where read() should start reading the data from. The buffer size is stored for the completeness – for now, we don’t use this field. You shouldn’t assume the users of your structure will correctly initialise all of these, so it is better to encapsulate buffer allocation and deallocation in functions. They are usually named buffer_alloc() and buffer_free().
static struct buffer *buffer_alloc(unsigned long size)
{
    struct buffer *buf;
    buf = kzalloc(sizeof(*buf), GFP_KERNEL);
    if (unlikely(!buf))
        goto out;
    ...
    out:
        return buf;
}
Kernel memory is allocated with kmalloc() and freed with kfree(); the kzalloc() flavour sets the memory to all-zeroes. Unlike standard malloc(), its kernel counterpart receives flags specifying the type of memory requested in the second argument. Here, GFP_KERNEL means we need a normal kernel memory (not in DMA or high-memory zones) and the function can sleep (reschedule the process) if needed. sizeof(*buf) is a common way to get the size of a structure accessible via pointer.
You should always check kmalloc()’s return value: dereferencing NULL pointer will result in kernel panic. Also note the use of unlikely() macro. It (and the opposite likely() macro) is widely used in the kernel to signify that the condition is almost always true (or false). It doesn’t affect control flow, but helps modern processors to boost performance with branch prediction.
Finally, note the gotos. They are often considered evil, however, the Linux kernel (and some other system software) employs them to implement centralised function exiting. This results in less deeply nested and more readable code, and is much like the try-ctach blocks used in higher-level languages.
With buffer_alloc() and buffer_free() in place, the implementation of the open and close methods becomes pretty straightforward.
static int reverse_open(struct inode *inode, struct file *file)
{
    int err = 0;
    file->private_data = buffer_alloc(buffer_size);
    ...
    return err;
}
struct file is a standard kernel data structure that stores information about an opened file, like current file position (file->f_pos), flags (file->f_flags), or open mode (file->f_mode). Another field, file->private_data is used to associate the file with some arbitrary data. Its type is void *, and it is opaque to the kernel outside the file’s owner. We store a buffer there.
If the buffer allocation fails, we indicate this to the calling user space code by returning negative value (-ENOMEM). A C library doing open(2) system call (probably, glibc) will detect this and set errno appropriately.

Learn to read and write

“Read” and “write” methods are where the real job is done. When data is written to a buffer, we drop its previous contents and reverse the phrase in-place, without any temporary storage. The read method simply copies the data from the kernel buffer into the userspace. But what should the reverse_read() method do if there is no data in the buffer yet? In userspace, the read() call would block until the data is available. In the kernel, you must wait. Luckily, there is a mechanism for this, and it is called ‘wait queues’.
The idea is simple. If a current process needs to wait for some event, its descriptor (a struct task_struct stored as ‘current’) is put into non-runnable (sleeping) state and added to a queue. Then schedule() is called to select another process to run. A code that generates the event uses the queue to wake up the waiters by putting them back to the TASK_RUNNING state. The scheduler will select one of them somewhere in the future. Linux has several non-runnable process states, most notably TASK_INTERRUPTIBLE (a sleep that can be interrupted with a signal) and TASK_KILLABLE (a sleeping process that can be killed). All of this should be handled correctly, and wait queues do this for you.
A natural place to store our read wait queue head is struct buffer, so start with adding wait_queue_head_t read_queue field to it. You should also include linux/sched.h. A wait queue can be declared statically with DECLARE_WAITQUEUE() macro. In our case, dynamic initialisation is needed, so add this line to buffer_alloc():
init_waitqueue_head(&buf->read_queue);
We wait for the data to be available; or for read_ptr != end condition to become true. We also want the wait to be interruptible (say, by Ctrl+C). So the “read” method should start like this:
static ssize_t reverse_read(struct file *file, char __user * out,
        size_t size, loff_t * off)
{
    struct buffer *buf = file->private_data;
    ssize_t result;
    while (buf->read_ptr == buf->end) {
        if (file->f_flags & O_NONBLOCK) {
            result = -EAGAIN;
            goto out;
        }
        if (wait_event_interruptible
        (buf->read_queue, buf->read_ptr != buf->end)) {
            result = -ERESTARTSYS;
            goto out;
        }
    }
...
We loop until the data is available and use wait_event_interruptible() (it’s a macro, not a function, that’s why the queue is passed by value) to wait if it isn’t. If wait_event_interruptible() is, well, interrupted, it returns a non-zero value, which we translate to -ERESTARTSYS. This code means the system call should be restarted. file->f_flags check accounts for files opened in non-blocking mode: if there is no data, we return -EAGAIN.
We can’t use if() instead of while(), since there can be many processes waiting for the data. When the write method awakes them, the scheduler chooses the one to run in an unpredictable way, so by the time this code is given a chance to execute, the buffer can be empty again. Now we need to copy the data from buf->data to the userspace. The copy_to_user() kernel function does just that:
    size = min(size, (size_t) (buf->end - buf->read_ptr));
    if (copy_to_user(out, buf->read_ptr, size)) {
        result = -EFAULT;
        goto out;
    }
The call can fail if the user space pointer is wrong; if this happen, we return -EFAULT. Remember not to trust anything coming outside the kernel!
    buf->read_ptr += size;
    result = size;
out:
    return result;
}
Simple arithmetic is needed so the data can be read in arbitrary chunks. The method returns the number of bytes read or an error code.
The write method is simpler and shorter. First, we check that the buffer have enough space, then we use the copy_from_userspace() function to get the data. Then read_ptr and end pointers are reset and the buffer contents are reversed:
    buf->end = buf->data + size;
    buf->read_ptr = buf->data;
    if (buf->end > buf->data)
        reverse_phrase(buf->data, buf->end - 1);
Here, reverse_phrase() does all heavy lifting. It relies on the reverse_word() function, which is quite short and marked inline. This is another common optimisation; however, you shouldn’t overuse it, since aggressive inlining makes the kernel image unnecessarily large.
Finally, we need to wake up processes waiting for the data at read_queue, as described earlier. wake_up_interruptible() does just that:
    wake_up_interruptible(&buf->read_queue);
Phew! You now have a kernel module that at least compiles successfully. Now it’s time to test it.

Debugging kernel code

Perhaps the most common debugging method in the kernel is printing. You can use plain printk() (presumably with KERN_DEBUG log level) if you wish. However, there are better ways. Use pr_debug() or dev_dbg(), if you are writing a device driver that has its own “struct device”: they support the dynamic debug (dyndbg) feature and can be enabled or disabled on request (see Documentation/dynamic-debug-howto.txt). For pure development messages, use pr_devel(), which becomes a no-op unless DEBUG is defined. To enable DEBUG for our module, include:
CFLAGS_reverse.o := -DDEBUG
in the Makefile. After that, use dmesg to view debug messages generated by pr_debug() or pr_devel().
Alternatively, you can send debug messages directly to the console. To do this, either set the console_loglevel kernel variable to 8 or greater (echo 8 > /proc/sys/kernel/printk) or temporarily print the debug message in question at the high log level like KERN_ERR. Naturally, you should remove debug statements of this kind before publishing your code.
Note that kernel messages appear on the console, not in a terminal emulator window such as Xterm; that’s why you’ll find recommendations not to do kernel development in the X environment.

Surprise, surprise!

Compile the module and load it into the kernel:
$ make
$ sudo insmod reverse.ko buffer_size=2048
$ lsmod
reverse 2419 0
$ ls -l /dev/reverse
crw-rw-rw- 1 root root 10, 58 Feb 22 15:53 /dev/reverse
Everything seems to be in place. Now, to test how the module works, we’ll write a small program that reverses its first command line argument. The main() function (sans error checking) may look like this:
int fd = open("/dev/reverse", O_RDWR);
write(fd, argv[1], strlen(argv[1]));
read(fd, argv[1], strlen(argv[1]));
printf("Read: %s\n", argv[1]);
Run it as:
$ ./test 'A quick brown fox jumped over the lazy dog'
Read: dog lazy the over jumped fox brown quick A
It works! Play with it a little: try passing single-word or single-letter phrases, empty or non-English strings (if you have a keyboard layout set) and anything else.
Now let’s make things a little trickier. We’ll create two processes that share the file descriptor (and hence the kernel buffer). One will continuously write strings to the device, and another will read them. The fork(2) system call is used in the example below, but pthreads will work as well. I also omitted the code that opens and closes the device and does the error checking (again):
char *phrase = "A quick brown fox jumped over the lazy dog";
if (fork())
    /* Parent is the writer */
    while (1)
        write(fd, phrase, len);
else
    /* child is the reader */
    while (1) {
        read(fd, buf, len);
        printf("Read: %s\n", buf);
}
What do you expect this program to output? Below is what I’ve got on my laptop:
Read: dog lazy the over jumped fox brown quick A
Read: A kcicq brown fox jumped over the lazy dog
Read: A kciuq nworb xor jumped fox brown quick A
...

What’s going on here? It’s a race. We thought read and write were atomic, or executed one instruction at a time from the beginning till the end. However the kernel is a concurrent beast, and it can easily reschedule the process running the kernel-mode part of the write operation somewhere inside the reverse_phrase() function. If the process that does read() is scheduled before the writer is given a chance to finish, it will see the data in an inconsistent state. Such bugs are really hard to debug. But how to fix it?
Basically, we need to ensure that no read method can be executed until the write method returns. If you ever programmed a multi-threaded application, you’ve probably seen synchronisation primitives (locks) like mutexes or semaphores. Linux has them as well, but there are nuances. Kernel code can run in the process context (working “on behalf” of the userspace code, as our methods do) and in the interrupt context (for example, in an IRQ handler). If you are in the process context and a lock you need has already been taken, you simply sleep and retry until you succeed. You can’t sleep in the interrupt context, so the code spins in a loop until the lock become available. The corresponding primitive is called a spinlock, but in our case, a simple mutex – an object that only one process can “hold” at the given time – is sufficient. A real-world code may also use a read-write semaphore, for performance reasons.
Locks always protect some data (in our case, a “struct buffer” instance), and it is very common to embed them in a structure they are protecting. So we add a mutex (‘struct mutex lock’) into the “struct buffer”. We must also initialise the mutex with mutex_init(); buffer_alloc() is a good place for this. The code that uses mutexes must also include linux/mutex.h.
A mutex is much like a traffic light – it’s useless unless drivers look at it and follow the signals. So we need to update reverse_read() and reverse_write() to acquire the mutex before doing anything to the buffer and release it when they are done. Let’s have a look at the read method – write works just the same way:
static ssize_t reverse_read(struct file *file, char __user * out,
        size_t size, loff_t * off)
{
    struct buffer *buf = file->private_data;
    ssize_t result;
    if (mutex_lock_interruptible(&buf->lock)) {
        result = -ERESTARTSYS;
        goto out;
}
We acquire the lock at the very beginning of the function. mutex_lock_interruptible() either grabs the mutex and returns or puts the process to sleep until the mutex is available. As before, the _interruptible suffix means the sleep can be interrupted with a signal.
    while (buf->read_ptr == buf->end) {
        mutex_unlock(&buf->lock);
        /* ... wait_event_interruptible() here ... */
        if (mutex_lock_interruptible(&buf->lock)) {
            result = -ERESTARTSYS;
            goto out;
        }
    }
Below is our “wait for the data” loop. You should never sleep when holding a mutex, or a situation called a “deadlock” may occur. So, if there is no data, we release the mutex and call wait_event_interruptible(). When it returns, we reacquire the mutex and continue as usual:
    if (copy_to_user(out, buf->read_ptr, size)) {
        result = -EFAULT;
        goto out_unlock;
    }
    ...
out_unlock:
    mutex_unlock(&buf->lock);
out:
    return result;
Finally, the mutex is unlocked when the function ends or if an error occurs while the mutex is being held. Recompile the module (don’t forget to reload it) and run the second test again. You should see no corrupted data now.

What’s next?

Now you have a taste of kernel hacking. We’ve just scratched the surface of the topic, and there is much more to see. Our first module was intentionally simple, however the concepts you learned will stay the same in more complex scenarios as well. Concurrency, method tables, registering callbacks, putting processes to sleep and waking them up are things that every kernel hacker should be comfortable with, and now you’ve seen all of them in action. Maybe your kernel code will end up in the mainline Linux source tree some day – drop us a line if this happens!

TogetherJS

$
0
0
http://www.linuxjournal.com/content/togetherjs

Want to add real-time collaboration to your Web application? Mozilla's TogetherJS is worth a look.
When Tim Berners-Lee invented the World Wide Web more than 20 years ago, he did it in the hopes that physicists would be able to collaborate easily with one another over the Internet. Since then, the Web has grown and morphed into a new medium that handles everything from newspapers to finance to supermarkets.
And yet, although we can marvel at the large number of things we can do on the Web nowadays, the original idea that drove it all, of collaboration, is still a bit of a dream. Sure, we have sites like GitHub, which provide a Web interface to the Git version-control system. And of course, we have plenty of writing systems, such as WordPress, that allow a number of people to create (and publish) documents. And there's also Facebook, which sometimes can be seen as collaborative.
But if you really think about it, we still don't have the sort of seamless collaboration we originally thought might be possible via the Web. Sure, I can work on something, hand it to others, and then work on it again when they are done with it, but it's still relatively rare to have collaborative tools on-line.
Perhaps the most sophisticated and widespread example of real-time, Web-based collaboration is Google Docs (now known, I think, as Google Drive). It's true that Google's applications make it possible for you to store your documents in the cloud, as people now like to say. And it's certainly convenient to be able to read and write your documents from anywhere, so long as you have access to a Web browser. But for me, the real power of Google Docs is in the collaboration. Many different people can work on the same document, and they even can do so at the same time. I found this sort of collaboration to be invaluable when I had to work with several other people to put together a budget on a project several years ago. The fact that we could all, from our own computers, edit the same spreadsheet in real time was quite useful.
There are a number of open-source alternatives to Google's word processor as well. Etherpad was released as an open-source project after its authors were acquired by Google several years ago. You can download and install Etherpad on your own, or you can take advantage of one of the existing Etherpad servers on-line. Another interesting application is Ace, a browser-based programming editor with impressive collaborative abilities.
Now, I never would claim that all collaboration needs to be in real time. There are many examples in the open-source world of people communicating and collaborating asynchronously, using e-mail and Git to work together—often quite effectively, without the bells and whistles that real-time collaboration seems to offer.
However, for many of us, collaboration without a real-time component is always missing something. It would be great for me not only to be able to talk to someone about a Web site, but also to look at it (and edit its content) along with them, in real time. Yes, there are screen-sharing systems, such as VNC, Join.me and ScreenHero, but they require that you install something on your computer and that you activate it.
That's why I have become interested in a project sponsored by the Mozilla Foundation known as TogetherJS. As the name implies, TogetherJS is a JavaScript-based, real-time collaboration system. The most impressive thing, in my opinion, is how much TogetherJS provides out of the box, with little or no configuration. It allows you to make your site more collaborative by adding some simple elements to each page.
So in this article, I want to look into TogetherJS—what it does, how you can add it to your own sites, and how you even can connect your application to it, creating your own, custom collaborative experience.

What Is TogetherJS?

TogetherJS is a project sponsored by the Mozilla Foundation (best known for the Firefox browser and the Thunderbird e-mail client). Mozilla has been developing and releasing a growing number of interesting open-source tools during the past few years, of which TogetherJS is one of the most recent examples. (In recent months, for instance, Mozilla also released Persona, which attempts to let you sign in to multiple sites using a single identity, without tying it to a for-profit company.) TogetherJS was released by "Mozilla Labs", which, from the name and description, suggests this is where Mozilla experiments with new ideas and technologies.
On a technical level, TogetherJS is a client-server system. The client is a JavaScript library—or more accurately, a set of JavaScript libraries—loaded onto a Web page, which then communicates back to a server. The server to which things are sent, known in TogetherJS parlance as the "hub", runs under node.js, the JavaScript-powered server system that has become quite popular during the past few years. The hub acts as a simple switchboard operator, running WebSockets, a low-overhead protocol designed for real-time communication. Thus, if there are ten people using TogetherJS, divided into five pairs of collaborators, they can all be using the same hub, but the hub will make sure to pass messages solely to the appropriate collaborators.
Installing TogetherJS on a Web site is surprisingly easy. You first need to load the TogetherJS library into your page. This is done by adding the following line into your Web application:


Of course, you also can host the JavaScript file on your own server, either because you want to keep it private or internal, or if you are modifying it, or if you simply prefer not to have it upgrade each time Mozilla releases a new version.
That JavaScript file doesn't actually do much on its own. Rather, it checks to see whether you want to download a minimized version of the code. Based on that, it decides whether to download all of the code in a single file or in separate ones. Regardless of how you download TogetherJS, the above line ensures that the JavaScript component is ready to work.
But of course, it's not enough to install the JavaScript. Someone needs to activate and then use it, which means installing a button on your Web site that will do so. Once again, because of the way TogetherJS is constructed, it's pretty straightforward. You can install the following:


In other words, you create a button that, when clicked, invokes the TogetherJS function. When users click on that button, they will be added to TogetherJS. Now, this is actually pretty boring; if you're running TogetherJS by yourself, it's not going to seem to be doing very much. Once you click on the TogetherJS button, and after you click through the first-time introduction, you'll immediately be given a link, labeled "invite a friend". In my particular case, running this on port 8000 of my server, I get http://lerner.co.il:8000/togetherjs.html#&togetherjs=oTtEp6wmoF.
As you can see, the TogetherJS special-invitation URL combines the URL of the page you own, along with a token that uniquely identifies your session. This allows multiple sets of people to collaborate on the same page, with each set existing in its own, isolated environment.
For example, togetherjs.html (Listing 1) is a file that I put up on my server. I opened two separate browsers onto that page, one via the direct URL and the second by using the full URL shown above, with a specific confirmation token. Once both browsers were pointing to the site, and once both users had confirmed their interest in collaborating and using TogetherJS, I found that either user could modify the content of the "textarea" tag, and that no matter who was typing, the changes were reflected immediately on the other person's computer. In addition, each click of the mouse is displayed graphically. And if one user goes to a different page on the site (assuming that the TogetherJS library is on the other page as well), TogetherJS will ask the other user if he or she wants to follow along.

Listing 1. togetherjs.html


Collaborate!


Collaborate!


Configuration and Customization

It's great and amazing that TogetherJS works so well, immediately upon installing it. However, there also are ways you can configure TogetherJS, so it'll reflect your needs. Because of the way TogetherJS is loaded, it's recommended that you make these configuration settings before TogetherJS has been loaded. For example:

All of the configuration variables begin with TogetherJSConfig_ and have names that are fairly descriptive. A full list is on the TogetherJS site at https://togetherjs.com/docs/#configuring-togetherjs, but you also can look through the together.js code, which contains comments describing what the configuration variables do.

For example, if you decide you want to run your own hub (that is, a message-passing, WebSockets-based server), you must tell TogetherJS to look in a different location, with TogetherJSConfig_hubBase.

Other useful configuration variables are:

  • TogetherJSConfig_useMinimizedCode: downloads the minimized JavaScript files for the rest of TogetherJS.

  • TogetherJSConfig_inviteFromRoom: allows you to think about collaboration on a site-wide basis.

  • TogetherJSConfig_youtube: when set, this means that if one person views a YouTube video, everyone will, and they will be synchronized.

But, TogetherJS provides more than just the ability to configure and use it. You also can extend it. The same message-passing system that TogetherJS uses for itself is available to developers. Thus, you can send arbitrary messages, for arbitrary events, between all of the people currently collaborating on this system.

In order to send an arbitrary JSON message, all of the parties involved need to agree on the message "type"—that is, the string that you will use to identify your message. All parties also need to register their interest in receiving messages of this type and to define a callback function that will fire when the message is sent. Although it makes sense to do this within the HTML or JavaScript in your application, it's also possible to do it in your favorite browser's JavaScript console.

First, you register interest in your object by telling TogetherJS that whenever it receives a message of a certain type from a hub (using the TogetherJS.hub.on methods), it should fire a particular callback:

TogetherJS.hub.on("reuvenTest", function (msg) { console.log("message received: " + msg) } );

Now, it's true that because your message is an object, it will be printed as "[Object object]" in the Web console, which is really too bad. If you prefer, you can choose individual fields from the object, but be sure that you know what fields you will be receiving.

To send a message, just invoke TogetherJS.send along with a JSON object that will be sent to all of the other TogetherJS subscribers on this channel. There is no way to send a message to one particular computer; in this way, the paradigm is similar to what you probably saw with real-time Web updates with Pusher and PubNub last year.

To send a message, you use the following:

TogetherJS.send({type: "reuvenTest", foo: ↪'foofoo', bar: 'barbar'});

I should note that both of these methods return undefined to the caller. Normally, this isn't a problem, but if you're working in the console, you might not expect such a response.

Of course, the power of this communication channel is in deciding what you want to communicate, and what should happen when communication comes in. When a message arrives, do you want to change the way something is displayed on the receivers' screens? Do you want to display a message for the user?

Conclusion

TogetherJS is relatively new, and I am still in the early stages of using it in my applications that require real-time collaboration. That said, TogetherJS is an interesting application in and of itself, and it was designed as a platform that will continue to grow and expand. With TogetherJS, we are one additional step closer to using the Web for new and different forms of collaboration.

Resources

The home page for TogetherJS is http://togetherjs.com, but the GitHub page is https://github.com/mozilla/togetherjs. You can use TogetherJS with any modern browser, which basically means that it does not support Internet Explorer. I was able to get it to work with Firefox, Chrome and Safari (on OS X) without any problems. Note: TogetherJS explicitly states that it doesn't support Internet Explorer very well, including the most recent versions, which means that if you're working in a mixed environment, it might not be a good choice.


Set FTP Autologin with .netrc file in linux

$
0
0
http://www.nextstep4it.com/categories/unix-command/ftp-autologin


There are some scenario where we do not want to specify ftp user name and password on the ftp command line. So to automatically supply ftp username and password to the ftp client, create a file .netrc in user's home direcrory which contains the information regarding the ftp server name, ftp user & password.

We can also use .netrc file in a shell script where we will use ftp client to transfer files to remote ftp server.

Below are the steps to enable FTP autologin with .netrc file .

Step:1 Create a .netrc file in user's home directory


# vi ~/.netrc
machine login password

Example :


machine  ftp.nstpmail.com login ftp-user password xyz@abc123

Save & Exit the file.

Note: We can add multiple machines ,Just one line per machine in the .netrc file.

Step:2 Set permissions so that Owner can only read the file


# chmod 0600 ~/.netrc

Step:3 Now Try to connect Your ftp server


# ftp < FTP-Server-Name>

Now above command will connect to your ftp server automatically, whereas ftp user name and password is picked up from .netrc file

Expand FreeNAS with plugins

$
0
0
http://www.openlogic.com/wazi/bid/345617/expand-freenas-with-plugins

FreeNAS is a powerful open source implementation of a network-attached storage (NAS) server – file-level computer data storage connected to your network. FreeNAS is easy to manage, and because it's free it can serve files for small- to mid-sized companies without straining their software budgets or act as a media and storage server for a home network – a great way to make use of any aging Windows XP boxes lying around.
FreeNAS supports a powerful plugin architecture that lets you expand its default feature set to better meet your demands. You'll find plugins for Firefly media server, CouchPotato movie server, and more. The plugins are in 32-bit or 64-bit PBI (push button installer) files on the FreeNAS project's website. PBI provides a native FreeNAS graphical installation wrapper for software ported to FreeBSD, allowing you to automate installation.
Here's a taste of some of the most interesting available plugins:

CrashPlan

You can use a plugin to back up your FreeNAS data to CrashPlan cloud-based backup, if you have an account with the service. While FreeNAS software stores your data safely and securely, computer hardware is prone to crashes, so both organizations and individuals need a solid backup and disaster recovery plan.

ownCloud

ownCloud is another cloud connector, but one that offers greater flexibility. If you have an in-house ownCloud server you can take advantage of this plugin to automatically back up your FreeNAS server.

Bacula

The Bacula plugin allows you to connect your FreeNAS servers to this powerful open source backup tool. This plugin includes file daemons (backup clients), directors (backup server), and storage daemons (back end). Bacula itself, however, is a bit of a challenge to get up and running.

Maraschino

The Maraschino project aims at creating an easy-to-use interface for managing a home theatre PC (HTPC). With this tool you can see recently added files, browse your media library, check disk space, and control multiple media servers.

Plex Media Server

You can turn your FreeNAS into a powerful multimedia server with the plugin for Plex Media Server. You can use Plex not only to view your favorite sci-fi films, instructional videos, and TED talks, but you can also create a training resource for new hires.
How can you make use of these plugins? All you need is a running FreeNAS server and access to the FreeNAS administrator account.

Installing plugins

First, determine whether you're running FreeNAS on 64-bit or 32-bit hardware. More plugins are available for the former than the latter, so if you have a choice, install FreeNAS on 64-bit hardware.
In order to install plugins, you must already have your FreeNAS set up with volumes.
The easiest way to install plugins is to select them from a list on the software's Plugins tab. Log in to the FreeNAS web administration portal as the admin (or root) user and go to the Plugins tab. Select a plugin to install (Figure 1), click the Install button, and let the installation complete:
Figure 1 The list of plugins will vary depending upon your system architecture.
Though it's simple, the process of installing a plugin can be time-consuming. FreeNAS first creates a jail – that is, a virtual environment with its own hostname and IP address – so it can install the plugin, in the form of a PBI file, onto the FreeBSD system that underlies FreeNAS. When the process completes successfully you should see the new plugin listed in the left navigation tree (Figure 2):
Figure 2 The Firefly media server plugin is now installed.
After you install a plugin you need to enable it. Click on the Installed tab and then click the slider for the plugin to the On position (Figure 3):
Figure 3 Enabling plugins to make them available for FreeNAS
You can then configure the plugin by clicking on its entry in the left navigation tree. A popup window appears (Figure 4) to allow you to set up the plugin to meet your needs:
Figure 4 Configuring the Firefly media server plugin for FreeNAS
Alternatively, you can install plugins by uploading a PBI file to FreeNAS. Once you've downloaded the plugin you want from the FreeNAS site, click on the Plugins tab, then click on the Upload button. Choose a file and allow the installation to complete.

Troubleshooting

When FreeNAS creates a new jail for a plugin, that jail is assigned an IP address. If you find that your plugins continually fail either to install or to work properly, the most likely cause is that the jail's IP address conflicts with the address of something else on your network. To avoid this, assign an IP address range to your jails that is outside the DHCP scope of your network. You can do this as the FreeNAS root user from the Jails tab (Figure 5):
Figure 5 Configuring jail addresses to be outside of your DHCP scope
If you still have issues, make sure the gateway address and DNS are correctly configured within FreeNAS. Click on the Network button (in the top navigation bar) and then click Global Configuration (Figure 6). Enter the correct hostname, domain, gateway, and nameserver, click Save, then attempt to work with plugins again.
Figure 6 Configuring networkin for FreeNAS.
As you can see, FreeNAS's powerful plugin system gives you the ability to use the software for more than just file storage and sharing.

Install And Configure PXE Server And Client On CentOS 6.5

$
0
0
http://www.unixmen.com/install-configure-pxe-server-client-centos-6-5

PXE Server, stands for preboot execution environment, is used to enable a network computer to boot only from a network interface card. This method will be very helpful, if a System Administrator wants to install many systems which doesn’t have a CD/DVD device on the network. PXE environment needs a DHCP server that distributes the IP addresses to the client systems, and a TFTP server that downloads the installation files to the PXE clients. You don’t need any CD/DVD or USB bootable drives to install client systems. Just, copy the ISO images on the PXE server and start installing your Linux clients via network using PXE server.

Scenario

My test box(pxe server) details are given below:
  • OS: CentOS 6.5 Minimal Installation.
  • IP Address: 192.168.1.150/24.
  • SELinux disabled on PXE server.
  • IP tables stopped on PXE server.
In this tutorial, we are going to setup PXE server On CentOS 6.5 server, and install CentOS 6.5 32bit edition on our client system using the PXE server.

Installation

First, you should Install and configure DHCP server on your PXE server. To install and configure DHCP server, refer the following link:
Now, install the following packages for setting up PXE environment:
yum install httpd xinetd syslinux tftp-server -y

Configure PXE Server

Copy the following TFTP configuration files to the /var/lib/tftpboot/ directory.
cd /usr/share/syslinux/
cp pxelinux.0 menu.c32 memdisk mboot.c32 chain.c32 /var/lib/tftpboot/
Edit file /etc/xinetd.d/tftp
vi /etc/xinetd.d/tftp
Enable TFTP server. To d this, change “disable=yes” to “no”.
 # default: off
# description: The tftp server serves files using the trivial file transfer \
#       protocol.  The tftp protocol is often used to boot diskless \
#       workstations, download configuration files to network-aware printers, \
#       and to start the installation process for some operating systems.
service tftp
{
socket_type             = dgram
protocol                = udp
wait                    = yes
user                    = root
server                  = /usr/sbin/in.tftpd
server_args             = -s /var/lib/tftpboot
disable                 = no
per_source              = 11
cps                     = 100 2
flags                   = IPv4
}
Next, create a directory to store CentOS installation ISO image. and mount the image to that directory as shown below. I have CentOS 6.5 32bit ISO image on my /root directory.
mkdir /var/lib/tftpboot/centos6_i386
mount -o loop /root/CentOS-6.5-i386-bin-DVD1.iso /var/lib/tftpboot/centos6_i386
Note: If you want to install CentOS 64bit edition, make a relevant directory called centos6_x86_64 (/var/lib/tftpboot/centos6_x86_64).
Create a apache configuration file for PXE server under /etc/httpd/conf.d/ directory:
vi /etc/httpd/conf.d/pxeboot.conf
Add the following lines:
Alias /centos6_i386 /var/lib/tftpboot/centos6_i386


Options Indexes FollowSymLinks
Order Deny,Allow
Deny from all
Allow from 127.0.0.1 192.168.1.0/24
Save and close the file.
Then, create a configuration directory for PXE server:
mkdir /var/lib/tftpboot/pxelinux.cfg
Now, create PXE server configuration file under the pxelinux.cfg:
vi /var/lib/tftpboot/pxelinux.cfg/default
Add the following lines:
default menu.c32
prompt 0
timeout 300
ONTIMEOUT local

menu title ########## PXE Boot Menu ##########

label 1
menu label ^1) Install CentOS 6 i386 Edition
kernel centos6_i386/images/pxeboot/vmlinuz
append initrd=centos6_i386/images/pxeboot/initrd.img method=http://192.168.1.150/centos6_i386 devfs=nomount

label 2
menu label ^2) Boot from local drive localboot
Save and close the file.

Configure DHCP Server

Now, we have to configure the DHCP server to work with PXE server.
Edit file /etc/dhcp/dhcpd.conf,
vi /etc/dhcp/dhcpd.conf
Add the following lines at the end:
allow booting;
allow bootp;
option option-128 code 128 = string;
option option-129 code 129 = text;
next-server 192.168.1.150;
filename "pxelinux.0";
Save and close the file.
Now, We have come to the end of PXE server configuration. Restart all the services to complete the configuration.
service xinetd restart
service httpd restart
service dhcpd restart
Congratulations! We have completed the PXE server configuration.

PXE Client Configuration

The client may be any system that has network boot enabled option (PXE boot). You can enable this option in your Bios settings.
Due to lack of resources, I have created a Virtual Machine client on my Oracle VirtualBox.
Open up the Oracle VirtualBox. Click on the New button in the menu bar.
Oracle VM VirtualBox Manager_001
Enter the Virtual machine name.
Create Virtual Machine_002
Enter the RAM size to the Virtual machine.
Create Virtual Machine_003
Select “Create a virtual hard drive now” option and click Create.
Create Virtual Machine_003
Select the Virtual hard drive file type. If you don’t know to what to select, leave the default option and click Next.
Create Virtual Hard Drive_005
Select whether the new virtual hard drive file should grow as it is used or if it should be created as fixed size.
Create Virtual Hard Drive_006
Enter the Virtual hard drive size.
Create Virtual Hard Drive_007
That’s it. Our Virtual Client machine has been created. Now, we should make the client to boot from the network. To do that, go to the Vitual machine Settings option.
Oracle VM VirtualBox Manager_008
Select the System tab on the left, and Choose Network from the boot order option on the right side.
CentOS 6.5 Client - Settings_009
Then, go to the Network tab and select “Bridged Adapter” from the “Attached to” drop down box.
CentOS 6.5 Client - Settings_011
Once you done all the above steps, click OK to save the changes. That’s it. Now power on the Virtual client system. You should see the following screen.
CentOS 6.5 Client [Running] - Oracle VM VirtualBox_012
That’s it. Now you know what to know next. Start installing CentOS on your client using the PXE server.
CentOS 6.5 Client [Running] - Oracle VM VirtualBox_013
Good luck!

Linux compressors comparison on CentOS 6.5 x86-64: lzo vs lz4 vs gzip vs bzip2 vs lzma

$
0
0
http://linuxaria.com/article/linux-compressors-comparison-on-centos-6-5-x86-64-lzo-vs-lz4-vs-gzip-vs-bzip2-vs-lzma

Today I want to repost for my readers a really interesting article by Gionatan Danti first posted on his blog http://www.ilsistemista.net/, I hope you enjoy it as much as I do
File compression is an old trick: one of the first (if not the first) program capable of compressing files was “SQ”, in the early 1980s, but the first widespread, mass-know compressor probably was ZIP (released in 1989).
In other word, compressing a file to save space is nothing new and, while current TB-sized, low costs disks provide plenty of space, sometime compression is desirable because it not only reduces the space needed to store data, but it can even increase I/O performance due to the lower amount of bits to be written or read to/from the storage subsystem. This is especially true when comparing the ever-increasing CPU speed to the more-or-less stagnant mechanical disk performance (SSDs are another matter, of course).
While compression algorithms and programs varies, basically we can distinguish to main categories: generic lossless compressors and specialized, lossy compressors.
If the last categories include compressors with quite spectacular compression factor, they can typically be used only when you want to preserve the general information as a whole, and you are not interested in a true bit-wise precise representation of the original data. In other word, you can use a lossy compressor for storing an high-resolution photo or a song, but not for storing a compressed executable on your disk (executable need to be perfectly stored, bit per bit) or text log files (we don’t want to lose information on text files, right?).
So, for the general use case, lossless compressors are the way to go. But what compressor to use from the many available? Sometime different programs use the same underlying algorithm or even the same library implementation, so using one or another is a relatively low-important choice. However, when comparing compressors using different compression algorithms, the choice must be a weighted one: you want to privilege high compression ratio or speed? In other word, you need a fast and low-compression algorithm or a slow but more effective one?
In this article, we are going to examine many different compressors based on few different compressing libraries:
  • lz4, a new, high speed compression program and algorithm
  • lzop, based on the fast lzo library, implementing the LZO algorithm
  • gzip and pigz (multithreaded gzip), based on the zip library which implements the ZIP alg
  • bzip2 and pbzip2 (multithreaded bzip2), based on the libbzip2 library implementing the Burrows–Wheeler compressing scheme
  • 7-zip, based mainly (but not only) on the LZMA algorithm
  • xz, another LZMA-based program


Programs, implementations, libraries and algorithms

Before moving to the raw number, lets first clarify the terminology.
A lossless compression algorithms is a mathematical algorithms that define how to reduce (compress) a specific dataset in a smaller one, without losing information. In other word, it involves encoding information using fewer bit that the original version, with no information loss. To be useful, a compression algorithms must be reversible – it should enable us to re-expand the compressed dataset, obtaining an exact copy of the original source. It’s easy to see how the fundamental capabilities (compression and ratio and speed) are rooted in the algorithm itself, and different algorithms can strongly differ in results and applicable scopes.
The next step is the algorithm implementation – in short, the real code used to express the mathematical behavior of the compression alg. This is another critical step: for example, vectorized or multithreaded code is way faster than plain, single-threaded code.
When a code implementation is considered good enough, often it is packetized in a standalone manner, creating a compression library. The advantage to spin-off the alg implementation in a standalone library is that you can write many different compressing programs without reimplement the basic alg multiple times.
Finally, we have the compression program itself. It is the part that, providing a CLI or a GUI, “glues” together the user and the compression library.
Sometime the alg, library and program have the same name (eg: zip). Other times, we don’t have a standalone library, but it is built right inside the compression program. While this is slightly confusing, what written above still apply.
To summarize, our benchmarks will cover the alg, libraries and programs illustrated below:
ProgramLibraryALGComp. RatioComp. SpeedDecomp. Speed
Lz4, version r110buit-inLz4 (a LZ77 variant)LowVery HighVery High
Lzop, version 1.02rc1Lzo, version 2.03Lzo (a LZ77 variant)LowVery HighVery High
Gzip, version 1.3.12built-inLZ77MediumMediumHigh
Pigz, version 2.2.5Zlib, version 1.2.3LZ77MediumHigh (multithread)High
Bzip2, version 1.0.5Libbz2, 1.0.5Burrows–WheelerHighLowLow
Pbzip2, version 1.1.6Libbz2, 1.0.5Burrows–WheelerHighMedium (multithread)Medium (multithread)
7-zipbuilt-inLZMAVery HighVery Low (multithread)Medium
Xz,version 4.999.9 betaLiblzma, ver 4.999.9betaLZMAVery HighVery LowMedium
Pxz,version 4.999.9 betaLiblzma, ver 4.999.9betaLZMAVery HighMedium (multithread)Medium

Testbed and methods

Benchmarks were performed on a system equipped with:
  • PhenomII 940 CPU (4 cores @ 3.0 GHz, 1.8 GHz Northbridge and 6 MB L3 cache)
  • 8 GB DDR2-800 DRAM (in unganged mode)
  • Asus M4A78 Pro motherboard (AMD 780G + SB700 chipset)
  • 4x 500 GB hard disks (1x WD Green, 3x Seagate Barracuda) in AHCI mode, configured in software RAID10 “near” layout
  • S.O. CentOS 6.5 x64
I timed the compression and decompression of two different datasets:
  1. a tar file containing an uncompressed CentOS 6.5 minimal install / (root) image (/boot was excluded)
  2. the tar file containing Linux 3.14.1 stable kernel
In order to avoid any influence by the disk subsystem, I moved both dataset in the RAM-backed /dev/shm directory (you can think about it as a RAMDISK).
When possible, I tried to separate single-threaded results from multi-threaded ones. However, it appear that 7-zip has no thread-selection options, and by default it spawn as many threads as the hardware threads the CPU provide. So I marked 7-zip results with an asterisk (*)
Many compressors expose some tuning – for example, selecting “-1” generally means a faster (but less effective) compression that “-9”. I experimented with these flags also, where applicable.

Compressing a CentOS 6.5 root image file

Let start our analysis compressing a mostly executables-rich dataset: a minimal CentOS 6.5 root image. Executables and binary files can often be reduced – albeit with somewhat low compression ratios.
centos_st
As you can see, both lz4 and lzop maintain their promise to be very fast, both at compression and decompression – albeit lz4 is the absolute winner. On the other hand, they have relatively low compression factor. However, ask them to increase their compression ratio (via “-9” switch) and they slow down immensely, without producing appreciably smaller files.
Gzip and especially bzip2 shows are not so good – while their compression factor is better (3X), they suffer a massive performance hit.
7-zip and xz have very low compression speed, but very high compression ratio and acceptable decompression speed.
Remember that these are single-threaded results. Moder CPU, with multiple cores, can be put to good use using some multi-threaded compression programs:
centos_mt
Scaling:
centos_scaling
Pigz, pbzip2 and pxz all produce way better results than theri single-threaded counterparts. However, while compression scaling is often very good, only pbzip2 is capable of decompression acceleration also.

Compressing the linux kernel 3.14.1 sources

Sources are text files, and text files generally have very good compression ratios. Let see how our contenders fare in compressing the linux kernel 3.14.1 source tar file:
kernel_st
While the relative standing remains the same, we can see two differences:
  1. as expected, the compression ratio is somewhat higher
  2. lzop is considerably faster at compression compared to the previous run.
Now, the multi-threaded part:
kernel_mt
and scaling:
kernel_scaling
Compression scaling remain excellent, with pxz in the last place.

Conclusions

From the above benchmarks, is clear that each contender has it specific use case:
  • lz4 and lzop are very good for realtime or near-realtime compression, providing significant space saving at a very high speed
  • gzip, especially in the multithreaded pgiz version, is very good at the general use case: it has both quite good compression ratio and speed
  • vanilla, single-threaded bzip2 does not fare very well: both its compression factor and speed are lower than xz. Only the excellent pbzip2 multithreaded implementation somewhat redeem it
  • xz is the clear winner in the compression ratio, but it is one of the slower programs both at compressing and decompressiong. If your main concern is compression ratio rather than speed (eg: on-line archive download) you can not go wrong with it
  • 7zip basically is a close relative of xz, but it main implementation belong to the windows ecosystem. Under Linux, simply use xz instead of 7-zip.

How to extend & reduce Swap Space on an LVM2 Logical Volume

$
0
0
http://www.nextstep4it.com/categories/how-to/resize-swap-lvm

By default all Linux(RHEL,CentOS,Fedora & Ubuntu) like operating system uses all available space during installation. If this is the case with your system, then you must first add a new physical volume to the volume group used by the swap space.

After adding additional storage to the swap space's volume group, it is now possible to extend it. To do so, perform the following steps (assuming /dev/VolGroup/lv_swap is the volume you want to extend by 2 GB):

Output of Free Command before extend :


Steps to Extend Swap space on an LVM2 Logical Volume :


Step:1 Disable swapping for the associated logical volume:

[root@localhost ~]# swapoff -v /dev/VolGroup/lv_swap
swapoff on /dev/VolGroup/lv_swap

Step:2 Resize the LVM2 logical volume by 2 GB:

[root@localhost ~]# lvresize /dev/VolGroup/lv_swap -L +2G
Extending logical volume lv_swap to 3.97 GiB
Logical volume lv_swap successfully resized

Step:3. Format the new swap space:

[root@localhost ~]# mkswap /dev/VolGroup/lv_swap
mkswap: /dev/VolGroup/lv_swap: warning: don't erase bootbits sectors
on whole disk. Use -f to force.
Setting up swapspace version 1, size = 4161532 KiB
no label, UUID=14df63cb-5e3b-42c3-911d-2016fb771804

Step:4 Enable the extended logical volume:

[root@localhost ~]# swapon -v /dev/VolGroup/lv_swap
swapon on /dev/VolGroup/lv_swap
swapon: /dev/mapper/VolGroup-lv_swap: found swap signature: version 1, page-size 4, same byte order
swapon: /dev/mapper/VolGroup-lv_swap: pagesize=4096, swapsize=4261412864, devsize=4261412864

To test if the logical volume was successfully extended, use cat /proc/swaps or free to inspect the swap space.


Steps to Reduce Swap on an LVM2 Logical Volume


To reduce an LVM2 swap logical volume (assuming /dev/VolGroup/lv_swap is the volume you want to reduce by 512 MB):

Output of Free Command before reduction :


Step:1 Disable swapping for the associated logical volume:

[root@localhost ~]# swapoff -v /dev/VolGroup/lv_swap
swapoff on /dev/VolGroup/lv_swap

Step:2 Reduce the LVM2 logical volume by 512 MB:

[root@localhost ~]# lvreduce /dev/VolGroup/lv_swap -L -512M
WARNING: Reducing active logical volume to 3.47 GiB
THIS MAY DESTROY YOUR DATA (filesystem etc.)
Do you really want to reduce lv_swap? [y/n]: y
Reducing logical volume lv_swap to 3.47 GiB
Logical volume lv_swap successfully resized

Step:3 Format the new swap space:

[root@localhost ~]# mkswap /dev/VolGroup/lv_swap
mkswap: /dev/VolGroup/lv_swap: warning: don't erase bootbits sectors
on whole disk. Use -f to force.
Setting up swapspace version 1, size = 3637244 KiB
no label, UUID=7f8f11de-5bc3-4b9c-b558-471fc540fa9b
 

Step:4 Enable the resized logical volume:

[root@localhost ~]# swapon -v /dev/VolGroup/lv_swap
swapon on /dev/VolGroup/lv_swap
swapon: /dev/mapper/VolGroup-lv_swap: found swap signature: version 1, page-size 4, same byte order
swapon: /dev/mapper/VolGroup-lv_swap: pagesize=4096, swapsize=3724541952, devsize=3724541952

To test if the swap's logical volume size was successfully reduced, use cat /proc/swaps or free to inspect the swap space.


How to set up and use RANCID under CentOS

$
0
0
http://www.openlogic.com/wazi/bid/346615/how-to-set-up-and-use-rancid-under-centos


RANCID (Really Awesome New Cisco ConfIg Differ) is a powerful tool for keeping track of changes in the configuration of network devices, not only from Cisco, but also vendors such as Juniper, Catalyst, and Foundry. You can use RANCID to view configuration files, compare changes in different versions of configuration, and save a historic record of configuration instances.
To start setting up RANCID under CentOS, add the repoforge.org repository to your system. I also suggest disabling SELinux, but tuning SELinux for RANCID is beyond the scope of this article. Then install RANCID's dependencies using yum and make sure that the cron, MySQL, and Apache HTTP Server services are started:
yum install expect cvs python httpd mysql mysql-server gcc make autoconf gcc-c++ kernel-devel php-common php-gd php-mcrypt php-pear php-pecl-memcache php-mysql php-xml MySQL-python crontabs telnet docutils rcs

yum groupinstall "Development tools" MySQL-python diffutils

service crond restart; chkconfig crontab on
service mysqld restart; chkconfig mysqld on
service httpd restart; chkconfig httpd on
Next, create a user, group, and home directory for RANCID, then download the project's tarball to that directory and install RANCID from source:
groupadd netadm
useradd -g netadm -d /usr/local/rancid rancid
mkdir /usr/local/rancid/pkg
cd /usr/local/rancid/pkg

wget http://pkgs.fedoraproject.org/repo/pkgs/rancid/rancid-2.3.6.tar.gz/c700f33978d2eb5a246bec056280c017/rancid-2.3.6.tar.gz
tar zxvf rancid-2.3.6.tar.gz

cd rancid-2.3.6
./configure --prefix=/usr/local/rancid/
make install
After RANCID is installed, copy a sample .cloginrc file, the file RANCID uses to store passwords, from the installation package. Also set appropriate permissions for the user and group rancid:netadm, and make sure they own the files under the rancid directory:
cp /usr/local/rancid/pkg/rancid-2.3.6/cloginrc.sample /usr/local/rancid/.cloginrc
chmod 640 /usr/local/rancid/.cloginrc
chmod 775 /usr/local/rancid/
chown -R rancid:netadm /usr/local/rancid/
Now you can edit RANCID's configuration file /usr/local/rancid/etc/rancid.conf so that it reflects your network. Based on your network architecture, you could group devices based on departments, geographic locations, or building campuses, or based on the functions they provide, such as management, voice, or data equipment. You can create separate RANCID groups for each managed network, each containing its own switches and routers. To show how this works, let's define two networks: Network1 will contain a router (Network1-Router-A, IP:10.10.10.1), and Network2 will include another router (Network2-Router-B, IP: 11.11.11.1):
LIST_OF_GROUPS="Network1 Network2"
RANCID works with CVS (Concurrent Versions System), a version control tool, to keep track of changes in configuration files. Whenever RANCID detects a change in the configuration of a device, the change is stored in a new file with an updated version number. Administrators can track changes back to the initial configuration version.
As user rancid, run CVS to create the necessary repositories. RANCID will check its configuration file and create necessary files for each network group – Network1 and Network2 in this case:
su - rancid
bin/rancid-cvs
Next, again as user rancid, edit the file .cloginrc and add the device credentials. The login password is the non-administrative password you use to log in to the switch or router. RANCID also needs the "enable" or administrative password in order to read the startup or running configuration file:
#NETWORK1-ROUTER-A
add user 10.10.10.1
add password 10.10.10.1 login-pass enable-pass

#NETWORK2-ROUTER-A
add user 11.11.11.1
add password 11.11.11.1 login-pass enable-pass
The passwords are stored as plain text in .cloginrc, which could be a security concern, but the file .cloginrc has permission of 640 for rancid:netadm, so only the user and group specifically created for RANCID (and root, of course) should be able to read it. The device configuration files stored by RANCID contain plain text and/or encrypted passwords based on how the passwords are stored within the actual device.
You can manually test whether the .cloginrc script works by manually executing the clogin script provided by RANCID. This script is also invoked while RANCID is running to log in to devices:
bin/clogin 10.10.10.1
10.10.10.1
spawn telnet 10.10.10.1
Trying 10.10.10.1...
Connected to 10.10.10.1.
Escape character is '^]'.

User Access Verification

Password:
NETWORK-1-ROUTER-A>enable
Password:
NETWORK-1-ROUTER-A#
If the script fails, double-check that the passwords saved in .cloginrc are correct. Also check whether the ACLs in the router permit remote logins from the IP address of the RANCID server.
Once RANCID can recognize the routers and connect to them with the proper passwords, add the IP address or hostname, device type, and state of the device under the respective Network sections. To use hostnames you need to have DNS support. The device data is listed using the syntaxip-address:device-type:state. Devices for each group go in separate files called router.db under var/groupname for each group you defined.
vim /usr/local/rancid/var/Network1/router.db
10.10.10.1:cisco:up

vim /usr/local/rancid/var/Network2/router.db
11.11.11.1:cisco:up
Next, invoke the rancid-run script, which executes RANCID. RANCID checks each added device, verifies any changes to an already saved configuration, and stores the configuration files with version numbers:
su - rancid
bin/rancid-run
If the run is successful, you should see text files named 10.10.10.1 and 11.11.11.1 under /usr/local/rancid/var/NetworkX/config that contain the entire configuration of each device.
Now create a cron job to run RANCID at a fixed interval so that the configuration files stored in RANCID are updated periodically. Choose an interval based on your requirements; I am using 30 minutes for this demonstration. Also, set up a second cron job to run at 00:00 on the first day of the month and remove log files that have not been modified for 30 days:
crontab -u rancid -e

*/30 * * * * /usr/local/rancid/bin/rancid-run #half hourly router dump
00 00 1 * * /usr/bin/find /usr/local/rancid/var/logs -type f -mtime +30 -exec rm {} \;

service crond restart
At this point you have a running RANCID server that periodically checks and stores the configuration files of network devices.

Adding ViewVC

At this stage you can access the configuration files stored by RANCID only via the command line. A web interface could help users more easily access the stored information. ViewVC provides an easy-to-use web interface with navigable directory support and the ability to view different versions of configuration files and view and compare changes.
Before installing ViewVC you must install some Python package prerequisites:
cd /usr/local/rancid/pkg
wget http://peak.telecommunity.com/dist/ez_setup.py
python ./ez_setup.py
easy_install babel
easy_install Genshi
easy_install Pygments
easy_install docutils
easy_install textile
Now you can set up and configure ViewVC:
cd /usr/local/rancid/pkg
wget http://viewvc.tigris.org/files/documents/3330/49347/viewvc-1.1.22.tar.gz
tar zxvf viewvc-1.1.22.tar.gz

cd viewvc-1.1.22
./viewvc-install ## we set the installation path as /usr/local/viewvc ##
Next, edit the ViewVC configuration file /usr/local/viewvc/viewvc.conf. Specify the root directory of the CVS repository you created earlier and the paths to executables ViewVC uses, such as rcs, enscript, and highlight:
[general]
root_parents = /usr/local/rancid/var/CVS : cvs
rcs_path = /usr/bin/
use_enscript = 1
enscript_path = /usr/bin/
use_highlight = 1
highlight_path = /usr/bin
Copy the ViewVC CGI files to Apache's cgi-bin directory and change their ownership to the Apache user and group:
cp /usr/local/viewvc/bin/cgi/*.cgi /var/www/cgi-bin/

chown apache:apache /var/www/cgi-bin/query.cgi
chown apache:apache /var/www/cgi-bin/viewvc.cgi
You also need to add two aliases to Apache's /etc/httpd/conf/httpd.conf configuration file to link the ViewVC CGI scripts with landing pages of /rancid and /query:
ScriptAlias /rancid "/var/www/cgi-bin/viewvc.cgi"
ScriptAlias /query "/var/www/cgi-bin/query.cgi"
Then restart Apache with the command service httpd restart.
Next, edit /etc/group and add the user apache to the group netadm. Previously, we set 775 permission for the directory /usr/local/rancid for the user rancid and group netadm. Adding apache to the group ensures that it has the necessary permissions to access the scripts stored within /usr/local/rancid:
netadm:x:GID:apache
CVS can also be integrated with MySQL. Without MySQL CVS stores all information in separate text files. Working with a large numbers of text files can get inefficient. MySQL can keep records of the CVS filenames and check out and commit states of files. It provides an efficient platform for querying. Create a MySQL database for ViewVC as root:
/usr/local/viewvc/bin/make-database
MySQL Hostname (leave blank for default):
MySQL Port (leave blank for default):
MySQL User: root
MySQL Password: ##MySQL root password here##
ViewVC Database Name [default: ViewVC]:

mysql -u root -p
MySQL root password here

mysql> GRANT ALL ON ViewVC.* TO viewvcuser@localhost;
mysql> set password for viewvcuser@localhost=password("viewvcpw");
mysql> FLUSH privileges;
Add the MySQL user viewvcuser to /usr/local/viewvc/viewvc.conf:
[cvsdb]
enabled = 1
host = localhost
port = 3306
database_name = ViewVC
user = viewvcuser
passwd = viewvcpw
Finally, populate the database with the necessary tables and the CVS data created earlier by rancid-cvs using an installed script:
/usr/local/viewvc/bin/cvsdbadmin rebuild /usr/local/rancid/var/CVS/CVSROOT

Using RANCID

You can now access RANCID by pointing a browser to http://ServerIP/rancid. The interface contains separate links for each group you created.
Whenever a device configuration is changed, RANCID detects the change and saves the configuration using an incremented version number. Select any device to see information on all saved versions. You can view the entire configuration, as well as compare changes from any previous versions.
Figure 1Different versions of one router's configuration stored at RANCID

Figure 2 A comparison between two versions of a router's configuration
If you want to add a new device to a group, change to user rancid and add the credentials in .cloginrc and the IP information in /usr/local/rancid/bin/groupname/router.db:
/usr/local/rancid/.cloginrc:
#NETWORK1-Switch-A
add user 10.10.10.2
add password 10.10.10.2 login-pass enable-pass

/usr/local/rancid/var/Network1/router.db
10.10.10.2:cisco:up
You can then run RANCID manually with a command like /usr/local/rancid/bin/rancid-run -r 10.10.10.2, or you can just wait for cron to run it.
You can disable polling of a device while retaining the already saved configuration versions, as you might do if you were taking down a switch but wanted to keep all the configuration information that RANCID has already saved. To do so, declare the device as down in the router.db file and RANCID will not poll it for changes:
11.11.11.11:cisco:down
To sum up, RANCID is a useful tool for managing and tracking changes to network device configurations. In network operations centers where many engineers work together, RANCID provides a platform to keep a history of changes, which can help not only for reverting back to previous states but also in network audits.

How to turn Vim into a full-fledged IDE

$
0
0
http://xmodulo.com/2014/06/turn-vim-full-fledged-ide.html

If you code a little, you know how handy an Integrated Development Environment (IE) can be. Java, C, Python, they all become a lot more accessible when the IDE software is checking the syntax for you, compiling in the background, or importing the libraries you need. On the other hand, if you are on Linux, you might also know how handy Vim can be when it comes to text editing. So naturally, you would like to get all the features of an IDE from Vim.

In fact, there are quite a few ways to do so. One could think of c.vim which attempts to transform Vim into a C oriented IDE, or Eclim which merges Vim into Eclipse. However, I would like to propose you a more generalist approach using only plugins. You do not want to bloat your editor with too many panels or features. Instead, the plugin approach lets you choose what you put into your Vim. As a bonus, the result will not be language-specific, allowing you to code in anything. So here is my top 10 list of plugins which brings IDE features to Vim.

Bonus: Pathogen

First of all, we might not all be familiar with plugins for Vim, and how to install them. This is why the first plugin that I recommend is Pathogen, as it will allow you to install other plugins more easily. That way, if you want to install another plugin for Vim not listed here, you will be able to do so easily. The official page is really well documented, so go visit it to download and install. From there installing the rest of the plugins will be easy.

1. SuperTab


The first thing we get used to in an IDE is auto-completion feature. For that, I like the plugin SuperTab which comes in quite handy, giving "super powers" to the tabulation key.

2. Syntastic


If you tend to code in more than one language, it is really easy to confuse the syntax at some point. Hopefully, syntastic will check it for you, and tell you if should put brackets or parentheses for that conditional, or remind you that you forgot a semi-colon somewhere.

3. Auto Pairs

Another thing that drives most of the coders insane: did I write this last parenthesis or not?! Everyone hates counting with your finger all the parentheses you put so far. To deal with that, I use Auto Pairs, which automatically inserts and formats parentheses and brackets.

4. NERD Commenter

Then if you are looking for a quick shortcut to comment code, regardless of the programming language, you can turn to NERD Commenter. Even if you are not a programmer, I really really recommend this plugin as it just so efficient while commenting bash scripts or anything in your system.

5. Snipmate

Any programmer knows that a good coders codes, but an excellent one reuses. For that, snipmate will easily insert code snippets into your file and greatly reduce your typing. It comes by default with a lot of snippets for various languages, but you can also easily add yours to the list.

6. NERDTree


To manage a big project, it is always a good idea to split the code into different files. Just basic good coding practices. And to keep all this files in mind, NERDTree is a nice file browser to use straight from Vim.

7. MiniBufferExplorer


To complement a file explorer, there is nothing better than a good buffer manager to have more than one file open at any time. MiniBufferExplorer does the job well and efficiently. It even sets different colors for your buffers as well as easy shortcuts to switch the focus.

8. Tag List


When you have more than one file open at any given time, it is easy to forget what you put in them. To prevent that, Tag List is a code visualizer that will display the different variables and functions written in a nice compact format.

9. undotree


For all of us who like to undo, redo, and undo again some modifications to see how the compilation evolves, undotree is a nice plugin to see your undo and redo edits in a tree. This kind of functionality is clearly not limited to code, so this is a plugin that I like a lot.

10. gdbmgr

Finally, last but not least, anyone needs a good debugger at some point. If you like gdb, then gdbmgr is for you as it integrates the famous debugger to Vim.
To conclude, whether you are an insane coder or not, it is always handy to have a few extra functions of Vim at hand at any time. Like I said in the introduction, you do not have to install all these plugins if you do not need them, or you might want to install different ones. But this is definitely a solid basis.
What plugins do you use for Vim? Or how would you complement this top 10? Please let us know in the comments.

Setup Digital Repository For Your Institution Using Dspace On Ubuntu 14.04 Server

$
0
0
http://www.unixmen.com/setup-digital-repository-institution-using-dspace-ubuntu-14-04-server

Introduction

If you’re working in an Educational institution, probably you’ve heard about Dspace which is used to setup Digital Repository System. Digital Repository is nothing but a Centralized storage place which can be used to store and distribute any digital contents to the client systems, whether it may be a video, audio, document files etc. So, the students of the Institution can be able to browse the contents or download and store them on their local drive for later reference. We can store online lectures, course materials, syllabus, Q&A documents and all kind of contents used for students in the Digital Repository. By this way, the students can access the digital contents either from his/her Laptop, Desktop, or any mobile devices via LAN or WAN.
Dspace is an open source and free application used by 1000+ educational institutions around the world. The MIT Libraries and Hewlett-Packard (HP) originally developed DSpace, but the software is now supported by DuraSpace. Using Dspace, we can setup Digital Repository for any institutions and store thousands of video lectures, books etc. As you may know, many popular Universities like IIT, IIMK, Harverd, MIT etc, has their own digital repository and have stored tons of course materials for their students. You can see the complete list of institutions that are using Dspace here.

Supported Digital contents

DSpace accepts all manner of digital formats.
  • Documents, such as articles, preprints, working papers, technical reports, conference papers
  • Books
  • Theses
  • Data sets
  • Computer programs
  • Visualizations, simulations, and other models
  • Multimedia publications
  • Administrative records
  • Published books
  • Overlay journals
  • Bibliographic datasets
  • Images
  • Audio files
  • Video files
  • e-formatted digital library collections
  • Learning objects
  • Web pages

Minimum Hardware Requirements

  • Any modern workstation or server(Preferably Quad core server).
  • 4GB or more RAM
  • 200GB or more Hdd
The storage may vary depending upon the size of the contents that you want to store.
In this brief tutorial, let me teach you how to setup our own Digital Repository using Dspace on Ubuntu 14.04 32bit server. However, the steps provided in this document are same for all Ubuntu based systems.

Scenario

As I said before, for the purpose of this tutorial, I have a test server running with Ubuntu 14.04 LTS 32bit edition. My test box details are given below.
  • OS: Ubuntu 14.04 LTS 32bit Server
  • IP Address: 192.168.1.250/24
  • Hostname: server.unixmen.local

Prerequisites

Before installing Dsapce, we have to install the following important softwares.
  1. Java (JDK)
  2. Apache Ant, Maven, Tomcat
  3. PostgreSQL
Before installing the above prerequisites, update your server.
sudo apt-get update && sudo apt-get upgrade
Run the following command to install the above prerequisites all at once.
sudo apt-get install openjdk-7-jdk ant maven tomcat7 postgresql
Now, check the packages are properly installed as shown below.
Check Java:
java -version
Sample output:
java version "1.7.0_55"
OpenJDK Runtime Environment (IcedTea 2.4.7) (7u55-2.4.7-1ubuntu1)
OpenJDK Client VM (build 24.51-b03, mixed mode, sharing)
Check Ant:
ant -version
Sample output:
Apache Ant(TM) version 1.9.3 compiled on April 8 2014
Check Postgresql:
/etc/init.d/postgresql status
Sample output:
9.3/main (port 5432): online
Check Tomcat:
sudo /etc/init.d/tomcat7 status
Sample output:
* Tomcat servlet engine is running with pid 11402
Check Maven:
mvn -version
Sample output:
Apache Maven 3.0.5
Maven home: /usr/share/maven
Java version: 1.7.0_55, vendor: Oracle Corporation
Java home: /usr/lib/jvm/java-7-openjdk-i386/jre
Default locale: en_IN, platform encoding: UTF-8
OS name: "linux", version: "3.13.0-24-generic", arch: "i386", family: "unix"
Open up the /etc/postgresql/9.3/main/pg_hba.conf file:
sudo vi /etc/postgresql/9.3/main/pg_hba.conf
Add the following line shown in red color.
[...]
local   all             postgres                                peer

# TYPE  DATABASE        USER            ADDRESS                 METHOD

# "local" is for Unix domain socket connections only
local   all             dspace                                  md5
local   all             all                                     peer
# IPv4 local connections:
host    all             all             127.0.0.1/32            md5
# IPv6 local connections:
host    all             all             ::1/128                 md5
[...]
Make sure the above line is added on the top of the local section. Save and close the file. Restart postgresql service.
sudo /etc/init.d/postgresql restart

Create Dspace user

First, create a system user (normal operating system user) called dspace.
sudo useradd -m dspace
Create database user:
Log in to postgresql:
sudo su postgres
Next, we will create a database called “dspace” and database user called “dspace” with password “dspace”. Don’t confuse database user with normal user. Both are different.
createuser -U postgres -d -A -P dspace
Enter password for new role: ## Enter password for the user dsapce
Enter it again: ## Re-enter password
Create database:
createdb -U dspace -E UNICODE dspace
Password: ## Enter dspace user password.
After creating the database and user, type “exit” from the postgresql prompt and return back to normal user.
exit

Download Dspace

Create one new directory called dspace. This is the main directory that will hold the actual dspace application files after compilation. You can choose different directory as your liking.
cd /
sudo mkdir dspace
Download the latest version from the official download link. At the time writing this document, the latest stable version is 4.1.
sudo wget http://sourceforge.net/projects/dspace/files/DSpace%20Stable/4.1/dspace-4.1-release.zip
Extract the downloaded zip file.
sudo unzip dspace-4.1-release.zip
The above command will extract the dspace source zip file in the current directory. Change the ownership to the above directories to user “dspace”.
sudo chown dspace.dspace dspace/ -R
sudo chown dspace.dspace dspace-4.1-release/ -R
Now, switch to dspace user:
sudo su dspace
Go the the dspace directory:
cd /dspace-4.1-release/
Then, Edit file build.properties,
vi build.properties
And, change the following values to fit into your organization details.
[...]
# SERVER CONFIGURATION #
##########################

# DSpace installation directory. This is the location where you want
# to install DSpace. NOTE: this value will be copied over to the
# "dspace.dir" setting in the final "dspace.cfg" file. It can be
# modified later on in your "dspace.cfg", if needed.
dspace.install.dir=/dspace

# DSpace host name - should match base URL.  Do not include port number
dspace.hostname = localhost

# DSpace base host URL.  Include port number etc.
dspace.baseUrl = http://localhost:8080
dspace.url = ${dspace.baseUrl}/jspui

# Name of the site
dspace.name = Unixmen Digital Repository

# Solr server
solr.server=http://localhost:8080/solr

# Default language for metadata values
default.language = en_US

##########################
# DATABASE CONFIGURATION #
##########################

# Database name ("oracle", or "postgres")
db.name=postgres

# Uncomment the appropriate block below for your database.
# postgres
db.driver=org.postgresql.Driver
db.url=jdbc:postgresql://localhost:5432/dspace
db.username=dspace
db.password=dspace
Save and close the file.
Now, start compiling the dspace. Make sure your server is connected to Internet. It is must to download all the necessary files during compilation.
Run the following command to start compiling from the dspace source directory (dspace-4.1-src-release):
mvn package
This command will download all necessary files from the Internet. Be patient, It will take a while depending upon the Internet speed.
After completing the build process successfully, you should see the following BUILD SUCCESS message.
dspace@server: -dspace-4.1-release_001
Then, go to the build directory,
cd /dspace-4.1-release/dspace/target/dspace-4.1-build/
and enter the following command:
ant fresh_install
Wait for few minutes to complete. After a successful installation, you should see the “BUILD SUCCESSFUL” message.
dspace@server:-dspace-4.1-src-release-dspace-target-dspace-4.1-build_004
The DSpace has been installed. To complete installation, you should do the following:
Get back as normal system user:
exit
Setup your Web servlet container (e.g. Tomcat) to look for your DSpace web applications in: /dspace/webapps/ directory.
OR, copy any web applications from /dspace/webapps/ to the appropriate place for your servlet container. For example, ‘$CATALINA_HOME/webapps’ for Tomcat.
First set the environment variables to Tomcat server.
Edit file /etc/profile,
sudo vi /etc/profile
Add the following lines at the end:
[...]
export  CATALINA_BASE=/var/lib/tomcat7
export  CATALINA_HOME=/usr/share/tomcat7
Save and close the file. Then, run the following command to take effect the environment variables settings.
source /etc/profile
Now, copy the dspace/webapps directory contents to the tomcat webapps directory.
sudo cp -r /dspace/webapps/* $CATALINA_BASE/webapps/

Create Administrator Account

Now, make an initial administrator account (an e-person) in DSpace:
sudo /dspace/bin/dspace create-administrator
Enter the email address and password to log in to dspace administrative panel.
Creating an initial administrator account
E-mail address: sk@unixmen.com
First name: Senthilkumar
Last name: Palani
WARNING: Password will appear on-screen.
Password: dspace
Again to confirm: dspace
Is the above data correct? (y or n): y
Administrator account created
Restart Tomcat service.
sudo /etc/init.d/tomcat7 restart

Access Dspace Home page

Now, You should then be able to access your DSpace home page.
XMLUI interface:
http://ip-address:8080/xmlui
Or,
JSPUI Interface:
http://ip-address:8080/jspui
DSpace Home - Mozilla Firefox_003
Congratulations! Dspace is ready now. Start using Dspace. In my next tutorial, I will show you how to upload contents to the Dspace repository. Stay tuned.
Cheers!

Contributing to OSS

$
0
0
http://thelinuxrain.com/articles/contributing-to-oss

Many individuals may want to contribute to Linux or some open-source software project. However, many people may not be sure where to start or how to help. Others may not know computer programming and feel that there is no way they can contribute. Well, guess what? There are many ways anyone can contribute to Linux directly or some open-source software (OSS).

Ways to Help:

Beta-testing:

Many computer users may not understand computer programming, have time to learn, or feel they do not know enough to perform adequately. Thankfully, these people still have many options that the open-source community will be grateful for. These people can perform beta-testing. Unofficial beta-testers are not part of the software's project team. Instead, they test the software and report bugs on the projects site (if the project allows non-members to do so). Official beta-testers are a part of the software's team and perform beta-testing according to the team's plans and policies. Many software teams are happy to have official beta-testers that they can depend on. Beta-testers (whether official or unofficial) find bugs that the developers remove. This makes the software more stable and safe for mainstream use. However, keep in mind that being a beta-tester for open-source software is voluntary work. That is, it is a hobby you perform free-of-charge.
Those of you who are video game lovers can greatly enhance Linux games by playing/testing the games and reporting bugs to the respective developers.

Ideas/Brain-storming:

Over time, developers run out of good ideas, but still want to maintain having the best state-of-the-art software. They also want to create software that users enjoy using. Usually, these software developers love to get ideas from users of their software. The best people to provide ideas would be the users themselves. With many people contributing ideas, very powerful and helpful software can be created.

Supporters:

People that promote the software and thank the developers for their contribution to the world help the programmers and beta-testers by letting them know their work is appreciated. Why would someone make software that no one uses? As long as a software team has a large following, this helps the team continue to work and perform better.

Reviewers:

Reviewer can help people see if a particular piece of software is worth using. Also, a review article on a blog or social network can help make the software known to more people. The developers can see what reviewers say about their software and make improvements accordingly. Many of you reading this probably have an account on at least one social networking website. There is where you can recommend and discuss your favorite open-source software. Alternately, you could make Youtube tutorials demonstrating how to use particular open-source software. How else can open-source software be advertised?

Writers and Proof Readers:

Do you love to write or read, maybe even both? Well, guess what? You can help a lot. Most software has a manual, help files, forums, or some online documentation like a wiki. Someone needs to write those, and then someone needs to proof-read (we hope someone proof-reads). Well, that could be you. The documentation/tutorials that you write, proof-read, and/or enhance will help hundreds, thousands, or maybe even millions of users.

Mailing-Lists and Forums:

Those that start forums or mailing-lists are providing a way for fellow users to exchange ideas and ask/answer questions. The owner of the site could make money allowing companies to post advertisements on the forum. (See, there is money to be made in open-source software.)

Monetary Donations:

Some projects need money to pay for the website providers, server maintenance, or any other type of expense. Project that need money usually have a “Donate” button or link somewhere on the main page. Most projects accept Paypal. Usually, it is the more popular OSS applications that ask for donations like GIMP.

Foster-Developers:

Some developers are unable to continue their project due to innumerable factors. These developers are usually willing to give the project to another programmer. Many open-source projects have been adopted by others to keep the project going. This adoption is usually good for the development of the software because new programmers mean a new set of ideas and skills.

Where to Help:

You may have an idea on how you want to contribute, but you may be wondering where to go. Thankfully, there are many options.
You may have an application in mind you want to help develop. Go to the software's home page or use a search engine to find the software's page. The official website may have a link to click for those who want to contribute. If there is no obvious link or page to use to become a contributor, try contacting a team member and let them know what you would like to contribute.
The wiki for most software and Linux distro can be found by typing “X wiki” in your favorite search engine where “X” is the software or distro of preference. For example, Ubuntu's wiki is https://wiki.ubuntu.com/ and Slackware is http://slackwiki.com/Main_Page.
If you are reporting a bug, figure out where the code is developed/hosted. Most open-source software is hosted on Launchpad.net, GitHub.com, or SourceForge.net. However, many other sites exist. Find the project's page and find a link/button that says something like “Report bug”, “Report bugs here”, “Bug submissions”, “Issues”, etc. A user account is required for reporting bugs on these types of sites. These site provide a self-explaining form used to report bugs. Always remember to include version numbers and error codes/messages. When reporting an error/crash, it is best to include what caused the error/crash if you know. On these reports, be as accurate and clear as possible to the best of your knowledge/abilities. Be sure to explain where or what the issue is. If it is a graphics issue, including a screenshot can be very helpful. Before reporting a bug, ensure the system is up-to-date because you and the bug manager will not want to waste time on an already fixed bug. In the report, include the version numbers of the associated software. For example, if the application is written in Java, it helps the developers to know which Java engine you are using. Often times, the bug may lie in the interpreter (Java engine in this case). It also helps to include the version and type of Linux distro and kernel in use. If you compiled the code from source, include your compiler version and the compilation parameters. Typically, the bug report will state what information to include or disregard. It is best to follow the instructions on the report itself than anything else.
To get the information about the distro, run this command in a terminal “lsb_release -rd”. The kernel's information can be retrieved by executing “uname -rv” in a terminal. If you are not sure which version of the software you own, check the Help/About tabs/windows. If you are using a Debian-based system, type “apt-cache policy X”. Where “X” is the command used to start to software.
To offer a suggestion, view the project's website and figure out how the developers prefer to receive ideas. Usually, idea suggestions are completed the same way as a bug report. The difference is you provide an idea and why the idea should be implemented. If you can and are willing, you could offer to write or add this feature yourself. On Launchpad.net, for instance, click “Report a bug” and give your idea there. Some users type “[IDEA]” in the beginning of the report's title to indicate this is an idea and not a bug. Some developers prefer to be emailed ideas. You can usually find out what they prefer on their project's page.
If you are a programmer and wish to host your own project, there are a number of sites to choose from.
Launchpad.net– Ubuntu is developed here
SourceForge.net– You can not only host Linux applications here but also Windows, Mac, Solaris, FreeBSD, . . . , etc.
GitHub.com– The Linux kernel is developed here. This is where you can help with Linux itself.
savannah.nongnu.org
bitbucket.org

Final Thoughts:

Anyone and everyone can help open-source software become the best it can be. If everyone reading this contributed one deed to open-source software, a lot can be changed. After you read this, report a bug, thank a developer, do what ever you want to do to make software better and help others. Everyone can be a catalyst for change if they want to be. If you do not contribute because you feel you gain nothing, then look at it this way – every project you help with can be mentioned in a resume. Most employers like to see volunteer work on resumes. Also, the gratification of helping many people may be rewarding.

Linux: Bash Delete All Files In Directory Except Few

$
0
0
http://www.cyberciti.biz/faq/linux-bash-delete-all-files-in-directory-except-few

I'm a new Linux system user. I need to cleanup in a download directory i.e. delete all files from ~/Downloads/ folders except the following types:
*.iso - All iso images files.
*.zip - All zip files.
How do I delete all file except some in bash shell on a Linux, OS X or Unix-like systems?

Bash shell supports rich file pattern matching such as follows:
Tutorial details
DifficultyEasy (rss)
Root privilegesNo
RequirementsBash
Estimated completion time2m
  • * - Match any files.
  • ? - Matches any single character in filenames.
  • [...] - Matches any one of the enclosed characters.

Method #1: Say hello to extended pattern matching operators

You need to use the extglob shell option using the shopt builtin command to use extended pattern matching operators such as:
  1. ?(pattern-list) - Matches zero or one occurrence of the given patterns.
  2. *(pattern-list) - Matches zero or more occurrences of the given patterns.
  3. +(pattern-list) - Matches one or more occurrences of the given patterns.
  4. @(pattern-list) - Matches one of the given patterns.
  5. !(pattern-list) - Matches anything except one of the given patterns.
A pattern-list is nothing but a list of one or more patterns (filename) separated by a |. First, turn on extglob option:
 
shopt -s extglob
 

Bash remove all files except *.zip and *.iso files

The rm command syntax is:
## Delete all file except file1 ##
rm !(file1)
 
## Delete all file except file1 and file2 ##
rm !(file1|file2)
 
## Delete all file except all zip files ##
rm !(*.zip)
 
## Delete all file except all zip and iso files ##
rm !(*.zip|*.iso)
 
## You set full path too ##
rm /Users/vivek/!(*.zip|*.iso|*.mp3)
 
## Pass options ##
rm[options] !(*.zip|*.iso)
rm -v !(*.zip|*.iso)
rm -f !(*.zip|*.iso)
rm -v -i !(*.php)
 
Finally, turn off extglob option:
 
shopt -u extglob
 

Method #2: Using bash GLOBIGNORE variable to remove all files except specific ones

From the bash(1) page:
A colon-separated list of patterns defining the set of filenames to be ignored by pathname expansion. If a filename matched by a pathname expansion pattern also matches one of the patterns in GLOBIGNORE, it is removed from the list of matches.
To delete all files except zip and iso files, set GLOBIGNORE as follows:
## only works with BASH ##
cd ~/Downloads/
GLOBIGNORE=*.zip:*.iso
rm -v *
unset GLOBIGNORE
 

Method #3: Find command to rm all files except zip and iso files

If you are using tcsh/csh/sh/ksh or any other shell, try the following find command syntax on a Unix-like system to delete files:
 
find /dir/ -type f -not -name 'PATTERN' -delete
 
OR
## deals with weird file names using xargs ##
find /dir/ -type f -not -name 'PATTERN' -print0 | xargs-0 -I {}rm{}
find /dir/ -type f -not -name 'PATTERN' -print0 | xargs-0 -I {}rm[options]{}
 
To delete all files except php files in ~/sources/ directory, type:
 
find ~/sources/ -type f -not -name '*.php' -delete
 
OR
 
find ~/sources/ -type f -not -name '*.php' -print0 | xargs-0 -I {}rm -v {}
 
The syntax to delete all files except *.zip and *.iso is as follows:
 
find . -type f -not \( -name '*zip' -or -name '*iso' \) -delete
 
For more information see bash command man page and find command man page.

Out in the Open: The Little-Known Open Source OS That Rules the Internet of Things

$
0
0
http://www.wired.com/2014/06/contiki

Image: /Wikipedia
Image: Adnk/Wikipedia
You can connect almost anything to a computer network. Light bulbs. Thermostats. Coffee makers. Even badgers. Yes, badgers.
Badgers spend a lot of time underground, which make it difficult for biologists and zoologists to track their whereabouts and activities. GPS, for example, doesn’t work well underground or in enclosed areas. But about five years ago, University of Oxford researchers Andrew Markham and Niki Trigoni solved that problem by inventing a wireless tracking system that can work underground. Their system is clever, but they didn’t do it alone. Like many other scientists, they turned to open source to avoid having to rebuild fundamental components from scratch. One building block they used is an open source operating system called Contiki.
“Contiki was a real enabler as it allowed us to do rapid prototyping and easily shift between different hardware platforms,” says Markham, now an associate professor at the University of Oxford.
Contiki isn’t nearly so well-known as Windows or OS X or even Linux, but for more than a decade, it has been the go-to operating system for hackers, academics, and companies building network-connected devices like sensors, trackers, and web-based automation systems. Developers love it because it’s lightweight, it’s free, and it’s mature. It provides a foundation for developers and entrepreneurs eager to bring us all the internet-connected gadgets the internet of things promises, without having to develop the underlying operating system those gadgets will need.
Perhaps the biggest thing Contiki has going for it is that it’s small. Really small. While Linux requires one megabyte of RAM, Contiki needs just a few kilobytes to run. Its inventor, Adam Dunkels, has managed to fit an entire operating system, including a graphical user interface, networking software, and a web browser into less than 30 kilobytes of space. That makes it much easier to run on small, low powered chips–exactly the sort of things used for connected devices–but it’s also been ported to many older systems like the Apple IIe and the Commodore 64.
Adam Dunkels. Photo: Sara Arnald
Contiki will soon face competition from the likes of Microsoft, which recently announced Windows for the Internet of Things. But while Microsoft’s new operating system will be free for devices less than 9 inches in size, it won’t be open source. And Contiki has an 11-year head start.
Contiki started in 2003, but its roots stretch to Dunkels’ days as a computer science student at Mälardalen University in Sweden. In 2000, he was working on a project to use wireless sensors to track hockey players’ vital signs and display them on a screen the crowd could see. “We convinced them to have this thing up their nose so we could measure their breathing rates,” Dunkels recalls.
To make the sensors work correctly, Dunkels had to write software would enable them to interact with a computer network. He called the resulting code LwIP, for “light weight internet protocol.” Although LwIP is still used in many microcontrollers and other products today, Dunkels decided it wasn’t quite lightweight enough. In 2003, he created microIP, which evolved into Contiki. The OS was an immediate hit with researchers and hobbyists, and has in recent years attracted commercial users including Rad-DX radiation detection devices and Zolertia noise monitoring system.
While Nest, the web connected thermostat company Google acquired for $3.2 billion in January, has come to define the Internet of Things, Dunkels notes that many companies have been using network-connected devices for years in applications including industrial and building automation. “With something like CES you see all the consumer stuff, but there are just so many different aspects of this,” Dunkel says.
But consumer technology companies are beginning to embrace Contiki as well. The LiFX“smart light bulb” is using the operating system, for example, as is the Nest competitor Tado.
To help support the burgeoning commercial usage of Contiki, Dunkels left his job as a professor at the Swedish Institute of Computer Science and founded Thingsquare, a startup focused on providing a cloud-based back-end for Contiki devices. The idea is to make it easy for developers to connect their hardware devices with smartphones and the web. Thingsquare manages the servers, and provides all the software necessary to manage a device over the web.

Five new how-to guides for mastering OpenStack

$
0
0
http://opensource.com/business/14/6/five-new-guides-mastering-openstack

Image by : 
opensource.com
submit to reddit
While the official documentation for OpenStack is a fantastic resource that's growing every day, sometimes all you're looking for is a single-purpose guide to walk you through a specific task.
In this monthly roundup of our favorite how-tos, guides, and tutorials, we look at getting OpenStack play well with firewalld and NetworkManager, using Test Kitchen with Puppet on an OpenStack deployment, and more.
  • First up, are you using Kerberos to control network authentication in your organization? Ever wondered how to integrate it with Keystone, the OpenStack identity service? Adam Young provides a guide for doing just that, by configuring Keystone to run with an LDAP backend in Apache httpd, and then connecting the two.
  • Firewalls are an important part of any system's security, but not everyone is an expert in configuring them correctly. Lars Kellogg-Stedman provides a quick set of notes on how to configure your FirewallD, as well as NetworkManager with OpenStack. 
  • Test Kitchen is a tool that allow's you to test our your configured code on a platform of your choice with a number of testing frameworks. Edmund Haselwanter has written a great article on how to use Test Kitchen with Puppet to easily conduct your tests against an OpenStack environment by using the kitchen-openstack driver.
  • There has been a lot of buzz using Linux containers—and Docker specifically—as an alternative to traditional virtual machine environments for isolating applications running on the same physical server. Docker has very low overhead, so for applications that can be packaged up in Docker containers, it might be a faster alternative than a normal VM, and possibly easier to configure, too, depending on your requirements. Maish Saidel-Keesing has written a guide, aptly titled "The quickest way to get started with Docker," which will take you through the basics and let you evaluate Docker as a potential tool for managing and deploying applications in your OpenStack environment.
  • Finally, are you managing systems in a Solaris environment and want to give OpenStack a try? Oracle has provided a simple guide to get started exploring OpenStack on top of VirtualBox with a Solaris 11.2 virtual machine template, though you'll still need a Linux live CD of your favorite distribution to get through some of the steps.
Looking for more? Check out last month's roundup, which included several excellent beginners' guides, tips on managing floating IPs, security and server hardening guides, an introduction to multi-node installation, and an overview of what is new in the most recent release of OpenStack Heat.

Linux Containers and the Future Cloud

$
0
0
http://www.linuxjournal.com/content/linux-containers-and-future-cloud

 Linux-based container infrastructure is an emerging cloud technology based on fast and lightweight process virtualization. It provides its users an environment as close as possible to a standard Linux distribution. As opposed to para-virtualization solutions (Xen) and hardware virtualization solutions (KVM), which provide virtual machines (VMs), containers do not create other instances of the operating system kernel. Due to the fact that containers are more lightweight than VMs, you can achieve higher densities with containers than with VMs on the same host (practically speaking, you can deploy more instances of containers than of VMs on the same host).
Another advantage of containers over VMs is that starting and shutting down a container is much faster than starting and shutting down a VM. All containers under a host are running under the same kernel, as opposed to virtualization solutions like Xen or KVM where each VM runs its own kernel. Sometimes the constraint of running under the same kernel in all containers under a given host can be considered a drawback. Moreover, you cannot run BSD, Solaris, OS/x or Windows in a Linux-based container, and sometimes this fact also can be considered a drawback.
The idea of process-level virtualization in itself is not new, and it already was implemented by Solaris Zones as well as BSD jails quite a few years ago. Other open-source projects implementing process-level virtualization have existed for several years. However, they required custom kernels, which was often a major setback. Full and stable support for Linux-based containers on mainstream kernels by the LXC project is relatively recent, as you will see in this article. This makes containers more attractive for the cloud infrastructure. More and more hosting and cloud services companies are adopting Linux-based container solutions. In this article, I describe some open-source Linux-based container projects and the kernel features they use, and show some usage examples. I also describe the Docker tool for creating LXC containers.
The underlying infrastructure of modern Linux-based containers consists mainly of two kernel features: namespaces and cgroups. There are six types of namespaces, which provide per-process isolation of the following operating system resources: filesystems (MNT), UTS, IPC, PID, network and user namespaces (user namespaces allow mapping of UIDs and GIDs between a user namespace and the global namespace of the host). By using network namespaces, for example, each process can have its own instance of the network stack (network interfaces, sockets, routing tables and routing rules, netfilter rules and so on).
Creating a network namespace is very simple and can be done with the following iproute command: ip netns add myns1. With the ip netns command, it also is easy to move one network interface from one network namespace to another, to monitor the creation and deletion of network namespaces, to find out to which network namespace a specified process belongs and so on. Quite similarly, when using the MNT namespace, when mounting a filesystem, other processes will not see this mount, and when working with PID namespaces, you will see by running the ps command from that PID namespace only processes that were created from that PID namespace.
The cgroups subsystem provides resource management and accounting. It lets you define easily, for example, the maximum memory that a process may use. This is done by using cgroups VFS operations. The cgroups project was started by two Google developers, Paul Menage and Rohit Seth, back in 2006, and it initially was called "process containers". Neither namespaces nor cgroups intervene in critical paths of the kernel, and thus they do not incur a high performance penalty, except for the memory cgroup, which can incur significant overhead under some workloads.

Linux-Based Containers

Basically, a container is a Linux process (or several processes) that has special features and that runs in an isolated environment, configured on the host. You might sometimes encounter terms like Virtual Environment (VE) and Virtual Private Server (VPS) for a container.
The features of this container depend on how the container is configured and on which Linux-based container is used, as Linux-based containers are implemented differently in several projects. I mention the most important ones in this article:
  • OpenVZ: the origins of the OpenVZ project are in a proprietary server virtualization solution called Virtuozzo, which originally was started by a company called SWsoft, founded in 1997. In 2005, a part of the Virtuozzo product was released as an open-source project, and it was called OpenVZ. Later, in 2008, SWsoft merged with a company called Parallels. OpenVZ is used for providing hosting and cloud services, and it is the basis of the Parallels Cloud Server. Like Virtuozzo, OpenVZ also is based on a modified Linux kernel. In addition, it has command-line tools (primarily vzctl) for management of containers, and it makes use of templates to create containers for various Linux distributions. OpenVZ also can run on some unmodified kernels, but with a reduced feature set. The OpenVZ project is intended to be fully mainlined in the future, but that could take quite a long time.
  • Google containers: in 2013, Google released the open-source version of its container stack, lmctfy (which stands for Let Me Contain That For You). Right now, it's still in the beta stage. The lmctfy project is based on using cgroups. Currently, Google containers do not use the kernel namespaces feature, which is used by other Linux-based container projects, but using this feature is on the Google container project roadmap.
  • Linux-VServer: an open-source project that was first publicly released in 2001, it provides a way to partition resources securely on a host. The host should run a modified kernel.
  • LXC: the LXC (LinuX Containers) project provides a set of userspace tools and utilities to manage Linux containers. Many LXC contributors are from the OpenVZ team. As opposed to OpenVZ, it runs on an unmodified kernel. LXC is fully written in userspace and supports bindings in other programming languages like Python, Lua and Go. It is available in most popular distributions, such as Fedora, Ubuntu, Debian and more. Red Hat Enterprise Linux 6 (RHEL 6) introduced Linux containers as a technical preview. You can run Linux containers on architectures other than x86, such as ARM (there are several how-tos on the Web for running containers on Raspberry PI, for example).
I also should mention the libvirt-lxc driver, with which you can manage containers. This is done by defining an XML configuration file and then running virsh start, virsh consoleand visrh destroy to run, access and destroy the container, respectively. Note that there is no common code between libvirt-lxc and the userspace LXC project.

LXC Container Management

First, you should verify that your host supports LXC by running lxc-checkconfig. If everything is okay, you can create a container by using one of several ready-made templates for creating containers. In lxc-0.9, there are 11 such templates, mostly for popular Linux distributions. You easily can tailor these templates according to your requirements, if needed. So, for example, you can create a Fedora container called fedoraCT with:

lxc-create -t fedora -n fedoraCT
The container will be created by default under /var/lib/lxc/fedoraCT. You can set a different path for the generated container by adding the --lxcpath PATH option.
The -t option specifies the name of the template to be used, (fedora in this case), and the -n option specifies the name of the container (fedoraCT in this case). Note that you also can create containers of other distributions on Fedora, for example of Ubuntu (you need the debootstrappackage for it). Not all combinations are guaranteed to work.
You can pass parameters to lxc-create after adding --. For example, you can create an older release of several distributions with the -R or -roption, depending on the distribution template. To create an older Fedora container on a host running Fedora 20, you can run:

lxc-create -t fedora -n fedora19 -- -R 19
You can remove the installation of an LXC container from the filesystem with:

lxc-destroy -n fedoraCT
For most templates, when a template is used for the first time, several required package files are downloaded and cached on disk under /var/cache/lxc. These files are used when creating a new container with that same template, and as a result, creating a container that uses the same template will be faster next time.
You can start the container you created with:

lxc-start -n fedoraCT
And stop it with:

lxc-stop -n fedoraCT
The signal used by lxc-stop is SIGPWR by default. In order to use SIGKILL in the earlier example, you should add -k to lxc-stop:

lxc-stop -n fedoraCT -k
You also can start a container as a dæmon by adding -d, and then log on into it with lxc-console, like this:

lxc-start -d -n fedoraCT
lxc-console -n fedoraCT
The first lxc-console that you run for a given container will connect you to tty1. If tty1 already is in use (because that's the second lxc-console that you run for that container), you will be connected to tty2 and so on. Keep in mind that the maximum number of ttys is configured by the lxc.tty entry in the container configuration file.
You can make a snapshot of a non-running container with:

lxc-snapshot -n fedoraCT
This will create a snapshot under /var/lib/lxcsnaps/fedoraCT. The first snapshot you create will be called snap0; the second one will be called snap1 and so on. You can time-restore the snapshot at a later time with the -roption—for example:

lxc-snapshot -n fedoraCT -r snap0 restoredFdoraCT
You can list the snapshots with:

lxc-snapshot -L -n fedoraCT
You can display the running containers by running:

lxc-ls --active
Managing containers also can be done via scripts, using scripting languages. For example, this short Python script starts the fedoraCT container:

#!/usr/bin/python3

import lxc

container = lxc.Container("fedoraCT")
container.start()

Container Configuration

A default config file is generated for every newly created container. This config file is created, by default, in /var/lib/lxc//config, but you can alter that using the --lxcpath PATH option. You can configure various container parameters, such as network parameters, cgroups parameters, device parameters and more. Here are some examples of popular configuration items for the container config file:
  • You can set various cgroups parameters by setting values to the lxc.cgroup.[subsystem name] entries in the config file. The subsystem name is the name of the cgroup controller. For example, configuring the maximum memory a container can use to be 256MB is done by setting lxc.cgroup.memory.limit_in_bytes to be 256MB.
  • You can configure the container hostname by setting lxc.utsname.
  • There are five types of network interfaces that you can set with the lxc.network.type parameter: empty, veth, vlan, macvlan and phys. Using veth is very common in order to be able to connect a container to the outside world. By using phys, you can move network interfaces from the host network namespace to the container network namespace.
  • There are features that can be used for hardening the security of LXC containers. You can avoid some specified system calls from being called from within a container by setting a secure computing mode, or seccomp, policy with the lxc.seccompentry in the configuration file. You also can remove capabilities from a container with the lxc.cap.drop entry. For example, setting lxc.cap.drop = sys_module will create a container without the CAP_SYS_MDOULE capability. Trying to run insmodfrom inside this container will fail. You also can define Apparmor and SELinux profiles for your container. You can find examples in the LXC README and in man 5 lxc.conf.

    Docker

    Docker is an open-source project that automates the creation and deployment of containers. Docker first was released in March 2013 with Apache License Version 2.0. It started as an internal project by a Platform-as-a-Service (PaaS) company called dotCloud at the time, and now called Docker Inc. The initial prototype was written in Python; later the whole project was rewritten in Go, a programming language that was developed first at Google. In September 2013, Red Hat announced that it will collaborate with Docker Inc. for Red Hat Enterprise Linux and for the Red Hat OpenShift platform. Docker requires Linux kernel 3.8 (or above). On RHEL systems, Docker runs on the 2.6.32 kernel, as necessary patches have been backported.
    Docker utilizes the LXC toolkit and as such is currently available only for Linux. It runs on distributions like Ubuntu 12.04, 13.04; Fedora 19 and 20; RHEL 6.5 and above; and on cloud platforms like Amazon EC2, Google Compute Engine and Rackspace.
    Docker images can be stored on a public repository and can be downloaded with the docker pull command—for example, docker pull ubuntu or docker pull busybox.
    To display the images available on your host, you can use the docker images command. You can narrow the command for a specific type of images (fedora, for example) with docker images fedora.
    On Fedora, running a Fedora docker container is simple; after installing the docker-io package, you simply start the docker dæmon with systemctl start docker, and then you can start a Fedora docker container with docker run -i -t fedora /bin/bash.
    Docker has git-like capabilities for handling containers. Changes you make in a container are lost if you destroy the container, unless you commit your changes (much like you do in git) with docker commit . These images can be uploaded to a public registry, and they are available for downloading by anyone who wants to download them. Alternatively, you can set a private Docker repository.
    Docker is able to create a snapshot using the kernel device mapper feature. In earlier versions, before Docker version 0.7, it was done using AUFS (union filesystem). Docker 0.7 adds "storage plugins", so people can switch between device mapper and AUFS (if their kernel supports it), so that Docker can run on RHEL releases that do not support AUFS.
    You can create images by running commands manually and committing the resulting container, but you also can describe them with a Dockerfile. Just like a Makefile will compile code into a binary executable, a Dockerfile will build a ready-to-run container image from simple instructions. The command to build an image from a Dockerfile is docker build. There is a tutorial about Dockerfiles and their command syntax on the Docker Web site. For example, the following short Dockerfile is for installing the iperf package for a Fedora image:

    FROM fedora
    MAINTAINER Rami Rosen
    RUN yum install -y iperf
    You can upload and store your images for free on the Docker public index. Just like with GitHub, storing public images is free and just requires you to register an account.

    The Checkpoint/Restore Feature

    The CRIU (Checkpoint/Restore in userspace) project is implemented mostly in userspace, and there are more than 100 little patches scattered in the kernel for supporting it. There were several attempts to implement Checkpoint/Restore in kernel space solely, some of them by the OpenVZ project. The kernel community rejected all of them though, as they were too complex.
    The Checkpoint/Restore feature enables saving a process state in several image files and restoring this process from the point at which it was frozen, on the same host or on a different host at a later time. This process also can be an LXC container. The image files are created using Google's protocol buffer (PB) format. The Checkpoint/Restore feature enables performing maintenance tasks, such as upgrading a kernel or hardware maintenance on that host after checkpointing its applications to persistent storage. Later on, the applications are restored on that host.
    Another feature that is very important in HPC is load balancing using live migration. The Checkpoint/Restore feature also can be used for creating incremental snapshots, which can be used after a crash occurs. As mentioned earlier, some kernel patches were needed for supporting CRIU; here are some of them:
  • A new system call named kcmp() was added; it compares two processes to determine if they share a kernel resource.
  • A socket monitoring interface called sock_diag was added to UNIX sockets in order to be able to find the peer of a UNIX domain socket. Before this change, the ss tool, which relied on parsing of /proc entries, did not show this information.
  • A TCP connection repair mode was added.
  • A procfs entry was added (/proc/PID/map_files).
Let's look at a simple example of using the criu tool. First, you should check whether your kernel supports Checkpoint/Restore, by running criu check --ms. Look for a response that says "Looks good."
Basically, checkpointing is done by:

criu dump -t
You can specify a folder where the process state files will be saved by adding -D folderName.
You can restore with criu restore .

Summary

In this article, I've described what Linux-based containers are, and I briefly explained the underlying cgroups and namespaces kernel features. I have discussed some Linux-based container projects, focusing on the promising and popular LXC project. I also looked at the LXC-based Docker engine, which provides an easy and convenient way to create and deploy LXC containers. Several hands-on examples showed how simple it is to configure, manage and deploy LXC containers with the userspace LXC tools and the Docker tools.
Due to the advantages of the LXC and the Docker open-source projects, and due to the convenient and simple tools to create, deploy and configure LXC containers, as described in this article, we presumably will see more and more cloud infrastructures that will integrate LXC containers instead of using virtual machines in the near future. However, as explained in this article, solutions like Xen or KVM have several advantages over Linux-based containers and still are needed, so they probably will not disappear from the cloud infrastructure in the next few years.

Acknowledgements

Thanks to Jérôme Petazzoni from Docker Inc. and to Michael H. Warfield for reviewing this article.

Resources

Google Containers: https://github.com/google/lmctfy
OpenVZ: http://openvz.org/Main_Page
Linux-VServer: http://linux-vserver.org
LXC: http://linuxcontainers.org
libvirt-lxc: http://libvirt.org/drvlxc.html
Docker: https://www.docker.io
Docker Public Registry: https://index.docker.io

Docker 101: What it is and why it’s important

$
0
0
http://www.networkworld.com/article/2361465/cloud-computing/docker-101-what-it-is-and-why-it-s-important.html

docker
Credit:Shutterstock

Eight burning questions, including: Will containers kill the VM?

Docker is a hot topic this week. If you’re unfamiliar with what this technology is or what it means for your business, here’s a guide.
What is it?
Docker is both an open source project and the name of a startup that focuses on Linux Containers. Containers are the idea of running multiple applications on a single host. It’s similar to compute virtualization, but instead of virtualizing a server to create multiple operating systems, containers offer a more lightweight alternative by essentially virtualizing the operating system, allowing multiple workloads to run on a single host.
Why all the hype?
Docker the company has released the 1.0 version of its product this week (read more about the 1.0 release here), and in conjunction with doing so is hosting an event named DockerCon. Docker Founder and CTO Solomon Hykes said the open source Docker project has been downloaded (for free) more than 2.75 million times and more than 460 contributors helped create this version. Docker has built up partners to support its product and service providers are jumping on board to offer Docker services.
docker vs. vms
Featured Resource
Presented by Riverbed Technology
Practical advice for you to take full advantage of the benefits of APM and keep your IT environment
Learn More
+MORE AT NETWORK WORLD: Six Docker services making serious waves +
Where did containers come from?
Containers, and specifically Linux containers, are not new. Tech giants such as Oracle, HP and IBM have been using containers for decades. In recent years, though, the open source project Docker has gained popularity as an alternative, or complement to virtualization. Recognizing a market opportunity to provide support around the open source project, a company named dotcloud was formed, but was renamed Docker. In January the company received a Series B funding round worth $15 million, led by Greylock Partners. Red Hat has committed a major investment in the company as well. (Read more about Red Hat’s work with Docker here.)

How do they work?
The open source project has two major aspects: cgroups, or Control Groups, which define the compute, memory and disk i/o that a workload needs; and namesakes, which isolate and separate each of the workloads.
Docker the commercial product has two major components as well: Docker Engine, which is the core software platform that enables users to create and use containers; and Docker Hub, a SaaS-based service for creating and sharing Docker services. With the release of the 1.0 version and Docker Hub, the company says it has more than 14,000 applications that can be used with its containers.
Are containers a VM killer?
Writes tech blogger Scott Lowe. “Containers, on the other hand, generally offer less isolation but lower overhead through sharing certain portions of the host kernel and operating system instance.” Containers are an attractive option for environments where there is only a single operating system, whereas virtual machines and hypervisors can be useful if there is a need to run multiple OSs in an environment. VMs are not going away, but containers could offer a better way to run certain applications instead of virtualization. (Read more about how containers can replace VMs here.)
What are they used for?
One of the major benefits of containers is portability. Containers can run on top of virtual machines, or bare metal servers. They can run on-premises or in the cloud. This has made one of the earliest popular use cases of containers be around software development. Coders can write applications, place it in a container, and then the application can be moved across various environments, as it is encapsulated inside the container.
How much does it cost?
Docker the open source project is free to download from GitHub. Docker the product offers privately hosted repositories of containers, which are about $1 per container. See full Docker pricing here.
Who else is involved?
With all the buzz around Docker, many tech companies are looking to get in on the action. Docker is building up its partnerships, too. The commercial version of Docker comes with support from the company, and integrations with a variety of other software platforms, including Linux distros from Red Hat, SuSE and Ubuntu, and other services like scheduling tools such as Puppet, Chef, Ansible and Jenkins.
Other service provider vendors are enabling Docker on their platforms. Rackspace CTO John Engates, for example, wrote a blog post this week saying that initially he and the cloud hosting company were not terribly impressed with Docker. But then after customers started using it and asking for Rackspace to support it, the company was “pulled” into the community, Engates says. Now, they’re converts; Engates calls containerization “next generation virtualization.”
Rackspace is using Docker to test and deploy new applications in various environments; it’s even using containers in networking, because it allows for multi-tenancy of software-based load balancers. The biggest impact though, he says, could be the way containers could usher in an era of portability of workloads across environments. “Docker could provide the abstraction that makes swapping workloads between clouds possible. They don’t have to be OpenStack clouds either. OS-level virtualization makes the application agnostic to the underlying infrastructure. Docker could enable spot markets for cloud computing and the ability for users to find a best-fit solution for their needs.”
He goes on to list some of the ways users can get involved in the Docker community if they’re interested.
Viewing all 1417 articles
Browse latest View live


Latest Images

<script src="https://jsc.adskeeper.com/r/s/rssing.com.1596347.js" async> </script>