Quantcast
Channel: Sameh Attia
Viewing all 1406 articles
Browse latest View live

Smart API integrations with Python and Zato

$
0
0
http://opensource.com/business/15/5/api-integrations-with-python-and-zato


As the number of applications and APIs connected in a cloud-driven world rises dramatically, it becomes a challenge to integrate them in an elegant way that will scale in terms of the clarity of architecture, run-time performance, complexity of processes the systems take part in, and the level of maintenance required to keep integrated environments operational.
Organizations whose applications grow organically with time tend to get entangled in a cobweb of unmanageable dependencies, unidentified requirements, and hidden flows of information that cannot be touched lest seemingly unrelated parts suddenly stop functioning. This can happen to everyone, and is actually to be expected to some extent.
It's natural to think that one can easily manage just a couple of APIs here and there.
It's natural to think that one can easily manage just a couple of APIs here and there .
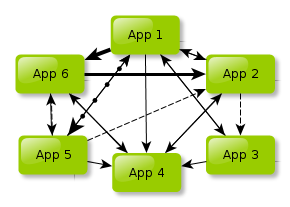
Yet, what starts out as just a few calls to one system or another has an intriguing characteristic of inevitably turning into a closely coupled network of actors whose further usage or development becomes next to impossible:
A couple of APIs turns into a closely coupled network of actors
This has become particularly evident in the today's always-connected landscape of online APIs that grow in importance on a huge scale.

Introducing IRA services

To deal with demand and introduce order one can look to software such as the Python-based Zato integration platform, released under LGPL and freely available both from GitHub as well as a set of OS-specific packages.
Zato promotes clear separation of systems and APIs being integrated and emphasizes architecting integrations out of IRA services that substitute point-to-point communication.
An IRA service is a piece of functionality running in a distributed and clustered environment with the attributes of being:
  • Interesting
  • Reusable
  • Atomic
This, in fact, is nothing else than the Unix philosophy taken onto a much higher level of composing processes out of applications and APIs rather than individual system programs.
Different settings three decades after the philosophy has been originally postulated yet the principles stay the same—be composable instead of tying everything into a monolith.
While designing software as reusable and atomic building blocks is understood, being interesting may raise an obvious question—what does it mean to be interesting?
The answer is a two-fold question again:
  • Would you truly accept to use such a service yourself each and every day for the next 10 years or more?
  • Can you fully explain the service's purpose to non-technical stakeholders, the people who ultimately sponsor the development, and have them confirm they can clearly understand what values it brings to the equation?
If the stakeholders happen to be technical people, the second question can be reworded—would you be able to explain the service's goal in a single Tweet and have half of your technically-minded followers retweet or favorite it?
Looking at it through a Unix philosophy's perspective and command line tools, this is interesting:
  • Are you OK with using the ls command? Or do you strongly feel it's a spawn of R'lyeh that needs to be replaced as soon as possible?
  • Would you have any issues with explaining what a purpose of the mkdir command is to a person who understands what directories are?
And now, what is not interesting:
  • Would you be happy if all shell commands had, say, combinations of options expressed in digits only, changed weekly and unique to each host? For instance 'ls -21' instead of 'ls -la' but 'ls -975' for 'ls -latrh'? I know, one could get used to everything, but would you truly condone it with a straight face?
  • How would you explain without any shame the very existence of such a version of ls to a newcomer to Linux?
Same goes for integrating APIs and systems—if you follow the IRA principles you'll be asking yourself the same sort of questions. Add reusability and atomicity on top of it and you've got a recipe for a nice approach to connecting otherwise disconnected participants.
Such a service can also be called a microservice.

Implementing IRA services

Now let's suppose there's an application using OpenStack Swift to store information regarding new customers and it all needs to be distributed to various parties. Here's how to approach it while taking IRA into account:
  • Have the producer store everything in Swift containers
  • Use Zato's notifications to periodically download latest sets of data
  • Have Zato distribute the information to intended recipients using given recipient's chosen protocols
All of the IRA postulates are fulfilled here:
  • Producer simply produces output and is not concerned with who really consumes it—if there are more recipients with time, nothing really changes because it's Zato that will know of it, not the producer
  • Likewise, recipients can conveniently assume the fact they are being invoked means new data is ready. If there's a new producer with time, it's all good, they will just accept the payload from Zato.
  • It's Zato that translates information between various formats or protocols such as XML, JSON, SOAP, REST, AMQP or any other
  • Hence, the service of notifying of new customers is:
    • Interesting—easy to explain
    • Re-usable—can be plugged into various producers or consumers
    • Atomic—it does one thing only and does it well
from zato.server.service import Service

class CreateCustomer(Service):
def handle(self):

# Synchronously call REST recipients as defined in Redis
for conn_name in self.kvdb.conn.smembers('new.customer'):
conn = self.outgoing.plain_http[conn_name].conn
conn.send(self.cid, self.request.raw_request)

# Async notify all pub/sub recipients
self.pubsub.publish(self.request.raw_request, '/newcust')
This is yet another example of using IRA in practice because Zato's own architecture lets one develop services that are not bothered with details of where their input comes from—most of the code above can be re-used in different contexts as well, the code itself won't change.
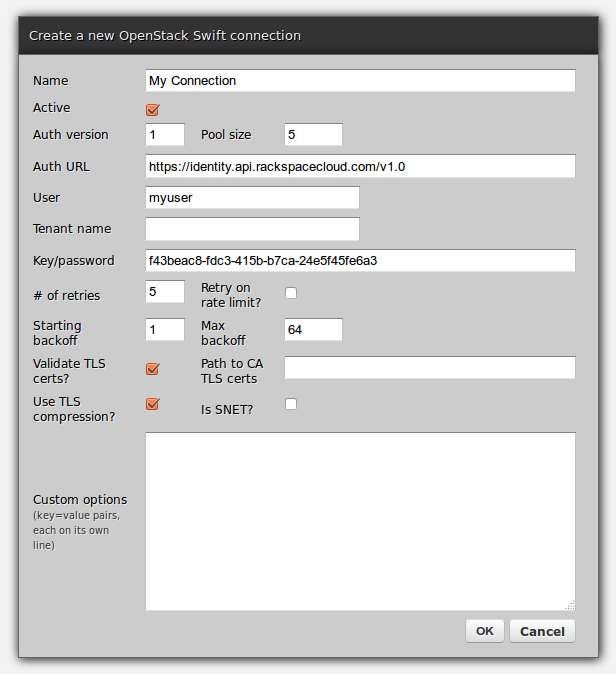
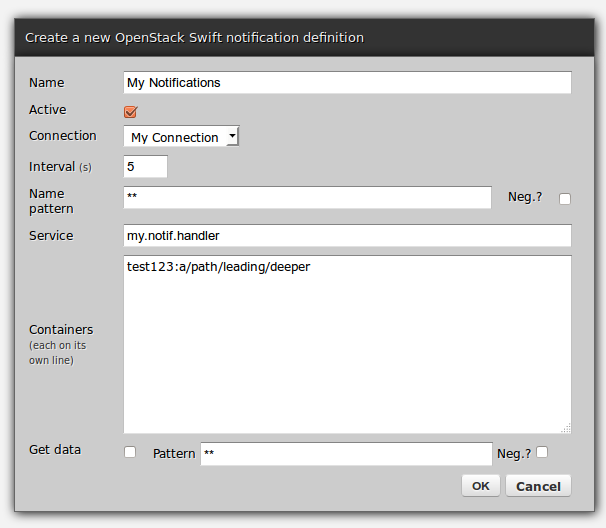
The rest is only a matter of filling out a few forms and clicking OK to propagate the changes throughout the whole Zato cluster.
The rest is a matter of filling out forms
Filling out forms
That code + a few GUI clicks alone suffices for Swift notifications be distributed among all the parties interested though on top of it there is also command line interface and the platform's own public admin API.
And here it is, an IRA service confirming to IRA principles:
  • Interesting—strikes as something that will come in handy in multiple situations
  • Reusable—can be used in many situations
  • Atomic—does its own job and excels at it
Such services can now form higher-level business processes, all of them again interesting, reusable and atomic—the approach is scalable from lowest to highest levels.
To get in touch with the Zato project, you can drop by the mailing list, IRC, Twitter or the LinkedIn group.
Everyone is strongly encouraged to share their thoughts, ideas or code on how to best integrate modern APIs in a way that guarantees flexibility and ease of use.

An Illustrated Guide to SSH Agent Forwarding

$
0
0
http://www.unixwiz.net/techtips/ssh-agent-forwarding.html

The Secure Shell is widely used to provide secure access to remote systems, and everybody who uses it is familiar with routine password access. This is the easiest to set up, is available by default, but suffers from a number of limitations. These include both security and usability issues, and we hope to cover them here.
In this paper, we'll present the various forms of authentication available to the Secure Shell user and contrast the security and usability tradeoffs of each. Then we'll add the extra functionality of agent key forwarding, we hope to make the case that using ssh public key access is a substantial win.
Note - This is not a tutorial on setup or configuration of Secure Shell, but is an overview of technology which underlies this system. We do, however, provide some pointers to information on several packages which may guide the user in the setup process.

Ordinary Password Authentication

SSH supports access with a username and password, and this is little more than an encrypted telnet. Access is, in fact, just like telnet, with the normal username/password exchange.
We'll note that this exchange, and all others in this paper, assume that an initial exchange of host keys has been completed successfully. Though an important part of session security, host validation is not material to the discussion of agent key forwarding.
All examples start from a user on homepc (perhaps a Windows workstation) connecting with PuTTY to a server running OpenSSH. The particular details (program names, mainly) vary from implementation to implementation, but the underlying protocol has been proven to be highly interoperable.
1 The user makes an initial TCP connection and sends a username. We'll note that unlike telnet, where the username is prompted as part of the connected data stream (with no semantic meaning understood by telnet itself), the username exchange is part of the ssh protocol itself. sends username
2 The ssh daemon on the server responds with a demand for a password, and access to the system has not yet been granted in any way. password prompt
3 The ssh client prompts the user for a password, which is relayed through the encrypted connection to the server where it is compared against the local user base. sends password
4 If the user's password matches the local credential, access to the system is granted and a two-way communications path is established, usually to a login shell. access granted
The main advantage of allowing password authentication is that it's simple to set up — usually the default — and is easy to understand. Systems which require access for many users from many varying locations often permit password auth simply to reduce the administrative burden and to maximize access.
Password Authentication
Pro: easy to set up
Con: allows brute-force password guessing
Con: requires password entry every time
The substantial downside is that by allowing a user to enter a password, it means anybody is allowed to enter a password. This opens the door to wholesale password guessing by users or bots alike, and this has been an increasingly common method of system compromise.
Unlike prior-generation ssh worms, which attempted just a few very common passwords with common usernames, modern badware has a very extensive dictionary of both usernames and passwords and has proven to be most effective in penetrating even systems with "good" passwords. Only one compromised account is required to gain entry to a system.
But even putting security issues aside, the other downside of password authentication is that passwords must be remembered and entered separately upon every login. For users with just one system to access, this may not be such a burden, but users connecting to many systems throughout the day may find repeated password entry tedious.
And having to remember a different password for every system is not conducive to choosing strong passwords.

Public Key Access

Note - older versions of OpenSSH stored the v2 keys in authorized_keys2 to distinguish them from v1 keys, but newer versions use either file.
To counteract the shortcomings of password authentication, ssh supports public key access. A user creates a pair of public and private keys, and installs the public key in his $HOME/.ssh/authorized_keys file on the target server. This is nonsensitive information which need not be guarded, but the other half — the private key — is protected on the local machine by a (hopefully) strong passphrase.
A public key is a long string of bits encoded in ASCII, and it's stored on one long line (though represented here on three continued lines for readability). It includes a type (ssh-rsa, or others), the key itself, and a comment:
$HOME/.ssh/authorized_keys
ssh-rsa AzAAB3NzaC1yc2EaaaabiWaaaieaX9AyNR7xWnW0eI3x2NGXrJ4gkQpK/EqpkveGCvvbM \
oH84zqu3Us8jSaQD392JZAEAhGSoe0dWMBFm9Y41VGZYmncwkfTQPFH1P07vDw49aTAa2RJNFyV \
QANZCbSocDeuT0Q7usuUj/v8h27+PqsUUl9XVQSDIhXBkWV+bJawc1c= Steve's key
This key must be installed on the target system — one time — where it is used for subsequent remote access by the holder of the private key.
1 The user makes an initial connection and sends a username along with a request to use a key. Sends username and key setup request
2 The ssh daemon on the server looks in the user's authorized_keys file, constructs a challenge based on the public key found there, and sends this challenge back to the user's ssh client. server sends key challenge
3 The ssh client receives the key challenge. It finds the user's private key on the local system, but it's protected by an encrypting passphrase. An RSA key file is named id_rsa on OpenSSH and SecureCRT, keyname.ppk on PuTTY. Other types of keys (DSA, for instance) have similar name formats. client looks up private key file
4 The user is prompted for the passphrase to unlock the private key. This example is from PuTTY. client prompts for private key passphrase
5 ssh uses the private key to construct a key response, and sends it to the waiting sshd on the other end of the connection. It does not send the private key itself! client sends key response
6 sshd validates the key response, and if valid, grants access to the system. access granted
This process involves more steps behind the scenes, but the user experience is mostly the same: you're prompted for a passphrase rather than a password. But, unlike setting up access to multiple computer systems (each of which may have a different password), using public key access means you type the same passphrase no matter which system you're connecting to.
Public Key Authentication
Pro: public keys cannot be easily brute-forced
Pro: the same private key (with passphrase) can be used to access multiple systems: no need to remember many passwords
Con: requires one-time setup of public key on target system
Con: requires unlocking private key with secret passphrase upon each connection
This has a substantial, but non-obvious, security benefit: since you're now responsible for just one secret phrase instead of many passwords, you type it more often. This makes you more likely to remember it, and therefore pick a stronger passphrase to protect the private key than you otherwise might.
Trying to remember many separate passwords for different remote systems is difficult, and does not lend itself to picking strong ones. Public key access solves this problem entirely.
We'll note that though public-key accounts can't generally be cracked remotely, the mere installation of a public key on a target system does not disable the use of passwords systemwide. Instead, the server must be explicitly configured to allow only public key encryption by the use of the PasswordAuthentication nokeywords in the sshd_config file.

Public Key Access with Agent support

Now that we've taken the leap into public key access, we'll take the next step to enable agent support. In the previous section, the user's private key was unlocked at every connection request: this is not functionally different from typing a password, and though it's the same passphrase every time (which makes it habitual), it nevertheless gets tedious in the same manner.
Fortunately, the ssh suite provides a broker known as a "key agent" which can hold and manage private keys on your workstations, and responding to requests from remote systems to verify your keys. Agents provide a tremendous productivity benefit, because once you've unlocked your private key (one time when you launch the agent), subsequent access works with the agent without prompting.
This works much like the key access seen previously, but with a twist.
1 The user makes an initial connection and sends a username along with a request to use a key. client sends username and key-setup request
2 The ssh daemon on the server looks [1] in the user's authorized_keys file, constructs a challenge based on the key, and sends it [2] back to the user's ssh client. server sends key challenge
3 The ssh client receives the key challenge, and forwards it to the waiting agent. The agent, rather than ssh itself, opens the user's private key and discovers that it's protected by a passphrase. client passes request to agent
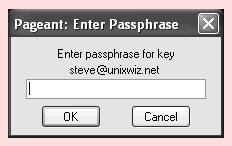
4 The user is prompted for the passphrase to unlock the private key. This example shows the prompt from PuTTY'spageant. agent prompting for passphrase
5 The agent constructs the key response and hands it back [1] to the ssh process, which sends it off [2] to the sshd waiting on the other end. Unlike the previous example, ssh never sees the private key directly, only the key response. agent sends response to client, forwards to server
6 sshd validates the key response, and if valid, grants access to the system. Note: the agent still retains the private keys in memory, though it's not participating in the ongoing conversation. access granted
As far as the user is concerned, this first exchange is little different from key access shown in the previous section: the only difference is which program prompts for the private key (ssh itself versusthe agent).
But where agent support shines is at the next connection request made while the agent is still resident. Since it remembers the private keys from the first time it was unlocked with the passphrase, it's able to respond to the key challenge immediately without prompting. The user sees an immediate, direct login without having to type anything.
Public Key with Agent
Pro: Requires unlocking of the private key only once
Pro: Facilitates scripted remote operation to multiple systems
Con: One-time cost to set up the agent
Con: Requires private key on remote client machines if they're to make further outbound connections
Many users only unlock their private keys once in the morning when they launch their ssh client and agent, and they don't have to enter it again for the rest of the day because the resident agent is handling all the key challenges. It's wonderfully convenient, as well as secure.
It's very important to understand that private keys neverleave the agent: instead, the clients ask the agent to perform a computation based on the key, and it's done in a way which allows the agent to prove that it has the private key without having to divulge the key itself. We discuss the challenge/response in a later section.
Once agent support is enabled, all prompting has now been bypassed, and one can consider performing scripted updates of remote systems. This contrived example copies a .bashrc login config file to each remote system, then checks for how much disk space is used (via the df command):
# scripted update of several remote systems

for svr in server1 server2 server3 server4
do
scp .bashrc $svr:~/ # copy up new .bashrc
ssh $svr df # ask about disk space
done
Without agent support, each server would require two prompts (first for the copy, then for the remote command execution). Withagent support, there is no prompting at all.
However, these benefits only accrue to outbound connections made from the local system to ssh servers elsewhere: once logged into a remote server, connecting from there to yet a third server requires either password access, or setting up the user's private key on the intermediate system to pass to the third.
Having agent support on the local system is certainly an improvement, but many of us working remotely often must copy files from one remote system to another. Without installing and initializing an agent on the first remote system, the scp operation will require a password or passphrase every time. In a sense, this just pushes the tedium back one link down the ssh chain.
Fortunately, there's a great solution which solves all these issues.

Public Key Access with Agent Forwarding

With our Key Agent in place, it's time to enable the final piece of our puzzle: agent forwarding. In short, this allows a chain of ssh connections to forward key challenges back to the original agent, obviating the need for passwords or private keys on any intermediate machines.
1 This all starts with an already established connection to the first server, with the agent now holding the user's private key. The second server plays no part yet. established connection to server
2 The user launches the ssh client on the first server with a request to connect to server2, and this passes the username and a use-key request to the ssh daemon (this could likewise be done with the scp secure copy command as well) user on server connects to server2
3 The ssh daemon consults the user's authorized_keys file [1], constructs a key challenge from the key, and sends it [2] back down the channel to the client which made the request. server2 issues key challenge
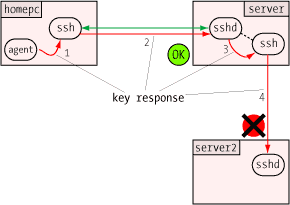
4 This is where the magic occurs: the ssh client on server receives the key challenge from the target system, and it forwards [1] that challenge to the sshd server on the same machine acting as a key agent.
sshd in turn relays [2] the key challenge down the first connection to the original ssh client. Once back on homepc, the ssh client takes the final step in the relay process by handing the key challenge off [3] to the resident agent, which knows about the user's private key.
key challenge forwarded back to original agent
5 The agent running on homepc constructs the key response and hands it [1] back to the local ssh client, which in turn passes it [2] down the channel to the sshd running on server.
Since sshd is acting as a key agent, it forwards [3] the key response off to the requesting ssh client, which sends it [4] to the waiting sshd on the target system (server2). This forwarding action is all done automatically and near instantly.
agent sends key response back down the chain
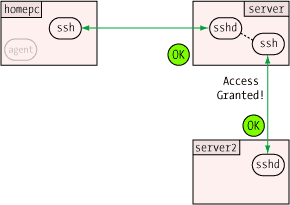
6 The ssh daemon on server2 validates the key response, and if valid, grants access to the system. access granted
This process can be repeated with even more links in the chain (say, if the user wanted to ssh from server2 to server3), and it all happens automatically. It supports the full suite of ssh-related programs, such as ssh, scp (secure copy), and sftp (secure FTP-like file transfer).
Agent Forwarding
Pro: Exceptional convenience
Con: Requires installation of public keys on all target systems
Con: Requires a Tech Tip to understand
Pro: An excellent Tech Tip is available :-)
This does require the one-time installation of the user's public — not private! — keys on all the target machines, but this setup cost is rapidly recouped by the added productivity provided. Those using public keys with agent forwarding rarely go back.

How Key Challenges Work

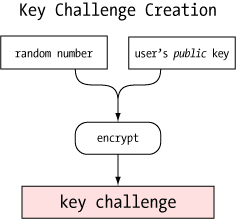
key challenge generation One of the more clever aspects of the agent is how it can verify a user's identity (or more precisely, possession of a private key) without revealing that private key to anybody. This, like so many other things in modern secure communications, uses public key encryption.
When a user wishes access to an ssh server, he presents his username to the server with a request to set up a key session. This username helps locate the list of public keys allowed access to that server: typically it's found in the $HOME/.ssh/authorized_keys file.
The server creates a "challenge" which can only be answered by one in possession of the corresponding private key: it creates and remembers a large random number, then encrypts it with the user's public key. This creates a buffer of binary data which is sent to the user requesting access. To anybody without the private key, it's just a pile of bits.

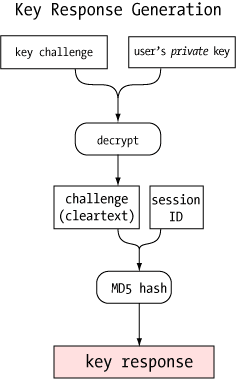
key response generation When the agent receives the challenge, it decrypts it with the private key. If this key is the "other half" of the public key on the server, the decryption will be successful, revealing the original random number generated by the server. Only the holder of the private key could ever extract this random number, so this constitutes proof that the user is the holder of the private key.
The agent takes this random number, appends the SSH session ID (which varies from connection to connection), and creates an MD5 hash value of the resultant string: this result is sent back to the server as the key response.
The server computes the same MD5 hash (random number + session ID) and compares it with the key response from the agent: if they match, the user must have been in possession of the private key, and access is granted. If not, the next key in the list (of any) is tried in succession until a valid key is found, or no more authorized keys are available. At that point, access is denied.
Curiously, the actual random number is never exposed in the client/agent exchange - it's sent encrypted tothe agent, and included in an MD5 hash from the agent. It's likely that this is a security precaution designed to make it harder to characterize the properties of the random number generator on the server by looking at the the client/agent exchange.
More information on MD5 hashes can be found in An Illustrated Guide to Cryptographic Hashes, also on this server.

Security Issues With Key Agents

Caution! One of the security benefits of agent forwarding is that the user's private key never appears on remote systems or on the wire, even in encrypted form. But the same agent protocol which shields the private key may nevertheless expose a different vulnerability: agent hijacking.

Each ssh implementation has to provide a mechanism for clients to request agent services, and on UNIX/Linux this is typically done with a UNIX domain socket stored under the /tmp/ directory. On our Linux system running OpenSSH, for instance, we find the file /tmp/ssh-CXkd6094/agent.6094 associated with the SSH daemon servicing a SecureCRT remote client.
This socket file is as heavily protected as the operating system allows (restricted to just the user running the process, kept in a protected subdirectory), but nothing can really prevent a root user from accessing any file anywhere.
If a root user is able to convince his ssh client to use another user's agent, root can impersonate that user on any remote system which authorizes the victim user's public key. Of course, root can do this on the local system as well, but he can do this directly anyway without having to resort to ssh tricks.
Several environment variables are used to point a client to an agent, but only SSH_AUTH_SOCK is required in order to use agent forwarding. Setting this variable to a victim's agent socket allows full use of that socket if the underlying file is readable. For root, it always is.
# ls -l /tmp/ssh*— look for somebody's agent socket
/tmp/ssh-CXkd6094:
total 24
srwxr-xr-x 1 steve steve 0 Aug 30 08:46 agent.6094=

# export SSH_AUTH_SOCK=/tmp/ssh-CXkd6094/agent.6094

# ssh steve@remotesystem

remote$ — Gotcha! Logged in as "steve" user on remote system!
One cannot tell just from looking at the socket information which remote systems will accept the user's key, but it doesn't take too much detective work to track it down. Running the ps command periodically on the local system may show the user running ssh remotesystem, and the netstat command may well point to the user's home base.
Furthermore, the user's $HOME/.ssh/known_hosts file contains a list of machines which the user has a connection: though they may not all be configured to trust the user's key, it's certainly a great place to start looking. Modern versions (4.0 and later) of OpenSSH can optionally hash the known_hosts file to forestall this.
There is no technical method which will prevent a root user from hijacking an SSH agent socket if he has the ability to access it, so this suggests that agent forwarding might not be such a good idea when the remote system cannot be entirely trusted. All ssh clients provide a method to disable agent forwarding.

Additional Resources

Up to this point, we've provided essentially no practical how-to information on how to install or configure any particular SSH implementation. Our feeling is that this information is covered better elsewhere, and we're happy to provide some links here to those other resources.
O'Reilly SSH book coverThe Secure Shell: The Definitive Guide, 2 Ed(O'Reilly & Associates).
This is clearly the standout book in its class: it covers Secure Shell from A to Z, including many popular implementations. There is no better comprehensive source for nearly all aspects of Secure Shell Usage. A worthy addition to any bookshelf.
PuTTY
This is a very popular Open Source ssh client for Windows, and it's notable for its economy (it will easily fit on a floppy disk). The next resource provides extensive configuration guidance.
Unixwiz.net Tech Tip: Secure Linux/UNIX access with PuTTY and OpenSSH
This is one of our own Tech Tips which is a hands on guide to configurating the excellent open source PuTTYclient for Windows. Particular coverage was given to public key generation and usage, with plenty of screenshots to guide the way.
Unixwiz.net Tech Tip: Building and configuring OpenSSH
Though this Tech Tip is mainly concerned with configuration of the server on a UNIX/Linux platform, it also provides coverage of the commercial SecureCRTWindows client from VanDyke Software (which we use ourselves). It specifically details key generation and agent forwarding settings, though briefly.
Unixwiz.net Tech Tip: An Illustrated Guide to Cryptographic Hashes
Though not central to using SSH Agent Forwarding, some coverage cryptographic hashes may help understand the key challenge and response mechanism. This Tech Tip provides a good overview of crypto hashes in a similarly-illustrated format.

Sharing Admin Privileges for Many Hosts Securely

$
0
0
http://www.linuxjournal.com/content/sharing-admin-privileges-many-hosts-securely

The problem: you have a large team of admins, with a substantial turnover rate. Maybe contractors come and go. Maybe you have tiers of access, due to restrictions based on geography, admin level or even citizenship (as with some US government contracts). You need to give these people administrative access to dozens (perhaps hundreds) of hosts, and you can't manage all their accounts on all the hosts.
This problem arose in the large-scale enterprise in which I work, and our team worked out a solution that:
  • Does not require updating accounts on more than one host whenever a team member arrives or leaves.
  • Does not require deletion or replacement of Secure Shell (SSH) keys.
  • Does not require management of individual SSH keys.
  • Does not require distributed sudoers or other privileged-access management tools (which may not be supported by some Linux-based appliances anyway).
  • And most important, does not require sharing of passwords or key passphrases.
It works between any UNIX or Linux platforms that understand SSH key trust relationships. I personally have made use of it on a half-dozen different Linux distros, as well as Solaris, HP-UX, Mac OS X and some BSD variants.
In our case, the hosts to be managed were several dozen Linux-based special-purpose appliances that did not support central account management tools or sudo. They are intended to be used (when using the shell at all) as the root account.
Our environment also (due to a government contract) requires a two-tier access scheme. US citizens on the team may access any host as root. Non-US citizens may access only a subset of the hosts. The techniques described in this article may be extended for N tiers without any real trouble, but I describe the case N == 2 in this article.

The Scenario

I am going to assume you, the reader, know how to set up an SSH trust relationship so that an account on one host can log in directly, with no password prompting, to an account on another. (Basically, you simply create a key pair and copy the public half to the remote host's ~/.ssh/authorized_keys file.) If you don't know how to do this, stop reading now and go learn. A Web search for "ssh trust setup" will yield thousands of links—or, if you're old-school, the AUTHENTICATION section of the ssh(1) man page will do. Also see ssh-copy-id(1), which can greatly simplify the distribution of key files.
Steve Friedl's Web site has an excellent Tech Tip on these basics, plus some material on SSH agent-forwarding, which is a neat trick to centralize SSH authentication for an individual user. The Tech Tip is available at http://www.unixwiz.net/techtips/ssh-agent-forwarding.html.
I describe key-caching below, as it is not very commonly used and is the heart of the technique described herein.
For illustration, I'm assigning names to players (individuals assigned to roles), the tiers of access and "dummy" accounts.
Hosts:
  • darter — the hostname of the central management host on which all the end-user and utility accounts are active, all keys are stored and caching takes place; also, the sudoers file controlling access to utility accounts is here.
  • n1, n2, ... — hostnames of target hosts for which access is to be granted for all team members ("n" for "non-special").
  • s1, s2, ... — hostnames of target hosts for which access is to be granted only to some team members ("s" for "special").
Accounts (on darter only):
  • univ — the name of the utility account holding the SSH keys that all target hosts (u1, u2, ...) will trust.
  • spec — the name of the utility account holding the SSH keys that only special, restricted-access, hosts (s1, s2, ...) will trust.
  • joe — let's say the name of the guy administering the whole scheme is "Joe" and his account is "joe". Joe is a trusted admin with "the keys to the kingdom"—he cannot be a restricted user.
  • andy, amy — these are users who are allowed to log in to all hosts.
  • alice
  • ned, nora — these are users who are allowed to log in only to "n" (non-special) hosts; they never should be allowed to log in to special hosts s1, s2, ...
  • nancy
You will want to create shared, unprivileged utility accounts on darter for use by unrestricted and restricted admins. These (per our convention) will be called "univ" and "rstr", respectively. No one should actually directly log in to univ and rstr, and in fact, these accounts should not have passwords or trusted keys of their own. All logins to the shared utility accounts should be performed with su(1) from an existing individual account on darter.

The Setup

Joe's first act is to log in to darter and "become" the univ account:

$ sudo su - univ
Then, under that shared utility account, Joe creates a .ssh directory and an SSH keypair. This key will be trusted by the root account on every target host (because it's the "univ"-ersal key):

$ mkdir .ssh # if not already present
$ ssh-keygen -t rsa -b 2048 -C "universal access
↪key gen YYYYMMDD" -f
.ssh/univ_key
Enter passphrase (empty for no passphrase):
Very important: Joe assigns a strong passphrase to this key. The passphrase to this key will not be generally shared.
(The field after -C is merely a comment; this format reflects my personal preference, but you are of course free to develop your own.)
This will generate two files in .ssh: univ_key (the private key file) and univ_key.pub (the public key file). The private key file is encrypted, protected by the very strong passphrase Joe assigned to it, above.
Joe logs out of the univ account and into rstr. He executes the same steps, but creates a keypair named rstr_key instead of univ_key. He assigns a strong passphrase to the private key file—it can be the same passphrase as assigned to univ, and in fact, that is probably preferable from the standpoint of simplicity.
Joe copies univ_key.pub and rstr_key.pub to a common location for convenience.
For every host to which access is granted for everyone (n1, n2, ...), Joe uses the target hosts' root credentials to copy both univ_key.pub and rstr_key.pub (on separate lines) to the file .ssh/authorized_keys under the root account directory.
For every host to which access is granted for only a few (s1, s2, ...), Joe uses the target hosts' root credentials to copy only rstr_key.pub (on a single line) to the file .ssh/authorized_keys under the root account directory.
So to review, now, when a user uses su to "become" the univ account, he or she can log in to any host, because univ_key.pub exists in the authorized_keys file of n1, n2, ... and s1, s2, ....
However, when a user uses su to "become" the rstr account, he or she can log in only to n1, n2, ..., because those hosts' authorized_keys files contain rstr_key.pub, but not univ_key.pub.
Of course, in order to unlock the access in both cases, the user will need the strong passphrase with which Joe created the keys. That seems to defeat the whole purpose of the scheme, but there's a trick to get around it.

The Trick

First, let's talk about key-caching. Any user who uses SSH keys whose key files are protected by a passphrase may cache those keys using a program called ssh-agent. ssh-agent does not take a key directly upon invocation. It is invoked as a standalone program without any parameters (at least, none useful to us here).
The output of ssh-agent is a couple environment variable/value pairs, plus an echo command, suitable for input to the shell. If you invoke it "straight", these variables will not become part of the environment. For this reason, ssh-agent always is invoked as a parameter of the shell built-in eval:

$ eval $(ssh-agent)
Agent pid 29013
(The output of eval also includes an echo statement to show you the PID of the agent instance you just created.)
Once you have an agent running, and your shell knows how to communicate with it (thanks to the environment variables), you may cache keys with it using the command ssh-add. If you give ssh-add a key file, it will prompt you for the passphrase. Once you provide the correct passphrase, ssh-agent will hold the unencrypted key in memory. Any invocation of SSH will check with ssh-agent before attempting authentication. If the key in memory matches the public key on the remote host, trust is established, and the login simply happens with no entry of passwords or passphrases.
(As an aside: for those of you who use the Windows terminal program PuTTY, that tool provides a key-caching program called Pageant, which performs much the same function. PuTTY's equivalent to ssh-keygen is a utility called PuTTYgen.)
All you need to do now is set it up so the univ and rstr accounts set themselves up on every login to make use of persistent instances of ssh-agent. Normally, a user manually invokes ssh-agent upon login, makes use of it during that session, then kills it, with eval $(ssh-agent -k), before exiting. Instead of manually managing it, let's write into each utility account's .bash_profile some code that does the following:
  1. First, check whether there is a current instance of ssh-agent for the current account.
  2. If not, invoke ssh-agent and capture the environment variables in a special file in /tmp. (It should be in /tmp because the contents of /tmp are cleared between system reboots, which is important for managing cached keys.)
  3. If so, find the file in /tmp that holds the environment variables and source it into the shell's environment. (Also, handle the error case where the agent is running and the /tmp file is not found by killing ssh-agent and starting from scratch.)
All of the above assumes the key already has been unlocked and cached. (I will come back to that.)
Here is what the code in .bash_profile looks like for the univ account:

/usr/bin/pgrep -u univ 'ssh-agent'>/dev/null

RESULT=$?

if [[ $RESULT -eq 0 ]] # ssh-agent is running
then
if [[ -f /tmp/.env_ssh.univ ]] # bring env in to session
then
source /tmp/.env_ssh.univ
else # error condition
echo 'WARNING: univ ssh agent running, no environment
↪file found'
echo ' ssh-agent being killed and restarted ... '
/usr/bin/pkill -u univ 'ssh-agent'>/dev/null
RESULT=1 # due to kill, execute startup code below
fi

if [[ $RESULT -ne 0 ]] # ssh-agent not running, start
↪it from scratch
then
echo "WARNING: ssh-agent being started now;
↪ask Joe to cache key"
/usr/bin/ssh-agent > /tmp/.env_ssh.univ
/bin/chmod 600 /tmp/.env_ssh.univ
source /tmp/.env_ssh.univ
fi
And of course, the code is identical for the rstr account, except s/univ/rstr/ everywhere.
Joe will have to intervene once whenever darter (the central management host on which all the user accounts and the keys reside) is restarted. Joe will have to log on and become univ and execute the command:

$ ssh-add ~/.ssh/univ_key
and then enter the passphrase. Joe then logs in to the rstr account and executes the same command against ~/.ssh/rstr_key. The command ssh-add -l lists cached keys by their fingerprints and filenames, so if there is doubt about whether a key is cached, that's how to find out. A single agent can cache multiple keys, if you have a use for that, but it doesn't come up much in my environment.
Once the keys are cached, they will stay cached. (ssh-add -t may be used to specify a timeout of N seconds, but you won't want to use that option for this shared-access scheme.) The cache must be rebuilt for each account whenever darter is rebooted, but since darter is a Linux host, that will be a rare event. Between reboots, the single instance (one per utility account) of ssh-agent simply runs and holds the key in memory. The last time I entered the passphrases of our utility account keys was more than 500 days ago—and I may go several hundred more before having to do so again.
The last step is setting up sudoers to manage access to the utility accounts. You don't really have to do this. If you like, you can set (different) passwords for univ and rstr and simply let the users hold them. Of course, shared passwords aren't a great idea to begin with. (That's one of the major points of this whole scheme!) Every time one of the users of the univ account leaves the team, you'll have to change that password and distribute the new one (hopefully securely and out-of-band) to all the remaining users.
No, managing access with sudoers is a better idea. This article isn't here to teach you all of—or any of—the ins and outs of sudoers' Extremely Bizarre Nonsensical Frustration (EBNF) syntax. I'll just give you the cheat code.
Recall that Andy, Amy, Alice and so on were all allowed to access all hosts. These users are permitted to use sudo to execute the su - univ command. Ned, Nora, Nancy and so on are permitted to access only the restricted list of hosts. They may log in only to the rstr account using the su - rstrcommand. The sudoers entries for these might look like:

User_Alias UNIV_USERS=andy,amy,alice,arthur # trusted
User_Alias RSTR_USERS=ned,nora,nancy,nyarlathotep # not so much

# Note that there is no harm in putting andy, amy, etc. into
# RSTR_USERS as well. But it also accomplishes nothing.

Cmnd_Alias BECOME_UNIV = /bin/su - univ
Cmnd_Alias BECOME_RSTR = /bin/su - rstr

UNIV_USERS ALL= BECOME_UNIV
RSTR_USERS ALL= BECOME_RSTR
Let's recap. Every host n1, n2, n3 and so on has both univ and rstr key files in authorized_keys.
Every host s1, s2, s3 and so on has only the univ key file in authorized_keys.
When darter is rebooted, Joe logs in to both the univ and rstr accounts and executes the ssh-add command with the private key file as a parameter. He enters the passphrase for these keys when prompted.
Now Andy (for example) can log in to darter, execute:

$ sudo su - univ
and authenticate with his password. He now can log in as root to any of n1, n2, ..., s1, s2, ... without further authentication. If Andy needs to check the functioning of ntp (for example) on each of 20 hosts, he can execute a loop:

$ for H in n1 n2 n3 [...] n10 s1 s2 s3 [...] s10
> do
> ssh -q root@$H 'ntpdate -q timeserver.domain.tld'
> done
and it will run without further intervention.
Similarly, nancy can log in to darter, execute:

$ sudo su - rstr
and log in to any of n1, n2 and so on, execute similar loops, and so forth.

Benefits and Risks

Suppose Nora leaves the team. You simply would edit sudoers to delete her from RSTR_USERS, then lock or delete her system account.
"But Nora was fired for misconduct! What if she kept a copy of the keypair?"
The beauty of this scheme is that access to the two key files does not matter. Having the public key file isn't important—put the public key file on the Internet if you want. It's public!
Having the encrypted copy of the private key file doesn't matter. Without the passphrase (which only Joe knows), that file may as well be the output of /dev/urandom. Nora never had access to the raw key file—only the caching agent did.
Even if Nora kept a copy of the key files, she cannot use them for access. Removing her access to darter removes her access to every target host.
And the same goes, of course, for the users in UNIV_USERS as well.
There are two caveats to this, and make sure you understand them well.
Caveat the first: it (almost) goes without saying that anyone with root access to darter obviously can just become root, then su - univ at any time. If you give someone root access to darter, you are giving that person full access to all the target hosts as well. That, after all, is the meaning of saying the target hosts "trust" darter. Furthermore, a user with root access who does not know the passphrase to the keys still can recover the raw keys from memory with a little moderately sophisticated black magic. (Linux memory architecture and clever design of the agent prevent non-privileged users from recovering their own agents' memory contents in order to extract keys.)
Caveat the second: obviously, anyone holding the passphrase can make (and keep) an unencrypted copy of the private keys. In our example, only Joe had that passphrase, but in practice, you will want two or three trusted admins to know the passphrase so they can intervene to re-cache the keys after a reboot of darter.
If anyone with root access to your central management host (darter, in this example) or anyone holding private key passphrases should leave the team, you will have to generate new keypairs and replace the contents of authorized_keys on every target host in your enterprise. (Fortunately, if you are careful, you can use the old trust relationship to create the new one.)
For that reason, you will want to entrust the passphrase only to individuals whose positions on your team are at least reasonably stable. The techniques described in this article are probably not suitable for a high-turnover environment with no stable "core" admins.
One more thing about this: you don't need to be managing tiered or any kind of shared access for this basic trick to be useful. As I noted above, the usual way of using an SSH key-caching agent is by invoking it at session start, caching your key, then killing it before ending your session. However, by including the code above in your own .bash_profile, you can create your own file in /tmp, check for it, load it if present and so on. That way, the host always has just one instance of ssh-agent running, and your key is cached in it permanently (or until the next reboot, anyway).
Even if you don't want to cache your key that persistently, you still can make use of a single ssh-agent and cache your key with the timeout (-t) option mentioned earlier; you still will be saving yourself a step.
Note that if you do this, however, anyone with root on that host will have access to any account of yours that trusts your account on that machine— so caveat actor. (I use this trick only on personal boxes that only I administer.)
The trick for personal use is becoming obsolete, as Mac OS X (via SSHKeyChain) and newer versions of GNOME (via Keyring) automatically know the first time you SSH to a host with which you have a key-based authentication set up, then ask you your passphrase and cache the key for the rest of your GUI login session. Given the lack of default timeouts and warnings about root users' access to unlocked keys, I am not sure this is an unmixed technological advance. (It is possible to configure timeouts in both utilities, but it requires that users find out about the option, and take the effort to configure it.)

Acknowledgements

I gratefully acknowledge the technical review and helpful suggestions of David Scheidt and James Richmond in the preparation of this article.

Bash: Find out the exit codes of all piped commands

$
0
0
http://www.cyberciti.biz/faq/unix-linux-bash-find-out-the-exit-codes-of-all-piped-commands

How do I get exit status of process that's piped to another (for e.g. 'netstat -tulpn | grep nginx') on a Linux or Unix-like system using a bash shell?

A shell pipe is a way to connect the output of one program to the input of another program without any temporary file. The syntax is:
Tutorial details
DifficultyEasy (rss)
Root privilegesNo
RequirementsNone
Estimated completion time2m
command1 | command2 | commandN
OR
command1 | filter_data_command > output
OR
get_data_command | verify_data_command | process_data_command | format_data_command > output.data.file

How to use pipes to connect programs

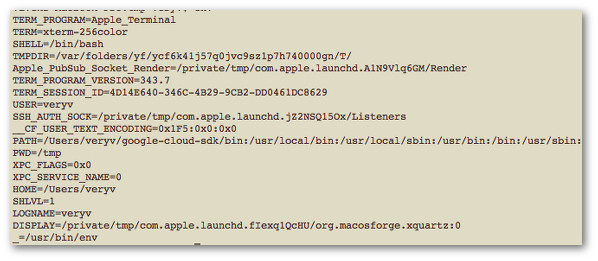
Use the vertical bar (|) between two commands. In this example, send netstat command output to grep command i.e. find out if nginx process exits or not in the system:
# netstat -tulpn | grep nginx
Sample outputs:
Fig.01: Find the exit status of pipe command

How to get exit status of process that's piped to another

The syntax is:
command1 | command2
echo"${PIPESTATUS[@]}"
OR
command1 | command2
echo"${PIPESTATUS[0]} ${PIPESTATUS[1]}"
PIPESTATUS is an array variable containing a list of exit status values from the processes in the most-recently-executed foreground pipeline. Try the following commands:
 
netstat -tulpn | grep nginx
echo"${PIPESTATUS[@]}"
 
true | true
echo"The exit status of first command ${PIPESTATUS[0]}, and the second command ${PIPESTATUS[1]}"
 
true | false
echo"The exit status of first command ${PIPESTATUS[0]}, and the second command ${PIPESTATUS[1]}"
 
false | false | true
echo"The exit status of first command ${PIPESTATUS[0]}, second command ${PIPESTATUS[1]}, and third command ${PIPESTATUS[2]}"
 
Sample outputs:
Fig.02: Use the PIPESTATUS array variable to get the exit status of each element of the pipeline
Fig.02: Use the PIPESTATUS array to get the exit status of each element of the pipeline (click to enlarge)

Putting it all together

Here is a sample script that use ${PIPESTATUS[0]} to find out the exit status of mysqldump command in order to notify user on screen about database backup status:
#!/bin/bash
### Purpose: mysql.backup.sh : Backup database ###
### Author: Vivek Gite , under GPL v2.x+ or above. ###
### Change as per your needs ###
MUSER='USERNAME-here'
MPASS='PASSWORD-here'
MHOST='10.0.3.100'
DEST="/nfs42/backups/mysql"
NOWFORMAT="%m_%d_%Y_%H_%M_%S%P"
MYSQL="/usr/bin/mysql"
MYSQLDUMP="/usr/bin/mysqldump"
MKDIR="/bin/mkdir"
RM="/bin/rm"
GZIP="/bin/gzip"
DATE="/bin/date"
SED="/bin/sed"
 
# Failsafe? Create dir #
[ ! -d "$DEST"]&& $MKDIR -p "$DEST"
 
# Filter db names
DBS="$($MYSQL -u $MUSER -h $MHOST -p$MPASS -Bse 'show databases')"
DBS="$($SED -e 's/performance_schema//' -e 's/information_schema//'<<<$DBS)"
 
# Okay, let us go
for db in$DBS
do
tTime=$(date +"${NOWFORMAT}")
FILE="$DEST/${db}.${tTime}.gz"
$MYSQLDUMP -u $MUSER -h $MHOST -p$MPASS$db | $GZIP-9> $FILE
if[ ${PIPESTATUS[0]} -ne "0"];
then
echo"The command $MYSQLDUMP failed with error code ${PIPESTATUS[0]}."
exit1
else
echo"Database $db dump successfully."
fi
done
 

A note about zsh user

Use the array called pipestatus as follows:
 
true | true
echo"${pipestatus[1]} ${pipestatus[2]}"
 
Outputs:
0 0

How to run DOS applications in Linux

$
0
0
https://www.howtoforge.com/tutorial/run-dos-application-in-linux

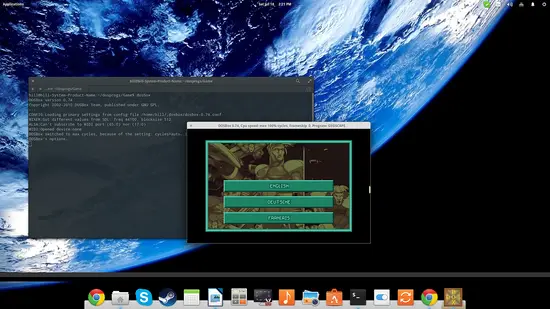
Chances are that most of you reading along those lines have started your “adventure” in computers through DOS. Although this long deprecated operating system is only running in our memories anymore, it will always hold a special place in our hearts. That said, some of you may still want to drink a sip of nostalgia or show your kids what old days were like by running some MS-DOS applications on your Linux distribution. The good news is, you can do it without much effort!
For this tutorial, I will be using a DOS game I was playing when I was a little kid called “UFO Enemy Unknown”. This was the first ever squad turn-based strategy game released by Microprose a bit over twenty years ago. A remake of the game was realized by Firaxis in 2012, clearly highlighting the success of the original title.

Wine

Since DOS executables are .exe files, it would be natural to think that you could run them with wine, but unfortunately you can't. The reason is stated as “DOS memory range unavailability”.
What this means is that the Linux kernel forbids any programs (including wine) from executing 16-bit applications and thus accessing the first 64k of kernel memory. It's a security feature and it won't change, so the terminal prompt to use DOSBox can be the first alternative option.

DOSBox

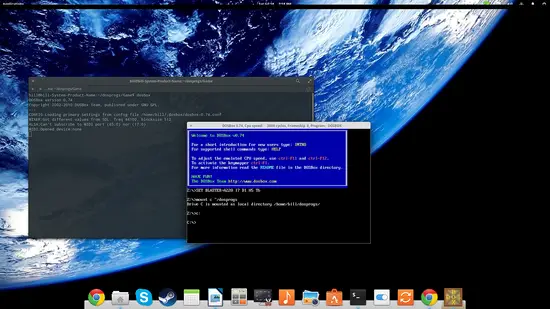
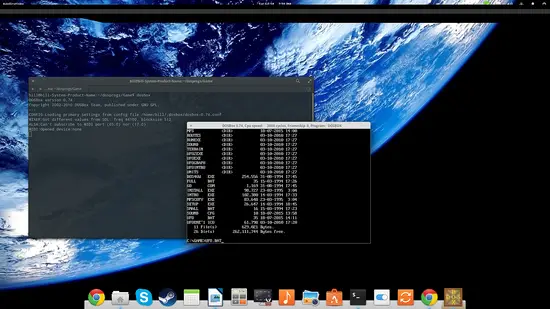
Install DOSBox from your Software Center and then open your file manager and make sure that you create a folder named “dosprogs” located in your home directory. Copy the game files inside this folder and then open dosbox by typing “dosbox” in a terminal. Now what we need to do is to mount the “dosprogs” folder into dosbox. To do this type mount c ~/dosprogs and press enter on the DOSBox console. Then type c: to enter the newly mounted disk as shown in the following screenshot.
You may then navigate the disk folders by using the “cd” command combined with the “dir” until you locate the game executable. For example, type “cd GAME” to enter the GAME folder and then type “dir” and press enter to see what the folder GAME contains. If the file list is too long to see in a screen, you may also give the “dir /w/p” command a try. In my case, the executable is UFO.bat and so I can run it by typing its name (with the extension) and pressing enter.

DOSemu

Another application that allows you to run DOS executables under Linux is DOS Emulator (also available in the Software Center). It is more straight forward in regards to the mounted partitions as you simply type “D:” and enter on the console interface to access your home directory. From there you can navigate to the folder that contains the DOS executable and run it in the same way we did in DOSBox. The thing is though that while DOSemu is simpler to use, it may not run flawlessly as I found through my testing. You can always give it a try though and see how it goes.

How to enable logging in Open vSwitch for debugging and troubleshooting

$
0
0
http://ask.xmodulo.com/enable-logging-open-vswitch.html

Question: I am trying to troubleshoot my Open vSwitch deployment. For that I would like to inspect its debug messages generated by its built-in logging mechanism. How can I enable logging in Open vSwitch, and change its logging level (e.g., to INFO/DEBUG level) to check more detailed debug information? Open vSwitch (OVS) is the most popular open-source implementation of virtual switch on the Linux platform. As the today's data centers increasingly rely on the software-defined network (SDN) architecture, OVS is fastly adopted as the de-facto standard network element in data center's SDN deployments.
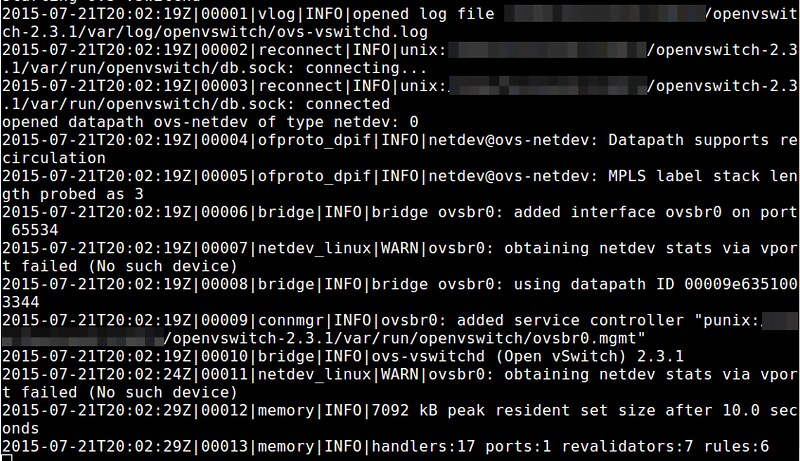
Open vSwitch has a built-in logging mechanism called VLOG. The VLOG facility allows one to enable and customize logging within various components of the switch. The logging information generated by VLOG can be sent to a combination of console, syslog and a separate log file for inspection. You can configure OVS logging dynamically at run-time with a command-line tool called ovs-appctl.

Here is how to enable logging and customize logging levels in Open vSwitch with ovs-appctl.
The syntax of ovs-appctl to customize VLOG is as follows.
$ sudo ovs-appctl vlog/set module[:facility[:level]]
  • Module: name of any valid component in OVS (e.g., netdev, ofproto, dpif, vswitchd, and many others)
  • Facility: destination of logging information (must be: console, syslog or file)
  • Level: verbosity of logging (must be: emer, err, warn, info, or dbg)
In OVS source code, module name is defined in each source file in the form of:
1
VLOG_DEFINE_THIS_MODULE();
For example, in lib/netdev.c, you will see:
1
VLOG_DEFINE_THIS_MODULE(netdev);
which indicates that lib/netdev.c is part of netdev module. Any logging messages generated in lib/netdev.c will belong to netdev module.
Depending on severity, several different kinds of logging messages are used in OVS source code: VLOG_INFO() for informational, VLOG_WARN() for warning, VLOG_ERR() for error, VLOG_DBG() for debugging, VLOG_EMERG for emergency. Logging level and facility determine which logging messages are sent to where.
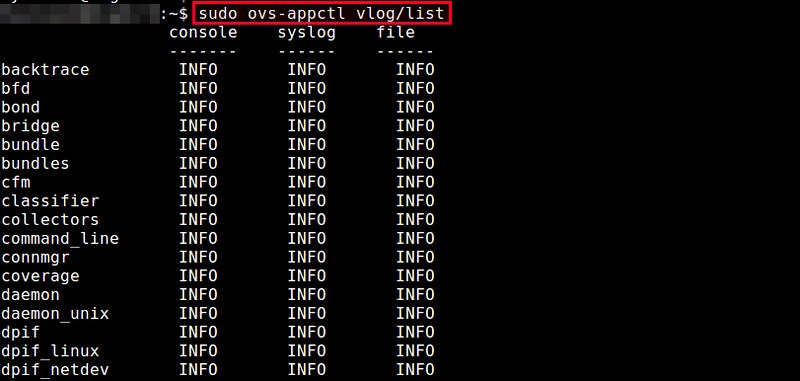
To see a full list of available modules, facilities, and their respective logging levels, run the following commands. This command must be invoked after you have started OVS.
$ sudo ovs-appctl vlog/list

The output shows the debug levels of each module for three different facilities (console, syslog, file). By default, all modules have their logging level set to INFO.
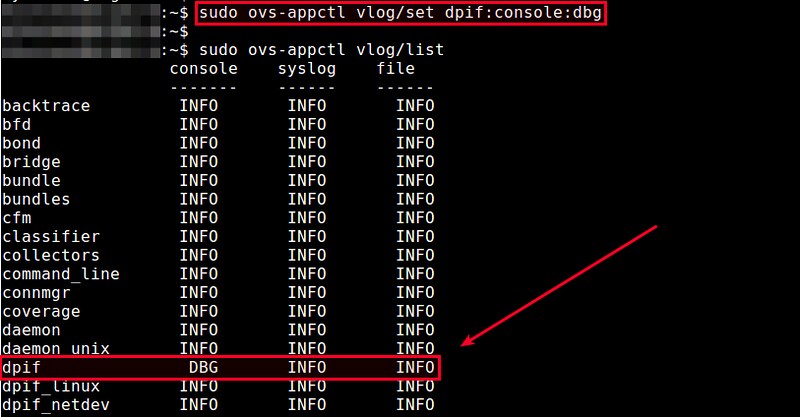
Given any one OVS module, you can selectively change the debug level of any particular facility. For example, if you want to see more detailed debug messages of dpif module at the console screen, run the following command.
$ sudo ovs-appctl vlog/set dpif:console:dbg
You will see that dpif module's console facility has changed its logging level to DBG. The logging level of two other facilities, syslog and file, remains unchanged.

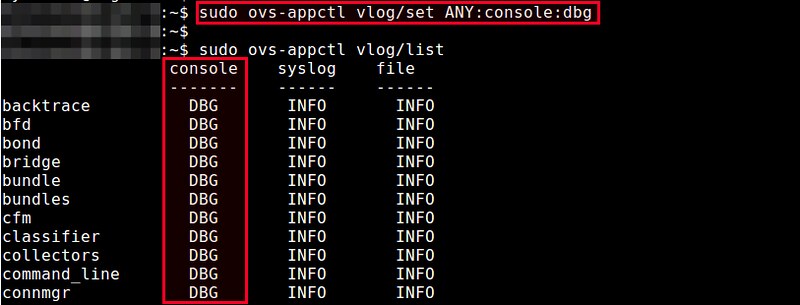
If you want to change the logging level for all modules, you can specify "ANY" as the module name. For example, the following command will change the console logging level of every module to DBG.
$ sudo ovs-appctl vlog/set ANY:console:dbg

Also, if you want to change the logging level of all three facilities at once, you can specify "ANY" as the facility name. For example, the following command will change the logging level of all facilities for every module to DBG.
$ sudo ovs-appctl vlog/set ANY:ANY:dbg

How to Handle Files with Scilab on Ubuntu 15.04

$
0
0
https://www.howtoforge.com/tutorial/scilab-file-handling

Scilab is an OpenSource Linux software for numerical computation similar to Matlab. This tutorial shows how to load data from files into Scilab for later use or processing. Scilab will interpret the code in the file and it's structure and format, etc. To use a file within the Scilab environment, it is necessary to use a number of previous commands that allow both reading and interpretation of the file in question.
You haven't installed scilab yet? Please see our Scilab installation tutorial.

Opening Files with the mopen command

This command opens a file in Scilab. The sequence is:
[fd, err] = mopen(file [, mode, swap ])
The meaning for each argument is:
File: A character string containing the path of the file to open.
Mode: A character string specifying the access mode requested for the file

Swap: A scalar swap is present and swap = 0 then automatic bytes swap is disabled. The default value is 1.

Err:  Returns a value that indicates the following errors:
Error ValueError Message
0No error
-1No more logical Units
-2Cannot open file
-3No more memory
-4Invalid value
-5Invalid Status

Fd: a positive integer, indicates a file descriptor.

Example Opening Files in Ubuntu Using Scilab

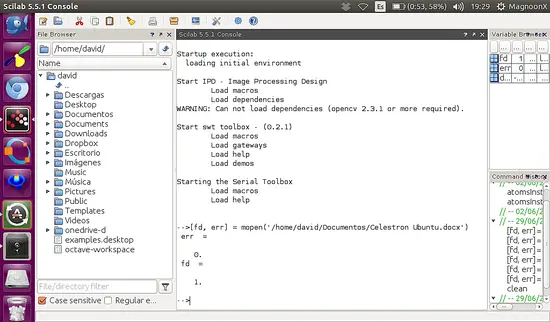
Now, we are going to open a MS Word Document using de mopen command
[fd, err] = mopen('/home/david/Documentos/Celestron Ubuntu.docx')
Please note that we didn´t use any additional argument, only for opening purpose.


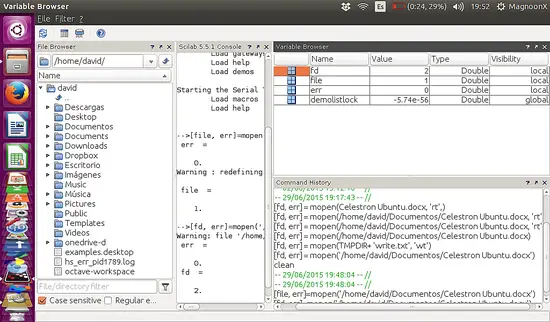
Note:  In the Variable Browser we can find all the variable created including fd.


Parameters in mode Argument

The parameters are used to control access to the stream. The possible values are:

r: Opens the file for reading purposes.

rb: Opens the binary file for reading.

rt: Opens a text file for reading.

w: Creates a new file for writing. Also truncates the actual file to zero length.

wb:  Creates a new binary file for writing. Also truncates the actual file to zero length.

wt:  Creates a new text binary file for writing. Also truncates the actual file to zero length.

a or ab:  Appends writing to opened file to the end.

r+ or r+b: Opens a file for update.

w+ or w+b:  Truncates to zero length or creates a new file for update.

a+ or a+b: Appends.

Example Opening Files with parameters in Ubuntu Using Scilab


In this example, we are going to create a text file and write a line on it.

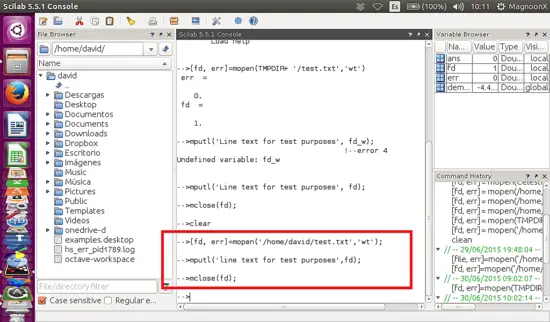
Type:
[fd, err] = mopen('/home/your name/test.txt', 'wt' );
mputl('Line text for test purposes', fd);


Note that if we have finished working with the file that we created, we have to close it using the mclose command. Later in this tutorial we try mclose command syntax.
mclose (fd);

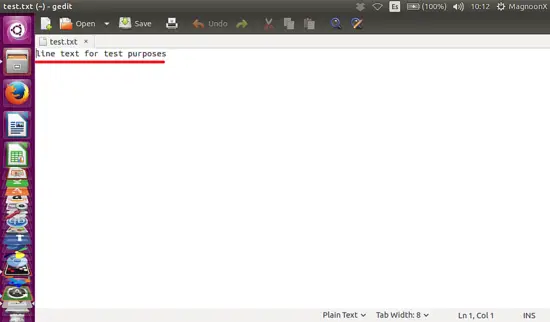
Then we can search for the file in the directory:


Open the file:


This is useful if we are going to retrieve data from an external source, just like a data acquisition interface. We can load data from a txt file and then use this for processing.

Closing Files. mclose command.

Mclose must be used to close a file opened by mopen. If fd is omitted mclose closes the last opend file. mclose('all') closes all files opened by file('open',..) or mopen. Be careful with this use of mclose because when it is used inside a Scilab script file, it also closes the script and Scilab will not execute commands written after mclose('all').

Reading and using a text file content.

Sometimes we need to read and use the content of a txt file, either for reasons of data acquisition or for word processing. For reading purposes, we will use the command mgetl.

The Command mgetl

The command mgetl reads a line or lines from a txt file.

Syntax

txt=mgetl(file_desc [,m])

Arguments


file_desc: A character string giving the file name or a logical unit returned by mopen.

m: An integer scalar. The number of lines to read. The default value is -1.

txt: A column vector of string.

Examples using mgetl

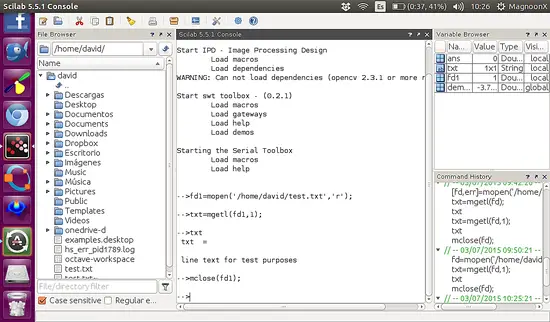
With the file created before we can type:
>fd=mopen(/home/david/test.txt', 'r')
>txt=mgetl(fd,1);
>txt
>mclose(fd);

Note: We used the argument 'r' because we only need to read the file. A file cannot be opened for reading and writing at the same time. We set the argument 1 in mgetl for reading the first line only and don´t forget to close the file with mclose. The content of the first line is stored in a 'txt' string type variable.


There are many advanced commands that will be treated in further tutorials.

References

  1. Scilab Help Online, "https://help.scilab.org/". Retrieved at 06/30/2015.

How To Run Cronjob Script On The Last Day Of a Month

$
0
0
http://www.cyberciti.biz/faq/unix-linux-bash-run-cronjob-script-on-the-last-day-of-a-month

How to execute script on the last day of a month on Linux or Unix bash shell? How do I run a disk usage or custom reporting shell/perl/python script on the last day of a month on a Linux or Unix-like systems?

You need to use the date command to find out whether tomorrow is the first day of the next month. If it is true, you can run your script.

Say hello to TZ variable

Tutorial details
DifficultyEasy (rss)
Root privilegesNo
RequirementsBash/KSH/ZSH
Estimated completion time5m

TZ is time zone environment variable on Linux or Unix-like systems. The TZ environment variable tells functions such as the ctime(3) family and programs like date what the time zone and daylight saving rule is. For example, Greenwich Mean Time can be defined as follows:TZ='GMT'
You can set TZ as follows to get tomorrow from the current date (+%d):
TZ=GMT-24 date +%d

How do I find out tomorrow date?

The syntax is as follows:
# CDT
TZ=CDT-24date +%d
 
#PST
TZ=PST-24date +%d
 
#EDT
TZ=PST-24date +%d
 
 
#IST
TZ=IST-24date +%d
 

Example: Shell script

#!/bin/bash
# Purpose: Tell if it is last day of a month
# Author: Vivek Gite under GPL v2.x+
# ---------------------------------
 
# Find tomorrow day in IST time zone
day=$(TZ=IST-24date +%d)
 
# Compare it
# If both are 1 means today is the last day of a month
iftest$day -eq 1; then
echo"Last Day of a Month"
else
echo"Noop"
fi
 
Run it as follows:
$ date
$ ./script

Sample outputs:
Fri Jul 31 12:35:16 IST 2015
Last Day of a Month
Try one more time:
$ date
$ ./script

Tue Aug  4 01:04:48 IST 2015
Noop

Create a wrapper script

Let us say you want to find out disk usage on the last day of a month. You've a script called /root/scripts/disk-usage.sh. Modify above script as follows:
#!/bin/bash
# Script: /root/scripts/is-end-of-month.sh
# Purpose: Tell if it is last day of a month
# Author: Vivek Gite under GPL v2.x+
# ---------------------------------
 
# Find tomorrow day in IST time zone
day=$(TZ=IST-24date +%d)
 
# Compare it
# If both are 1 means today is the last day of a month
iftest$day -eq 1; then
# Call disk usage script
/root/scripts/disk-usage.sh
fi
 

Create a cron job

You can install your cronjob by running the following command:
# crontab -e
Append the following code to run a script called /root/scripts/is-end-of-month.sh once a day:
@daily        /root/scripts/disk-usage.sh
OR
0 0 * * *      /root/scripts/disk-usage.sh
Save and close the file.

How to set up a system status page of your infrastructure

$
0
0
http://xmodulo.com/setup-system-status-page.html

If you are a system administrator who is responsible for critical IT infrastructure or services of your organization, you will understand the importance of effective communication in your day-to-day tasks. Suppose your production storage server is on fire. You want your entire team on the same page in order to resolve the issue as fast as you can. While you are at it, you don't want half of all users contacting you asking why they cannot access their documents. When a scheduled maintenance is coming up, you want to notify interested parties of the event ahead of the schedule, so that unnecessary support tickets can be avoided.
All these require some sort of streamlined communication channel between you, your team and people you serve. One way to achieve that is to maintain a centralized system status page, where the detail of downtime incidents, progress updates and maintenance schedules are reported and chronicled. That way, you can minimize unnecessary distractions during downtime, and also have any interested party informed and opt-in for any status update.
One good open-source, self-hosted system status page solution is Cachet. In this tutorial, I am going to describe how to set up a self-hosted system status page using Cachet.

Cachet Features

Before going into the detail of setting up Cachet, let me briefly introduce its main features.
  • Full JSON API: The Cachet API allows you to connect any external program or script (e.g., uptime script) to Cachet to report incidents or update status automatically.
  • Authentication: Cachet supports Basic Auth and API token in JSON API, so that only authorized personnel can update the status page.
  • Metrics system: This is useful to visualize custom data over time (e.g., server load or response time).
  • Notification: Optionally you can send notification emails about reported incidents to anyone who signed up to the status page.
  • Multiple languages: The status page can be translated into 11 different languages.
  • Two factor authentication: This allows you to lock your Cachet admin account with Google's two-factor authentication.
  • Cross database support: You can choose between MySQL, SQLite, Redis, APC, and PostgreSQL for a backend storage.
In the rest of the tutorial, I explain how to install and configure Cachet on Linux.

Step One: Download and Install Cachet

Cachet requires a web server and a backend database to operate. In this tutorial, I am going to use the LAMP stack. Here are distro-specific instructions to install Cachet and LAMP stack.

Debian, Ubuntu or Linux Mint

$ sudo apt-get install curl git apache2 mysql-server mysql-client php5 php5-mysql
$ sudo git clone https://github.com/cachethq/Cachet.git /var/www/cachet
$ cd /var/www/cachet
$ sudo git checkout v1.1.1
$ sudo chown -R www-data:www-data .
For more detail on setting up LAMP stack on Debian-based systems, refer to this tutorial.

Fedora, CentOS or RHEL

On Red Hat based systems, you first need to enable REMI repository (to meet PHP version requirement). Then proceed as follows.
$ sudo yum install curl git httpd mariadb-server
$ sudo yum --enablerepo=remi-php56 install php php-mysql php-mbstring
$ sudo git clone https://github.com/cachethq/Cachet.git /var/www/cachet
$ cd /var/www/cachet
$ sudo git checkout v1.1.1
$ sudo chown -R apache:apache .
$ sudo firewall-cmd --permanent --zone=public --add-service=http
$ sudo firewall-cmd --reload
$ sudo systemctl enable httpd.service; sudo systemctl start httpd.service
$ sudo systemctl enable mariadb.service; sudo systemctl start mariadb.service
For more details on setting up LAMP on Red Hat-based systems, refer to this tutorial.

Configure a Backend Database for Cachet

The next step is to configure database backend.
Log in to MySQL/MariaDB server, and create an empty database called 'cachet'.
$ sudo mysql -uroot -p
mysql> create database cachet;
mysql> quit
Now create a Cachet configuration file by using a sample configuration file.
$ cd /var/www/cachet
$ sudo mv .env.example .env
In .env file, fill in database information (i.e., DB_*) according to your setup. Leave other fields unchanged for now.
1
2
3
4
5
6
7
8
9
10
11
12
13
14
15
16
17
18
19
20
21
22
23
24
25
26
APP_ENV=production
APP_DEBUG=false
APP_URL=http://localhost
APP_KEY=SomeRandomString
 
DB_DRIVER=mysql
DB_HOST=localhost
DB_DATABASE=cachet
DB_USERNAME=root
DB_PASSWORD=
 
CACHE_DRIVER=apc
SESSION_DRIVER=apc
QUEUE_DRIVER=database
 
MAIL_DRIVER=smtp
MAIL_HOST=mailtrap.io
MAIL_PORT=2525
MAIL_USERNAME=null
MAIL_PASSWORD=null
MAIL_ADDRESS=null
MAIL_NAME=null
 
REDIS_HOST=null
REDIS_DATABASE=null
REDIS_PORT=null

Step Three: Install PHP Dependencies and Perform DB Migration

Next, we are going to install necessary PHP dependencies. For that we will use composer. If you do not have composer installed on your system, install it first:
$ curl -sS https://getcomposer.org/installer | sudo php -- --install-dir=/usr/local/bin --filename=composer
Now go ahead and install PHP dependencies using composer.
$ cd /var/www/cachet
$ sudo composer install --no-dev -o
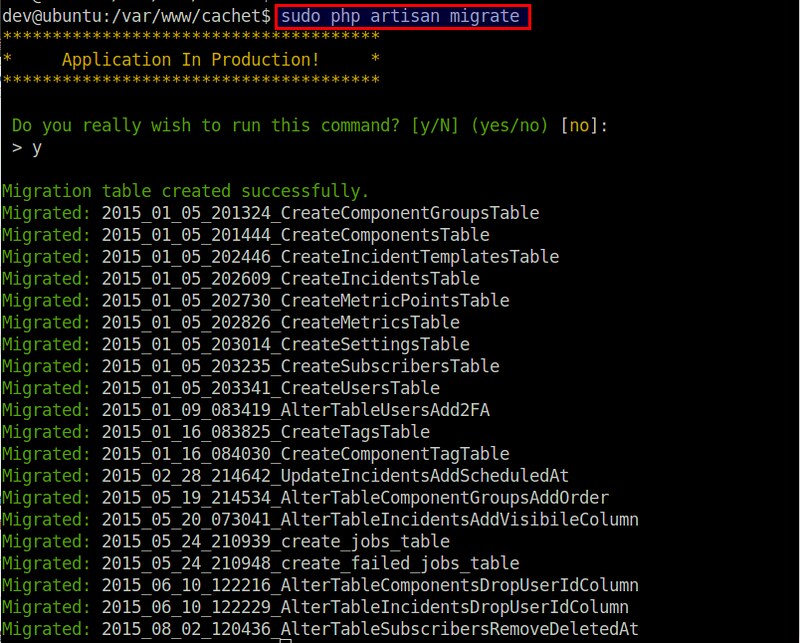
Next, perform one-time database migration. This step will populate the empty database we created earlier with necessary tables.
$ sudo php artisan migrate
Assuming the database config in /var/www/cachet/.env is correct, database migration should be completed successfully as shown below.

Next, create a security key, which will be used to encrypt the data entered in Cachet.
$ sudo php artisan key:generate
$ sudo php artisan config:cache

The generated app key will be automatically added to the APP_KEY variable of your .env file. No need to edit .env on your own here.

Step Four: Configure Apache HTTP Server

Now it's time to configure the web server that Cachet will be running on. As we are using Apache HTTP server, create a new virtual host for Cachet as follows.

Debian, Ubuntu or Linux Mint

$ sudo vi /etc/apache2/sites-available/cachet.conf
1
2
3
4
5
6
7
8
9
10
11
12
    ServerName cachethost
    ServerAlias cachethost
    DocumentRoot "/var/www/cachet/public"
    "/var/www/cachet/public">
        Require all granted
        Options Indexes FollowSymLinks
        AllowOverride All
        Order allow,deny
        Allow from all
    </Directory>
</VirtualHost>
Enable the new Virtual Host and mod_rewrite with:
$ sudo a2ensite cachet.conf
$ sudo a2enmod rewrite
$ sudo service apache2 restart

Fedora, CentOS or RHEL

On Red Hat based systems, create a virtual host file as follows.
$ sudo vi /etc/httpd/conf.d/cachet.conf
1
2
3
4
5
6
7
8
9
10
11
12
    ServerName cachethost
    ServerAlias cachethost
    DocumentRoot "/var/www/cachet/public"
    "/var/www/cachet/public">
        Require all granted
        Options Indexes FollowSymLinks
        AllowOverride All
        Order allow,deny
        Allow from all
    </Directory>
</VirtualHost>
Now reload Apache configuration:
$ sudo systemctl reload httpd.service

Step Five: Configure /etc/hosts for Testing Cachet

At this point, the initial Cachet status page should be up and running, and now it's time to test.
Since Cachet is configured as a virtual host of Apache HTTP server, we need to tweak /etc/hosts of your client computer to be able to access it. Here the client computer is the one from which you will be accessing the Cachet page.
Open /etc/hosts, and add the following entry.
$ sudo vi /etc/hosts
    cachethost
In the above, the name "cachethost" must match with ServerName specified in the Apache virtual host file for Cachet.

Test Cachet Status Page

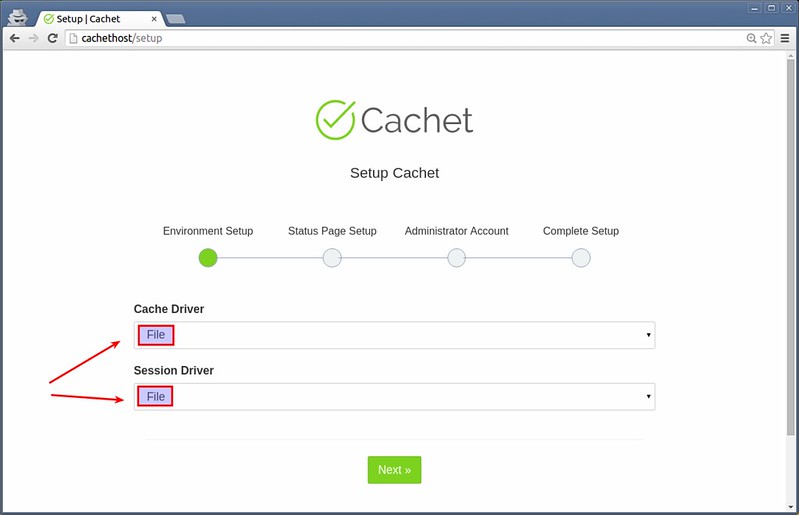
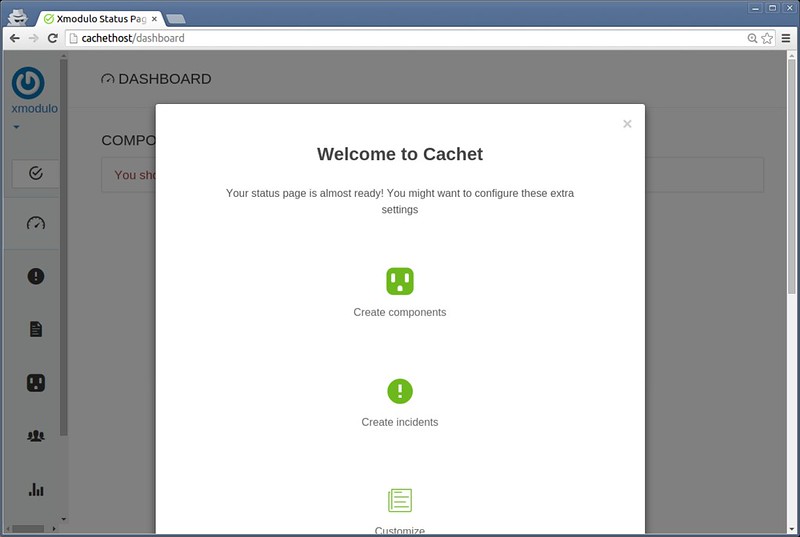
Now you are ready to access Cachet status page. Type http://cachethost in your browser address bar. You will be redirected to the initial Cachet setup page as follows.

Choose cache/session driver. Here let's choose "File" for both cache and session drivers.
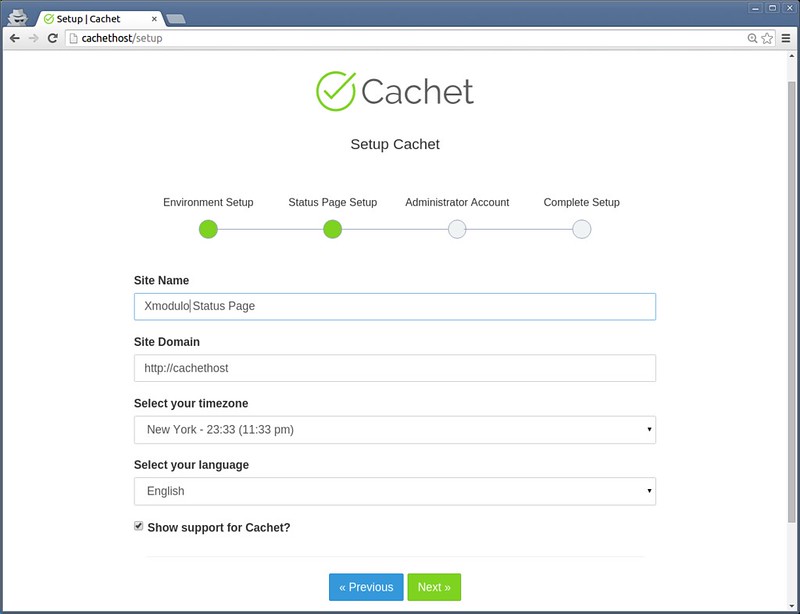
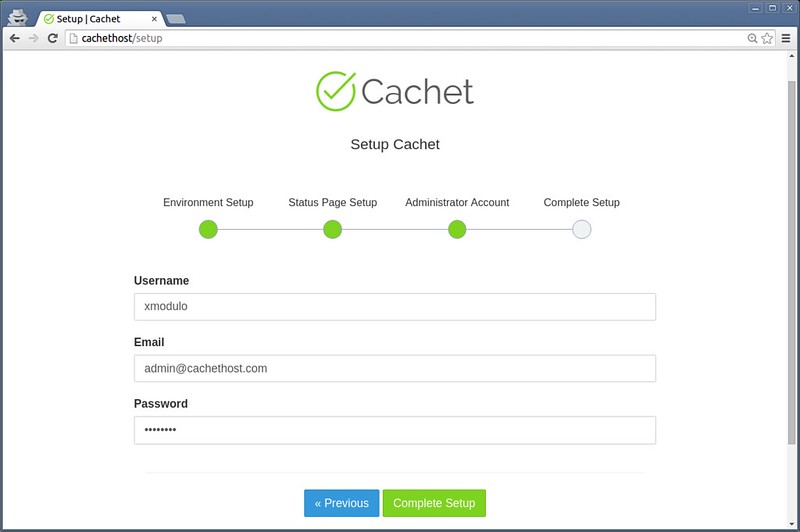
Next, type basic information about the status page (e.g., site name, domain, timezone and language), as well as administrator account.


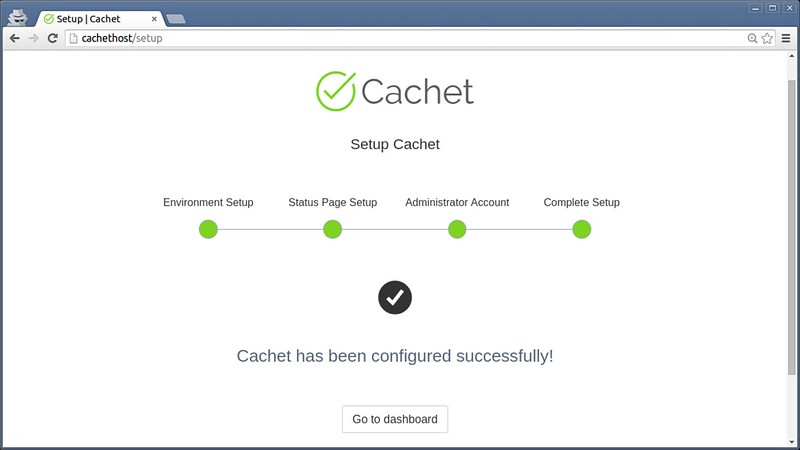
Your initial status page will finally be ready.

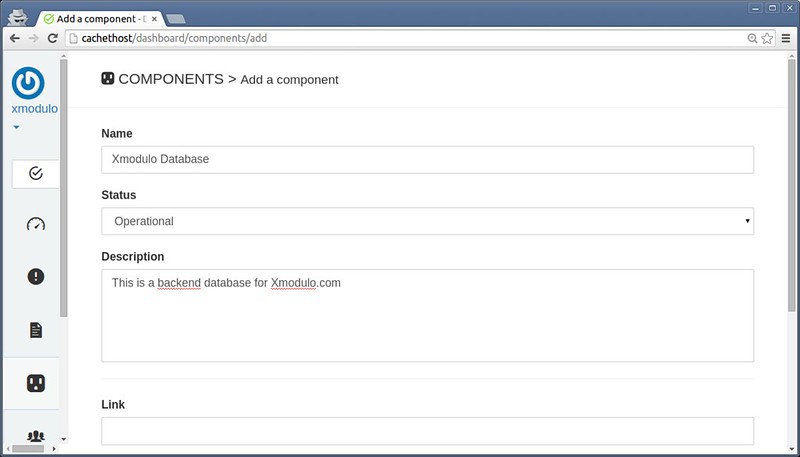
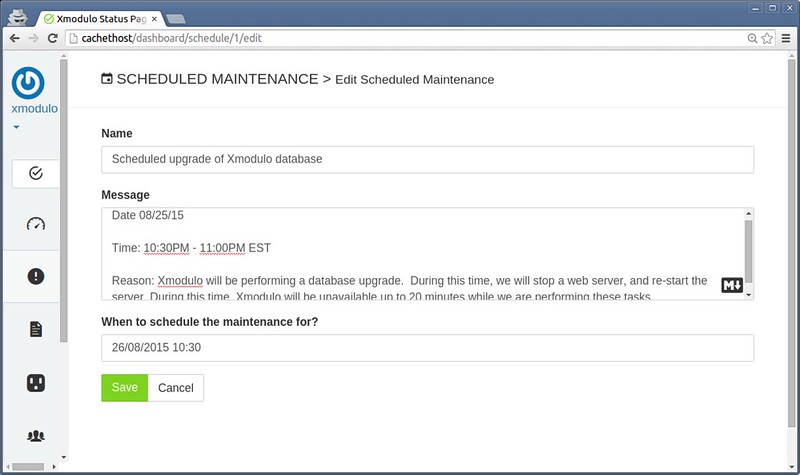
Go ahead and create components (units of your system), incidents or any scheduled maintenance as you want.
For example, to add a new component:

To add a scheduled maintenance:

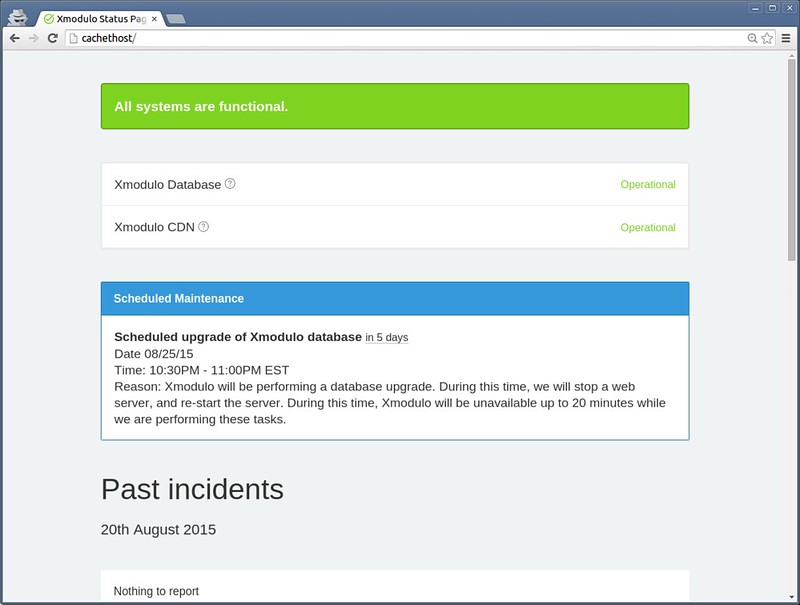
This is what the public Cachet status page looks like:

With SMTP integration, you can send out emails on status updates to any subscribers. Also, you can fully customize the layout and style of the status page using CSS and markdown formatting.

Conclusion

Cachet is pretty easy-to-use, self-hosted status page software. One of the nicest features of Cachet is its support for full JSON API. Using its RESTful API, one can easily hook up Cachet with separate monitoring backends (e.g., Nagios), and feed Cachet with incident reports and status updates automatically. This is far quicker and efficient than manually manage a status page.
As final words, I'd like to mention one thing. While setting up a fancy status page with Cachet is straightforward, making the best use of the software is not as easy as installing it. You need total commitment from the IT team on updating the status page in an accurate and timely manner, thereby building credibility of the published information. At the same time, you need to educate users to turn to the status page. At the end of the day, it would be pointless to set up a status page if it's not populated well, and/or no one is checking it. Remember this when you consider deploying Cachet in your work environment.

Troubleshooting

As a bonus, here are some useful troubleshooting tips in case you encounter problems while setting up Cachet.
1. The Cachet page does not load anything, and you are getting the following error.
production.ERROR: exception 'RuntimeException' with message 'No supported encrypter found. The cipher and / or key length are invalid.' in /var/www/cachet/bootstrap/cache/compiled.php:6695
Solution: Make sure that you create an app key, as well as clear configuration cache as follows.
$ cd /path/to/cachet
$ sudo php artisan key:generate
$ sudo php artisan config:cache
2. You are getting the following error while invoking composer command.
- danielstjules/stringy 1.10.0 requires ext-mbstring * -> the requested PHP extension mbstring is missing from your system.
- laravel/framework v5.1.8 requires ext-mbstring * -> the requested PHP extension mbstring is missing from your system.
- league/commonmark 0.10.0 requires ext-mbstring * -> the requested PHP extension mbstring is missing from your system.
Solution: Make sure to install the required PHP extension mbstring on your system which is compatible with your PHP. On Red Hat based system, since we installed PHP from REMI-56 repository, we install the extension from the same repository.
$ sudo yum --enablerepo=remi-php56 install php-mbstring
3. You are getting a blank page while trying to access Cachet status page. The HTTP log shows the following error.
PHP Fatal error:  Uncaught exception 'UnexpectedValueException' with message 'The stream or file "/var/www/cachet/storage/logs/laravel-2015-08-21.log" could not be opened: failed to open stream: Permission denied' in /var/www/cachet/bootstrap/cache/compiled.php:12851
Solution: Try the following commands.
$ cd /var/www/cachet
$ sudo php artisan cache:clear
$ sudo chmod -R 777 storage
$ sudo composer dump-autoload
If the above solution does not work, try disabling SELinux:
$ sudo setenforce 0

Concerning Containers' Connections: on Docker Networking by Federico Kereki

$
0
0
http://www.linuxjournal.com/content/concerning-containers-connections-docker-networking

Containers can be considered the third wave in service provision after physical boxes (the first wave) and virtual machines (the second wave). Instead of working with complete servers (hardware or virtual), you have virtual operating systems, which are far more lightweight. Instead of carrying around complete environments, you just move applications, with their configuration, from one server to another, where it will consume its resources, without any virtual layers. Shipping over projects from development to operations also is simplified—another boon. Of course, you'll face new and different challenges, as with any technology, but the possible risks and problems don't seem to be insurmountable, and the final rewards appear to be great.
Docker is an open-source project based on Linux containers that is showing high rates of adoption. Docker's first release was only a couple years ago, so the technology isn't yet considered mature, but it shows much promise. The combination of lower costs, simpler deployment and faster start times certainly helps.
In this article, I go over some details of setting up a system based on several independent containers, each providing a distinct, separate role, and I explain some aspects of the underlying network configuration. You can't think about production deployment without being aware of how connections are made, how ports are used and how bridges and routing are set up, so I examine those points as well, while putting a simple Web database query application in place.

Basic Container Networking

Let's start by considering how Docker configures network aspects. When the Docker service dæmon starts, it configures a virtual bridge, docker0, on the host system (Figure 1). Docker picks a subnet not in use on the host and assigns a free IP address to the bridge. The first try is 172.17.42.1/16, but that could be different if there are conflicts. This virtual bridge handles all host-containers communications.
When Docker starts a container, by default, it creates a virtual interface on the host with a unique name, such as veth220960a, and an address within the same subnet. This new interface will be connected to the eth0 interface on the container itself. In order to allow connections, iptables rules are added, using a DOCKER-named chain. Network address translation (NAT) is used to forward traffic to external hosts, and the host machine must be set up to forward IP packets.
Figure 1. Docker uses a bridge to connect all containers on the same host to the local network.
The standard way to connect a container is in "bridged" mode, as described previously. However, for special cases, there are more ways to do this, which depend on the -net option for the docker runcommand. Here's a list of all available modes:
  • -net=bridge— The new container uses a bridge to connect to the rest of the network. Only its exported public ports will be accessible from the outside.
  • -net=container:ANOTHER.ONE— The new container will use the network stack of a previously defined container. It will share its IP address and port numbers.
  • -net=host— This is a dangerous option. Docker won't separate the container's network from the host's. The new container will have full access to the host's network stack. This can cause problems and security risks!
  • -net=none— Docker won't configure the container network at all. If you want, you can set up your own iptables rules (see Resources if you're interested in this). Even without the network, the container could contact the world by shared directories, for example.
Docker also sets up each container so it will have DNS resolution information. Run findmnt inside a container to produce something along the lines of Listing 1. By default, Docker uses the host's /etc/resolv.conf data for DNS resolution. You can use different nameservers and search lists with the --dns and --dns-searchoptions.

Listing 1. The last three lines show Docker's special mount trick, so containers get information from Docker-managed host files.


root@4de393bdbd36:/var/www/html# findmnt -o TARGET,SOURCE
TARGET SOURCE
/ /dev/mapper/docker-8:2-25824189-4de...822[/rootfs]
|-/proc proc
| |-/proc/sys proc[/sys]
| |-/proc/sysrq-trigger proc[/sysrq-trigger]
| |-/proc/irq proc[/irq]
| |-/proc/bus proc[/bus]
| `-/proc/kcore tmpfs[/null]
|-/dev tmpfs
| |-/dev/shm shm
| |-/dev/mqueue mqueue
| |-/dev/pts devpts
| `-/dev/console devpts[/2]
|-/sys sysfs
|-/etc/resolv.conf /dev/sda2[/var/lib/docker/containers/4de...822/resolv.conf]
|-/etc/hostname /dev/sda2[/var/lib/docker/containers/4de...822/hostname]
`-/etc/hosts /dev/sda2[/var/lib/docker/containers/4de...822/hosts]
Now that you have an idea about how Docker sets up networking for individual containers, let's develop a small system that will be deployed via containers and then finish by working out how to connect all the pieces together.

Designing Your Application: the World Database

Let's say you need an application that will let you search for cities that include a given text string in their names. (Figure 2 shows a sample run.) For this example, I used the geographical information at GeoNames (see Resources) to create an appropriate database. Basically, you work with countries (identified by their ISO 3166-1 two-letter codes, such as "UY" for "Uruguay") and cities (with a name, a pair of coordinates and the country to which they belong). Users will be able to enter part of the city name and get all the matching cities (not very complex).
Figure 2. This sample application finds these cities with DARWIN in their names.
How should you design your mini-system? Docker is meant to package single applications, so in order to take advantage of containers, you'll run separate containers for each required role. (This doesn't necessarily imply that only a single process may run on a container. A container should fulfill a single, definite role, and if that implies running two or more programs, that's fine. With this very simple example, you'll have a single process per container, but that need not be the general case.)
You'll need a Web server, which will run in a container, and a database server, in a separate container. The Web server will access the database server, and end users will need connections to the Web server, so you'll have to set up those network connections.
Start by creating the database container, and there's no need to start from scratch. You can work with the official MySQL Docker image (see Resources) and save a bit of time. The Dockerfile that produces the image can specify how to download the required geographical data. The RUN commands set up a loaddata.sh script that takes care of that. (For purists: a single longer RUN command would have sufficed, but I used three here for clarity.) See Listing 2 for the complete Dockerfile file; it should reside in an otherwise empty directory. Building the worlddb image itself can be done from that directory with the sudo docker build -t worlddb . command.

Listing 2. The Dockerfile to create the database server also pulls down the needed geographical data.


FROM mysql:latest
MAINTAINER Federico Kereki fkereki@gmail.com

RUN apt-get update && \
apt-get -q -y install wget unzip && \
wget 'http://download.geonames.org/export/dump/countryInfo.txt'&& \
grep -v '^#' countryInfo.txt >countries.txt && \
rm countryInfo.txt && \
wget 'http://download.geonames.org/export/dump/cities1000.zip'&& \
unzip cities1000.zip && \
rm cities1000.zip

RUN echo "\
CREATE DATABASE IF NOT EXISTS world; \
USE world; \
DROP TABLE IF EXISTS countries; \
CREATE TABLE countries ( \
id CHAR(2), \
ignore1 CHAR(3), \
ignore2 CHAR(3), \
ignore3 CHAR(2), \
name VARCHAR(50), \
capital VARCHAR(50), \
PRIMARY KEY (id)); \
LOAD DATA LOCAL INFILE 'countries.txt' \
INTO TABLE countries \
FIELDS TERMINATED BY '\t'; \
DROP TABLE IF EXISTS cities; \
CREATE TABLE cities ( \
id NUMERIC(8), \
name VARCHAR(200), \
asciiname VARCHAR(200), \
alternatenames TEXT, \
latitude NUMERIC(10,5), \
longitude NUMERIC(10,5), \
ignore1 CHAR(1), \
ignore2 VARCHAR(10), \
country CHAR(2)); \
LOAD DATA LOCAL INFILE 'cities1000.txt' \
INTO TABLE cities \
FIELDS TERMINATED BY '\t'; \
"> mydbcommands.sql

RUN echo "#!/bin/bash \n \
mysql -h localhost -u root -p\$MYSQL_ROOT_PASSWORD loaddata.sh && \
chmod +x loaddata.sh
The sudo docker images command verifies that the image was created. After you create a container based on it, you'll be able to initialize the database with the ./loaddata.sh command.

Searching for Data: Your Web Site

Now let's work on the other part of the system. You can take advantage of the official PHP Docker image, which also includes Apache. All you need is to add the php5-mysql extension to be able to connect to the database server. The script should be in a new directory, along with search.php, the complete code for this "system". Building this image, which you'll name "worldweb", requires the sudo docker build -t worldweb . command (Listing 3).

Listing 3. The Dockerfile to create the Apache Web server is even simpler than the database one.


FROM php:5.6-apache
MAINTAINER Federico Kereki fkereki@gmail.com

COPY search.php /var/www/html/

RUN apt-get update && \
apt-get -q -y install php5-mysql && \
docker-php-ext-install mysqli
The search application search.php is simple (Listing 4). It draws a basic form with a single text box at the top, plus a "Go!" button to run a search. The results of the search are shown just below that in a table. The process is easy too—you access the database server to run a search and output a table with a row for each found city.

Listing 4. The whole system consists of only a single search.php file.


Cities Search


Search for: ">


prepare($query);

$searchFor = "%".$_REQUEST["searchFor"]."%";
$stmt->bind_param("s", $searchFor);
$stmt->execute();
$result = $stmt->get_result();

echo "


";
foreach ($result->fetch_all(MYSQLI_NUM) as $row) {
echo "
";
foreach($row as $data) {
echo "";
}
echo "
";
}
echo "
CountryCityLatLong
".$data."

";

} catch (Exception $e) {
echo "Exception " . $e->getMessage();
}
}
?>


Both images are ready, so let's get your complete "system" running.

Linking Containers

Given the images that you built for this example, creating both containers is simple, but you want the Web server to be able to reach the database server. The easiest way is by linking the containers together. First, you start and initialize the database container (Listing 5).

Listing 5. The database container must be started first and then initialized.


# su -
# docker run -it -d -e MYSQL_ROOT_PASSWORD=ljdocker
↪--name MYDB worlddb
fbd930169f26fce189a9d6020861eb136643fdc9ee73a4e1f114e0bfd0fe6a5c
# docker exec -it MYDB bash
root@fbd930169f26:/# dir
bin cities1000.txt dev etc lib
↪loaddata.sh mnt opt root sbin
↪srv tmp var
boot countries.txt entrypoint.sh home lib64 media
↪mydbcommands.sql proc run selinux sys usr
root@fbd930169f26:/# ./loaddata.sh
Warning: Using a password on the command line interface
↪can be insecure.
root@fbd930169f26:/# exit
Now, start the Web container, with docker run -it -d -p 80:80 --link MYDB:MYDB --name MYWEB worldweb. This command has a couple interesting options:
  • -p 80:80— This means that port 80 (the standard HTTP port) from the container will be published as port 80 on the host machine itself.
  • --link MYDB:MYDB— This means that the MYDB container (which you started earlier) will be accessible from the MYWEB container, also under the alias MYDB. (Using the database container name as the alias is logical, but not mandatory.) The MYDB container won't be visible from the network, just from MYWEB.
In the MYWEB container, /etc/hosts includes an entry for each linked container (Listing 6). Now you can see how search.php connects to the database. It refers to it by the name given when linking containers (see the mysqli_connectcall in Listing 4). In this example, MYDB is running at IP 172.17.0.2, and MYWEB is at 172.17.0.3.

Listing 6. Linking containers in the same server is done via /etc/hosts entries.


# su -
# docker exec -it MYWEB bash
root@fbff94177fc7:/var/www/html# cat /etc/hosts
172.17.0.3 fbff94177fc7
127.0.0.1 localhost
...
172.17.0.2 MYDB

root@fbff94177fc7:/var/www/html# export
declare -x MYDB_PORT="tcp://172.17.0.2:3306"
declare -x MYDB_PORT_3306_TCP="tcp://172.17.0.2:3306"
declare -x MYDB_PORT_3306_TCP_ADDR="172.17.0.2"
declare -x MYDB_PORT_3306_TCP_PORT="3306"
declare -x MYDB_PORT_3306_TCP_PROTO="tcp"
...
The environment variables basically provide all the connection data for each linkage: what container it links to, using which port and protocol, and how to access each exported port from the destination container. In this case, the MySQL container just exports the standard 3306 port and uses TCP to connect. There's just a single problem with some of these variables. Should you happen to restart the MYDB container, Docker won't update them (although it would update the /etc/hosts information), so you must be careful if you use them!
Examining the iptables configuration, you'll find a DOCKER new chain (Listing 7). Port 80 on the host machine is connected to port 80 (http) in the MYWEB container, and there's a connection for port 3306 (mysql) linking MYWEB to MYDB.

Listing 7. Docker adds iptables rules to link containers' ports.


# sudo iptables --list DOCKER
Chain DOCKER (1 references)
target prot opt source destination
ACCEPT tcp -- anywhere 172.17.0.3 tcp dpt:http
ACCEPT tcp -- 172.17.0.3 172.17.0.2 tcp dpt:mysql
ACCEPT tcp -- 172.17.0.2 172.17.0.3 tcp spt:mysql
If you need to have circular links (container A links to container B, and vice versa), you are out of luck with standard Docker links, because you can't link to a non-running container! You might want to look into docker-dns (see Resources), which can create DNS records dynamically based upon running containers. (And in fact, you'll be using DNS later in this example when you set up containers in separate hosts.) Another possibility would imply creating a third container, C, to which both A and B would link, and through which they would be interconnected. You also could look into orchestration packages and service registration/discovery packages. Docker is still evolving in these areas, and new solutions may be available at any time.
You just saw how to link containers together, but there's a catch with this. It works only with containers on the same host, not on separate hosts. People are working on fixing this restriction, but there's an appropriate solution that can be used for now.

Weaving Remote Containers Together

If you had containers running on different servers, both local and remote ones, you could set up everything so the containers eventually could connect with each other, but it would be a lot of work and a complex configuration as well. Weave (currently on version 0.9.0, but quickly evolving; see Resources to get the latest version) lets you define a virtual network, so that containers can connect to each other transparently (optionally using encryption for added security), as if they were all on the same server. Weave behaves as a sort of giant switch, with all your containers connected in the same virtual network. An instance must run on each host to do the routing work.
Locally, on the server where it runs, a Weave router establishes a network bridge, prosaically named weave. It also adds virtual Ethernet connections from each container and from the Weave router itself to the bridge. Every time a local container needs to contact a remote one, packets are forwarded (possibly with "multi-hop" routing) to other Weave routers, until they are delivered by the (remote) Weave router to the remote container. Local traffic isn't affected; this forwarding applies only to remote containers (Figure 3).
Figure 3. Weave adds several virtual devices to redirect some of the traffic eventually to other servers.
Building a network out of containers is a matter of launching Weave on each server and then starting the containers. (Okay, there is a missing step here; I'll get to that soon.) First, launch Weave on each server with sudo weave launch. If you plan to connect containers across untrusted networks, add a password (obviously, the same for all Weave instances) by adding the -password some.secret.password option. If all your servers are within a secure network, you can do without that. See the sidebar for a list of all the available weave command-line options.

weave Command-Line Options

  • weave attach— Attach a previously started running Docker container to a Weave instance.
  • weave connect— Connect the local Weave instance to another one to add it into its network.
  • weave detach— Detach a Docker container from a Weave instance.
  • weave expose— Integrate the Weave network with a host's network.
  • weave hide— Revert a previous expose command.
  • weave launch— Start a local Weave router instance; you may specify a password to encrypt communications.
  • weave launch-dns— Start a local DNS server to connect Weave instances on distinct servers.
  • weave ps— List all running Docker containers attached to a Weave instance.
  • weave reset— Stop the running Weave instance and remove all of its network-related stuff.
  • weave run— Launch a Docker container.
  • weave setup— Download everything Weave needs to run.
  • weave start— Start a stopped Weave instance, re-engaging it to the Weave topology.
  • weave status— Provide data on the running Weave instance, including encryption, peers, routes and more.
  • weave stop— Stop a running Weave instance, disengaging it from the Weave topology.
  • weave stop-dns— Stop a running Weave DNS service.
  • weave version— List the versions of the running Weave components; today (April 2015) it would be 0.9.0.
When you connect two Weave routers, they exchange topology information to "learn" about the rest of the network. The gathered data is used for routing decisions to avoid unnecessary packet broadcasts. To detect possible changes and to work around any network problems that might pop up, Weave routers routinely monitor connections. To connect two routers, on a server, type the weave connect the.ip.of.another.server command. (To drop a Weave router, do weave forget ip.of.the.dropped.host.) Whenever you add a new Weave router to an existing network, you don't need to connect it to every previous router. All you need to do is provide it with the address of a single existing Weave instance in the same network, and from that point on, it will gather all topology information on its own. The rest of the routers similarly will update their own information in the process.
Let's start Docker containers, attached to Weave routers. The containers themselves run as before; the only difference is they are started through Weave. Local network connections work as before, but connections to remote containers are managed by Weave, which encapsulates (and encrypts) traffic and sends it to a remote Weave instance. (This uses port 6783, which must be open and accessible on all servers running Weave.) Although I won't go into this here, for more complex applications, you could have several independent subnets, so containers for the same application would be able to talk among themselves, but not with containers for other applications.
First, decide which (unused) subnet you'll use, and assign a different IP on it to each container. Then, you can weave run each container to launch it through Docker, setting up all needed network connections. However, here you'll hit a snag, which has to do with the missing step I mentioned earlier. How will containers on different hosts connect to each other? Docker's --link option works only within a host, and it won't work if you try to link to containers on other hosts. Of course, you might work with IPs, but maintenance for that setup would be a chore. The best solution is using DNS, and Weave already includes an appropriate package, WeaveDNS.
WeaveDNS (a Docker container on its own) runs over a Weave network. A WeaveDNS instance must run on each server on the network, with the weave launch-dns command. You must use a different, unused subnet for WeaveDNS and assign a distinct IP within it to each instance. Then, when starting a Docker container, add a --with-dns option, so DNS information will be available. You should give containers a hostname in the .weave.local domain, which will be entered automatically into the WeaveDNS registers. A complete network will look like Figure 4.
Figure 4. Using Weave, containers in local and remote networks connect to each other transparently; access is simplified with Weave DNS.
Now, let's get your mini-system to run. I'm going to cheat a little, and instead of a remote server, I'll use a virtual machine for this example. My main box (at 192.168.1.200) runs OpenSUSE 13.2, while the virtual machine (at 192.168.1.108) runs Linux Mint 17, just for variety. Despite the different distributions, Docker containers will work just the same, which shows its true portability (Listing 8).

Listing 8. Getting the Weave network to run on two servers.


> # At 192.168.1.200 (OpenSUSE 13.2 server)
> su -
$ weave launch
$ weave launch-dns 10.10.10.1/24
$ C=$(weave run --with-dns 10.22.9.1/24 -it -d -e
↪MYSQL_ROOT_PASSWORD=ljdocker -h MYDB.weave.local --name MYDB worlddb)
$ # You can now enter MYDB with "docker exec -it $C bash"

> # At 192.168.1.108 (Linux Mint virtual machine)
> su -
$ weave launch
$ weave launch-dns 10.10.10.2/24
$ weave connect 192.168.1.200
$ D=$(weave run --with-dns 10.22.9.2/24 -it -d -p 80:80 -h
↪MYWEB.weave.local --name MYWEB worldweb)
The resulting configuration is shown in Figure 5. There are two hosts, on 192.168.1.200 and 192.168.1.108. Although it's not shown, both have port 6783 open for Weave to work. In the first host, you'll find the MYDB MySQL container (at 10.22.9.1/24 with port 3306 open, but just on that subnet) and a WeaveDNS server at 10.10.10.1/24. In the second host, you'll find the MYWEB Apache+PHP container (at 10.22.9.2/24 with port 80 open, exported to the server) and a WeaveDNS server at 10.10.10.2/24. From the outside, only port 80 of the MYWEB container is accessible.
Figure 5. The final Docker container-based system, running on separate systems, connected by Weave.
Because port 80 on the 192.168.1.108 server is directly connected to port 80 on the MYWEB server, you can access http://192.168.1.108/search.php and get the Web page you saw earlier (in Figure 2). Now you have a multi-host Weave network, with DNS services and remote Docker containers running as if they resided at the same host—success!

Conclusion

Now you know how to develop a multi-container system (okay, it's not very large, but still), and you've learned some details on the internals of Docker (and Weave) networking. Docker is still maturing, and surely even better tools will appear to simplify configuration, distribution and deployment of larger and more complex applications. The current availability of networking solutions for containers shows you already can begin to invest in these technologies, although be sure to keep up with new developments to simplify your job even further.

Resources

Get Docker itself from http://www.docker.com. The actual code is at https://github.com/docker/docker.
For more detailed documentation on Docker network configuration, see https://docs.docker.com/articles/networking.
The docker-dns site is at https://www.npmjs.com/package/docker-dns, and its source code is at https://github.com/bnfinet/docker-dns.
The official MySQL Docker image is at https://registry.hub.docker.com/_/mysql. If you prefer, there also are official repositories for MariaDB (https://registry.hub.docker.com/_/mariadb). Getting it to work shouldn't be a stretch.
The Apache+PHP official Docker image is at https://registry.hub.docker.com/_/php.
Weave is at http://weave.works, and the code itself is on GitHub at https://github.com/weaveworks/weave. For more detailed information on its features, go to https://zettio.github.io/weave/features.html.
WeaveDNS is on GitHub at https://github.com/weaveworks/weave/tree/master/weavedns.
For more on articles on Docker in Linux Journal, read the following:
The geographical data I used for the example in this article comes from GeoNames http://www.geonames.org. In particular, I used the countries table (http://download.geonames.org/export/dump/countryInfo.txt) and the cities (with more than 1,000 inhabitants) table (http://download.geonames.org/export/dump/cities1000.zip), but there are larger and smaller sets.


Complete solution for online privacy with own private OpenSSH, OpenVPN and VNC server

$
0
0
http://www.blackmoreops.com/2015/07/30/complete-solution-for-online-privacy-with-own-private-openssh-openvpn-and-vnc-server

Taking control of your public access security

An easy path to greater security through
OpenSSH, OpenVPN and VNC on a single­honed Fedora 21 Workstation on your home network

Complete solution for online privacy with own private OpenSSH, OpenVPN and VNC server - blackMORE OpsWe all know that public wifi access is a potential playground for would’ve hackers with nefarious desires. You can easily take a major step in protecting yourself by installing an OpenSSH and an OpenVPN server on your home network; through which you encrypt and tunnel all of your public access traffic. By doing so, you will only be providing the coffee house hacker with nothing more than an encrypted stream of data. An encrypted stream that provides absolutely nothing useful to assist him/her in their nefarious deeds.
While there are publicly available VPN and SSH servers available – some free and some not – on the Internet, anyone who has tried to use them has discovered that they are not as reliable as they had hoped them to be: Difficulty in connecting, and very poor performance are common. Many people feel that the servers should not maintain logs; something that is difficult to find without paying a monthly or annual fee — which, if you think about it, takes away your anonymity because now they have a record of their sales transaction.
The best possible solution for this situation is to set up a private SSH and VPN server on your home network and use them when you are out on the road or overseas: You won’t have logs to worry about, it is always available and totally exclusive to you; which means that your performance should be outstanding! And, all of your traffic transverses an encrypted channel which makes it virtually immune to hacking and prying eyes.
If you are more accustomed to using a GUI for administration of your computers, no worries! This article will show you how to set up a VNC server (remote desktop) that you can use to open that server in a window with full GUI access – from anywhere in the world – and do it via an SSH encrypted tunnel or using your brand new VPN Server!
You don’t need a lot of money or heavy duty equipment to make it work either! Any older computer with at least a Pentium processor, a single connection, via Ethernet or WiFi, to your home network, a 60 GB (or larger) hard disk, and 1 GB (multi­user.target [runlevel 3]) or 2 GB (graphical.target [runlevel 5]) RAM will suffice. You can probably pick one up for free from a friend that is looking to dump the old “boat anchor” somewhere. All the software required for this project is free, so this minor investment into your private access security is well worth the time and effort to implement.

Project Requirements

  1. Boat­anchor computer (as outlined above)
  2. Fedora 21 workstation iso file
  3. A blank DVD or a 2GB USB drive
  4. About 4 hours of time
  5. A basic understanding of using a terminal; both as root and as a regular user
Hint: use su and enter your password to get to root. Use exit to get back to the regular user; which is when you will use sudo to perform certain tasks. You will never use sudo as root. Caveats and disclaimers…

Caveats and Disclaimers

While this was written during installation and testing on Fedora 21 workstation, the principles involved are the same regardless of distro. If you are not using Fedora 21, then you should still be able to figure out the details with some google searches for your distro. Since there may be documentation errors here that I am not aware of, use these procedures at your own risk! Double check everything, type slowly, deliberately and double check again before pressing Enter!! Do not just copy and paste the commands from this document into a root terminal!! You will most certainly bring your machine down! Note that you will already have installed Fedora 21 Workstation on a computer – you can use whatever partitioning you desire for this project. The main goal is to just get it installed and working on the home network. Also, only the Linux client is explained in this article.
Please note that these procedures are for a freshly installed Fedora 21 Workstation. If you go through these procedures on a box that has had its firewall, iptables, etc. modified from the default values, then you may run into issues and have to develop workarounds for your particular circumstances …
One more thing. This work is a conglomeration, with very little of the material being original. I had to dig through countless sites and read until my eyes bled to put together the solution as outlined here; taking bits and pieces from here and there; working my way through all the errors, developing work­arounds, etc.. I apologize to the authors of the information that I have included “wholesale” for not citing each and every procedure/note/comment, etc. that is written here. That would be near impossible. If you see something here that you yourself have written, I know that you understand where I am coming from on this issue.

Food for Thought: Numbering private subnets

Setting up a VPN often entails linking together private subnets from different locations.
For example, suppose you use the popular 192.168.0.0/24 subnet as your private LAN subnet. Now you are trying to connect to the VPN from an internet cafe which is using the same subnet for its WiFi LAN. You will have a routing conflict because your machine won’t know if 192.168.0.1 refers to the local WiFi gateway or to the same address on the VPN.
The best solution is to avoid using 10.0.0.0/24 or 192.168.0.0/24 as private LAN network addresses. Instead, use something that has a lower probability of being used in a WiFi cafe, airport, or hotel where you might expect to connect from remotely. The best candidates are subnets in the middle of the vast 10.0.0.0/8 netblock (for example 10.66.77.0/24).
With this in mind, it is a good idea to start this whole project by changing your home router to provide DHCP addresses in the “middle” of the 10.0.0.0/8 netblock. As an example, I used my birth year to set up my local network addresses; so mine is set as: 10.19.58.0/24
Remember that in all instances within this document you have to substitute user with a valid user on your VPN Server box! The same goes for servername.
Warning: For some unknown reason, if you copy and paste a command line from this document the – will not appear when pasted! Therefore, double check your command line and replace the – where necessary.

Set up DDNS on the Internet

Go to http://www.noip.com/remote­access and signup for the free DDNS account.
Download the update client, configure and install it after setting up your router (see below) to allow the ports used by the updater. http://www.noip.com/support/knowledgebase/ should answer all of your questions.

Set up an SSH Server on the machine that will become your VPN Server

Before we get started with anything else, we need to establish our firewall’s Default Zone Set a Default Zone
[root@fedora21test ~]# firewall­-cmd --­­list-­all-­zones 
[root@fedora21test ~]# firewall­-cmd ­­--get­-default­-zone
[root@fedora21test ~]# firewall­-cmd ­­--set-­default-­zone=whicheverzoneyoudesire
Further info is available at: https://fedoraproject.org/wiki/FirewallD#Using_firewall­cmd
[root@fedora21test ~]# yum -y install openssh
OpenSSH has a plethora of options, which will not be covered here. All we need is a basic setup for our project. For those who would like to add additional security by disabling root login and implementing certificates for login authentication (all highly recommended), all the information needed is here: https://wiki.archlinux.org/index.php/SSH_keys#Disabling_password_logins
For now, one thing you should do is change the listening port for the SSH server since it will be exposed to the internet. You do that by changing the port designation on line 16 of the /etc/ssh/sshd_config file. Of course, you will have to add that port to the server’s firewall as well as adjust the entry on the Virtual Servers page of your router (see below). You can add your custom port to the firewall using:
[root@fedora21test]# firewall-­cmd --­­permanent ­­--add­port=yoursshportdesignator/tcp
Now add the ssh service to the firewall, enable and start the ssh server deamon…
[root@fedora21test ~]# firewall­-cmd ­­--permanent --­­add-­service ssh 
[root@fedora21test ~]# firewall­-cmd ­­--reload
[root@fedora21test ~]# systemctl -f enable sshd.service
[root@fedora21test ~]# systemctl daemon-­reload
[root@fedora21test ~]# systemctl start sshd.service
Tip: install htop as well to see exactly how your server is doing in reference to cpu load, memory usage and services running, etc. from the terminal used to connect to your server using SSH.
[root@fedora21test ~]# yum -y install htop
Once installed you will be able to log onto the server with ssh, type htop at the user prompt, and get a complete, real­time, health report of your server.
To connect to your server locally
[user@fedora21test ~]# ssh user@x.x.x.x← local ip address of ssh server; i.e. 10.19.58.14
To connect when away from home
[user@fedora21test ~]# ssh user@yourdomain.ddns.net← whatever your set up is at no­ip.com
You should now be able to administer this server from anywhere on the planet using your newly set up DDNS and SSH! You could just stop right here and configure your applications individually to use the SSH Tunnel, but, the VPN solution is way more secure and actually very easy to set up: You just have to make sure that you make the appropriate changes before you begin the OpenVPN Server installation.
Tip: Add your server name and ip address to the clients’ /etc/hosts so that you can just do something like:
[user@fedora21test ~]# ssh user@servername
— to make the connection.
Tip: There are a series of scripts at the end of this document that will allow you to connect in various ways after everything is set up and running. Start by creating a bin directory in your home directory and copy the contents for each script into the files indicated and chmod 700 on all scripts. Then you can create a link to each of them and place those links in a folder on your desktop. All of this is outlined in detail later in this article.

Configure your router

Find out where you add Virtual Servers, DHCP Reservations and Port Triggers on your router and add the following…
Virtual Servers – Default settings are used for the servers in this listing

If you decide to change your ports for SSH and VNC then enter those ports instead of the defaults listed here… 
DescriptionInbound PortTypePrivate IP AddressLocal Port
DUC18245-8245Both10.19.58.148245-8245
DUC2943-943TCP10.19.58.14943-943
VPN11194-1194UDP10.19.58.141194-1194
VPN2443-443TCP10.19.58.14443-443
SSHServer22-22TCP10.19.58.1422-22
VNCServer5910TCP10.19.58.145910
VNCServer6010TCP10.19.58.146010
Note: The 6010 entry is not necessary if you will not be using ip6 to access your vnc server.
The Private IP address is the address that you will reserve, under the DHCP options, for your VPN server box. Unless you are using my ip scheme, it is not going to be 10.19.58.14 for those entries.
Port Triggers – Default settings are used for the servers in this listing
If you decide to change your port for the VNCServer then enter that port instead of the defaults listed here…
DescriptionOutbound PortTypeInbound Port
DUC Out8245-8245Both8245­8245
VNC5910TCP5910
VNC6010TCP6010
Note: The 6010 entry is not necessary if you will not be using ip6 to access your vnc server.
A Port Trigger is needed because these services initiate a connection from inside the network instead of just responding to incoming requests. The VNC entries are required ONLY if you plan on doing GUI installs on the server at some later time. See the Fedora Installation Guide for details on VNC based installs.
Reserved IP Client List
NameIP AddressMac AddressStatus
[Server Name]10.19.58.1400:03:C0:10:BE:40Online

Enable IP masquerading

[root@fedora21test ~]# firewall-­cmd ­­--permanent --­­add-­masquerade
Then reload the firewall
[root@fedora21test ~]# firewall-­cmd --­­reload
Double check your work…
[root@fedora21test ~]# firewall-­cmd ­­--query-­masquerade && echo "enabled" || echo "Not enabled"
You should get back a response of:
yes 
enabled

Enable IP Forwarding

Next, edit or create /etc/sysctl.d/99­sysctl.conf to permanently enable IPv4 packet forwarding (takes effect at the next boot):
[root@fedora21test ~]# vim /etc/sysctl.d/99­sysctl.conf
Enable packet forwarding by putting this line into that file
[root@fedora21test ~]# net.ipv4.ip_forward=1
Double check your work…
[root@fedora21test ~]# sysctl net.ipv4.ip_forward
You should get back a response of:
net.ipv4.ip_forward = 1
Adjust your iptables appropriately.
First get your network­interface­id for the next set of entries
[root@fedora21test ~]# ifconfig
Now make these entries:
[root@fedora21test ~]# iptables ­-A INPUT -­i tun+ ­-j ACCEPT 
[root@fedora21test ~]# iptables -­A FORWARD -­i tun+ ­-j ACCEPT
[root@fedora21test ~]# iptables -­t nat -­A POSTROUTING -­s 10.8.0.0/24 ­-o network­interface­id ­-j MASQUERADE

Adjust SELinux Policy

[root@fedora21test ~]# getenforce
[root@fedora21test ~]# vim /etc/selinux/config
change SELINUX=enforcing to SELINUX=disabled or permissive (see note below)
[root@fedora21test ~]# reboot
Note: Disabling selinux is required for the VNC server installation. If you do not intend on installing the VNC server, then you can set the above variable declaration to permissive.

Install OpenVPN

Install OpenVPN on the server
[root@fedora21test ~]# yum install openvpn -­y
OpenVPN ships with a sample server configuration, so we will copy it to where we need it:
[root@fedora21test ~]# cp /usr/share/doc/openvpn/sample/sample­config­files/server.conf /etc/openvpn

Generate Keys and Certificates

NOTE: Build your keys on the machine with the highest Random Entropy. You do not have to do this on the server. To obtain your random entropy figure, use: cat /proc/sys/kernel/random/entropy_avail (the higher the figure the better. Do NOT use a machine that has less than 200!) See this article for more information on random entropy and its importance in encryption: https://major.io/2007/07/01/check­ available­entropy­in­linux/ The comments section has solutions for generating higher random entropy.
Also, note that the server and client clocks need to be roughly in sync or certificates might not work properly. If not already set up, you should use ntp on both your server and clients.

Generate the master Certificate Authority (CA) certificate & key

Install easy-­rsa

[root@fedora21test ~]# yum install easy-­rsa
Copy the easy­-rsa directory to /etc/openvpn/
[root@fedora21test ~]# cp ­-r /usr/share/easy-­rsa /etc/openvpn 
[root@fedora21test ~]# cd /etc/openvpn/easy-­rsa
[root@fedora21test ~]# init-­config
Now edit the vars file and set the KEY_COUNTRY, KEY_PROVINCE, KEY_CITY, KEY_ORG, and KEY_EMAIL parameters. Don’t leave any of these parameters blank.
Next, initialize PKI:
[root@fedora21test ~]# . ./vars 
[root@fedora21test ~]# ./clean­all
[root@fedora21test ~]# ./build­-ca
The final command (build­-ca) will build the certificate authority (CA) certificate and key by invoking the interactive openssl command:
ai:easy-rsa # ./build-ca
Generating a 1024 bit RSA private key
............++++++
...........++++++
writing new private key to 'ca.key'
You are about to be asked to enter information that will be incorporated
into your certificate request.
What you are about to enter is what is called a Distinguished Name or a DN.
There are quite a few fields but you can leave some blank
For some fields there will be a default value,
If you enter '.', the field will be left blank.
-----
Country
Name (2 letter code) [KG]:
State or Province Name (full name) [NA]:
Locality Name (eg, city) [BISHKEK]:
Organization Name (eg, company) [OpenVPN-TEST]:
Organizational Unit Name (eg, section) []:
Common Name (eg, your name or your server's hostname) []: Servername-CA
Email Address [me@myhost.mydomain]:
Note that in the above sequence, most queried parameters were defaulted to the values set in the vars or vars.bat files. The only parameter which must be explicitly entered is the Common Name. In the example above, I used Servername-­CA which you should change to reflect your own CA name.

Generate certificate & key for server

[root@fedora21test ~]# ./build­-key-­server server
As in the previous step, most parameters can be defaulted. When the Common Name is queried, enter “server”. Two other queries require positive responses:
"Sign the certificate? [y/n]"
"1 out of 1 certificate requests certified, commit? [y/n]".

Generate certificates & keys for clients

[root@fedora21test ~]# ./build-­key client1 
[root@fedora21test ~]# ./build­-key client2
[root@fedora21test ~]# ./build­-key client3 (etc.)
Remember that for each client, make sure to type the appropriate Common Name when prompted, i.e. “client1”, “client2”, or “client3”. Always use a unique common name for each client.

Generate Diffie Hellman

[root@fedora21test ~]# ./build-­dh

Generate the ta.key file

[root@fedora21test ~]# openvpn ­­--genkey ­­--secret ta.key

Key Files Summary

All of your newly­-generated keys and certificates in the/etc/openvpn/easy­-rsa/keys sub-­directory. Here is an explanation of the relevant files:
FilenameNeeded ByPurposeSecret
ca.crtserver + all clientsRoot CA certificateNO
ca.keykey signing machine onlyRoot CA keyYES
dh{n}.pemserver onlyDiffie Hellman parametersNO
server.crtserver onlyServer CertificateNO
server.keyserver onlyServer KeyYES
ta.keyserver + all clientstls­authYES
client1.crtclient1 onlyClient1 CertificateNO
client1.keyclient1 onlyClient1 KeyYES
client2.crtclient2 onlyClient2 CertificateNO
client2.keyclient2 onlyClient2 KeyYES
client3.crtclient3 onlyClient3 CertificateNO
client3.keyclient3 onlyClient3 KeyYES

Distribute keys

[root@fedora21test ~]# mkdir /etc/openvpn/keys
The final step is to copy the appropriate files to the /etc/openvpn/keys directory of machines that need them. Take extra care to copy secret files over a secure channel (or USB) to the other computers.
Although you can place the keys anywhere, for the sample config files to work, all keys are placed in the same sub­directory on all machines: /etc/openvpn/keys
Once the keys are in place you need to update your selinux policy on each of the clients and the server. This is not required if you set your policy to disabled.
[root@fedora21test ~]# restorecon ­-Rv /etc/openvpn

Edit the server configuration file

(A completed, working sample file is included in this document)
The default OpenVPN server configuration will create a tun0 network interface (for routing), will listen for client connections on UDP port 1194 (OpenVPN’s default), authenticate client access, and distribute virtual addresses to connecting clients from the 10.8.0.0/24 subnet.
[root@fedora21test ~]# vim /etc/openvpn/server.conf
Edit the ca, cert, key, tls-­auth and dh parameters to point to the ca, key, cert, dh and ta files you generated above. (i.e. /etc/openvpn/keys) and uncomment the following items:
server
proto udp
dev tun
topology subnet
push "redirect-gateway def1 bypass-dhcp"
push "dhcp-option DNS 208.67.222.222"
push "dhcp-option DNS 208.67.220.220"
cipher <-- and="" choose="" commented.="" desire="" group="" leave="" method="" nobody="" others="" pre="" the="" user="" which="" you="">


Install OpenVPN on the client


[root@fedora21Client ~]# yum install openvpn -­y
Edit the client configuration file
(A completed sample file is included in this document)
The sample client configuration file (client.conf) mirrors the default directives set in the sample server configuration file. Since OpenVPN can be either a server or client, configuration files for both are included when installed.
[root@fedora21Client ~]# cp /usr/share/doc/openvpn/sample/sample­-config-­files/client.conf /etc/openvpn 
[root@fedora21Client ~]# vim /etc/openvpn/client.conf
Edit the ca, cert, key, and tls­-auth parameters to point to the ca, key, cert, and ta files you generated above. (i.e. /etc/openvpn/keys) and check the following items:
  1. The remote directive points to the hostname/IP address and port number of your OpenVPN server. Follow the instructions above for installation, configuration and setup of DDNS. You will use your DDNS name on the remote line…
  2. That the dev (tun), proto (udp), cipher, comp-­lzo and fragment directives are consistent with the server.conf file.
  3. That the remote-­cert­-tls server option is uncommented.

Final Steps for server

[root@fedora21test ~]# ln ­-s /lib/systemd/system/openvpn\@.service /etc/systemd/system/multi-user.target.wants/openvpn\@server.service
[root@fedora21test ~]# firewall­-cmd ­­--permanent ­­--add­-service openvpn
[root@fedora21test ~]# systemctl stop openvpn@server.service
[root@fedora21test ~]# systemctl -f enable openvpn@server.service
[root@fedora21test ~]# systemctl start openvpn@server.service

Final Steps for clients

[root@fedora21Client ~]# firewall­-cmd ­­--permanent ­­--zone=FedoraWorkstation --­­add-­service openvpn
[root@fedora21Client ~]# firewall­-cmd --­­permanent --­­zone=FedoraWorkstation ­­--add-­service ssh
Either run the VPN Client via command line in root terminal (Ctrl­c will exit) or set up your VPN connection using Network Manager (covered below). For now, we will just use a terminal…
To open a VPN connection using the command line:
[root@fedora21Client ~]# openvpn /etc/openvpn/client.conf
Test the connection by pinging your side of the tunnel, the VPN server’s side of the tunnel (usually at 10.8.0.1) and the internal ip address of the VPN server (the one it uses to communicate on its Ethernet or WiFi connection to the router) and finally the default gateway of the VPN server itself.
[root@fedora21Client ~]# ifconfig ← to get ip address of tun0 
[root@fedora21Client ~]# ping 10.8.0.2 (tun0 ip address)
[root@fedora21Client ~]# ping 10.8.0.1 (vpn server tun0 address)
[root@fedora21Client ~]# ping 10.19.58.14 (vpn server address)
[root@fedora21Client ~]# ping 10.19.58.1 (vpn server default gateway)

Ensure that all traffic is flowing through the tunnel:

[root@fedora21Client ~]# ip route get [the ip address you used in testing the connection] one ip at a time.
Note: The default gateway of the router may come back with a good ping, but ip route get may show a route other than the tunnel. In that case, the easiest way to test is to connect your laptop wifi to your cell phone hotspot (or connect to some other external wifi network), reconnect to the VPN server, and run the ping & ip route get commands again.
When successful, whatismyip.com should show the ip address of your home routers external IP. When you disconnect it should show your cell phones IP address.
Once you have verified that you can ping successfully through the vpn connection, you can run traceroute and ip route get to verify that all traffic is flowing through the tunnel.
Compare name resolution for both
  1. While vpn is up and
  2. When VPN is down.

While VPN is UP

[root@fedora21Client ~]# traceroute www.google.com
Which should return a lot of information, but the most important part is in the first two lines:
1 10.8.0.1 (10.8.0.1) 58.430 ms 68.225 ms 77.327 ms
2 10.19.58.1 (10.19.58.1) 77.510 ms 68.233 ms 68.235 ms
Notice that the first route is to the vpn server and the second is to the default gateway on the server.
[root@fedora21Client ~]# ip route get 8.8.8.8
8.8.8.8 via 10.8.0.1 dev tun0 src 10.8.0.2
Notice that it shows that the route was obtained through your tun0 interface and that it got that route via the vpn server’s tun0 interface address.

When VPN is DOWN

[root@fedora21Client ~]# traceroute www.microsoft.com
traceroute to www.microsoft.com (23.66.56.154), 30 hops max, 60 byte packets
1 192.168.43.1 (192.168.43.1) 6.727 ms 10.024 ms 10.031 ms
2 33.sub­66­174­43.myvzw.com (66.174.43.33) 43.569 ms 43.579 ms 53.647 ms

Useful OpenVPN References:

  1. https://www.digitalocean.com/community/tutorials/how­to­setup­and­configure­an­openvpn­server­on­ centos­6
  2. https://openvpn.net/index.php/open­source/documentation/howto.html#numbering
  3. https://wiki.archlinux.org/index.php/OpenVPN
Contents of/lib/systemd/system/openvpn@.server
[Unit]
Description=OpenVPN on %I
After=network.target
[Service]
PrivateTmp=true
Type=forking
PIDFile=/var/run/openvpn/%i.pid
ExecStart=/usr/sbin/openvpn --daemon --writepid /var/run/openvpn/%i
.pid --cd /etc/openvpn/ --config %i.conf
[Install]
WantedBy=multi-user.target
You can use this text for your server.conf if you have been following the procedures used in this document, or modify it if your keys are in different locations or you have made other adjustments along the way.
Example of working, simplified/etc/openvpn/server.conf– All comments removed…
server
port 1194
proto udp
dev tun
ca /etc/openvpn/keys/ca.crt
cert /etc/openvpn/keys/server.crt
key /etc/openvpn/keys/server.key
dh /etc/openvpn/keys/dh2048.pem
topology subnet
server 10.8.0.0 255.255.255.0
ifconfig-pool-persist ipp.txt
push "redirect-gateway def1 bypass-dhcp"
push "dhcp-option DNS 208.67.222.222"
push "dhcp-option DNS 208.67.220.220"
keepalive 10 120
tls-auth /etc/openvpn/keys/ta.key 0
cipher BF-CBC
comp-lzo
user nobody
group nobody
persist-key
persist-tun
status openvpn-status.log
verb 3
If you choose not to keep status logs, then comment out the status openvpn-­status.log and the verb 3 lines.
You can use this text for your client.conf if you have been following the procedures used in this document, or modify it if your keys are in different locations or you have made other adjustments along the way.
Just make sure to insert your own DDNS value where the text is red in the following:
Example of working, simplified/etc/openvpn/client.confAll comments removed
client
dev tun
proto udp
remote yourdomain.ddns.net-1 1194
resolv-retry infinite
nobind
user nobody
group nobody
persist-key
persist-tun
ca /etc/openvpn/keys/ca.crt
cert /etc/openvpn/keys/client1.crt
key /etc/openvpn/keys/client1.key
remote-cert-tls server
tls-auth /etc/openvpn/keys/ta.key 1
cipher BF-CBC
comp-lzo
verb 3
If you choose not to keep status logs, then comment out the verb 3 line.
Tip: Once you have created and saved your client.conf file you can import it into Network Manager! Just bring up Network Connections, select add, under VPN select Import a saved OpenVPN configuration, point to your /etc/openvpn/client.conf file and hit create!
Double check all of the Authentication information on the VPN tab (you do not need to enter anything in the password box), then select Advanced and verify the information on the TLS Authentication tab. Save and exit.
Now, you will be able toggle your VPN in Network Manager!

VNC Server and Client Setup – With instructions for using VNC over SSH

This may seem pretty obvious, but VNC Server will not load if you boot your computer into multiuser. target (runlevel 3).
To change back and forth you can run one of the following and then reboot.
[root@fedora21test ~]# systemctl set-default multi-user.target
[root@fedora21test ~]# systemctl set-default graphical.target
Be aware that you may have to re-­do the server configuration from scratch if you switch to multi­-user.target and then want to go back to graphical.target. Shortened procedures for doing this are near the end of this document.
NOTE! Pay very close attention to which user is issuing the command!
This changing back and forth is necessary for the appropriate files to be created in the correct locations! Watch what you are doing very closely here because it is very easy to get fouled up.

Step 1 :

Install the Tiger VNC server & client packages
[root@fedora21test ~]# yum -y install tigervnc­-server (on the server) 
[root@fedora21test ~]# yum -y install tigervnc (on the client)

Step 2 :

Copy the VNC server configuration file to where it needs to be for editing:
[root@fedora21test ~]# cp /lib/systemd/system/vncserver@.service /etc/systemd/system/vncserver@:10.service
By default, VNC server uses port 5900. The vncserver@:10.service file, shows a port­offset of 10. This means that the service will be listening on the base server listening port (5900) + 10 = 5910. So, X11 will use port 5910 for routing the display to the client. This means we are running the service on a sub­port of the default port 5900. When using this port-­offset we can connect to the VNC server by specifying the IP address:sub­-port format.
Eg: 10.30.0.78:10*
* Tip: For added security, you can change the listening port to whatever you desire on line 199 of the /usr/bin/vncserver file
[root@fedora21test ~]# vim /usr/bin/vncserver
199 $vncPort = 4400 + $displayNumber;
In this example the listening port has been changed to 4400. Since the @:10.service file shows a 10 offset, you would use 4410 instead of 5910 in the upcoming firewall commands. You would also need to ensure that you are using 4410 on the Virtual Server page of your router for the VNC Server.

Step 3:

Edit the copied file and make changes as mentioned below. Changes are indicated in RED and BOLD below…
[root@fedora21test ~]# vim /etc/systemd/system/vncserver@\:10.service
For simplicity sake, I have a user named “user”, so in my example this user is what the server will authenticate me against when attempting to connect. Thus, my file would look the one below:
Please choose your user and change accordingly.
[Unit]
Description=Remote desktop service (VNC)
After=syslog.target network.target
[Service]
Type=forked #change this to simple if you are having issues with loading
# Clean any existing files in /tmp/.X11unix !!
ExecStartPre=/bin/sh -c '/usr/bin/vncserver -kill %i > /dev/null 2>&1 || :'
ExecStart=/sbin/runuser -l user -c "/usr/bin/vncserver %i"
PIDFile=/home/user/.vnc/%H%i.pid
ExecStop=/bin/sh -c '/usr/bin/vncserver -kill %i > /dev/null 2>&1 || :'
[Install]
WantedBy=multi-user.target

Step 4:

Now add the service and ports to the firewall for VNC.
[root@fedora21test ~]# firewall-­cmd ­­--permanent ­­--add-­service vnc­-server 
[root@fedora21test ~]# firewall­-cmd --­­permanent ­­--add­port=5910/tcp
[root@fedora21test ~]# firewall­-cmd ­­--permanent ­­--add­port=6010/tcp
Remember to change the port here to the one you entered in/usr/bin/vncserver. Also, the 6010 entry is not necessary if you are not going to use ip6 for VNC.
NOTE: If you haven’t already done do, don’t forget to add these ports to the Virtual Server section on your router (as shown under Configure your Router above). If you intend on doing installs/upgrades via VNC on this same box (i.e. Fedora Server using the GUI interface – which is recommended) then you will also have to add a Port Trigger for these two addresses; since in that case the server will be initiating a connection with a listening client… See the Fedora Installation guide for details. Once again, the 6010 entry will not necessary on the Port Trigger page if you are not going to use ip6 for VNC.
Now, reload the firewall with:
[root@fedora21test ~]# firewall­-cmd --­­reload
Hints: You can always double-­check which ports are open, and which services are allowed, on the firewall with:
[root@fedora21test ~]# firewall­-cmd ­­--list-­ports 
[root@fedora21test ~]# firewall-­cmd --­­get­-services
For a complete listing of all firewall­-cmd’s refer to this site: https://fedoraproject.org/wiki/FirewallD#Using_firewall­cmd

Step 5:

Next, setup a password for the VNC user.
Using a standard (nonroot) terminal, do as indicated below:
[user@fedora21test ~]$ vncpasswd
Password :
Verify :
After this process has finished, a new directory (.vnc) will be created under the home directory of the user with a passwd file in it.
Check to make sure it was created…
[user@fedora21test ~]# ls -­l /home/user/.vnc/
-­rw------­­­­­­. 1 user user 8 Feb 20 17:55 passwd

Step 6 :

Now reload the systemctl daemon and start the VNC service.
[user@fedora21test ~]# sudo systemctl daemon-­reload 
[user@fedora21test ~]# sudo systemctl -f enable vncserver@:10.service
[user@fedora21test ~]# sudo systemctl start vncserver@:10.service.
After the server service successfully starts, you can verify which ports the VNCServer is listening to:
[root@fedora21test ~]# lsof -­i ­-P | grep ­-i "listen" | grep Xvn
Xvnc 8433 vpn 7u IPv4 110262 0t0 TCP *:5910 (LISTEN)
Running the systemctl start above will create an xstartup script under the /home/user/.vnc/ directory of the specific user account.
Check to make sure that it was created…
[user@fedora21test ~]# ls -­l /home/user/.vnc/
-­rw-------­­­­­­. 1 user user 8 Feb 20 17:55 passwd
-­rwxr-­xr-­x. 1 user user 355 Feb 20 17:11 xstartup

Step 7 :

IF you need to set the resolution for the VNC desktop, you can edit /etc/sysconfig/vncservers
[root@fedora21test ~]# vim /etc/sysconfig/vncservers
After editing the configuration file, you will need restart the VNC service.
[user@fedora21test ~]# sudo systemctl daemon-reload
[user@fedora21test ~]# sudo systemctl stop vncserver@:10.service.
[user@fedora21test ~]# sudo systemctl start vncserver@:10.service.

Step 8

One of the drawbacks of VNC is that its connections and traffic are not encrypted.
The easiest (and most secure) way to use VNC is to run it after you have established a VPN connection.
If you desire to run all of your traffic through an SSH tunnel instead, you can do so by following the procedures outlined below. Numbers in red need to be changed if you chose to change your ports earlier. 
To run your VNCclient through a secure ssh tunnel, do the following:
For local network connections…
[user@fedora21Client ~]# ssh user@x.x.x.x -L 6999:localhost:5910
Where x.x.x.x is the local network’s ← ip address for the VNC Server.
For cross internet  connections…
[user@fedora21Client ~]# ssh user@mydynamic.ddns.net -L 6999:localhost:5910
where mydynamic.ddns.net is what was set up at noip.com and points to your home routers external IP address.
NOTE: You need to connect to the server via SSH every time before running the VNC client…
The above lines essentially say:
Establish an SSH connection and then take all traffic bound for port 6999 on the localhost interface, and forward it through the SSH connection to port 5910 on the server.

Step 9

Regardless of whether you have chosen to use the internal ip address or the external one (as shown above) to forward your VNC traffic over SSH, you will always use the same line (indicated below) to connect via the VNC client.
  1. Now connect using a VNC client…
  2. On the address line enter:
  3. localhost:6999
  4. You should now get a password prompt box.
  5. Enter your password and you will get a popup window showing the screen of the server.
Now your VNC connection is running inside of a secure SSH tunnel! WooHoo! :)

Scripts for starting connections to your VPN, SSH, VNC server.

Obviously, you need to edit these scripts with your own particular user name, server name, noip domain name, and ip address:
Highlighted in red below…

ExternalSecureVNC:

#!/bin/bash
# To be used prior to using vnc viewer securely across the internet.
ssh user@yourdomain.ddns.net -L 6999:localhost:5910

LocalSecureVNC:

#!/bin/bash
# To be used prior to using vnc viewer securely locally.
# for a straight ip to the server
;ssh user@x.x.x.x -L 6999:localhost:5910
# for using your /etc/hosts entries
;ssh user@servername -L 6999:localhost:5910

StraightSSH:

#!/bin/bash
# for a straight local ip to the server
;ssh user@x.x.x.x
# for using your /etc/hosts entries
;ssh user@servername
# for connecting across the internet
;ssh user@yourdomain.ddns.net

VPNConnect:

#!/bin/bash
sudo openvpn /etc/openvpn/client.conf

Notes:

Don’t forget to chmod 700 * in the directory where all the scripts have been placed; to allow them to be executable.
It is recommended that you create /home/user/bin and put all of your scripts there. That way they will run from any location. While using the terminal, simply type the name of the script.
As an alternative, you can create links to your scripts and put them either on the desktop (or into a folder on the desktop) for easy access and execution. This can be accomplished by executing the following:
[user@fedora21test ~]# ln -s /home/user/bin/nameofscript /home/user/Desktop/nameofscript

What to do if the VNC Server Service fails to start…

If the server fails to start for whatever reason, the following procedures should get it going … First check to see if this file still exists:
[root@fedora21test ~]# ls /etc/systemd/system/vncserver@\:10.service
If not, then copy and edit the sample file again and replace with a valid user on your system:
[root@fedora21test ~]# cp /lib/systemd/system/vncserver@.service /etc/systemd/system/vncserver@:10.service
[root@fedora21test ~]# vim /etc/systemd/system/vncserver@\:10.service
Then continue with the following commands:
[user@fedora21test ~]# sudo rm -f /home/user/.vnc/*
[user@fedora21test ~]# sudo rm -f /tmp/.X11unix/*
[user@fedora21test ~]# vncpasswd
Do NOT use root or sudo here. Enter the vncserver password twice.
Display issues can usually be cleared up by editing the vncserver file and making the following change (I have indicated the line numbers below):
[root@fedora21test ~]# vim /usr/bin/vncserver
Go to this section and uncomment the line &GetXDisplayDefaults();
113 # Uncomment this line if you want default geometry, depth and pixelformat
114 # to match the current X display:
115 &GetXDisplayDefaults();
:wq!

[user@fedora21test ~]# sudo systemctl daemon-reload
[user@fedora21test ~]# sudo systemctl -f enable vncserver@:10.service
[user@fedora21test ~]# sudo systemctl start vncserver@:10.service
Now go back and check that there is a new xstartup script and passwd file in /home/user/.vnc as well as new entries in /tmp/.X11unix
[user@fedora21test ~]# ls -a /home/user/.vnc
[user@fedora21test ~]# sudo ls -a /tmp/.X11unix
If everything went according to plan, you should now have the ability to be anywhere on the planet and have a secure communication channel back to your home server via SSH, VPN and VNC! Each one of these services provides you with different and various options to access your server, or pass through it out on to the Internet, securely. Do your homework on each of these services and stay safe!

What to do if the client just goes away after clicking connect…

[root@fedora21test ~]# yum erase tigervnc
[root@fedora21test ~]# reboot
[root@fedora21test ~]# yum install tigervnc
Double check that your scripts (if you are using them) have the correct port entries:
Bring up tigervnc and if using SSH to provide a secure tunnel for you VNC session, ensure that both of your ssh start scripts for VNC have the correct ports entered.
Remember that you always have to run either the LocalSecureVNC or ExternalSecureVNC script before attempting to connect with the vncviewer if you want SSH security.
On the address line of the vncviewer, ensure that you are entering localhost:6999 before selecting connect.
If you want to connect to a VNC server and you have a VPN connection up, ensure that you enter x.x.x.x:portnumber on the address line of the client before selecting connect.
x.x.x.x is the INTERNAL (home network; i.e. 10.19.58.14) ip address of the VNC server: It is the SAME address that you entered on the Virtual Servers page on the router. The portnumber is your chosen port number, if you have changed it from the default, or 5910 if you have not.
The included /etc/openvpn/server.conf has topology subnet as one of the options. If you did not use that config file, then ensure that you have uncommented that entry in the server.conf file you are using. That entry makes it possible to connect through VPN to the VNC server as if it were on the same subnet as you. If you did have to make that change then you will also have to stop and restart the VPN server.
It is much easier to just bring up a VPN connection and then initiate a VNC connection to the server. I have included the SSH procedures as a means of showing an alternative, should the VPN Service be down for any reason.

Additional Tidbits:

Disk space usage with my own setup:
FilesystemSizeUsedAvailUse%Mounted on
devtmpfs3.7G03.7G0%/dev
tmpfs3.7G03.7G0%/dev/shm
tmpfs3.7G856k3.7G1%/run
tmpfs3.7G03.7G0%/sys/fs/cgroup
/dev/mapper/fedora­root50G103M47G1%/root
/dev/mapper/fedora­usr50G4.3G43G10%/user
/dev/mapper/fedora­home50G139M47G1%/home
/dev/mapper/fedora­var50G1.5G46G4%/var
/dev/sda2477M117M331M27%/boot
/dev/sda1200M9.6M191M5%/boot/efi
/dev/mapper/fedora­tmp20G45M19G1%/tmp
tmpfs744M0744M0%/run/user/1000
As you can see, my partitioning for this workstation is a bit much for what is actually required…
A complete solution for own private SSH, VPN and VNC server - blackMORE Ops - 1
My Virtual Server settings page on the router. Note the changed port number for the SSH server.
A complete solution for own private SSH, VPN and VNC server - blackMORE Ops - 2

The Port Triggers page on my router. Since I will not be using ip6 I have left out the entry for that on this page.
A complete solution for own private SSH, VPN and VNC server - blackMORE Ops - 3
Using htop to view server status via SSH connection over the internet.
Notice that in multi­-user.target (runlevel 3) mode, the RAM usage is only 177MB!
A complete solution for own private SSH, VPN and VNC server - blackMORE Ops - 4
But, even in graphical.target mode (runlevel 5), RAM usage is still only 696MB! In either target, performance is outstandingwhen connecting externally.
Post Submitted by: RedBrick
This is a user submitted post and I take no credit for other than putting it together here www.blackmoreops.com
-->

How To: Temporarily Clear Bash Environment Variables on a Linux and Unix-like System

$
0
0
http://www.cyberciti.biz/faq/linux-unix-temporarily-clearing-environment-variables-command

I'm a bash shell user. I would like to temporarily clear bash shell environment variables. I do not want to delete or unset an exported environment variable. How do I run a program in a temporary environment in bash or ksh shell?

You can use the env command to set and print environment on a Linux or Unix-like systems. The env command executes utility after modifying the environment as specified
Tutorial details
DifficultyEasy (rss)
Root privilegesNo
RequirementsNone
Estimated completion time2m
on the command line.

How do I display my current environment?

Open the terminal application and type any one of the following command:
 
printenv
 
OR
 
env
 
Sample outputs:
Fig.01: Unix/Linux: List All Environment Variables Command

Counting your environment variables

Type the following command:
 
env | wc -l
printenv | wc -l
 
Sample outputs:
20

Run a program in a clean environment in bash/ksh/zsh

The syntax is as follows:
 
env -i your-program-name-here arg1 arg2 ...
 
For example, run the wget program without using http_proxy and/or all other variables i.e. temporarily clear all bash/ksh/zsh environment variables and run the wget program:
 
env -i /usr/local/bin/wget www.cyberciti.biz
env -i wget www.cyberciti.biz
 
This is very useful when you want to run a command ignoring any environment variables you have set. I use this command many times everyday to ignore the http_proxy and other environment variable I have set.

Example: With the http_proxy

$ wget www.cyberciti.biz
--2015-08-03 23:20:23-- http://www.cyberciti.biz/
Connecting to 10.12.249.194:3128... connected.
Proxy request sent, awaiting response... 200 OK

Length: unspecified [text/html]
Saving to: 'index.html'
index.html [ <=> ] 36.17K 87.0KB/s in 0.4s
2015-08-03 23:20:24 (87.0 KB/s) - 'index.html' saved [37041]

Example: Ignore the http_proxy

$ env -i /usr/local/bin/wget www.cyberciti.biz
--2015-08-03 23:25:17-- http://www.cyberciti.biz/
Resolving www.cyberciti.biz... 74.86.144.194
Connecting to www.cyberciti.biz|74.86.144.194|:80... connected.

HTTP request sent, awaiting response... 200 OK
Length: unspecified [text/html]
Saving to: 'index.html.1'
index.html.1 [ <=> ] 36.17K 115KB/s in 0.3s
2015-08-03 23:25:18 (115 KB/s) - 'index.html.1' saved [37041]

The option -i causes env command to completely ignore the environment it inherits. However, it does not prevent your command (such as wget or curl) setting new variables. Also, note down the side effect of running bash/ksh shell:
 
env -i env | wc -l ## empty ##
# Now run bash ##
env -i bash
## New enviroment set by bash program ##
env | wc -l
 

Example: Set an environmental variable

The syntax is:
 
envvar=value /path/to/command arg1 arg2 ...
## OR ##
var=value /path/to/command arg1 arg2 ...
 
For example set http_proxy:
envhttp_proxy="http://USER:PASSWORD@server1.cyberciti.biz:3128/" \
/usr/local/bin/wget www.cyberciti.biz

Teach coding with games: a review of Codewars and CodeCombat

$
0
0
http://opensource.com/education/15/7/codewars-codecombat-review

Image by : 
opensource.com

I recently stumbled upon two websites for learning coding and programming skills: CodeCombat and Codewars. Both use a free software philosophy (all code examples are open source licensed and/or available GitHub) and help teach different computer programming languages. I tested CodeCombat and Codewars out when some of my students were seeking to learn the Python programming language.

CodeCombat

CodeCombat screenshot
Screenshot provided by Horst Jens. CC BY-SA 4.0.
CodeCombat has a focus on gamification that makes it suitable for a younger audience. If you like RPG games with cartoon fantasy graphics, you'll enjoy it too. The game builds on older learn-to-code systems such as Rurple and Karel. The screen is split between a code editor on the right and a labyrinth on the left half. Inside the labyrinth is an avatar the player can control using a restricted set of commands (e.g. self.moveDown(), self.moveRight(), self.attack(self.findNearestEnemy()), etc.). Commands have to be typed correctly to control the avatar, and incorrect programs with logical faults (like commanding the avatar to run against a wall) will cause it to lose hit points and eventually die.
In each level, the player is assigned a set of tasks—usually to collect gems, defeat monsters, and move to the exit of a level. The player is gradually introduced to new commands like loops, conditionals, and variables. Diamonds collected in a level can be invested between levels for better armor, weapons, and programming commands (cleverly symbolized as spellbooks and magic devices) to master the increasingly tricky tasks in the higher levels.
CodeCombat begins with a smooth learning curve well suited to players with no coding experience. As the player progresses, the tasks involve more complex programming concepts. Most importantly, the levels themselves become more complex due to more possible interaction with the objects in the game world: fences can be built, fire traps can be set, enemies can be lured into minefields, special weapons allow special attacks with a cooldown timer, etc.
In addition to beautifully designed levels, the game's later stages also boast riddles that are complex enough to fascinate gamers and coders alike.
License
CodeCombat itself can be found on GitHub under the free MIT license. All the art assets (sprites, backgrounds, sound effects, etc.) can also be found on GitHub and are published under a Creative Commons CC BY 4.0 license. This allows easy use of the game artwork for projects of students.
Business model
The licenses and attributions are explained in more detail on the CodeCombat legal page. CodeCombat reserves the right to publish levels for CodeCombat created and uploaded with the CodeCombat level editor under a non-free license.
The current business model relies on "nudging" parents and teachers into a US$9.99/month subscription to gain access to video tutorials, more levels, and more (virtual) diamonds. While the built-in advertising and nudging to subscribe may be slightly irritating for some players, it's a legal way to build a business ecosystem around a free/libre/open source core.
Because the complete CodeCombat source code is on GitHub, forkers can create their own code combat system with a different business model (or no business model at all) attached to it.
User participation
CodeCombat seeks user contributions for level-design, coding, translation, and other tasks. I especially look forward to community-created content from teachers and educators, like lesson plans or best-practice guidebooks for integrating CodeCombat sessions into computer science courses.
CodeCombat ways to contribute
Screenshot provided by Horst Jens. CC BY-SA 4.0.
Teaching experience
My own experience with using CodeCombat in my programming courses was pleasant. CodeCombat was a hit with my 11-year-old students and often attracted older students willing to "help." Students were able to figure out most of the tasks for themselves with little to no assistance from a teacher. For some levels, the task description is hidden in the code comments. On higher levels, my German-speaking students' limited English skills were a problem.
The gamification worked very well, especially among younger students. They loved spending time pondering how best to invest their hard-earned virtual diamonds and were very pleased when they earned superior virtual armor and weapons.
Critique
I don't have much to criticize, but there were a few things:
    • Pythonic non-python: CodeCombat students learn a lot of commands that only exist in the game world. While this is fine in the game, some "structural" commands like loop: could have easily been replaced by the correct Python command (while True:).
    • Forced Object orientation: CodeCombat introduces commands like self.moveDown() instead of moveDown() at the beginning, indicating that the avatar is an instance of an avatar class. While I like the concept of doing it right from the start and explaining later, I wonder if it's really necessary to force object-oriented concepts onto students right away when the necessary teaching (loops, conditionals, variables) could be as well taught without object-orientation paradigm. I guess it's to enable CodeCombat to use other programing languages like Java.

Codewars

Codewars is a more mature version of CodeCombat. Students aren't guided through lessons, but instead confronted with programming tasks—not unlike the homework assignments of a typical computer science class.
Kata
Each programming task is in reference to a Japanese martial art called Kata. They include a short task description, a set of input data, and the desired output data. The student is tasked with writing a function in his preferred programming language to transform the given input into the desired output. This is all done with the online, built-in programming editor.
The student is also tasked with writing his own tests, and the outcome of the tests (pass or fail) give clues as to whether the code is ready to submit to the public. To make the Katas more difficult, the given set of input-output data in the task description is only a subset of the data used to test a Kata before submitting it to the public. The user can run his function against his own test with a button or can press "submit" to test it against the bigger, hidden dataset. Only once all tests are passed can the function be uploaded to and inspected by the public.
This is a very revealing moment: even for a seemingly simple and straightforward problem there exist countless different solutions. Solutions can be upvoted as "best practice" so that the swarm intelligence of all coders sort the most acceptable solution to the top. It is also possible to vote a solution as "clever."
There's also a built-in web forum where Kata solutions can be discussed.
There's not much gamification in Codewars, but solving Katas—along with a few other activities—will slowly raise a student's rank.
Codewars screenshot
Screenshot provided by Horst Jens. CC BY-SA 4.0.
Kumite
A step up from Katas are Kumites, more complex coding problems where other coders are invited to refactor code and provide solutions.
Teaching experience and critique
While I personally like Codewars, I found it less than ideal for teaching Python (I tested it on with 14-year old, German-speaking students with some Python knowledge and basic knowledge of English). In contrast to CodeCombat, the teaching must happen before Codewars is used, or a student must have the skill and self-discipline to learn necessary coding skills other ways.
The biggest problems were understanding the task description and understanding how to use write tests. Simply put, most tests use the assert.equal statement:
Test.assert_equals(function_name('input data'),'desired output data')
Unfortunately, this line was not present in the test area in all Katas, further confusing students.
However, Codewars offers huge learning opportunities by looking at (and discussing) the solutions of others. It is also a good tool for tackling Katas already solved in a preferred programming language with a different, new programming language.
Lastly, Codewars is well suited for introducing the concept of pair programming via coding dojos: two students have to solve a Kata together with one doing the thinking (navigator) while the other does the typing (driver). After a given time interval or after at least one test is passed, a new student becomes driver and the driver becomes navigator.
Participation and license
Codewars users are encouraged to participate. The ability to discuss, share, and fork Katas and Kumites is built-in. As stated in the Codewars terms page, all uploaded code is licensed under the FreeBSD 2-Clause license.
Business model
It's not obvious what the business model is for Codewars. I think the site could become useful as a recruiting tool for IT jobs, but I hope the site will attract enough donations from thankful computer science teachers, like me, who finally have been able to rid themselves of the need to create and score homework.
Originally posted at spielend-programmieren.at. Republished with permission under Creative Commons.

Django Models and Migrations

$
0
0
http://www.linuxjournal.com/content/djangos-migrations-make-it-easy-define-and-update-your-database-schema

In my last two articles, I looked at the Django Web application framework, written in Python. Django's documentation describes it as an MTV framework, in which the acronym stands for model, template and views.
When a request comes in to a Django application, the application's URL patterns determine which view method will be invoked. The view method can then, as I mentioned in previous articles, directly return content to the user or send the contents of a template. The template typically contains not only HTML, but also directives, unique to Django, which allow you to pass along variable values, execute loops and display text conditionally.
You can create lots of interesting Web applications with just views and templates. However, most Web applications also use a database, and in many cases, that means a relational database. Indeed, it's a rare Web application that doesn't use a database of some sort.
For many years, Web applications typically spoke directly with the database, sending SQL via text strings. Thus, you would say something like:

s = "SELECT first_name, last_name FROM Users where id = 1"
You then would send that SQL to the server via a database client library and retrieve the results using that library. Although this approach does allow you to harness the power of SQL directly, it means that your application code now contains text strings with another language. This mix of (for example) Python and SQL can become difficult to maintain and work with. Besides, in Python, you're used to working with objects, attributes and methods. Why can't you access the database that way?
The answer, of course, is that you can't, because relational databases eventually do need to receive SQL in order to function correctly. Thus, many programs use an ORM (object-relational mapper), which translates method calls and object attributes into SQL. There is a well established ORM in the Python world known as SQLAlchemy. However, Django has opted to use its own ORM, with which you define your database tables, as well as insert, update and retrieve information in those tables.
So in this article, I cover how you create models in Django, how you can create and apply migrations based on those model definitions, and how you can interact with your models from within a Django application.

Models

A "model" in the Django world is a Python class that represents a table in the database. If you are creating an appointment calendar, your database likely will have at least two different tables: People and Appointments. To represent these in Django, you create two Python classes: Person and Appointment. Each of these models is defined in the models.py file inside your application.
This is a good place to point out that models are specific to a particular Django application. Each Django project contains one or more applications, and it is assumed that you can and will reuse applications within different projects.
In the Django project I have created for this article ("atfproject"), I have a single application ("atfapp"). Thus, I can define my model classes in atfproject/atfapp/models.py. That file, by default, contains a single line:

from django.db import models
Given the example of creating an appointment calendar, let's start by defining your Appointment model:

from django.db import models

class Appointment(models.Model):
starts_at = models.DateTimeField()
ends_at = models.DateTimeField()
meeting_with = models.TextField()
notes = models.TextField()
def __str__(self):
return "{} - {}: Meeting with {} ({})".format(self.starts_at,
self.ends_at,
self.meeting_with,
self.notes)
Notice that in Django models, you define the columns as class attributes, using a Python object known as a descriptor. Descriptors allow you to work with attributes (such as appointment.starts_at), but for methods to be fired in the back. In the case of database models, Django uses the descriptors to retrieve, save, update and delete your data in the database.
The one actual instance method in the above code is __str__, which every Python object can use to define how it gets turned into a string. Django uses the __str__ method to present your models.
Django provides a large number of field types that you can use in your models, matching (to a large degree) the column types available in most popular databases. For example, the above model uses two DateTimeFields and two TextFields. As you can imagine, these are mapped to the DATETIME and TEXT columns in SQL. These field definitions not only determine what type of column is defined in the database, but also the way in which Django's admin interface and forms allow users to enter data. In addition to TextField, you can have BooleanFields, EmailFields (for e-mail addresses), FileFields (for uploading files) and even GenericIPAddressField, among others.
Beyond choosing a field type that's appropriate for your data, you also can pass one or more options that modify how the field behaves. For example, DateField and DateTimeField allow you to pass an "auto_now" keyword argument. If passed and set to True, Django automatically will set the field to the current time when a new record is stored. This isn't necessarily behavior that you always will want, but it is needed frequently enough that Django provides it. That's true for the other fields, as well—they provide options that you might not always need, but that really can come in handy.

Migrations

So, now you have a model! How can you start to use it? Well, first you somehow need to translate your model into SQL that your database can use. This means, before continuing any further, you need to tell Django what database you're using. This is done in your project's configuration file; in my case, that would be atfproject/atfproject/settings.py. That file defines a number of variables that are used throughout Django. One of them is DATABASES, a dictionary that defines the databases used in your project. (Yes, it is possible to use more than one, although I'm not sure if that's normally such a good idea.)
By default, the definition of DATABASES is:

DATABASES = {
'default': {
'ENGINE': 'django.db.backends.sqlite3',
'NAME': os.path.join(BASE_DIR, 'db.sqlite3'),
}
}
In other words, Django comes, out of the box, defined to use SQLite. SQLite is a wonderful database for most purposes, but it is woefully underpowered for a real, production-ready database application that will be serving the general public. For such cases, you'll want something more powerful, such as my favorite database, PostgreSQL. Nevertheless, for the purposes of this little experiment here, you can use SQLite.
One of the many advantages of SQLite is that it uses one file for each database; if the file exists, SQLite reads the data from there. And if the file doesn't yet exist, it is created upon first use. Thus, by using SQLite, you're able to avoid any configuration.
However, you still somehow need to convert your Python code to SQL definitions that SQLite can use. This is done with "migrations".
Now, if you're coming from the world of Ruby on Rails, you are familiar with the idea of migrations—they describe the changes made to the database, such that you easily can move from an older version of the database to a newer one. I remember the days before migrations, and they were significantly less enjoyable—their invention really has made Web development easier.
Migrations are latecomers to the world of Django. There long have been external libraries, such as South, but migrations in Django itself are relatively new. Rails users might be surprised to find that in Django, developers don't create migrations directly. Rather, you tell Django to examine your model definitions, to compare those definitions with the current state of the database and then to generate an appropriate migration.
Given that I just created a model, I go back into the project's root directory, and I execute:

django-admin.py makemigrations
This command, which you execute in the project's root directory, tells Django to look at the "atfapp" application, to compare its models with the database and then to generate migrations.
Now, if you encounter an error at this point (and I often do!), you should double-check to make sure your application has been added to the project. It's not sufficient to have your app in the Django project's directory. You also must add it to INSTALLED_APPS, a tuple in the project's settings.py. For example, in my case, the definition looks like this:

INSTALLED_APPS = (
'django.contrib.admin',
'django.contrib.auth',
'django.contrib.contenttypes',
'django.contrib.sessions',
'django.contrib.messages',
'django.contrib.staticfiles',
'atfapp'
)
The output of makemigrations on my system looks like this:

Migrations for 'atfapp':
0001_initial.py:
- Create model Appointment
In other words, Django now has described the difference between the current state of the database (in which "Appointment" doesn't exist) and the final state, in which there will be an "Appointment" table. If you're curious to see what this migration looks like, you can always look in the atfapp/migrations directory, in which you'll see Python code.
Didn't I say that the migration will describe the needed database updates in SQL? Yes, but the description originally is written in Python. This allows you, at least in theory, to migrate to a different database server, if and when you want to do so.
Now that you have the migrations, it's time to apply them. In the project's root directory, I now write:

django-admin.py migrate
And then see:

Operations to perform:
Apply all migrations: admin, contenttypes, auth, atfapp, sessions
Running migrations:
Applying contenttypes.0001_initial... OK
Applying auth.0001_initial... OK
Applying admin.0001_initial... OK
Applying atfapp.0001_initial... OK
Applying sessions.0001_initial... OK
The above shows that the "atfapp" initial migration was run. But where did all of these other migrations come from? The answer is simple. Django's user model and other built-in models also are described using migrations and, thus, are applied along with mine, if that hasn't yet happened in my Django project.
You might have noticed that each migration is given a number. This allows Django to keep track of the history of the migrations and also to apply more than one, if necessary. You can create a migration, then create a new migration and then apply both of them together, if you want to keep the changes separate.
Or, perhaps more practically, you can work with other people on a project, each of whom is updating the database. Each of them can create their own migrations and commit them into the shared Git repository. If and when you retrieve the latest changes from Git, you'll get all of the migrations from your coworkers and then can apply them to your app.

Migrating Further

Let's say that you modify your model. How do you create and apply a new migration? The answer actually is fairly straightforward. Modify the model and ask Django to create an appropriate migration. Then you can run the newly created migration.
So, let's add a new field to the Appointment model, "minutes", to keep track of what happened during the meeting. I add a single line to the model, such that the file now looks like this:

from django.db import models

class Appointment(models.Model):
starts_at = models.DateTimeField()
ends_at = models.DateTimeField()
meeting_with = models.TextField()
notes = models.TextField()
minutes = models.TextField() # New line here!
def __str__(self):
return "{} - {}: Meeting with {} ({})".format(self.starts_at,
self.ends_at,
self.meeting_with,
self.notes)
Now I once again run makemigrations, but this time, Django is comparing the current definition of the model with the current state of the database. It seems like a no-brainer for Django to deal with, and it should be, except for one thing: Django defines columns, by default, to forbid NULL values. If I add the "minutes" column, which doesn't allow NULL values, I'll be in trouble for existing rows. Django thus asks me whether I want to choose a default value to put in this field or if I'd prefer to stop the migration before it begins and to adjust my definitions.
One of the things I love about migrations is that they help you avoid stupid mistakes like this one. I'm going to choose the first option, indicating that "whatever" is the (oh-so-helpful) default value. Once I have done that, Django finishes with the migration's definition and writes it to disk. Now I can, once again, apply the pending migrations:

django-admin.py migrate
And I see:

Operations to perform:
Apply all migrations: admin, contenttypes, auth, atfapp, sessions
Running migrations:
Applying atfapp.0002_appointment_minutes... OK
Sure enough, the new migration has been applied!
Of course, Django could have guessed as to my intentions. However, in this case and in most others, Django follows the Python rule of thumb in that it's better to be explicit than implicit and to avoid guessing.

Conclusion

Django's models allow you to create a variety of different fields in a database-independent way. Moreover, Django creates migrations between different versions of your database, making it easy to iterate database definitions as a project moves forward, even if there are multiple developers working on it.
In my next article, I plan to look at how you can use models that you have defined from within your Django application.

Install Elastix Unified Communication Server

$
0
0
http://www.unixmen.com/install-elastix-unified-communication-server

Please shareShare on Facebook391Share on Google+10Tweet about this on Twitter35Share on LinkedIn4Share on Reddit3Digg thisShare on StumbleUpon1Share on VKBuffer this page

Introduction

From the wikipedia,
Elastix is an unified communications server software that brings together IP PBX, email, IM, faxing and collaboration functionality. It has a Web interface and includes capabilities such as a call center software with predictive dialing. The Elastix functionality is based on open source projects including Asterisk, FreePBX, HylaFAX, Openfire and Postfix. Those packages offer the PBX, fax, instant messaging and email functions, respectively.

Installation

Prerequisites:
  • Minimum Storage Capacity: 80 GB
  • RAM: 2 GB
  • CPU: Core i3 or better
Step 1:
Download ISO Image of Elastix Unified Communication Server from Following Link:
Make a bootable usb or burn iso image to DVD, Boot from device and Install.
Step 2:
At the boot prompt, press Enter.
bbq_(001)
Step 3:
Change the default language, press enter.
bbq_(002)
Step 4:
We have selected us pattern, press enter.
bbq_(003)
Step 5:
Recreate partitions, press yes and then press enter.
bbq_(005)
Step 6:
Select Installed Hard Disk, press enter.
bbq_(008)
Step 7:
Apply Changes and review your partition table.
bbq_(006)
bbq_(007)
Step 8:
Configure Network Interface, press Yes.
bbq_(009)
Step 9:
Select protocols you wants to have with your VoIP Server.
bbq_(010)
Step 10:
Assign IP address, in our scenario it will be 192.168.1.5.
bbq_(011)
Step 11:
Latest Elastix Distro also support IPv6, leave it as default.
bbq_(012)
Step 12:
Provide Gateway IP Address and DNS Address, press OK.
bbq_(013)
Step 13:
Provide hostname, in out case it will be ‘voip.unixmen.com’, press ok.
bbq_(014)
Step 14:
Select your time zone, press ok.
bbq_(015)
Step 15:
Provide password to the root user, our will be ‘P@ssw0rd’.
bbq_(016)
Step 16:
The System will check dependencies, Then it will start installation packages automatically.
bbq_(017)
bbq_(018)
Step 17:
This step may take some time during installation process, System will automatically reboot after completion of this step, do not interrupt this boot process, Server will automatically ask for Mysql password, assign that password (our password is ‘P@ssw0rd’).
bbq_(020)
Step 18:
In next step it will ask for admin password, this password will be required when you have to log in server via web browser (our is ‘P@ssw0rd’).
Step 19:
After completion of installation process, server will be prompted with a terminal, login with username ‘root’ and provide password for root user.
bbq_(021)
Step 19:
Congratulation! installation is done.
Now open browser from remote system and type ip_address of elastix to open management console of server. (our scenario ip will be  192.168.1.5).
bbq_(023)
Step 20:
Login with ‘admin’ user and provide password then login, a dash board will appear, now you can manage all of your messaging, VoIP, Mail Services.
bbq_(024)
Congratulations!! you have installed Elastix unified Communication Service, Explore all of the available service,  with Mail Services you can add domains, can configure mail accounts, and provide mail addresses as per your need, similarly you can handle your PBX or FAX etc. services.
bbq_(025)
That’s it. Have Fun!!

How to enable SSL for MySQL server and client

$
0
0
http://xmodulo.com/enable-ssl-mysql-server-client.html

When users want to have a secure connection to their MySQL server, they often rely on VPN or SSH tunnels. Yet another option for securing MySQL connections is to enable SSL wrapper on an MySQL server. Each of these approaches has its own pros and cons. For example, in highly dynamic environments where a lot of short-lived MySQL connections occur, VPN or SSH tunnels may be a better choice than SSL as the latter involves expensive per-connection SSL handshake computation. On the other hand, for those applications with relatively few long-running MySQL connections, SSL based encryption can be reasonable. Since MySQL server already comes with built-in SSL support, you do not need to implement a separate security layer like VPN or SSH tunnel, which has their own maintenance overhead.
The implementation of SSL in an MySQL server encrypts all data going back and forth between a server and a client, thereby preventing potential eavesdropping or data sniffing in wide area networks or within data centers. In addition, SSL also provides identify verification by means of SSL certificates, which can protect users against possible phishing attacks.
In this article, we will show you how to enable SSL on MySQL server. Note that the same procedure is also applicable to MariaDB server.

Creating Server SSL Certificate and Private Key

We have to create an SSL certificate and private key for an MySQL server, which will be used when connecting to the server over SSL.
First, create a temporary working directory where we will keep the key and certificate files.
$ sudo mkdir ~/cert
$ cd ~/cert
Make sure that OpenSSL is installed on your system where an MySQL server is running. Normally all Linux distributions have OpenSSL installed by default. To check if OpenSSL is installed, use the following command.
$ openssl version
OpenSSL 1.0.1f 6 Jan 2014
Now go ahead and create the CA private key and certificate. The following commands will create ca-key.pem and ca-cert.pem.
$ openssl genrsa 2048 > ca-key.pem
$ openssl req -sha1 -new -x509 -nodes -days 3650 -key ca-key.pem > ca-cert.pem
The second command will ask you several questions. It does not matter what you put in these field. Just fill out those fields.
The next step is to create a private key for the server.
$ openssl req -sha1 -newkey rsa:2048 -days 730 -nodes -keyout server-key.pem > server-req.pem
This command will ask several questions again, and you can put the same answers which you have provided in the previous step.
Next, export the server's private key to RSA-type key with this command below.
$ openssl rsa -in server-key.pem -out server-key.pem
Finally, generate a server certificate using the CA certificate.
$ openssl x509 -sha1 -req -in server-req.pem -days 730 -CA ca-cert.pem -CAkey ca-key.pem -set_serial 01 > server-cert.pem

Configuring SSL on MySQL Server

After the above procedures, we should have a CA certificate, a server's private key and its certificate. The next step is to configure our MySQL server to use the key and certificates.
Before configuring the MySQL server, check whether the SSL options are enabled or disabled. For that, log in to the MySQL server, and type the query below.
mysql> SHOW GLOBAL VARIABLES LIKE 'have_%ssl';
The result of this query will look like the following.

Note that the default value of 'have_openssl' and 'have_ssl' variables is 'disabled' as shown above. To enable SSL in the MySQL server, go ahead and follow the steps below.
1. Copy or move ca-cert.pem, server-cert.pem, and server-key.pem under /etc directory.
$ sudo mkdir /etc/mysql-ssl
$ sudo cp ca-cert.pem server-cert.pem server-key.pem /etc/mysql-ssl
2. Open my.cnf of the server using a text editor. Add or un-comment the lines that look like below in [mysqld] section. These should point to the key and certificates you placed in /etc/mysql-ssl.
1
2
3
4
[mysqld]
ssl-ca=/etc/mysql-ssl/ca-cert.pem
ssl-cert=/etc/mysql-ssl/server-cert.pem
ssl-key=/etc/mysql-ssl/server-key.pem
3. In my.cnf, also find "bind-address = 127.0.0.1", and change it to:
1
bind-address = *
That way, you can connect to the MySQL server from another host.
4. Restart MySQL service.
$ sudo service mysql restart
or:
$ sudo systemctl restart mysql
or:
$ sudo /etc/init.d/mysql restart
You can check whether the SSL configuration is working or not by examining the MySQL error log file (e.g., /var/log/mysql/mysql.log). If no warning or error is shown in the error log (like the screenshot below), it means that SSL configuration works okay.

Another way to verify SSL configuration is by re-running the 'have_%ssl' query inside the MySQL server.
mysql> SHOW GLOBAL VARIABLES LIKE 'have_%ssl';

Creating a User with SSL Privilege

After the server-side SSL configuration is finished, the next step is to create a user who has a privilege to access the MySQL server over SSL. For that, log in to the MySQL server, and type:
mysql> GRANT ALL PRIVILEGES ON *.* TO ‘ssluser’@’%’ IDENTIFIED BY ‘dingdong’ REQUIRE SSL;
mysql> FLUSH PRIVILEGES;
Replace 'ssluser' (username) and 'dingdong' (password) with your own.
If you want to give a specific ip address (e.g., 192.168.2.8) from which the user will access the server, use the following query instead.
mysql> GRANT ALL PRIVILEGES ON *.* TO ‘ssluser’@’192.168.2.8’ IDENTIFIED BY 'dingdong' REQUIRE SSL;
mysql> FLUSH PRIVILEGES;

Configure SSL on MySQL Client

Now that MySQL server-side configuration is done, let's move to the client side. For MySQL client, we need to create a new key and certificate based on server's CA key and certificate.
Run the following commands on the MySQL server host where the server's CA key and certificate reside.
$ openssl req -sha1 -newkey rsa:2048 -days 730 -nodes -keyout client-key.pem > client-req.pem
Similar to server-side configuration, the above command will ask several questions. Just fill out the fields like we did before.
We also need to convert the generated client key into RSA type as follows.
$ openssl rsa -in client-key.pem -out client-key.pem
Finally we need to create a client certificate using the server's CA key and certificate.
$ openssl x509 -sha1 -req -in client-req.pem -days 730 -CA ca-cert.pem -CAkey ca-key.pem -set_serial 01 > client-cert.pem
Now transfer the ca-cert.pem, client-cert.pem, and client-key.pem files to to any host where you want to run MySQL client.
On the client host, use the following command to connect to the MySQL server with SSL.
$ mysql --ssl-ca=ca-cert.pem --ssl-cert=client-cert.pem --ssl-key=client-key.pem -h -u ssluser -p
After typing the ssluser's password, you will see the MySQL prompt as usual.
To check whether you are on SSL, type status command at the prompt.
mysql> status;
If you are connected over SSL, it will show you the cipher information in the SSL field as shown below.

If you do not want to specify client certificate and key information in the command line, you can create ~/.my.cnf file, and put the following information under [client] section.
1
2
3
4
[client]
ssl-ca=/path/to/ca-cert.pem
ssl-cert=/path/to/client-cert.pem
ssl-key=/path/to/client-key.pem
With that, you can simply use the following command line to connect to the server over SSL.
$ mysql -h -u ssluser -p

Must-Know Linux Commands For New Users

$
0
0
http://www.linux.com/learn/tutorials/842251-must-know-linux-commands-for-new-users

fedora cli
Manage system updates via the command line with dnf on Fedora.
One of the beauties of Linux-based systems is that you can manage your entire system right from the terminal using the command line. The advantage of using the command line is that you can use the same knowledge and skills to manage any Linux distribution.
This is not possible through the graphical user interface (GUI) as each distro, and desktop environment (DE), offers its own user interfaces. To be clear, there are cases in which you will need different commands to perform certain tasks on different distributions, but more or less the concept and ideas remain the same.
In this article, we are going to talk about some of the basic commands that a new Linux user should know. I will show you how to update your system, manage software, manipulate files and switch to root using the command line on three major distributions: Ubuntu (which also includes its flavors and derivatives, and Debian), openSUSE and Fedora.
Let's get started!

Keep your system safe and up-to-date

Linux is secure by design, but the fact is that all software has bugs and there could be security holes. So it's very important to keep your system updated. Think of it this way: Running an out-of-date operating system is like being in an armored tank with the doors unlocked. Will the armor protect you? Anyone can enter through the open doors and cause harm. Similarly there can be un-patched holes in your OS which can compromise your systems. Open source communities, unlike the proprietary world, are extremely quick at patching holes, so if you keep your system updated you'll stay safe.
Keep an eye on news sites to be aware of security vulnerabilities. If there is a hole discovered, read about it and update your system as soon as a patch is out. Either way you must make it a practice to run the update commands at least once a week on production machines. If you are running a complicated server then be extra careful and go through the changelog to ensure updates won't break your customization.
Ubuntu: Bear one thing in mind: you must always refresh repositories (aka repos) before upgrading the system or installing any software. On Ubuntu, you can update your system with the following commands. The first command refreshes repositories:
sudo apt-get update
Once the repos are updated you can now run the system update command:
sudo apt-get upgrade
However this command doesn't update the kernel and some other packages, so you must also run this command:
sudo apt-get dist-upgrade
openSUSE: If you are on openSUSE, you can update the system using these commands (as usual, the first command is meant to update repos)
sudo zypper refresh
sudo zypper up
Fedora: If you are on Fedora, you can use the 'dnf' command which is 'kind' of equivalent to zypper and apt-get:
sudo dnf update
sudo dnf upgrade

Software installation and removal

You can install only those packages which are available in the repositories enabled on your system. Every distro comes with some official or third-party repos enabled by default.
Ubuntu: To install any package on Ubuntu, first update the repo and then use this syntax:
sudo apt-get install [package_name]
Example:
sudo apt-get install gimp
openSUSE: The commands would be:
sudo zypper install [package_name]
Fedora: Fedora has dropped 'yum' and now uses 'dnf' so the command would be:
sudo dnf install [package_name]
The procedure to remove the software is the same, just exchange 'install' with 'remove'.
Ubuntu:
sudo apt-get remove [package_name]
openSUSE:
sudo zypper remove [package_name]
Fedora:
sudo dnf remove [package_name]

How to manage third party software?

There is a huge community of developers who offer their software to users. Different distributions use different mechanisms to make third party software available to their users. It also depends on how a developer offers their software to users; some offer binaries and others offer it through repositories.
Ubuntu heavily relies on PPAs (personal package archives) but, unfortunately, there is no built-in tool which can assist a user in searching PPAs. You will need to Google the PPA and then add the repository manually before installing the software. This is how you would add any PPA to your system:
sudo add-apt-repository ppa:
Example: Let's say I want to add LibreOffice PPA to my system. I would Google the PPA and then acquire the repo name from Launchpad, which in this case is "libreoffice/ppa". Then add the ppa using the following command:
sudo add-apt-repository ppa:libreoffice/ppa
It will ask you to hit the Enter key in order to import the keys. Once it's done, refresh the repos with the 'update' command and then install the package.
openSUSE has an elegant solution for third-party apps. You can visit software.opensuse.org, search for the package and install it with one click. It will automatically add the repo to your system. If you want to add any repo manually, use this command:.
sudo zypper ar -f url_of_the_repo name_of_repo
sudo zypper ar -f http://download.opensuse.org/repositories/LibreOffice:Factory/openSUSE_13.2/LibreOffice:Factory.repo LOF
Then refresh the repo and install software:
sudo zypper refresh
sudo zypper install libreoffice
Fedora users can simply add RPMFusion (both free and non-free repos) which contain a majority of applications. In case you do need to add a repo, this is the command:
dnf config-manager --add-repo http://www.example.com/example.repo

Some basic commands

I have written a few articles on how to manage files on your system using the CLI, here are some of the basic commands which are common across all distributions.
Copy files or directories to a new location:
cp path_of_file_1 path_of_the_directory_where_you_want_to_copy/
Copy all files from a directory to a new location (notice the slash and asterisk, which implies all files within that directory):
cp path_of_files/* path_of_the_directory_where_you_want_to_copy/
Move a file from one location to another (the trailing slash means inside that directory):
mv path_of_file_1 path_of_the_directory_where_you_want_to_move/
Move all file from one location to another:
mv path_of_directory_where_files_are/* path_of_the_directory_where_you_want_to_move/
Delete a file:
rm path_of_file
Delete a directory:
rm -r path_of_directory
Remove all content from the directory, leaving the directory folder intact:
rm -r path_of_directory/*

Create new directory

To create a new directory, first enter the location where you want to create a directory. Let's say you want to create a 'foundation' folder inside your Documents directory. Let's change the directory using the cd (aka change directory) command:
cd /home/swapnil/Documents
(exchange 'swapnil with the user on your system)
Then create the directory with mkdir command:
mkdir foundation
You can also create a directory from anywhere, by giving the path of the directory. For example:
mdkir /home/swapnil/Documents/foundation
If you want to create parent-child directories, which means directories within other directories then use the -p option. It will create all directories in the given path:
mdkir -p /home/swapnil/Documents/linux/foundation

Become root

You either need to be root or the user should have sudo powers to perform some administrative tasks such as managing packages or making changes to the root directories or files. An example would be to edit the 'fstab' file which keeps a record of mounted hard drives. It's inside the 'etc' directory which is within the root directory. You can make changes to this file only as a super user. In most distros you can become root by 'switching user'. Let's say on openSUSE I want to become root as I am going to work inside the root directory. You can use either command:
sudo su -
Or
su -
That will ask for the password and then you will have root privileges. Keep one point in mind: never run your system as root user unless you know what you are doing. Another important point to note is that the files or directories you modify as root also change ownership of those files from that user or specific service to root. You may have to revert the ownership of those files otherwise the services or users won't be able to to access or write to those files. To change users, this is the command:
sudo chown -R user:user /path_of_file_or_directory
You may often need this when you have partitions from other distros mounted on the system. When you try to access files on such partitions, you may come across a permission denied error. You can simply change the ownership of such partitions to access them. Just be extra careful, don't change permissions or ownership of root directories.
These are the basic commands any new Linux user needs. If you have any questions or if you want us to cover a specific topic, please mention them in the comments below.

Hacking a Safe with Bash

$
0
0
http://www.linuxjournal.com/content/hacking-safe-bash

Through the years, I have settled on maintaining my sensitive data in plain-text files that I then encrypt asymmetrically. Although I take care to harden my system and encrypt partitions with LUKS wherever possible, I want to secure my most important data using higher-level tools, thereby lessening dependence on the underlying system configuration. Many powerful tools and utilities exist in this space, but some introduce unacceptable levels of "bloat" in one way or another. Being a minimalist, I have little interest in dealing with GUI applications that slow down my work flow or application-specific solutions (such as browser password vaults) that are applicable only toward a subset of my sensitive data. Working with text files affords greater flexibility over how my data is structured and provides the ability to leverage standard tools I can expect to find most anywhere.

Asymmetric Encryption

Asymmetric encryption, or public-key cryptography, relies on the use of two keys: one of which is held private, while the other is published freely. This model offers greater security over the symmetric approach, which is based on a single key that must be shared between the sender and receiver. GnuPG is a free software implementation of the OpenPGP standard as defined by RFC4880. GnuPG supports both asymmetric and symmetric algorithms. Refer to https://gnupg.org for additional information.

GPG

This article makes extensive use of GPG to interact with files stored in your safe. Many tutorials and HOWTOs exist that will walk you through how to set up and manage your keys properly. It is highly recommended to configure gpg-agent in order to avoid having to type your passphrase each time you interact with your private key. One popular approach used for this job is Keychain, because it also is capable of managing ssh-agent.
Let's take the classic example of managing credentials. This is a necessary evil and while both pass and KeePassC look interesting, I am not yet convinced they would fit into my work flow. Also, I am definitely not lulled by any "copy to clipboard" feature. You've all seen the inevitable clipboard spills on IRC and such—no thanks! For the time being, let's fold this job into a "safe" concept by managing this data in a file. Each line in the file will conform to a simple format of:

resource:userid:password
Where "resource" is something mnemonic, such as an FQDN or even a hardware device like a router that is limited to providing telnet access. Both userid and password fields are represented as hints. This hinting approach works nicely given my conscious effort to limit the number of user IDs and passwords I routinely use. This means a hint is all that is needed for muscle memory to kick in. If a particular resource uses some exotic complexity rules, I quickly can understand the slight variation by modifying the hint accordingly. For example, a hint of "fo" might end up as "!fo" or "fO". Another example of achieving this balance between security and usability comes up when you need to use an especially long password. One practical solution would be to combine familiar passwords and document the hint accordingly. For example, a hint representing a combination of "fo" and "ba" could be represented as "fo..ba". Finally, the hinting approach provides reasonable fall-back protection since the limited information would be of little use to an intruder.
Despite the obscurity, leaving this data in the clear would be silly and irresponsible. Having GnuPG configured provides an opportunity to encrypt the data using your private key. After creating the file, my work flow was looking something like this:

$ gpg --ear
$ shred -u
Updating the file would involve decrypting, editing and repeating the steps above. This was tolerable for a while since, practically speaking, I'm not establishing credentials on a daily basis. However, I knew the day would eventually come when the tedious routine would become too much of a burden. As expected, that day came when I found myself keeping insurance-related notes that I then considered encrypting using the same technique. Now, I am talking about managing multiple files—a clear sign that it is time to write a script to act as a wrapper. My requirements were simple:
  1. Leverage common tools, such as GPG, shred and bash built-ins.
  2. Reduce typing for common operations (encrypt, decrypt and so on).
  3. Keep things clean and readable in order to accommodate future growth.
  4. Accommodate plain-text files but avoid having to micro-manage them.
    Interestingly, the vim-gnupg Vim plugin easily can handle these requirements, because it integrates seamlessly with files ending in .asc, .gpg or .pgp extensions. Despite its abilities, I wanted to avoid having to manage multiple encrypted files and instead work with a higher-level "vault" of sorts. With that goal in mind, the initial scaffolding was cobbled together:

    #!/bin/bash

    CONF=${HOME}/.saferc
    [ -f $CONF ] && . $CONF
    [ -z "$SOURCE_DIR" ] && SOURCE_DIR=${HOME}/safe
    SOURCE_BASE=$(basename $SOURCE_DIR)
    TAR_ENC=$HOME/${SOURCE_BASE}.tar.gz.asc
    TAR="tar -C $(dirname $SOURCE_DIR)"

    usage() {
    cat <
    This framework is simple enough to build from and establishes some ground rules. For starters, you're going to avoid micro-managing files by maintaining them in a single tar archive. The $SOURCE_DIR variable will fall back to $HOME/safe unless it is defined in ~/.saferc. Thinking ahead, this will allow people to collaborate on this project without clobbering the variable over and over. Either way, the value of $SOURCE_DIR is used as a base for the $SOURCE_BASE, $TAR_ENC and $TAR variables. If my ~/.saferc were to define $SOURCE_DIR as $HOME/foo, my safe will be maintained as $HOME/foo.tar.gz.asc. If I choose not to maintain a ~/.saferc file, my safe will reside in $HOME/safe.tar.gz.asc.
    Back to this primitive script, let's limit the focus simply to being able to open and close the safe. Let's work on the create_safe() function first so you have something to extract later:

    create_safe() {
    [ -d $SOURCE_DIR ] || { "Missing directory: $SOURCE_DIR"; exit 1; }
    $TAR -cz $SOURCE_BASE | gpg -ear $(whoami) --yes -o $TAR_ENC
    find $SOURCE_DIR -type f | xargs shred -u
    rm -fr $SOURCE_DIR
    }
    The create_safe() function is looking pretty good at this point, since it automates a number of tedious steps. First, you ensure that the archive's base directory exists. If so, you compress the directory into a tar archive and pipe the output straight into GPG in order to encrypt the end result. Notice how the result of whoami is used for GPG's -r option. This assumes the private GPG key can be referenced using the same ID that is logged in to the system. This is strictly a convenience, as I have taken care to keep these elements in sync, but it will need to be modified if your setup is different. In fact, I could see eventually supporting an override of sorts with the ~/.saferc approach. For now though, let's put that idea on the back burner. Finally, the function calls the shred binary on all files within the base directory. This solves the annoying "Do I have a plain-text version laying around?" dilemma by automating the cleanup.
    Now you should be able to create the safe. Assuming no ~/.saferc exists and the $PATH environment variable contains the directory containing safe.sh, you can begin to test this script:

    $ cd
    $ mkdir safe
    $ for i in $(seq 5); do echo "this is secret #$i">
    ↪safe/file${i}.txt; done
    $ safe.sh -c
    You now should have a file named safe.tar.gz.asc in your home directory. This is an encrypted tarball containing the five files previously written to the ~/safe directory. You then cleaned things up by shredding each file and finally removing the ~/safe directory. This is probably a good time to recognize you are basing the design around an expectation to manage a single directory of files. For my purposes, this is acceptable. If subdirectories are needed, the code would need to be refactored accordingly.
    Now that you are able to create your safe, let's focus on being able to open it. The following extract_safe() function will do the trick nicely:

    extract_safe() {
    [ -f $TAR_ENC ] || { "Missing file: $TAR_ENC"; exit 1; }
    gpg --batch -q -d $TAR_ENC | $TAR -zx
    }
    Essentially, you are just using GPG and tar in the opposite order. After opening the safe by running the script with -x, you should see the ~/safe directory.
    Things seem to be moving along, but you easily can see the need to list the contents of your safe, because you do not want to have to open it each time in order to know what is inside. Let's add a list_safe() function:

    list_safe() {
    [ -f $TAR_ENC ] || { "Missing file: $TAR_ENC"; exit 1; }
    gpg --batch -q -d $TAR_ENC | tar -zt
    }
    No big deal there, as you are just using tar's ability to list contents rather than extract them. While you are here, you can start DRYing this up a bit by consolidating all the file and directory tests into a single function. You even can add a handy little backup feature to scp your archive to a remote host. Listing 1 is an updated version of the script up to this point.

    Listing 1. safe.sh


    #!/bin/bash
    #
    # safe.sh - wrapper to interact with my encrypted file archive

    CONF=${HOME}/.saferc
    [ -f $CONF ] && . $CONF
    [ -z "$SOURCE_DIR" ] && SOURCE_DIR=${HOME}/safe
    SOURCE_BASE=$(basename $SOURCE_DIR)
    TAR_ENC=$HOME/${SOURCE_BASE}.tar.gz.asc
    TAR="tar -C $(dirname $SOURCE_DIR)"

    usage() {
    cat < /dev/null
    [ $? -eq 0 ] && echo OK || echo Failed
    done
    The new -b option requires a hostname passed as an argument. When used, the archive will be scp'd accordingly. As a bonus, you can use the -b option multiple times in order to back up to multiple hosts. This means you have the option to configure a routine cron job to automate your backups while still being able to run a "one off" at any point. Of course, you will want to manage your SSH keys and configure ssh-agent if you plan to automate your backups. Recently, I have converted over to pam_ssh () in order to fire up my ssh-agent, but that's a different discussion.
    Back to the code, there is a small is_or_die() function that accepts an argument but falls back to the archive specified in $TAR_ENC. This will help keep the script lean and mean since, depending on the option(s) used, you know you are going to want to check for one or more files and/or directories before taking action.
    For the remainder of this article, I'm going to avoid writing out the updated script in its entirety. Instead, I simply provide small snippets as new functionality is added.
    For starters, how about adding the ability to output the contents of a single file being stored in your safe? All you would need to do is check for the file's presence and modify your tar options appropriately. In fact, you have an opportunity to avoid re-inventing the wheel by simply refactoring your extract_safe() function. The updated function will operate on a single file if called accordingly. Otherwise, it will operate on the entire archive. Worth noting is the extra step to provide a bit of user-friendliness. Using the default $SOURCE_DIR of ~/safe, the user can pass either safe/my_file or just my_file to the -o option:

    list_safe() {
    is_or_die
    gpg --batch -q -d $TAR_ENC | tar -zt | sort
    }

    search_safe() {
    is_or_die
    FILE=${1#*/}
    for f in $(list_safe); do
    ARCHIVE_FILE=${f#$SOURCE_BASE/}
    [ "$ARCHIVE_FILE" == "$FILE" ] && return
    done
    false
    }

    extract_safe() {
    is_or_die
    OPTS=" -zx"
    [ $# -eq 1 ] && OPTS+=" $SOURCE_BASE/${1#*/} -O"
    gpg --batch -q -d $TAR_ENC | $TAR $OPTS
    }
    The final version of safe.sh is maintained at https://github.com/windowsrefund/safe. It supports a few more use cases, such as the ability to add and remove files. When adding these features, I tried to avoid actually having to extract the archive to disk as a precursor to modifying its contents. I was unsuccessful due to GNU tar's refusal to read from STDIN when -r is used. A nice alternative to connecting GPG with tar via pipes might exist in GnuPG's gpg-zip binary. However, the Arch package maintainer appears to have included only the gpg-zip man page. In short, I prefer the "keep things as simple as possible; but no simpler" approach. If anyone is interested in improving the methods used to add and remove files, feel free to submit your pull requests. This also applies to the edit_safe()function, although I foresee refactoring that at some point given some recent activity with the vim-gnupg plugin.

    Integrating with Mutt

    My MUA of choice is mutt. Like many people, I have configured my mail client to interact with multiple IMAP accounts, each requiring authentication. In general, these credentials simply could be hard-coded in one or more configuration files but that would lead to shame, regret and terrible things. Instead, let's use a slight variation of Aaron Toponce's clever approachthat empowers mutt with the ability to decrypt and source sensitive data:

    $ echo "set my_pass_imap = l@mepassw0rd"> /tmp/pass_mail
    $ safe.sh -a /tmp/pass_mail
    Now that your safe contains the pass_mail file; you have mutt read it with this line in your ~/.muttrc:

    source "safe.sh -o pass_mail |"
    By reading the file, mutt initializes a variable you have named my_pass_imap. That variable can be used in other areas of mutt's configuration. For example, another area of your mutt configuration can use these lines:

    set imap_user = "my_user_id"
    set imap_pass = $my_pass_imap
    set folder = "imaps://example.com"
    set smtp_url = smtp://$imap_user:$imap_pass@example.com
    By combining appropriately named variables with mutt's ability to support multiple accounts, it is possible to use this technique to manage all of your mail-related credentials securely while never needing to store plain-text copies on your hard drive.

How to monitor CentOS and Ubuntu servers with Pandora FMS

$
0
0
https://www.howtoforge.com/tutorial/pandora-fms-monitor-centos-7

Introduction

Pandora FMS (Pandora Flexible Monitoring System) is a flexible and highly scalable monitoring software for networks, servers, applications and virtual environments. Pandora FMS can monitor the status and performance of a different server operating systems and server applications like web servers, databases, proxies etc. Pandora FMS consists of a server software and monitoring agents. In this tutorial, I will show you how to install Pandora FMS Server on CentOS 7 and how to add a monitoring agent on Ubuntu 15.04.

Prerequisites

  • CentOS 7 - 64bit for Pandora Server
  • Ubuntu 15.04 - 64bit for Pandora agent
  • Root privileges
CentOS 7 IP - 192.168.43.187
Ubuntu 15.04 IP - 192.168.43.105
What we will do in this tutorial:
  1. Install the prerequisite packages for Pandora FMS.
  2. Disable SELinux and firewalld.
  3. Installing Pandora Server on CentOS 7
  4. Installing Pandora Agent on Ubuntu 15.04
  5. Testing

Install the prerequisite packages

The first step is to install the prerequisites for the PandoraFMS software on our CentOS Server.The server will run the web-based Pandora UI and it will be the central place where the monitoring agents will connect to.
yum install mariadb-server httpd mod_php php-gd php-mysql php-mbstring xorg-x11-fonts-misc graphviz php-snmp php-pear php-ldap xorg-x11-fonts-75dpi graphviz perl-Sys-Syslog perl-libwww-perl perl-XML-Simple perl-XML-Twig net-snmp-utils perl-NetAddr-IP perl-IO-Socket-INET6 perl-Socket6 perl-Net-Telnet nmap perl-JSON perl-Encode-Locale net-snmp-perl perl-CPAN
The wimc package is not available from CentOS base repository so we will download it with wget and install it manually.
cd /tmp
wget http://softlayer-dal.dl.sourceforge.net/project/pandora/Tools%20and%20dependencies%20%28All%20versions%29/RPM%20CentOS%2C%20RHEL/wmic-4.0.0tp4-0.x86_64.rpm

rpm -ivh wmic-4.0.0tp4-0.x86_64.rpm
Disable SELinux:
sed -i -e 's/SELINUX=enforcing/SELINUX=disabled/g' /etc/selinux/config
and stop firewalld:
systemctl stop firewalld

Installing Pandora FMS on CentOS 7

Step 1 - Configuring MariaDB/MySQL

systemctl start mariadb
mysql_secure_installation
Set root password? [Y/n] Y
TYPE YOUR PASSWORD
Remove anonymous users? [Y/n] Y
Disallow root login remotely? [Y/n] Y
Remove test database and access to it? [Y/n] Y
Reload privilege tables now? [Y/n] Y

Step 2 - Install Pandora Console

Download and Install Pandora Console:
cd /tmp
wget http://sourceforge.net/projects/pandora/files/Pandora%20FMS%205.1/SP1Final/RHEL_CentOS/pandorafms_console-5.1SP1-1.noarch.rpm
rpm -ivh pandorafms_console-5.1SP1-1.noarch.rpm
Give 777 permission for Pandora Server Configuration file.
chmod -R 777 /var/www/html/pandora_console/include
Start MariaDB and httpd
systemctl start mariadb
systemctl start httpd
Open the pandora server from your browser. http://yourip/pandora_console/.
Click Next.
Pandora FMS
Click Yes, I accept licence terms.
Licence
All Software dependencies are installed, please select "MySQL Database" for this tutorial and
click Next.
dependencies installed
You will Create a New Database with the name pandora with root privileges.
Click Next.
Configure Database
Database Configuration is finished successfully. Please note the random password generated - dxowdqfx because you need it for the next step.
Click Next.
Database Success
and finally, the Pandora Console is installed and you now can login with default credentials. username = admin - password = pandora.
Pandora Admin
Before you login to pandora, you need to rename the file install.php in the /var/www/html/pandora_console directory.
mv /var/www/html/pandora_console/install.php /var/www/html/pandora_console/install_backup.php
and now Log in to the Pandora Console. This is a Screenshot after Log into Pandora Console.
Pandora

Step 3 - Install Pandora Server

Download and Install Pandora Server.
cd /tmp
wget http://sourceforge.net/projects/pandora/files/Pandora%20FMS%205.1/SP1Final/RHEL_CentOS/pandorafms_server-5.1SP1-1.noarch.rpm

rpm -ivh pandorafms_server-5.1SP1-1.noarch.rpm
Edit Pandora server configuration file :
vi /etc/pandora/pandora_server.conf
add the password generated on dbpass line - dxowdqfx.
Pandora dbpass
and then start pandora server and tentacle server.
/etc/init.d/pandora-server start
/etc/init.d/tentacle_serverd start
At this step, Pandora server has been configured and ready to add new host monitoring to the server.

Installing Pandora Agent on Ubuntu 15.04

In this part of the tutorial, you will install the Pandora monitoring agent on Ubuntu 15.04 and add it to the pandora server.
Login to the Ubuntu server and become root user by running:
sudo -
Then download and install the agent on Ubuntu:
cd /tmp
wget http://softlayer-ams.dl.sourceforge.net/project/pandora/Pandora%20FMS%205.1/SP1Final/Debian_Ubuntu/pandorafms.agent_unix_5.1SP1.deb

dpkg -i pandorafms.agent_unix_5.1SP1.deb
Edit Pandora agent configuration file,
vi /etc/pandora/pandora_agent.conf
add the Pandora Server IP 192.168.43.187  in the server_ip line,
Pandora Agent
and then start Pandora agent.
/etc/init.d/pandora_agent_daemon start

Testing PandoraFMS

Open your browser and log in to the Pandora console. http://192.168.43.187/pandora_console/
Pandora Finish
You can see :
Pandora Server CentOS 7 with IP 192.168.43.187 is running.
Ubuntu 15.04 with the IP 192.168.43.105  has been monitored.

Conclusion

Pandora FMS is powerful monitoring tool for a servers, networks and applications. It is easy to configure and deploy onto the servers. Pandora FMS can monitor different operating systems like Linux, Windows, HP-UX, Solaris and BSD and has a complete documentation library.

How to Mount a NTFS Drive on CentOS / RHEL / Scientific Linux

$
0
0
https://www.howtoforge.com/tutorial/mount-ntfs-centos

This tutorial will show you how to mount an NTFS drive ina read/write mode on CentOS and other RHEL based Linux operating systems with ntfs-3g driver. NTFS-3G is a stable Open Source NTFS driver that supports reading and writing to NTFS drives on Linux and other operating systems.

The ntfs-3g driver is available in the EPEL repository. The first step is to install and activate EPEL on your Linux system.

Enable the EPEL repository

Run the following command as root user on the shell to enable the EPEL repository.
yum install epel-release
EPEL (Extra Packages for Enterprise Linux) is a Fedora Special Interest Group that creates, maintains, and manages a set of additional high quality packages for Enterprise Linux, including, but not limited to, Red Hat Enterprise Linux (RHEL), CentOS and Scientific Linux (SL), Oracle Linux (OL).

Install ntfs-3g

Then we have to install the ntfs-3g package
yum install ntfs-3g
Once installed, we create a directory where the NTFS drive shall be mounted:
mkdir /mnt/win
And mount the NTFS partition by running this command:
mount -t ntfs-3g /dev/sdb1 /mnt/win
In this example my NTFS partition is the device /dev/sdb1, you have to replace that with the device name of your NTFS partition.
The mount point will exist until reboot or until you unmount it with:
umount /mnt/win
To mount the NTFS partition permanently, add the following line to the /etc/fstab file.
Open /etc/fstab with an editor:
nano /etc/fstab
And add the line:
/dev/sdb1 /mnt/win ntfs-3g defaults 0 0
Again, replace /dev/sdb1 with the device name that matches your setup. Now your Linux system will mount the NTFS drive automatically at boot time.
Viewing all 1406 articles
Browse latest View live


<script src="https://jsc.adskeeper.com/r/s/rssing.com.1596347.js" async> </script>