Quantcast
Channel: Sameh Attia
Viewing all 1406 articles
Browse latest View live

How to Run ISO Files Directly From the HDD with GRUB2

$
0
0
https://www.maketecheasier.com/run-iso-files-hdd-grub2


Most Linux distros offer a live environment, which you can boot up from a USB drive, for you to test the system without installing. You can either use it to evaluate the distro or as a disposable OS. While it is easy to copy these onto a USB disk, in certain cases one might want to run the same ISO image often or run different ones regularly. GRUB 2 can be configured so that you do not need to burn the ISOs to disk or use a USB drive, but need to run a live environment directly form the boot menu.
To obtain an ISO image, you should usually visit the website of the desired distribution and download any image that is compatible with your setup. If the image can be started from a USB, it should be able to start from the GRUB menu as well.
Once the image has finished downloading, you should check its integrity by running a simple md5 check on it. This will output a long combination of numbers and alphanumeric characters
rundirectiso-md5
which you can compare against the MD5 checksum provided on the download page. The two should be identical.
ISO images contain full systems. All you need to do is direct GRUB2 to the appropriate file, and tell it where it can find the kernel and the initramdisk or initram filesystem (depending on which one your distribution uses).
In this example, a Kubuntu 15.04 live environment will be set up to run on an Ubuntu 14.04 box as a Grub menu item. It should work for most newer Ubuntu-based systems and derivatives. If you have a different system or want to achieve something else, you can get some ideas on how to do this from one of these files, although it will require a little experience with GRUB.
In this example the file kubuntu-15.04-desktop-amd64.iso
lives in /home/maketecheasier/TempISOs/ on /dev/sda1.
To make GRUB2 look for it in the right place, you need to edit the
/etc/grub.d40-custom
file which allows you to add your own menu entries. The file should already exist and contain a few lines.
rundirectiso-40-custom-empty
To start Kubuntu from the above location, add the following code (after adjusting it to your needs) below the commented section, without modifying the original content.
menuentry "Kubuntu 15.04 ISO"{
setisofile="/home/maketecheasier/TempISOs/kubuntu-15.04-desktop-amd64.iso"
loopback loop (hd0,1)$isofile
echo"Starting $isofile..."
linux (loop)/casper/vmlinuz.efi boot=casper iso-scan/filename=${isofile} quiet splash
initrd (loop)/casper/initrd.lz
}
rundirectiso-40-custom-new
First set up a variable named $menuentry. This is where the ISO file is located. If you want to change to a different ISO, you need to change the bit where it says set isofile="/path/to/file/name-of-iso-file-.iso".
The next line is where you specify the loopback device; you also need to give it the right partition number. This is the bit where it says
loopback loop (hd0,1)$isofile
Note the hd0,1 bit; it is important. This means first HDD, first partition (/dev/sda1).
GRUB’s naming here is slightly confusing. For HDDs, it starts counting from “0”, making the first HDD #0, the second one #1, the third one #2, etc. However, for partitions, it will start counting from 1. First partition is #1, second is #2, etc. There might be a good reason for this but not necessarily a sane one (UX-wise it is a disaster, to be sure)..
This makes fist disk, first partition, which in Linux would usually look something like /dev/sda1 become hd0,1 in GRUB2. The second disk, third partition would be hd1,3, and so on.
The next important line is
linux (loop)/casper/vmlinuz.efi boot=casper iso-scan/filename=${isofile} quiet splash
It will load the kernel image. On newer Ubuntu Live CDs, this would be in the /casper directory and called vmlinuz.efi. If you use a different system, your kernel might be missing the .efi extension or be located somewhere else entirely (You can easily check this by opening the ISO file with an archive manager and looking inside /casper.). The last options, quiet splash, would be your regular GRUB options, if you care to change them.
Finally
initrd (loop)/casper/initrd.lz
will load initrd, which is responsible to load a RAMDisk into memory for bootup.
To make it all work, you will only need to update GRUB2
sudo update-grub
rundirectiso-updare-grub
When you reboot your system, you should be presented with a new GRUB entry which will allow you to load into the ISO image you’ve just set up.
rundirectiso-grub-menu
Selecting the new entry should boot you into the live environment, just like booting from a DVD or USB would.

How to Install and run Kali Linux on any Android Smartphone

$
0
0
http://www.techworm.net/2015/09/how-to-install-and-run-kali-linux-on-any-android-smartphone.html

Tutorial for installing and running Kali Linux on Android smartphones and tablets

Kali Linux is one the best love operating system of white hat hackers, security researchers and pentesters. It offers advanced penetration testing tool and its ease of use means that it should be a part of every security professional’s toolbox.
Penetration testing involves using a variety of tools and techniques to test the limits of security policies and procedures. Now a days more and more apps are available on Android operating system for smartphones and tablets so it becomes worthwhile to have Kali Linux on your smartphone as well.
Kali Linux on Android smartphones and tablets allows researchers and pentesters to perform ” security checks” on things like cracking wep Wi-Fi passwords, finding vulnerabilities/bugs or cracking security on websites.  This opens the door to doing this from a mobile device such as a phone or a tablet.
You can also install Kali Linux Distribution in your
Android smartphone by following the instructions below  :
(Rooted Android smartphone/tablet required for this installation)
Keep the following thing ready for the installation :
  • Fully charged Android Phone
  • Good Internet Connection(For Download Kali Linux images)
  • Root Permission (Rooting Guide for Every Phone)
  • Atleast 5GB  Free Space
Step 1. Download Linux Deploy App in Your Android Mobile from Google Play Store.
Tutorial for installing and running Kali Linux on Android smartphones and tablets
Developer: meefik
Price: Free
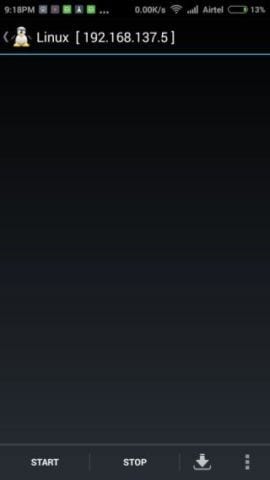
Step 2. Install and open Linux Deploy App in your mobile and click on download Icon.
Tutorial for installing and running Kali Linux on Android smartphones and tablets
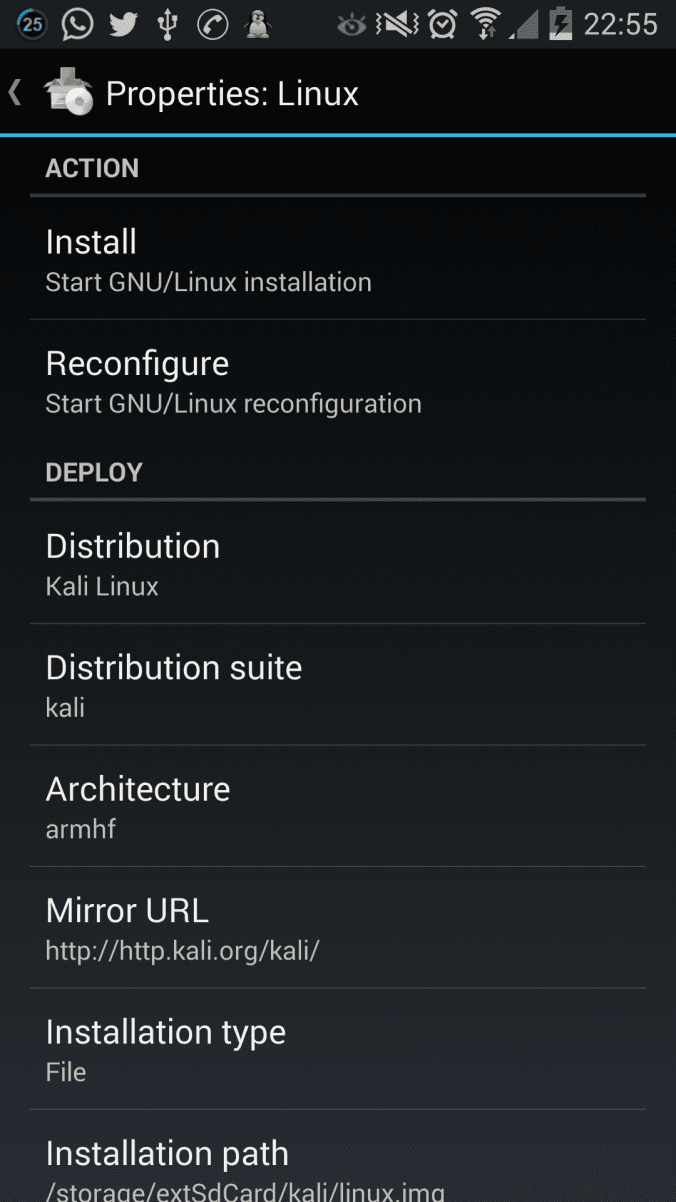
Step 3. Change the Distribution of Your Linux to Kali Linux.
How to Install and run Kali Linux on any Android Smartphone
Step 4.  Go to Top of the screen and hit the Install button. This will take about 5 minutes provided you have a good Internet connection.
How to Install and run Kali Linux on any Android Smartphone
Step 5. Download Android VNC Viewer App from Google Play Store.
Tutorial for installing and running Kali Linux on Android smartphones and tablets
Developer: RealVNC Limited
Price: Free

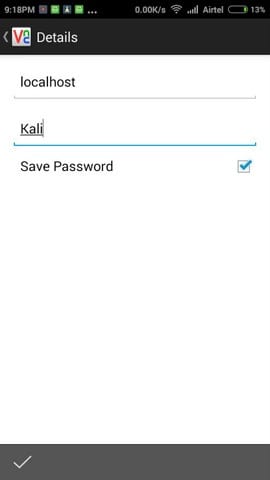
Step 6. After installing, enter below  settings in your VNC Android App.
How to Install and run Kali Linux on any Android Smartphone
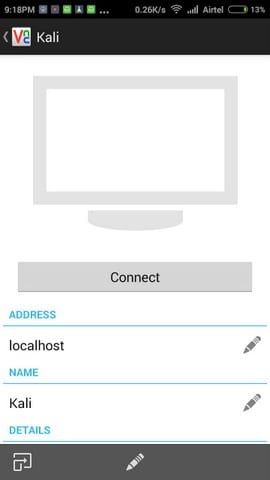
Step 7. Click the Connect Button in VNC Viewer App.
Now you are done and you will be able to run Kali Linux in your Android smartphone or tablet. Check the video tutorial below for a step by step procedure:
https://www.youtube.com/watch?v=VGo0mw-1rWY

Linux Server See the Historical and Statistical Uptime of System With tuptime Utility

$
0
0
http://www.cyberciti.biz/hardware/howto-see-historical-statistical-uptime-on-linux-server

You can use the following tools to see how long system has been running on a Linux or Unix-like system:
  • uptime : Tell how long the server has been running.
  • lastt : Show the reboot and shutdown time.
  • tuptime : Report the historical and statistical running time of system, keeping it between restarts. Like uptime command but with more interesting output.

Finding out the system last reboot time and date

You can use the following commands to get the last reboot and shutdown time and date on a Linux operating system (also works on OSX/Unix-like system):
## Just show  system reboot and shutdown date and time ###
who -b
last reboot
last shutdown
## Uptime info ##
uptime
cat /proc/uptime
awk'{ print "up " $1 /60 " minutes"}' /proc/uptime
w
 
Sample outputs:
Fig.01: Various Linux commands in action to find out the server uptime

Say hello to tuptime

The tuptime command line tool can report the following information on a Linux based system:
  1. Count system startups
  2. Register first boot time (a.k.a. installation time)
  3. Count nicely and accidentally shutdowns
  4. Average uptime and downtime
  5. Current uptime
  6. Uptime and downtime rate since first boot time
  7. Accumulated system uptime, downtime and total
  8. Report each startup, uptime, shutdown and downtime

Installation

Type the following command to clone a git repo on a Linux operating system:
$ cd /tmp
$ git clone https://github.com/rfrail3/tuptime.git
$ ls
$ cd tuptime
$ ls

Sample outputs:
Fig.02: Cloning a git repo

Make sure you've Python v2.7 installed with sys, optparse, os, re, string, sqlite3, datetime, disutils, and locale modules.
You can simply install it as follows:
$ sudo tuptime-install.sh
OR do a manual installation (recommended method due to systemd or non-systemd based Linux system):
$ sudo cp /tmp/tuptime/latest/cron.d/tuptime /etc/cron.d/tuptime
If is a system with systemd, copy service file and enable it:
$ sudo cp /tmp/tuptime/latest/systemd/tuptime.service /lib/systemd/system/
$ sudo systemctl enable tuptime.service

If the systemd don't have systemd, copy init file:
$ sudo cp /tmp/tuptime/latest/init.d/tuptime.init.d-debian7 /etc/init.d/tuptime
$ sudo update-rc.d tuptime defaults

Run it

Simply type the following command:
$ sudo tuptime
Sample outputs:
Fig.03: tuptime in action

After kernel upgrade I rebooted the box and typed the same command again:
$ sudo tuptime
System startups: 2 since 03:52:16 PM 08/21/2015
System shutdowns: 1 ok - 0 bad
Average uptime: 7 days, 16 hours, 48 minutes and 3 seconds
Average downtime: 2 hours, 30 minutes and 5 seconds
Current uptime: 5 minutes and 28 seconds since 06:23:06 AM 09/06/2015
Uptime rate: 98.66 %
Downtime rate: 1.34 %
System uptime: 15 days, 9 hours, 36 minutes and 7 seconds
System downtime: 5 hours, 0 minutes and 11 seconds
System life: 15 days, 14 hours, 36 minutes and 18 seconds
You can change date and time format as follows:
$ sudo tuptime -d '%H:%M:%S %m-%d-%Y'
Sample outputs:
System startups: 1   since   15:52:16 08-21-2015
System shutdowns: 0 ok - 0 bad
Average uptime: 15 days, 9 hours, 21 minutes and 19 seconds
Average downtime: 0 seconds
Current uptime: 15 days, 9 hours, 21 minutes and 19 seconds since 15:52:16 08-21-2015
Uptime rate: 100.0 %
Downtime rate: 0.0 %
System uptime: 15 days, 9 hours, 21 minutes and 19 seconds
System downtime: 0 seconds
System life: 15 days, 9 hours, 21 minutes and 19 seconds
Enumerate each startup, uptime, shutdown and downtime:
$ sudo tuptime -e
Sample outputs:
Startup:  1  at  03:52:16 PM 08/21/2015
Uptime: 15 days, 9 hours, 22 minutes and 33 seconds
 
System startups: 1 since 03:52:16 PM 08/21/2015
System shutdowns: 0 ok - 0 bad
Average uptime: 15 days, 9 hours, 22 minutes and 33 seconds
Average downtime: 0 seconds
Current uptime: 15 days, 9 hours, 22 minutes and 33 seconds since 03:52:16 PM 08/21/2015
Uptime rate: 100.0 %
Downtime rate: 0.0 %
System uptime: 15 days, 9 hours, 22 minutes and 33 seconds
System downtime: 0 seconds
System life: 15 days, 9 hours, 22 minutes and 33 seconds

How to monitor OpenStack deployments with Docker, Graphite, Grafana, collectd and Chef

$
0
0
http://superuser.openstack.org/articles/how-to-monitor-openstack-deployments-with-docker-graphite-grafana-collectd-and-chef

I was considering making this a part of the "Monitoring UrbanCode Deployments with Docker, Graphite, Grafana, collectd and Chef!" series but as I didn't include this in the original architecture so it would be more to consider this an addendum. In reality, it's probably more of a fork as I'll may continue with future blog postings about the architecture herein.
One of the issues I ran into right away while deploying the monitoring solution described in the above post was an internal topology managed by UrbanCode Deploy whereby each of the agent host machines had quirks and issues that required me to constantly tweak the monitoring install process. (Fixing yum and apt-get repositories, removing conflicts, installing unexpectedly missing libraries, conflicting JDKs.) The reason for this? Each machine was installed by different people who installed the operating systems and the UrbanCode Deploy Agent in different ways with different options. It would have been great if all nodes were consistent and it would have made my life much easier.
It was at this point that my colleague Michael told me that I should create a blueprint in UrbanCode Deploy for the topology I want to deploy the monitoring solution into for testing.
Here's Michael doing a quick demo of UrbanCode Deploy Blueprint Designer, also known as UrbanCode Deploy with Patterns in the video below:
Fantastic, now I can create a blueprint of the desired topology, add a monitoring component to the nodes that I wish to have monitored and presto! Here is what the blueprint looks like in UrbanCode Deploy Blueprint Designer:
alt text here
I created three nodes with three different operating systems just to show off that this solution works on different operating systems. (It also works on RHEL 7 but I thought adding another node would be overdoing it a little as well as cramming my already overcrowded RSA sketches).
This blueprint is actually a Heat Orchestration Template (HOT). You can see the source code here: https://hub.jazz.net/git/kuschel/monitorucd/contents/master/Monitoring/Monitoring.yaml
So, if we modify the original Installation in Monitoring UrbanCode Deployments with Docker, Graphite, Grafana, collectd and Chef! Part 1, it would look something like this:
alt text here
We don't have any UrbanCode Deploy agents installed as the agent install is incorporated as part of the blueprint. You can see this in the yaml under the resources identified by ucd_agent_install_linux and ucd_agent_install_win. You'll see some bash or powershell scripting that installs the UrbanCode Agent as part of the virtual machine initialization.
You'll also see the IBM::UrbanCode::SoftwareDeploy::UCD, IBM::UrbanCode::SoftwareConfig::UCD and IBM::UrbanCode::ResourceTree resource types which allow the Heat engine to deploy create resources in UrbanCode Deploy and ensure that component processes are executed are installed into the virtual machines, once the UrbanCode Deploy agents are installed and started.
Ok, let's take a time out and talk a little about how this all works. First, what's Heat? Heat is an orchestration engine that is able to call cloud provider APIs (and other necessary APIs) to actualize the resources that are specified in yaml into a cloud environment. Heat is part of the OpenStack project so it natively supports OpenStack Clouds but can also work with Amazon Web Services, IBM SoftLayer or any other cloud provider that is compliant with the OpenStack interfaces required to create virtual machines, virtual networks, etc.
In addition, Heat can be extended with other resource types like those for UrbanCode Deploy components that allows them to be deployed into environments provisioned by OpenStack via Heat using the Heat Orchestration Template (HOT) specified during a provisioning.
The UrbanCode Deploy Blueprint Designer provides a kick ass visual editor and a simple way to drag drop UrbanCode Deploy Components into Heat Orchestration Templates (HOT). It also provides the ability to connect to a cloud provider (OpenStack, AWS and IBM SoftLayer are currently supported) and deploy the HOT. You can monitor the deployment progress. Oh, it also uses Git as a source for the HOTs (yaml) so that makes it super easy to version and share blueprints.
Ok, let's go over the steps on how to install it. I assume you have UrbanCode Deploy installed and configured with UrbanCode Deploy Blueprint Designer and connected to an OpenStack cloud. You can set up a quick cloud using DevStack.
You'll also need to install the Chef plugin from here: https://developer.ibm.com/urbancode/plugin/chef. Import the application from IBM BlueMix DevOps Service Git found here: https://hub.jazz.net/git/kuschel/monitorucd/contents/master/Monitored_app.json Import it from the "applications" tab:
alt text here
Use the default options in the import dialog. After, you should now see it listed in applications as "monitored." There will also be a new component in the "components" tab called monitoring:
alt text here
I have made the Git repository public so the component is already configured to to to the IBM BlueMix DevOps Service Git and pull the recipe periodically and create a new version, you may change this behaviour in Basic Settings by unchecking the Import Versions Automatically setting.
You'll have to fix up the imported process a little as I had to remove the encrypted fields to allow easier import. Go to components->monitoring->processes-Install and edit the install collectd step:
alt text here
alt text here
In the collectd password field put. You will see bullets, that's OK. Copy/paste (and no spaces!):
${p:environment/monitoring.password}
We need a metrics collector to store the metrics and a graphing engine to visualize them. We'll be using a Docker image of Graphite/Grafana/Collectd I put together. You will need to ability to build run a docker container either using boot2docker or the native support available in Linux I have put the image up on the public docker registry as bkuschel/graphite-grafana-collectd but you can also build it from the Dockerfile in IBM BlueMix DebOps Services's Git at https://hub.jazz.net/git/kuschel/monitorucd/contents/master/DockerWithCollectd/Dockerfile To get the image run:
docker pull bkuschel/graphite-grafana-collect
Now run the image and bind the ports 80, 2003 and udp port 2 from the docker container to the hosts ports.
docker run -p 80:80 -p 2003:2003 -p 25826:25826/udp -t bkuschel/graphite-grafana-collectd
You can also mount file volumes to the container that contains the collector's database, if you wish that to be persisted. Each time you restart the container, it contains a fresh database. This has its advantages for testing. You can also specify other configurations beyond what are provided as defaults. Look at the Dockerfile for the volumes. You'll need to connect the UrbanCode Blueprint Designer to Git by adding https://hub.jazz.net/git/kuschel/monitorucd to the repositories
alt text here
You should now see monitoring in the list of blueprints on the UrbanCode Deploy Blueprint Designer Home Page. Click on it to open the blueprint.
I am not going to cover the UrbanCode Component Processes as they are essentially the same the ones I described in Monitoring UrbanCode Deployments with Docker, Graphite, Grafana, collectd and Chef! (Part 2: The UCD Process) and Interlude #2: UCD Monitoring with Windows Performance Monitor and JMXTrans. The processes have been reworked to be executable using the application/component processes rather then solely from Resource Processes (generic). I also added some steps that do fix of typical problems in OpenStack images, such as fixing the repository and a workaround for a host name issue causing JMX not to bind properly.
The blueprint is also rudimentary and it may need to be tweaked to conform to the specific cloud set up in your environment. I created three virtual machines for Operating System images I happened to have available on my OpenStack, hooked them together on the private network and gave them external IPs so that I can access them. They all have the monitoring component added to them and should be deployed into the Monitored Application.
Once you've fixed everything up, make sure you select a cloud and then click "provision:"
alt text here
It will now ask for launch configuration parameters, again, many of these will be specific to you environment but you should be able to leave everything as is.
alt text here
If you bound the Docker container to other different ports you'll have to change the port numbers for graphite (2003) and Docker (25826). You will need to set the admin password to something recognizable, it's the Windows administrator password. You may or may not need this depending on how your Windows image is set up. (I needed it.) The monitoring/server is the Public IP address of your Docker host running the bkuschel/graphite-grafana-collectd image. The monitoring/password is the one the is built into the Docker image. You will need to modify the Docker image to either not hard code this value or build a new image with a different password.
Once "provision" is clicked, something like this should happen: alt text here
click to enlarge:
The monitoring.yaml(originating from Git) in UrbanCode Deploy Blueprint is passed to the heat engine on provisioning, with all parameters bound. The heat engine creates an UrbanCode Deploy Environment in the application specified in yaml (this can be changed) The UrbanCode Deploy Environment is mapped to the UrbanCode Deploy Component as specified in the yaml resource It also creates UrbanCode Deploy resources that will be used to represent the UrbanCode Deploy agents once they come online The agent resources are mapped to the environment. Heat interacts with the cloud provider (OpenStack in this case) to deploy the virtual machines specified in the yaml. The virtual machines are created and the agents installed as part of virtual machine intialization ("user data.") Once the agents come online the component process is run The component process will be run for each resource mapped to the environment The component process runs the generic process Install_collectd_process (or Install_perfmon_process for Windows) on each agent. The agent installs collectd or GraphitePowershellFunctions via Chef and performs other process steps as required to get the monitoring solution deployed.
The progress can be monitored in UrbanCode Deploy Blueprint Designer:
alt text here
(Click here for larger version.)
Once the process is finished, the new topology should look something like this:
alt text here
(For larger version, click here.)
That should be it, give it a shot. Once you've got it working, the results are quite impressive. Here are some Grafana performance dashboards for CPU and Heap based on the environment I deployed using this method. The three Monitoring_Monitoring_ correspond to :
alt text here
(For larger version, click here.)

WiFi Without Network Manager Frippery

$
0
0
http://freedompenguin.com/articles/networking/wifi-without-network-manager-frippery

Back in my day, sonny…there was a time when you could make your networking work without the network manager applet. Not that I’m saying the NetworkManager program is bad, because it actually has been getting better. But the fact of the matter is that I’m a networking guy and a server guy, so I need keep my config-file wits sharp. So take out your pocket knife and let’s start to whittle.
Begin by learning and making some notes about your interfaces before you start to turn off NetworkManager. You’ll need to write down these 3 things:
1) Your SSID and passphrase.
2) The names of your Ethernet and radio devices. They might look like wlan0, wifi0, eth0 or enp2p1.
3) Your gateway IP address.
Next, we’ll start to monkey around in the command line… I’ll do this with Ubuntu in mind.
So, let’s list our interfaces:
  1. $ ip a show
Note the default Ethernet and wifi interfaces:
ip-a-show
It looks like our Ethernet port is eth0. Our WiFi radio is wlan0. Want to make this briefer?
  1. $ ip a show | awk '/^[0-9]: /{print $2}'
The output of this command will look something like this:
lo:
eth0:
wlan0:
Your gateway IP address is found with:
  1. route -n
It provides access to destination 0.0.0.0 (everything). In the below image it is 192.168.0.1, which is perfectly nominal.
route-n
Let’s do a bit of easy configuration in our /etc/networking/interfaces file. The format of this file is not difficult to put together from the man page, but really, you should search for examples first.
interfaces
Plug in your Ethernet port.
Basically, we’re just adding DHCP entries for our interfaces. Above you’ll see a route to another network that appears when I get a DHCP lease on my Ethernet port. Next, add this:

  1. auto lo
  2. iface lo inet loopback
  3. auto eth0
  4. iface eth0 inet dhcp
  5. auto wlan0
  6. iface wlan0 inet dhcp

To be honest, that’s probably all you will ever need. Next, enable and start the networking service:
  1. sudo update-rc.d networking enable

  1. sudo /etc/init.d/networking start
Let’s make sure this works, by resetting the port with these commands:
  1. sudo ifdown eth0

  1. sudo ip a flush eth0

  1. sudo ifup eth0
This downs the interface, flushes the address assignment to it, and then brings it up. Test it out by pinging your gateway IP: ping 192.168.0.1. If you don’t get a response, your interface is not connected or your made a typo.
Let’s “do some WiFi” next! We want to make an /etc/wpa_supplicant.conf file. Consider mine:
  1. network={
  2. ssid="CenturyLink7851"
  3. scan_ssid=1
  4. key_mgmt=WPA-PSK
  5. psk="4f-------------ac"
  6. }
Now we can reset the WiFi interface and put this to work:
  1. sudo ifdown wlan0

  1. sudo ip a flush wlan0

  1. sudo ifup wlan0

  1. sudo wpa_supplicant -Dnl80211 -c /root/wpa_supplicant.conf -iwlan0 -B

  1. sudo dhclient wlan0
That should do it. Use a ping to find out, and do it explicitly from wlan0, so it gets it’s address first:

  1. $ ip a show wlan0 | grep "inet"
192.168.0.45
  1. $ ping -I 192.168.0.45 192.168.0.1
Presumably dhclient updated your /etc/resolv.conf, so you can also do a:
  1. ping -I 192.168.0.45 www.yahoo.com
Well guess what – you’re now running without NetworkManager!

5 open source alternatives to Gmail

$
0
0
http://opensource.com/life/15/9/open-source-alternatives-gmail

Image by : 
Judith E. Bell. Modified by Opensource.com. CC BY-SA 2.0.
Gmail has enjoyed phenomenal success, and regardless of which study you choose to look at for exact numbers, there's no doubt that Gmail is towards the top of the pack when it comes to market share. For certain circles, Gmail has become synonymous with email, or at least with webmail. Many appreciate its clean interface and the simple ability to access their inbox from anywhere.
But Gmail is far from the only name in the game when it comes to web-based email clients. In fact, there are a number of open source alternatives available for those who want more freedom, and occasionally, a completely different approach to managing their email without relying on a desktop client.
Let's take a look at just a few of the free, open source webmail clients out there available for you to choose from.

Roundcube

First up on the list is Roundcube. Roundcub is a modern webmail client which will install easily on a standard LAMP (Linux, Apache, MySQL, and PHP) stack. It features a drag-and-drop interface which generally feels modern and fast, and comes with a slew of features: canned responses, spell checking, translation into over 70 languages, a templating system, tight address book integration, and many more. It also features a pluggable API for creating extensions.
It comes with a comprehensive search tool, and a number of features on the roadmap, from calendaring to a mobile UI to conversation view, all sound promising, but at the moment these missing features do hold it back a bit compared to some other options.
Roundcube is available as open source under the GPLv3.
Roundcube
Roundcube screenshot courtesy of the project's website.

Zimbra

The next client on the list is Zimbra, which I have used extensively for work. Zimbra includes both a webmail client and an email server, so if you’re looking for an all-in-one solution, it may be a good choice.
Zimbra is a well maintained project which has been hosted at a number of different corporate entities through the years, most recently being acquired by a company called Synacore, last month. It features most of the things you’ve come to expect in a modern webmail client, from webmail to folders to contact lists to a number of pluggable extensions, and generally works very well. I have to admit that I'm most familiar with an older version of Zimbra which felt at times slow and clunky, especially on mobile, but it appears that more recent versions have overcome these issues and provide a snappy, clean interface regardless of the device you are using. A desktop client is also available for those who prefer a more native experience. For more on Zimbra, see this article from from Zimbra's Olivier Thierry who shares a good deal more about Zimbra's role in the open source community.
Zimbra's web client is licensed under a Common Public Attribution License, and the server code is available under GPLv2.
Zimbra
Zimbra screenshot courtesy of Clemente under the GNU Free Documentation License.

SquirrelMail

I have to admit, SquirrelMail (self-described as "webmail for nuts") does not have all of the bells and whistles of some more modern email clients, but it’s simple to install and use and therefore has been my go-to webmail tool for many years as I’ve set up various websites and needed a mail client that was easy and "just works." As I am no longer doing client work and shifted towards using forwarders instead of dedicated email accounts for personal projects, I realized it had been awhile since I took a look at SquirrelMail. For better or for worse, it’s exactly where I left it.
SquirrelMail started in 1999 as an early entry into the field of webmail clients, with a focus on low resource consumption on both the server and client side. It requires little in the way of special extensions of technologies to be used, which back in the time it was created was quite important, as browsers had not yet standardized in the way we expect them to be by today’s standards. The flip side of its somewhat dated interface is that it has been tested and used in production environments for many years, and is a good choice for someone who wants a webmail client with few frills but few headaches to administer.
SquirrelMail is written in PHP and is licensed under the GPL.
SquirrelMail
SquirrelMail screenshot courtesy of the project website.

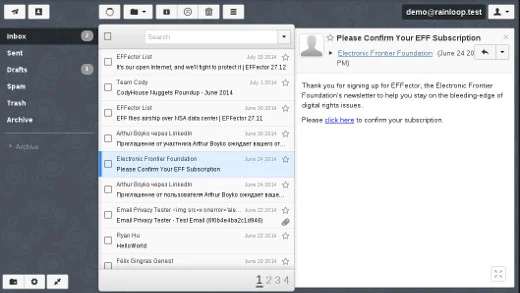
Rainloop

Next up is Rainloop. Rainloop is a very modern entry into the webmail arena, and its interface is definitely closer to what you might expect if you're used to Gmail or another commercial email client. It comes with most features you've come to expect, including email address autocompletion, drag-and-drop and keyboard interfaces, filtering support, and many others, and can easily be extended with additional plugins. It integrates with other online accounts like Facebook, Twitter, Google, and Dropbox for a more connected experience, and it also renders HTML emails very well compared to some other clients I've used, which can struggle with complex markup.
It's easy to install, and you can try Rainloop in an online demo to decide if it's a good fit for you.
Rainloop is primarily written in PHP, and the community edition is licensed under the AGPL. You can also check out the source code on GitHub.
Rainloop
Rainloop screenshot by author.

Kite

The next webmail client we look at is Kite, which unlike some of the other webmail clients on our list was designed to go head-to-head with Gmail, and you might even consider it a Gmail clone. While Kite hasn't fully implemented all of Gmail's many features, you will instantly be familiar with the interface. It's easy to test it out with Vagrant in a virtual machine out of the box.
Unfortunately, development on Kite seems to have stalled about a year ago, and no new updates have been made to the project since. However, it's still worth checking out, and perhaps someone will pick up the project and run with it.
Kite is written in Python and is licensed under a BSD license. You can check out the source code on GitHub.

More options

  • HastyMail is an older email client, originating back in 2002, which is written in PHP and GPL-licensed. While no longer maintained, the project's creators have gone on to a new webmail project, Cypht, which also looks promising.
  • Mailpile is an HTML 5 email client, written in Python and available under the AGPL. Currently in beta, Mailpile has a focus on speed and privacy.
  • WebMail Lite is a modern but minimalist option, licensed under the AGPL and written mostly in PHP.
  • There are also a number of groupware solutions, such as Horde, which provide webmail in addition to other collaboration tools.
This is by no means a comprehensive list. What's your favorite open source webmail client?

How to remove unused old kernel images on Ubuntu

$
0
0
http://ask.xmodulo.com/remove-kernel-images-ubuntu.html

Question: I have upgraded the kernel on my Ubuntu many times in the past. Now I would like to uninstall unused old kernel images to save some disk space. What is the easiest way to uninstall earlier versions of the Linux kernel on Ubuntu?
In Ubuntu environment, there are several ways for the kernel to get upgraded. On Ubuntu desktop, Software Updater allows you to check for and update to the latest kernel on a daily basis. On Ubuntu server, the unattended-upgrades package takes care of upgrading the kernel automatically as part of important security updates. Otherwise, you can manually upgrade the kernel using apt-get or aptitude command.
Over time, this ongoing kernel upgrade will leave you with a number of unused old kernel images accumulated on your system, wasting disk space. Each kernel image and associated modules/header files occupy 200-400MB of disk space, and so wasted space from unused kernel images will quickly add up.

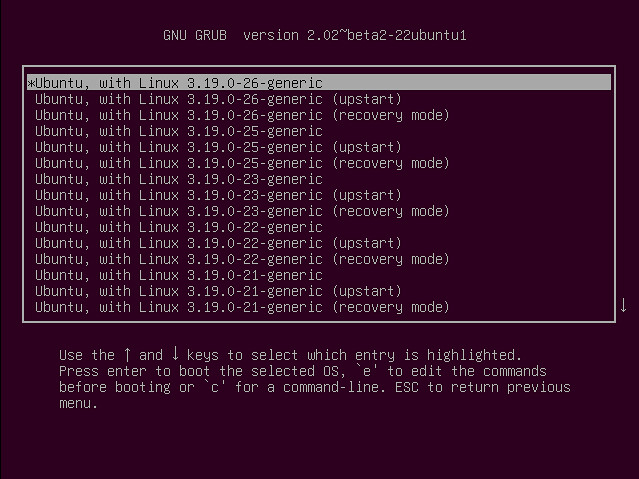
GRUB boot manager maintains GRUB entries for each old kernel, in case you want to boot into it.

As part of disk cleaning, you can consider removing old kernel images if you haven't used them for a while.

How to Clean up Old Kernel Images

Before you remove old kernel images, remember that it is recommended to keep at least two kernel images (the latest one and an extra older version), in case the primary one goes wrong. That said, let's see how to uninstall old kernel images on Ubuntu platform.
In Ubuntu, kernel images consist of the following packages.
  • linux-image-: kernel image
  • linux-image-extra-: extra kernel modules
  • linux-headers-: kernel header files
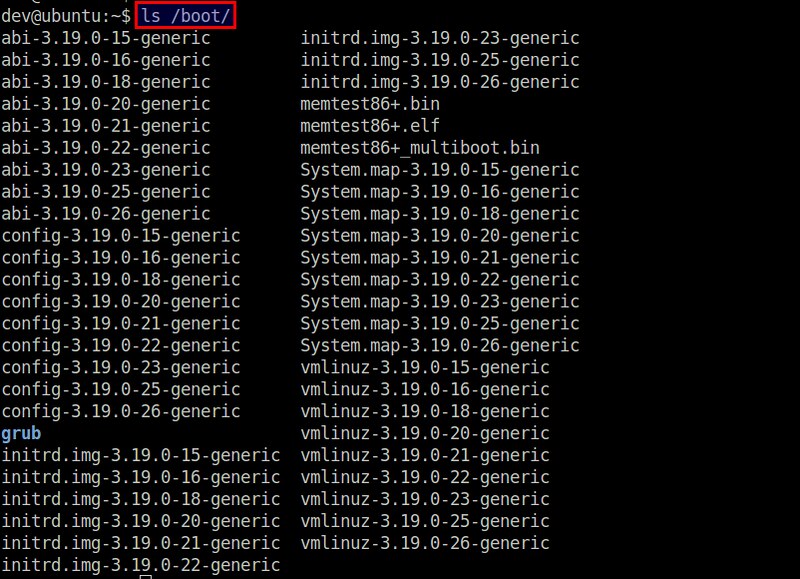
First, check what kernel image(s) are installed on your system.
$ dpkg --list | grep linux-image
$ dpkg --list | grep linux-headers

Among the listed kernel images, you can remove a particular version (e.g., 3.19.0-15) as follows.
$ sudo apt-get purge linux-image-3.19.0-15
$ sudo apt-get purge linux-headers-3.19.0-15
The above commands will remove the kernel image, and its associated kernel modules and header files.
Note that removing an old kernel will automatically trigger the installation of the latest Linux kernel image if you haven't upgraded to it yet. Also, after the old kernel is removed, GRUB configuration will automatically be updated to remove the corresponding GRUB entry from GRUB menu.
If you have many unused kernels, you can remove multiple of them in one shot using the following shell expansion syntax. Note that this brace expansion will work only for bash or any compatible shells.
$ sudo apt-get purge linux-image-3.19.0-{18,20,21,25}
$ sudo apt-get purge linux-headers-3.19.0-{18,20,21,25}

The above command will remove 4 kernel images: 3.19.0-18, 3.19.0-20, 3.19.0-21 and 3.19.0-25.
If GRUB configuration is not properly updated for whatever reason after old kernels are removed, you can try to update GRUB configuration manually with update-grub2 command.
$ sudo update-grub2
Now reboot and verify that your GRUB menu has been properly cleaned up.

Display Awesome Linux Logo With Basic Hardware Info Using screenfetch and linux_logo Tools

$
0
0
http://www.cyberciti.biz/hardware/howto-display-linux-logo-in-bash-terminal-using-screenfetch-linux_logo

Do you want to display a super cool logo of your Linux distribution along with basic hardware information? Look no further try awesome screenfetch and linux_logo utilities.

Say hello to screenfetch

screenFetch is a CLI bash script to show system/theme info in screenshots. It runs on a Linux, OS X, FreeBSD and many other Unix-like system. From the man page:
This handy Bash script can be used to generate one of those nifty terminal theme information + ASCII distribution logos you see in everyone's screenshots nowadays. It will auto-detect your distribution and display an ASCII version of that distribution's logo and some valuable information to the right.

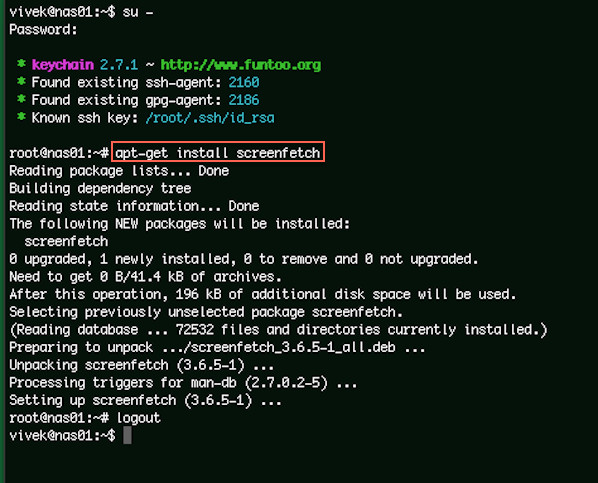
Installing screenfetch on Linux

Open the Terminal application. Simply type the following apt-get command on a Debian or Ubuntu or Mint Linux based system:
$ sudo apt-get install screenfetch
Fig.01: Installing screenfetch using apt-get

Installing screenfetch Mac OS X

Type the following command:
$ brew install screenfetch
Fig.02: Installing screenfetch using brew command

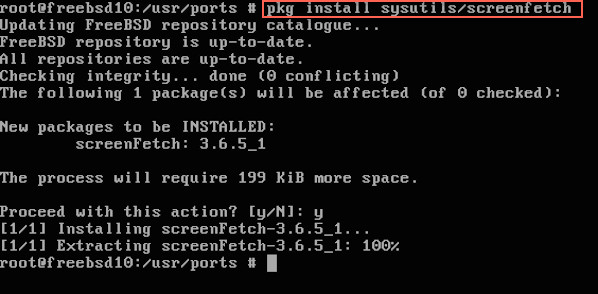
Installing screenfetch on FreeBSD

Type the following pkg command:
$ sudo pkg install sysutils/screenfetch
Fig.03: FreeBSD install screenfetch using pkg

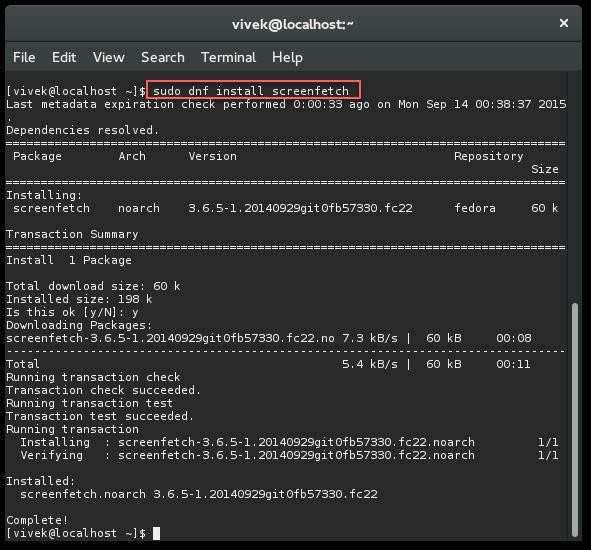
Installing screenfetch on Fedora Linux

Type the following dnf command:
$ sudo dnf install screenfetch
Fig.04: Fedora Linux 22 install screenfetch using dnf

How do I use screefetch utility?

Simply type the following command:
$ screenfetch
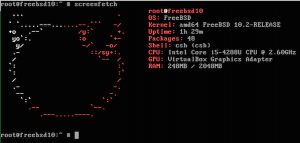
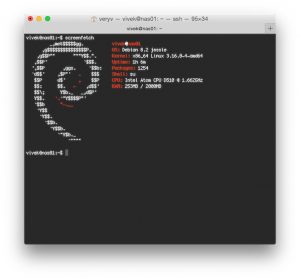
Here is the output from various operating system:

Take screenshot

To take a screenshot and to save a file, enter:
$ screenfetch -s
You will see a screenshot file at ~/Desktop/screenFetch-*.jpg. To take a screenshot and upload to imgur directly, enter:
$ screenfetch -su imgur
Sample outputs:
                 -/+:.          veryv@Viveks-MacBook-Pro
:++++. OS: 64bit Mac OS X 10.10.5 14F27
/+++/. Kernel: x86_64 Darwin 14.5.0
.:-::- .+/:-``.::- Uptime: 3d 1h 36m
.:/++++++/::::/++++++/:` Packages: 56
.:///////////////////////:` Shell: bash 3.2.57
////////////////////////` Resolution: 2560x1600 1920x1200
-+++++++++++++++++++++++` DE: Aqua
/++++++++++++++++++++++/ WM: Quartz Compositor
/sssssssssssssssssssssss. WM Theme: Blue
:ssssssssssssssssssssssss- Font: Not Found
osssssssssssssssssssssssso/` CPU: Intel Core i5-4288U CPU @ 2.60GHz
`syyyyyyyyyyyyyyyyyyyyyyyy+` GPU: Intel Iris
`ossssssssssssssssssssss/ RAM: 6405MB / 8192MB
:ooooooooooooooooooo+.
`:+oo+/:-..-:/+o+/-

Taking shot in 3.. 2.. 1.. 0.
==> Uploading your screenshot now...your screenshot can be viewed at http://imgur.com/HKIUznn
You can visit http://imgur.com/HKIUznn to see uploaded screenshot.

Say hello to linux_logo

The linux_logo program generates a color ANSI picture of a penguin which includes some system information obtained from the /proc filesystem.

Installation

Simply type the following command as per your Linux distro.

Debian/Ubutnu/Mint

$ sudo apt-get install linux_logo
OR
$ sudo apt-get install linuxlogo

CentOS/RHEL/Older Fedora

# yum install linux_logo

Fedora Linux v22+ or newer

# dnf install linux_logo

Run it

Simply type the following command:
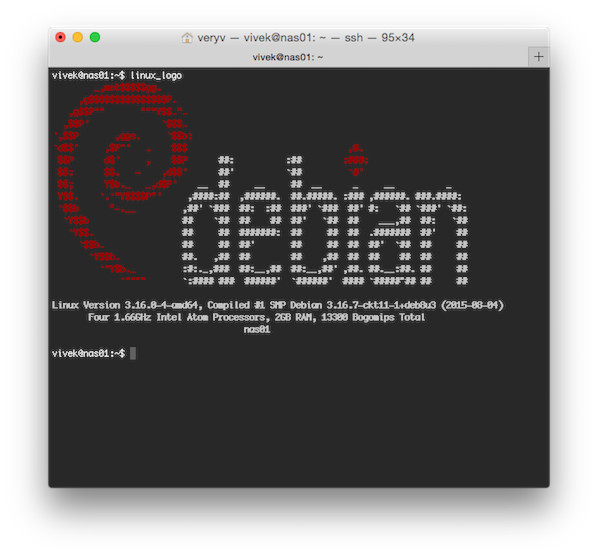
$ linux_logo
linux_logo in action

But wait, there's more!

You can see a list of compiled in logos using:
$ linux_logo -f -L list
Sample outputs:
Available Built-in Logos:
Num Type Ascii Name Description
1 Classic Yes aix AIX Logo
2 Banner Yes bsd_banner FreeBSD Logo
3 Classic Yes bsd FreeBSD Logo
4 Classic Yes irix Irix Logo
5 Banner Yes openbsd_banner OpenBSD Logo
6 Classic Yes openbsd OpenBSD Logo
7 Banner Yes solaris The Default Banner Logos
8 Banner Yes banner The Default Banner Logo
9 Banner Yes banner-simp Simplified Banner Logo
10 Classic Yes classic The Default Classic Logo
11 Classic Yes classic-nodots The Classic Logo, No Periods
12 Classic Yes classic-simp Classic No Dots Or Letters
13 Classic Yes core Core Linux Logo
14 Banner Yes debian_banner_2 Debian Banner 2
15 Banner Yes debian_banner Debian Banner (white)
16 Classic Yes debian Debian Swirl Logos
17 Classic Yes debian_old Debian Old Penguin Logos
18 Classic Yes gnu_linux Classic GNU/Linux
19 Banner Yes mandrake Mandrakelinux(TM) Banner
20 Banner Yes mandrake_banner Mandrake(TM) Linux Banner
21 Banner Yes mandriva Mandriva(TM) Linux Banner
22 Banner Yes pld PLD Linux banner
23 Classic Yes raspi An ASCII Raspberry Pi logo
24 Banner Yes redhat RedHat Banner (white)
25 Banner Yes slackware Slackware Logo
26 Banner Yes sme SME Server Banner Logo
27 Banner Yes sourcemage_ban Source Mage GNU/Linux banner
28 Banner Yes sourcemage Source Mage GNU/Linux large
29 Banner Yes suse SUSE Logo
30 Banner Yes ubuntu Ubuntu Logo

Do "linux_logo -L num" where num is from above to get the appropriate logo.
Remember to also use -a to get ascii version.
To see aix logo, enter:
$ linux_logo -f -L aix
To see openbsd logo:
$ linux_logo -f -L openbsd
Or just see some random Linux logo:
$ linux_logo -f -L random_xy
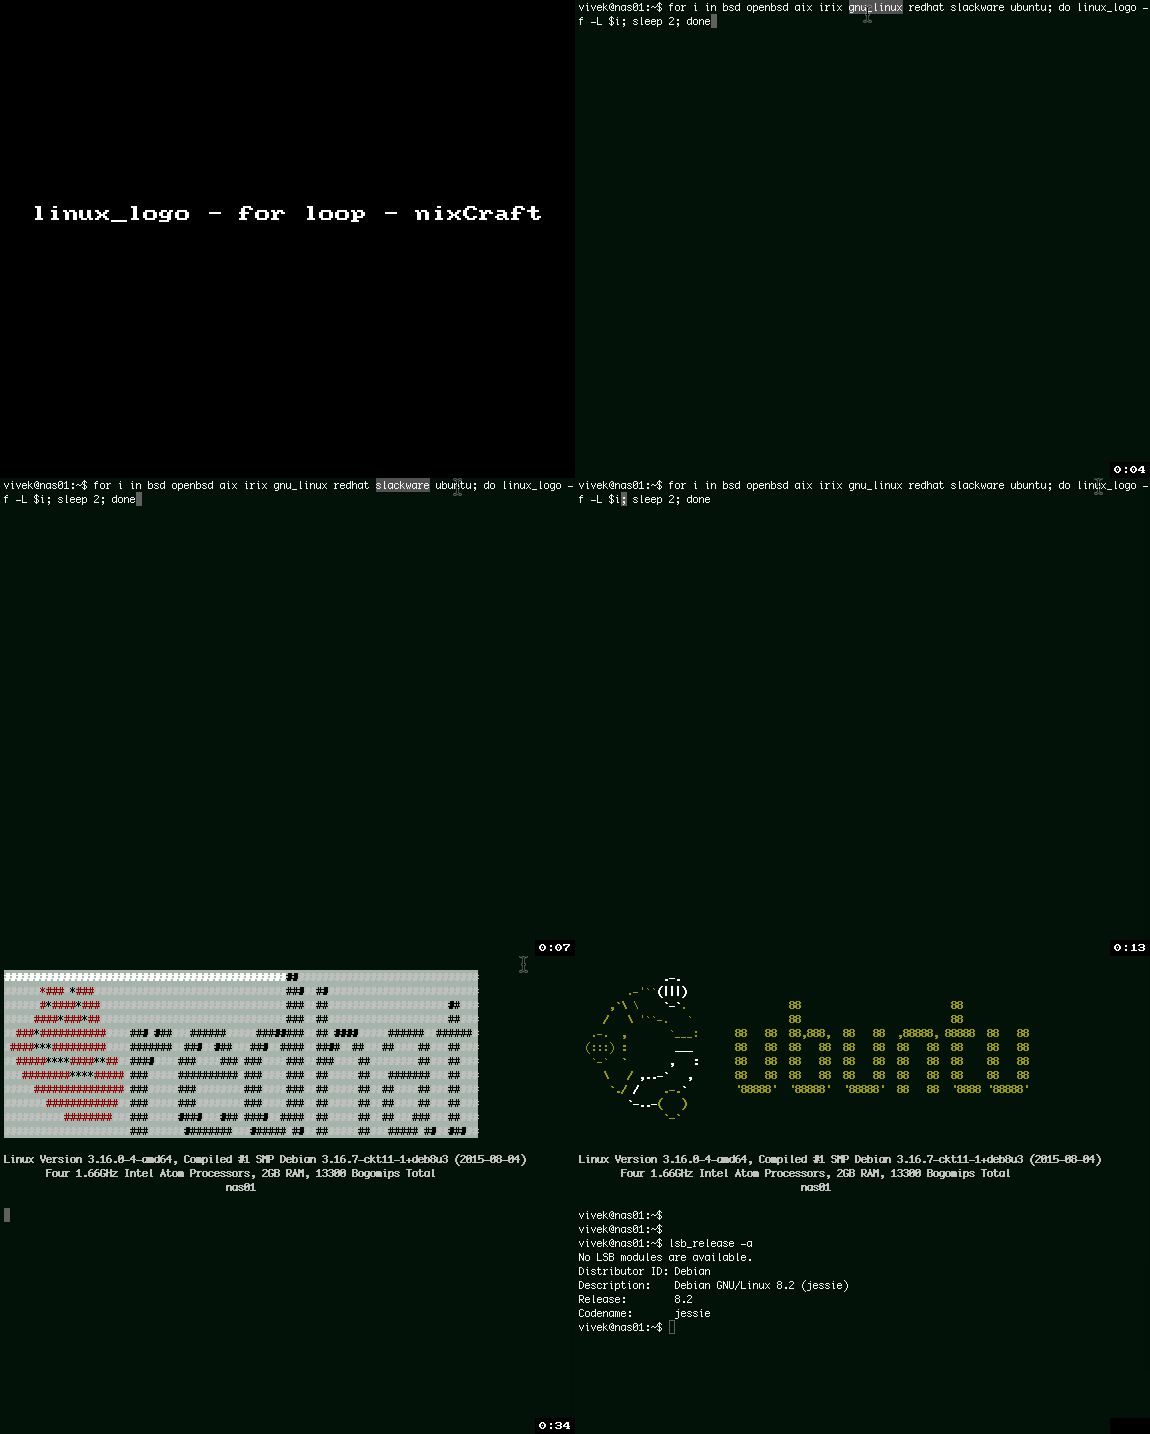
You can combine bash for loop as follows to display various logos, enter:
Gif 01: linux_logo and bash for loop for fun and profie

Getting help

Simply type the following command:
$ screenfetch -h
$ linux_logo -h

References

Yawls: Let Your Webcam Adjust Your Laptop Screen Brightness in Ubuntu/Linux Mint

$
0
0
http://www.noobslab.com/2015/06/yawls-let-your-webcam-adjust-your.html

Yawls stands for Yet Another Webcam Light Sensor, it is a small Java program created for Ubuntu, it adjust the brightness level of your display by using the internal/externel webcam of your notebook as an ambient light sensor, that uses the OpenCV Library and designed to comfort and save energy of your laptop battery. Yawls can also be used from command line interface and run itself as a system daemon, two times a minute it runs and adjusts the brightness of the notebook screen with reference to the ambient brightness. It doesn't engage webcam constantly, as mentioned above in a 30 seconds interval it uses the webcam and leave it for other programs to use. The interval time can be adjust from GUI or from config file if you are using CLI version
It also has face detection option which can be useful if you sits in dark room and yawls can adjust screens brightness as per your needs, by default this option is disabled, you can enable if you intend to use it. After very first installation you must calibrate yawls otherwise it may not function properly. If it causes problem somewhere between usage then re-calibrate it. If you found any kind of bug in the application then report it via github or launchpad.


Installation:
It can be installed in Ubuntu 15.04 Vivid/Ubuntu 15.10/14.04 Trusty/Linux Mint 17.x/17/other related Ubuntu derivatives.
First of all you must enable universe repository from Ubuntu software sources then proceed to install this deb file.


What do you think about this application?

How to extend GIMP with GMIC

$
0
0
https://www.howtoforge.com/tutorial/how-to-extend-gimp-with-gmic

GIMP is the n1 open source image editor and raster graphics manipulator that offers an array of special effects and filters out of the box. Although the software's default capabilities will be more than enough for most people out there, there isn't any reason why you couldn't expand them if you wished for it. While there are many ways to do exactly that, I will focus on how to enrich your GIMP filters and effects sets with the use of G'MIC.

Extend GIMP with G'MIC

G'MIC is an acronym for GREYC's Magic for Image Computing and it is basically an open-source image processing framework that can be used through the command line, online, or on GIMP in the form of an external plugin. As a plugin, it boasts over 400 additional filters and effects, so the expansion of GIMP's possibilities is significant and important.
First, thing you need to do is download the plugin from G'MIC's download web page. Note that the plugin is available in both 32 and 64-bit architectures and that it has to match your existing GIMP (and OS) installation to work. Download the proper G'MIC version and decompress the contents of the downloaded file under the /.gimp-2.8/plug-ins directory. This is a “hidden” directory so you'll have to press “Ctrl+H” when in your Home folder and then locate the folder.
Note that the G'MIC plugin is actually an executable that must be placed in the directory “/.gimp-2.8/plug-ins”. The directory structure is important as placing the G'MIC folder in the plug-ins won't change anything on GIMP.
After having done that, close your GIMP (if open) and restart it. If the plugin was installed correctly, you should be seeing a “G'MIC” entry in the “Filters” options menu. Pressing it will open up a new window that contains all of the new filters and effects.
Each filter features adjustable settings on the right size of the window, while a convenient preview screen is placed on the left. Users may also use specific layers to apply filters on, or even use their own G'MIC code as a new “custom filter”.
While many of the G'MIC filters are already available in GIMP, you will find a lot that aren't so dig deep and locate the one thing that you need every time. Luckily, G'MIC offers categorization for its multitudinous effects collection.

Install G'MIC on Ubuntu

If you're using Ubuntu derivatives, you can also install G'MIC through a third party repository. You can add it at your own risk by entering the following commands on a terminal:
sudo add-apt-repository ppa:otto-kesselgulasch/gimp
sudo apt-get update
sudo apt-get install gimp-gmic
The benefit from doing this is that you will get G'MIC updates whenever there are any, instead of having to download the latest version and to untar the file in the appropriate folder again.

Other GIMP Plugins

G'MIC is certainly great for when you're looking for a filtering extension, but here are some other GIMP plugins that will help you expand other aspects of this powerful software. The GIMP Paint Studio for example is great when in need for additional brushes and their accompanying tool presets, the GIMP Animation Package helps you create simple animations, and finally the FX-Foundry Scripts Pack is a selection of high-quality scripts that do wonders in many cases.

How to install Ioncube Loader on CentOS, Debian and Ubuntu

$
0
0
https://www.howtoforge.com/tutorial/how-to-install-ioncube-loader

The Ioncube loader is a PHP module to load files that were protected with the Ioncube Encoder software. Ioncube is often used by commercial PHP software vendors to protect their software, so it is likely that you come across an Ioncube encoded file sooner or later when you install extensions for CMS or Shop software written in PHP. In this tutorial, I will explain the installation of the Ioncube loader module in detail for CentOS, Debian, and Ubuntu.

1 Prerequisites

Your server must have the PHP programming language installed. I will use the command line Editor Nano and the command line download application wget. Nano and Wget are installed on most servers, in case they are missing on your server then install them with apt / yum:

CentOS

yum install nano wget

Debian and Ubuntu

apt-get install nano wget

2 Download Ioncube Loader

The Ioncube loader files can be downloaded free of charge from Ioncube Inc. They exist for 32Bit and 64Bit Linux systems.
In the first step, I will check if the server is a 32Bit or 64Bit system. Run:
uname -a
The output will be similar to this:
Run uname -a command.
When the text contains "x86_64" then the server runs a 64Bit Linux Kerbel, otherwise it's a 32Bit (i386) Kernel. Most current Linux servers run a 64Bit Kernel.
Download the Loader in tar.gz format to the /tmp folder and unpack it:
For 64Bit x86_64 Linux:
cd /tmp
wget http://downloads3.ioncube.com/loader_downloads/ioncube_loaders_lin_x86-64.tar.gz
tar xfz ioncube_loaders_lin_x86-64.tar.gz
For 32Bit i386 Linux:
cd /tmp
wget http://downloads3.ioncube.com/loader_downloads/ioncube_loaders_lin_x86.tar.gz
tar xfz ioncube_loaders_lin_x86.tar.gz
The files get unpacked into a folder with the name "ioncube".

3 Which Ioncube Loader is the right one?

When you run "ls /tmp/ioncube" then you see that there are many loader files in the ioncube directory.
List of ioncube loader files.
The files have a number that corresponds with the PHP version they are made for and there is also a "_ts" (Thread Safe) version of each loader. We will use the version without thread safety here.
To find out the installed php version, run the command:
php -v
The output will be similar to this:
The php -v output.
For this task only the first two digits of the version number in the first result line matter, on this server I'll run PHP 5.6. We note this number as we need it for the next steps.
Now it's time to find out where the extension directory of this PHP version is, run the following command to find the directory name:
php -i | grep extension_dir
The output should be similar to the one from this screenshot:
The PHP extension directory path.
I marked the path in the screenshot, the extension directory on this server is "/usr/lib/php5/20131226". The directory name will be different for each PHP version and Linux distribution, jus use the one you get from the command and not the one that I got here.
No well copy the ioncube loader for our PHP version 5.6 to the extension directory /usr/lib/php5/20131226:
cp /tmp/ioncube/ioncube_loader_lin_5.6.so /usr/lib/php5/20131226/
Replace "5.6" in the above with your PHP version and "/usr/lib/php5/20131226" with the extension directory of your PHP version.

4 Configure PHP for the Ioncube Loader

The next configuration step is a bit different for Centos and Debian/Ubuntu. We will have to add a line:
zend_extension = /usr/lib/php5/20131226/ioncube_loader_lin_5.6.so
as first line into the php.ini file(s) of the system. Again, the above path contains the extension directory "/usr/lib/php5/20131226" and the PHP version "5.6", ensure that you replace them to match your system setup. I'll start with the instructions for CentOS.

3.1 Configure Ioncube loader on CentOS

Centos has just one central phhp.ini file where we have to add the ioncube loader to. Open the file /etc/php.ini with an editor:
nano /etc/php.ini
and add "zend_extension =" plus the path to the ioncube loader as the first line in the file.
zend_extension = /usr/lib/php5/20131226/ioncube_loader_lin_5.6.so
Then save the file and restart the apache web server:
service httpd restart
service php-fpm restart

3.1 Configure Ioncube loader on Debian and Ubuntu

Debian and Ubuntu use separate php.ini files for PHP CLI (Commandline), CGI, Apache2 and FPM mode. The file paths are:
  • /etc/php5/apache2/php.ini
  • /etc/php5/cli/php.ini
  • /etc/php5/cgi/php.ini
  • /etc/php5/fpm/php.ini
A file has to be edited to enable the ioncube loader into the corresponding PHP mode. You are free to leave out files for PHP modes that you don't use or where you don't need ioncube loader support. It is also possible that you don't have all files on your server, so don't worry when you can't find one of the files.
Apache mod_php
nano /etc/php5/apache2/php.ini
Command line PHP (CLI)
nano /etc/php5/cli/php.ini
PHP CGI (used for CGI and Fast_CGI modes)
nano /etc/php5/cgi/php.ini
PHP FPM
nano /etc/php5/fpm/php.ini
and add "zend_extension =" plus the path to the ioncube loader as the first line in the file(s).
zend_extension = /usr/lib/php5/20131226/ioncube_loader_lin_5.6.so
Then save the file(s) and restart the apache webserver and php-fpm:
service apache2 restart
service php5-fpm restart

5 Test Ioncube

Let's check if ioncube loader has been installed successfully. First I will test the commandline PHP. Run:
php -v
Ioncube loaded in cli PHP.
I marked the line in white that shows that the ioncube loader has been enabled:
with the ionCube PHP Loader (enabled) + Intrusion Protection from ioncube24.com (unconfigured) v5.0.17, Copyright (c) 2002-2015, by ionCube Ltd.
If you like to test the PHP of a website, create an "info.php file with this content:
phpinfo();
?>
And open the URL in a web browser. You will be able to see ioncube in the phpinfo() output:
PHP info output with ioncube module loaded.

Schedule FiOS Router Reboots with a Pogoplug

$
0
0
http://freedompenguin.com/articles/how-to/schedule-fios-router-reboots-with-a-pogoplug


There are few things in life more irritating than having your Internet go out. This is often caused by your router needing a reboot. Sadly, not all routers are created equal which complicates things a bit. At my home for example, we have FIOS Internet. My connection from my ONT to my FIOS router is through coaxial (coax cable). Why does this matter? Because if I was connected to CAT6 from my ONT, I could use the router of my choosing. Sadly a coaxial connection doesn’t easily afford me this opportunity.
So why don’t I just switch my FIOS over to CAT6 instead of using the coaxial cable? Because I have no interest in running the CAT6 throughout my home. This means I must get the most out of my ISP provided router as possible.
What is so awful about using the Actiontec router?
1) The Actiontec router overheats when using wifi and router duties.
2) This router has a small NAT table that means frequent rebooting is needed.
Thankfully, I’m pretty good at coming up with reliable solutions. To tackle the first issue, I simply turned off the wifi portion of the Actiontec router. This allowed me to connect to my own personal WiFi instead. As for the second problem, this was a bit trickier. Having tested the “Internet Only Bridge” approach for the Actiontec and watching it fail often, I finally settled on using my own personal router as a switch instead. It turned out to be far more reliable and I wasn’t having to mess with it every time my ISP renewed a new IP address. Trust me when I say I’m well aware of ALL of the options and this is what works best for me. Okay, moving on.
Automatic rebooting
As reliable as my current setup is, there is still the issue of the small NAT table with the Actiontec. Being the sort of person who likes simple, I usually just reboot the router when things start slowing down. It’s rarely needed, however getting to the box is a pain in the butt.
This lead me on a mission: how can I automatically reboot my router without buying any extra hardware? I’m on a budget, so simply buying one of those IP-enabled remote power switches wasn’t something I was going to do. After all, if the thing stops working, I’m left with a useless brick.
Instead, I decided to build my own. Looking around in my “crap box”, I discovered two Pogoplugs I had forgotten about. These devices provide photo backup and sharing for the less tech savvy among us. All I need to do was install Linux onto the Pogoplug device.
Why would someone choose a Pogoplug vs a Rasberry Pi? Easy, the Pogoplugs are “stupid cheap.” According to the current listings on Amazon, a Pi Model B+ is $32 and a Pi 2 will run $41 USD. Compare that to $10 for a new Pogoplug and it’s obvious which option makes the most sense. I’d much rather free up my Pi for other duties than merely managing my router’s ability to reboot itself.

Installing Debian onto the Pogoplug

I should point out that most of the tutorials regarding installing Debian (or any Linux distro) onto a Pogoplug are missing information, half-wrong and almost certain to brick the device. After extensive research I found a tutorial that provides complete, accurate information. Based on that research, I recommend using the tutorial for the Pogoplug v4 (both Series 4 and Mobile). If you try out the linked tutorial on other Pogoplug models you will “brick” the Pogoplug.
Getting started: When running the curl command (for dropbear), if you are getting errors – leave the box plugged in and Ethernet connected for at least an hour. If you continue to see the error: “pogoplug curl: (7) Failed to connect to”, then you need to contact Pogoplug to have them de-register the device.
Pogoplug Support Email
If installing Debian on the Pogoplug sounds scary or you’ve already got a Raspberry Pi running Linux that you’re not using, then you’re ready for the next step.
Setting up your router reboot box
(Hat tip to Verizon Forums)
Important: After you’ve installed Debian onto your Pogoplug v4 (or setup your existing Rasberry Pi instead), you would be wise to consider setting up a common non-root user for casual SSH sessions. Even though this is behind your router’s firewall, you’re still running a Linux box as root with various open ports.
First up, login to your Actiontec MI424WR (or similar) FIOS router, browse to Advanced, click Yes to acknowledge the warning, then click on Local Administration on the bottom left. Check “Using Primary Telnet Port (23)” and hit Apply. This is for local administration only and is not to be confused with Remote Administration settings.
Go ahead and SSH into your newly tweaked Pogoplug. Next, you’re going to want to install a package called “expect.” Assuming you’re not running as root, we’ll be using “sudo” for this demonstration. I first discovered this concept on the Verizon forums last year. Even though it was scripted for a Pi, I found it also works great on the Pogoplug. SSH into your Pogoplug:
  1. cd /home/non-root-username/
  1. sudo apt-get install expect -y
Next, run nano in a terminal and paste in the following contents, edit any mention of your /home/non-root-username/ and your router’s IP LAN address to match your personal details.
  1. spawn telnet 192.168.1.1
  2. expect "Username:"
  3. send "admin\r"
  4. expect "Password:"
  5. send "ACTUAL-ROUTER-password\r"
  6. expect "Wireless Broadband Router> "
  7. sleep 5
  8. send "system reboot\r"
  9. sleep 5
  10. send "exit\r"
  11. close
  12. sleep 5
  13. exit
Now name the file verizonrouterreboot.expect and save it. You’ll note that we’re saving this in your /home/non-root-username/ directory. You could call the file anything you like, but for the sake of consistency, I’m sticking with the file names as I have them.
The file we just created accesses the router via telnet (locally), then using hard returns (\r) is logging into the router and rebooting it. Clearly this file on it’s own would be annoying, since executing it just reboots your router. However it does provide the executable for our next file so that we can automate when we want it to run.
Let’s open nano in the same directory and paste in the following contents:
  1. {
  2. cd /home/non-root-username/
  3. expect -f verizonrouterreboot.expect
  4. echo "\r"
  5. } 2>&1 > /home/non-root-username/verizonrouterreboot.log
  6. echo "Nightly Reboot Successful: $(date)">> /home/non-root-username/successful.log
  7. sleep 3
  8. exit
Now save this file as verizonrouterreboot.sh so it can provide you with a log file and run your expect script.
As an added bonus, I’m going to also provide you with a script that will reboot the router if the Internet goes out or the router isn’t connecting with your ISP.
Once again, open up nano in the same directory and drop the following into it:
  1. #!/bin/bash
  2. if ping -c 1 208.67.220.220
  3. then
  4. : # colon is a null and is required
  5. else
  6. /home/non-root-username/verizonrouterreboot.sh
  7. fi
Save this file as pingme.sh and it will make sure you’ll never have to go fishing for the power outlet ever again. This script is designed to ping an OpenDNS server on a set schedule (explained shortly). If the ping fails, it then runs the reboot script.
Before I wrap this up, there are two things that must still be done to make this work. First, we need to make sure these files can be executed.
  1. chmod +x /verizonrouterreboot.sh
  1. chmod +x verizonrouterreboot.expect
  1. chmod +x pingme.sh
Pogoplug Debian
Pogoplug Debian
Now that our scripts are executable, the next step is to schedule the scripts on their appropriate schedules. My recommendation is to schedule verizonrouterreboot.sh at a time when no one is using the computer, say at 4am. And I recommend running “pingme” every 30 minutes. After all, who wants to be without the Internet for more than 30 minutes? You can setup a cron job and then verify your schedule is set up correctly.
Are you a cable Internet user?
You are? That’s awesome! As luck would have it, I’m working on two different approaches for automatically rebooting cable modems. If you use a cable modem and would be interested in helping me test these techniques out, HIT THE COMMENTS and let’s put our heads together. Let me know if you’re willing to help me do some testing!
I need to be able to test both the “telnet method” and the “wget to url” method with your help. Ideally if both work, this will cover most cable modem types and reboot methods.

Linux Security - How Can Your Linux Be Hacked Using Malware, Trojans, Worms, Web Scripts Etc.

$
0
0
http://www.linuxandubuntu.com/home/linux-security-how-can-your-linux-be-hacked-using-malware-trojans-worms-web-scripts-etc

Is Linux Virus free?
Is it possible that Linux can be infected with viruses? Probably, you heard of this in some debates. But here are some facts that you need to know to better understand how Linux is secured and what things can damage a Linux system. See how it is possible that Linux can be too infected and what are the percentages that you're currently with an infected Linux running on your computer.

Introduction

First of all before I continue to speak anything about the topic, let me tell you that I've been using Linux for years now and never ever found any virus or virus-effect in any of my Linux systems.

There have been debates on the topic of whether Linux is virus-free or not. I have been in Linux environment for years and heard infinite numbers of Windows users accepting "Linux Is Virus Free". Many of such Windows users turned to Linux, actually I'm one of them. Although, I do use Windows for tutorial purposes several times in a month, but for regular, I'm a Linux user. 

Is "Linux Virus-Free" A Myth ?

Linux is virus free, a myth?
It won't be correct to answer it in Yes or No. The question raises big debates that I don't want to create here. But I will answer it saying that Linux is one of the most secure operating systems available when we only talk about the "system only" and leave everything else that happen inside that system. For example, running vulnerable third-party applications on Linux, users errors etc. It happens many times that the user is running an outdated application. Running outdated application can cause users be tricked by any attacker. When the newer version of any application is released, the developers or company informs all the new stuff that newer version has, including bug fixes and fixed security holes. Attackers take benefit of this information and find people who are still using an outdated and vulnerable application. Attackers/Hackers know exactly what vulnerabilities they need to target and how.

Although Linux system is very powerful and Linux developers provide updates frequently to secure users but those third-party applications may not be as good at security as Linux developers are. So the answer is very clear of how Linux is Virus-Free and how not.

Do We Also Have Viruses For Linux ?

Everyone who runs Windows or even one who does not, knows very well that there are viruses for Windows. Actually many viruses for Windows. But what about Linux? Are there viruses for Linux? The clear answer is YES. There are viruses, trojans, worms and other types of malware that affect the Linux operating system but not many. Very few viruses are for Linux and most are not of that high quality, Windows-like viruses that can cause doom for you. Although Linux kernel is memory resident and read-only, so infection seriousness depends on with what permissions that malware was run. If the malware or trojan was run without root permission then it can cause temporary infection but if malware or trojan was run with the root access then it can infect the entire system.

Getting Infected By A Windows Machine

Windows viruses in linux
Having not many viruses for Linux does make Linux users secure but not careless. There are many other ways that Linux can be too infected and one of the major reasons is Windows. Most users whether using Linux server or desktop, they are connected to a Windows computer on a local network to share documents, files and other stuff. It is very much possible that Linux user accepts a file which is a virus and capable of executing on Linux too.

There are viruses that can execute under Windows and Linux both. So users need to be extra careful when receiving files from a Windows machine. 

Downloading Applications From Unauthenticated Sources

Another and very powerful way of attackers to infect your Linux is by providing you an app with some interesting functionalities. You download it and keep on using it without knowing that the application is sending your information out to the attacker who coded this application. That's why it is always suggested to download/install applications from the authenticated places on the web. I've talked to some Ubuntu developers and they always suggested to use software center as much as possible. Although I have used other resources but all of them were secure and trustable. If you want any application that you don't find in software center, you can leave an entry on our contact form and we'll provide you application with all the information about it.

User Errors

User errors can be the most harmful for a Linux system because in this user himself provides root access to a malware. This happens when an unauthenticated application is installed on the system and application has some basic features that user likes. While the user was installing this malicious application he was asked to provide root access, and the user did. Now the application goes up to its most dangerous face and infects the entire Linux system. Running a malicious program without root access can be dangerous but it won't be permanent. After the restart, the system can recover from the effects that were caused by the virus.
linux hacks using users errors

Linux Viruses - Precautions To Adopt To Secure Linux System

So all the above-mentioned security risks are possible. So why not take precautions. Here are some precautions adopting them will provide you the extra security and your most powerful Linux system won't be infected.

1. Be Careful

All of the above-mentioned security risks are rare and only occurs when the user is careless. So whether the Linux user is new or advance, the first precaution is "Don't Be Careless". Being careless can cause the system severe damage. Double check before you receive any file from the Windows system, don't install software from malicious website that promise to crack the password or any such illegal promises. Install software from the system provided software center and repositories. If you need any application that is not available in the default system repositories then there are many trustable resources that you can download the applications from. 

2. Anti-virus Scanners

One of the most debated topics is whether Linux needs an antivirus or not. I will mention some of the facts and based on those facts you can decide to install or not install an antivirus in your Linux system. Let's go ahead and see some fundamentals of antivirus.

In simple terms, an antivirus is a set of tools that scans the device to find malicious programs, viruses, trojans and hundreds of other types of threats that can damage one's system and then trash all the threats out of the system.

Antiviruses companies are working very hard to code definitions of the latest viruses. All these new definitions can recognise latest and more advanced viruses and delete them as quickly as possible. Now one thing to be noticed here why a Linux system might require an antivirus.

Why Linux Require An Antivirus ?

A user needs to decide himself whether he needs any antivirus or not without going into the debates. First of all there are not many viruses for the Linux OS so it's very rare that user system is infected with a "Linux type" virus. And secondly, there are hundreds and thousands of viruses for Windows. For a Linux system alone you might not require any antivirus but if you have Windows files in your Linux so there are higher chances of getting infected with those viruses, if they are able to execute on Linux too. Even if those viruses are not executable in Linux then they'll wait for a Windows system to execute their malicious programs.

The latest study of Kaspersky for the first quarter of 2015 shows how Linux system have been used to DDoS. You can read the full report here.

You can decide to use an antivirus scanner (not the full suit) to scan the viruses contained with Windows files. The antivirus scanner will scan all the files and find out the viruses or threats that you can remove manually via terminal. But you're all free to install a complete suit to protect from Windows viruses. Below are two of the popular antivirus scanners that you can use for free. Other popular antivirus also provide free scanners for Linux. Google for any other antivirus if you want.
Clam AV
Comodo Antivirus For Linux

Conclusion

Now so many people will take it wrong way to install any antivirus for Linux but here is an important thing to be understood. There are for sure few viruses for Linux and most of them are not of high quality and destructive. But there are still Windows viruses that can spread across the system if executable on Linux. Even if viruses can not execute in Linux they will still spread when the Linux user transfers data to a Windows system. So to find the threats and delete them, we Linux users can install antivirus scanner. Those who don't store Windows files or do not connect with Windows machines they might skip installing antivirus scanner but still they need to be careful.

Finally tell us your point of view or Linux experience with us and share with us any story where any user had virus effects in Linux.

How Will the Big Data Craze Play Out?

$
0
0
http://www.linuxjournal.com/content/how-will-big-data-craze-play-out

I was in the buzz-making business long before I learned how it was done. That happened here, at Linux Journal. Some of it I learned by watching kernel developers make Linux so useful that it became irresponsible for anybody doing serious development not to consider it—and, eventually, not to use it. Some I learned just by doing my job here. But most of it I learned by watching the term "open source" get adopted by the world, and participating as a journalist in the process.
For a view of how quickly "open source" became popular, see Figure 1 for a look at what Google's Ngram viewer shows.
Figure 1. Google Ngram Viewer: "open source"
Ngram plots how often a term appears in books. It goes only to 2008, but the picture is clear enough.
I suspect that curve's hockey stick began to angle toward the vertical on February 8, 1998. That was when Eric S. Raymond (aka ESR), published an open letter titled "Goodbye, 'free software'; hello, 'open source'" and made sure it got plenty of coverage. The letter leveraged Netscape's announcement two weeks earlier that it would release the source code to what would become the Mozilla browser, later called Firefox. Eric wrote:
It's crunch time, people. The Netscape announcement changes everything. We've broken out of the little corner we've been in for twenty years. We're in a whole new game now, a bigger and more exciting one—and one I think we can win.
Which we did.
How? Well, official bodies, such as the Open Source Initiative (OSI), were founded. (See Resources for a link to more history of the OSI.) O'Reilly published books and convened conferences. We wrote a lot about it at the time and haven't stopped (this piece being one example of that). But the prime mover was Eric himself, whom Christopher Locke describes as "a rhetorician of the first water".
To put this in historic context, the dot-com mania was at high ebb in 1998 and 1999, and both Linux and open source played huge roles in that. Every Linux World Expo was lavishly funded and filled by optimistic start-ups with booths of all sizes and geeks with fun new jobs. At one of those, more than 10,000 attended an SRO talk by Linus. At the Expos and other gatherings, ESR held packed rooms in rapt attention, for hours, while he held forth on Linux, the hacker ethos and much more. But his main emphasis was on open source, and the need for hackers and their employers to adopt its code and methods—which they did, in droves. (Let's also remember that two of the biggest IPOs in history were Red Hat's and VA Linux's, in August and December 1999.)
Ever since witnessing those success stories, I have been alert to memes and how they spread in the technical world. Especially "Big Data" (see Figure 2).
Figure 2. Google Trends: "big data"
What happened in 2011? Did Big Data spontaneously combust? Was there a campaign of some kind? A coordinated set of campaigns?
Though I can't prove it (at least not in the time I have), I believe the main cause was "Big data: The next frontier for innovation, competition, and productivity", published by McKinsey in May 2011, to much fanfare. That report, and following ones by McKinsey, drove publicity in Forbes, The Economist, various O'Reilly pubs, Financial Times and many others—while providing ample sales fodder for every big vendor selling Big Data products and services.
Among those big vendors, none did a better job of leveraging and generating buzz than IBM. See Resources for the results of a Google search for IBM + "Big Data", for the calendar years 2010–2011. Note that the first publication listed in that search, "Bringing big data to the Enterprise", is dated May 16, 2011, the same month as the McKinsey report. The next, "IBM Big Data - Where do I start?" is dated November 23, 2011.
Figure 3 shows a Google Trends graph for McKinsey, IBM and "big data".
Figure 3. Google Trends: "IBM big data", "McKinsey big data"
See that bump for IBM in late 2010 in Figure 3? That was due to a lot of push on IBM's part, which you can see in a search for IBM and big data just in 2010—and a search just for big data. So there was clearly something in the water already. But searches, as we see, didn't pick up until 2011. That's when the craze hit the marketplace, as we see in a search for IBM and four other big data vendors (Figure 4).
Figure 4. Google Trends: "IBM big data", "SAP big data", "HP big data", "Oracle big data", "Microsoft big data"
So, although we may not have a clear enough answer for the cause, we do have clear evidence of the effects.
Next question: to whom do those companies sell their Big Data stuff? At the very least, it's the CMO, or Chief Marketing Officer—a title that didn't come into common use until the dot-com boom and got huge after that, as marketing's share of corporate overhead went up and up. On February 12, 2012, for example, Forbes ran a story titled "Five Years From Now, CMOs Will Spend More on IT Than CIOs Do". It begins:
Marketing is now a fundamental driver of IT purchasing, and that trend shows no signs of stopping—or even slowing down—any time soon. In fact, Gartner analyst Laura McLellan recently predicted that by 2017, CMOs will spend more on IT than their counterpart CIOs.
At first, that prediction may sound a bit over the top. (In just five years from now, CMOs are going to be spending more on IT than CIOs do?) But, consider this: 1) as we all know, marketing is becoming increasingly technology-based; 2) harnessing and mastering Big Data is now key to achieving competitive advantage; and 3) many marketing budgets already are larger—and faster growing—than IT budgets.
In June 2012, IBM's index page was headlined, "Meet the new Chief Executive Customer. That's who's driving the new science of marketing." The copy was directly addressed to the CMO. In response, I wrote "Yes, please meet the Chief Executive Customer", which challenged some of IBM's pitch at the time. (I'm glad I quoted what I did in that post, because all but one of the links now go nowhere. The one that works redirects from the original page to "Emerging trends, tools and tech guidance for the data-driven CMO".)
According to Wikibon, IBM was the top Big Data vendor by 2013, raking in $1.368 billion in revenue. In February of this year (2015), Reuters reported that IBM "is targeting $40 billion in annual revenue from the cloud, big data, security and other growth areas by 2018", and that this "would represent about 44 percent of $90 billion in total revenue that analysts expect from IBM in 2018".
So I'm sure all the publicity works. I am also sure there is a mania to it, especially around the wanton harvesting of personal data by all means possible, for marketing purposes. Take a look at "The Big Datastillery", co-published by IBM and Aberdeen, which depicts this system at work (see Resources). I wrote about it in my September 2013 EOF, titled "Linux vs. Bullshit". The "datastillery" depicts human beings as beakers on a conveyor belt being fed marketing goop and releasing gases for the "datastillery" to process into more marketing goop. The degree to which it demeans and insults our humanity is a measure of how insane marketing mania, drunk on a diet of Big Data, has become.
T.Rob Wyatt, an alpha geek and IBM veteran, doesn't challenge what I say about the timing of the Big Data buzz rise or the manias around its use as a term. But he does point out that Big Data is truly different in kind from its predecessor buzzterms (such as Data Processing) and how it deserves some respect:
The term Big Data in its original sense represented a complete reversal of the prevailing approach to data. Big Data specifically refers to the moment in time when the value of keeping the data exceeded the cost and the prevailing strategy changed from purging data to retaining it.
He adds:
CPU cycles, storage and bandwidth are now so cheap that the cost of selecting which data to omit exceeds the cost of storing it all and mining it for value later. It doesn't even have to be valuable today, we can just store data away on speculation, knowing that only a small portion of it eventually needs to return value in order to realize a profit. Whereas we used to ruthlessly discard data, today we relentlessly hoard it; even if we don't know what the hell to do with it. We just know that whatever data element we discard today will be the one we really need tomorrow when the new crop of algorithms comes out.
Which gets me to the story of Bill Binney, a former analyst with the NSA. His specialty with the agency was getting maximum results from minimum data, by recognizing patterns in the data. One example of that approach was ThinThread, a system he and his colleagues developed at the NSA for identifying patterns indicating likely terrorist activity. ThinThread, Binney believes, would have identified the 9/11 hijackers, had the program not been discontinued three weeks before the attacks. Instead, the NSA favored more expensive programs based on gathering and hoarding the largest possible sums of data from everywhere, which makes it all the harder to analyze. His point: you don't find better needles in bigger haystacks.
Binney resigned from the NSA after ThinThread was canceled and has had a contentious relationship with the agency ever since. I've had the privilege of spending some time with him, and I believe he is A Good American—the title of an upcoming documentary about him. I've seen a pre-release version, and I recommend seeing it when it hits the theaters.
Meanwhile, I'm wondering when and how the Big Data craze will run out—or if it ever will.
My bet is that it will, for three reasons.
First, a huge percentage of Big Data work is devoted to marketing, and people in the marketplace are getting tired of being both the sources of Big Data and the targets of marketing aimed by it. They're rebelling by blocking ads and tracking at growing rates. Given the size of this appetite, other prophylactic technologies are sure to follow. For example, Apple is adding "Content Blocking" capabilities to its mobile Safari browser. This lets developers provide ways for users to block ads and tracking on their IOS devices, and to do it at a deeper level than the current add-ons. Naturally, all of this is freaking out the surveillance-driven marketing business known as "adtech" (as a search for adtech + adblock reveals).
Second, other corporate functions must be getting tired of marketing hogging so much budget, while earning customer hate in the marketplace. After years of winning budget fights among CXOs, expect CMOs to start losing a few—or more.
Third, marketing is already looking to pull in the biggest possible data cache of all, from the Internet of Things. Here's T.Rob again:
IoT device vendors will sell their data to shadowy aggregators who live in the background ("...we may share with our affiliates..."). These are companies that provide just enough service so the customer-facing vendor can say the aggregator is a necessary part of their business, hence an affiliate or partner.
The aggregators will do something resembling "big data" but generally are more interested in state than trends (I'm guessing at that based on current architecture) and will work on very specialized data sets of actual behavior seeking not merely to predict but rather to manipulate behavior in the immediate short term future (minutes to days). Since the algorithms and data sets differ greatly from those in the past, the name will change. The pivot will be the development of new specialist roles in gathering, aggregating, correlating, and analyzing the datasets.
This is only possible because our current regulatory regime allows all new data tech by default. If we can, then we should. There is no accountability of where the data goes after it leaves the customer-facing vendor's hands. There is no accountability of data gathered about people who are not account holders or members of a service.
I'm betting that both customers and non-marketing parts of companies are going to fight that.
Finally, I'm concerned about what I see in Figure 5.
Figure 5. Google Trends: "open source", "big data"
If things go the way Google Trends expects, next year open source and big data will attract roughly equal interest from those using search engines. This might be meaningless, or it might be meaningful. I dunno. What do you think?

Resources

Eric S. Raymond:
"Goodbye, 'free software'; hello, 'open source'", by Eric S. Raymond: http://www.catb.org/esr/open-source.html
"Netscape Announces Plans to Make Next-Generation Communicator Source Code Available Free on the Net": http://web.archive.org/web/20021001071727/wp.netscape.com/newsref/pr/newsrelease558.html
Open Source Initiative: http://opensource.org/about
History of the OSI: http://opensource.org/history
O'Reilly Books on Open Source: http://search.oreilly.com/?q=open+source
O'Reilly's OSCON: http://www.oscon.com/open-source-eu-2015
Red Hat History (Wikipedia): https://en.wikipedia.org/wiki/Red_Hat#History
"VA Linux Registers A 698% Price Pop", by Terzah Ewing, Lee Gomes and Charles Gasparino (The Wall Street Journal): http://www.wsj.com/articles/SB944749135343802895
Google Trends "big data": https://www.google.com/trends/explore#q=big%20data
"Big data: The next frontier for innovation, competition, and productivity", by McKinsey: http://www.mckinsey.com/insights/business_technology/big_data_the_next_frontier_for_innovation
Google Search Results for IBM + "Big Data", 2010–2011: https://www.google.com/search?q=%2BIBM+%22Big+Data%22&newwindow=1&safe=off&biw=1267&bih=710&source=lnt&tbs=cdr%3A1%2Ccd_min%3A1%2F1%2F2010%2Ccd_max%3A12%2F31%2F2011&tbm=
"Bringing big data to the Enterprise": http://www-01.ibm.com/software/au/data/bigdata
"IBM Big Data - Where do I start?": https://www.ibm.com/developerworks/community/blogs/ibm-big-data/entry/ibm_big_data_where_do_i_start?lang=en
Google Trends: "IBM big data", "McKinsey big data": https://www.google.com/trends/explore#q=IBM%20big%20data,%20McKinsey%20big%20data&cmpt=q&tz=Etc/GMT%2B4
Google Search Results for "IBM big data" in 2010: https://www.google.com/search?q=ibm+big+data&newwindow=1&safe=off&biw=1095&bih=979&source=lnt&tbs=cdr%3A1%2Ccd_min%3A1%2F1%2F2010%2Ccd_max%3A12%2F31%2F2010
Google Search Results for Just "big data": https://www.google.com/search?q=ibm+big+data&newwindow=1&safe=off&biw=1095&bih=979&source=lnt&tbs=cdr%3A1%2Ccd_min%3A1%2F1%2F2010%2Ccd_max%3A12%2F31%2F2010#newwindow=1&safe=off&tbs=cdr:1%2Ccd_min:1%2F1%2F2010%2Ccd_max:12%2F31%2F2010&q=big+data
Google Trends for "IBM big data", "SAP big data", "HP big data", "Oracle big data", "Microsoft big data": https://www.google.com/search?q=ibm+big+data&newwindow=1&safe=off&biw=1095&bih=979&source=lnt&tbs=cdr%3A1%2Ccd_min%3A1%2F1%2F2010%2Ccd_max%3A12%2F31%2F2010#newwindow=1&safe=off&tbs=cdr:1%2Ccd_min:1%2F1%2F2010%2Ccd_max:12%2F31%2F2010&q=big+data
Google Books Ngram Viewer Results for "chief marketing officer" between 1900 and 2008: https://books.google.com/ngrams/graph?content=chief+marketing+officer&year_start=1900&year_end=2008&corpus=0&smoothing=3&share=&direct_url=t1%3B%2Cchief%20marketing%20officer%3B%2Cc0
Forbes, "Five Years From Now, CMOs Will Spend More on IT Than CIOs Do", by Lisa Arthur: http://www.forbes.com/sites/lisaarthur/2012/02/08/five-years-from-now-cmos-will-spend-more-on-it-than-cios-do
"By 2017 the CMO will Spend More on IT Than the CIO", hosted by Gartner Analyst Laura McLellan (Webinar): http://my.gartner.com/portal/server.pt?open=512&objID=202&mode=2&PageID=5553&resId=1871515&ref=Webinar-Calendar
"Yes, please meet the Chief Executive Customer", by Doc Searls: https://blogs.law.harvard.edu/doc/2012/06/19/yes-please-meet-the-chief-executive-customer
Emerging trends, tools and tech guidance for the data-driven CMO: http://www-935.ibm.com/services/c-suite/cmo
Big Data Vendor Revenue and Market Forecast 2013–2017 (Wikibon): http://wikibon.org/wiki/v/Big_Data_Vendor_Revenue_and_Market_Forecast_2013-2017
"IBM targets $40 billion in cloud, other growth areas by 2018" (Reuters): http://www.reuters.com/article/2015/02/27/us-ibm-investors-idUSKBN0LU1LC20150227
"The Big Datastillery: Strategies to Accelerate the Return on Digital Data": http://www.ibmbigdatahub.com/blog/big-datastillery-strategies-accelerate-return-digital-data
"Linux vs. Bullshit", by Doc Searls, Linux Journal, September 2013: http://www.linuxjournal.com/content/linux-vs-bullshit
T.Rob Wyatt: https://tdotrob.wordpress.com
William Binney (U.S. intelligence official): https://en.wikipedia.org/wiki/William_Binney_%28U.S._intelligence_official%29
ThinThread: https://en.wikipedia.org/wiki/ThinThread
A Good American: http://www.imdb.com/title/tt4065414
Safari 9.0 Secure Extension Distribution ("Content Blocking"): https://developer.apple.com/library/prerelease/ios/releasenotes/General/WhatsNewInSafari/Articles/Safari_9.html
Google Search Results for adtech adblock: https://www.google.com/search?q=adtech+adblock&gws_rd=ssl
Google Trends results for "open source", "big data": https://www.google.com/trends/explore#q=open%20source,%20big%20data&cmpt=q&tz=Etc/GMT%2B4

How to find PID of process listening on a port in Linux? netstat and lsof command examples

$
0
0
http://javarevisited.blogspot.ca/2015/11/how-to-find-pid-of-process-listening-on-a-port-unix-netstat-lsof-command-examples.html

In Linux, many times, you want to find out the PID of a process which are listening on a port e.g. if multiple tomcat servers are running on a host then, how do you find the PID of the tomcat listening on port 8080? There are many UNIX commands to find the process using a specific port, but I'll share what I use. I always use the netstat command with -p option, which displays process id of the process listening on a port. Btw, netstat is not the only command to find all processes using a particular port, you can also use lsof command for the same purpose. If you remember, we have used lsof earlier to find all the processes accessing a file but it can also be used to find all processes accessing a specific port. You will see the example of both netstat and lsof commands in this article to find PID of process listening on a specific port in Linux.


Netstat command to find the PID of process listening on a port

So to find the PID of your Java server listening on port 8080, you can use following UNIX command:

$ netstat -nap | grep 8080
(Not all processes could be identified, non-owned process info will not be shown, you would have to be root to see it all.)
tcp 000.0.0.0:80800.0.0.0:* LISTEN 25414/java

here you go, 25414 is the PID of your tomcat server. Since tomcat is a Java web application it started with java command and that's why you see 25414/java.

Remember, if you are not logged in as root or the user under which your server is running, you might see following error:

No info could be read for "-p": geteuid()=XXX but you should be root

If you see this error, then just sudo as the user which is running the tomcat.

lsof command example to find the processes using a specific port

Here is the example of lsof command to list the process listening on a port.

$ lsof -i :8080
COMMAND PID USER FD TYPE DEVICE SIZE NODE NAME
java 25414 appuser 44u IPv4 3733348 TCP *:XXX (LISTEN)

just remember to -i option and color (:) before the port i.e.  :8080. Btw, if you don't find lsof command in your PATH, search in /usr/sbin, more often /usr/sbin is not added into user's PATH. In that you can run the command as shown below:

$ /usr/sbin/lsof -i :8080
COMMAND PID USER FD TYPE DEVICE SIZE NODE NAME
java 25414 appuser 44u IPv4 3733348 TCP *:XXX (LISTEN)

It will display the same result.

That's all about how to find the PID of the process listening on a port in UNIX or Linux. You can use both netstat and lsof command to get the PID, but I mostly use netstat because sometimes I don't remember the port but I know the PID. Since in the case of netstat I am just doing grep, even if give PID it will fetch the line from netstat output then I can get the port on which a particular process is listening. Anyway, I will show you a couple of more tricks to find the port on which a particular port is listening in next tutorial.

Here is the summary of how to find the process listening on a particular port in UNIX:

UNIX command to find the PID of the process listening on specific port


Related UNIX and Linux command tutorials for Java Programers:
  • 10 examples of find command in UNIX (examples)
  • How to call REST web service from UNIX command line? (command)
  • 10 examples of grep command in UNIX (examples)
  • Difference between soft link and hard link in Linux? (answer)
  • 10 examples of date command in Linux (examples)
  • How to getIP address from hostname and vice-versa in Linux (command)
  • 10 examples of tar command in UNIX (examples)
  • How to delete empty files and directory in UNIX (solution)
  • 10 examples of Vim in UNIX (examples)
  • How to create, update and delete soft link in UNIX (command)
  • 5 examples of sort command in Linux (examples)
  • How to make directory tree in one command? (example)
  • 10 examples of chmod command in UNIX (examples)
  • UNIX command to find out how long a process is running? (answer)
  • 5 examples of kill command in Linux (examples)
  • How to how long argument of a process in Solaris (command)
  • 10 examples of xargs command in Linux (examples)
  • UNIX command to find the size of file and directory? (command)
  • 10 tips to work fast in UNIX? (tips)
Further Reading

How to send email notifications using Gmail SMTP server on Linux

$
0
0
http://xmodulo.com/send-email-notifications-gmail-smtp-server-linux.html

Suppose you want to configure a Linux app to send out email messages from your server or desktop. The email messages can be part of email newsletters, status updates (e.g., Cachet), monitoring alerts (e.g., Monit), disk events (e.g., RAID mdadm), and so on. While you can set up your own outgoing mail server to deliver messages, you can alternatively rely on a freely available public SMTP server as a maintenance-free option.
One of the most reliable free SMTP servers is from Google's Gmail service. All you have to do to send email notifications within your app is to add Gmail's SMTP server address and your credentials to the app, and you are good to go.
One catch with using Gmail's SMTP server is that there are various restrictions in place, mainly to combat spammers and email marketers who often abuse the server. For example, you can send messages to no more than 100 addresses at once, and no more than 500 recipients per day. Also, if you don't want to be flagged as a spammer, you cannot send a large number of undeliverable messages. When any of these limitations is reached, your Gmail account will temporarily be locked out for a day. In short, Gmail's SMTP server is perfectly fine for your personal use, but not meant for commercial bulk emails.
With that being said, let me demonstrate how to use Gmail's SMTP server in Linux environment.

Google Gmail SMTP Server Setting

If you want to send emails from your app using Gmail's SMTP server, you need to adjust the security setting of the Gmail account to be used. Go to the Google account settings, and enable the option to allow less secure apps, which is off by default.
Then you will need to provide your app with the following details.
  • Outgoing mail server (SMTP server): smtp.gmail.com
  • Use authentication: yes
  • Use secure connection: yes
  • Username: your Gmail account ID (e.g., "alice" if your email is alice@gmail.com)
  • Password: your Gmail password
  • Port: 587 (TLS) or 465 (SSL)
Exact configuration syntax may vary depending on apps. In the rest of this tutorial, I will show you several useful examples of using Gmail SMTP server in Linux.

Send Emails from the Command Line

As the first example, let's try the most basic email functionality: send an email from the command line using Gmail SMTP server. For this, I am going to use a command-line email client called mutt.
First, install mutt:
For Debian-based system:
$ sudo apt-get install mutt
For Red Hat based system:
$ sudo yum install mutt
Create a mutt configuration file (~/.muttrc) and specify in the file Gmail SMTP server information as follows. Replace with your own Gmail ID. Note that this configuration is for sending emails only (not receiving emails).
$ vi ~/.muttrc
set from = "@gmail.com"
set realname = "Dan Nanni"
set smtp_url = "smtp://@smtp.gmail.com:587/"
set smtp_pass = ""
Now you are ready to send out an email using mutt:
$ echo "This is an email body." | mutt -s "This is an email subject" alice@yahoo.com
To attach a file in an email, use "-a" option:
$ echo "This is an email body." | mutt -s "This is an email subject" alice@yahoo.com -a ~/test_attachment.jpg

Using Gmail SMTP server means that the emails appear as sent from your Gmail account. In other words, a recepient will see your Gmail address as the sender's address. If you want to use your domain as the email sender, you need to use Gmail SMTP relay service instead.

Send Email Notification When a Server is Rebooted

If you are running a virtual private server (VPS) for some critical website, one recommendation is to monitor VPS reboot activities. As a more practical example, let's consider how to set up email notifications for every reboot event on your VPS. Here I assume you are using systemd on your VPS, and show you how to create a custom systemd boot-time service for automatic email notifications.
First create the following script reboot_notify.sh which takes care of email notifications.
$ sudo vi /usr/local/bin/reboot_notify.sh
1
2
3
#!/bin/sh
 
echo"`hostname` was rebooted on `date`"| mutt -F /etc/muttrc-s "Notification on `hostname`"alice@yahoo.com
$ sudo chmod +x /usr/local/bin/reboot_notify.sh
In the script, I use "-F" option to specify the location of system-wide mutt configuration file. So don't forget to create /etc/muttrc file and populate Gmail SMTP information as described earlier.
Now let's create a custom systemd service as follows.
$ sudo mkdir -p /usr/local/lib/systemd/system
$ sudo vi /usr/local/lib/systemd/system/reboot-task.service
1
2
3
4
5
6
7
8
9
10
11
[Unit]
Description=Send a notification email when the server gets rebooted
DefaultDependencies=no
Before=reboot.target
 
[Service]
Type=oneshot
ExecStart=/usr/local/bin/reboot_notify.sh
 
[Install]
WantedBy=reboot.target
Once the service file is created, enable and start the service.
$ sudo systemctl enable reboot-task
$ sudo systemctl start reboot-task
From now on, you will be receiving a notification email every time the VPS gets rebooted.

Send Email Notification from Server Usage Monitoring

As a final example, let me present a real-world application called Monit, which is a pretty useful server monitoring application. It comes with comprehensive VPS monitoring capabilities (e.g., CPU, memory, processes, file system), as well as email notification functions.
If you want to receive email notifications for any event on your VPS (e.g., server overload) generated by Monit, you can add the following SMTP information to Monit configuration file.
1
2
3
4
5
6
7
8
9
10
11
12
13
14
15
setmailserver smtp.gmail.com port 587
    username ""password ""
    using tlsv12
 
setmail-format{
 from: @gmail.com
 subject: $SERVICE $EVENT at $DATE on $HOST
 message: Monit $ACTION $SERVICE $EVENT at $DATE on $HOST : $DESCRIPTION.
 
       Yours sincerely,
          Monit
  }
 
# the person who will receive notification emails
setalert alice@yahoo.com
Here is the example email notification sent by Monit for excessive CPU load.

Conclusion

As you can imagine, there will be so many different ways to take advantage of free SMTP servers like Gmail. But once again, remember that the free SMTP server is not meant for commercial usage, but only for your own personal project. Also, for security reasons, it is a probably good idea to create a throw-away Gmail address just for email notifications, instead of using your own personal Gmail account. If you are using Gmail SMTP server inside any app, feel free to share your use case.

Unikernels: The Next Generation of Cloud Technology

$
0
0
http://www.itbusinessedge.com/slideshows/unikernels-the-next-generation-of-cloud-technology.html

Next

Unikernels vs. Containers

Click through for more on unikernels and how they may change the cloud as we know it, as identified by the Xen Project.
 
Next

The New Needs of the Cloud

At its inception, cloud computing was focused on services and orchestration. Now that this goal has been accomplished, the needs of cloud computing have shifted to create workloads that are better suited to the cloud: workloads that are lightweight and agile, yet just as powerful and more secure than their predecessors. This has given rise to technologies like containers and unikernels, whose purpose is to make the packaging and distribution of applications lighter, faster and more efficient. But where do they fall short in this goal and what types of environments might work best for one over the other?

 
Next

What Is a Unikernel?

A unikernel is an entire application stack — from operating environment to the application — rolled into a single executable. There is no actual operating system, no general-purpose utilities, no assortment of device drivers; just a single program that sits bare and alone in a virtual machine. The result is a tiny, agile, and secure package, which is ideal for the cloud. The unikernel concept has long been used in the embedded systems area, where a standalone program is embedded into chips in an intelligent device. But, the concept of creating cloud-ready unikernels to populate workloads in the data center is entirely new. From web servers to network function virtualization (NFV) to databases, the unikernel concept can revolutionize the cloud as we know it.

 
Next

Unikernels: A Perfect Fit for Cloud

Elasticity and agility are both key concepts in the cloud. Traditional data center workloads are large and slow, requiring lots of resources and taking time to start and stop as needed. Unikernels take those same workloads and make them much smaller and much quicker. By stripping away the unneeded parts of the application stack, many tasks can be reduced to a fraction of their traditional size into tiny VMs, which can be created in less than a second. This has given rise to transient microservices or services that are born when a need appears and then die as soon as it disappears. This becomes a theoretical backplane to concepts like the Internet of Things (IoT), in which millions, billions, or even trillions of devices will need to register every button pushed and every switch flipped. We don't need millions of VMs sitting idle taking up valuable resources waiting for something to happen; we need transient microservices that appear the instant the button is pushed and disappear the moment the job is done. IoT is just one of new ideas that will benefit from unikernel technology.

Next

Unikernels Compared to Containers

Unikernels facilitate the very same desirable attributes described by container proponents, with the addition of impressive security, which few other solutions can match. They deliver impressive flexibility, speed and versatility for cross-platform environments. And, like container-based solutions, unikernels are easy to deploy. They also retain the rich hypervisor ecosystem and enable isolation, live migration and robust SLA. Additionally, unikernels provide container-like properties such as sub-second boot time, density and simplicity. They also offer an extremely tiny, specialized runtime footprint much less vulnerable to attack.


  • Next
    Next

    The Best Environment for Unikernels

    Unikernels are poised to become the core of a new form of cloud computing, where a single hypervisor instance can support hundreds or even thousands of VMs. Network protection services, network routing, or software-defined networking are great places for unikernels. Early adopters are also using them to run websites, critical systems infrastructure, and cutting-edge research. One example is HaLVM, which provides a reliable, secure VPN solution for laptops or to implement a variety of network services, including encryption nodes, random number generators, and network sensors. Anyone needing a lightweight, single-service component that can be brought up and down quickly or massive scalability should consider this new technology.
    Next

    The Best Environment for Containers

    Again containers are lightweight and there are some instances where they might be a good strategy, but it would have to be an environment where security is not a top concern, e.g., inside an organization where you don't have a big internal security risk factor.
    Next

    Using Unikernels and Containers Together

    These two technologies can coexist nicely in the same environment. If you are using applications that are deployed in a low security situation, like internally at an organization or within a local lab where the users are considered trustworthy, one can leverage container technology. It is very easy to create and deploy. If you have an application that needs to withstand the less secure Internet world, then unikernels would be a good choice. Most organizations have a variety of each of these applications, so the two technologies pair nicely together. As cloud orchestration software is expanded to handle both Docker-based containers and unikernels, it will become even easier to have both technologies coexisting in a single data center.


    How reader-friendly are your docs?

    $
    0
    0
    http://opensource.com/business/15/11/how-reader-friendly-are-your-docs

    The first task any accomplished technical writer has to do is write for the audience. This task may sound simple, but when I thought about people living all over the world, I wondered: Can they read our documentation? Readability is something that has been studied for years, and what follows is a brief summary of what research shows.
    Studies prove that people respond to information that they can easily understand. The question is: Are we writing content that the average person can easily read and understand? If people are not connecting with our content, one reason could be that we are writing "over their heads," which happens more often than you might think. In an effort to sound superior, intelligent, or as experts in our fields, many people will overwrite content, or use big words to make the most printed material space.
    A simple way to check your document to see whether it is easy to read is to use a readability test. Many different tests have been created for this purpose, and three of the most popular are:
    1. Flesch Reading Ease
    2. Flesch-Kincaid
    3. Gunning Fog Index

    Popular readability tests

    Flesch Reading Ease Test

    Rudolf Flesch, author of Why Johnny Can't Read: And What You Can Do About It created the Flesch Reading Ease Test as a way to further advance his belief that American teachers needed to return to teaching phonics rather than sight reading (whole word literacy). His work and advocacy for reading and phonics were the inspiration for Dr. Seuss to write The Cat in the Hat. This test tells us how easy it is to read the text. The algorithm is as follows:
    algorithm
    Figure via Wikipedia. CC BY-SA 3.0
    The resulting score is interpreted as follows:
    table
    Table via WikipediaCC BY-SA 3.0
    What does this mean?
    • The lower the score, the harder the text is to read
    • 65 is the "Plain English" rating
    How does this score measure up to well-known publications? [1]
    • Reader's Digest: 65
    • Time Magazine: 52
    • Harvard Law Review: >40

    Flesch-Kincaid Grade Level Readability Test

    The Flesch-Kincaid reading test is the result of a collaboration between Rudolf Flesch (mentioned above) and J. Peter Kincaid. J. Peter Kincaid is an educator and scientist who spent his time working in academia or researching with the U.S. Navy. J. Peter Kincaid developed his version of the readability test while under contract with the Navy in an effort to estimate the difficulty of technical manuals. The Flesch-Kincaid Grade Level Readability Test translates the test to a United States grade level, which judging whether the material is readable by others easier. The algorithm is as follows:
    algorithm
    Figure via WikipediaCC BY-SA 3.0
    The result corresponds to a U.S. grade level, so once the score is calculated, we know who can understand our writing. For example, President Obama's 2012 State of the Union address has a grade level of 8.5; however, the Affordable Care Acthas a readability level of 13.4 (university or higher). The results of a the readability of a few popular books may surprise you:

    Gunning Fog Index

    The Gunning Fog Index was created in 1952. The algorithm is as follows:
    algorithm
    Figure via WikipediaCC BY-SA 3.0
    This index is not perfect as some words (such as university) are complex but easy to understand, whereas short words (such as boon) may not be as easy to understand. Given that, the results can be interpreted as follows [2]:
    • A fog score of >12 is best for U.S. high school graduates
    • Between 8-12 (closer to 8) is ideal
    • <8 is="" li="" near="" understanding="" universal="">8>

    Why should I care about the readability of my writing?

    If our writing is too hard to read, then no one will want to read it. The sad truth is that approximately 50% of Americans read at an eight-grade level. The higher the grade level our writing is, the fewer people can read it. If we struggle to read something, our experience with the content will be negative, and this negative experience makes us less likely to recommend the content to someone else. Have you ever recommended a book you did not enjoy reading? The same goes with documentation.

    How do I calculate the readability of my writing?

    There are several ways to calculate readability. The easiest way to calculate it is within a word processor or editing tool. For example, Publican is a publishing tool based on DocBook XML. Publican version 4.0.0 included the addition of a Flesh-Kincaid Statistics Info feature, which lets users run the following command:
    $ publican report --quiet
    This will generate a readability report.
    If you are using vim as your text editor, vim-readability plug-ins can be downloaded and installed from GitHub (thanks to Peter Ondrejka). A similar plug-in, gulpease, is also available for gedit. To check readability without using a plugin, copy and paste the text at Readability-Score.com.

    Final thoughts

    Keep it simple, sweetheart! The easier our documentation is to understand, the more people will use it. In case you're curious, this article has a readability of:
    • Flesch: 68.5
    • Flesch-Kincaid: 6.9
    • Gunning Fog: 9.3
    Once we know the readability of our writing, we can simplify it, if necessary. I will outline ideas for doing that in my next article. Stay tuned!

    Sources

    1. Flesch–Kincaid readability tests (Wikipedia)
    2. Gunning fox index
    3. This Surprising Reading Level Analysis Will Change the Way You Write, by Shane Snow
    4. Readability-Score.com

    Mission Impossible: Hardening Android for Security and Privacy

    $
    0
    0
    https://blog.torproject.org/blog/mission-impossible-hardening-android-security-and-privacy

    Executive Summary

    The future is here, and ahead of schedule. Come join us, the weather's nice.
    This blog post describes the installation and configuration of a prototype of a secure, full-featured, Android telecommunications device with full Tor support, individual application firewalling, true cell network baseband isolation, and optional ZRTP encrypted voice and video support. ZRTP does run over UDP which is not yet possible to send over Tor, but we are able to send SIP account login and call setup over Tor independently.
    The SIP client we recommend also supports dialing normal telephone numbers if you have a SIP gateway that provides trunking service.
    Aside from a handful of binary blobs to manage the device firmware and graphics acceleration, the entire system can be assembled (and recompiled) using only FOSS components. However, as an added bonus, we will describe how to handle the Google Play store as well, to mitigate thetwo infamous Google Play Backdoors.


    Introduction


    Android is the most popular mobile platform in the world, with a wide variety of applications, including many applications that aid in communications security, censorship circumvention, and activist organization. Moreover, the core of the Android platform is Open Source, auditable, and modifiable by anyone.
    Unfortunately though, mobile devices in general and Android devices in particular have not been designed with privacy in mind. In fact, they've seemingly been designed with nearly the opposite goal: to make it easy for third parties, telecommunications companies, sophisticated state-sized adversaries, and even random hackers to extract all manner of personal information from the user. This includes the full content of personal communications with business partners and loved ones. Worse still, by default, the user is given very little in the way of control or even informed consent about what information is being collected and how.
    This post aims to address this, but we must first admit we stand on the shoulders of giants. Organizations like Cyanogen, F-Droid, the Guardian Project, and many others have done a great deal of work to try to improve this situation by restoring control of Android devices to the user, and to ensure the integrity of our personal communications. However, all of these projects have shortcomings and often leave gaps in what they provide and protect. Even in cases where proper security and privacy features exist, they typically require extensive configuration to use safely, securely, and correctly.
    This blog post enumerates and documents these gaps, describes workarounds for serious shortcomings, and provides suggestions for future work.
    It is also meant to serve as a HOWTO to walk interested, technically capable people through the end-to-end installation and configuration of a prototype of a secure and private Android device, where access to the network is restricted to an approved list of applications, and all traffic is routed through the Tor network.
    It is our hope that this work can be replicated and eventually fully automated, given a good UI, and rolled into a single ROM or ROM addon package for ease of use. Ultimately, there is no reason why this system could not become a full fledged off the shelf product, given proper hardware support and good UI for the more technical bits.
    The remainder of this document is divided into the following sections:
    1. Hardware Selection
    2. Installation and Setup
    3. Google Apps Setup
    4. Recommended Software
    5. Device Backup Procedure
    6. Removing the Built-in Microphone
    7. Removing Baseband Remnants
    8. Future Work
    9. Changes Since Initial Posting


    Hardware Selection


    If you truly wish to secure your mobile device from remote compromise, it is necessary to carefully select your hardware. First and foremost, it is absolutely essential that the carrier's baseband firmware is completely isolated from the rest of the platform. Because your cell phone baseband does not authenticate the network (in part to allow roaming), any random hacker with their own cell network can exploit these backdoors and use them to install malware on your device.
    While there are projects underway to determine which handsets actually provide true hardware baseband isolation, at the time of this writing there is very little public information available on this topic. Hence, the only safe option remains a device with no cell network support at all (though cell network connectivity can still be provided by a separate device). For the purposes of this post, the reference device is the WiFi-only version of the 2013 Google Nexus 7 tablet.
    For users who wish to retain full mobile access, we recommend obtaining a cell modem device that provides a WiFi access point for data services only. These devices do not have microphones and in some cases do not even have fine-grained GPS units (because they are not able to make emergency calls). They are also available with prepaid plans, for rates around $20-30 USD per month, for about 2GB/month of 4G data. If coverage and reliability is important to you though, you may want to go with a slightly more expensive carrier. In the US, T-Mobile isn't bad, but Verizon is superb.
    To increase battery life of your cell connection, you can connect this access point to an external mobile USB battery pack, which typically will provide 36-48 hours of continuous use with a 6000mAh battery.
    The total cost of a Wifi-only tablet with cell modem and battery pack is only roughly USD $50 more than the 4G LTE version of the same device.
    In this way, you achieve true baseband isolation, with no risk of audio or network surveillance, baseband exploits, or provider backdoors. Effectively, this cell modem is just another untrusted router in a long, long chain of untrustworthy Internet infrastructure.
    However, do note though that even if the cell unit does not contain a fine-grained GPS, you still sacrifice location privacy while using it. Over an extended period of time, it will be possible to make inferences about your physical activity, behavior and personal preferences, and your identity, based on cell tower use alone.


    Installation and Setup


    We will focus on the installation of Cyanogenmod 11 using Team Win Recovery Project, both to give this HOWTO some shelf life, and because Cyanogenmod 11 features full SELinux support (Dear NSA: What happened to you guys? You used to be cool. Well, some of you. Some of the time. Maybe. Or maybe not).
    The use of Google Apps and Google Play services is not recommended due to security issues with Google Play. However, we do provide workarounds for mitigating those issues, if Google Play is required for your use case.

    Installation and Setup: ROM and Core App Installation

    With the 2013 Google Nexus 7 tablet, installation is fairly straight-forward. In fact, it is actually possible to install and use the device before associating it with a Google Account in any way. This is a desirable property, because by default, the otherwise mandatory initial setup process of the stock Google ROM sends your device MAC address directly to Google and links it to your Google account (all without using Tor, of course).
    The official Cyanogenmod installation instructions are available online, but with a fresh out of the box device, here are the key steps for installation without activating the default ROM code at all (using Team Win Recovery Project instead of ClockWorkMod).
    First, on your desktop/laptop computer (preferably Linux), perform the following:
    1. Download the latest CyanogenMod 11 release (we used cm-11-20140504-SNAPSHOT-M6)
    2. Download the latest Team Win Recovery Project image (we used 2.7.0.0)
    3. Download the F-Droid package (we used 0.66)
    4. Download the Orbot package from F-Droid (we used 13.0.7)
    5. Download the Droidwall package from F-Droid (we used 1.5.7)
    6. Download the Droidwall Firewall Scripts attached to this blogpost
    7. Download the Google Apps for Cyanogenmod 11 (optional)

    Because the download integrity for all of these packages is abysmal, here is a signed set of SHA256 hashes I've observed for those packages.
    Once you have all of those packages, boot your tablet into fastboot mode by holding the Power button and the Volume Down button during a cold boot. Then, attach it to your desktop/laptop machine with a USB cable and run the following commands from a Linux/UNIX shell:
     apt-get install android-tools-adb android-tools-fastboot
    fastboot devices
    fastboot oem unlock
    fastboot flash recovery openrecovery-twrp-2.7.0.0-flo.img

    After the recovery firmware is flashed successfully, use the volume keys to select Recovery and hit the power button to reboot the device (or power it off, and then boot holding Power and Volume Up).
    Once Team Win boots, go into Wipe and select Advanced Wipe. Select all checkboxes except for USB-OTG, and slide to wipe. Once the wipe is done, click Format Data. After the format completes, issue these commands from your Linux shell:
     adb server start
    adb push cm-11-20140504-SNAPSHOT-M6-flo.zip /sdcard/
    adb push gapps-kk-20140105-signed.zip /sdcard/ # Optional

    After this push process completes, go to the Install menu, and select the Cyanogen zip, and optionally the gapps zip for installation. Then click Reboot, and select System.
    After rebooting into your new installation, skip all CyanogenMod and Google setup, disable location reporting, and immediately disable WiFi and turn on Airplane mode.
    Then, go into Settings -> About Tablet and scroll to the bottom and click the greyed out Build number 5 times until developer mode is enabled. Then go into Settings -> Developer Options and turn on USB Debugging.
    After that, run the following commands from your Linux shell:
     adb install FDroid.apk
    adb install org.torproject.android_86.apk
    adb install com.googlecode.droidwall_157.apk

    You will need to approve the ADB connection for the first package, and then they should install normally.
    VERY IMPORTANT: Whenever you finish using adb, always remember to disable USB Debugging and restore Root Access to Apps only. While Android 4.2+ ROMs now prompt you to authorize an RSA key fingerprint before allowing a debugging connection (thus mitigating adb exploit tools that bypass screen lock and can install root apps), you still risk additional vulnerability surface by leaving debugging enabled.

    Installation and Setup: Initial Configuration

    After the base packages are installed, go into the Settings app, and make the following changes:
    1. Wireless & Networks More... =>
    • Temporarily Disable Airplane Mode
    • NFC -> Disable
    • Re-enable Airplane Mode
  • Location Access -> Off
  • Security =>
    • PIN screen Lock
    • Allow Unknown Sources (For F-Droid)
  • Language & Input =>
    • Spell Checker -> Android Spell Checker -> Disable Contact Names
    • Disable Google Voice Typing/Hotword detection
    • Android Keyboard (AOSP) =>
      • Disable AOSP next-word suggestion (do this first!)
      • Auto-correction -> Off
  • Backup & reset =>
    • Enable Back up my data (just temporarily, for the next step)
    • Uncheck Automatic restore
    • Disable Backup my data
  • About Tablet -> Cyanogenmod Statistics -> Disable reporting
  • Developer Options -> Device Hostname -> localhost
  • SuperUser -> Settings (three dots) -> Notifications -> Notification (not toast)
  • Privacy -> Privacy Guard =>
    • Enabled by default
    • Settings (three dots) -> Show Built In Apps
    • Enable Privacy Guard for every app with the following exceptions:
      • Calendar
      • Config Updater
      • Google Account Manager (long press)
        • Modify Settings -> Off
        • Wifi Change -> Off
        • Data Change -> Off
      • Google Play Services (long press)
        • Location -> Off
        • Modify Settings -> Off
        • Draw on top -> Off
        • Record Audio -> Off
        • Wifi Change -> Off
      • Google Play Store (long press)
        • Location -> Off
        • Send SMS -> Off
        • Modify Settings -> Off
        • Data change -> Off
      • Google Services Framework (long press)
        • Modify Settings -> Off
        • Wifi Change -> Off
        • Data Change -> Off
      • Trebuchet

  • Now, it is time to encrypt your tablet. It is important to do this step early, as I have noticed additional apps and configuration tweaks can make this process fail later on.
    We will also do this from the shell, in order to set a different password than your screen unlock pin. This is done to mitigate the risk of compromise of this password from shoulder surfers, and to allow the use of a much longer (and non-numeric) password that you would prefer not to type every time you unlock the screen.
    To do this, open the Terminal app, and type the following commands:
    su
    vdc cryptfs enablecrypto inplace NewMoreSecurePassword

    Watch for typos! That command does not ask you to re-type that password for confirmation.

    Installation and Setup: Disabling Invasive Apps and Services

    Before you configure the Firewall or enable the network, you likely want to disable at least a subset of the following built-in apps and services, by using Settings -> Apps -> All, and then clicking on each app and hitting the Disable button:
    • com.android.smspush
    • com.google.android.voicesearch
    • Face Unlock
    • Google Backup Transport
    • Google Calendar Sync
    • Google One Time Init
    • Google Partner Setup
    • Google Contacts Sync
    • Google Search
    • Hangouts
    • Market Feedback Agent
    • News & Weather
    • One Time Init
    • Picasa Updater
    • Sound Search for Google Play
    • TalkBack


    Installation and Setup: Tor and Firewall configuration


    Ok, now let's install the firewall and tor support scripts. Go back into Settings -> Developer Options and enable USB Debugging and change Root Access to Apps and ADB. Then, unzip the android-firewall.zip on your laptop, and run the installation script:
    ./install-firewall.sh

    That firewall installation provides several key scripts that provide functionality that is currently impossible to achieve with any app (including Orbot):
    1. It installs a userinit script to block all network access during boot.
    2. It disables "Google Captive Portal Detection", which involves connection attempts to Google servers upon Wifi assocation (these requests are made by the Android Settings UID, which should normally be blocked from the network, unless you are first registering for Google Play).
    3. It contains a Droidwall script that configures Tor transproxy rules to send all of your traffic through Tor. These rules include a fix for a Linux kernel Tor transproxy packet leak issue.
    4. The main firewall-torify-all.sh Droidwall script also includes an input firewall, to block all inbound connections to the device. It also fixes a Droidwall permissions vulnerability
    5. It installs an optional script to allow the Browser app to bypass Tor for logging into WiFi captive portals.
    6. It installs an optional script to temporarily allow network adb access when you need it (if you are paranoid about USB exploits, which you should be).
    7. It provides an optional script to allow the UDP activity of LinPhone to bypass Tor, to allow ZRTP-encrypted Voice and Video SIP/VoIP calls. SIP account login/registration and call setup/signaling can be done over TCP, and Linphone's TCP activity is still sent through Tor with this script.

    Note that with the exception of the userinit network blocking script, installing these scripts does not activate them. You still need to configure Droidwall to use them.
    We use Droidwall instead of Orbot or AFWall+ for five reasons:
    1. Droidwall's app-based firewall and Orbot's transproxy are known to conflict and reset one another.
    2. Droidwall does not randomly drop transproxy rules when switching networks (Orbot has had several of these types of bugs).
    3. Unlike AFWall+, Droidwall is able to auto-launch at "boot" (though still not before the network and Android Services come online and make connections).
    4. AFWall+'s "fix" for this startup data leak problem does not work on Cyanogenmod (hence our userinit script instead).
    5. Aside from the permissions issue fixed by our firewall-torify-all.sh script, AFWall+ provides no additional security fixes over the stock Droidwall.

    To make use of the firewall scripts, open up Droidwall and hit the config button (the vertical three dots), go to More -> Set Custom Script. Enter the following:
    . /data/local/firewall-torify-all.sh
    #. /data/local/firewall-allow-adb.sh
    #. /data/local/firewall-allow-linphone-udp.sh
    #. /data/local/firewall-allow-nontor-browser.sh

    NOTE: You must not make any typos in the above. If you mistype any of those files, things may break. Because the userinit.sh script blocks all network at boot, if you make a typo in the torify script, you will be unable to use the Internet at all!
    Also notice that these scripts have been installed into a readonly root directory. Because they are run as root, installing them to a world-writable location like /sdcard/ is extremely unwise.
    Later, if you want to enable one of network adb, LinPhone UDP, or captive portal login, go back into this window and remove the leading comment ('#') from the appropriate lines (this is obviously one of the many aspects of this prototype that could benefit from real UI).
    Then, configure the apps you want to allow to access the network. Note that the only Android system apps that must access the network are:
    • CM Updater
    • Downloads, Media Storage, Download Manager
    • F-Droid

    Orbot's network access is handled via the main firewall-torify-all.sh script. You do not need to enable full network access to Orbot in Droidwall.
    The rest of the apps you can enable at your discretion. They will all be routed through Tor automatically.
    Once Droidwall is configured, you can click on the Menu (three dots) and click the "Firewall Disabled" button to enable the firewall. Then, you can enable Orbot. Do not grant Orbot superuser access. It still opens the transproxy ports you need without root, and Droidwall is managing installation of the transproxy rules, not Orbot.
    You are now ready to enable Wifi and network access on your device. For vulnerability surface reduction, you may want to use the Advanced Options -> Static IP to manually enter an IP address for your device to avoid using dhclient. You do not need a DNS server, and can safely set it to 127.0.0.1.


    Google Apps Setup


    If you installed the Google Apps zip, you need to do a few things now to set it up, and to further harden your device. If you opted out of Google Apps, you can skip to the next section.

    Google Apps Setup: Initializing Google Play

    The first time you use Google Play, you will need to enable four apps in Droidwall: "Google Account Manager, Google Play Services...", "Settings, Dev Tools, Fused Location...", "Gmail", and "Google Play" itself.
    If you do not have a Google account, your best bet is to find open wifi to create one, as Google will often block accounts created through Tor, even if you use an Android device.
    After you log in for the first time, you should be able to disable the "Google Account Manager, Google Play Services...", "Gmail", and the "Settings..." apps in Droidwall, but your authentication tokens in Google Play may expire periodically. If this happens, you should only need to temporarily enable the "Google Account Manager, Google Play Services..." app in Droidwall to obtain new ones.

    Google Apps Setup: Mitigating the Google Play Backdoors

    If you do choose to use Google Play, you need to be very careful about how you allow it to access the network. In addition to the risks associated with using a proprietary App Store that can send you targeted malware-infected packages based on your Google Account, it has at least two major user experience flaws:
    1. Anyone who is able to gain access to your Google account can silently install root or full permission apps without any user interaction what-so-ever. Once installed, these apps can retroactively clear what little installation notification and UI-based evidence of their existence there was in the first place.
    2. The Android Update Process does not inform the user of changes in permissions of pending update apps that happen to get installed after an Android upgrade.

    The first issue can be mitigated by ensuring that Google Play does not have access to the network when not in use, by disabling it in Droidwall. If you do not do this, apps can be installed silently behind your back. Welcome to the Google Experience.
    For the second issue, you can install the SecCheck utility, to monitor your apps for changes in permissions during a device upgrade.

    Google Apps Setup: Disabling Google Cloud Messaging

    If you have installed the Google Apps zip, you have also enabled a feature called Google Cloud Messaging.
    The Google Cloud Messaging Service allows apps to register for asynchronous remote push notifications from Google, as well as send outbound messages through Google.
    Notification registration and outbound messages are sent via the app's own UID, so using Droidwall to disable network access by an app is enough to prevent outbound data, and notification registration. However, if you ever allow network access to an app, and it does successfully register for notifications, these notifications can be delivered even when the app is once again blocked from accessing the network by Droidwall.
    These inbound notifications can be blocked by disabling network access to the "Google Account Manager, Google Play Services, Google Services Framework, Google Contacts Sync" in Droidwall. In fact, the only reason you should ever need to enable network access by this service is if you need to log in to Google Play again if your authentication tokens ever expire.
    If you would like to test your ability to control Google Cloud Messaging, there are two apps in the Google Play store than can help with this. GCM Test allows for simple send and receive pings through GCM. Push Notification Tester will allow you to test registration and asynchronous GCM notification.


    Recommended Privacy and Auditing Software


    Ok, so now that we have locked down our Android device, now for the fun bit: secure communications!
    We recommend the following apps from F-Droid:
    1. Xabber
    2. Xabber is a full Java implementation of XMPP, and supports both OTR and Tor. Its UI is a bit more streamlined than Guardian Project's ChatSecure, and it does not make use of any native code components (which are more vulnerable to code execution exploits than pure Java code). Unfortunately, this means it lacks some of ChatSecure's nicer features, such as push-to-talk voice and file transfer.
      Despite better protection against code execution, it does have several insecure default settings. In particular, you want to make the following changes:
    • Notifications -> Message text in Notifications -> Off (notifications can be read by other apps!)
    • Accounts -> Integration into system accounts -> Off
    • Accounts -> Store message history -> Don't Store
    • Security -> Store History -> Off
    • Security -> Check Server Certificate
    • Chat -> Show Typing Notifications -> Off
    • Connection Settings -> Auto-away -> disabled
    • Connection Settings -> Extended away when idle -> Disabled
    • Keep Wifi Awake -> On
    • Prevent sleep Mode -> On
  • Offline Calendar
  • Offline Calendar is a hack to allow you to create a fake local Google account that does not sync to Google. This allows you to use the Calendar App without risk of leaking your activities to Google. Note that you must exempt both this app and Calendar from Privacy Guard for it to function properly.
  • LinPhone
  • LinPhone is a FOSS SIP client that supports TCP TLS signaling and ZRTP. Note that neither TLS nor ZRTP are enabled by default. You must manually enable them in Settings -> Network -> Transport and Settings -> Network -> Media Encryption.
    ostel.co is a free SIP service run by the Guardian Project that supports only TLS and ZRTP, but does not allow outdialing to normal PSTN telephone numbers. While Bitcoin has many privacy issues of its own, the Bitcoin community maintains a couplelists of "trunking" providers that allow you to obtain a PSTN phone number in exchange for Bitcoin payment.
  • Plumble Plumble is a Mumble client that will route voice traffic over Tor, which is useful if you would like to communicate with someone over voice without revealing your IP to them, or your activity to a local network observer. However, unlike Linphone, voice traffic is not end-to-end encrypted, so the Mumble server can listen to your conversations.
  • K-9 Mail and APGK-9 Mail is a POP/IMAP client that supports TLS and integrates well with APG, which will allow you to send and receive GPG-encrypted mail easily. Before using it, you should be aware of two things: It identifies itself in your mail headers, which opens you up to targeted attacks specifically tailored for K-9 Mail and/or Android, and by default it includes the subject of messages in mail notifications (which is bad, because other apps can read notifications). There is a privacy option to disable subject text in notifications, but there is no option to disable the user agent in the mail headers.
  • OSMAnd~
  • A free offline mapping tool. While the UI is a little clunky, it does support voice navigation and driving directions, and is a handy, private alternative to Google Maps.
  • VLC The VLC port in F-Droid is a fully capable media player. It can play mp3s and most video formats in use today. It is a handy, private alternative to Google Music and other closed-source players that often report your activity to third party advertisers. VLC does not need network access to function.
  • Firefox
  • We do not yet have a port of Tor Browser for Android (though one is underway -- see the Future Work section). Unless you want to use Google Play to get Chrome, Firefox is your best bet for a web browser that receives regular updates (the built in Browser app does not). HTTPS-Everywhere and NoScript are available, at least.
  • Bitcoin
  • Bitcoin might not be the most private currency in the world. In fact, you might even say it's the least private currency in the world. But, it is a neat toy.
  • Launch App Ops The Launch App Ops app is a simple shortcut into the hidden application permissions editor in Android. A similar interface is available through Settings -> Privacy -> Privacy Guard, but a direct shortcut to edit permissions is handy. It also displays some additional system apps that Privacy Guard omits.
  • PermissionsThe Permissions app gives you a view of all Android permissions, and shows you which apps have requested a given permission. This is particularly useful to disable the record audio permission for apps that you don't want to suddenly decide to listen to you. (Interestingly, the Record Audio permission disable feature was broken in all Android ROMs I tested, aside from Cyanogenmod 11. You can test this yourself by revoking the permission from the Sound Recorder app, and verifying that it cannot record.)
  • CatLog
  • In addition to being supercute, CatLog is an excellent Android monitoring and debugging tool. It allows you to monitor and record the full set of Android log events, which can be helpful in diagnosing issues with apps.
  • OS Monitor
  • OS Monitor is an excellent Android process and connection monitoring app, that can help you watch for CPU usage and connection attempts by your apps.
  • Intent Intercept
  • Intent Intercept allows you to inspect and extract Android Intent content without allowing it to get forwarded to an actual app. This is useful for monitoring how apps attempt to communicate with eachother, though be aware it only covers one of the mechanisms of inter-app communication in Android.

    Backing up Your Device Without Google


    Now that your device is fully configured and installed, you probably want to know how to back it up without sending all of your private information directly to Google. While the Team Win Recovery Project will back up all of your system settings and apps (even if your device is encrypted), it currently does not back up the contents of your virtualized /sdcard. Remembering to do a couple adb pulls of key directories can save you a lot of heartache should you suffer some kind of data loss or hardware failure (or simply drop your tablet on a bridge while in a rush to catch a train).
    The backup.sh script uses adb to pull your Download and Pictures directories from the /sdcard, as well as pulls the entire TWRP backup directory.
    Before you use that script, you probably want to delete old TWRP backup folders so as to only pull one backup, to reduce pull time. These live in /sdcard/TWRP/BACKUPS/, which is also known as /storage/emulated/0/TWRP/BACKUPS in the File Manager app.
    To use this script over the network without a usb cable, enable both USB Debugging and ADB Over Network in your developer settings. The script does not require you to enable root access from adb, and you should not enable root because it takes quite a while to run a backup, especially if you are using network adb.
    Prior to using network adb, you must edit your Droidwall custom scripts to allow it (by removing the '#' in the #. /data/local/firewall-allow-adb.sh line you entered earlier), and then run the following commands from a non-root Linux shell on your desktop/laptop (the ADB Over Network setting will tell you the IP and port):
    killall adb
    adb connect ip:5555
    VERY IMPORTANT: Don't forget to disable USB Debugging, as well as the Droidwall adb exemption when you are done with the backup!


    Removing the Built-in Microphone


    If you would really like to ensure that your device cannot listen to you even if it is exploited, it turns out it is very straight-forward to remove the built-in microphone in the Nexus 7. There is only one mic on the 2013 model, and it is located just below the volume buttons (the tiny hole).
    To remove it, all you need to do is pop off the the back panel (this can be done with your fingernails, or a tiny screwdriver), and then you can shave the microphone right off that circuit board, and reattach the panel. I have done this to one of my devices, and it was subsequently unable to record audio at all, without otherwise affecting functionality.
    You can still use apps that require a microphone by plugging in headphone headset that contains a mic built in (these cost around $20 and you can get them from nearly any consumer electronics store). I have also tested this, and was still able to make a Linphone call from a device with the built in microphone removed, but with an external headset. Note that the 2012 Nexus 7 does not support these combination microphone+headphone jacks (and it has a secondary microphone as well). You must have the 2013 model.
    The 2013 Nexus 7 Teardown video can give you an idea of what this looks like before you try it. Again you do not need to fully disassemble the device - you only need to remove the back cover.
    Pro-Tip: Before you go too crazy and start ripping out the cameras too, remember that you can cover the cameras with a sticker or tape when not in use. I have found that regular old black electrical tape applies seamlessly, is non-obvious to casual onlookers, and is easy to remove without smudging or gunking up the lenses. Better still, it can be removed and reapplied many times without losing its adhesive.


    Removing the Remnants of the Baseband


    There is one more semi-hardware mod you may want to make, though.
    It turns out that the 2013 Wifi Nexus 7 does actually have a partition that contains a cell network baseband firmware on it, located on the filesystem as the block device /dev/block/platform/msm_sdcc.1/by-name/radio. If you run strings on that block device from the shell, you can see that all manner of CDMA and GSM log messages, comments, and symbols are present in that partition.
    According to ADB logs, Cyanogenmod 11 actually does try to bring up a cell network radio at boot on my Wifi-only Nexus 7, but fails due to it being disabled. There is also a strong economic incentive for Asus and Google to make it extremely difficult to activate the baseband even if the hardware is otherwise identical for manufacturing reasons, since they sell the WiFi-only version for $100 less. If it were easy to re-enable the baseband, HOWTOs would exist (which they do not seem to, at least not yet), and they would cut into their LTE device sales.
    Even so, since we lack public schematics for the Nexus 7 to verify that cell components are actually missing or hardware-disabled, it may be wise to wipe this radio firmware as well, as defense in depth.
    To do this, open the Terminal app, and run:
    su
    cd /dev/block/platform/msm_sdcc.1/by-name
    dd if=/dev/zero of=./radio

    I have wiped that partition while the device was running without any issue, or any additional errors from ADB logs.
    Note that an anonymous commenter also suggested it is possible to disable the baseband of a cell-enabled device using a series of Android service disable commands, and by wiping that radio block device. I have not tested this on a device other than the WiFI-only Nexus 7, though, so proceed with caution. If you try those steps on a cell-enabled device, you should archive a copy of your radio firmware first by doing something like the following from that dev directory that contains the radio firmware block device.
    dd if=./radio of=/sdcard/radio.img

    If anything goes wrong, you can restore that image with:
    dd if=/sdcard/radio.img of=./radio


    Future Work


    In addition to streamlining the contents of this post into a single additional Cyanogenmod installation zip or alternative ROM, the following problems remain unsolved.

    Future Work: Better Usability

    While arguably very secure, this system is obviously nowhere near usable. Here are some potential improvements to the user interface, based on a brainstorming session I had with another interested developer.
    First of all, the AFWall+/Droidwall UI should be changed to be a tri-state: It should allow you to send app traffic over Tor, over your normal internet connection, or block it entirely.
    Next, during app installation from either F-Droid or Google Play (this is an Intent another addon app can actually listen for), the user should be given the chance to decide if they would like that app's traffic to be routed over Tor, use the normal Internet connection, or be blocked entirely from accessing the network. Currently, the Droidwall default for new apps is "no network", which is a great default, but it would be nice to ask users what they would like to do during actual app installation.
    Moreover, users should also be given a chance to edit the app's permissions upon installation as well, should they desire to do so.
    The Google Play situation could also be vastly improved, should Google itself still prove unwilling to improve the situation. Google Play could be wrapped in a launcher app that automatically grants it network access prior to launch, and then disables it upon leaving the window.
    A similar UI could be added to LinPhone. Because the actual voice and video transport for LinPhone does not use Tor, it is possible for an adversary to learn your SIP ID or phone number, and then call you just for the purposes of learning your IP. Because we handle call setup over Tor, we can prevent LinPhone from performing any UDP activity, or divulging your IP to the calling party prior to user approval of the call. Ideally, we would also want to inform the user of the fact that incoming calls can be used to obtain information about them, at least prior to accepting their first call from an unknown party.

    Future Work: Find Hardware with Actual Isolated Basebands

    Related to usability, it would be nice if we could have a serious community effort to audit the baseband isolation properties of existing cell phones, so we all don't have to carry around these ridiculous battery packs and sketch-ass wifi bridges. There is no engineering reason why this prototype could not be just as secure if it were a single piece of hardware. We just need to find the right hardware.
    A random commenter claimed that the Galaxy Nexus might actually have exactly the type of baseband isolation we want, but the comment was from memory, and based on software reverse engineering efforts that were not publicly documented. We need to do better than this.

    Future Work: Bug Bounty Program

    If there is sufficient interest in this prototype, and/or if it gets transformed into a usable addon package or ROM, we may consider running a bug bounty program where we accept donations to a dedicated Bitcoin address, and award the contents of that wallet to anyone who discovers a Tor proxy bypass issue or remote code execution vulnerability in any of the network-enabled apps mentioned in this post (except for the Browser app, which does not receive security updates).

    Future Work: Port Tor Browser to Android

    The Guardian Project is undertaking a port of Tor Browser to Android as part of their OrFox project. This will greatly improve the privacy of your web browsing experience on the Android device over both Firefox and Chrome. We look forward to helping them in any way we can with this effort.

    Future Work: WiFi MAC Address Randomization

    It is actually possible to randomize the WiFi MAC address on the Google Nexus 7. The closed-source root app Mac Spoofer is able to modify the device MAC address using Qualcomm-specific methods in such a way that the entire Android OS becomes convinced that this is your actual MAC.
    However, doing this requires installation of a root-enabled, closed-source application from the Google Play Store, which we believe is extremely unwise on a device you need to be able to trust. Moreover, this app cannot be autorun on boot, and your MAC address will also reset every time you disable the WiFi interface (which is easy to do accidentally). It also supports using only a single, manually entered MAC address.
    Hardware-independent techniques (such as a the Terminal command busybox ifconfig wlan0 hw ether ) appear to interfere with the WiFi management system and prevent it from associating. Moreover, they do not cause the Android system to report the new MAC address, either (visible under Settings -> About Tablet -> Status).
    Obviously, an Open Source F-Droid app that properly resets (and automatically randomizes) the MAC every time the WiFi interface is brought up is badly needed.

    Future Work: Disable Probes for Configured Wifi Networks

    The Android OS currently probes for all of your configured WiFi networks while looking for open wifi to connect to. Configured networks should not be probed for explictly unless activity for their BSSID is seen. The xda-developers forum has a limited fix to change scanning behavior, but users report that it does not disable the active probing behavior for any "hidden" networks that you have configured.

    Future Work: Recovery ROM Password Protection

    An unlocked recovery ROM is a huge vulnerability surface for Android. While disk encryption protects your applications and data, it does not protect many key system binaries and boot programs. With physical access, it is possible to modify these binaries through your recovery ROM.
    The ability to set a password for the Team Win recovery ROM in such a way that a simple "fastboot flash recovery" would overwrite would go a long way to improving device security. At least it would become evident to you if your recovery ROM has been replaced, in this case (due to the absence of the password).
    It may also be possible to restore your bootloader lock as an alternative, but then you lose the ability to make backups of your system using Team Win.

    Future Work: Disk Encryption via TPM or Clever Hacks

    Unfortunately, even disk encryption and a secure recovery firmware is not enough to fully defend against an adversary with an extended period of physical access to your device.
    Cold Boot Attacks are still very much a reality against any form of disk encryption, and the best way to eliminate them is through hardware-assisted secure key storage, such as through a TPM chip on the device itself.
    It may also be possible to mitigate these attacks by placing key material in SRAM memory locations that will be overwritten as part of the ARM boot process. If these physical memory locations are stable (and for ARM systems that use the SoC SRAM to boot, they will be), rebooting the device to extract key material will always end up overwriting it. Similar ARM CPU-based encryption defenses have also been explored in the research literature.

    Future Work: Download and Build Process Integrity

    Beyond the download integrity issues mentioned above, better build security is also deeply needed by all of these projects. A Gitian descriptor that is capable of building Cyanogenmod and arbitrary F-Droid packages in a reproducible fashion is one way to go about achieving this property.

    Future Work: Removing Binary Blobs

    If you read the Cyanogenmod build instructions closely, you can see that it requires extracting the binary blobs from some random phone, and shipping them out. This is the case with most ROMs. In fact, only the Replicant Project seems concerned with this practice, but regrettably they do not support any wifi-only devices. This is rather unfortunate, because no matter what they do with the Android OS on existing cell-enabled devices, they will always be stuck with a closed source, backdoored baseband that has direct access to the microphone, if not the RAM and the entire Android OS.
    Kudos to them for finding one of the backdoors though, at least.


    Changes Since Initial Posting


    1. Updated firewall scripts to fix Droidwall permissions vulnerability.
    2. Updated Applications List to recommend VLC as a free media player.
    3. Mention the Guardian Project's planned Tor Browser port (called OrFox) as Future Work.
    4. Mention disabling configured WiFi network auto-probing as Future Work
    5. Updated the firewall install script (and the android-firewall.zip that contains it) to disable "Captive Portal detection" connections to Google upon WiFi association. These connections are made by the Settings service user, which should normally be blocked unless you are Activating Google Play for the first time.
    6. Updated the Executive Summary section to make it clear that our SIP client can actually also make normal phone calls, too.
    7. Document removing the built-in microphone, for the truly paranoid folk out there.
    8. Document removing the remnants of the baseband, or disabling an existing baseband.
    9. Update SHA256SUM of FDroid.apk for 0.63
    10. Remove multiport usage from firewall-torify-all.sh script (and update android-firewall.zip).
    11. Add pro-tip to the microphone removal section: Don't remove your cameras. Black electrical tape works just fine, and can be removed and reapplied many times without smudges.
    12. Update android-firewall.zip installation and documentation to use /data/local instead of /etc. CM updates will wipe /etc, of course. Woops. If this happened to you while updating to CM-11-M5, download that new android-firewall.zip and run install-firewall.sh again as per the instructions above, and update your Droidwall custom script locations to use /data/local.
    13. Update the Future work section to describe some specific UI improvements.
    14. Update the Future work section to mention that we need to find hardware with actual isolated basebands. Duh. This should have been in there much earlier.
    15. Update the versions for everything
    16. Suggest enabling disk crypto directly from the shell, to avoid SSD leaks of the originally PIN-encrypted device key material.
    17. GMail network access seems to be required for App Store initialization now. Mention this in Google Apps section.
    18. Mention K-9 Mail, APG, and Plumble in the Recommended Apps section.
    19. Update the Firewall instructions to clarify that you need to ensure there are no typos in the scripts, and actually click the Droidwall UI button to enable the Droidwall firewall (otherwise networking will not work at all due to userinit.sh).
    20. Disable NFC in Settings config

    Web Walker: How to Bypass Internet Surveillance or Even a Total Web Shut Down

    $
    0
    0
    https://proparanoid.wordpress.com/2012/08/25/web-walker-how-to-bypass-internet-surveillance-or-even-a-total-web-shut-down

    A simple solution: establish a Web Walker, your own Internet emulation to totally bypass the existing system — and its snoops

    By H. Michael Sweeney, Copyright REMOVED. Permissions to duplicate granted provided it is reproduced in full with all links in tact, and referenced to the original article here at proparanoid.wordpress.com.
    Web Walker: How to Bypass Internet Surveillance or Defeat a Total Web Shut Down
    Updated Nov 26, 2012: Removed copyright and some text changes which do not impact conceptually, other than it is in preparation for creating an Open Source project to make a real operational Web Walker network available World wide. Additions introduced with RED TEXT.
    Web Walker: How to Bypass Internet Surveillance or Defeat a Total Web Shut Down
    This is  a serious discussion of modest technical complexity which will take about fifteen minutes to read. If you bore easily with technospeak and are just curious, don’t bother yourself. Read this short, fun piece, instead, as it has more entertainment value. And then come back when you are more serious about preserving your freedoms in the face of the NWO.
    The FBI, CIA, DIA, DHS, NSA, and dozens of other agencies including the Federal Reserve spy on internet users, and it is going to get much worse, SOON — perhaps to include martial law and suspension of the Constitution in the major next terrorism wave.
    For example, CISPA and other legislation continues to threaten to remake the Internet into a completely transparent spying mechanism, or worse, it seems logical to expect government to shut these systems down altogether in a Martial Law or other declared emergency, or if there is a 99% Occupy on Steroids event, or worse. Since the attacks of Sept. 11, the government has created more than 260 new Agencies, the bulk of which are geared up for or in support of spying on you and me, what we do, say, and think.  King George-style Sedition laws cannot be far behind, and have already been proposed by some Congressionals, though defeated if actually reaching the Floor. Currently, offering this advice is legal, but you can bet government snoops don’t want you to know about it.
    Survival in the future, more than ever, will depend on access to key information, and when government actions shut down or seek to have unlimited access and control of communications… you don’t want to be just another person without a clue while serious risks to your safety unfold nearer and nearer to you; if they shut down the Web, you can bet TV, phones, and radio will also be curtailed except for ‘official’ propaganda. And when it comes back on line, it will be a totally new Internet in terms of the threat of surveillance. Read this review of what to expect under Martial Law and you will better understand the concern. I WILL NOT GO PEACFULLY  INTO THAT DARK NIGHT, for it is born of pure evil, that yet more evil may be undertaken, and I am not willing to live within an evil construct with no way out. How say you?
    These Hitlerite Police State tactics are being undertaken by a paranoid government in the name of combating terrorism, but the simple truth is, they do not fear terrorists, but the actual truth itself, and those who seek and share it. Terrorism is an invented enemy of political-control convenience that does less harm than unrighteous violence dished out by out-of-control Police. As clue this is true, very few of the hundreds of Federal Agencies and new weapon/surveillance systems/laws are aimed directly at Terrorists. No, the focus is ALL on citizens.
    What better way to combat truth and free exchange of ideas and information than through the Internet, and by it, back doors into our computers, phones, and game systems by that same digital interface? You can no longer depend on the Military-Industrial-Intelligence-Media Complex to maintain such systems, provide you with protections of your privacy, or even uninterrupted access. Its time to become your own Island of communications safety. Become a Web Walker ‘Node’ (WW node). Not just because of privacy concerns, but also in case the government moves to shut down or replace the Web with a snoop friendly version… or even a natural disaster which disables whole portions of the current WWW.
    There’s nothing particularly novel about the idea (but by all means, feel free to credit me with accolades).  It is not patentable, but even if it were, I would freely put it in the public domain. Also feel free to come up with better solutions; I claim no superior skills or knowledge which cannot be surpassed by the likes of an Anonymous hacker or a software or hardware engineer, or every day super geek. It is merely a nuts and bolts solution to insuring privacy and continuity in the face of an overbearing Big Brother mentality.
    To effect solution which protects privacy, truth, and unbroken access requires three things. Some hardware you probably do not already have, but may easily obtain; some like-minded people willing to work with you within a defined geographical boundary; and a willingness to take a little more trouble with your communications than you may be currently used to dealing with, though much of that can be addressed by those who know how to create automated scripting. Web Walker: How to Bypass Internet Surveillance or Defeat a Total Web Shut Down

    Web Walker Equipment:

    Most of us employ a router in our home to service more than one computer, game system, or a laptop that roams throughout the house and perhaps even the yard, etc. A typical router can service four or five such devices to a distance of a couple of hundred feet. When the signal goes through walls and furnishings, the maximum distance drops notably, but some of us may have purchased booster antenna systems to compensate the signal loss. What we need to do is think bigger, and more powerful, and to establish cooperative communications ‘nodes’ to extend range beyond our individual capabilities.
    As it happens, Apple Computer has our back; visit the Apple Store for more information and technical description. Their Airport Extreme router is reasonably priced (can be purchased refurbished from Apple for as little as $130, and new for about $120 more — I’ve bought used ones for as low as $50). Take care not to confuse with the Airport Express, a lesser unit.
    The Extreme does not care if you are using a Macintosh or a PC, a game system, a smart phone, or anything else you might want to hook up to it, including Apple TV, a shared printer, or a hard drive for automated backup for all connected users. Unlike most systems which operate in just one frequency (2.4 Ghz), it also uses 5 GHz, where there is less signal clutter in the radio environment. That improves both range and prevents data errors that slow things down.
    But what makes it especially useful is its power and capacity, and it offers a built-in range extending feature.  As it sits, it can handle up to five times the data throughput of most routers, and does so for twice the distance of the best of them (802.11a/b/g standards), and is less subject to interference from other RF sources. As an example of range, I’ve enjoyed a useful signal at nearly 500 feet away, in my car, with several homes and lots of trees and power poles between us. Best of all for our purposes, it can accommodate up to 50 users simultaneously.
    And, like Macintosh computers, it has superlative security features to prevent unauthorized access, which will be critical. It is indeed extendable with the ability to add up to four ‘bridges’ (more routers) in daisy-chain fashion (or a radial layout) to essentially quadruple what is already an impressive operating envelope, or to resolve difficult signal penetration issues within a building. Bridges become range extension nodes in your WW network; a Bridge Node (B node) to allow roughly 50 more users. Lesser Apple routers also could be used, or perhaps competing units, but with reduced performance/capacity. Here is a YouTube video on setting up wireless bridging.
    Web Walker: How to Bypass Internet Surveillance or Defeat a Total Web 
    Booster antenna systems
    When you couple any node to a booster antenna, you can enjoy phenomenal range. Apple has designed these units with an internal, concealed omnidirectional (all directions) antenna and provides software that controls the gain and other aspects which can improve nominal performance. Some Extremes feature a jack for adding an Apple made booster antenna, but it is also possible to modify any model using instructions found here, and a $20 adapting cable that works with any standard booster system. By itself, the unit has a 20 db rating, though apparently offering better performance than competitor units with similar ratings. Were you to double or triple that with a booster, you theoretically double or triple the distance. Only the surrounding or intervening environment dictates resulting performance (e.g., trees, structures, hills).
    Boosters come in two flavors: omnidirectional to boost coverage area around you in all directions, and directional, to extend range through an arc of about 15-30 degrees in a given direction.  I am told you can actually use both omnidirectional and directional boosters simultaneously with a simple signal splitter. They are available for both indoor and outdoor placement (outdoor increases reach), but an outdoor unit can be concealed inside and aimed through a window or attic vent, which is highly suggested to avoid visual detection by Men in Black.
    Because networks can be ‘named’ and selected by name for use, you can have any number of WW nodes, each with or without bridge nodes, each with or without their own booster for a given directional or omnidirectional need. Any one of these can be simultaneously connected to an existing ISP for ‘normal’ use, or can be operated as de facto Web Walker ‘ISP’ in a closed network, and easily be reconfigured (plug and play, or in this case, plug and share) at will.
    Directional systems usually rely upon what is called a Yagi antenna design, which may or may not be enclosed in a can or tube, or small triangular housing. Where the signals going into or coming from a Yagi are additionally passed through an amplifier, phenomenal range can be achieved, though if building your own ‘black box’ solution, you must be aware of FCC guidelines and limitations on signal strength. But by way of example, an amplified Yagi system can be so powerful and precise that it is best used on a tripod with a rifle scope to center it on target destinations miles away. That is how the WW can be made to reach users well into the countryside, where line-of-sight access is available. By such a method, it would even be possible to link nearby communities in daisy-chain fashion.
    Booster systems start in the 9 db range but you can find them up to 49 db, which can mean up to 1,500 feet between bridges, give or take. That’s well over a mile in total distance if employing four bridges, and about 3 million square feet of user coverage. Claims of distances for Yagi systems of up to 4,800 feet are out there, but don’t get sucked in by anyone who sells a product specifying distance — it’s a disreputable tactic that usually involves a sham. Web Walker: How to Bypass Internet Surveillance or Defeat a Total Web Shut Down
    Like-minded people to connect with:
    That’s the whole point, right? Such a system is not intended to replace the Internet for everyone who is currently subscribed to an ISP. That would cause bandwidth issues beyond the current state of the art’s ability to inexpensively cope. It is to allow people of common need and support to stay in truly confidential touch and securely share critical information which would otherwise be deprived of them, or obtained from them surreptitiously without permission. So you pick and choose friends, family, coworkers, compatriots, and patriots whom you think best meet your needs. That does not mean you cannot also have others join the network to enhance functionality. Here’s how you reach them…
    First, map out the locations of people who should be logical participants and who are interested in joining your WW.  Some may already be ‘in range.’ For those further away, consider directional antenna or bridge solutions, or a combination. For bridges used to fill in the distance gaps with useful signals, seek out the most logical locations for placement of bridges, and see if you know someone there, or could make friends with someone in the area. Explain your goals and see where the dialog goes. Hopefully you would find them kindred Constitutionalists or Activists at heart, or otherwise willing to house your bridge unit and keep it powered up in exchange for benefits, and perhaps join your WW node or even contribute toward costs.
    But bridges merely render you and up to 50 other persons within range into a relatively small private local-area WW network, and may still fall short of enough range to reach intended persons at greater distance. But there is even more we can do. Because each individual node operator/user can have multiple named routers and select which is in use, any user can establish their own WW node and serve as a relay station from one such node to another… and if needed, to another, and another, ad nauseum.
    By this means, a whole city can be encompassed. Multiple routes or paths from point A to D via B and C are also advised so that system integrity is maintained if a node is lost. There are additional security-related route redundancy considerations discussed shortly.
    I’d suggest an ideal WW operator’s site would look like this: three Web Walkers with directional boosters just for distance in three differing directions, and one omnidirectional for those around you, perhaps a system you make available to all neighbors who apply, over time (a move considered a security risk, at best). I think of it as being triads of node triads in a pattern which blossoms outward like some kind of Dandelion seed puff covering the whole of its core being. But there are many environmental reasons an actual geometric pattern is not likely to result.
    And at the end of those routes, that is where you want your most loyal of kindred spirits, because they should do the same, and likewise at the end of their otherwise completely separate routes.  Keep in mind, too, that a bridge operator can likewise add additional units and establish their own WW node while remaining a bridge element in yours. It is completely free form to need for each individual node operator/user. Web Walker: How to Bypass Internet Surveillance or Defeat a Total Web Shut Down
    Changes in how you communicate:
    Each WW node operator/user would be key to facilitating communications beyond their own node’s connected users (other nodes). Everyone on their own node (also true of B nodes), which functions with the ease of a local network, would become a peer-to-peer communicant party with others on that node; it is a local Intranet. They would be able to easily send information and files to anyone else in that same network, or even make portions of their computer files directly available to select or even all other communicants, with or without password requirements.  That is, in fact, how they could mount a personal Web site for access by others, essentially serving as their own Web host system. Nothing new in that.
    Google Earth Image: An excellent resource for planning WW layouts as it can show terrain and building heights to the planners advantage.
    Martial law, Police State, revolution, natural disaster, Internet shut down, CISP, PIPA
    Add some Intranet email software clients or peer-to-peer clients and you get some ease of communications which would seem rather normalized to the way one uses the Web, currently. But as for Web Walker-based user Web sites, the actual Internet would be out of bounds, or should be, to prevent assault from spyware or worms designed to discover and track Web Walker activity.
    One simple solution is to buy a used Macintosh, which is generally impervious to externalized attacks of this sort, and which would be safer for use on any compromised Internet government might control. Go ahead and mount Windows and your PC software on it so it behaves like a PC if that’s what you are more comfortable with. In a way, a Mac is often more ‘PC compatible’ than many PCs, anyway. Protect Web Walker best by complete dissociation from the WWW by use of a dedicated router for the actual Internet. You can easily bounce back and forth between WW and WWW sources with a few mouse clicks, and copy and past may prove useful.
    But where an elaborate WW node (e.g., multiple routers in multiple directions) is employed, the potential exists to relay information (email or Web site data) between any two adjacent WW locations. And there is no end of relays possible. All that is required is a localized addressing scheme, which is easy to come by because each server has a name, and each user an intranet IP address unique to the router. So whomever is the central-most party of a Triad (the designer, if you will), would determine the name of the WW router for addressing purposes, and track THAT node’s user IPs. So to send data or request data to/ from an outside Web Walker, would only require that you knew the address;  IPnumber@router name.  Thus whenever a new router (node) is to be added to the greater WW network, a proposed router name should be submitted to the network to allow people to indicate if it was perhaps already in use at their end.
    As in the real Internet, you should never share addresses, as that could compromise user privacy expectations. That means no one knows exactly where on the greater WW network a given user is located. So to send a request for a ‘Web page’ on the WW network, or an email, one uses email (I suggest using PGP – Pretty Good Privacy encryption because it employs a sender/recipient decryption key scheme so that only the recipient can access) to send to the WW node operator. When the operator gets it, he compares the address to those listed on his own node(s), and sends it on if the recipient is one of his ‘flock.’ This could be automated with minimal software.
    Otherwise, he switches his computer over to each of the other WW nodes which link to other, distant WW nodes, and forwards the file (also subject to automation). In this way the message goes everywhere until it finds the right operator, and is forwarded to the specific recipient. If a Web page request, the recipient sends an email back containing the Web markup language code for the file, along with all embedded images, videos, etc.  This may require an email client which has no file size limitation, such as a virtual private network email client, which is a good choice, anyway, for management of email by a node operator.
    The flaw in this plan is that the designer would need to spend a considerable amount of time looking at data flows and switching routers and forwarding as needed from one node to another. That could prove a severe issue in a major City environment well connected to large numbers of individuals. Therefore, two additional bits of advice are offered. Web Walker: How to Bypass Internet Surveillance or Defeat a Total Web Shut Down
    1) to some degree, restrict membership to those persons of value to the localized network. That means people who truly are kindred spirits, or who have useful resources or skills, such as weapons, food, or whatever is appropriate for assuring mutual survival. This is not our Children’s Internet;
    2) Users should limit communications to serious needs, only. You don’t go ‘surfing,’ and you don’t send spam, or watch movies, porn, play games, etc.
    3) Employ scripting, utility software, or write custom software to handle as much of the work load as possible. Macintosh has system-level scripting built in, as do many kinds of Web utilities, and Linux/Unix systems are also quite flexible in this respect.Web Walker: How to Bypass Internet Surveillance or Defeat a Total Web Shut Down
    Men in Black
    Naturally, the government will not like this idea very much. Who knows? They may label me a terrorist any moment for having published this idea. Welcome to do so if they want a bit of bad publicity.  I’m sure I’m already on their list, anyway. But their concern means that you would likely want to hide your units and shield your rooms to prevent so many strong signals from screaming, ‘Here I am!’ Better they should see only one signal at a time, if possible, and not easily ascertain its point of origin. Ask me about Primus Pick Proof Locks for your home, if truly worried about Men in Black snoops.
    Again, it would be wise to establish multiple routes between critical or important users or resources in case one route is compromised or suffers technical failure. Any two adjacent WW Node operators would know each other and would become aware of any such loss of service (again, to play safe, shut down any signal to it) and investigate carefully before deciding what to do about it (e.g., replace the route, help repair, etc.)
    Unless they specifically passed a law or edict against, even if discovered, you should not likely be in too great a danger except from confiscation of equipment and questioning. Likely, the files on your computer would be a greater risk of getting you into trouble if they felt like pressing a given matter. Spare equipment, secret locations, and escape tunnels may be called for in the worst of times.
    And should revolution come, I have heard it said regarding one such revolution, “It was the best of times, and the worst of times…” But in such a case, being able to communicate can make a bad time the best possible.
    Update:Due to popular response and interest, I’m going to attempt to launch an Open Source Project to make Web Walker real. The first order of business will be to come up with a new name: at the time of first posting just a few months back, there was only one Web Walker out there, a Web authoring service, and one product  (a one word trade name). Now, however, there are nearly a half dozen Web Walkers of all manner since then, for some reason. Why, if I was paranoid, I’d think it on purpose~ :) Ideas anyone?
    Click the FOLLOW button at very page top to learn more about the Open Source Project, or better yet, especially if wanting to learn about the may options or ways in which you can participate, use the CONTACT link at page top to express your interest. There will be more posts on the Project, to include many enhancements such as an inherent mechanism to simulate social networking and search engines free of advertising, spying mechanisms, and useless distracting fluff. THANK YOU for taking the time to learn about Web Walker!
    PLEASE: Comment (page bottom, or contact me), Rate (at page top), Share/Tweet this article. Visit my Reader Forum to promote your own cause or URL, even if unrelated to this article.
    Viewing all 1406 articles
    Browse latest View live


    <script src="https://jsc.adskeeper.com/r/s/rssing.com.1596347.js" async> </script>