Quantcast
Channel: Sameh Attia
Viewing all 1406 articles
Browse latest View live

Debian / Ubuntu Linux Delete Old Kernel Images Command

$
0
0
http://www.cyberciti.biz/faq/debian-ubuntu-linux-delete-old-kernel-images-command

I'm a new Ubuntu Linux user and noticed that old kernel still exists in my system. Why doesn't Ubuntu remove old kernels automatically? How do I delete old unused kernel images to free disk space. How to remove unused old kernel images on Ubuntu Linux safely?

You need to delete and/or remove old kernels from system manually. Ubuntu and Debian based system keeps old kernel images so that system can be booted if newer kernel failed. The safest way to purge and remove old kernel is as follows. In this tutorial you will learn how to delete unused old kernel images on Ubuntu or Debian Linux to free disk space as well as the various state of linux-image package.

Step #1: Boot into new kernel

First, boot into newly installed kernel. Verify this with the following command:
$ uname -mrs
$ uname -a

Sample outputs:
Linux server1 3.13.0-68-generic #111-Ubuntu SMP Fri Nov 6 18:17:06 UTC 2015 x86_64 x86_64 x86_64 GNU/Linux
To list all installed Linux kernel images, enter:
# dpkg --list | egrep -i --color 'linux-image|linux-headers'
Sample outputs:
Fig.01: Check what kernel image(s) are installed on your system
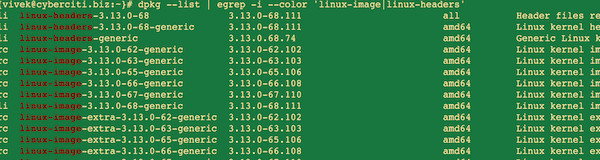
Fig.01: Check what kernel image(s) are installed on your system (click to enlarge)

Step #2: Delete unwanted and unused kernel images

You can remove kernel images one by one using the following syntax:
# apt-get --purge remove linux-image-3.13.0-67-generic
OR
$ sudo apt-get --purge remove linux-image-3.13.0-67-generic

A note about newer Ubuntu and Debian system

On newer system all obsolete kernels and headers should automatically be flagged as no more needed, and thus can be purged with the following single command:
$ sudo apt-get autoremove

Understanding package states in Ubuntu and Debian Linux

Consider the following example:
# dpkg --list | grep linux-image
Sample outputs:
rc  linux-image-3.13.0-62-generic        3.13.0-62.102                         amd64        Linux kernel image for version 3.13.0 on 64 bit x86 SMP
rc linux-image-3.13.0-63-generic 3.13.0-63.103 amd64 Linux kernel image for version 3.13.0 on 64 bit x86 SMP
rc linux-image-3.13.0-65-generic 3.13.0-65.106 amd64 Linux kernel image for version 3.13.0 on 64 bit x86 SMP
rc linux-image-3.13.0-66-generic 3.13.0-66.108 amd64 Linux kernel image for version 3.13.0 on 64 bit x86 SMP
rc linux-image-3.13.0-67-generic 3.13.0-67.110 amd64 Linux kernel image for version 3.13.0 on 64 bit x86 SMP
ii linux-image-3.13.0-68-generic 3.13.0-68.111 amd64 Linux kernel image for version 3.13.0 on 64 bit x86 SMP
rc linux-image-extra-3.13.0-62-generic 3.13.0-62.102 amd64 Linux kernel extra modules for version 3.13.0 on 64 bit x86 SMP
rc linux-image-extra-3.13.0-63-generic 3.13.0-63.103 amd64 Linux kernel extra modules for version 3.13.0 on 64 bit x86 SMP
rc linux-image-extra-3.13.0-65-generic 3.13.0-65.106 amd64 Linux kernel extra modules for version 3.13.0 on 64 bit x86 SMP
rc linux-image-extra-3.13.0-66-generic 3.13.0-66.108 amd64 Linux kernel extra modules for version 3.13.0 on 64 bit x86 SMP
rc linux-image-extra-3.13.0-67-generic 3.13.0-67.110 amd64 Linux kernel extra modules for version 3.13.0 on 64 bit x86 SMP
ii linux-image-extra-3.13.0-68-generic 3.13.0-68.111 amd64 Linux kernel extra modules for version 3.13.0 on 64 bit x86 SMP
ii linux-image-generic 3.13.0.68.74 amd64 Generic Linux kernel image
The first column indicates package flags like rc, ii. So, what do the various dpkg flags like 'ii''rc' mean?
  • rc: It means package is in remove/deinstall state and only config file exists.
  • ii: It means package is in install state and it is 100% installed on the system.
You can remove all linux-image packages in rc state using the following command:
# x=$(dpkg --list | grep -i linux-image | grep ^rc| awk '{ print $2}')
# echo "$x"
# apt-get --purge remove $x

Sample outputs:
Reading package lists... Done
Building dependency tree
Reading state information... Done
The following packages will be REMOVED:
linux-image-3.13.0-62-generic* linux-image-3.13.0-63-generic*
linux-image-3.13.0-65-generic* linux-image-3.13.0-66-generic*
linux-image-3.13.0-67-generic* linux-image-extra-3.13.0-62-generic*
linux-image-extra-3.13.0-63-generic* linux-image-extra-3.13.0-65-generic*
linux-image-extra-3.13.0-66-generic* linux-image-extra-3.13.0-67-generic*
0 upgraded, 0 newly installed, 10 to remove and 0 not upgraded.
After this operation, 0 B of additional disk space will be used.
Do you want to continue? [Y/n] y
(Reading database ... 65623 files and directories currently installed.)
Removing linux-image-3.13.0-62-generic (3.13.0-62.102) ...
Purging configuration files for linux-image-3.13.0-62-generic (3.13.0-62.102) ...
Examining /etc/kernel/postrm.d .
run-parts: executing /etc/kernel/postrm.d/initramfs-tools 3.13.0-62-generic /boot/vmlinuz-3.13.0-62-generic
run-parts: executing /etc/kernel/postrm.d/zz-update-grub 3.13.0-62-generic /boot/vmlinuz-3.13.0-62-generic
Removing linux-image-3.13.0-63-generic (3.13.0-63.103) ...
Purging configuration files for linux-image-3.13.0-63-generic (3.13.0-63.103) ...
Examining /etc/kernel/postrm.d .
run-parts: executing /etc/kernel/postrm.d/initramfs-tools 3.13.0-63-generic /boot/vmlinuz-3.13.0-63-generic
run-parts: executing /etc/kernel/postrm.d/zz-update-grub 3.13.0-63-generic /boot/vmlinuz-3.13.0-63-generic
Removing linux-image-3.13.0-65-generic (3.13.0-65.106) ...
Purging configuration files for linux-image-3.13.0-65-generic (3.13.0-65.106) ...
Examining /etc/kernel/postrm.d .
run-parts: executing /etc/kernel/postrm.d/initramfs-tools 3.13.0-65-generic /boot/vmlinuz-3.13.0-65-generic
run-parts: executing /etc/kernel/postrm.d/zz-update-grub 3.13.0-65-generic /boot/vmlinuz-3.13.0-65-generic
Removing linux-image-3.13.0-66-generic (3.13.0-66.108) ...
Purging configuration files for linux-image-3.13.0-66-generic (3.13.0-66.108) ...
Examining /etc/kernel/postrm.d .
run-parts: executing /etc/kernel/postrm.d/initramfs-tools 3.13.0-66-generic /boot/vmlinuz-3.13.0-66-generic
run-parts: executing /etc/kernel/postrm.d/zz-update-grub 3.13.0-66-generic /boot/vmlinuz-3.13.0-66-generic
Removing linux-image-3.13.0-67-generic (3.13.0-67.110) ...
Purging configuration files for linux-image-3.13.0-67-generic (3.13.0-67.110) ...
Examining /etc/kernel/postrm.d .
run-parts: executing /etc/kernel/postrm.d/initramfs-tools 3.13.0-67-generic /boot/vmlinuz-3.13.0-67-generic
run-parts: executing /etc/kernel/postrm.d/zz-update-grub 3.13.0-67-generic /boot/vmlinuz-3.13.0-67-generic
Removing linux-image-extra-3.13.0-62-generic (3.13.0-62.102) ...
Purging configuration files for linux-image-extra-3.13.0-62-generic (3.13.0-62.102) ...
Removing linux-image-extra-3.13.0-63-generic (3.13.0-63.103) ...
Purging configuration files for linux-image-extra-3.13.0-63-generic (3.13.0-63.103) ...
Removing linux-image-extra-3.13.0-65-generic (3.13.0-65.106) ...
Purging configuration files for linux-image-extra-3.13.0-65-generic (3.13.0-65.106) ...
Removing linux-image-extra-3.13.0-66-generic (3.13.0-66.108) ...
Purging configuration files for linux-image-extra-3.13.0-66-generic (3.13.0-66.108) ...
Removing linux-image-extra-3.13.0-67-generic (3.13.0-67.110) ...
Purging configuration files for linux-image-extra-3.13.0-67-generic (3.13.0-67.110) ...
Type the following command again to see the results:
# dpkg --list | egrep -i --color 'linux-image|linux-headers'
Sample outputs:
ii  linux-headers-3.13.0-68              3.13.0-68.111                         all          Header files related to Linux kernel version 3.13.0
ii linux-headers-3.13.0-68-generic 3.13.0-68.111 amd64 Linux kernel headers for version 3.13.0 on 64 bit x86 SMP
ii linux-headers-generic 3.13.0.68.74 amd64 Generic Linux kernel headers
ii linux-image-3.13.0-68-generic 3.13.0-68.111 amd64 Linux kernel image for version 3.13.0 on 64 bit x86 SMP
ii linux-image-extra-3.13.0-68-generic 3.13.0-68.111 amd64 Linux kernel extra modules for version 3.13.0 on 64 bit x86 SMP
ii linux-image-generic 3.13.0.68.74 amd64 Generic Linux kernel image

Regular Expressions In grep

$
0
0
http://www.cyberciti.biz/faq/grep-regular-expressions

How do I use the Grep command with regular expressions on a Linux and Unix-like operating systems?

Linux comes with GNU grep, which supports extended regular expressions. GNU grep is the default on all Linux systems. The grep command is used to locate information stored anywhere on your server or workstation.

Regular Expressions


Regular Expressions is nothing but a pattern to match for each input line. A pattern is a sequence of characters. Following all are examples of pattern:
^w1
w1|w2
[^ ]

grep Regular Expressions Examples

Search for 'vivek' in /etc/passswd
grep vivek /etc/passwd
Sample outputs:
vivek:x:1000:1000:Vivek Gite,,,:/home/vivek:/bin/bash
vivekgite:x:1001:1001::/home/vivekgite:/bin/sh
gitevivek:x:1002:1002::/home/gitevivek:/bin/sh
Search vivek in any case (i.e. case insensitive search)
grep -i -w vivek /etc/passwd
Search vivek or raj in any case
grep -E -i -w 'vivek|raj' /etc/passwd
The PATTERN in last example, used as an extended regular expression.

Anchors

You can use ^ and $ to force a regex to match only at the start or end of a line, respectively. The following example displays lines starting with the vivek only:
grep ^vivek /etc/passwd
Sample outputs:
vivek:x:1000:1000:Vivek Gite,,,:/home/vivek:/bin/bash
vivekgite:x:1001:1001::/home/vivekgite:/bin/sh
You can display only lines starting with the word vivek only i.e. do not display vivekgite, vivekg etc:
grep -w ^vivek /etc/passwd
Find lines ending with word foo:
grep 'foo$' filename
Match line only containing foo:
grep '^foo$' filename
You can search for blank lines with the following examples:
grep '^$' filename

Character Class

Match Vivek or vivek:
grep '[vV]ivek' filename
OR
grep '[vV][iI][Vv][Ee][kK]' filename
You can also match digits (i.e match vivek1 or Vivek2 etc):
grep -w '[vV]ivek[0-9]' filename
You can match two numeric digits (i.e. match foo11, foo12 etc):
grep 'foo[0-9][0-9]' filename
You are not limited to digits, you can match at least one letter:
grep '[A-Za-z]' filename
Display all the lines containing either a "w" or "n" character:
grep [wn] filename
Within a bracket expression, the name of a character class enclosed in "[:" and ":]" stands for the list of all characters belonging to that class. Standard character class names are:
  • [:alnum:] - Alphanumeric characters.
  • [:alpha:] - Alphabetic characters
  • [:blank:] - Blank characters: space and tab.
  • [:digit:] - Digits: '0 1 2 3 4 5 6 7 8 9'.
  • [:lower:] - Lower-case letters: 'a b c d e f g h i j k l m n o p q r s t u v w x y z'.
  • [:space:] - Space characters: tab, newline, vertical tab, form feed, carriage return, and space.
  • [:upper:] - Upper-case letters: 'A B C D E F G H I J K L M N O P Q R S T U V W X Y Z'.
In this example match all upper case letters:
grep '[:upper:]' filename

Wildcards

You can use the "." for a single character match. In this example match all 3 character word starting with "b" and ending in "t":
grep'\<b.t\>' filename
Where,
  • \< Match the empty string at the beginning of word
  • \> Match the empty string at the end of word.
Print all lines with exactly two characters:
grep '^..$' filename
Display any lines starting with a dot and digit:
grep '^\.[0-9]' filename

Escaping the dot

The following regex to find an IP address 192.168.1.254 will not work:
grep '192.168.1.254' /etc/hosts
All three dots need to be escaped:
grep '192\.168\.1\.254' /etc/hosts
The following example will only match an IP address:
egrep'[[:digit:]]{1,3}\.[[:digit:]]{1,3}\.[[:digit:]]{1,3}\.[[:digit:]]{1,3}' filename
The following will match word Linux or UNIX in any case:
egrep -i '^(linux|unix)' filename

How Do I Search a Pattern Which Has a Leading - Symbol?

Searches for all lines matching '--test--' using -e option Without -e, grep would attempt to parse '--test--' as a list of options:
grep -e '--test--' filename

How Do I do OR with grep?

Use the following syntax:
grep 'word1|word2' filename
OR
grep 'word1\|word2' filename

How Do I do AND with grep?

Use the following syntax to display all lines that contain both 'word1' and 'word2'
grep 'word1' filename | grep 'word2'

How Do I Test Sequence?

You can test how often a character must be repeated in sequence using the following syntax:
{N}
{N,}
{min,max}
Match a character "v" two times:
egrep "v{2}" filename
The following will match both "col" and "cool":
egrep 'co{1,2}l' filename
The following will match any row of at least three letters 'c'.
egrep 'c{3,}' filename
The following example will match mobile number which is in the following format 91-1234567890 (i.e twodigit-tendigit)
grep"[[:digit:]]\{2\}[ -]\?[[:digit:]]\{10\}" filename

How Do I Hightlight with grep?

Use the following syntax:
grep --color regex filename

How Do I Show Only The Matches, Not The Lines?

Use the following syntax:
grep -o regex filename

Regular Expression Operator

Regex operatorMeaning
.Matches any single character.
?The preceding item is optional and will be matched, at most, once.
*The preceding item will be matched zero or more times.
+The preceding item will be matched one or more times.
{N}The preceding item is matched exactly N times.
{N,}The preceding item is matched N or more times.
{N,M}The preceding item is matched at least N times, but not more than M times.
-Represents the range if it's not first or last in a list or the ending point of a range in a list.
^Matches the empty string at the beginning of a line; also represents the characters not in the range of a list.
$Matches the empty string at the end of a line.
\bMatches the empty string at the edge of a word.
\BMatches the empty string provided it's not at the edge of a word.
\<Match the empty string at the beginning of word.
\>Match the empty string at the end of word.

grep vs egrep

egrep is the same as grep -E. It interpret PATTERN as an extended regular expression. From the grep man page:
       In basic regular expressions the meta-characters ?, +, {, |, (, and ) lose their special meaning; instead use the backslashed versions \?, \+, \{,
\|, \(, and \).
Traditional egrep did not support the { meta-character, and some egrep implementations support \{ instead, so portable scripts should avoid { in
grep -E patterns and should use [{] to match a literal {.
GNU grep -E attempts to support traditional usage by assuming that { is not special if it would be the start of an invalid interval specification.
For example, the command grep -E '{1' searches for the two-character string {1 instead of reporting a syntax error in the regular expression.
POSIX.2 allows this behavior as an extension, but portable scripts should avoid it.

References:

  • man page grep and regex(7)
  • info page grep

HowTo: Linux Check Password Strength With Cracklib-check Command

$
0
0
http://www.cyberciti.biz/security/linux-password-strength-checker

Using the same password on different servers allows attackers to access your accounts if cracker manage to steal your password from a less secure server. This is true for online website accounts too. So solution is to create unique passwords for server accounts like your email, sftp and ssh accounts. General guideline to create a strong and unique password is as follows:

Creating a strong and unique password for Linux or Unix-like systems

  1. Create a password with mix of numbers, special symbols, and alphabets.
  2. Make sure your password is hard to guess. You can use tool such as makepasswd to create hard to guess password.
  3. Do not use simple words like "password", "123456", "123abc" or "qwerty".
  4. Use a unique password for all your server accounts.
  5. A minimum password length of 12 to 14 characters should be used. See how to configure CentOS / RHEL / Fedora Linux based server password quality requirements.
  6. Generating passwords randomly where feasible. You can do this with a simple shell script function.
  7. If possible use two-factor authentication.
  8. Use pam_crack to ensure strong passwords and to check passwords against a dictionary attack.
But, how do you test the effectiveness of a password in resisting guessing and brute-force attacks under Linux? The answer is simple use cracklib-check command.

Install cracklib on a Linux based system

Type the following yum command to install on RHEL and friends:
# yum install cracklib
Type the following apt-get command to install on Debian/Ubuntu and friends:
# apt-get install libcrack2

Say hello to cracklib-check

This command takes a list of passwords from keyboard (stdin) and checks them using libcrack2. The idea is simple: try to prevent users from choosing passwords that could be guessed by "crack" by filtering them out, at source.

Examples

Test a simple password like "password", enter:
$ echo "password" | cracklib-check
Sample outputs:
password: it is based on a dictionary word
Try sequential patterns such as "abc123456":
$ echo "abc123456" | cracklib-check
Sample outputs:
abc123456: it is too simplistic/systematic
Try a password with a mix of letters, numbers, and symbols:
$ echo 'i1oVe|DiZza' | cracklib-check
Sample outputs:
i1oVe|DiZza: OK
The above password increases the difficulty of guessing or cracking your password. I used a random phrase (easy to remember) "I Love Pizza" and inserted random characters to create a strong hard to guess password - "i1oVe|DiZza".
Fig.01: Linux cracklib-check command examples

Putting it all together

 
#!/bin/bash
# A sample shell script to add user to the system
# Check password for strength
# Written by Vivek Gite under GPL v2.x+
# ----------------------------------------------
read -p "Enter username : " user
read -sp "Enter password : " password
echo
echo"Tesing password strength..."
echo
result="$(cracklib-check <<<"$password")"
# okay awk is bad choice but this is a demo
okay="$(awk -F': ''{ print $2}'<<<"$result")"
if[["$okay" == "OK"]]
then
echo"Adding a user account please wait..."
/sbin/useradd -m -s /bin/bash $user
echo"$user:$password" | /sbin/chpasswd
else
echo"Your password was rejected - $result"
echo"Try again."
fi
 

A note about password manager

A reasonable compromise for using large numbers of passwords is to record them in a password manager, which include stand-alone applications, web browser extensions, or a manager built into the operating system. See how to install gpass - an easy to use and secure password manager for GNOME2 under RHEL / CentOS / Fedora Linux desktop. gpass stores all your password in an encrypted (Blowfish) file, protected by a master-password.

Check out related media


(Video:01 - How to create a strong password)
Recommended readings:

How to remove trailing whitespaces in a file on Linux

$
0
0
http://ask.xmodulo.com/remove-trailing-whitespaces-linux.html

Question: I have a text file in which I need to remove all trailing whitespsaces (e.g., spaces and tabs) in each line for formatting purpose. Is there a quick and easy Linux command line tool I can use for this?
When you are writing code for your program, you must understand that there are standard coding styles to follow. For example, "trailing whitespaces" are typically considered evil because when they get into a code repository for revision control, they can cause a lot of problems and confusion (e.g., "false diffs"). Many IDEs and text editors are capable of highlighting and automatically trimming trailing whitepsaces at the end of each line.
Here are a few ways to remove trailing whitespaces in Linux command-line environment.

Method One

A simple command line approach to remove unwanted whitespaces is via sed.
The following command deletes all spaces and tabs at the end of each line in input.java.
$ sed -i 's/[[:space:]]*$//' input.java
If there are multiple files that need trailing whitespaces removed, you can use a combination of find and sed. For example, the following command deletes trailing whitespaces in all *.java files recursively found in the current directory as well as all its sub-directories.
$ find . -name "*.java" -type f -print0 | xargs -0 sed -i 's/[[:space:]]*$//'

Method Two

Vim text editor is able to highlight and trim whitespaces in a file as well.
To highlight all trailing whitespaces in a file, open the file with Vim editor and enable text highlighting by typing the following in Vim command line mode.
:set hlsearch
Then search for trailing whitespaces by typing:
/\s\+$
This will show all trailing spaces and tabs found throughout the file.

Then to clean up all trailing whitespaces in a file with Vim, type the following Vim command.
:%s/\s\+$//
This command means substituting all whitespace characters found at the end of the line (\s\+$) with no character.

Generate CPU, Memory & I/O report using SAR command

$
0
0
http://www.linuxtechi.com/generate-cpu-memory-io-report-sar-command

SAR stands for System Activity Report, as its name suggest sar command is used to collect,report & save CPU, Memory, I/O usage in Unix like operating system. SAR command produce the reports on the fly and can also save the reports in the log files as well.
In this article we will discuss different examples of SAR Command in CentOS  7 & RHEL 7, in case sar is not installed on your system then use the below command to install it.
[root@localhost ~]# yum install sysstat
Start the sadc (system activity data collector) service(sysstat) so that it saves the reports in log file “/var/log/sa/saDD”  where DD represents Current day and already existing files will be archived.
[root@localhost ~]# systemctl start sysstat
[root@localhost ~]# systemctl enable sysstat
It collects the data every 10 minutes and generate its report daily. Below crontab file is responsible for collecting and generating reports.
sar-crontab-file
Below is the Config File of SysStat ( sar command ).
sysstat-config-file

Example:1 Generating CPU Report on the Fly 5 times every 2 seconds.

[root@localhost ~]# sar 2 5
Linux 3.10.0-123.el7.x86_64 (localhost.localdomain)     Monday 26 October 2015     _x86_64_    (2 CPU)

01:43:55  EDT     CPU     %user     %nice   %system   %iowait    %steal     %idle
01:43:57  EDT     all      0.00      0.00      0.25      0.00      0.00     99.75
01:43:59  EDT     all      0.00      0.00      0.00      0.00      0.00    100.00
01:44:01  EDT     all      0.00      0.00      0.25      0.00      0.00     99.75
01:44:03  EDT     all      0.00      0.00      0.25      0.25      0.00     99.50
01:44:05  EDT     all      0.00      0.00      0.00      0.00      0.00    100.00
Average:        all      0.00      0.00      0.15      0.05      0.00     99.80
[root@localhost ~]#
If the %I/O wait is more than zero for a longer period of time then we can consider there is some bottleneck in I/O system ( Hard disk or Network )

Example:2 Saving sar output to a file using -o

[root@localhost ~]# sar 2 5 -o /tmp/data > /dev/null 2>&1
[root@localhost ~]#
use “sar -f ” to display the reports.
[root@localhost ~]# sar -f /tmp/data

read-data-file-sar

Example:3 Generating Memory Usage report using -r

-r option in the sar command is used to generate memory usage report.
[root@localhost ~]# sar -r 2 5
memory-usage-sar-command
kbcommit& %commit is the overall memory used including RAM & Swap

Example:4 Generating Paging Statistics Report using -B

-B option in the sar command is used to display paging statistics.
[root@localhost ~]# sar -B 2 5
paging-statistics-sar-command
In the report majflts/s shows the major faults per second means number of pages loaded into the memory from disk (swap), if its value is higher then we can say that system is running of RAM.
%vmeff indicates the number of pages scanned per second, if it’s vaule is 100 % its is consider OK and when it is below 30 % then there is some issue with virtual memory. Zero value indicates that there is no page scanned during that time.

Example:5 Generating block device statistics report using -d

-d option in the sar command is used to display the block device statistics report. Using option -p (pretty-print) along with -d make the dev column more readable, example is shown below :
[root@localhost ~]# sar -d -p 2 4
block-device-report-sar-command

Example:6 Generating Network statistic report using -n

-n option in the sar command is used to generate network statistic report. Below is the synatx :
# sar -n {keyword} or {ALL}
Following keywords can be used : DEV, EDEV, NFS, NFSD, SOCK, IP, EIP, ICMP, EICMP, TCP, ETCP, UDP, SOCK6, IP6, EIP6, ICMP6, EICMP6 & UDP6.
To generate all network statistic report use below command :
[root@localhost ~]# sar -n ALL
network-statistics-report-sar-command

Example:7 Reading SAR log file using -f

As we have discuss that sar logs files are kept under /var/log/sa/saDD, using -f option in sar command we can read the log files.
[root@localhost ~]# sar -r -f /var/log/sa/sa26
reading-sar-log-file

How to start Android app development for complete beginners in 5 steps

$
0
0
http://www.androidauthority.com/android-app-development-complete-beginners-658469


How to Start Android App Development for Complete Beginners in 5 Steps-aaSo you have a killer app idea and you’re ready to turn it into a reality and take it to market. No doubt you’re itching to start getting your first downloads, reviews and profits… But there’s just one problem: you don’t have a clue where to start!
Learning to code is difficult enough on its own but with Android development it can be more complicated. Not only do you need to understand Java, you also need to install all the Android-specific software and learn all of the unique quirks of Android app development.
In general, creating an Android app requires the SDK (Software Development Kit), an IDE (Integrated Development Environment) like Android Studio or Eclipse, the Java Software Development Kit (JDK) and a virtual device to test on. All this takes work to set up, and that’s before you’ve even started looking into things like Google Play Services, screen sizes, API levels…
Eclipse_4.2_Juno_screenshotSee also: I want to develop Android Apps – What languages should I learn?41 It’s just such a dense amount of information and it’s enough to put an awful lot of people off before they even begin. My aim with this article then, is to provide an approachable guide to try and make the whole prospect of creating an app a little less daunting… I’ll explain the bits you need to know and gloss over the rest and by the end you should have a basic app that you can start iterating on and experimenting with.
Go and make yourself a cup of tea first though, this may take a while…

Step 1: Download Android Studio

To program in most languages, you need a piece of software called an IDE or ‘Integrated Development Environment’. The most common IDE for Android development is Android Studio, which comes direct from Google itself. You can get it here.
An IDE is what gives you the main UI where you’ll enter your code (you can’t just start typing into notepad). It also highlights things you get wrong, offers suggestions and lets you run and test your creations conveniently. It creates the files you need, it provides basic layouts and generally it saves you a lot of time and effort.
Android Studio
What’s great about Android Studio is that it is designed specifically for Android development (unlike the second most popular option, Eclipse). This means that when you download the software, you’ll also get a lot of the other bits you need including the Android SDK (a selection of tools including the Android platform itself) and the Android Virtual Device, which is an emulator you can test your apps on. When you go through the installation, make sure you leave the boxes ticked to confirm that you want these additional components. You could manually add them later, but this will just complicate matters.
As mentioned, there are some alternatives to Android Studio. Eclipse is an older IDE that can be used for developing other things too (such as iOS apps) and that is a bit more flexible overall. It’s also a much more fiddly to get started with though and not nearly as beginner-friendly. Another personal favorite of mine is Basic4Android. Basic4Android is an IDE that lets you code Android apps with the BASIC programming language. It makes things easier in a number of other ways too and is focused on ‘rapid development’.
corona-sdk-balloon-or-bomb-thumbSee also: Writing your first Android game using the Corona SDK8 There are other options too, such as Unity3D and numerous app builders, each of which has specific strengths and weaknesses depending on what you’re planning on building. For the sake of simplicity though, we’re focusing on Android Studio because it has become the ‘main’ way to build basic apps and pretty much the industry standard. If you think you might ever sell your business, if you want to give yourself the most flexibility and control possible, or if you’d like to become a professional app developer, you’ll need this tool.
That said, if you read through all this and you find it too much still, you might want to consider Basic4Android as a simpler approach and I’ll be covering that in a future post.
Okay, just to recap: we now have Android Studio downloaded and installed. But, don’t run it until you  read step two! So far so good… What could possibly go wrong?

Step 2: Setting Up Android Studio

Now you have Android Studio installed you’ve taken your first, bold step toward becoming a developer! A lot of people only manage it this far and then leave the software installed on their computer for months on end, feeling guilty every time they see it in the Start Menu. Eventually they end deleting it to make space for the next AAA title on Steam and so ends the whole sorry affair… Don’t end up like them – it’s time for some more affirmative action!
Before you can get started, you also need to install Java on your machine to use Android Studio. Specifically, you’re going to need install the Java Development Kit (JDK). Java is the programming language you’re going to be using to build your apps in this instance and you need to install the JDK in order for Android Studio to be able to interpret and compile your code (compiling means turning the source into something that is understood by the CPU – machine code). You’ll find the Java Development Kit here. Just download and follow the instructions to install.
ASFeaturedPicSee also: Android Studio tutorial for beginners4Now you can click on Android Studio to launch it. Once it opens up, you’ll be presented with a menu where you’ll be able to get started or configure some options. The great thing is that everything is handled for you at this point, though you may want to familiarize yourself with the SDK Manager (Configure > SDK Manager) which is where you’ll update your Android SDK to support newer versions, as well as download things like code samples or support for Google Glass. But don’t worry about that now but if Android Studio says you’re missing something, this is where you’ll probably need to go to find it.
So really there are three main things interacting when you use Android Studio to create your apps.
  • Android Studio itself, which is an IDE that provides you with a nice interface for coding.
  • The code you write in Java, which you installed a moment ago…
  • And the Android SDK which you’ll access through your Java code in order to do Android-type things
If you find this all a bit complicated and daunting then… well, you don’t know you’re born. This used to be way worse.
Maybe that offers some consolation…

Step 3: Starting a New Project

Once you’ve installed your samples, you can go back to the first page you saw when you loaded up Android Studio. Now you want to choose Start a new Android Studio Project – it’s finally happening!
Enter the name you want for your application and your ‘company domain’. Together these elements will be used to create your package name with the following format:
com.companyname.appname
The package will be the compiled file or APK (‘Android Package File’) that you’ll eventually upload to the Google Play Store. There are ways that people can see this, so if you’re planning on making something you’ll eventually release, try to stay away from using ‘funny words’.
Choosing package name
The last field to enter is the directory where you want to save all the files pertaining to your app. I like to save in DropBox to make sure I always have a backup of my code. Click Next again and guess what… More options! Huzzah! Don’t worry, we’re nearly there…
Next you need to decide what type of device you’re going to be developing for and in this case we’ll start with the Phone and Tablet option. Other options are TV, Wear and Glass. It’s fine if you want to develop for a myriad of platforms in the future – that’s one of the wonders of Android – but let’s start with something a bit more straightforward to begin with, okay?
The other choice you have to make at this stage is the ‘Minimum SDK’. This is the lowest version of Android you want to support. Why not just enter the latest version of Android in here? Well, because relatively few people actually have the latest version of Android installed on their device at any given time. You want to support phones that are still running older versions in order to reach the largest possible audience – especially overseas.
Why not just go with Android 1.1? Well, apart from this not being an option (Froyo is as low as you can go), that would also prevent you from using any of the fancy new features from the latest updates.
The best bet at this stage is to go with the default option, so just leave this field as it is. On the next page, you’ll be given the option to pick the way you want your app to look at the start. This will be the look of your main ‘Activity Module’ which is basically the main page of your app. Think of these like templates; do you want to have the title of your app along the top of the screen, or do you want your UI to fill the whole display? Do you want to start off with some elements ready-designed for you? Is your app primarily going to use Google Maps (don’t go here for a bit, things get more complicated with Google Play Services).
Choosing Activity
Bear in mind that an app can have multiple activities that act like separate pages on a website. You might have a ‘settings’ activity for instance and a ‘main’ activity. So the activity isn’t the app per say but rather one stand-alone page of your app.
For your first creation though, you’ll probably do best to make something really simple that just displays a single, basic activity. Select ‘Basic Activity’ to keep things as simple as possible and for all intents and purposes, this will now be your app. Click Next again you get the last few options.
Now you get to pick the name for your activity and the layout name (if you chose ‘Basic Activity’ you’ll also have the title option and the ‘menu_resource’ name). The activity name is how you’ll refer to your activities in your code, so call it something logical (good advice for coding generally) like ‘MainActivity’. Creative, I know.
The layout name meanwhile describes a file that determines the layout of an activity. This is a separate piece of code that runs in concert with the main activity code to define where elements like images and menus go and what fonts you’ll use. This is actually not Java but XML – or Extensible Markup Language if you want to impress your friends.
For anyone with a background in web development, your XML is going to work a little like HTML or a CSS style sheet. The Java code for the activity meanwhile says what the elements on the screen do when pressed etc. It’s fine to leave the default name here as ‘activity_main’. Lastly, choose a name for the menu and for the title. Pick something nice for the title, as your users will be able to see this at some points. Click next… and now you get to see your app!
Your blank, useless app… All that just to get started! You see why people give up? But really we can break it down into the following very basic steps:
  • Download and install Android Studio, making sure to include the Android SDK
  • Install Java SDK
  • Start a new project and select the basic details
So it’s really not that bad… And remember: once you’ve done all this once, you can forget about it forever and focus on the fun stuff: creating apps! Your tea is probably cold at this point, so the next very important step, is to get more.

Step 4: Making an Actual Thing

Once your app opens, you should see a directory tree on the left with all the different files and folders that make up your app and a picture of a phone displaying ‘Hello World!’ in the center. Well, hello to you as well!
(A basic app that displays ‘Hello World’ is what most new developers make first when they learn to program in a new language. Android Studio cheats though, because it does it for you!)
You might notice that the open tab (along the top) is ‘activity_main.xml’, which is what the big phone is showing on its display. You may recall that activity_main.xml is the XML code that defines the layout instructions for your main activity.
If you selected ‘Basic Activity’ when you started your project, then you’ll see a second XML file too called ‘content_main.xml’. For the most part, these two do the same thing but the ‘acitvity_main.xml’ contains the basic layout that Android Studio created for you when you selected ‘Basic Activity’. The stuff you want to edit is in content_main.xml, so open that up and don’t worry about it for now.
(If this isn’t what is open to start, then use the directory on the left to open it by choosing: app > res > content_main.xml.)

The Layout

Android Studio is not showing the XML code itself here but rather a rendering of how the layout will appear on the screen. This is a visual editor a bit like Dreamweaver for web design and it makes life a little easier for us developers.
You also have a bunch of options called ‘widgets’ down the left that you can add to your app. This is your basic app stuff; so for instance, if you want to add a button saying ‘OK’ to your activity, you can simply drag it over to the screen and drop it anywhere you like. Go ahead and dump an ‘OK’ button right underneath the ‘Hello World’.
Something else you’ll find is that you can click on either of these elements in order to change the text and the ‘ID’. The ID is how you’re refer to each element (called a ‘view’) in your Java code, while the text is of course what you display to the user.
Delete the ‘Hello World’ widget (or view) and change the text on the button to ‘Hello?’. Likewise, change the ‘id’ on the button to ‘button1’.
I am now stealthily getting you to write a little program… Notice as well that when you select a view, you get options in the bottom right to change the text color and size etc. You can play around with these variables if you like to change the look of your button. We’re coming back here in a minute though so make a mental note!
java-rev1a-video-thumbnailSee also: Java tutorial for beginners12 Now open up your MainActivity.java. The tab will be along the top but in case it isn’t, find it under: App > Java.
This is the code that defines the behavior of your app. At this stage, you’re going to add in a little passage of code:
publicvoidbuttonOnClick(View v){
Button button1 = (Button) v;
((Button) v).setText("Hello!");
}

This is going to go right underneath the first lone closed bracket ‘}’, just before the “@Override, Public Boolean”. It should look like this:
Android Code Snippet
What does it all mean? Well basically, anything following “void buttonOnClick” will be carried out when someone clicks on the button. We’re then finding the button with the “Button button1 = (Button) v;” code and then changing the text.
Yes, there are other ways you could achieve the same thing but I feel like this keeps it nice and simple and thus easy to understand. Spend some time reading it and try to get your head around what is doing what…
At the top of the page is the word ‘import…’. Click on that to expand it and make sure that somewhere there is the line: “import android.widget.Button;”. It should have appeared on its own when you typed out the last bit (Android Studio is smart like that) but you can add it yourself if it didn’t.
Import Button View
(Notice as we type that lines end in “;”. This is basic Java formatting and if you forget one, it will throw up an error. Get used to searching around for them!)
Now go back to your content_main.xml and click on the button. In the right corner, where you have your parameters for the button, you should be able to find an option called ‘onClick’. Click on this and then select the ‘onClick’ line of code you just wrote from the drop down menu. What you’ve just done, is told Android Studio that you want to associate the section of code with the button you created (because you’ll have lots of buttons in future).
Onclick Event
Now all that’s left to do is run the app you just made. Simple go to ‘run’ along the top and then select ‘run app’ from the drop down menu. You should already have your AVD (Android Virtual Device) installed but if not, you can go to: tools > Android > AVD Manager > + Create Virtual Device. Don’t forget you also need to install an Android version onto the device.
Basic hello appFollow the steps to launch the emulator running your app. Be patient, it can sometimes take an age to load up… If it never loads up, you can consider ‘packaging’ the app in order to create an APK. Drag this onto your Android device and double click on it to install and run it.
Once it’s finally up and running you can have a go with this fun, fun app. What you should find is that when you click the button, the text from ‘Hello?’ to ‘Hello!’. We’re going to be rich…
(If it doesn’t work… something has gone wrong. It wasn’t me, my one works! Look for red text in your code and hover your mouse over it to get suggestions from Android Studio.)

Step 5: How to Get Better At App Development

Okay, so that was a lie. We’re probably not going to be rich. At the moment the app we’ve made is pretty lame. You can try and sell it sure but you probably won’t get that many good reviews.
The reason I talked you through this basic app creation though is because it teaches you the very fundamentals of programming. You have an action and a reaction – pressing on a button does something. Throw in some variables and some math, add some pretty images and a useful function and that’s genuinely enough to make a very basic app.
So where do we go from here? There’s so much more to learn: we haven’t looked at the Android Manifest yet, we haven’t talked about your private keysign (or how fun it is when you lose that) and we haven’t even studied the Android app ‘lifecycle’ (nothing to do with The Lion King). There’s issues with supporting different screen sizes and there’s just so much more to learn.
Unfortunately, it would take an entire book to teach you the entirety of Android app development. So that’s a good place to start: buy a book!
But more important is just to play around and try things. Don’t set out to make your world-changing app on day one. Instead, focus on making something simple and straightforward and then build on that. Try changing the layout of the text and try adding in more buttons and more rules to make your app actually useful.
Eventually, you’ll find there’s something you want to do that you can’t figure out on your own. Maybe you want a sound to play when someone clicks on your button, for example. This is where the real learning starts. Now all you need to do is search in Google: “How to play sound onClick Android”
You’ll find a bunch of complicated answers but eventually someone, probably on Stack Overflow, will break down the answer simply for you. Then what you do is you copy that code and you paste it into your app, making a few changes as you go.
Likewise, try out some of the code samples available through Android studio. See how they work, try changing things and just experiment. Things will go wrong and error messages will come up but for the most part, if you just follow the instructions, it’s easy enough to handle. Don’t panic! And that’s pretty much how you learn to make apps. A lot of it boils down to reverse engineering and copying and pasting. Once you have the main program in place, the rest you pick up as you go.
If you want the absolute easiest way to start, then just find some sample code that’s close to what you make and change it. No one is going to be able to explain all this to you in a way that makes any sense and if you worry about not grasping everything to begin with, you’ll never get anywhere.
So instead, dive in, get your hands dirty and learn on the job. It’s complicated and it’s frustrating but ultimately it’s highly rewarding and more than worth the initial effort.

Linux and Unix Port Scanning With netcat [nc] Command

$
0
0
http://www.cyberciti.biz/faq/linux-port-scanning

How do I find out which ports are opened on my own server? How do I run port scanning using the nc command instead of the nmap command on a Linux or Unix-like systems?

The nmap (“Network Mapper”) is an open source tool for network exploration and security auditing. If nmap is not installed and you do not wish to use all of nmap options you can use netcat/nc command for scanning ports. This may useful to know which ports are open and running services on a target machine. You can use nmap command for port scanning too.

How do I use nc to scan Linux, UNIX and Windows server port scanning?

If nmap is not installed try nc / netcat command as follow. The -z flag can be used to tell nc to report open ports, rather than initiate a connection. Run nc command with -z flag. You need to specify host name / ip along with the port range to limit and speedup operation:
## syntax ##
nc -z -v {host-name-here}{port-range-here}
nc -z -v host-name-here ssh
nc -z -v host-name-here 22
nc -w1 -z -v server-name-here port-Number-her
 
## scan 1 to 1023 ports ##
nc -zv vip-1.vsnl.nixcraft.in1-1023
Sample outputs:
Connection to localhost 25 port [tcp/smtp] succeeded!
Connection to vip-1.vsnl.nixcraft.in 25 port [tcp/smtp] succeeded!
Connection to vip-1.vsnl.nixcraft.in 80 port [tcp/http] succeeded!
Connection to vip-1.vsnl.nixcraft.in 143 port [tcp/imap] succeeded!
Connection to vip-1.vsnl.nixcraft.in 199 port [tcp/smux] succeeded!
Connection to vip-1.vsnl.nixcraft.in 783 port [tcp/*] succeeded!
Connection to vip-1.vsnl.nixcraft.in 904 port [tcp/vmware-authd] succeeded!
Connection to vip-1.vsnl.nixcraft.in 993 port [tcp/imaps] succeeded!
You can scan individual port too:
 
nc -zv v.txvip1 443
nc -zv v.txvip1 80
nc -zv v.txvip1 22
nc -zv v.txvip1 21
nc -zv v.txvip1 smtp
nc -zvn v.txvip1 ftp
 
## really fast scanner with 1 timeout value ##
netcat -v -z -n -w1 v.txvip1 1-1023
 
 
Sample outputs:
Fig.01: Linux/Unix: Use Netcat to Establish and Test TCP and UDP Connections on a Server

Where,
  1. -z : Port scanning mode i.e. zero I/O mode.
  2. -v : Be verbose [use twice -vv to be more verbose].
  3. -n : Use numeric-only IP addresses i.e. do not use DNS to resolve ip addresses.
  4. -w 1 : Set time out value to 1.
More examples:
$ netcat -z -vv www.cyberciti.biz http
www.cyberciti.biz [75.126.153.206] 80 (http) open
sent 0, rcvd 0
$ netcat -z -vv google.com https
DNS fwd/rev mismatch: google.com != maa03s16-in-f2.1e100.net
DNS fwd/rev mismatch: google.com != maa03s16-in-f6.1e100.net
DNS fwd/rev mismatch: google.com != maa03s16-in-f5.1e100.net
DNS fwd/rev mismatch: google.com != maa03s16-in-f3.1e100.net
DNS fwd/rev mismatch: google.com != maa03s16-in-f8.1e100.net
DNS fwd/rev mismatch: google.com != maa03s16-in-f0.1e100.net
DNS fwd/rev mismatch: google.com != maa03s16-in-f7.1e100.net
DNS fwd/rev mismatch: google.com != maa03s16-in-f4.1e100.net
google.com [74.125.236.162] 443 (https) open
sent 0, rcvd 0
$ netcat -v -z -n -w 1 192.168.1.254 1-1023
(UNKNOWN) [192.168.1.254] 989 (ftps-data) open
(UNKNOWN) [192.168.1.254] 443 (https) open
(UNKNOWN) [192.168.1.254] 53 (domain) open
See also

A hitchhikers guide to troubleshooting linux memory usage

$
0
0
http://techarena51.com/index.php/linux-memory-usage

A hitchhikers guide to troubleshooting linux memory usage
Linux memory management has always intrigued me. While learning Linux, many concepts are confusing at first, but after a lot of reading, googling, understanding and determination, I learned that the kernel is not only efficient at memory
management but also on par with artificial intelligence in making memory distribution decisions..
This post will hopefully show you how to troubleshoot or at least find out the
amount of memory used by Linux and an application running on it. If you have any
doubts, do let me know by commenting.
Finding Linux System Memory usage
One of the simplest way to check Linux system memory usage is with the “free”
command.
Below is my “free -­m” command output.
linux memory usage
The first line shows you that my free memory is only 111MB but the trick here is to
look at the second line for free memory.
The first line calculates caches and buffers along with the used memory.
Now linux does cache data to speed up the process of loading content.
But, that cached memory is also available for a new process to use at any time and
can be freed by the kernel immediately, in case any of your processes need it.
Buffers on the other hand, store metadata like file permissions or memory location of the cached data. Since this physical memory is availble for our process to use, we can subtract this information from the used memory to give us a free memory of 305MB as seen in the figure above.
Memory caching or Page cache
Linux divides memory into blocks called pages and hence the term page cache.
I will be using page cache from now on, but don’t get confused just replace page with memory if you do.
How page cache works.
Any time you do a read() from a file on disk, that data is read into memory, and
goes into the page cache. After this read() completes, the kernel has the option to
discard the page, since it is not being used. However, if you do a second read of
the same area in a file, the data will be read directly out of memory and no trip to
the disk will be taken. This is an incredible speedup.  And is the reason why Linux
uses its page cache so extensively, is because it knows that once you access a
page on disk the first time, you will surely access it again.
Similarly when you save data to a file it is not immediately written to the disk, it is
cached and written periodically to reduce I/O. The name for this type of cache is
Dirty.You can see it’s output  by running “cat /proc/meminfo”.
linux memory usage
You can flush the cache with the following command.
echo 1 > /proc/sys/vm/drop_caches
To write cache to disk you can use the sync command
sync
Finding linux process memory usage 
Here is my HTOP output.
linux memory usage
You need to look at the VIRT, RSS and SHR columns to get an idea of memory
consumption.
VIRT : Stands for Virtual Memory and displays the amount of memory requested
by an application. Applications often request more memory than required, however
they may not be actually using that memory and hence we can ignore this column.
RSS : Stands for Resident Set Size and displays the amount of memory used by
the process.
SHR : Stands for  Shared memory and displays the memory shared with other
processes.
The last two columns are what we need look at  to find out how much memory our
process is using.
For simple linux applications this information should suffice for you to know which
process is taking too much of your memory. But if you need to debug advance
issues like a memory leak then you need to go a step further.
The only problem with the HTOP output is that the RSS column displays used memory as Process memory + Total shared memory, even though the process is
using only a part of the shared memory.
Let’s take an analogy to understand this better.
I am a sensible spender ( I am married :) ), so sometimes I like to carpool to work.
Let’s say it takes 4$ worth of fuel from home to office.
When I go to work alone, I spend 4$ on fuel. The next day I car pool with 3 of my
friends, we pay a dollar each on fuel. So my total expenditure for the two days
would be 5$, however RSS would display it as $8.
Therefore, in order to find the exact memory usage you can you use a tool called
ps_mem.py.
git clone https://github.com/pixelb/ps_mem.git

cd ps_mem

sudo ./ps_mem.py

linux memory usage
There you go php­fpm is hogging my memory.
Troubleshooting slow application issues in Linux.
If you look at the free output again you will see that the swap memory is used even
though we have ram free
linux memory usage
The Linux kernel moves out pages which are not active or being used at the
moment to swap space on the disk. This process is known as
swappiness. Since swap space is on the hard drive fetching
data will be slower as compared to your ram, This may cause your application to take a hit in
terms of speed. You have the option to turn off swaping by changing the value in
“/proc/sys/vm/swappiness” to 0. The value ranges from 0 to 100 where 100
means aggressive swapping.
You can also build a web app to monitor Linux Memory and CPU with Flask
Update: A good tip from karthik in comments
“I would recommend 1 more step, before changing the swappiness value. Try “vmstat -n 1″ and check the “si”, “so” field. If “si” and “so” (stands for swapin and swapout) fields are always 0, then the system is currently not swapping. Some application, has used the swap but somehow its not cleaned the swap space. At such situation a “swapoff/swapon” command would be handy.”
Update 2: Another good tool and page cache advice from reddit user zeroshiftsl
“I would add one more section though, the slab. I recently ran into an issue where a system was consuming more and more memory over time. I thought it was a leak, but no process seemed to own any of the missing memory. Htop showed the memory as allocated but it didn’t add up in the processes. This was NOT disk cached memory. Using “slabtop“, I found that a bunch of memory was stuck in dentry and inode_cache. This memory was not being freed when dropping caches like it should, and upping the vfs_cache_pressure had no effect. Had to kill the parent process (SSH session) that created all of these to reclaim the memory.”
Update: The ps_mem.py script runs only once, you may want to run it periodically to get real time memory usage, hence I recommend you read How to display a changing output like top
I tried to keep this post as simple as possible and this data should give you enough
information to troubleshoot any memory usage issues you might face on your linux
vps or server.
If there is anything I missed please do share your experiences troubleshooting linux memory usage issues in the comments below.
https://www.kernel.org/doc/Documentation/sysctl/vm.txt
http://www.linuxhowtos.org/System/Linux%20Memory%20Management.htm
http://www.redhat.com/advice/tips/meminfo.html
http://www.thomas­krenn.com/en/wiki/Linux_Page_Cache_Basics

Practical tips for working with OpenStack

$
0
0
http://opensource.com/business/15/11/practical-tips-working-openstack

OpenStack tutorials

To build your own cloud and take advantage of the power of the open source powered OpenStack project takes dedicated resources and a good bit of learning. Due to the size of the project and the pace of development, keeping up can be difficult. The good news is that there are many resources to help, including the official documentation, a variety of OpenStack training and certification programs, as well as community-authored guides.
To help you keep up, Opensource.com puts together a list of the best how-tos, guides, tutorials, and tips every month. Here are some of our top picks for the last month.
  • First up, let's take a look at a piece from the CERN OpenStack cloud team on scheduling and disabling cells. Cells are a way of partitioning your cloud infrastructure into smaller pieces which can be controlled independently of one another. For large installations, they help make operating the cloud easier, but they also introduce some new restrictions. In this post, learn more about configuring and using cells.
  • Next, if you've been thinking about ways to make your OpenStack network work with containers, you may be interested in checking out a project called Kuryr. Kuryr works with OpenStack's Neutron networking project to provide networking capabilities to Docker containers. By working with Open Virtual Network (OVN) as a plugin backend to Neutron, your containers can talk to each other on your virtual network. Here's a look at how to get all of the pieces in this setup integrated.
  • If you've been wanting to learn how to use Ansible to manage parts of your OpenStack network, you'll be pleased to hear that several new Ansible modules specifically designed for working with OpenStack have recently been released. Learn about these new modules, what they do, and how to use them in this handy walk through.
  • Ceph is one of the most popular open source storage solutions for using OpenStack, and a new patch to the upstream Nova project makes using Ceph for taking VM snapshots easier than ever. Take a look at the underlying architecture and see just how easy it is to enable on your cloud.
  • With OpenStack's fast release cycle, being able to keep your workloads up and running through an upgrade is both critical and challenging. OpenStack's Nova has made huge strides at making live upgrades easier in recent years, and in many cases upgrades can be done without perceptible effects to end users. In this series of deep dives, learn how Nova handles live upgrades and what steps you needs to take with objects, RFC APIs, and database migrations to keep your applications up and running through an upgrade.
Itching to learn more? Check out our complete roundup of OpenStack tutorials for more great resources, including links to almost one hundred community-generated guides. Are we missing one of your favorites? Please let us know so we can consider it for our next collection.

Cipher Security: How to harden TLS and SSH

$
0
0
http://www.linuxjournal.com/content/cipher-security-how-harden-tls-and-ssh

Encryption and secure communications are critical to our life on the Internet. Without the ability to authenticate and preserve secrecy, we cannot engage in commerce, nor can we trust the words of our friends and colleagues.
It comes as some surprise then that insufficient attention has been paid in recent years to strong encryption, and many of our "secure" protocols have been easily broken. The recent Heartbleed, POODLE, CRIME and BEAST exploits put at risk our trust in our networks and in one another.
Gathered here are best-practice approaches to close known exploits and strengthen communication security. These recommendations are by no means the final word on the subject—the goal here is to draw focus upon continuing best practice.
Please note that many governments and jurisdictions have declared encryption illegal, and even where allowed, law enforcement has become increasingly desperate with growing opaque content (see the Resources section for articles on these topics). Ensure that both these techniques and the content that they protect are not overtly illegal.
This article focuses on Oracle Linux versions 5, 6 and 7 and close brethren (Red Hat, CentOS and Scientific Linux). From here forward, I refer to these platforms simply as V5, V6 and V7. Oracle's V7 runs only on the x86_64 platform, so that's this article's primary focus.
These products rightly can be considered defective, in spite of constant vendor patches. The library designers would likely argue that their place is to implement mechanism, not policy, but the resulting products are nonetheless critically flawed. Here is how to fix them.

Strong Ciphers in TLS

The Transport Layer Security (TLS) protocols emerged from the older Secure Sockets Layer (SSL) that originated in the Netscape browser and server software.
It should come as no surprise that SSL must not be used in any context for secure communications. The last version, SSLv3, was rendered completely insecure by the recent POODLE exploit. No version of SSL is safe for secure communications of any kind—the design of the protocol is fatally flawed, and no implementation of it can be secure.
TLS version 1.0 is also no longer safe. The immediate preference for secure communication is the modern TLS version 1.2 protocol, which, unfortunately, is not (yet) widely used. Despite the lack of popularity, prefer 1.2 if you value security.
Yet, even with TLS version 1.2, there still are a number of important weaknesses that must be addressed to meet current best practice as specified in RFC 7525:
  • "Implementations MUST NOT negotiate RC4 cipher suites." The RC4 cipher is enabled by default in many versions of TLS, and it must be disabled explicitly. This specific issue was previously addressed in RFC 7465.
  • "Implementations MUST NOT negotiate cipher suites offering less than 112 bits of security, including so-called 'export-level' encryption (which provide 40 or 56 bits of security)." In the days of SSL, the US government forced weak ciphers to be used in encryption products sold or given to foreign nationals. These weak "export" ciphers were created to be easily broken (with sufficient resources). They should have been removed long ago, and they recently have been used in new exploits against TLS.
  • "Implementations MUST NOT negotiate SSL version 3." This formalizes our distaste for the entire SSL suite.
  • "Implementations SHOULD NOT negotiate TLS version 1.0 (or) 1.1." Prefer TLS 1.2 whenever possible.
There are several implementations of the TLS protocols, and three competing libraries are installed on Oracle Linux systems by default: OpenSSL, NSS and GnuTLS. All of these libraries can provide Apache with TLS for HTTPS. It has been asserted that GnuTLS is of low code quality and unsafe for binary data, so exercise special care with this particular library in critical applications. This article focuses only on OpenSSL, as it is the most widely used.
For TLS cipher hardening under OpenSSL, I turn to Hynek Schlawack's Web site on the subject. He lists the following options for the SSL configuration of the Apache Web server:

SSLProtocol ALL -SSLv2 -SSLv3
SSLHonorCipherOrder On
SSLCipherSuite
ECDH+AESGCM:DH+AESGCM:ECDH+AES256:DH+AES256:ECDH+
↪AES128:DH+AES:ECDH+3DES:DH+3DES:RSA+AESGCM:
↪RSA+AES:RSA+3DES:!aNULL:!MD5:!DSS
This configuration focuses upon the Advanced Encryption Standard (AES)—also known as the Rijndael cipher (as named by the cipher's originators), with 3DES as a fallback for old browsers. Note that 3DES generally is agreed to provide 80 bits of security, and it also is quite slow. These characteristics do not meet the above criteria, but we allow the legacy Data Encryption Standard (Triple-DES) cipher to provide continued access to older browsers.
On an older V5 system (which does not implement TLS 1.1 or 1.2 in OpenSSL), the list of acceptable ciphers is relatively short:

$ cat /etc/oracle-release /etc/redhat-release
Oracle Linux Server release 5.11
Red Hat Enterprise Linux Server release 5.11 (Tikanga)

$ openssl ciphers -v
'ECDH+AESGCM:DH+AESGCM:ECDH+AES256:DH+AES256:ECDH+
↪AES128:DH+AES:ECDH+3DES:DH+3DES:RSA+AESGCM:
↪RSA+AES:RSA+3DES:!aNULL:!MD5:!DSS'
DHE-RSA-AES256-SHA SSLv3 Kx=DH Au=RSA Enc=AES(256) Mac=SHA1
DHE-RSA-AES128-SHA SSLv3 Kx=DH Au=RSA Enc=AES(128) Mac=SHA1
EDH-RSA-DES-CBC3-SHA SSLv3 Kx=DH Au=RSA Enc=3DES(168) Mac=SHA1
AES256-SHA SSLv3 Kx=RSA Au=RSA Enc=AES(256) Mac=SHA1
AES128-SHA SSLv3 Kx=RSA Au=RSA Enc=AES(128) Mac=SHA1
DES-CBC3-SHA SSLv3 Kx=RSA Au=RSA Enc=3DES(168) Mac=SHA1
Note that TLS version 1.1 introduced new defenses against CBC exploits. CBC is used above only with the 3DES cipher, which calls into question the use of 3DES with TLS version 1.0. Removing 3DES and/or enforcing a minimal protocol of TLS version 1.1 might be required if your security concerns are very grave, but this will adversely impact compatibility with older browsers. Banishing CBC on OpenSSL 0.9.8e will leave you with few working ciphers indeed.
On V7, the list of allowed ciphers is considerably longer:

$ cat /etc/oracle-release /etc/redhat-release
Oracle Linux Server release 7.1
Red Hat Enterprise Linux Server release 7.1 (Maipo)

$ openssl ciphers -v
'ECDH+AESGCM:DH+AESGCM:ECDH+AES256:DH+AES256:ECDH+
↪AES128:DH+AES:ECDH+3DES:DH+3DES:RSA+AESGCM:
↪RSA+AES:RSA+3DES:!aNULL:!MD5:!DSS'
ECDHE-RSA-AES256-GCM-SHA384 TLSv1.2 Kx=ECDH Au=RSA
↪Enc=AESGCM(256) Mac=AEAD
ECDHE-ECDSA-AES256-GCM-SHA384 TLSv1.2 Kx=ECDH Au=ECDSA
↪Enc=AESGCM(256) Mac=AEAD
ECDH-RSA-AES256-GCM-SHA384 TLSv1.2 Kx=ECDH/RSA Au=ECDH
↪Enc=AESGCM(256) Mac=AEAD
ECDH-ECDSA-AES256-GCM-SHA384 TLSv1.2 Kx=ECDH/ECDSA
↪Au=ECDH Enc=AESGCM(256) Mac=AEAD
ECDHE-RSA-AES128-GCM-SHA256 TLSv1.2 Kx=ECDH Au=RSA
↪Enc=AESGCM(128) Mac=AEAD
ECDHE-ECDSA-AES128-GCM-SHA256 TLSv1.2 Kx=ECDH Au=ECDSA
↪Enc=AESGCM(128) Mac=AEAD
ECDH-RSA-AES128-GCM-SHA256 TLSv1.2 Kx=ECDH/RSA Au=ECDH
↪Enc=AESGCM(128) Mac=AEAD
ECDH-ECDSA-AES128-GCM-SHA256 TLSv1.2 Kx=ECDH/ECDSA
↪Au=ECDH Enc=AESGCM(128) Mac=AEAD
DHE-RSA-AES256-GCM-SHA384 TLSv1.2 Kx=DH Au=RSA
↪Enc=AESGCM(256) Mac=AEAD
DHE-RSA-AES128-GCM-SHA256 TLSv1.2 Kx=DH Au=RSA
↪Enc=AESGCM(128) Mac=AEAD
ECDHE-RSA-AES256-SHA384 TLSv1.2 Kx=ECDH Au=RSA
↪Enc=AES(256) Mac=SHA384
ECDHE-ECDSA-AES256-SHA384 TLSv1.2 Kx=ECDH Au=ECDSA
↪Enc=AES(256) Mac=SHA384
ECDHE-RSA-AES256-SHA SSLv3 Kx=ECDH Au=RSA
↪Enc=AES(256) Mac=SHA1
ECDHE-ECDSA-AES256-SHA SSLv3 Kx=ECDH Au=ECDSA
↪Enc=AES(256) Mac=SHA1
ECDH-RSA-AES256-SHA384 TLSv1.2 Kx=ECDH/RSA Au=ECDH
↪Enc=AES(256) Mac=SHA384
ECDH-ECDSA-AES256-SHA384 TLSv1.2 Kx=ECDH/ECDSA
↪Au=ECDH Enc=AES(256) Mac=SHA384
ECDH-RSA-AES256-SHA SSLv3 Kx=ECDH/RSA Au=ECDH
↪Enc=AES(256) Mac=SHA1
ECDH-ECDSA-AES256-SHA SSLv3 Kx=ECDH/ECDSA Au=ECDH
↪Enc=AES(256) Mac=SHA1
DHE-RSA-AES256-SHA256 TLSv1.2 Kx=DH Au=RSA
↪Enc=AES(256) Mac=SHA256
DHE-RSA-AES256-SHA SSLv3 Kx=DH Au=RSA
↪Enc=AES(256) Mac=SHA1
ECDHE-RSA-AES128-SHA256 TLSv1.2 Kx=ECDH Au=RSA
↪Enc=AES(128) Mac=SHA256
ECDHE-ECDSA-AES128-SHA256 TLSv1.2 Kx=ECDH
↪Au=ECDSA Enc=AES(128) Mac=SHA256
ECDHE-RSA-AES128-SHA SSLv3 Kx=ECDH Au=RSA
↪Enc=AES(128) Mac=SHA1
ECDHE-ECDSA-AES128-SHA SSLv3 Kx=ECDH Au=ECDSA
↪Enc=AES(128) Mac=SHA1
ECDH-RSA-AES128-SHA256 TLSv1.2 Kx=ECDH/RSA
↪Au=ECDH Enc=AES(128) Mac=SHA256
ECDH-ECDSA-AES128-SHA256 TLSv1.2 Kx=ECDH/ECDSA
↪Au=ECDH Enc=AES(128) Mac=SHA256
ECDH-RSA-AES128-SHA SSLv3 Kx=ECDH/RSA Au=ECDH
↪Enc=AES(128) Mac=SHA1
ECDH-ECDSA-AES128-SHA SSLv3 Kx=ECDH/ECDSA
↪Au=ECDH Enc=AES(128) Mac=SHA1
DHE-RSA-AES128-SHA256 TLSv1.2 Kx=DH Au=RSA
↪Enc=AES(128) Mac=SHA256
DHE-RSA-AES128-SHA SSLv3 Kx=DH Au=RSA
↪Enc=AES(128) Mac=SHA1
ECDHE-RSA-DES-CBC3-SHA SSLv3 Kx=ECDH Au=RSA
↪Enc=3DES(168) Mac=SHA1
ECDHE-ECDSA-DES-CBC3-SHA SSLv3 Kx=ECDH Au=ECDSA
↪Enc=3DES(168) Mac=SHA1
ECDH-RSA-DES-CBC3-SHA SSLv3 Kx=ECDH/RSA Au=ECDH
↪Enc=3DES(168) Mac=SHA1
ECDH-ECDSA-DES-CBC3-SHA SSLv3 Kx=ECDH/ECDSA
↪Au=ECDH Enc=3DES(168) Mac=SHA1
EDH-RSA-DES-CBC3-SHA SSLv3 Kx=DH Au=RSA
↪Enc=3DES(168) Mac=SHA1
AES256-GCM-SHA384 TLSv1.2 Kx=RSA Au=RSA
↪Enc=AESGCM(256) Mac=AEAD
AES128-GCM-SHA256 TLSv1.2 Kx=RSA Au=RSA
↪Enc=AESGCM(128) Mac=AEAD
AES256-SHA256 TLSv1.2 Kx=RSA Au=RSA
↪Enc=AES(256) Mac=SHA256
AES256-SHA SSLv3 Kx=RSA Au=RSA
↪Enc=AES(256) Mac=SHA1
AES128-SHA256 TLSv1.2 Kx=RSA Au=RSA
↪Enc=AES(128) Mac=SHA256
AES128-SHA SSLv3 Kx=RSA Au=RSA
↪Enc=AES(128) Mac=SHA1
DES-CBC3-SHA SSLv3 Kx=RSA Au=RSA
↪Enc=3DES(168) Mac=SHA1
If possible under your release of Apache, also issue an SSLCompression Off directive. Compression should not be used with TLS because of the CRIME attack.
If you have connectivity problems with Web clients, try disabling the Cipher Order directive first. Custom HTTP clients may not fully implement the TLS negotiation, which might be solved by allowing the client to pick the cipher.
The cipher selector above also prevents any exploit of the "Logjam" (weak Diffie-Hellman primes) security flaw that recently has surfaced. If your version of Apache supports an alternate dh-prime configuration, it is recommended that you follow this procedure:

openssl dhparam -out /home/httpd/conf/dhparams.pem 2048
Then add the following line to your Apache SSL configuration:

SSLOpenSSLConfCmd DHParameters "/home/httpd/conf/dhparams.pem"
Ensure that you have appropriate permissions on your dhparams.pem file, and note that V5 does not support this configuration.
When you have applied these configuration changes to your Apache Web server, use the SSLlabs.com scan tool to rate your server (see Resources). If you are on an older V5 platform that uses the OpenSSL 0.9.8e release, the grade assigned to your server should be a "B"—your final security grade will be higher if you are on a later release.
It is also important to restart your TLS Web server for key regeneration every day, as is mentioned in the Apache changelog:
Session ticket creation uses a random key created during web server startup and recreated during restarts. No other key recreation mechanism is available currently. Therefore using session tickets without restarting the web server with an appropriate frequency (e.g. daily) compromises perfect forward secrecy.
This information is not well known, and has been met with some surprise and dismay in the security community: "You see, it turns out that generating fresh RSA keys is a bit costly. So modern web servers don't do it for every single connection. In fact, Apache mod_ssl by default will generate a single export-grade RSA key when the server starts up, and will simply re-use that key for the lifetime of that server" (from http://blog.cryptographyengineering.com/2015/03/attack-of-week-freak-or-factoring-nsa.html).
Note that Hynek Schlawack's site provides configuration instructions for nginx and HAProxy in addition to Apache. Several other applications allow a custom cipher specification—two that I mention here are stunnel and sendmail.
The stunnel "TLS shim" allows clear-text socket applications to be wrapped in TLS encryption transparently. In your stunnel configuration, specify the cipher= directive with the above string to force stunnel to best practice. Also, on the V7 platform, supply the fips=no directive; otherwise, you will be locked to the TLS version 1 protocol with the message 'sslVersion = TLSv1' is required in FIPS mode.
The sendmail transport agent has received recent patches to specify ciphers fully. You can add the following options to your sendmail.cf to force best practice ciphers:

O CipherList=ECDH+AESGCM:DH+AESGCM:ECDH+AES256:DH+
↪AES256:ECDH+AES128:DH+AES:ECDH+3DES:DH+3DES:
↪RSA+AESGCM:RSA+AES:RSA+3DES:!aNULL:!MD5:!DSS
O ServerSSLOptions=+SSL_OP_NO_SSLv2 +SSL_OP_NO_SSLv3
↪+SSL_OP_CIPHER_SERVER_PREFERENCE
O ClientSSLOptions=+SSL_OP_NO_SSLv2 +SSL_OP_NO_SSLv3
↪+SSL_OP_CIPHER_SERVER_PREFERENCE
With these settings, you will see encryption information in your mail logs:

May 12 10:17:58 myhost sendmail[1234]: STARTTLS=client,
↪relay=mymail.linuxjournal.com., version=TLSv1/SSLv3,
↪verify=FAIL, cipher=AES128-SHA, bits=128/128
May 12 10:38:28 myhost sendmail[5678]: STARTTLS=client,
↪relay=mymail.linuxjournal.com., version=TLSv1/SSLv3,
↪verify=FAIL, cipher=AES128-SHA, bits=128/128
The verify=FAIL indicates that your keys are not signed by a certificate authority (which is not as important for an SMTP server). The encryption is listed as AES128-SHA.
For a public mailserver, it is important to be more permissive with the allowed ciphers to prevent SMTP sessions from going clear text. Behind a corporate firewall, however, it is likely better to force strong TLS ciphers more rigorously.
It is also important to apply vendor patches promptly for TLS. It recently was discovered that later TLS versions were using SSLv3 padding functions directly in violation of the standards, rendering the latest versions vulnerable (this was more a concern for NSS than OpenSSL). Prompt patching is a requirement for a secure TLS configuration.
I would like to thank Hynek Schlawack for his contribution to and thoughtful commentary on TLS security.

Strong Ciphers in SSH

It is now well-known that (some) SSH sessions can be decrypted (potentially in real time) by an adversary with sufficient resources. SSH best practice has changed in the years since the protocols were developed, and what was reasonably secure in the past is now entirely unsafe.
The first concern for an SSH administrator is to disable protocol 1 as it is thoroughly broken. Despite a stream of vendor updates, older Linux releases maintain this flawed configuration, requiring the system manager to remove it by hand. Do so by ensuring "Protocol 2" appears in your sshd_config, and all reference to "Protocol 2,1" is deleted. Encouragement also is offered to remove it from client SSH applications as well, in case a server is inaccessible or otherwise overlooked.
For further hardening of Protocol 2 ciphers, I turn to the Stribika SSH Guide. These specifications are for the very latest versions of SSH and directly apply only to Oracle Linux 7.1.
For older versions of SSH, I turn to the Stribika Legacy SSH Guide, which contains relevant configuration details for Oracle Linux 5, 6 and 7.
There are only two recommended sshd_config changes for Oracle Linux 5:

Ciphers aes256-ctr,aes192-ctr,aes128-ctr
MACs hmac-ripemd160
Unfortunately, the PuTTY suite of SSH client programs for Win32 are incompatible with the MACs hmac-ripemd160 setting and will not connect to a V5 server when this configuration is implemented. As PuTTY quietly has become a corporate standard, this likely is an insurmountable incompatibility, so most enterprise deployments will implement only the Cipher directive.
Version 0.58 of PuTTY also does not implement the strong AES-CTR ciphers (these appear to have been introduced in the 0.60 release) and likewise will not connect to an SSH server where they are used exclusively. It is strongly recommended that you implement the Cipher directive, as it removes RC4 (arcfour), which is totally inappropriate for modern SSH. It is not unreasonable to expect corporate clients to run the latest versions of PuTTY, as new releases are trivially easy to install.
Oracle Linux 5 has a role of special importance as it is the underlying OS for the Linux version of the Oracle Exadata architecture (the alternate OS being Solaris). If you are an Exadata customer, confirm with Oracle that you will retain vendor support if you change cipher and protocol settings on a supported Exadata appliance.
V5's default SSH ciphers will be pruned especially hard:

$ man sshd_config | col -b | awk "/Ciphers/,/ClientAlive/"

Ciphers

Specifies the ciphers allowed for protocol version 2.
Multiple ciphers must be comma-separated. The
supported ciphers are 3des-cbc, aes128-cbc, aes192-cbc,
aes256-cbc, aes128-ctr, aes192-ctr, aes256-ctr, arcfour128,
arcfour256, arcfour, blowfish-cbc, and cast128-cbc. The
default is

aes128-ctr,aes192-ctr,aes256-ctr,arcfour256,arcfour128,
aes128-cbc,3des-cbc,blowfish-cbc,cast128-cbc,aes192-cbc,
aes256-cbc,arcfour
It is possible to install a newer version of OpenSSH on V5, but it is not easy. Attempting to compile the latest release results in the following error:

error: OpenSSL >= 0.9.8f required (have "0090802f
↪(OpenSSL 0.9.8e-fips-rhel5 01 Jul 2008)")
It is possible to compile OpenSSH without OpenSSL dependencies with the following:

--without-openssl Disable use of OpenSSL; use only
↪limited internal crypto **EXPERIMENTAL**
Enterprise deployments are likely unwilling to use experimental code, so I won't go into further details. If you obtain binary RPMs for upgrade, ensure that you know how they were produced.
Oracle Linux 7 lacks a few ciphers from the latest releases of SSH and differs only slightly from the recommended settings:

HostKey /etc/ssh/ssh_host_rsa_key
Ciphers aes256-gcm@openssh.com,aes128-gcm@openssh.com,
↪aes256-ctr,aes192-ctr,aes128-ctr
KexAlgorithms diffie-hellman-group-exchange-sha256
MACs hmac-sha2-512-etm@openssh.com,hmac-sha2-256-
↪etm@openssh.com,hmac-ripemd160-etm@openssh.com,
↪umac-128-etm@openssh.com,hmac-sha2-512,hmac-sha2-256,
↪hmac-ripemd160,umac-128@openssh.com
Oracle Linux 7.1 can be configured exactly as recommended, including the new ed25519 hostkey:

HostKey /etc/ssh/ssh_host_ed25519_key
HostKey /etc/ssh/ssh_host_rsa_key
Ciphers chacha20-poly1305@openssh.com,aes256-
↪gcm@openssh.com,aes128-gcm@openssh.com,
↪aes256-ctr,aes192-ctr,aes128-ctr
KexAlgorithms curve25519-sha256@libssh.org,diffie-
↪hellman-group-exchange-sha256
MACs hmac-sha2-512-etm@openssh.com,hmac-sha2-256-
↪etm@openssh.com,hmac-ripemd160-etm@openssh.com,
↪umac-128-etm@openssh.com,hmac-sha2-512,hmac-sha2-
↪256,hmac-ripemd160,umac-128@openssh.com
The Stribika Guide immediately dismisses the 3DES cipher, which is likely reasonable as it is slow and relatively weak, but also goes to some length to criticize the influence of NIST and the NSA. In the long view, this is not entirely fair, as the US government's influence over the field of cryptography has been largely productive. To quote cryptographer Bruce Schneier, "It took the academic community two decades to figure out that the NSA 'tweaks' actually improved the security of DES....DES did more to galvanize the field of cryptanalysis than anything else." Despite unfortunate recent events, modern secure communication has much to owe to the Data Encryption Standard and those who were involved in its introduction.
Stribika levels specific criticism:
...advising against the use of NIST elliptic curves because they are notoriously hard to implement correctly. So much so, that I wonder if it's intentional. Any simple implementation will seem to work but leak secrets through side channels. Disabling them doesn't seem to cause a problem; clients either have Curve25519 too, or they have good enough DH support. And ECDSA (or regular DSA for that matter) is just not a good algorithm, no matter what curve you use.
In any case, there is technical justification for leaving 3DES in TLS, but removing it from SSH—there is a greater financial cost when browsers and customers cannot reach you than when your administrators are inconvenienced by a software standards upgrade.
If you are using ssh-agent with a private key, you can strengthen the encryption of the password on the key using this method documented by Martin Kleppmann with PKCS#8. Here is the procedure summarized from the author:

cd ~/.ssh

mv ~/.ssh/id_rsa ~/.ssh/id_rsa.old

openssl pkcs8 -topk8 -v2 des3 -in ~/.ssh/id_rsa.old
↪-out ~/.ssh/id_rsa

chmod 600 ~/.ssh/id_rsa
The author estimates that this procedure provides the equivalent benefit of adding two extra characters to the password. It is important to note, however, that the PuTTY agent is not able to read the new format produced here. If you use pagent with PuTTY (or expect to), convert your OpenSSH key to pagent first, then run this procedure, assuming that retention of your key in both formats is allowed. It is likely wise to retain a copy of the original private key on offline media. It is also important to note that this procedure does not add any extra protection from a keylogger.
User SSH keypairs are likely superior to passwords for many aspects of security. SSH servers cannot enforce password standards on remote keys (minimum password length, change frequency, reuse prevention and so on), and there are definite risks in forwarding the ssh-agent that would compromise server security. If you allow your users to authenticate with SSH keypairs that they generate, you should understand how they can be (ab)used.
Finally, be aware that keystroke delay duration can be used as a side channel exploit in SSH via the application of the Viterbi Algorithm. Interactive SSH sessions are more revealing of content than most expect and should be avoided for those with high security requirements. Send batches of ssh commands, or implement a bandwidth "fuzzer" in a secondary session on the same channel if an interactive session is required but security is critical. Of particular note:
  • The "superuser" command (that is, su -) creates a distinct traffic signature in the encrypted data stream that reveals the exact length of the target password, plus keystroke timing. It should not be used over an SSH session.
  • If a user logs in to a remote SSH host, then uses the remote to log in to yet another host in a three-host configuration, this creates an even more distinct traffic signature in the encrypted data stream that essentially advertises the exact length of any passwords used. Avoid this practice.
  • Depending upon the cipher used, a short password (less than seven characters) can be detected at login. Enforce a minimum password length larger than seven characters, especially for SSH sessions.
I would like to thank Stribika for his contribution to and thoughtful commentary on SSH security.

Unbreakable Encryption

While the best practices above are helpful, these protocols have been entirely inadequate in assuring private communication channels, and they have been broken many times.
If your needs for secure communication are so dire that any risk of interception is too great, you likely should consider encryption tools that do not appear to have been broken as of yet.
A careful parse of recent evidence indicates that the Gnu Privacy Guard implementation of Pretty Good Privacy (PGP) continues to present insurmountable difficulty to eavesdropping and unauthorized decryption.
This utility is installed in all recent versions of Oracle Linux by default. It should be your first thought for secure communications, and you should realize that all the techniques described above are compromises for the sake of expedience.

Resources

The Heartbleed Bug: http://heartbleed.com
"Meaner POODLE bug that bypasses TLS crypto bites 10 percent of websites" by Dan Goodin: http://arstechnica.com/security/2014/12/meaner-poodle-bug-that-bypasses-tls-crypto-bites-10-percent-of-websites
CRIME ("Compression Ratio Info-leak Made Easy"): https://en.wikipedia.org/wiki/CRIME
"Beat the BEAST with TLS 1.1/1.2 and More" by Omar Santos: http://blogs.cisco.com/security/beat-the-beast-with-tls
Cypto Law Survey: http://www.cryptolaw.org
"Homeland Security Begs Silicon Valley to Stop the Encyption" by Annalee Newitz: http://gizmodo.com/dhs-secretary-begs-silicon-valley-to-stop-the-encryptio-1699273657
NIST Decprecates TLS 1.0 for Government Use by Bill Shelton: http://forums.juniper.net/t5/Security-Now/NIST-Deprecates-TLS-1-0-for-Government-Use/ba-p/242052
RFC 7525—Recommendations for Secure Use of Transport Layer Security (TLS) and Datagram Transport Layer Security (DTLS): https://www.rfc-editor.org/rfc/rfc7525.txt
RFC 7465—Prohibiting RC4 Cipher Suites: http://tools.ietf.org/html/rfc7465
OpenSSL: http://www.openssl.org
NSS: http://nss-crypto.org
The GnuTLS Transport Layer Security Library: http://gnutls.org
GnuTLS considered harmful: http://www.openldap.org/lists/openldap-devel/200802/msg00072.html
Hardening Your Web Server's SSL Ciphers—Hynek Schlawack: https://hynek.me/articles/hardening-your-web-servers-ssl-ciphers
The Logjam Attack: https://weakdh.org
SSL Labs Scan Tool: https://www.ssllabs.com
Apache changelog: http://www.apache.org/dist/httpd/CHANGES_2.4
"Attack of the week: FREAK (or 'factoring the NSA for fun and profit')" by Matthew Green: http://blog.cryptographyengineering.com/2015/03/attack-of-week-freak-or-factoring-nsa.html
"The POODLE bites again": https://www.imperialviolet.org/2014/12/08/poodleagain.html
Stribika SSH Guide: https://stribika.github.io/2015/01/04/secure-secure-shell.html
Stribika Legacy SSH Guide: https://github.com/stribika/stribika.github.io/wiki/Secure-Secure-Shell
"Saluting the data encryption legacy" by Bruce Schneier: http://www.cnet.com/news/saluting-the-data-encryption-legacy
"Improving the security of your SSH private key files" by Martin Kelppmann: http://martin.kleppmann.com/2013/05/24/improving-security-of-ssh-private-keys.html
"Timing Analysis of Keystrokes and Timing Attacks on SSH" by Dawn Xiaodong Song, David Wagner and Xuqing Tian: http://www.cs.berkeley.edu/~dawnsong/papers/ssh-timing.pdf
"The Encryption Tools the NSA Still Can't Crack Revealed in New Leaks" by Kelsey Campbell: http://gizmodo.com/the-encryption-tools-the-nsa-still-cant-crack-revealed-1675978237
"Prying Eyes: Inside the NSA's War on Internet Security" by SPIEGEL Staff: http://www.spiegel.de/international/germany/inside-the-nsa-s-war-on-internet-security-a-1010361.html
The GNU Privacy Guard: https://gnupg.org

Cleaning Linux: Jed’s Nappy /boot

$
0
0
http://freedompenguin.com/articles/how-to/cleaning-linux-jeds-nappy-boot

My home NAS machine is an Ubuntu 14.04 machine with a ZFS volume. I need the linux-headers packages in order to compile my ZFS dkms modules. Those take more space than the kernels tend to, so I try and stay on top of removing them. Wonder how many I have?
  • > dpkg-query -l linux-header* | grep 'ii ' | wc -l
  • 45
Oh. Guess I got a bit lazy there. Notice how I combine dpkg-query and grep‘ii ‘ (with a space after ‘ii’). This filters out what’s installed. However, I have kernels to boot into that I have booted yet and I need to filter out which of those actual packages are behind my present kernel and not un-install anything newer.
dpkg-query -l linux-header* | grep 'ii ' | while read k ; do  v=`echo "$k"| cut -d- -f4|cut -d'' -f1` ; [ ! -z "$v" ] && [ "$v" -lt 65 ] && echo $k|cut -d'' -f2 ; done
Now, I had to work on that one for a bit. I really did it as a one-liner but I would up-arrow and edit up-arrow and edit until I got it printing what I wanted. Let’s look at it a bit more like a shell script:
  • dpkg-query -l linux-header* \
  • | grep 'ii ' \
  • | while read k ; do \
  • v=`echo "$k" \
  • | cut -d- -f4 \
  • | cut -d'' -f1`;

  • [ ! -z "$v" ] \
  • && [ "$v" -lt 65 ] \
  • && echo $k \
  • |cut -d'' -f2
  • done
And that gives me output like:
linux-headers-3.13.0-59
linux-headers-3.13.0-59-generic
linux-headers-3.13.0-61
linux-headers-3.13.0-61-generic
linux-headers-3.13.0-62
linux-headers-3.13.0-62-generic
linux-headers-3.13.0-63
linux-headers-3.13.0-63-generic
…but much more. I’m going to uninstall these immediately by piping this to xargs dpkg -r:
dpkg-xargs
And what else do I need to remove? Well, a whole lot of installed kernels, too:
  • > dpkg-query -l linux-image* | grep 'ii ' \
  • | fgrep '3.5' | awk '{print $2}'
linux-image-3.5.0-25-generic
linux-image-3.5.0-27-generic
linux-image-3.5.0-38-generic
linux-image-extra-3.5.0-25-generic
linux-image-extra-3.5.0-27-generic
linux-image-extra-3.5.0-38-generic
And of course, we remove those by piping to xargs dpkg -r again. I will not bother you with the output of that because it’s pages of post-install grub output.
But that just leaves me with two kernels installed and I’ve cleaned up a lot of space.

Finding the right tool for the job

$
0
0
https://opensource.com/life/15/12/my-open-source-story-pete-savage

My open source story

When I was 13, our school was hooked up to the Internet—a 28.8 kbps U.S. Robotics modem was all that stood between us and the vast expanses of the Web. As I grew to understand more and more about the fundamentals of HTML and websites over the next couple of years, it seemed to me that you needed to use special tools like FrontPage or the legend that was DreamWeaver to make anything of any real merit.
FrontPage was introduced into the school the next year, but DreamWeaver was a veritable fable to me. I had never seen it and only heard about all the amazing things it could do for young web enthusiasts.
It wasn't until I opened an HTML file in a text editor and learned that there was a very definite set of rules that my view of this changed. This was when it suddenly dawned on me that although tools like FrontPage and DreamWeaver could make certain tasks easier, if I really wanted my websites to be limitless (as limitless as a 15 year old can imagine, anyway) then I should code using just a text editor.
Why? The text editor allowed me to input any of the HTML specification. No one had to support it in the editor; I could tell the website exactly what to do. Many people I knew had access to other tools, either through their parents' office suites or by other means, but I was content using notepad on a Windows machine. The funny part was that when people had issues with their fancy FrontPage sites, I could usually figure out the problem by jumping into the code for a few minutes.
Working without the fancy tools gave me a far greater understanding of the underlying technologies than my peers. The troubles that I came across, though they often slowed me down, taught me far more than I would have learned by using a wizard or template. This continued into my early career in system administration, where instead of buying expensive solutions I used open source tools to achieve my goals.
Working at a school, the budget was considerably less than in a commercial organization. This added another reason for me to be extra conservative when it came to spending. We used an open source tool for our web proxy that had many more features than the commercial offerings at the time.
In truth, open source tools do not always have the manpower to create the super-duper, fix-everything-automatically, razmatazz features of some of the commercial offerings. They don't often have the funding to be able to protect their ideas and stop people from copying them. Sometimes they are a little rough around the edges. If you ask me though, these shortfalls are also present in commercial offerings, often to a very similar degree.
I've lost count of the number of times I've been frustrated at proprietary packages precisely because I expected more from them. The difference is that in the open source world, if I find a problem I can try to fix it. I can often engage directly with the developers and ask them questions, give them use cases they had never thought of, and thank them directly for their contribution to my day job.
In my experience, open source is often thought of as the poor man's alternative to the "proper" tools. However, in all my years of working in the IT industry rarely has there been a case where using the proprietary tool has been compulsory. Most often the base feature set on the products has been the same. There have been occasions where I have had to emulate or hack my way around the lack of a feature in order to achieve the same results as a proprietary tool does. In these cases, sure, I've sometimes had to spend extra time in solving the problem, but I gained a better insight into the problem and on some occasions actually discovered a better way to solve it or have been able to develop my own solution using existing tooling.
The most important part is that then my workaround can be shared with the community so that everyone can benefit, enhance, and support this process.
I actually feel that working without the top-of-the-range tools has been more of a blessing than having endless budgets to throw at problems. Too much money on a problem can be as devastating as too little in my opinion. Decisions can change too quickly, and the drive to "make something work" becomes the drive to "find another alternative."
I've seen it happen both in my own career and in stories I've been told from friends. When recruiting, I'm far more likely to favor a candidate who has had to devise a solution by working to the strengths of the tools they have available than I am someone who simply spent X amount of revenue on product Y.
I've worked on many projects in my life so far, and almost all of them involve open source somewhere along the line. Below is a brief summary of some of the projects I worked on and the tools I used to work on projects in my own time, outside of work.
  • Photography for an event: Darktable (photo editor)
  • Writing a technical book about Git: Git (version control), LaTeX (typesetting), Geany (text editor)
  • Putting together a video for a church event: Blender (video editing)
  • Recording a video podcast: Kdenlive (video editing), Cinelerra (video editing)
  • Recording and mixing music: Ardour (multitrack recording), jack (audio subsystem), Hydrogen (drum editor), LinuxSampler (sampling software)
  • Creating a visual novel game: Python (scripting some tools), Ren'Py (visual novel engine)
So for me, though I do sometimes crave the shiny-top-of-the-line-most-expensive tool, I find that the open source alternative I choose is not necessarily the tool I wanted but is almost always the tool I needed. In the end, it is about making the smart choice, the open choice.
There's a short documentary called Default to Open, and I challenge you to watch it if you are looking for a tool to fix something or make something work.

Python Execute Unix / Linux Command Examples

$
0
0
http://www.cyberciti.biz/faq/python-execute-unix-linux-command-examples

How do I execute standard Unix or Linux shell commands using Python? Is there a command to invoke Unix commands using Python programs?


You can execute the command in a subshell using os.system(). This will call the Standard C function system(). This function will return the exit status of the process or command. This method is considered as old and not recommended, but presented here for historical reasons only. The subprocess module is recommended and it provides more powerful facilities for running command and retrieving their results.

os.system example (deprecated)

The syntax is:
 
importos
os.system("command")
 
In this example, execute the date command:
 
importos
os.system("date")
 
Sample outputs:
Sat Nov 10 00:49:23 IST 2012
0
In this example, execute the date command using os.popen() and store its output to the variable called now:
 
importos
f = os.popen('date')
now = f.read()
print"Today is ", now
 
Sample outputs:
Today is  Sat Nov 10 00:49:23 IST 2012

Say hello to subprocess

The os.system has many problems and subprocess is a much better way to executing unix command. The syntax is:
 
importsubprocess
subprocess.call("command1")
subprocess.call(["command1", "arg1", "arg2"])
 
In this example, execute the date command:
 
importsubprocess
subprocess.call("date")
 
Sample outputs:
Sat Nov 10 00:59:42 IST 2012
0
You can pass the argument using the following syntax i.e run ls -l /etc/resolv.conf command:
 
importsubprocess
subprocess.call(["ls", "-l", "/etc/resolv.conf"])
 
Sample outputs:
<-rw-r--r-- 0="" 157="" 15:06="" 1="" 7="" etc="" nov="" pre="" resolv.conf="" root="">To store output to the output variable, run:

 
importsubprocess
p = subprocess.Popen("date", stdout=subprocess.PIPE, shell=True)
(output, err) = p.communicate()
print"Today is", output
 
Sample outputs:
Today is Sat Nov 10 01:27:52 IST 2012
Another example (passing command line args):
 
importsubprocess
p = subprocess.Popen(["ls", "-l", "/etc/resolv.conf"], stdout=subprocess.PIPE)
output, err = p.communicate()
print"*** Running ls -l command ***\n", output
 
Sample outputs:
*** Running ls -l command ***
-rw-r--r-- 1 root root 157 Nov 7 15:06 /etc/resolv.conf
In this example, run ping command and display back its output:
 
importsubprocess
p = subprocess.Popen(["ping", "-c", "10", "www.cyberciti.biz"], stdout=subprocess.PIPE)
output, err = p.communicate()
print output
 
The only problem with above code is that output, err = p.communicate() will block next statement till ping is completed i.e. you will not get real time output from the ping command. So you can use the following code to get real time output:
 
importsubprocess
cmdping = "ping -c4 www.cyberciti.biz"
p = subprocess.Popen(cmdping, shell=True, stderr=subprocess.PIPE)
whileTrue:
out = p.stderr.read(1)
if out == ''and p.poll() != None:
break
if out != '':
sys.stdout.write(out)
sys.stdout.flush()
 
Sample outputs:
PING www.cyberciti.biz (75.126.153.206)56(84) bytes of data.
64 bytes from www.cyberciti.biz (75.126.153.206): icmp_req=1 ttl=55 time=307 ms
64 bytes from www.cyberciti.biz (75.126.153.206): icmp_req=2 ttl=55 time=307 ms
64 bytes from www.cyberciti.biz (75.126.153.206): icmp_req=3 ttl=55 time=308 ms
64 bytes from www.cyberciti.biz (75.126.153.206): icmp_req=4 ttl=55 time=307 ms
 
--- www.cyberciti.biz ping statistics ---
4 packets transmitted, 4 received, 0% packet loss, time 3001ms
rtt min/avg/max/mdev =307.280/307.613/308.264/0.783 ms
 

Related media

A quick video demo of above python code:
HTML 5 Video 01: Python Run External Command And Get Output On Screen or In Variable
References:
-rw-r--r-->

HowTo: Verify My NTP Working Or Not

$
0
0
http://www.cyberciti.biz/faq/linux-unix-bsd-is-ntp-client-working

I've setup an NTP (Network Time Protocol) client and/or server to manage the system clock over a network. But, how do I verify that it is working correctly?

Keeping correct time is important on a server. You can use any one of the following program to verify ntp client configuration:
  1. ntpq - standard NTP query program
  2. ntpstat - show network time synchronisation status
  3. timedatectl - show or set info about ntp using systemd

ntpstat command

The ntpstat command will report the synchronisation state of the NTP daemon running on the local machine. If the local system is found to be synchronised to a reference time source, ntpstat will report the approximate time accuracy.

exit status

You can use the exit status (return values) to verify its operations from a shell script or command line itself:
  • exit status 0 - Clock is synchronised.
  • exit status 1 - Clock is not synchronised.
  • exit status 2 - If clock state is indeterminant, for example if ntpd is not contactable.
Type the command as follows:
$ ntpstat
Sample outputs:
synchronised to NTP server (149.20.54.20) at stratum 3
time correct to within 42 ms
polling server every 1024 s
Use the echo command to display exit status of ntp client:
$ echo $?
Sample outputs:
0

ntpq command

The ntpq utility program is used to monitor NTP daemon ntpd operations and determine performance. The program can be run either in interactive mode or controlled using command line arguments. Type the following command
$ ntpq -pn
OR
$ ntpq -p
Sample outputs:
     remote           refid      st t when poll reach   delay   offset  jitter
==============================================================================
*dione.cbane.org 204.123.2.5 2 u 509 1024 377 51.661 -3.343 0.279
+ns1.your-site.c 132.236.56.252 3 u 899 1024 377 48.395 2.047 1.006
+ntp.yoinks.net 129.7.1.66 2 u 930 1024 377 0.693 1.035 0.241
LOCAL(0) .LOCL. 10 l 45 64 377 0.000 0.000 0.001
The above is an example of working ntp client. Where,
  1. -p : Print a list of the peers known to the server as well as a summary of their state.
  2. -n : Output all host addresses in dotted-quad numeric format rather than converting to the canonical host names.

A note about timedatectl command

If you are using systemd based system, run the following command to check the service status
# timedatectl status
Sample outputs:
Fig.01: Is my NTP (systemd-timesyncd) Working?

systemd-timesyncd configuration

If NTP enabled is set to No. Try configuring by editing /etc/systemd/timesyncd.conf file as follows:
# vi /etc/systemd/timesyncd.conf
Append/edit [Time] as follows i.e. add time servers or change the provided ones, uncomment the relevant line and list their host name or IP separated by a space (default from my Debian 8.x server):
[Time]
Servers=0.debian.pool.ntp.org 1.debian.pool.ntp.org 2.debian.pool.ntp.org 3.debian.pool.ntp.org
Save and close the file. Finally, start and enable it, run:
# timedatectl set-ntp true
# timedatectl status

Recommend readings:
man ntpq

Bash For Loop Examples

$
0
0
http://www.cyberciti.biz/faq/bash-for-loop

How do I use bash for loop to repeat certain task under Linux / UNIX operating system? How do I set infinite loops using for statement? How do I use three-parameter for loop control expression?

A 'for loop' is a bash programming language statement which allows code to be repeatedly executed. A for loop is classified as an iteration statement i.e. it is the repetition of a process within a bash script.

For example, you can run UNIX command or task 5 times or read and process list of files using a for loop. A for loop can be used at a shell prompt or within a shell script itself.

for loop syntax

Numeric ranges for syntax is as follows:
for VARIABLE in12345 .. N
do
command1
command2
commandN
done
OR
for VARIABLE in file1 file2 file3
do
command1 on $VARIABLE
command2
commandN
done
OR
for OUTPUT in $(Linux-Or-Unix-Command-Here)
do
command1 on $OUTPUT
command2 on $OUTPUT
commandN
done

Examples

This type of for loop is characterized by counting. The range is specified by a beginning (#1) and ending number (#5). The for loop executes a sequence of commands for each member in a list of items. A representative example in BASH is as follows to display welcome message 5 times with for loop:
#!/bin/bash
for i in12345
do
echo"Welcome $i times"
done
Sometimes you may need to set a step value (allowing one to count by two's or to count backwards for instance). Latest bash version 3.0+ has inbuilt support for setting up ranges:
#!/bin/bash
for i in{1..5}
do
echo"Welcome $i times"
done
Bash v4.0+ has inbuilt support for setting up a step value using {START..END..INCREMENT} syntax:
#!/bin/bash
echo"Bash version ${BASH_VERSION}..."
for i in{0..10..2}
do
echo"Welcome $i times"
done
Sample outputs:
Bash version 4.0.33(0)-release...
Welcome 0 times
Welcome 2 times
Welcome 4 times
Welcome 6 times
Welcome 8 times
Welcome 10 times

The seq command (outdated)

WARNING! The seq command print a sequence of numbers and it is here due to historical reasons. The following examples is only recommend for older bash version. All users (bash v3.x+) are recommended to use the above syntax.
The seq command can be used as follows. A representative example in seq is as follows:
#!/bin/bash
for i in $(seq1220)
do
echo"Welcome $i times"
done
There is no good reason to use an external command such as seq to count and increment numbers in the for loop, hence it is recommend that you avoid using seq. The builtin command are fast.

Three-expression bash for loops syntax

This type of for loop share a common heritage with the C programming language. It is characterized by a three-parameter loop control expression; consisting of an initializer (EXP1), a loop-test or condition (EXP2), and a counting expression (EXP3).
for(( EXP1; EXP2; EXP3 ))
do
command1
command2
command3
done
A representative three-expression example in bash as follows:
#!/bin/bash
for((c=1; c<=5; c++))
do
echo"Welcome $c times"
done
 
Sample output:
Welcome 1 times
Welcome 2 times
Welcome 3 times
Welcome 4 times
Welcome 5 times

How do I use for as infinite loops?

Infinite for loop can be created with empty expressions, such as:
#!/bin/bash
for(( ; ; ))
do
echo"infinite loops [ hit CTRL+C to stop]"
done

Conditional exit with break

You can do early exit with break statement inside the for loop. You can exit from within a FOR, WHILE or UNTIL loop using break. General break statement inside the for loop:
for I in12345
do
statements1 #Executed for all values of ''I'', up to a disaster-condition if any.
statements2
if(disaster-condition)
then
break#Abandon the loop.
fi
statements3 #While good and, no disaster-condition.
done
Following shell script will go though all files stored in /etc directory. The for loop will be abandon when /etc/resolv.conf file found.
#!/bin/bash
forfilein /etc/*
do
if["${file}" == "/etc/resolv.conf"]
then
countNameservers=$(grep -c nameserver /etc/resolv.conf)
echo"Total ${countNameservers} nameservers defined in ${file}"
break
fi
done

Early continuation with continue statement

To resume the next iteration of the enclosing FOR, WHILE or UNTIL loop use continue statement.
for I in12345
do
statements1 #Executed for all values of ''I'', up to a disaster-condition if any.
statements2
if(condition)
then
continue#Go to next iteration of I in the loop and skip statements3
fi
statements3
done
This script make backup of all file names specified on command line. If .bak file exists, it will skip the cp command.
#!/bin/bash
FILES="$@"
for f in$FILES
do
# if .bak backup file exists, read next file
if[ -f ${f}.bak ]
then
echo"Skiping $f file..."
continue# read next file and skip the cp command
fi
# we are here means no backup file exists, just use cpcommand to copy file
/bin/cp$f$f.bak
done

Check out related media

This tutorial is also available in a quick video format. The video shows some additional and practical examples such as converting all flac music files to mp3 format, all avi files to mp4 video format, unzipping multiple zip files or tar balls, gathering uptime information from multiple Linux/Unix servers, detecting remote web-server using domain names and much more.


Video 01: 15 Bash For Loop Examples for Linux / Unix / OS X Shell Scripting

Recommended readings:


How Do I Find The Largest Top 10 Files and Directories On a Linux / UNIX / BSD?

$
0
0
http://www.cyberciti.biz/faq/how-do-i-find-the-largest-filesdirectories-on-a-linuxunixbsd-filesystem

How do I find the largest top files and directories on a Linux or Unix like operating systems?

Sometime it is necessary to find out what file(s) or directories are eating up all your disk space. Further, it may be necessary to find out it at the particular location such as /tmp or /var or /home.
There is no simple command available to find out the largest files/directories on a Linux/UNIX/BSD filesystem. However, combination of following three commands (using pipes) you can easily find out list of largest files:
  • du command : Estimate file space usage.
  • sort command : Sort lines of text files or given input data.
  • head command : Output the first part of files i.e. to display first 10 largest file.
  • find command : Search file.
Type the following command at the shell prompt to find out top 10 largest file/directories:
# du -a /var | sort -n -r | head -n 10
Sample outputs:
1008372 /var
313236 /var/www
253964 /var/log
192544 /var/lib
152628 /var/spool
152508 /var/spool/squid
136524 /var/spool/squid/00
95736 /var/log/mrtg.log
74688 /var/log/squid
62544 /var/cache
If you want more human readable output try:
$ cd /path/to/some/where
$ du -hsx * | sort -rh | head -10

Where,
  • du command -h option : display sizes in human readable format (e.g., 1K, 234M, 2G).
  • du command -s option : show only a total for each argument (summary).
  • du command -x option : skip directories on different file systems.
  • sort command -r option : reverse the result of comparisons.
  • sort command -h option : compare human readable numbers. This is GNU sort specific option only.
  • head command -10 OR -n 10 option : show the first 10 lines.
The above command will only work of GNU/sort is installed. Other Unix like operating system should use the following version (see comments below):
 
for i in G M K; dodu -ah | grep[0-9]$i | sort -nr -k 1; done | head -n 11
 
Sample outputs:
179M .
84M ./uploads
57M ./images
51M ./images/faq
49M ./images/faq/2013
48M ./uploads/cms
37M ./videos/faq/2013/12
37M ./videos/faq/2013
37M ./videos/faq
37M ./videos
36M ./uploads/faq

Find the largest file in a directory and its subdirectories using the find command

Type the following GNU/find command:
## Warning: only works with GNU find ##
find /path/to/dir/ -printf'%s %p\n'| sort -nr | head-10
find . -printf'%s %p\n'| sort -nr | head-10
 
Sample outputs:
5700875 ./images/faq/2013/11/iftop-outputs.gif
5459671 ./videos/faq/2013/12/glances/glances.webm
5091119 ./videos/faq/2013/12/glances/glances.ogv
4706278 ./images/faq/2013/09/cyberciti.biz.linux.wallpapers_r0x1.tar.gz
3911341 ./videos/faq/2013/12/vim-exit/vim-exit.ogv
3640181 ./videos/faq/2013/12/python-subprocess/python-subprocess.webm
3571712 ./images/faq/2013/12/glances-demo-large.gif
3222684 ./videos/faq/2013/12/vim-exit/vim-exit.mp4
3198164 ./videos/faq/2013/12/python-subprocess/python-subprocess.ogv
3056537 ./images/faq/2013/08/debian-as-parent-distribution.png.bak
You can skip directories and only display files, type:
 
find /path/to/search/ -type f -printf'%s %p\n'| sort -nr | head-10
 
OR
 
find /path/to/search/ -type f -iname "*.mp4" -printf'%s %p\n'| sort -nr | head-10
 

Hunt down disk space hogs with ducks

Use the following bash shell alias:
 
aliasducks='du -cks * | sort -rn | head'
 
Run it as follows to get top 10 files/dirs eating your disk space:
$ ducks
Sample outputs:
Fig.01 Finding the largest files/directories on a Linux or Unix-like system

How to enable Software Collections (SCL) on CentOS

$
0
0
http://xmodulo.com/enable-software-collections-centos.html

Red Hat Enterprise Linux (RHEL) and its community fork, CentOS, offer 10-year life cycle, meaning that each version of RHEL/CentOS is updated with security patches for up to 10 years. While such long life cycle guarantees much needed system compatibility and reliability for enterprise users, a downside is that core applications and run-time environments grow antiquated as the underlying RHEL/CentOS version becomes close to end-of-life (EOF). For example, CentOS 6.5, whose EOL is dated to November 30th 2020, comes with python 2.6.6 and MySQL 5.1.73, which are already pretty old by today's standard.
On the other hand, attempting to manually upgrade development toolchains and run-time environments on RHEL/CentOS may potentially break your system unless all dependencies are resolved correctly. Under normal circumstances, manual upgrade is not recommended unless you know what you are doing.
The Software Collections (SCL) repository came into being to help with RHEL/CentOS users in this situation. The SCL is created to provide RHEL/CentOS users with a means to easily and safely install and use multiple (and potentially more recent) versions of applications and run-time environments "without" messing up the existing system. This is in contrast to other third party repositories which could cause conflicts among installed packages.
The latest SCL offers:
  • Python 3.3 and 2.7
  • PHP 5.4
  • Node.js 0.10
  • Ruby 1.9.3
  • Perl 5.16.3
  • MariaDB and MySQL 5.5
  • Apache httpd 2.4.6
In the rest of the tutorial, let me show you how to set up the SCL repository and how to install and enable the packages from the SCL.

Set up the Software Collections (SCL) Repository

The SCL is available on CentOS 6.5 and later. To set up the SCL, simply run:
$ sudo yum install centos-release-SCL
To enable and run applications from the SCL, you also need to install the following package.
$ sudo yum install scl-utils-build
You can browse a complete list of packages available from the SCL repository by running:
$ yum --disablerepo="*" --enablerepo="scl" list available

Install and Enable a Package from the SCL

Now that you have set up the SCL, you can go ahead and install any package from the SCL.
You can search for SCL packages with:
$ yum --disablerepo="*" --enablerepo="scl" search
Let's say you want to install python 3.3.
Go ahead and install it as usual with yum:
$ sudo yum install python33
At any time you can check the list of packages you installed from the SCL by running:
$ scl --list
python33
A nice thing about the SCL is that installing a package from the SCL does NOT overwrite any system files, and is guaranteed to not cause any conflicts with other system libraries and applications.
For example, if you check the default python version after installing python33, you will see that the default version is still the same:
$ python --version
Python 2.6.6
If you want to try an installed SCL package, you need to explicitly enable it "on a per-command basis" using scl:
$ scl enable
For example, to enable python33 package for python command:
$ scl enable python33 'python --version'
Python 3.3.2
If you want to run multiple commands while enabling python33 package, you can actually create an SCL-enabled bash session as follows.
$ scl enable python33 bash
Within this bash session, the default python will be switched to 3.3 until you type exit and kill the session.

In short, the SCL is somewhat similar to the virtualenv of Python, but is more general in that you can enable/disable SCL sessions for a far greater number of applications than just Python.
For more detailed instructions on the SCL, refer to the official quick start guide.

How to use snapshots, clones and replication in ZFS on Linux

$
0
0
https://www.howtoforge.com/tutorial/how-to-use-snapshots-clones-and-replication-in-zfs-on-linux

In the previous tutorial, we learned how to create a zpool and a ZFS filesystem or dataset. In this tutorial, I will show you step by step how to work with ZFS snapshots, clones, and replication. Snapshot, clone. and replication are the most powerful features of the ZFS filesystem.

ZFS Snapshots - an overview

Snapshot is one of the most powerfull features of ZFS, a snapshot provides a read-only, point-in-time copy of a file system or volume that does not consume extra space in the ZFS pool. The snapshot uses only space when the block references are changed. Snapshots preserve disk space by recording only the differences between the current dataset and a previous version.
A typical example use for a snapshot is to have a quick way of backing up the current state of the file system when a risky action like a software installation or a system upgrade is performed.

Creating and Destroying a ZFS Snapshot

Snapshots of volumes can not be accessed directly, but they can be cloned, backed up and rolled back to. Creating and destroying a ZFS snapshot is very easy, we can use zfs snapshot and zfs destroy commands for that.
Create a pool called datapool.
# zpool create datapool mirror /dev/sdb /dev/sdc
# zpool list
NAME       SIZE  ALLOC   FREE  EXPANDSZ   FRAG    CAP  DEDUP  HEALTH  ALTROOT
datapool  1.98G    65K  1.98G         -     0%     0%  1.00x  ONLINE  -
Now, we have a pool called datapool, next we have to create one ZFS filesystem to simulate the snapshot feature.
# zfs create datapool/docs -o mountpoint=/docs
# zfs list -r datapool
NAME            USED  AVAIL  REFER  MOUNTPOINT
datapool       93.5K  1.92G    19K  /datapool
datapool/docs    19K  1.92G    19K  /docs
To create a snapshot of the file system, we can use the zfs snapshot command by specifying the pool and the snapshot name. We can use the -r option if we want to create a snapshot recursively. The snapshot name must satisfy the following naming requirements:
filesystem@snapname
volume@snapname
# zfs snapshot datapool/docs@version1
# zfs list -t snapshot
NAME                     USED  AVAIL  REFER  MOUNTPOINT
datapool/docs@version1      0      -  19.5K  -
A snapshot for datapool/docs is created.
To destroy the snapshot, we can use zfs destroy command as usual.
# zfs destroy datapool/docs@version1
# zfs list -t snapshot
no datasets available

Rolling back a snapshot

For the simulation, we need to create a test file in the /docs directory.
# echo "version 1"> /docs/data.txt
# cat /docs/data.txt
version 1
# zfs snapshot datapool/docs@version1
# zfs list -t snapshot
NAME                     USED  AVAIL  REFER  MOUNTPOINT
datapool/docs@version1     9K      -  19.5K  -
Now we change the content of /docs/data.txt
# echo "version 2"> /docs/data.txt
# cat /docs/data.txt
version 2
We can roll back completely to an older snapshot which will give us the point in time copy at the time snapshot was taken.
# zfs list -t snapshot
NAME                     USED  AVAIL  REFER  MOUNTPOINT
datapool/docs@version1  9.50K      -  19.5K  -
# zfs rollback datapool/docs@version1
# cat /docs/data.txt
version 1
As we can see, the content of data.txt is back to the previous content.
If we want to rename the snapshot, we can use the zfs rename command.
# zfs rename datapool/docs@version1 datapool/docs@version2
# zfs list -t snapshot
NAME                     USED  AVAIL  REFER  MOUNTPOINT
datapool/docs@version2  9.50K      -  19.5K  -
Note: a dataset cannot be destroyed if snapshots of this dataset exist, but we can use the -r option to override that.
# zfs destroy datapool/docs
cannot destroy 'datapool/docs': filesystem has children
use '-r' to destroy the following datasets:
datapool/docs@version2
# zfs destroy -r datapool/docs
# zfs list -t snapshot
no datasets available

Overview of ZFS Clones

A clone is a writable volume or file system whose initial contents are the same as the dataset from which it was created.

Creating and Destroying a ZFS Clone

Clones can only be created from a snapshot and a snapshot can not be deleted until you delete the clone that is based on this snapshot. To create a clone, use the zfs clone command.
# zfs create datapool/docs -o mountpoint=/docs
# zfs list -r datapool
NAME            USED  AVAIL  REFER  MOUNTPOINT
datapool       93.5K  1.92G    19K  /datapool
datapool/docs    19K  1.92G    19K  /docs
# mkdir /docs/folder{1..5}
# ls /docs/
folder1  folder2  folder3  folder4  folder5
# zfs snapshot datapool/docs@today
# zfs list -t snapshot
NAME                  USED  AVAIL  REFER  MOUNTPOINT
datapool/docs@today      0      -    19K  -
Now we create a clone from the snapshot datapool/docs@today
# zfs clone datapool/docs@today datapool/pict
# zfs list
NAME            USED  AVAIL  REFER  MOUNTPOINT
datapool        166K  1.92G    19K  /datapool
datapool/docs    19K  1.92G    19K  /docs
datapool/pict     1K  1.92G    19K  /datapool/pict
The cloning process is finished, the snapshot datapool/docs@today has been cloned to /datapool/pict. When we check the content of the /datapool/pict directory, the content should be same than /datapool/docs.
# ls /datapool/pict
folder1  folder2  folder3  folder4  folder5
After we cloned a snapshot, the snapshot can't be deleted until you delete the dataset.
# zfs destroy datapool/docs@today
cannot destroy 'datapool/docs@today': snapshot has dependent clones
use '-R' to destroy the following datasets:
datapool/pict
# zfs destroy datapool/pict
Finally we can destroy the snapshot.
# zfs destroy datapool/docs@today
# zfs list -t snapshot
no datasets available

Overview of ZFS Replication

The basis for this ZFS replication is a snapshot, we can create a snapshot at any time, and we can create as many snapshots as we like. By continually creating, transferring, and restoring snapshots, you can provide synchronization between one or more machines. ZFS provides a built-in serialization feature that can send a stream representation of the data to standard output.

Configure ZFS Replication

In this section, I want to show you how to replicate a data set from datapool to backuppool, but it is possible to not only store the data on another pool connected to the local system but also to send it over a network to another system. The commands used for replicating data are zfs send and zfs receive.
Create another pool called backuppool.
# zpool create backuppool mirror sde sdf
# zpool list
NAME         SIZE  ALLOC   FREE  EXPANDSZ   FRAG    CAP  DEDUP  HEALTH  ALTROOT
backuppool  1.98G    50K  1.98G         -     0%     0%  1.00x  ONLINE  -
datapool    1.98G   568K  1.98G         -     0%     0%  1.00x  ONLINE  -
Check the pool status:
# zpool status
  pool: datapool
 state: ONLINE
  scan: none requested
config:

        NAME        STATE     READ WRITE CKSUM
        datapool    ONLINE       0     0     0
          mirror-0  ONLINE       0     0     0
            sdb     ONLINE       0     0     0
            sdc     ONLINE       0     0     0

errors: No known data errors
  pool: backuppool
 state: ONLINE
  scan: none requested
config:

        NAME        STATE     READ WRITE CKSUM
        backuppool    ONLINE       0     0     0
          mirror-0  ONLINE       0     0     0
            sde     ONLINE       0     0     0
            sdf     ONLINE       0     0     0

errors: No known data errors
Create a dataset that we'll replicate.
# zfs snapshot datapool/docs@today
# zfs list -t snapshot
NAME                  USED  AVAIL  REFER  MOUNTPOINT
datapool/docs@today      0      -    19K  -
# ls /docs/
folder1  folder2  folder3  folder4  folder5
It's time to do the replication.
# zfs send datapool/docs@today | zfs receive backuppool/backup
# zfs list
NAME                USED  AVAIL  REFER  MOUNTPOINT
backuppool           83K  1.92G    19K  /backuppool
backuppool/backup    19K  1.92G    19K  /backuppool/backup
datapool            527K  1.92G    19K  /datapool
datapool/docs        19K  1.92G    19K  /docs
# ls /backuppool/backup
folder1  folder2  folder3  folder4  folder5
The dataset datapool/docs@today has been successfully replicated to backuppool/backup.
To replicate a dataset to another machine, we can use the command below:
# zfs send datapool/docs@today | ssh otherserver zfs recv backuppool/backup
Done.

Conclusion

Snapshot, clone, and replication are the most powerful features of ZFS. Snapshots are used to create point-in-time copies of file systems or volumes, cloning is used to create a duplicate dataset, and replication is used to replicate a dataset from one datapool to another datapool on the same machine or to replicate datapool's between different machines.

Getting started with Docker by Dockerizing this Blog

$
0
0
http://bencane.com/2015/12/01/getting-started-with-docker-by-dockerizing-this-blog

This article covers the basic concepts of Docker and how to Dockerize an application by creating a custom Dockerfile

Docker is an interesting technology that over the past 2 years has gone from an idea, to being used by organizations all over the world to deploy applications. In today's article I am going to cover how to get started with Docker by "Dockerizing" an existing application. The application in question is actually this very blog!

What is Docker

Before we dive into learning the basics of Docker let's first understand what Docker is and why it is so popular. Docker, is an operating system container management tool that allows you to easily manage and deploy applications by making it easy to package them within operating system containers.

Containers vs. Virtual Machines

Containers may not be as familiar as virtual machines but they are another method to provide Operating System Virtualization. However, they differ quite a bit from standard virtual machines.
Standard virtual machines generally include a full Operating System, OS Packages and eventually an Application or two. This is made possible by a Hypervisor which provides hardware virtualization to the virtual machine. This allows for a single server to run many standalone operating systems as virtual guests.
Containers are similar to virtual machines in that they allow a single server to run multiple operating environments, these environments however, are not full operating systems. Containers generally only include the necessary OS Packages and Applications. They do not generally contain a full operating system or hardware virtualization. This also means that containers have a smaller overhead than traditional virtual machines.
Containers and Virtual Machines are often seen as conflicting technology, however, this is often a misunderstanding. Virtual Machines are a way to take a physical server and provide a fully functional operating environment that shares those physical resources with other virtual machines. A Container is generally used to isolate a running process within a single host to ensure that the isolated processes cannot interact with other processes within that same system. In fact containers are closer to BSD Jails and chroot'ed processes than full virtual machines.

What Docker provides on top of containers

Docker itself is not a container runtime environment; in fact Docker is actually container technology agnostic with efforts planned for Docker to support Solaris Zones and BSD Jails. What Docker provides is a method of managing, packaging, and deploying containers. While these types of functions may exist to some degree for virtual machines they traditionally have not existed for most container solutions and the ones that existed, were not as easy to use or fully featured as Docker.
Now that we know what Docker is, let's start learning how Docker works by first installing Docker and deploying a public pre-built container.

Starting with Installation

As Docker is not installed by default step 1 will be to install the Docker package; since our example system is running Ubuntu 14.0.4 we will do this using the Apt package manager.
# apt-get install docker.io
Reading package lists... Done
Building dependency tree
Reading state information... Done
The following extra packages will be installed:
aufs-tools cgroup-lite git git-man liberror-perl
Suggested packages:
btrfs-tools debootstrap lxc rinse git-daemon-run git-daemon-sysvinit git-doc
git-el git-email git-gui gitk gitweb git-arch git-bzr git-cvs git-mediawiki
git-svn
The following NEW packages will be installed:
aufs-tools cgroup-lite docker.io git git-man liberror-perl
0 upgraded, 6 newly installed, 0 to remove and 0 not upgraded.
Need to get 7,553 kB of archives.
After this operation, 46.6 MB of additional disk space will be used.
Do you want to continue? [Y/n] y
To check if any containers are running we can execute the docker command using the ps option.
# docker ps
CONTAINER ID IMAGE COMMAND CREATED STATUS PORTS NAMES
The ps function of the docker command works similar to the Linux ps command. It will show available Docker containers and their current status. Since we have not started any Docker containers yet, the command shows no running containers.

Deploying a pre-built nginx Docker container

One of my favorite features of Docker is the ability to deploy a pre-built container in the same way you would deploy a package with yum or apt-get. To explain this better let's deploy a pre-built container running the nginx web server. We can do this by executing the docker command again, however, this time with the run option.
# docker run -d nginx
Unable to find image 'nginx' locally
Pulling repository nginx
5c82215b03d1: Download complete
e2a4fb18da48: Download complete
58016a5acc80: Download complete
657abfa43d82: Download complete
dcb2fe003d16: Download complete
c79a417d7c6f: Download complete
abb90243122c: Download complete
d6137c9e2964: Download complete
85e566ddc7ef: Download complete
69f100eb42b5: Download complete
cd720b803060: Download complete
7cc81e9a118a: Download complete
The run function of the docker command tells Docker to find a specified Docker image and start a container running that image. By default, Docker containers run in the foreground, meaning when you execute docker run your shell will be bound to the container's console and the process running within the container. In order to launch this Docker container in the background I included the -d(detach) flag.
By executing docker ps again we can see the nginx container running.
# docker ps
CONTAINER ID IMAGE COMMAND CREATED STATUS PORTS NAMES
f6d31ab01fc9 nginx:latest nginx -g 'daemon off 4 seconds ago Up 3 seconds 443/tcp, 80/tcp desperate_lalande
In the above output we can see the running container desperate_lalande and that this container has been built from the nginx:latest image.

Docker Images

Images are one of Docker's key features and is similar to a virtual machine image. Like virtual machine images, a Docker image is a container that has been saved and packaged. Docker however, doesn't just stop with the ability to create images. Docker also includes the ability to distribute those images via Docker repositories which are a similar concept to package repositories. This is what gives Docker the ability to deploy an image like you would deploy a package with yum. To get a better understanding of how this works let's look back at the output of the docker run execution.
# docker run -d nginx
Unable to find image 'nginx' locally
The first message we see is that docker could not find an image named nginx locally. The reason we see this message is that when we executed docker run we told Docker to startup a container, a container based on an image named nginx. Since Docker is starting a container based on a specified image it needs to first find that image. Before checking any remote repository Docker first checks locally to see if there is a local image with the specified name.
Since this system is brand new there is no Docker image with the name nginx, which means Docker will need to download it from a Docker repository.
Pulling repository nginx
5c82215b03d1: Download complete
e2a4fb18da48: Download complete
58016a5acc80: Download complete
657abfa43d82: Download complete
dcb2fe003d16: Download complete
c79a417d7c6f: Download complete
abb90243122c: Download complete
d6137c9e2964: Download complete
85e566ddc7ef: Download complete
69f100eb42b5: Download complete
cd720b803060: Download complete
7cc81e9a118a: Download complete
This is exactly what the second part of the output is showing us. By default, Docker uses the Docker Hub repository, which is a repository service that Docker (the company) runs.
Like GitHub, Docker Hub is free for public repositories but requires a subscription for private repositories. It is possible however, to deploy your own Docker repository, in fact it is as easy as docker run registry. For this article we will not be deploying a custom registry service.

Stopping and Removing the Container

Before moving on to building a custom Docker container let's first clean up our Docker environment. We will do this by stopping the container from earlier and removing it.
To start a container we executed docker with the run option, in order to stop this same container we simply need to execute the docker with the kill option specifying the container name.
# docker kill desperate_lalande
desperate_lalande
If we execute docker ps again we will see that the container is no longer running.
# docker ps
CONTAINER ID IMAGE COMMAND CREATED STATUS PORTS NAMES
However, at this point we have only stopped the container; while it may no longer be running it still exists. By default, docker ps will only show running containers, if we add the -a(all) flag it will show all containers running or not.
# docker ps -a
CONTAINER ID IMAGE COMMAND CREATED STATUS PORTS NAMES
f6d31ab01fc9 5c82215b03d1 nginx -g 'daemon off 4 weeks ago Exited (-1) About a minute ago desperate_lalande
In order to fully remove the container we can use the docker command with the rm option.
# docker rm desperate_lalande
desperate_lalande
While this container has been removed; we still have a nginx image available. If we were to re-run docker run -d nginx again the container would be started without having to fetch the nginx image again. This is because Docker already has a saved copy on our local system.
To see a full list of local images we can simply run the docker command with the images option.
# docker images
REPOSITORY TAG IMAGE ID CREATED VIRTUAL SIZE
nginx latest 9fab4090484a 5 days ago 132.8 MB

Building our own custom image

At this point we have used a few basic Docker commands to start, stop and remove a common pre-built image. In order to "Dockerize" this blog however, we are going to have to build our own Docker image and that means creating a Dockerfile.
With most virtual machine environments if you wish to create an image of a machine you need to first create a new virtual machine, install the OS, install the application and then finally convert it to a template or image. With Docker however, these steps are automated via a Dockerfile. A Dockerfile is a way of providing build instructions to Docker for the creation of a custom image. In this section we are going to build a custom Dockerfile that can be used to deploy this blog.

Understanding the Application

Before we can jump into creating a Dockerfile we first need to understand what is required to deploy this blog.
The blog itself is actually static HTML pages generated by a custom static site generator that I wrote named; hamerkop. The generator is very simple and more about getting the job done for this blog specifically. All the code and source files for this blog are available via a public GitHub repository. In order to deploy this blog we simply need to grab the contents of the GitHub repository, install Python along with some Python modules and execute the hamerkop application. To serve the generated content we will use nginx; which means we will also need nginx to be installed.
So far this should be a pretty simple Dockerfile, but it will show us quite a bit of the Dockerfile Syntax. To get started we can clone the GitHub repository and creating a Dockerfile with our favorite editor; vi in my case.
# git clone https://github.com/madflojo/blog.git
Cloning into 'blog'...
remote: Counting objects: 622, done.
remote: Total 622 (delta 0), reused 0 (delta 0), pack-reused 622
Receiving objects: 100% (622/622), 14.80 MiB | 1.06 MiB/s, done.
Resolving deltas: 100% (242/242), done.
Checking connectivity... done.
# cd blog/
# vi Dockerfile

FROM - Inheriting a Docker image

The first instruction of a Dockerfile is the FROM instruction. This is used to specify an existing Docker image to use as our base image. This basically provides us with a way to inherit another Docker image. In this case we will be starting with the same nginx image we were using before, if we wanted to start with a blank slate we could use the Ubuntu Docker image by specifying ubuntu:latest.
## Dockerfile that generates an instance of http://bencane.com

FROM nginx:latest
MAINTAINER Benjamin Cane
In addition to the FROM instruction, I also included a MAINTAINER instruction which is used to show the Author of the Dockerfile.
As Docker supports using # as a comment marker, I will be using this syntax quite a bit to explain the sections of this Dockerfile.

Running a test build

Since we inherited the nginx Docker image our current Dockerfile also inherited all the instructions within the Dockerfile used to build that nginx image. What this means is even at this point we are able to build a Docker image from this Dockerfile and run a container from that image. The resulting image will essentially be the same as the nginx image but we will run through a build of this Dockerfile now and a few more times as we go to help explain the Docker build process.
In order to start the build from a Dockerfile we can simply execute the docker command with the build option.
# docker build -t blog /root/blog 
Sending build context to Docker daemon 23.6 MB
Sending build context to Docker daemon
Step 0 : FROM nginx:latest
---> 9fab4090484a
Step 1 : MAINTAINER Benjamin Cane
---> Running in c97f36450343
---> 60a44f78d194
Removing intermediate container c97f36450343
Successfully built 60a44f78d194
In the above example I used the -t(tag) flag to "tag" the image as "blog". This essentially allows us to name the image, without specifying a tag the image would only be callable via an Image ID that Docker assigns. In this case the Image ID is 60a44f78d194 which we can see from the docker command's build success message.
In addition to the -t flag, I also specified the directory /root/blog. This directory is the "build directory", which is the directory that contains the Dockerfile and any other files necessary to build this container.
Now that we have run through a successful build, let's start customizing this image.

Using RUN to execute apt-get

The static site generator used to generate the HTML pages is written in Python and because of this the first custom task we should perform within this Dockerfile is to install Python. To install the Python package we will use the Apt package manager. This means we will need to specify within the Dockerfile that apt-get update and apt-get install python-dev are executed; we can do this with the RUN instruction.
## Dockerfile that generates an instance of http://bencane.com

FROM nginx:latest
MAINTAINER Benjamin Cane

## Install python and pip
RUN apt-get update
RUN apt-get install -y python-dev python-pip
In the above we are simply using the RUN instruction to tell Docker that when it builds this image it will need to execute the specified apt-get commands. The interesting part of this is that these commands are only executed within the context of this container. What this means is even though python-dev and python-pip are being installed within the container, they are not being installed for the host itself. Or to put it simplier, within the container the pip command will execute, outside the container, the pip command does not exist.
It is also important to note that the Docker build process does not accept user input during the build. This means that any commands being executed by the RUN instruction must complete without user input. This adds a bit of complexity to the build process as many applications require user input during installation. For our example, none of the commands executed by RUN require user input.

Installing Python modules

With Python installed we now need to install some Python modules. To do this outside of Docker, we would generally use the pip command and reference a file within the blog's Git repository named requirements.txt. In an earlier step we used the git command to "clone" the blog's GitHub repository to the /root/blog directory; this directory also happens to be the directory that we have created the Dockerfile. This is important as it means the contents of the Git repository are accessible to Docker during the build process.
When executing a build, Docker will set the context of the build to the specified "build directory". This means that any files within that directory and below can be used during the build process, files outside of that directory (outside of the build context), are inaccessible.
In order to install the required Python modules we will need to copy the requirements.txt file from the build directory into the container. We can do this using the COPY instruction within the Dockerfile.
## Dockerfile that generates an instance of http://bencane.com

FROM nginx:latest
MAINTAINER Benjamin Cane

## Install python and pip
RUN apt-get update
RUN apt-get install -y python-dev python-pip

## Create a directory for required files
RUN mkdir -p /build/

## Add requirements file and run pip
COPY requirements.txt /build/
RUN pip install -r /build/requirements.txt
Within the Dockerfile we added 3 instructions. The first instruction uses RUN to create a /build/ directory within the container. This directory will be used to copy any application files needed to generate the static HTML pages. The second instruction is the COPY instruction which copies the requirements.txt file from the "build directory" (/root/blog) into the /build directory within the container. The third is using the RUN instruction to execute the pip command; installing all the modules specified within the requirements.txt file.
COPY is an important instruction to understand when building custom images. Without specifically copying the file within the Dockerfile this Docker image would not contain the requirements.txt file. With Docker containers everything is isolated, unless specifically executed within a Dockerfile a container is not likely to include required dependencies.

Re-running a build

Now that we have a few customization tasks for Docker to perform let's try another build of the blog image again.
# docker build -t blog /root/blog
Sending build context to Docker daemon 19.52 MB
Sending build context to Docker daemon
Step 0 : FROM nginx:latest
---> 9fab4090484a
Step 1 : MAINTAINER Benjamin Cane
---> Using cache
---> 8e0f1899d1eb
Step 2 : RUN apt-get update
---> Using cache
---> 78b36ef1a1a2
Step 3 : RUN apt-get install -y python-dev python-pip
---> Using cache
---> ef4f9382658a
Step 4 : RUN mkdir -p /build/
---> Running in bde05cf1e8fe
---> f4b66e09fa61
Removing intermediate container bde05cf1e8fe
Step 5 : COPY requirements.txt /build/
---> cef11c3fb97c
Removing intermediate container 9aa8ff43f4b0
Step 6 : RUN pip install -r /build/requirements.txt
---> Running in c50b15ddd8b1
Downloading/unpacking jinja2 (from -r /build/requirements.txt (line 1))
Downloading/unpacking PyYaml (from -r /build/requirements.txt (line 2))

Successfully installed jinja2 PyYaml mistune markdown MarkupSafe
Cleaning up...
---> abab55c20962
Removing intermediate container c50b15ddd8b1
Successfully built abab55c20962
From the above build output we can see the build was successful, but we can also see another interesting message; ---> Using cache. What this message is telling us is that Docker was able to use its build cache during the build of this image.

Docker build cache

When Docker is building an image, it doesn't just build a single image; it actually builds multiple images throughout the build processes. In fact we can see from the above output that after each "Step" Docker is creating a new image.
 Step 5 : COPY requirements.txt /build/
---> cef11c3fb97c
The last line from the above snippet is actually Docker informing us of the creating of a new image, it does this by printing the Image ID; cef11c3fb97c. The useful thing about this approach is that Docker is able to use these images as cache during subsequent builds of the blog image. This is useful because it allows Docker to speed up the build process for new builds of the same container. If we look at the example above we can actually see that rather than installing the python-dev and python-pip packages again, Docker was able to use a cached image. However, since Docker was unable to find a build that executed the mkdir command, each subsequent step was executed.
The Docker build cache is a bit of a gift and a curse; the reason for this is that the decision to use cache or to rerun the instruction is made within a very narrow scope. For example, if there was a change to the requirements.txt file Docker would detect this change during the build and start fresh from that point forward. It does this because it can view the contents of the requirements.txt file. The execution of the apt-get commands however, are another story. If the Apt repository that provides the Python packages were to contain a newer version of the python-pip package; Docker would not be able to detect the change and would simply use the build cache. This means that an older package may be installed. While this may not be a major issue for the python-pip package it could be a problem if the installation was caching a package with a known vulnerability.
For this reason it is useful to periodically rebuild the image without using Docker's cache. To do this you can simply specify --no-cache=True when executing a Docker build.

Deploying the rest of the blog

With the Python packages and modules installed this leaves us at the point of copying the required application files and running the hamerkop application. To do this we will simply use more COPY and RUN instructions.
## Dockerfile that generates an instance of http://bencane.com

FROM nginx:latest
MAINTAINER Benjamin Cane

## Install python and pip
RUN apt-get update
RUN apt-get install -y python-dev python-pip

## Create a directory for required files
RUN mkdir -p /build/

## Add requirements file and run pip
COPY requirements.txt /build/
RUN pip install -r /build/requirements.txt

## Add blog code nd required files
COPY static /build/static
COPY templates /build/templates
COPY hamerkop /build/
COPY config.yml /build/
COPY articles /build/articles

## Run Generator
RUN /build/hamerkop -c /build/config.yml
Now that we have the rest of the build instructions, let's run through another build and verify that the image builds successfully.
# docker build -t blog /root/blog/
Sending build context to Docker daemon 19.52 MB
Sending build context to Docker daemon
Step 0 : FROM nginx:latest
---> 9fab4090484a
Step 1 : MAINTAINER Benjamin Cane
---> Using cache
---> 8e0f1899d1eb
Step 2 : RUN apt-get update
---> Using cache
---> 78b36ef1a1a2
Step 3 : RUN apt-get install -y python-dev python-pip
---> Using cache
---> ef4f9382658a
Step 4 : RUN mkdir -p /build/
---> Using cache
---> f4b66e09fa61
Step 5 : COPY requirements.txt /build/
---> Using cache
---> cef11c3fb97c
Step 6 : RUN pip install -r /build/requirements.txt
---> Using cache
---> abab55c20962
Step 7 : COPY static /build/static
---> 15cb91531038
Removing intermediate container d478b42b7906
Step 8 : COPY templates /build/templates
---> ecded5d1a52e
Removing intermediate container ac2390607e9f
Step 9 : COPY hamerkop /build/
---> 59efd1ca1771
Removing intermediate container b5fbf7e817b7
Step 10 : COPY config.yml /build/
---> bfa3db6c05b7
Removing intermediate container 1aebef300933
Step 11 : COPY articles /build/articles
---> 6b61cc9dde27
Removing intermediate container be78d0eb1213
Step 12 : RUN /build/hamerkop -c /build/config.yml
---> Running in fbc0b5e574c5
Successfully created file /usr/share/nginx/html//2011/06/25/checking-the-number-of-lwp-threads-in-linux
Successfully created file /usr/share/nginx/html//2011/06/checking-the-number-of-lwp-threads-in-linux

Successfully created file /usr/share/nginx/html//archive.html
Successfully created file /usr/share/nginx/html//sitemap.xml
---> 3b25263113e1
Removing intermediate container fbc0b5e574c5
Successfully built 3b25263113e1

Running a custom container

With a successful build we can now start our custom container by running the docker command with the run option, similar to how we started the nginx container earlier.
# docker run -d -p 80:80 --name=blog blog
5f6c7a2217dcdc0da8af05225c4d1294e3e6bb28a41ea898a1c63fb821989ba1
Once again the -d(detach) flag was used to tell Docker to run the container in the background. However, there are also two new flags. The first new flag is --name, which is used to give the container a user specified name. In the earlier example we did not specify a name and because of that Docker randomly generated one. The second new flag is -p, this flag allows users to map a port from the host machine to a port within the container.
The base nginx image we used exposes port 80 for the HTTP service. By default, ports bound within a Docker container are not bound on the host system as a whole. In order for external systems to access ports exposed within a container the ports must be mapped from a host port to a container port using the -p flag. The command above maps port 80 from the host, to port 80 within the container. If we wished to map port 8080 from the host, to port 80 within the container we could do so by specifying the ports in the following syntax -p 8080:80.
From the above command it appears that our container was started successfully, we can verify this by executing docker ps.
# docker ps
CONTAINER ID IMAGE COMMAND CREATED STATUS PORTS NAMES
d264c7ef92bd blog:latest nginx -g 'daemon off 3 seconds ago Up 3 seconds 443/tcp, 0.0.0.0:80->80/tcp blog

Wrapping up

At this point we now have a running custom Docker container. While we touched on a few Dockerfile instructions within this article we have yet to discuss all the instructions. For a full list of Dockerfile instructions you can checkout Docker's reference page, which explains the instructions very well.
Another good resource is their Dockerfile Best Practices page which contains quite a few best practices for building custom Dockerfiles. Some of these tips are very useful such as strategically ordering the commands within the Dockerfile. In the above examples our Dockerfile has the COPY instruction for the articles directory as the last COPY instruction. The reason for this is that the articles directory will change quite often. It's best to put instructions that will change oftenat the lowest point possible within the Dockerfile to optimize steps that can be cached.
In this article we covered how to start a pre-built container and how to build, then deploy a custom container. While there is quite a bit to learn about Docker this article should give you a good idea on how to get started. Of course, as always if you think there is anything that should be added drop it in the comments below.

World’s Fastest Password Cracking Tool Hashcat Is Now Open Source

$
0
0
http://fossbytes.com/worlds-fastest-password-cracking-tool-is-now-open-source
hashcat3Short Bytes: The world’s fastest cracking tool Hashcat is now open source. The company has called it a very important step and listed out the reasons that inspired them to take this step.
If you are into password cracking, you might be aware of the fact that Hashcat is one of the most popular CPU-password recovery tools that is available for free. Hashcat is known for its speed and versatile nature to crack multiple types of hashes.Now, going one step ahead, Hashcat has taken an important step of making Hashcat and oclHashcat open source. Hashcat is a CPU-based password recovery tool and oclHashcat is a GPU-accelerated tool.
In its latest blog post, Hashcat mentions the reasons behind this step. Whenever any software decides to go open source, the license matters the most. Hashcat used the MIT license, that allowed an easy integration or packaging of the common Linux distros, along with packages for Kali Linux.
Due to the adoption of open source path, now it’ll be easier to integrate external libraries in Hashcat. At the moment, hashcat/oclHashcat doesn’t need any external libraries, but if the need arises, now you’ve got the option.
Get Cyber Security Developer Course Bundle at fossBytes store.
Mentioning another major improvement, Hashcat writes that before going open source, there was no native support for OS X as Apple doesn’t support “offline” compiling of the kernel code. With open source license, now you can easily compile the kernels using Apple OpenCL Runtime JIT.
According to the company, another inspiration for going open source was the implementation of bitsliced DES GPU kernels.
Hashcat offers multiple types of attack modes. Take a look:
  • Brute-Force attack
  • Combinator attack
  • Dictionary attack
  • Fingerprint attack
  • Hybrid attack
  • Mask attack
  • Permutation attack
  • Rule-based attack
  • Table-Lookup attack
  • Toggle-Case attack
  • PRINCE attack
Here’s the GitHub link: https://github.com/hashcat/
Willing to know more, visit the Hashcat website.
Download our Google chrome, Mozilla firefox and Opera extension to get instant updates -
Viewing all 1406 articles
Browse latest View live