Quantcast
Channel: Sameh Attia
Viewing all 1409 articles
Browse latest View live

OS.js Is A New Javascript Based Open Source Operating System Running In Your Browser

$
0
0
http://fossbytes.com/os-js-is-a-new-open-source-javascript-based-operating-system-running-on-your-browser

os.js javascript browser open source
Image | fossBytes
Short Bytes: OS.js is a free and open source operating system that runs in your web browser. Based on Javascript, this operating system comes with a fully-fledged window manager, ability to install applications, access to virtual filesystems and a lot more. Read more to know about the OS in detail.
Did you ever wish to use an operating system that ran just like a website inside your web browser? OS.js, a JavaScript-based open source operating system designed for the cloud, is here to provide you this facility.
On its website, OS.js describes itself as a Javascript web desktop implementation for you browser. As a preconceived notion, you might assume that a browser-based operating system won’t be of any use as it would lack some basic functionalities. However, OS.js is here to surprise you. This browser-based OS comes with a fully-fledged window manager, GUI toolkits, filesystem abstraction, and Application APIs.
The simple and neat homepage of the operating system has many complex things going in the backyard. Using drag and drop, multitasking is a smooth process.
OS.js comes with a range of applications to help you write, paint, listen to music and watch videos, play a couple of games, use the calculator, and write emails. Adding new applications through repositories is always an option in OS.js with extra applications like PDF viewer, XMPP Chat, Google Mail, Google Contacts, Tetris, and Wolfenstein3D.
os.js open source javascript os
Oh, and also it just takes 3-4 seconds to load.
OS.js is completely free and open source. This means you can add your own contributions and customize it according to your need.  Using the Virtual Filesystem, uploading, downloading, and modifying files using Google Drive, Dropbox, and OneDrive is made possible. The operating system also comes with support for Google API Javascript, and Windows Live API.
Watch the demo video below:
This operating system works in any modern browser and all platforms.
To know more about the OS and for using it right now, visit their website – OS.js

Evade monitoring by IP spoofing in Kali Linux with torsocks

$
0
0
http://www.blackmoreops.com/2015/12/28/ip-spoofing-in-kali-linux-with-torsocks

torsocks allows you to use most applications in a safe way with TOR. It ensures that DNS requests are handled safely and explicitly rejects any traffic other than TCP from the application you’re using. In this post we will cover IP spoofing in Kali Linux with torsocks which will allow users to connect to certain services that is banned to them. torsocks is an ELF shared library that is loaded before all others. The library overrides every needed Internet communication libc function calls such as connect() or gethostbyname().
This process is transparent to the user and if torsocks detects any communication that can’t go through the Tor network such as UDP traffic, for instance, the connection is denied. If, for any reason, there is no way for torsocks to provide the Tor anonymity guarantee to your application, torsocks will force the application to quit and stop everything.  In this article I will guide you to IP spoofing in Kali using torsocks.
Many applications do not directly support the use of SOCKS proxy. torsocks enables such applications to use the tor SOCKS proxy.
Shell wrapper to simplify the use of the torsocks library to transparently allow an application to use a SOCKS proxy.

Installation

torsocks gets installed along with the tor package on Kali Linux or Ubuntu for example:
root@kali:~# apt-get install tor
(or)
user@ubuntu:~$ apt-get install tor
IP spoofing in Kali Linux with torsocks - blackMORE Ops - 1

Building from source code

Requirements

  • autoconf
  • automake
  • libtool
  • gcc

Installation

./configure
make
sudo make install
If you are compiling it from the git repository, run ./autogen.sh before the configure script.

Using torsocks

Now all network connections s made by the telnet programs shall be routed through the tor proxy. There was many ways to get Public IP from Linux Terminal. To see the proxy effect try opening the the URL http://icanhazip.com/ through curl. The URL echos the public IP of the requesting user. Without proxy it would look something like this:
root@kali:~# curl icanhazip.com
123.123.93.36
root@kali:~#
IP spoofing in Kali Linux with torsocks - blackMORE Ops - 2
That means my Public IP address is 123.123.93.36. Now using it with torsocks.
root@kali:~# torsocks curl icanhazip.com
[Dec 28 20:20:26] PERROR torsocks[2979]: socks5 libc connect: Connection refused (in socks5_connect() at socks5.c:185)
curl: (6) Could not resolve host: icanhazip.com
root@kali:~#
Opps, that just means I forgot to start tor service. Start tor application using the following command:
root@kali:~# service tor start
root@kali:~#
Now try again:
root@kali:~# torsocks curl icanhazip.com
197.231.221.211
root@kali:~#
IP spoofing in Kali Linux with torsocks - blackMORE Ops - 3
Sweet as, now my Public IP changed to 197.231.221.211 because the URL was opened through the TOR proxy.
You should be able to use different application via torsocks using the following command:
root@kali:~# torsocks [application]
For example we want to use telnet and ssh command to connect through a SOCKS proxy. This can be done by wrapping the telnet command with torify/usewithtor.
root@kali:~# torsocks ssh username@some.ssh.com
root@kali:~# torify telnet google.com 80
root@kali:~# usewithtor telnet google.com 80
root@kali:~# torsocks iceweasel
For more details, please see the torsocks.1, torsocks.8 and torsocks.conf.5 man pages. Also, you can use -h, --help for all the possible options of the torsocks script.
A configuration file named torsocks.conf is also provided for the user to control some parameters.
You can also use the torsocks library without the script provided:
LD_PRELOAD=/full/path/to/libtorsocks.so your_app

Security

The tables below list applications that usewithtor /torsocks will send through Tor. At the moment a 100% guarantee of safe interoperability with Tor can only be given for a few of them. This is because the operation of the applications and the data they transmit has not been fully researched, so it is possible that a given application can leak user/system data at a level that neither Tor nor torsocks can control.
The following administrative applications are known to be compatible with usewithtor:
Application100% SafeDNSComments
sshMYPotential for identity leaks through login.
telnetMYPotential for identity leaks through login and password.
svnMY
gpgMYgpg --refresh-keys works well enough.
The following messaging applications are known to be compatible with usewithtor:
Application100% SafeDNSComments
pidginMYPotential for identity leaks through login and password.
kopeteMYPotential for identity leaks through login and password.
konversationMYPotential for identity leaks through login and password.
irssiMYPotential for identity leaks through login and password.
silcMYPotential for identity leaks through login and password.
The following email applications are known to be compatible with usewithtor:
Application100% SafeDNSComments
claws-mail**Use TorBirdy (Tor Button for Thunderbird) instead!
thunderbird**Use TorBirdy (Tor Button for Thunderbird) instead!
The following file transfer applications are known to be compatible with usewithtor:
Application100% SafeDNSComments
wgetNNProbable identity leaks through http headers. Leaks DNS and connects directly in certain cases when used with polipo and torsocks. http://pastebin.com/iTHbjfqMhttp://pastebin.com/akbRifQX
ftpMYPassive mode works well generally.
Table legend:
DNS: DNS requests safe for Tor?
N - The application is known to leak DNS requests when used with torsocks.
Y - Testing has shown that application does not leak DNS requests.
100% Safe: Fully verified to have no interoperability issues with Tor?
N - Anonymity issues suspected, see comments column.
M - Safe enough in theory, but either not fully researched or anonymity can be compromised
through indiscreet use (e.g. email address, login, passwords).
Y - Application has been researched and documented to be safe with Tor.
Check the project homepage to find out what applications work well with torsocks . For example pidgin works with torsocks . Just launch it with the usewithtor command
usewithtor pidgin

Conclusion

TOR or torsocks is free, somewhat secure, allows you to bypass proxies, Firewall, monitoring and content filtering. Though, it can be natively blocked in Firewalls and Proxies. Its sometime is slow and sometime is not that secure you’d think. If you find that using torsocks or tor is just too slow for you, then you can always use VPN services like PrivateInternetAccess which is deemed one of the best and most secured. Find a great and lengthy article on setting up VPN services which I recommend for serious users.
Users from Iran, Pakistan, Egypt, China, Bangladesh, North Korea etc. where content filtering is done in National Level maybe it’s a way to get the voice out. I do not want to discuss the legality of that and will leave that to you. Using proxy is another way for spoofing IP addresses.
On a similar note, I’ve previously covered issues where you can DoS using spoofed IP Address, install and use TOR, creating hidden services in TOR like DarkNet or SilkRoad etc.

References

  1. https://trac.torproject.org/projects/tor/wiki/doc/torsocks
  2. https://github.com/dgoulet/torsocks

[Howto] Managing Solaris 11 via Ansible

$
0
0
https://liquidat.wordpress.com/2016/01/04/howto-managing-solaris-11-via-ansible

Tower-Ansible-Solaris

[Howto] Managing Solaris 11 via Ansible

Ansible LogoAnsible can be used to manage various kinds of Server operating systems – among them Solaris 11.
Managing Solaris 11 servers via Ansible from my Fedora machine is actually less exciting than previously thought. Since the amount of blog articles covering that is limited I thought it might be a nice challenge.
However, the opposite is the case: it just works. On a fresh Solaris installation, out of the box. There is not even need for additional configuration or additional software. Of course, ssh access must be available – but the same is true on Linux machines as well. It’s almost boring ;-)
Here is an example to install and remove software on Solaris 11, using the new package system IPS which was introduced in Solaris 11:
1
2
$ ansible solaris -s -m pkg5 -a "name=web/server/apache-24"
$ ansible solaris -s -m pkg5 -a "state=absent name=/text/patchutils"
While Ansible uses a special module, pkg5, to manage Solaris packages, service managing is even easier because the usual service module is used for Linux as well as Solaris machines:
1
2
$ ansible solaris -s -m service -a "name=apache24 state=started"
$ ansible solaris -s -m service -a "name=apache24 state=stopped"
So far so good – of course things get really interesting if playbooks can perform tasks on Solaris and Linux machines at the same time. For example, imagine Apache needs to be deployed and started on Linux as well as on Solaris. Here conditions come in handy:
1
2
3
4
5
6
7
8
9
10
11
12
13
14
15
16
17
18
---
- name: install and start Apache
  hosts: clients
  vars_files:
    - "vars/{{ ansible_os_family }}.yml"
  sudo: yes
 
  tasks:
    - name: install Apache on Solaris
      pkg5: name=web/server/apache-24
      when: ansible_os_family == "Solaris"
 
    - name: install Apache on RHEL
      yum:  name=httpd
      when: ansible_os_family == "RedHat"
 
    - name: start Apache
      service: name={{ apache }} state=started
Since the service name is not the same on different operating systems (or even different Linux distributions) the service name is a variable defined in a family specific Yaml file.
It’s also interesting to note that the same Ansible module works different on the different operating systems: when a service is ordered to be stopped, but is not even available because the corresponding package and thus service definition is not even installed, the return code on Linux is OK, while on Solaris an error is returned:
1
2
3
4
5
TASK: [stop Apache on Solaris] ************************************************
failed: [argon] => {"failed": true}
msg: svcs: Pattern 'apache24' doesn't match any instances
 
FATAL: all hosts have already failed -- aborting
It would be nice to catch the error, however as far as I know error handling in Ansible can only specify when to fail, and not which messages/errors should be ignored.
But besides this problem managing Solaris via Ansible works smoothly for me. And it even works on Ansible Tower, of course:
Tower-Ansible-Solaris.png
I haven’t tried to install Ansible on Solaris itself, but since packages are available that shouldn’t be much of an issue.
So in case you have a mixed environment including Solaris and Linux machines (Red Hat, Fedora, Ubuntu, Debian, Suse, you name it) I can only recommend to start using Ansible as soon as you possible. It simply works and can ease the pain of day to day tasks substantially.

How to delete a single command from history on a Linux, OS X and Unix Bash shell

$
0
0
http://www.cyberciti.biz/faq/delete-command-from-history-linux-unix-osx-bash-shell

 I'm working in Ubuntu bash terminal application and remotely on a RHEL server in cloud platform. I typed the wrong and dangerous command. I no longer wish to remember dangerous command in the history file. How can I remove or delete a single command from bash history file?

You can use the history command to clear all history or selected command line.

How do I view history with line number?

Simply type the history command:
$ history
Sample outputs:
Fig.01: Bash history command with line number on a Linux, OS X, and Unix

How to delete a single command number 1013 from history

The syntax is:
## Delete the bash history entry at offset OFFSET ##
history -d offset
history -d number
history -d 1013
 
Verify it:
$ history

How do I delete all the history?

The syntax is:
 
history -c
 

Tip: Control bash history like a pro

First, you can increase your bash history size by appending the following config option in ~/.bashrc file:
## Set the  maximum  number of lines contained in the historyfile ##
HISTFILESIZE=5000000
 
## Set the number of commands to remember in the commandhistory ##
HISTSIZE=10000
 
## Append it ##
shopt -s histappend
 
######
# Controlling how commands are saved on the historyfile ##
# ignoreboth means: ##
# a) Command which begin with a space character are not saved in the history list ##
# b) Command matching the previous history entry to not be saved (avoid duplicate commands) ##
######
HISTCONTROL=ignoreboth
 
Save and close the file.

Where to find more information about history command?

You can read bash man page by typing the following command:
$ man bash
Or simply type the following command:
$ help history
Sample outputs:
 
history: history[-c][-d offset][n] or history -anrw [filename] or history -ps arg [arg...]
Display or manipulate the history list.
 
Display the history list with line numbers, prefixing each modified
entry with a '*'. An argument of N lists only the last N entries.
 
Options:
-c clear the history list by deleting all of the entries
-d offset delete the history entry at offset OFFSET.
 
-a append history lines from this session to the historyfile
-n read all history lines not already read from the historyfile
-r read the historyfile and append the contents to the history
list
-wwrite the current history to the historyfile
and append them to the history list
 
-p perform history expansion on each ARG and display the result
without storing it in the history list
-s append the ARGs to the history list as a single entry
 
If FILENAME is given, it is used as the historyfile. Otherwise,
if$HISTFILE has a value, that is used, else ~/.bash_history.
 
If the $HISTTIMEFORMAT variable is set and not null, its value is used
as a format string for strftime(3) to print the time stamp associated
with each displayed history entry. No time stamps are printed otherwise.
 
Exit Status:
Returns success unless an invalid option is given or an error occurs.
 

Linux: Find Out Which Process Is Listening Upon a Port

$
0
0
http://www.cyberciti.biz/faq/what-process-has-open-linux-port

How do I find out running processes were associated with each open port? How do I find out what process has open tcp port 111 or udp port 7000 under Linux?

You can the following programs to find out about port numbers and its associated process:
  1. netstat - a command-line tool that displays network connections, routing tables, and a number of network interface statistics.
  2. fuser - a command line tool to identify processes using files or sockets.
  3. lsof - a command line tool to list open files under Linux / UNIX to report a list of all open files and the processes that opened them.
  4. /proc/$pid/ file system - Under Linux /proc includes a directory for each running process (including kernel processes) at /proc/PID, containing information about that process, notably including the processes name that opened port.
You must run above command(s) as the root user.

netstat example

Type the following command:
# netstat -tulpn
Sample outputs:
Active Internet connections (only servers)
Proto Recv-Q Send-Q Local Address Foreign Address State PID/Program name
tcp 0 0 127.0.0.1:3306 0.0.0.0:* LISTEN 1138/mysqld
tcp 0 0 0.0.0.0:111 0.0.0.0:* LISTEN 850/portmap
tcp 0 0 0.0.0.0:80 0.0.0.0:* LISTEN 1607/apache2
tcp 0 0 0.0.0.0:55091 0.0.0.0:* LISTEN 910/rpc.statd
tcp 0 0 192.168.122.1:53 0.0.0.0:* LISTEN 1467/dnsmasq
tcp 0 0 0.0.0.0:22 0.0.0.0:* LISTEN 992/sshd
tcp 0 0 127.0.0.1:631 0.0.0.0:* LISTEN 1565/cupsd
tcp 0 0 0.0.0.0:7000 0.0.0.0:* LISTEN 3813/transmission
tcp6 0 0 :::22 :::* LISTEN 992/sshd
tcp6 0 0 ::1:631 :::* LISTEN 1565/cupsd
tcp6 0 0 :::7000 :::* LISTEN 3813/transmission
udp 0 0 0.0.0.0:111 0.0.0.0:* 850/portmap
udp 0 0 0.0.0.0:662 0.0.0.0:* 910/rpc.statd
udp 0 0 192.168.122.1:53 0.0.0.0:* 1467/dnsmasq
udp 0 0 0.0.0.0:67 0.0.0.0:* 1467/dnsmasq
udp 0 0 0.0.0.0:68 0.0.0.0:* 3697/dhclient
udp 0 0 0.0.0.0:7000 0.0.0.0:* 3813/transmission
udp 0 0 0.0.0.0:54746 0.0.0.0:* 910/rpc.statd
TCP port 3306 was opened by mysqld process having PID # 1138. You can verify this using /proc, enter:
# ls -l /proc/1138/exe
Sample outputs:
lrwxrwxrwx 1 root root 0 2010-10-29 10:20 /proc/1138/exe -> /usr/sbin/mysqld
You can use grep command to filter out information:
# netstat -tulpn | grep :80
Sample outputs:
tcp        0      0 0.0.0.0:80              0.0.0.0:*               LISTEN      1607/apache2

Video demo

fuser command

Find out the processes PID that opened tcp port 7000, enter:
# fuser 7000/tcp
Sample outputs:
7000/tcp:             3813
Finally, find out process name associated with PID # 3813, enter:
# ls -l /proc/3813/exe
Sample outputs:
lrwxrwxrwx 1 vivek vivek 0 2010-10-29 11:00 /proc/3813/exe -> /usr/bin/transmission
/usr/bin/transmission is a bittorrent client, enter:
# man transmission
OR
# whatis transmission
Sample outputs:
transmission (1)     - a bittorrent client

Task: Find Out Current Working Directory Of a Process

To find out current working directory of a process called bittorrent or pid 3813, enter:
# ls -l /proc/3813/cwd
Sample outputs:
lrwxrwxrwx 1 vivek vivek 0 2010-10-29 12:04 /proc/3813/cwd -> /home/vivek
OR use pwdx command, enter:
# pwdx 3813
Sample outputs:
3813: /home/vivek

Task: Find Out Owner Of a Process

Use the following command to find out the owner of a process PID called 3813:
# ps aux | grep 3813
OR
# ps aux | grep '[3]813'
Sample outputs:
vivek     3813  1.9  0.3 188372 26628 ?        Sl   10:58   2:27 transmission
OR try the following ps command:
# ps -eo pid,user,group,args,etime,lstart | grep '[3]813'
Sample outputs:
3813 vivek    vivek    transmission                   02:44:05 Fri Oct 29 10:58:40 2010
Another option is /proc/$PID/environ, enter:
# cat /proc/3813/environ
OR
# grep --color -w -a USER /proc/3813/environ
Sample outputs (note --colour option):
Fig.01: grep output
Fig.01: grep output

lsof Command Example

Type the command as follows:
lsof -i :portNumber
lsof -i tcp:portNumber
lsof -i udp:portNumber
lsof -i :80
lsof -i :80 | grep LISTEN
Sample outputs:
apache2   1607     root    3u  IPv4   6472      0t0  TCP *:www (LISTEN)
apache2 1616 www-data 3u IPv4 6472 0t0 TCP *:www (LISTEN)
apache2 1617 www-data 3u IPv4 6472 0t0 TCP *:www (LISTEN)
apache2 1618 www-data 3u IPv4 6472 0t0 TCP *:www (LISTEN)
apache2 1619 www-data 3u IPv4 6472 0t0 TCP *:www (LISTEN)
apache2 1620 www-data 3u IPv4 6472 0t0 TCP *:www (LISTEN)
Now, you get more information about pid # 1607 or 1616 and so on:
# ps aux | grep '[1]616'
Sample outputs:
www-data 1616 0.0 0.0 35816 3880 ? S 10:20 0:00 /usr/sbin/apache2 -k start
I recommend the following command to grab info about pid # 1616:
# ps -eo pid,user,group,args,etime,lstart | grep '[1]616'
Sample outputs:
1616 www-data www-data /usr/sbin/apache2 -k start     03:16:22 Fri Oct 29 10:20:17 2010
Where,
  • 1616 : PID
  • www-date : User name (owner - EUID)
  • www-date : Group name (group - EGID)
  • /usr/sbin/apache2 -k start : The command name and its args
  • 03:16:22 : Elapsed time since the process was started, in the form [[dd-]hh:]mm:ss.
  • Fri Oct 29 10:20:17 2010 : Time the command started.

Help: I Discover an Open Port Which I Don't Recognize At All

The file /etc/services is used to map port numbers and protocols to service names. Try matching port numbers:
$ grep port /etc/services
$ grep 443 /etc/services

Sample outputs:
https  443/tcp    # http protocol over TLS/SSL
https 443/udp

Check For rootkit

I strongly recommend that you find out which processes are really running, especially servers connected to the high speed Internet access. You can look for rootkit which is a program designed to take fundamental control (in Linux / UNIX terms "root" access, in Windows terms "Administrator" access) of a computer system, without authorization by the system's owners and legitimate managers. See how to detecting / checking rootkits under Linux.

Keep an Eye On Your Bandwidth Graphs

Usually, rooted servers are used to send a large number of spam or malware or DoS style attacks on other computers.

See also:

See the following man pages for more information:
$ man ps
$ man grep
$ man lsof
$ man netstat
$ man fuser

Man in the Middle Attack using Kali Linux – MITM attack

$
0
0
http://www.blackmoreops.com/2015/12/22/man-in-the-middle-attack-using-kali-linux

The man-in-the-middle attack (often abbreviated MITM, MitM, MIM, MiM, MITMA) in cryptography and computer security is a form of active eavesdropping in which the attacker makes independent connections with the victims and relays messages between them, making them believe that they are talking directly to each other over a private connection, when in fact the entire conversation is controlled by the attacker. The attacker must be able to intercept all messages going between the two victims and inject new ones, which is straightforward in many circumstances (for example, an attacker within reception range of an unencrypted Wi-Fi wireless access point, can insert himself as a man-in-the-middle).
A man-in-the-middle attack can succeed only when the attacker can impersonate each endpoint to the satisfaction of the other—it is an attack on mutual authentication (or lack thereof). Most cryptographic protocols include some form of endpoint authentication specifically to prevent MITM attacks. For example, SSL can authenticate one or both parties using a mutually trusted certification authority.

Scenario:

This is the simple scenario, and I try to draw it in a picture.
MITM - Man in the Middle Attack using Kali Linux - blackMORE Ops - 1
Kali Linux Man in the Middle Attack
  1. Victim IP address : 192.168.8.90
  2. Attacker network interface : eth0; with IP address : 192.168.8.93
  3. Router IP address : 192.168.8.8

Requirements:

  1. Arpspoof
  2. Driftnet
  3. Urlsnarf
Following steps show how to perform Man in the Middle Attack using Kali Linux and a target machine.
Open your terminal (CTRL + ALT + T kali shortcut) and configure our Kali Linux machine to allow packet forwarding, because act as man in the middle attacker, Kali Linux must act as router between “real router” and the victim.
You can change your terminal interface to make the view much more friendly and easy to monitor by splitting kali terminal window.
The next step is setting up arpspoof between victim and router.
arpspoof -i eth0 -t 192.168.8.90 192.168.8.8
Kali Linux Man in the Middle Attack
  1. And then setting up arpspoof from to capture all packet from router to victim.
arpspoof -i eth0 -t 192.168.8.8 192.168.8.90

Kali Linux Man in the Middle Attack

After step three and four, now all the packet sent or received by victim should be going through attacker machine.

Use DriftNet to Monitor packets and images

Inspired by EtherPEG (though, not owning an Apple Macintosh, I’ve never actually seen it in operation), DriftNet is a program which listens to network traffic and picks out images from TCP streams it observes. Fun to run on a host which sees lots of web traffic.
In an experimental enhancement, DriftNet now picks out MPEG audio streams from network traffic and tries to play them.
Now we can try to use DriftNet to monitor all victim image traffic. According to its website……
Use the following command to run DriftNet
driftnet -i eth0
When victim browse a website with image, DriftNet will capture all image traffic as shown in the screen-shot below.

Use URLSnarf to Monitor packets

URLSnarf is a tool that can sniff HTTP requests in Common Log Format. URLSnarf outputs all requested URLs sniffed from HTTP traffic in CLF (Common Log Format, used by almost all web servers), suitable for offline post-processing with your favorite web log analysis tool (analog, wwwstat, etc.).
urlsnarf -i eth0
and URLSnarf will start capturing all website address visited by victim machine.
When victim browse a website, attacker will know the address victim visited.

Defenses against the attack

Various defenses against MITM attacks use authentication techniques that include:
  • DNSSEC Secure DNS extensions
  • Strong encryption (as opposed to relying on small symmetric or asymmetric key sizes, broken ciphers or unproven ciphers)
  • Public key infrastructures
    • PKI mutual authentication The main defence in a PKI scenario is mutual authentication. In this case as well as the application validating the user (not much use if the application is rogue)—the users devices validates the application—hence distinguishing rogue applications from genuine applications
  • A recorded media attestment (assuming that the user’s identity can be recognized from the recording), which can either be:
    • A verbal communication of a shared value for each session (as in ZRTP)
    • An audio/visual communication of the public key hash (which can be easily distributed via PKI)
  • Stronger mutual authentication, such as:
    • Secret keys (which are usually high information entropy secrets, and thus more secure), or
    • Passwords (which are usually low information entropy secrets, and thus less secure)
  • Latency examination, such as with long cryptographic hash function calculations that lead into tens of seconds; if both parties take 20 seconds normally, and the calculation takes 60 seconds to reach each party, this can indicate a third party
  • Second (secure) channel verification
  • Carry-forward verification
  • Testing is being carried out on deleting compromised certificates from issuing authorities on the actual computers and compromised certificates are being exported to sandbox area before removal for analysis
The integrity of public keys must generally be assured in some manner, but need not be secret. Passwords and shared secret keys have the additional secrecy requirement. Public keys can be verified by a certificate authority, whose public key is distributed through a secure channel (for example, with a web browser or OS installation). Public keys can also be verified by a web of trust that distributes public keys through a secure channel (for example by face-to-face meetings).

Forensic analysis of MITM attacks

Captured network traffic from what is suspected to be a MITM attack can be analyzed in order to determine if it really was a MITM attack or not. Important evidence to analyze when doing network forensics of a suspected SSL MITM attack include:
  • IP address of the server
  • DNS name of the server
  • X.509 certificate of the server
    • Is the certificate self signed?
    • Is the certificate signed by a trusted CA?
    • Has the certificate been revoked?
    • Has the certificate been changed recently?
    • Do other clients, elsewhere on the Internet, also get the same certificate?

Conclusion

  1. To change or spoof the attacker MAC address, you can view the tutorial about how to change Kali Linux MAC address.
  2. Driftnet or Urlsnarf was hard to detect, but you can try to find the device in your network with promiscuous mode which have possibility to sniff the network traffic.
Hope you found it useful.

10 cool tools from the Docker community

$
0
0
https://opensource.com/business/15/12/10-cool-tools-docker-community


Looking back at 2015, there have been many projects created by the Docker community that have advanced the developer experience. Although choosing among all the great contributions is hard, here are 10 "cool tools" that you should be using if you are looking for ways to expand your knowledge and use of Docker.

1. Container Migration Tool (CMT)

A winning entry at the Docker Global Hack Day #3, the Container Migration team drew inspiration from a DockerCon talk in which Michael Crosby (@crosbymichael) and Arnaud Porterie (@icecrime) migrated a Quake 3 container around the world, demonstrating container migration while maintaining a TCP connection. The CMT project created an external command-line tool that can be either used with Docker or runC to help "live migrate" containers between different hosts by performing pre-migration validations and allowing it to auto-discover suitable target hosts.

2. Dockercraft

We had to add in a fun one! Lots of Docker users run custom Minecraft servers in containers. But Dockercraft is a Minecraft client to visualize and manage Docker containers. With the flick of a switch, a container turns on or off. And with the press of a button, you can destroy one. Dockercraft is a fun project—that is surprisingly addictive—from Docker engineers Adrien Duermael and Gaetan de Villele.

3. Docker Label Inspector

The Docker Label Inspector tool helps ensure that developers are providing Docker images with the metadata containers required when distributed across the Internet. Specifically, this tool enables developers to use Docker labels to create metadata within the domain of container technology, to check labels against official label schema and to validate against provided JSON schema.

4. dvol

Dvol enables version control for your development databases in Docker. Dvol lets you commit, reset, and branch the containerized databases running on your laptop, so you can easily save a particular state and come back to it later. Dvol can also integrate with Docker Compose to spin up reproducible microservices environments on your laptop.

5. IPVS Daemon GORB

Presented at DockerCon EU, IP Virtual Server (IPVS) for Docker containers enables production-level load balancing and request routing using open source IPVS, which has been part of the Linux kernel for more than a decade. It supports TCP, SCTP, and UDP and can achieve fast speeds, often within five percent of direct connection speeds. Other features include NAT, tunneling, and direct routing. To make IPVS easier to use, the Go Routing and Balancing (GORB) daemon was created as a REST API inside a Docker container to provide IPVS routing for Docker.

6. libnetwork

Libnetwork combines networking code from both libcontainer and Docker Engine to create a multi-platform library for networking containers. The goal of libnetwork is to deliver a robust Container Network Model that provides a consistent programming interface and the required network abstractions for applications. There are many networking solutions available to suit a broad range of use-cases. libnetwork uses a driver/plugin model to support all of these solutions, while abstracting the complexity of the driver implementations by exposing a simple and consistent Network Model to users.

7. The Raspberry Pi Challenge

In the DockerCon closing keynote, Dieter Reuter from Hypriot presented a demo running 500 Docker containers on a Raspberry Pi 2 device. Convinced that this number of containers could be at least doubled, Dieter then challenged the Docker community to beat his personal record. As part of his project, Dieter Reuter demonstrated how to get started with Docker on Raspberry Pi and how to scale the number number of web servers running in containers that could reside on a single Raspberry Pi 2. The current record is more than 2,500 web servers running in containers on a single Raspberry Pi 2.

8. Scaling Spark with Zoe analytics

This open source user-facing tool ties together Spark, a data-intensive framework for big data computation, and Docker Swarm. Zoe can execute long-running Spark jobs, but also Scala or iPython interactive notebooks and streaming applications, covering the full Spark development cycle. When a computation is finished, resources are automatically freed and available for other uses, because all processes are run in Docker containers. This tooling can enable application scheduling on top of Swarm and optimized container placement.

9. Unikernel demo source code

First unveiled as a cool hack at DockerCon EU (Unikernels, meet Docker!), this demo showed how unikernels can be treated as any other container. In this demo, Docker was used to build a unikernel microservice and then followed up by deploying a real web application with database, webserver, and PHP code, all running as distinct unikernel microservices built using Rump Kernels. Docker managed the unikernels just like Linux containers, but without needing to deploy a traditional operating system. Apart from the MySQL, NGINX, and PHP with Nibbleblog unikernels shown in the demo, this repository also contains some examples of how to get started.

10. Wagl, DNS service discovery for Swarm

Wagl is a DNS server that allows microservices running as containers on a distributed Docker Swarm cluster to find and talk to each other. Wagl is minimalist and works as a drop-in container in your cluster to provide DNS-based service discovery and simple load balancing by rotating a list of IP addresses in DNS records.

What are good web server benchmarking tools for Linux

$
0
0
http://xmodulo.com/web-server-benchmarking-tools-linux.html

As far as web server performance is concerned, there are many different factors at play, e.g., front-end application design, network latency/bandwidth, web server configuration, server-side in-memory cache, raw hardware capability, server load of shared hosting, etc. To compare and optimize web server performance under such a wide array of factors, we often perform load test (or stress test) using a web server micro-benchmark tool. A typical benchmark tool injects synthetic workloads or replays real-world traces to a web server, and measures web server performance and scalability in terms of varying metrics (e.g., response time, throughput, number of requests per second, CPU load, etc).
For those of you who want to find out how your web server or web service will measure up under different workload conditions, here are a list of web server benchmark tools available on Linux platforms.

1. ApacheBench

ApacheBench (ab) is a standard command-line web server benchmark tool bundled with Apache HTTP server. It can send an arbitrary list of (concurrent) web requests. Support for POST/PUT/GET requests, as well as basic password authentication is available. Testing results include requests per second, time per request, transfer rate, connection time statistics (min, max, median, mean), etc. Last update: 12/2015. License: Apache v2.0.

2. Apache JMeter

Apache JMeter is a cross-platform Java-based GUI program designed to stress test any web application. It can be used to test the performance of web-server backends powered by server-side languages (e.g., PHP, Java, ASP.NET) or databases (e.g., JDBC, LDAP, MongoDB). It provides highly pluggable testing architecture via extensible data visualization GUI. Last update: 03/2015. License: Apache v2.0.

3. curl-loader

curl-loader is a command-line application workload generator which can simulate multiple HTTP/HTTPS FTP/FTPS clients. Simulated clients can conduct various tasks, such as authenticated login (POST or GET/POST), GET/POST/PUT requests from batch configuration with probabilistic distribution, FTP passive/active operations, HTTP logoff (POST, GET/POST, GET with cookie), etc. Per-client status and statistics are logged to a file. Last update: 01/2012. License: GPLv2.

4. FunkLoad

FunkLoad is a web server load testing tool written Python. It can perform functional unit testing, as well as stress and longevity testing. Features include GET/POST/PUT/DELETE requests, basic authentication, cookie, HTTPS with SSL/TLS, browser cache emulation, and CSS/image/JavaScript fetching. Last update: 05/2015. License: GNU GPL.

5. Gatling

Gatling is an open-source protocol-agnostic load testing tool primarily used to benchmark HTTP servers and web services. Using a lightweight asynchronous testing engine, it can easily simulate thousands of concurrent users whose web browsing behaviors and scenarios (e.g., login, browse product listings, add a product to cart, check out) are independently scripted. It supports real-time reports via the Graphite protocol, and can be integrated via extensions with other third-party building tools such as Maven, Jenkins, SBT. Last update: 12/2015. License: Apache v2.0.

6. Httperf

Httperf is an HTTP workload generator command-line tool which can generate a number of different types of HTTP traffic, including GET/HEAD/PUT/POST requests, HTTP pipelining, SSL traffic, stateful sessions with cookie, etc. Output includes connection rate, connection time statistics (min, max, median, stddev), request/reply rate, and network throughput. Last update: 12/2015. License: GNU GPLv2.

7. Pylot

Pylot is a Python-based performance and scalability testing tool for web services. It generates multi-agent workload scenarios based on test cases defined in an XML file, and displays stats and error reporting results in real-time. It supports HTTPS/SSL, cookie handling, regular expression based response verification, multi-threading, console/GUI modes. Last update: 07/2009. License: GNU GPLv3.

8. Siege

Siege is an HTTP load testing and benchmarking tool for terminal environment. Support for basic password authentication, cookies, HTTPS with SSL is available. Last update: 06/2015. License: GNU GPL.

9. The Grinder

The Grinder is a Java-based multi-threaded test framework which can perform load test and functional test of various application and network protocols written in Java APIs, including as HTTP servers, SOAP, XML-RPC, REST web services, JMS, JDBC, RMI, and POP3/SMTP/LDAP. It supports dynamic loading and monitoring of test scripts written in Jython and Clojure languages, and allows injecting load from multiple machines in the distributed fashion. Its HTTP support includes cookie handling, SSL, connection rate-limiting, trace record and replay, proxy, etc. Last update: 04/2015.

10. Tsung

Tsung is an open-source multi-protocol stress test tool which can generate different types of workloads for HTTP, SSL, WebDAV, SOAP, PostgresSQL, MySQL, LDAP, XMPP servers. With HTTP server testing, it supports basic requests (GET/POST/PUT/DELETE/HEAD), cookies, authentication with password or oAuth, SOAP, graph visualization and HTML report, multiple IP addresses via IP aliasing, etc. Last update: 06/2015. License: GNU GPLv2.

11. Web Polygraph

Web Polygraph is a workload generator tool that can simulate HTTP, FTP, SSL traffic for benchmarking. It comes with HTTP client and server which, together, can stress test caching proxies, web server accelerators, content filters, etc. Support for LDAP credentials, basic/NTLM/Kerberos authentication is available. Last update: 10/2014. License: Apache v2.0.

12. Wrk

wrk is a scalable HTTP benchmarking tool which leverages lightweight event notifications like epoll and kqueue. Support for LuaJIT-scripted workloads, HTTP pipelining, authentication token, dynamic requests, and customizable report is available. Last update: 11/2015. License: Apache v2.0.

Facebook's top 5 open source projects of 2015

$
0
0
https://opensource.com/business/15/12/top-5-facebook-open-source-projects-2015


Facebook believes in the power of open source. When a community gathers to work on code, there are a host of benefits. Fresh eyes point out problems and we arrive at solutions faster. Together we tackle the challenges we're facing, innovation accelerates, and the community stretches the limitations of existing technology.
Of course, a successful open source program depends on a strong, collaborative community. As the end of the year approaches, we wanted to reflect on Facebook's top five open source projects in 2015, measured by community activity and impact.

HipHop Virtual Machine (HHVM)

HHVM is our virtual machine and web server that we open sourced in 2013, building on the HPHPc compiler we released in 2010. In the past year alone, we've seen a 29% increase in the number of commits and a 30% increase in the number of forks.
HHVM is most commonly run as a standalone server, replacing both Apache and mod_php, designed to execute programs written in Hack and PHP. It uses a just-in-time compilation approach to achieve superior performance, while maintaining the flexibility that PHP developers are accustomed to. We've reached great milestones this year:
  1. We made new Async features available by default, including AsyncMySQL and MCRouter (memcached) support.
  2. In December we announced support for all major PHP 7 features at the same time that the language itself was released, and we released our next generation of user documentation.
  3. Box announced HHVM as the exclusive engine that serves its PHP codebase.
  4. Etsy migrated to HHVM in April, which helped the company address a variety of challenges associated with building mobile products at the scale needed.

React

Facebook open sourced React in May 2013, and in the past year we've continued to see strong collaboration in the community, including a 75% increase in the number of commits and a 198% increase in the number of forks. React is Facebook's JavaScript library for building user interfaces, and is being used by many companies because it takes a different approach to building applications: React allows you to break the application down into separate components that are decoupled so that the various components can be maintained and iterated on independently.
This year we had two major releases, launched React Native, announced new developer tools, and saw more companies—including Netflix and WordPress—use React to build their products.

Presto

Presto is our distributed SQL engine for running interactive analytic queries against data sources of all sizes, ranging from gigabytes to petabytes. We created Presto to help us analyze data faster because our data volume grew and the pace of our product cycle increased.
Since making Presto available to others in November 2013, we've seen a lot of growth, adoption, and support for it, including a 48% increase in the number of commits and a 99% increase in the number of forks in the past year. Companies like Airbnb, Dropbox, and Netflix use Presto as their interactive querying engine. We also see growing adoption all over the world, including by Gree, a Japanese social media game development company, and Chinese e-commerce company JD.com.
This year, Teradata announced plans to join the Presto community, with a focus on enhancing enterprise features and providing support. This emphasizes the level of trust the community has in Presto's ability to be an integral part of the data infrastructure stack. In addition, Amazon Web Services (AWS) supports Presto as a first-class offering in its EMR service, with many production users—including Nasdaq and leading business intelligence tool vendor MicroStrategy—supporting Presto in its flagship MicroStrategy 10 product.

RocksDB

We open sourced RocksDB, an embeddable, persistent key-value store for fast storage, in November 2013. Aside from the impressive 52% increase in the number of commits and the 57% increase in the number of forks for this project in the past year, the reason this particular project has resonated so well in the open source community is that the embedded database helps provide a way to work around slow query response time due to network latency, and it is flexible enough to be customized for various emerging hardware trends.
RocksDB powers critical services at companies such as LinkedIn and Yahoo, and a key focus for us this year was to bring the RocksDB storage engine to general-purpose databases, starting with MongoDB. Similar to Teradata's commercial support for Presto, another milestone for RocksDB this year was the announcement of enterprise-level support by Percona's data performance experts.

React Native

React Native, one of our newest open source projects, was made available in March of this year. React Native lets engineers use the same React methodology and tools to rapidly build native applications for mobile devices. In addition to developing these tools internally, Facebook collaborates with the open source community to improve the experience for developers worldwide. In its first year, React Native has become the second most popular Facebook open source project, with more than 23,000 followers in GitHub. It was used internally to build the Facebook Ads app for both iOS and Android, resulting in an 85% code reuse by developers whose core competency was JavaScript. The paradigm shift in mobile development that React Native brings to the table makes this one a key highlight of the year.
Overall, we still have a lot of work to do, but we're proud of what we've been able to accomplish as a community. We want to thank everyone who dedicated time to these projects and helped us make this a great year!

Configuring function (Fn) keys in Linux under Openbox

$
0
0
http://thatlinuxthing.blogspot.rs/2015/11/configuring-function-fn-keys-in-linux.html

Often, special function keys (e.g. for controlling volume, brightness, sleep etc.) will not be automatically configured in many Linux distros. Luckily, in most cases it is easy to manually set this up. As with most other settings, Openbox allows custom key bindings to be added via entries in ~/.config/openbox/rc.xml. This way, functionality can be assigned to Fn keys not recognized out-of-the-box.
This is especially easy for standard functions (like volume-up and down, mute, sleep, brightness-up and down etc.) as these already have special key-codes assigned to them. For example, brightness-up button will be detected as XF86MonBrightnessUp allowing functionality to be directly bound to this code.

Discovering the key code to use

The best way to discover what happens when a key is pressed is using xev. Fire it from the terminal, and it will give you a window that captures events and logs them to the console. There, you'll be able to see the code for each button or button combination you press. Later on, you can use these codes to bind commands to them.

Configure keys using a graphical interface

Instead of editing Openbox's rc.xml manually, you can use obkey (Openbox Key Editor), which can automate the procedure of capturing the key codes for you and binding commands to them. See below for example commands you can bind to keys.

List of common function keys and example configurations

  • Increase/decrease brightness

    Brightness can be controlled using xbacklight, so assigning the following bindings will make the brightness function keys work:

    1. <keybind key="XF86MonBrightnessUp">  
    2.   <action name="Execute">  
    3.     <command>xbacklight -inc 40</command>  
    4.   </action>  
    5. </keybind>  
    6.   
    7. <keybind key="XF86MonBrightnessDown">  
    8.   <action name="Execute">  
    9.     <command>xbacklight -dec 40</command>  
    10.   </action>  
    11. </keybind>  
  • Sleep and Hibernate

    Assuming a SystemD setup, systemctl can be used to suspend the system to RAM (a.k.a. sleep), to disk (a.k.a hibernate) or both (a.k.a. hybrid sleep). Add the following to make the sleep function key work:
    1. <keybind key="XF86Sleep">  
    2.   <action name="Execute">  
    3.     <command>systemctl suspend</command>  
    4.   </action>  
    5. </keybind>  
    If you have additional keys (apart from sleep), you can try the following binding (make sure hibernation is properly configured and working on your system, and your user has the permissions to use it first):
    1. <keybind key="XF86Standby">  
    2.   <action name="Execute">  
    3.     <command>systemctl hibernate</command>   
    4.   </action>  
    5. </keybind>  
  • Search

    Many keyboards have a dedicated search key. To bind a command appropriate for your system (exemplified using SpaceFM) use the following:
    1. <keybind key="XF86Search">  
    2.   <action name="Execute">  
    3.     <command>spacefm --find-files %F</command>  
    4.   </action>  
    5. </keybind>  
  • Screen lock

    Bind any screen-locking (screensaver) utility, like slock or gnome-screensaver-command, as exemplified below to make the lock-screen button work:
    1. <keybind key="XF86ScreenSaver">  
    2.   <action name="Execute">  
    3.     <command>slock</command>   
    4.   </action>  
    5. </keybind>  
  • Volume up/down/mute

    There's a few options for dealing with volume keys.
    • Let volumeicon manage the function keys
      volumeicon is often used with Openbox and can be configured to manage volume buttons. Additionally, it can display OSD notifications nicely, and it supports multiple back-ends (GTK+ popups, libnotify, and possibly more). If you want to go this route, edit your ~/.config/volumeicon/volumeicon to contain the following:
      1. [Hotkeys]  
      2. up_enabled=true  
      3. down_enabled=true  
      4. mute_enabled=true  
      5. up=XF86AudioRaiseVolume  
      6. down=XF86AudioLowerVolume  
      7. mute=XF86AudioMute  
    • Bind volume buttons to amixer commands
      amixer can be called directly to control the volume. If you're using Alsa only, you may have to first find out the name of the mixer control your sound card exposes by using amixer scontrols. It is usually called Master, but not always. With PulseAudio, it is always called Master.
      1. <keybind key="XF86AudioRaiseVolume">      
      2.   <action name="Execute">  
      3.       
      4.     <command>amixer set Master 5%+ unmute</command>   
      5.   </action>  
      6. </keybind>  
      7.   
      8. <keybind key="XF86AudioLowerVolume">  
      9.   <action name="Execute">  
      10.     <command>amixer set Master 5%- unmute</command>  
      11.   </action>  
      12. </keybind>  
      13.   
      14. <keybind key="XF86AudioMute">  
      15.   <action name="Execute">  
      16.     <command>amixer set Master toggle</command>  
      17.   </action>  
      18. </keybind>  
  • Projector/Presentation mode

    The projector/presentation mode button will most often simply be understood as Super (Windows key) + P, and not as a separate key code, so you can bind it as such.
    1. <keybind key="XF86Search">  
    2.   <action name="Execute">  
    3.     <command>xrandr --auto</command>   
    4.   </action>  
    5. </keybind>  

Adding OSD notifications to commands

Most DEs come with a notification server you can use to display on-screen messages. Find out which one your DE/distro uses and simply wrap the commands used above in a script that also fires notifications. notify-send is a simple utility that comes with libnotify itself and can be used in most setups. It should be noted though that it doesn't offer a universal way to re-draw or replace a notification, making it hard to display a progress bar (e.g. for displaying volume or brightness level) and will keep creating new notifications each time it is called.
Some back-ends, like notify-osd, implement an extension supporting this scenario, but you'll have to know what you have in your distro. A back-end-agnostic drop-in replacement called notify-send.sh can also be used to work around the issue with back-ends that don't support this feature themselves.
  • Simple notify-send example

    For back-ends supporting the extension, a commands similar to the following could be used to increment the volume and show the level on screen: notify-send "" -i notification-audio-volume-medium -h int:value:$(amixer set Master 5%+ unmute | grep -m 1 "%]" | cut -d "[" -f2|cut -d "%" -f1) -h string:synchronous:volume
    This, of course, could be enriched to choose the correct icon based on the volume level etc.
  • Using notify-send.sh

    For back-ends without the extension, notify-send.sh can be used with a command similar to the above, but with adding --print-id as an argument. This will make the command return the notification ID that can later to be used to replace the notification with a new one by providing --replace=$ID. Of course, the ID would have to persisted somewhere between the calls, like a global variable of a file.

Feeling abandoned by Adobe? Check out the video editing suites for penguins

$
0
0
http://www.theregister.co.uk/2015/12/26/linux_video_editors

Options for those lacking a Linux render farm

Penguin with video photo via Shutterstock
reddit
Twitter
Facebook
42
linkedin
9
When it comes to video editing, Windows and Mac rule the screen. Professional apps by the likes of Adobe, Avid and Apple only run in the Win/Mac world and Apple even throws in a pretty sophisticated video editor (iMovie) for free.
No matter how much you love Linux and open source software, you're never going to get Adobe Premiere or Avid running on a Linux box. If it makes you feel better, most of the massive render farms at studios like Pixar run exclusively on Linux. No? Me either.
The good news is that IT IS possible to edit and produce professional quality video on Linux.
Figuring out where and how to start can be overwhelming though. Video editing software offers a huge variety of options, ranging from the very basic editors that come pre-installed in many distros to the heavyweight options like Cinelerra.
Fortunately, most of us do not need the massively complex full-featured editors used to produce feature length films. And I strongly suggest beginners don't start with the feature-complete, everything-and-the-kitchen-sink variety of editor because it will quickly become overwhelming.
Start with something basic and when you find something you want to do that your current editor can't do, then start looking for something more complicated.
What should you look for in a video editor? First and foremost make sure that the editor can import whatever format of movie clips your camera produces – particularly if you've got a 4K-capable camera, as not every program supports 4K video yet.
Also bear in mind that adding effects and filters to 4K video can quickly bring even top-of-the-line consumer PCs to their knees. All testing was done on a MacBook Pro with a 2.7GHz Core i7 chip and 16GB of RAM (running Linux Mint 17.2) which is about the bare minimum hardware you'd want to try editing 4K video on.
With more and more phones shooting 4K video, it increasingly feels like anything that can't handle 4K shouldn't be considered a serious piece of software, so all testing was done with 4K MOV files shot with a DJI Phantom 3 drone.
Regardless of what camera you use, be sure to visit each of the project pages for the software below and double check to make sure your camera is supported. The same goes for output format, if you need to export/render to a specific codec your search may need to be a little more limited.
For example, while Lightworks is a capable editor the export options in the free version are extremely limited, which is why it won't be covered below. At the other end of the equation is an app such as Avidemux, which is fine for quick edits to single clips – trimming commercials out of something you recorded for instance – but lacks tools, such as a timeline editor.
Instead we'll start with an editor that is probably familiar to most Ubuntu and GNOME desktop users, since it has long shipped as part of the default application stack – OpenShot.

OpenShot

OpenShot was once the go-to standard for video editing on GNOME-based distros. Unfortunately, OpenShot 1.x is looking largely like abandonware at this point. In fact, it's supposed to. The primary developer has been hard at work on OpenShot 2.0 for, well, quite a while now. There's a good reason for the delay, OpenShot 2.0 will be a total re-write and even abandons the underlying Media Lovin' Toolkit (MLT) backend in favor of a custom backend. It's no small undertaking in other words.
It's also not here yet. For now you'll be using 1.4.3, which is a capable, if somewhat basic video editor. Thanks to FFmpeg under the hood, it has good codec support and will work with just about any video, audio, and image formats.
The basic tools of a good video editor, including clip libraries, timelines and drag-and-drop editing are all there. In fact, if you're coming from iMovie or Windows Movie Maker you'll feel right at home with OpenShot.
openshot Filter options in OpenShot
Unfortunately, working with 4K video clips proved painfully slow even with an SSD and 16GB of RAM. And by painfully slow I mean it wouldn't really even play, repeatedly crashed the app, and made it otherwise unusable.
Still, if you're looking for something easy to use, don't mind the lack of updates, and don't have any 4K footage then OpenShot still makes a decent editor.

Pitivi

OpenShot's biggest competitor is Pitivi, which once scored a spot as the default video editor in Ubuntu. It proved a little unstable for that role (and Ubuntu decided it didn't need a video editor), but a lot of work has gone into fixing that in the years since it was booted out of Ubuntu. In fact, in my testing it was considerably more stable and usable than OpenShot .
The Pitivi interface looks very similar to OpenShot; it's clean, simple and relatively easy to figure out without going to film school. In fact the two apps are so similar that unless you've used both side by side you'd be hard pressed to tell them apart. Under the hood though it uses GStreamer, so the output results and codec support will be different than OpenShot.
Pitivi used to be very unstable. The last time I tested it for The Register about the only thing it did reliably was crash. Somewhere in the past few years though the developers have largely ironed out those bugs. In my testing on Mint 17.2 Pitivi was faster than OpenShot when rendering and playing back 4K clips (downsized to 1080p) and didn't crash once.
Pitvi Pitivi's clean interface, lacking some features but one of the easiest to use for beginners
Pitivi offers a nice range of filters and color manipulation tools, all pulled from the frei0r projects, and it allows you to set keyframes for applying effects' properties over time.
Pitivi has matured nicely since Ubuntu ditched it and if you're just getting started in video editing, I suggest you try Pitivi first.

Kdenlive

Kdenlive is a step up from Pitivi and OpenShot, but is correspondingly more complex. Fortunately, Kdenlive has some of the best documentation of the bunch and, because it's very popular, there are loads of tutorials around the web (this might be a result of one very nice extra feature in Kdenlive – you can record your desktop for easy screencasting).
Kdenlive does have its quirks, including the fact that it seems to be very crash-prone on Linux Mint, so much so that I ended up doing my testing in Debian 8, where it worked fine.
There are also some things that are less discoverable about Kdenlive, such as the only way I could find to apply a transition was right-clicking the clip in the timeline.
kdenlive Advanced color correction options in Kdenlive
However, Kdenlive handled 4K clips without missing a beat and was the speediest overall in my testing. It definitely has a steeper learning curve than Pitivi, but it also offers more features and better codec support.

Shotcut

There are two relative newcomers worth taking a look at as well. Both fall into the intermediate range, being somewhat more complex than OpenShot, but less so than Cinelerra or Blender.
The first is Shotcut, which is the latest effort from Dan Dennedy, who was once the driving force behind Kino (another video editor) and still works extensively on the MLT backend that powers Shotcut as well as several others in this list, including Kdenlive, OpenShot 1.x and Flowblade.
Features-wise Shotcut is similar to Kdenlive, though you would not know that from looking at it. Much of Shotcut's feature set is hidden away in the interface, including the timeline by default.
shotcut Shotcut hides most of its interface away, letting you open up only what you need
It takes some getting used to as this buried UI applies to much of the rest of the app as well. For example, if you want to apply a filter, you need to right-click your clip and select filters. However, if you dig into the tutorials and can wrap your head around the way it works Shotcut becomes a very powerful editor.
In fact, the main reason I've been sticking with Kdenlive is that the color corrections are somewhat more powerful, but it may well be that I just haven't discovered everything hidden away in Shotcut.
Shotcut handled everything I threw at it, though as with the rest adding a ton of filters to a timeline full of 4K clips will slow things to a crawl.

Flowblade

Flowblade is the other relative newcomer to the Linux video scene and just launched a huge update that sees the app ported to GTK3, which seems, from my testing, to have made the interface quite a bit snappier.
Flowblade is more traditional and out-of-the-box than Shotcut and offers some impressive features for a 1.x release, including a wide range of filters and color correction tools.
flowblade The rendering panel in Flowblade
The biggest problem I had with Flowblade is that it's very poorly documented. While it is a reasonably powerful editor on par with Shotcut and Kdenlive, given the lack of documentation I would not suggest it for video editing newcomers.

Cinelerra/Lumiera and Blender

Both Cinelerra and Blender are very complex, full featured editors, far too complex to go into any detail here. Suffice to say that Cinelerra is the closest Linux comes to an open source Avid/Final Cut Pro. It's correspondingly complex and, sadly, wrapped in an interface I'm pretty sure not even its mother could love.
A few years ago it was forked in an effort to, among other things, give it a face lift, but nothing seems to have come of that effort (dubbed Lumiera). Ugly as it maybe, Cinelerra is the most capable video editor of the bunch. If you want pro-level features, Cinelerra has most of them.
Blender is probably best known as an animation and rendering tool, particularly for 3D modeling, but it actually has a very nice and capable timeline editor in it as well. In fact, if you're coming from something like Premiere or Final Cut Pro, Blender may be the most familiar of the bunch and among the most capable.

Recommendations

There's clearly no shortage of Linux video editors. There's also half a dozen more out there that I haven't had time to test. The variety is nice, but it also complicated the decision – which one is right for you?
For quick video edits to a single clip, Avidemux fits the bill.
If you've got a few clips you'd like to combine, maybe add a audio track to and perhaps apply a filter before uploading to YouTube then Pitivi is probably your best bet, though OpenShot might be worth testing.
If you've got 4K video to edit and want to apply color correction and effects you'll need correspondingly more sophisticated tools. I prefer Kdenlive and have yet to find something I couldn't do with it, though Shotcut appears equally capable if you take the time to figure out its interface.
And of course if you do run into some limitations with the lighter weight options there's always Blender and Cinelerra. ®


Crack passwords in Kali Linux with Hydra

$
0
0
http://www.blackmoreops.com/2015/12/23/crack-passwords-in-kali-linux-with-hydra

For years, experts have warned about the risks of relying on weak passwords to restrict access to data, and this is still a problem. A rule of thumb for passwords is the longer, the better. In this guide I will use FTP as a target service and will show how to crack passwords in Kali Linux with Hydra. Crack passwords in Kali Linux with Hydra - blackMORE Ops -1
There are already several login hacker tools available, however none does either support more than one protocol to attack or support parallelized connects. We’ve previously covered password cracking using John the Ripper, Wireshark,NMAP and MiTM.
Hydra can be used and compiled cleanly on Linux, Windows/Cygwin, Solaris, FreeBSD/OpenBSD, QNX (Blackberry 10) and OSX.
Currently THC Hydra tool supports the following protocols:
Asterisk, AFP, Cisco AAA, Cisco auth, Cisco enable, CVS, Firebird, FTP, HTTP-FORM-GET, HTTP-FORM-POST, HTTP-GET, HTTP-HEAD, HTTP-PROXY, HTTPS-FORM-GET, HTTPS-FORM-POST, HTTPS-GET, HTTPS-HEAD, HTTP-Proxy, ICQ, IMAP, IRC, LDAP, MS-SQL, MYSQL, NCP, NNTP, Oracle Listener, Oracle SID, Oracle, PC-Anywhere, PCNFS, POP3, POSTGRES, RDP, Rexec, Rlogin, Rsh, SAP/R3, SIP, SMB, SMTP, SMTP Enum, SNMP v1+v2+v3, SOCKS5, SSH (v1 and v2), SSHKEY, Subversion, Teamspeak (TS2), Telnet, VMware-Auth, VNC and XMPP.

Supported Platforms

  1. All UNIX platforms (linux, *bsd, solaris, etc.)
  2. Mac OS/X
  3. Windows with Cygwin (both IPv4 and IPv6)
  4. Mobile systems based on Linux, Mac OS/X or QNX (e.g. Android, iPhone, Blackberry 10, Zaurus, iPaq)
Hydra is a parallelized login cracker which supports numerous protocols to attack. It is very fast and flexible, and new modules are easy to add. This tool makes it possible for researchers and security consultants to show how easy it would be to gain unauthorized access to a system remotely. On Ubuntu it can be installed from the synaptic package manager. On Kali Linux, it is per-installed.
For brute forcing Hydra needs a list of passwords. There are lots of password lists available out there. In this example we are going to use the default password list provided with John the Ripper which is another password cracking tool. Other password lists are available online, simply Google it.
The password list s pre-installed on Kali Linux and its password list can be found at the following location
/usr/share/john/password.lst
It looks like this
#!comment: This list has been compiled by Solar Designer of Openwall Project,
#!comment: http://www.openwall.com/wordlists/
#!comment:
#!comment: This list is based on passwords most commonly seen on a set of Unix
#!comment: systems in mid-1990's, sorted for decreasing number of occurrences
#!comment: (that is, more common passwords are listed first). It has been
#!comment: revised to also include common website passwords from public lists
#!comment: of "top N passwords" from major community website compromises that
#!comment: occurred in 2006 through 2010.
#!comment:
#!comment: Last update: 2011/11/20 (3546 entries)
123456
12345
password
password1
123456789
12345678
1234567890
Create a copy of that file to your desktop or any location and remove the comment lines (all the lines above the password 123456). Now our word list of passwords is ready and we are going to use this to brute force an ftp server to try to crack its password.
Here is the simple command with output
root@kali:~# hydra -t 1 -l admin -P /root/Desktop/password.lst -vV 192.168.1.1 ftp
Hydra v7.4.2 (c)2012 by van Hauser/THC & David Maciejak - for legal purposes only

Hydra (http://www.thc.org/thc-hydra) starting at 2013-05-13 04:32:18
[DATA] 1 task, 1 server, 3546 login tries (l:1/p:3546), ~3546 tries per task
[DATA] attacking service ftp on port 21
[VERBOSE] Resolving addresses ... done
[ATTEMPT] target 192.168.1.1 - login "admin" - pass "123456" - 1 of 3546 [child 0]
[ATTEMPT] target 192.168.1.1 - login "admin" - pass "12345" - 2 of 3546 [child 0]
[ATTEMPT] target 192.168.1.1 - login "admin" - pass "password" - 3 of 3546 [child 0]
[21][ftp] host: 192.168.1.1 login: admin password: password
[STATUS] attack finished for 192.168.1.1 (waiting for children to complete tests)
1 of 1 target successfully completed, 1 valid password found
Hydra (http://www.thc.org/thc-hydra) finished at 2013-05-13 04:32:33
root@kali:~#
Check the line “[21][ftp]”. It mentions the username/password combination that worked for the ftp server. Quite easy!
Now lets take a look at the options. The t option tells how many parallel threads Hydra should create. In this case I used 1 because many routers cannot handle multiple connections and would freeze or hang for a short while. To avoid this its better to do 1 attempt at a time. The next option is “l” which tells the username or login to use. In this case its admin. Next comes the capital “P” option which provides the word list to use. Hydra will pickup each line as a single password and use it.
The “v” option is for verbose and the capital “V” option is for showing every password being tried. Last comes the host/IP address followed by the service to crack.

THC hydra help menu - click to expand

Brute forcing is the most basic form of password cracking techniques. In works well with devices like routers etc which are mostly configured with their default passwords. However when it comes to other systems, brute forcing will not work unless you are too lucky.
However still brute forcing is a good practice for hackers so you should keep trying all techniques to hack a system. So keep hacking!!

Additional tools bundled with THC Hydra

pw-inspector

It reads passwords in and prints those which meets the requirements

pw-inspector help menu - click to expand

Resources

Source: http://www.thc.org/thc-hydra/
  • Author: Van Hauser, Roland Kessler

3 open source genealogy tools for mapping your family tree

$
0
0
https://opensource.com/life/15/12/open-source-family-tree-genealogy

Genealogy, the study of family histories, is a popular pastime for millions of people worldwide. Individuals seeking to learn more about their pedigree or simply discover more about their family's past have built vibrant communities of like-minded (and possibly related) individuals to help each other play historical detective and track down the missing links in their chain of ancestry.
Fortunately, to assist in this historical sleuthing and help to organize all of the important names, dates, and documents which paint the picture of their kinship, amateur and professional genealogists alike have access to a slew of software tools. Providing a number of different features, and running on a variety of platforms, family tree researchers can choose between many options to meet their needs, and many of these choices are free, open source, and usable on a Linux operating system.
Most programs designed to help you patch together your family tree utilize a common data format for import and export, called GEDCOM, which allows for the use of many different software programs for working with the same dataset, and makes sharing easy regardless of what platform your collaborators choose to use.
Here we look at three free tools for organizing family historical records, all open source, which can help in your search for your own family's past.

HuMo-gen

HuMo-gen is a web-based genealogy program, based on PHP and MySQL, allowing it to run on nearly any standard web server platform of your choosing. Originally created in 1999 by Dutch developer Huub Mons, HuMo-gen is now available in a number of languages, including English, and is still being actively developed. It allows for storing a number of attributes for each member of the family tree, from the basic names and dates to locations, witnesses, and sources, and you can add attached files to any family member as well.
The program can generate a number of reports on the data you store inside of it, including ancestors, descendants, timelines, and an outline view. Also featured in HuMo-gen are access control groups, allowing you to decide which information is public, and what additional information is revealed to any number of tiers of access. As a web application, HuMo-gen allows you to easily style the output with simple CSS, and it has other interesting features as well, like a ancestory birthday RSS feed.
The HuMo-gen software and its source code are available for download from SourceForge and it is made available as open source under version 3 of the GPL.

Public domain screenshot via Wikipedia.

Gramps

Gramps, originally standing for "Genealogical Research and Analysis Management Programming System," is a Python-based desktop tool for managing genealogical data. While first written for Linux and similar unix-like systems, today Gramps runs on Windows and OS X as well as its original Linux base.
Gramps uses its own format, an XML variant which is also open, although it can import and export from GEDCOM as well. Gramps has a number of features and views, including stored geographic information and media, citations and sources, events records, and a dashboard interface called "Gramplets" to help you keep track of the progress of your research. You can bookmark individual relativees for easy access, and it handles historic calendar formats for dates not in the modern Gregorian calendar.
Released under version 2 of the GPL, you can check out the Gramps project and its source code on SourceForge.

Screenshot by Jason Baker.

PhpGedView and webtrees

The final genealogy projects we'll highlight here are PhpGedView, and its fork, webtrees. Like HuMo-gen, these two are developed using PHP and a MySQL backend, allowing it to run on most general purpose web hosting configurations. Though there's a good deal of feature overlap, webtrees took a slightly different direction with the project after several of PhpGedView's developers moved over to the new project.
Both projects have a variety of report types, supported import and export formats, and different views for the data included. Both also allow for the standard set of data to be stored about each person listed in your tree. Webtrees has an online demo so you can try it our yourself. While PhpGedView is stable, it has not seen the recent development that webtrees has. PhpGedView is released under version 2 of the GPL, and webtrees under version 3.

GPL-licensed screenshot via Wikipedia.

In addition to these choices, there are other tools out there as well designed with a similar purpose in mind:
  • Family.Show, released under the Microsoft Public License, is a project which was created to showcase Windows Presentation Foundation, but has not been updated in six years.
  • GenealogyJ and Ancestris are both Java-based family tree tools, which should work across a variety of desktop platforms.
  • LifeLines is an MIT-licensed tool for genealogy which sports a text-based interface, and although it has not been updated in several years, is recognized as one of the first open source projects for tracing family history.
The Gramps project wiki lists even more options that may be worth checking out. So let us know, have you tried any of these projects? Let us know which is your favorite, and why, in the comments below.

Nmap Command For Network Admins

$
0
0
http://kalitut.blogspot.ca/2015/12/nmap-command-for-network-admins.html

some of the most used Nmap command Linux
Every network admin knows about Nmap every one of them use it or used it.
It’s one of the best, it’s best of the best originally it is a Linux-only utility,
But it was ported to:


Windows, Solaris, BSD variants, HP-UX, OS X, IRIX, AmigaOS


When a software get ported to all those OS it’s a mark for how important that software is,
Whatever you are trying to do as a network admin or a Penetration Tester you will need to work with Nmap one day
What is Nmap ?
Nmap ("Network Mapper") is an open source tool for network exploration and security auditing.
It was designed to rapidly scan large networks, yet it works fine against single hosts.
Nmap uses raw IP packets in novel ways to determine what hosts are available on the network, what services those hosts are offering, what operating systems they are running, what type of packet filters/firewalls are in use, and dozens of other characteristics.
With Nmap you can know:
What computers are running on a local network.
What IP addresses are running on a local network.
What is the operating system of your target machine.
What ports are open on the machine that you just scanned.
Find out if the system is infected with malware or virus.
Search for unauthorized servers or network service on your network.
Find and remove computers which don’t meet the organization’s minimum level of security.

While Nmap is commonly used for security audits, many systems and network administrators, find it useful for routine tasks such as network inventory, managing service upgrade schedules, and monitoring host or service uptime.
To accomplish its goal, Nmap sends specially crafted packets to the target host and then analyzes the responses.
The software provides a number of features for probing computer networks we will try to learn some of the features together
Nmap originally written by Gordon Lyon first release in September 1997 Written in C, C++, Python, Lua

So now after knowing almost everything we need to know about Nmap we will start with the command list.

1) Nmap Scan a single host or an IP address (IPv4)
### Scan a single ip address ###
nmap 192.168.1.1

## Scan a host name ###
nmap exmple.com

## Scan a host name with more info###
nmap -v exmple.com
The output will show you some interesting open port and the MAC Address


2) Scan multiple IP address or subnet (IPv4)
nmap 192.168.1.1 192.168.1.2 192.168.1.3

## works with same subnet i.e. 192.168.1.0/24
nmap 192.168.1.1,2,3

## You can scan a range of IP address too:
nmap 192.168.1.1-20

## You can scan a range of IP address using a wildcard:
nmap 192.168.1.*

## Finally, you scan an entire subnet:
nmap 192.168.1.0/24


3) Read list of hosts/networks from a file (IPv4)
The -iL option allows you to read the list of target systems using a text file.
This is useful to scan a large number of hosts/networks.
Create a text file as follows:
Your Text file should look like this ( Test.txt )
facebook.com
Yahoo.com
192.168.1.0/24
192.168.1.1/24
10.15.23.7
localhost
Lets say the text file is in tmp
here is your commend

nmap -iL /tmp/test.txt
4) Excluding hosts/networks (IPv4)
When scanning a large number of hosts/networks you can exclude hosts from a scan:

nmap 192.168.1.0/24 --exclude 192.168.1.5
nmap 192.168.1.0/24 --exclude 192.168.1.5,192.168.1.254

OR exclude list from a file called /tmp/exclude.txt

nmap -iL /tmp/scanlist.txt --excludefile /tmp/exclude.txt
5) Turn on OS and version detection scanning script (IPv4)
The results of a scan might determine that a machine is listening on port 80, without knowing its corresponding OS and Web Server version makes the task of attempted compromise a “shot in the dark” methodology.
 NMap solve this dilemma by using OS and Version detection. The following commands:

nmap -A 192.168.1.254
nmap -v -A 192.168.1.1
nmap -A -iL /tmp/scanlist.txt

6) Check if a host/network is protected by a firewall

nmap -sA 192.168.1.254
nmap -sA exmple.com
7) Scan a host when protected by the firewall

nmap -PN 192.168.1.1
nmap -PN
exmple.com
8) Scan an IPv6 host/address
The -6 option enable IPv6 scanning. The syntax is:

nmap -6 IPv6-Address-Here
nmap -6 exmple.com
nmap -6 2607:f0d0:1002:51::4
nmap -v A -6 2607:f0d0:1002:51::4
9) Scan a network and find out which servers and devices are up and running
This is known as host discovery or ping scan:

nmap -sP 192.168.1.0/24
Sample outputs:
Host 192.168.1.1 is up (0.00035s latency).
MAC Address: BC:AE:C5:C3:16:93 (Unknown)
Host 192.168.1.2 is up (0.0038s latency).
MAC Address: 74:44:01:40:57:FB (Unknown)
Host 192.168.1.5 is up.
Host nas03 (192.168.1.12) is up (0.0091s latency).
MAC Address: 00:11:32:11:15:FC (Synology Incorporated)
Nmap done: 256 IP addresses (4 hosts up) scanned in 2.80 second
10) Display the reason a port is in a particular state:

nmap --reason 192.168.1.1
nmap --reason
exmple.com
11) Only show open (or possibly open) ports :

nmap --open 192.168.1.1
nmap --open
exmple.com
12) Show all packets sent and received

nmap --packet-trace 192.168.1.1
nmap --packet-trace
exmple.com
13) Show host interfaces and routes
This is useful for debugging (ip command or route command or netstat command like output using nmap)

nmap --iflist
Sample outputs:
nmap --iflist host interfaces and routes


14) Scan specific ports

map -p [port] hostName
## Scan port 80
nmap -p 80 192.168.1.1

## Scan TCP port 80
nmap -p T:80 192.168.1.1

## Scan UDP port 53
nmap -p U:53 192.168.1.1

## Scan two ports ##
nmap -p 80,443 192.168.1.1

## Scan port ranges ##
nmap -p 80-200 192.168.1.1

## Combine all options ##
nmap -p U:53,111,137,T:21-25,80,139,8080 192.168.1.1
nmap -p U:53,111,137,T:21-25,80,139,8080 server1.exampl.com
nmap -v -sU -sT -p U:53,111,137,T:21-25,80,139,8080 192.168.1.254

## Scan all ports with * wildcard ##
nmap -p "*" 192.168.1.1

## Scan top ports i.e. scan $number most common ports ##
nmap --top-ports 5 192.168.1.1
nmap --top-ports 10 192.168.1.1
Sample outputs:
nmap --top-ports


15) Scan all your devices/computers for open ports ever

nmap -T5 192.168.1.0/24
16) detect remote operating system?
You can identify a remote host apps and OS using the -O option:

nmap -O 192.168.1.1
nmap -O --osscan-guess 192.168.1.1
nmap -v -O --osscan-guess 192.168.1.1
Sample outputs:
remote operating system

17) detect remote services (server / daemon) version numbers:

nmap -sV 192.168.1.1
Sample outputs:


18) Scan a host using TCP ACK (PA) and TCP Syn (PS) ping
If firewall is blocking standard ICMP pings, try the following host discovery methods:

nmap -PS 192.168.1.1
nmap -PS 80,21,443 192.168.1.1
nmap -PA 192.168.1.1
nmap -PA 80,21,200-512 192.168.1.1

19) Scan a host using IP protocol ping
nmap -PO 192.168.1.1
20) Scan a host using UDP ping
This scan bypasses firewalls and filters that only screen TCP:

nmap -PU 192.168.1.1
nmap -PU 2000.2001 192.168.1.1

21) Find out the most commonly used TCP ports using TCP SYN Scan

### Stealthy scan ###
nmap -sS 192.168.1.1

### Find out the most commonly used TCP ports using TCP connect scan (warning: no stealth scan)
### OS Fingerprinting ###
nmap -sT 192.168.1.1

### Find out the most commonly used TCP ports using TCP ACK scan
nmap -sA 192.168.1.1

### Find out the most commonly used TCP ports using TCP Window scan
nmap -sW 192.168.1.1

### Find out the most commonly used TCP ports using TCP Maimon scan
nmap -sM 192.168.1.1

22) Scan a host for UDP services (UDP scan)
Most popular services on the Internet run over the TCP protocol. DNS, SNMP, and DHCP are three of the most common UDP services. Use the following syntax to find out UDP services:

nmap -sU nas03
nmap -sU 192.168.1.1

Starting Nmap 7.01 ( https://nmap.org ) at 2015-12-15 12:27 EST
Stats: 0:05:29 elapsed; 0 hosts completed (1 up), 1 undergoing UDP Scan
UDP Scan Timing: About 32.49% done; ETC: 01:09 (0:11:26 remaining)
Interesting ports on nas03 (192.168.1.12):
Not shown: 995 closed ports
PORT STATE SERVICE
111/udp open|filtered rpcbind
123/udp open|filtered ntp
161/udp open|filtered snmp
2049/udp open|filtered nfs
5353/udp open|filtered zeroconf
MAC Address: 00:11:32:11:15:FC (Synology Incorporated)

Nmap done: 1 IP address (1 host up) scanned in 1099.55 seconds

23) Scan for IP protocol
This type of scan allows you to determine which IP protocols (TCP, ICMP, IGMP, etc.) are supported by target machines:

nmap -sO 192.168.1.1
24) Scan a firewall for security weakness
The following scan types exploit a subtle loophole in the TCP and good for testing security of common attacks:
## TCP Null Scan to fool a firewall to generate a response ##
## Does not set any bits (TCP flag header is 0) ##
nmap -sN 192.168.1.254

## TCP Fin scan to check firewall ##
## Sets just the TCP FIN bit ##
nmap -sF 192.168.1.254

## TCP Xmas scan to check firewall ##
## Sets the FIN, PSH, and URG flags, lighting the packet up like a Christmas tree ##
nmap -sX 192.168.1.254

25) Scan a firewall for packets fragments:

The -f option causes the requested scan (including ping scans) to use tiny fragmented IP packets. The idea is to split up the TCP header over
several packets to make it harder for packet filters, intrusion detection systems, and other annoyances to detect what you are doing.
nmap -f 192.168.1.1
nmap -f fw2.nixcraft.net.in
nmap -f 15 fw2.nixcraft.net.in
## Set your own offset size with the --mtu option ##
nmap --mtu 32 192.168.1.1

26) Cloak a scan with decoys
The -D option it appear to the remote host that the host(s) you specify as decoys are scanning the target network too. Thus their IDS might report 5-10 port scans from unique IP addresses, but they won’t know which IP was scanning them and which were innocent decoys:
nmap -n -Ddecoy-ip1,decoy-ip2,your-own-ip,decoy-ip3,decoy-ip4 remote-host-ip
nmap -n -D192.168.1.5,10.5.1.2,172.1.2.4,3.4.2.1 192.168.1.5

27) Scan a firewall for MAC address spoofing:
### Spoof your MAC address ##
nmap --spoof-mac MAC-ADDRESS-HERE 192.168.1.1

### Add other options ###
nmap -v -sT -PN --spoof-mac MAC-ADDRESS-HERE 192.168.1.1

### Use a random MAC address ###
### The number 0, means nmap chooses a completely random MAC address ###
nmap -v -sT -PN --spoof-mac 0 192.168.1.1

28) How to save output to a text file
The syntax is:
nmap 192.168.1.1 > output.txt
nmap -oN /path/to/filename 192.168.1.1
nmap -oN output.txt 192.168.1.1

Those are the most important commend for NMAP
but those days many want thing to be more simple easy just a click and it scan , for that we have Zenmap
Zenmap is the official Nmap Security Scanner GUI. It is a multi-platform (Linux, Windows, Mac OS X, BSD, etc.) free and open source application which aims to make Nmap easy for beginners to use while providing advanced features for experienced Nmap users.
you can download it from here Link

Hope you found what you want here , leave a comment let me know what you need i will do my best to help
and keep in mind learning the commend lines is very important sometime you just have to deal with it without a GUI Scanner.

Tips and Tricks to Get the Most out of Your Linux WiFi

$
0
0
https://www.linux.com/learn/tutorials/872372-tips-and-tricks-to-get-the-most-out-of-your-linux-wifi

jack wifi a
Figure 1: Wireless settings.

Regardless of your operating system, wireless can sometimes be a headache. Either you drop a signal, your wireless connections flakes out, your connection is slow, or your wireless device winds up MIA. Either way, there are times you’ll wind up having to troubleshoot or tinker to get the most out of that connection.
Everyone using Linux knows that wireless problems aren’t limited to our favorite open source platform. As with printers, all operating systems can succumb to the woes of wireless. Fortunately, with Linux, there are plenty of ways to prevent or fix the problems.
For those that like to eke out the most power and functionality from their system, I will provide a few tips and tricks specific to wireless connectivity. Hopefully, one of these tips will be exactly what you need to get the most out of your own wireless connection (see Figure 1).
I will be demonstrating these tips using Ubuntu GNOME 15.10 and elementary OS Freya. If you’re using a different distribution, you’ll only need to make minor alterations to the command structure for this to work (such as, su’ing to root instead of using sudo).

Enable Disabled Wireless Device

You may run into this issue. You’ve done something to your desktop or laptop (such as, switch off the wireless with the machine's built-in WiFi adapter on/off switch -- which can save battery) which causes WiFi to show up as disabled in the Network manager. No matter how many times you reboot, wireless simply won’t turn on. Why this happens is the adapter gets hardblocked by rfkill.
If you open a terminal window and issue the command rfkill list and you see your wireless adapter listed as either hard or soft blocked, you’ll need to unblock it. To do this, issue the command rfkill unblock all. This should unblock your wireless adapter from rfkill and allow you to re-enable it (it might automatically re-enable without your interaction). If the wireless adapter doesn’t re-enable after this, reboot the machine and it should be fine.

Force Disable 802.11n

Even though 802.11n offers better data speeds, many older routers simply don’t support it. One way to gain an increase in speeds is to disable the 802.11n protocol on your wireless Linux machine — especially if your machine uses the iwlwifi driver (Intel wireless chips), because that particular driver does a poor job with the 802.11n protocol. To do this, you only need to disable the protocol to gain some speed. Here’s what you need to do:
  1. Open up a terminal window
  2. Find out what driver your wireless card uses with the command lshw -C network
  3. Locate the section driver= and note the name of the driver
  4. Change to super user with sudo su
  5. Issue the command echo "options DRIVER_NAME 11n_disable=1">> /etc/modprobe.d/DRIVER_NAME.conf (Where DRIVER_NAME is the name of the driver being used)
Note: The above change is permanent. The only way to change it would be to issue the command echo "options DRIVER_NAME 11n_disable=1">> /etc/modprobe.d/DRIVER_NAME.conf (Where DRIVER_NAME is the name of the driver being used).

Disable Power Management

Some wireless cards support power management. This feature can sometimes get in the way of the card’s connection quality (which also affects connection speeds). If your card happens to support it, you can turn off the power management feature with a simple command:
iwconfig wlp4s0 power off
The problem with the command is that, as soon as you reboot, it will reset to the default on setting. To get around this, you’ll have to create a short script that will run the command at boot. Here’s how:
Create the script (we’ll call it wifipower) with the following contents (you will substitute the name of your wireless card where mine says wlp4s0):
#!/bin/sh
/sbin/iwconfig wlp4s0 power off
Save the script and give it executable permissions with the command chmod u+x wifipower. With the permissions in place, move the file to /etc/init.d and issue the command update-rc.d wifipower defaults. Now the power management feature will turn off at boot. The only caveat to this is ensuring your card supports the feature. If it doesn’t, the power off command will report back to you that the feature isn’t supported.

Set the BSSID

Did you know that the Linux Network Manager rescans the network every two minutes? This can actually cause problems with your wireless connection. If you happen to work with your wireless in the same, familiar locations, you can set the BSSID to the MAC address of your router which will prevent Network Manager from scanning for access points on that particular wireless connection. Here’s how:
  1. Open up the Network Manager (usually found in the system tray of your desktop)
  2. Select the wireless connection you want to work with
  3. Click Edit
  4. In the Wi-Fi tab, click the drop-down associated with BSSID (Figure 2)
  5. Select the MAC address for your router (if it does not appear, you’ll have to locate it on your router and enter it manually)
  6. Click Save
    jack-wifi b
    Figure 2: Setting the BSSID for a wireless connection.

Dual-Boot Blues

If your Linux box dual boots with Windows, you may find that, after booting into Windows, your machine can no longer get an IP address. This situation is most likely caused by the fact the router thinks it already handed an IP address out to the MAC address associated with your network card.
There are a few ways around this issue. What you do will depend on how you use your machine. If you spend the vast majority of your time dual booting at home, you can simply set a static IP address for one of the operating systems. By doing this, the router will not fail to hand out a dynamically assigned IP address to the other operating system.
If you want to set the static address on the Linux side, follow these steps:
  1. Open up Network Manager
  2. Select your wireless connection from the list and click the settings icon (or Edit, depending on your desktop)
  3. Go to the IPv4 section
  4. Select Manual from the Addresses section
  5. Enter the necessary information (Figure 3)
  6. Click Apply
  7. Close Network Manager
jack-wifi c
Figure 3: Setting a static address to avoid dual-booting issues.

If you don’t want to set a static address on either side (or you cannot do so because you’re on someone else’s network), your best bet is to have Windows release the IP address before you reboot into Linux. This is done (within Windows), with the command:
ipconfig /release
Once Windows has released the IP address back to the router, it will assume the MAC address will need an IP address the next time it checks in. Reboot, and then Linux shouldn’t have any problems with wireless.
There are plenty of other wireless situations that call for other solutions, but what I’ve outlined here should go a long way to help you get the most out of your wireless connection on Linux.

How to block network traffic by country on Linux

$
0
0
http://xmodulo.com/block-network-traffic-by-country-linux.html

As a system admin who maintains production Linux servers, there are circumstances where you need to selectively block or allow network traffic based on geographic locations. For example, you are experiencing denial-of-service attacks mostly originating from IP addresses registered with a particular country. In other cases, you want to block SSH logins from unknown foreign countries for security reasons. Or your company has a distribution right to online videos, which allows it to legally stream to particular countries only. Or you need to prevent any local host from uploading documents to any non-US remote cloud storage due to geo-restriction company policies.
All these scenarios require an ability to set up a firewall which does country-based traffic filtering. There are a couple of ways to do that. For one, you can use TCP wrappers to set up conditional blocking for individual applications (e.g., SSH, NFS, httpd). The downside is that the application you want to protect must be built with TCP wrappers support. Besides, TCP wrappers are not universally available across different platforms (e.g., Arch Linux dropped its support). An alternative approach is to set up ipset with country-based GeoIP information and apply it to iptables rules. The latter approach is more promising as the iptables-based filtering is application-agnostic and easy to set up.
In this tutorial, I am going to present another iptables-based GeoIP filtering which is implemented with xtables-addons. For those unfamiliar with it, xtables-addons is a suite of extensions for netfilter/iptables. Included in xtables-addons is a module called xt_geoip which extends the netfilter/iptables to filter, NAT or mangle packets based on source/destination countries. For you to use xt_geoip, you don't need to recompile the kernel or iptables, but only need to build xtables-addons as modules, using the current kernel build environment (/lib/modules/`uname -r`/build). Reboot is not required either. As soon as you build and install xtables-addons, xt_geoip is immediately usable with iptables.
As for the comparison between xt_geoip and ipset, the official source mentions that xt_geoip is superior to ipset in terms of memory foot print. But in terms of matching speed, hash-based ipset might have an edge.
In the rest of the tutorial, I am going to show how to use iptables/xt_geoip to block network traffic based on its source/destination countries.

Install Xtables-addons on Linux

Here is how you can compile and install xtables-addons on various Linux platforms.
To build xtables-addons, you need to install a couple of dependent packages first.

Install Dependencies on Debian, Ubuntu or Linux Mint

$ sudo apt-get install iptables-dev xtables-addons-common libtext-csv-xs-perl pkg-config

Install Dependencies on CentOS, RHEL or Fedora

CentOS/RHEL 6 requires EPEL repository being set up first (for perl-Text-CSV_XS).
$ sudo yum install gcc-c++ make automake kernel-devel-`uname -r` wget unzip iptables-devel perl-Text-CSV_XS

Compile and Install Xtables-addons

Download the latest xtables-addons source code from the official site, and build/install it as follows.
$ wget http://downloads.sourceforge.net/project/xtables-addons/Xtables-addons/xtables-addons-2.10.tar.xz
$ tar xf xtables-addons-2.10.tar.xz
$ cd xtables-addons-2.10
$ ./configure
$ make
$ sudo make install
Note that for Red Hat based systems (CentOS, RHEL, Fedora) which have SELinux enabled by default, it is necessary to adjust SELinux policy as follows. Otherwise, SELinux will prevent iptables from loading xt_geoip module.
$ sudo chcon -vR --user=system_u /lib/modules/$(uname -r)/extra/*.ko
$ sudo chcon -vR --type=lib_t /lib64/xtables/*.so

Install GeoIP Database for Xtables-addons

The next step is to install GeoIP database which will be used by xt_geoip for IP-to-country mapping. Conveniently, the xtables-addons source package comes with two helper scripts for downloading GeoIP database from MaxMind and converting it into a binary form recognized by xt_geoip. These scripts are found in geoip folder inside the source package. Follow the instructions below to build and install GeoIP database on your system.
$ cd geoip
$ ./xt_geoip_dl
$ ./xt_geoip_build GeoIPCountryWhois.csv
$ sudo mkdir -p /usr/share/xt_geoip
$ sudo cp -r {BE,LE} /usr/share/xt_geoip
According to MaxMind, their GeoIP database is 99.8% accurate on a country-level, and the database is updated every month. To keep the locally installed GeoIP database up-to-date, you want to set up a monthly cron job to refresh the local GeoIP database as often.

Block Network Traffic Originating from or Destined to a Country

Once xt_geoip module and GeoIP database are installed, you can immediately use the geoip match options in iptables command.
$ sudo iptables -m geoip --src-cc country[,country...] --dst-cc country[,country...]
Countries you want to block are specified using two-letter ISO3166 code (e.g., US (United States), CN (China), IN (India), FR (France)).
For example, if you want to block incoming traffic from Yemen (YE) and Zambia (ZM), the following iptables command will do.
$ sudo iptables -I INPUT -m geoip --src-cc YE,ZM -j DROP
If you want to block outgoing traffic destined to China (CN), run the following command.
$ sudo iptables -A OUTPUT -m geoip --dst-cc CN -j DROP
The matching condition can also be "negated" by prepending "!" to "--src-cc" or "--dst-cc". For example:
If you want to block all incoming non-US traffic on your server, run this:
$ sudo iptables -I INPUT -m geoip ! --src-cc US -j DROP

For Firewall-cmd Users

Some distros such as CentOS/RHEL 7 or Fedora have replaced iptables with firewalld as the default firewall service. On such systems, you can use firewall-cmd to block traffic using xt_geoip similarly. The above three examples can be rewritten with firewall-cmd as follows.
$ sudo firewall-cmd --direct --add-rule ipv4 filter INPUT 0 -m geoip --src-cc YE,ZM -j DROP
$ sudo firewall-cmd --direct --add-rule ipv4 filter OUTPUT 0 -m geoip --dst-cc CN -j DROP
$ sudo firewall-cmd --direct --add-rule ipv4 filter INPUT 0 -m geoip ! --src-cc US -j DROP

Conclusion

In this tutorial, I presented iptables/xt_geoip which is an easy way to filter network packets based on their source/destination countries. This can be a useful arsenal to deploy in your firewall system if needed. As a final word of caution, I should mention that GeoIP-based traffic filtering is not a foolproof way to ban certain countries on your server. GeoIP database is by nature inaccurate/incomplete, and source/destination geography can easily be spoofed using VPN, Tor or any compromised relay hosts. Geography-based filtering can even block legitimate traffic that should not be banned. Understand this limitation before you decide to deploy it in your production environment.
Download this article as ad-free PDF (made possible by your kind donation): 
Download PDF

Squid Proxy Hide System’s Real IP Address

$
0
0
http://www.cyberciti.biz/faq/squid-proxy-is-not-hiding-client-ip-address

My squid proxy server is displaying system's real IP address. I've a corporate password protected squid proxy server located at 202.54.1.2. My clients work from home or offices via A/DSL / cable connections. Squid should hide all system's IP address, but it is forwarding and displaying the system's IP address. How do I configure squid to hide client's real IP address?

Squid proxy server has a directive called forwarded_for. If set, Squid will include your system's IP address or a name of the HTTP requests it forwards. By default it looks like
this:
X-Forwarded-For: 191.1.2.5
If you disable this (set to "off"), it will appear as
X-Forwarded-For: unknown
If set to "transparent", Squid will not alter the X-Forwarded-For header in any way. If set to "delete", Squid will delete the entire X-Forwarded-For header. If set to "truncate", Squid will remove all existing X-Forwarded-For entries, and place the client IP as the sole entry.

Configuration

Open squid.conf file:
# vi squid.conf
Or (for squid version 3)
# vi /etc/squid3/squid.conf
Set forwarded_for to off:
forwarded_for off
OR set it to delete:
forwarded_for delete
Save and close the file.

Reload squid server

You need to restart the squid server, enter:
# /etc/init.d/squid restart
OR
# squid -k reconfigure
For squid version 3, run:
# squid3 -k reconfigure
Here are my options:
# Hide client ip #
forwarded_for delete
 
# Turn off via header #
via off
 
# Deny request for original source of a request
follow_x_forwarded_for deny all
 
# See below
request_header_access X-Forwarded-For deny all
 

Say hello to request_header_access

By default, all headers are allowed (no anonymizing is performed for privacy). You can anonymize outgoing HTTP headers (i.e. headers sent by Squid to the following HTTP hop such as a cache peer or an origin server) to create the standard or paranoid experience. The following option are only tested on squid server version 3.x:

Squid standard anonymizer privacy experience

Set the following options in squid3.conf:
 
request_header_access From deny all
request_header_access Referer deny all
request_header_access User-Agent deny all
 
Save and close the file. Do not forget to restart the squid3 as described above.

Squid standard privacy experience

Set the following options in squid3.conf:
 
request_header_access Authorization allow all
request_header_access Proxy-Authorization allow all
request_header_access Cache-Control allow all
request_header_access Content-Length allow all
request_header_access Content-Type allow all
request_header_access Date allow all
request_header_access Host allow all
request_header_access If-Modified-Since allow all
request_header_access Pragma allow all
request_header_access Accept allow all
request_header_access Accept-Charset allow all
request_header_access Accept-Encoding allow all
request_header_access Accept-Language allow all
request_header_access Connection allow all
request_header_access All deny all
 
Save and close the file. Do not forget to restart the squid3 as described above.

Server Hardening

$
0
0
http://www.linuxjournal.com/content/server-hardening

Server hardening. The very words conjure up images of tempering soft steel into an unbreakable blade, or taking soft clay and firing it in a kiln, producing a hardened vessel that will last many years. Indeed, server hardening is very much like that. Putting an unprotected server out on the Internet is like putting chum in the ocean water you are swimming in—it won't be long and you'll have a lot of excited sharks circling you, and the outcome is unlikely to be good. Everyone knows it, but sometimes under the pressure of deadlines, not to mention the inevitable push from the business interests to prioritize those things with more immediate visibility and that add to the bottom line, it can be difficult to keep up with even what threats you need to mitigate, much less the best techniques to use to do so. This is how corners get cut—corners that increase our risk of catastrophe.
This isn't entirely inexcusable. A sysadmin must necessarily be a jack of all trades, and security is only one responsibility that must be considered, and not the one most likely to cause immediate pain. Even in organizations that have dedicated security staff, those parts of the organization dedicated to it often spend their time keeping up with the nitty gritty of the latest exploits and can't know the stack they are protecting as well as those who are knee deep in maintaining it. The more specialized and diversified the separate organizations, the more isolated each group becomes from the big picture. Without the big picture, sensible trade-offs between security and functionality are harder to make. Since a deep and thorough knowledge of the technology stack along with the business it serves is necessary to do a thorough job with security, it sometimes seems nearly hopeless.
A truly comprehensive work on server hardening would be beyond the scope not only of a single article, but a single (very large) book, yet all is not lost. It is true that there can be no "one true hardening procedure" due to the many and varied environments, technologies and purposes to which those technologies are put, but it is also true that you can develop a methodology for governing those technologies and the processes that put the technology to use that can guide you toward a sane setup. You can boil down the essentials to a few principles that you then can apply across the board. In this article, I explore some examples of application.
I also should say that server hardening, in itself, is almost a useless endeavor if you are going to undercut yourself with lazy choices like passwords of "abc123" or lack a holistic approach to security in the environment. Insecure coding practices can mean that the one hole you open is gaping, and users e-mailing passwords can negate all your hard work. The human element is key, and that means fostering security consciousness at all steps of the process. Security that is bolted on instead of baked in will never be as complete or as easy to maintain, but when you don't have executive support for organizational standards, bolting it on may be the best you can do. You can sleep well though knowing that at least the Linux server for which you are responsible is in fact properly if not exhaustively secured.
The single most important principle of server hardening is this: minimize your attack surface. The reason is simple and intuitive: a smaller target is harder to hit. Applying this principle across all facets of the server is essential. This begins with installing only the specific packages and software that are exactly necessary for the business purpose of the server and the minimal set of management and maintenance packages. Everything present must be vetted and trusted and maintained. Every line of code that can be run is another potential exploit on your system, and what is not installed can not be used against you. Every distribution and service of which I am aware has an option for a minimal install, and this is always where you should begin.
The second most important principle is like it: secure that which must be exposed. This likewise spans the environment from physical access to the hardware, to encrypting everything that you can everywhere—at rest on the disk, on the network and everywhere in between. For the physical location of the server, locks, biometrics, access logs—all the tools you can bring to bear to controlling and recording who gains physical access to your server are good things, because physical access, an accessible BIOS and a bootable USB drive are just one combination that can mean that your server might as well have grown legs and walked away with all your data on it. Rogue, hidden wireless SSIDs broadcast from a USB device can exist for some time before being stumbled upon.
For the purposes of this article though, I'm going to make a few assumptions that will shrink the topics to cover a bit. Let's assume you are putting a new Linux-based server on a cloud service like AWS or Rackspace. What do you need to do first? Since this is in someone else's data center, and you already have vetted the physical security practices of the provider (right?), you begin with your distribution of choice and a minimal install—just enough to boot and start SSH so you can access your shiny new server.
Within the parameters of this example scenario, there are levels of concern that differ depending on the purpose of the server, ranging from "this is a toy I'm playing with, and I don't care what happens to it" all the way to "governments will topple and masses of people die if this information is leaked", and although a different level of paranoia and effort needs to be applied in each case, the principles remain the same. Even if you don't care what ultimately happens to the server, you still don't want it joining a botnet and contributing to Internet Mayhem. If you don't care, you are bad and you should feel bad. If you are setting up a server for the latter purpose, you are probably more expert than myself and have no reason to be reading this article, so let's split the difference and assume that should your server be cracked, embarrassment, brand damage and loss of revenue (along with your job) will ensue.
In any of these cases, the very first thing to do is tighten your network access. If the hosting provider provides a mechanism for this, like Amazon's "Zones", use it, but don't stop there. Underneath securing what must be exposed is another principle: layers within layers containing hurdle after hurdle. Increase the effort required to reach the final destination, and you reduce the number that are willing and able to reach it. Zones, or network firewalls, can fail due to bugs, mistakes and who knows what factors that could come into play. Maximizing redundancy and backup systems in the case of failure is a good in itself. All of the most celebrated data thefts have happened when not just some but all of the advice contained in this article was ignored, and if only one hurdle had required some effort to surmount, it is likely that those responsible would have moved on to someone else with lower hanging fruit. Don't be the lower hanging fruit. You don't always have to outrun the bear.
The first principle, that which is not present (installed or running) can not be used against you, requires that you ensure you've both closed down and turned off all unnecessary services and ports in all runlevels and made them inaccessible via your server's firewall, in addition to whatever other firewalling you are doing on the network. This can be done via your distribution's tools or simply by editing filenames in /etc/rcX.d directories. If you aren't sure if you need something, turn it off, reboot, and see what breaks.
But, before doing the above, make sure you have an emergency console back door first! This won't be the last time you need it. When just beginning to tinker with securing a server, it is likely you will lock yourself out more than once. If your provider doesn't provide a console that works when the network is inaccessible, the next best thing is to take an image and roll back if the server goes dark.
I suggest first doing two things: running ps -ef and making sure you understand what all running processes are doing, and lsof -ni | grep LISTEN to make sure you understand why all the listening ports are open, and that the process you expect has opened them.
For instance, on one of my servers running WordPress, the results are these:

# ps -ef | grep -v \] | wc -l
39
I won't list out all of my process names, but after pulling out all the kernel processes, I have 39 other processes running, and I know exactly what all of them are and why they are running. Next I examine:

# lsof -ni | grep LISTEN
mysqld 1638 mysql 10u IPv4 10579 0t0 TCP
127.0.0.1:mysql (LISTEN)
sshd 1952 root 3u IPv4 11571 0t0 TCP *:ssh (LISTEN)
sshd 1952 root 4u IPv6 11573 0t0 TCP *:ssh (LISTEN)
nginx 2319 root 7u IPv4 12400 0t0 TCP *:http (LISTEN)
nginx 2319 root 8u IPv4 12401 0t0 TCP *:https (LISTEN)
nginx 2319 root 9u IPv6 12402 0t0 TCP *:http (LISTEN)
nginx 2320 www-data 7u IPv4 12400 0t0 TCP *:http (LISTEN)
nginx 2320 www-data 8u IPv4 12401 0t0 TCP *:https (LISTEN)
nginx 2320 www-data 9u IPv6 12402 0t0 TCP *:http (LISTEN)
This is exactly as I expect, and it's the minimal set of ports necessary for the purpose of the server (to run WordPress).
Now, to make sure only the necessary ports are open, you need to tune your firewall. Most hosting providers, if you use one of their templates, will by default have all rules set to "accept". This is bad. This defies the second principle: whatever must be exposed must be secured. If, by some accident of nature, some software opened a port you did not expect, you need to make sure it will be inaccessible.
Every distribution has its tools for managing a firewall, and others are available in most package managers. I don't bother with them, as iptables (once you gain some familiarity with it) is fairly easy to understand and use, and it is the same on all systems. Like vi, you can expect its presence everywhere, so it pays to be able to use it. A basic firewall looks something like this:

# make sure forwarding is off and clear everything
# also turn off ipv6 cause if you don't need it
# turn it off
sysctl net.ipv6.conf.all.disable_ipv6=1
sysctl net.ipv4.ip_forward=0
iptables -F
iptables --flush
iptables -t nat --flush
iptables -t mangle --flush
iptables --delete-chain
iptables -t nat --delete-chain
iptables -t mangle --delete-chain


#make the default -drop everything
iptables --policy INPUT DROP
iptables --policy OUTPUT ACCEPT
iptables --policy FORWARD DROP


#allow all in loopback
iptables -A INPUT -i lo -j ACCEPT

#allow related
iptables -A INPUT -m state --state
↪ESTABLISHED,RELATED -j ACCEPT

#allow ssh
iptables -A INPUT -m tcp -p tcp --dport 22 -j ACCEPT
You can get fancy, wrap this in a script, drop a file in /etc/rc.d, link it to the runlevels in /etc/rcX.d, and have it start right after networking, or it might be sufficient for your purposes to run it straight out of /etc/rc.local. Then you modify this file as requirements change. For instance, to allow ssh, http and https traffic, you can switch the last line above to this one:

iptables -A INPUT -p tcp -m state --state NEW -m
↪multiport --dports ssh,http,https -j ACCEPT
More specific rules are better. Let's say what you've built is an intranet server, and you know where your traffic will be coming from and on what interface. You instead could add something like this to the bottom of your iptables script:

iptables -A INPUT -i eth0 -s 192.168.1.0/24 -p tcp
↪-m state --state NEW -m multiport --dports http,https
There are a couple things to consider in this example that you might need to tweak. For one, this allows all outbound traffic initiated from the server. Depending on your needs and paranoia level, you may not wish to do so. Setting outbound traffic to default deny will significantly complicate maintenance for things like security updates, so weigh that complication against your level of concern about rootkits communicating outbound to phone home. Should you go with default deny for outbound, iptables is an extremely powerful and flexible tool—you can control outbound communications based on parameters like process name and owning user ID, rate limit connections—almost anything you can think of—so if you have the time to experiment, you can control your network traffic with a very high degree of granularity.
Second, I'm setting the default to DROP instead of REJECT. DROPis a bit of security by obscurity. It can discourage a script kiddie if his port scan takes too long, but since you have commonly scanned ports open, it will not deter a determined attacker, and it might complicate your own troubleshooting as you have to wait for the client-side timeout in the case you've blocked a port in iptables, either on purpose or by accident. Also, as I've detailed in a previous article in Linux Journal (http://www.linuxjournal.com/content/back-dead-simple-bash-complex-ddos), TCP-level rejects are very useful in high traffic situations to clear out the resources used to track connections statefully on the server and on network gear farther out. Your mileage may vary.
Finally, your distribution's minimal install might not have sysctl installed or on by default. You'll need that, so make sure it is on and works. It makes inspecting and changing system values much easier, as most versions support tab auto-completion. You also might need to include full paths to the binaries (usually /sbin/iptables and /sbin/sysctl), depending on the base path variable of your particular system.
All of the above probably should be finished within a few minutes of bringing up the server. I recommend not opening the ports for your application until after you've installed and configured the applications you are running on the server. So at the point when you have a new minimal server with only SSH open, you should apply all updates using your distribution's method. You can decide now if you want to do this manually on a schedule or set them to automatic, which your distribution probably has a mechanism to do. If not, a script dropped in cron.daily will do the trick. Sometimes updates break things, so evaluate carefully. Whether you do automatic updates or not, with the frequency with which critical flaws that sometimes require manual configuration changes are being uncovered right now, you need to monitor the appropriate lists and sites for critical security updates to your stack manually, and apply them as necessary.
Once you've dealt with updates, you can move on and continue to evaluate your server against the two security principles of 1) minimal attack surface and 2) secure everything that must be exposed. At this point, you are pretty solid on point one. On point two, there is more you can yet do.
The concept of hurdles requires that you not allow root to log in remotely. Gaining root should be at least a two-part process. This is easy enough; you simply set this line in /etc/ssh/sshd_config:

PermitRootLogin no
For that matter, root should not be able to log in directly at all. The account should have no password and should be accessible only via sudo—another hurdle to clear.
If a user doesn't need to have remote login, don't allow it, or better said, allow only users that you know need remote access. This satisfies both principles. Use the AllowUsers and AllowGroups settings in /etc/ssh/sshd_config to make sure you are allowing only the necessary users.
You can set a password policy on your server to require a complex password for any and all users, but I believe it is generally a better idea to bypass crackable passwords altogether and use key-only login, and have the key require a complex passphrase. This raises the bar for cracking into your system, as it is virtually impossible to brute force an RSA key. The key could be physically stolen from your client system, which is why you need the complex passphrase. Without getting into a discussion of length or strength of key or passphrase, one way to create it is like this:

ssh-keygen -t rsa
Then when prompted, enter and re-enter the desired passphrase. Copy the public portion (id_rsa.pub or similar) into a file in the user's home directory called ~/.ssh/authorized_keys, and then in a new terminal window, try logging in, and troubleshoot as necessary. I store the key and the passphrase in a secure data vault provided by Personal, Inc. (https://personal.com), and this will allow me, even if away from home and away from my normal systems, to install the key and have the passphrase to unlock it, in case an emergency arises. (Disclaimer: Personal is the startup I work with currently.)
Once it works, change this line in /etc/ssh/sshd_config:

PasswordAuthentication no
Now you can log in only with the key. I still recommend keeping a complex password for the users, so that when you sudo, you have that layer of protection as well. Now to take complete control of your server, an attacker needs your private key, your passphrase and your password on the server—hurdle after hurdle. In fact, in my company, we also use multi-factor authentication in addition to these other methods, so you must have the key, the passphrase, the pre-secured device that will receive the notification of the login request and the user's password. That is a pretty steep hill to climb.
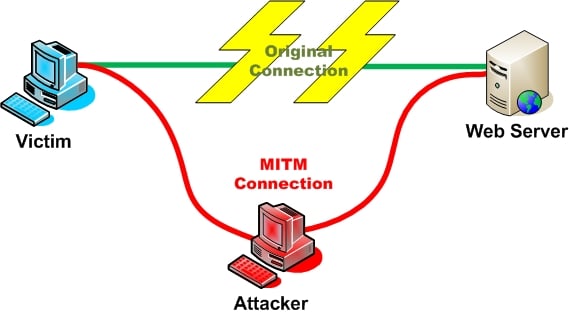
Encryption is a big part of keeping your server secure—encrypt everything that matters to you. Always be aware of how data, particularly authentication data, is stored and transmitted. Needless to say, you never should allow login or connections over an unencrypted channel like FTP, Telnet, rsh or other legacy protocols. These are huge no-nos that completely undo all the hard work you've put into securing your server. Anyone who can gain access to a switch nearby and perform reverse arp poisoning to mirror your traffic will own your servers. Always use sftp or scp for file transfers and ssh for secure shell access. Use https for logins to your applications, and never store passwords, only hashes.
Even with strong encryption in use, in the recent past, many flaws have been found in widely used programs and protocols—get used to turning ciphers on and off in both OpenSSH and OpenSSL. I'm not covering Web servers here, but the lines of interest you would put in your /etc/ssh/sshd_config file would look something like this:

Ciphers aes128-ctr,aes192-ctr,aes256-ctr,arcfour256,arcfour128
MACs hmac-sha1,umac-64@openssh.com,hmac-ripemd160
Then you can add or remove as necessary. See man sshd_config for all the details.
Depending on your level of paranoia and the purpose of your server, you might be tempted to stop here. I wouldn't. Get used to installing, using and tuning a few more security essentials, because these last few steps will make you exponentially more secure. I'm well into principle two now (secure everything that must be exposed), and I'm bordering on the third principle: assume that every measure will be defeated. There is definitely a point of diminishing returns with the third principle, where the change to the risk does not justify the additional time and effort, but where that point falls is something you and your organization have to decide.
The fact of the matter is that even though you've locked down your authentication, there still exists the chance, however small, that a configuration mistake or an update is changing/breaking your config, or by blind luck an attacker could find a way into your system, or even that the system came with a backdoor. There are a few things you can do that will further protect you from those risks.
Speaking of backdoors, everything from phones to the firmware of hard drives has backdoors pre-installed. Lenovo has been caught no less than three times pre-installing rootkits, and Sony rooted customer systems in a misguided attempt at DRM. A programming mistake in OpenSSL left a hole open that the NSA has been exploiting to defeat encryption for at least a decade without informing the community, and this was apparently only one of several. In the late 2000s, someone anonymously attempted to insert a two-line programming error into the Linux kernel that would cause a remote root exploit under certain conditions. So suffice it to say, I personally do not trust anything sourced from the NSA, and I turn SELinux off because I'm a fan of warrants and the fourth amendment. The instructions are generally available, but usually all you need to do is make this change to /etc/selinux/config:

#SELINUX=enforcing # comment out
SELINUX=disabled # turn it off, restart the system
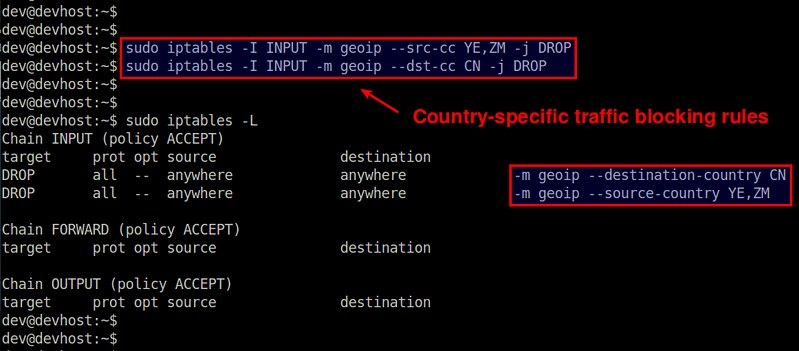
In the spirit of turning off and blocking what isn't needed, since most of the malicious traffic on the Internet comes from just a few sources, why do you need to give them a shot at cracking your servers? I run a short script that collects various blacklists of exploited servers in botnets, Chinese and Russian CIDR ranges and so on, and creates a blocklist from them, updating once a day. Back in the day, you couldn't do this, as iptables gets bogged down matching more than a few thousand lines, so having a rule for every malicious IP out there just wasn't feasible. With the maturity of the ipset project, now it is. ipset uses a binary search algorithm that adds only one pass to the search each time the list doubles, so an arbitrarily large list can be searched efficiently for a match, although I believe there is a limit of 65k entries in the ipset table.
To make use of it, add this at the bottom of your iptables script:

#create iptables blocklist rule and ipset hash
ipset create blocklist hash:net
iptables -I INPUT 1 -m set --match-set blocklist
↪src -j DROP
Then put this somewhere executable and run it out of cron once a day:

#!/bin/bash

PATH=$PATH:/sbin
WD=`pwd`
TMP_DIR=$WD/tmp
IP_TMP=$TMP_DIR/ip.temp
IP_BLOCKLIST=$WD/ip-blocklist.conf
IP_BLOCKLIST_TMP=$TMP_DIR/ip-blocklist.temp
list="chinese nigerian russian lacnic exploited-servers"
BLOCKLISTS=(
"http://www.projecthoneypot.org/list_of_ips.php?t=d&rss=1" # Project
↪Honey Pot Directory of Dictionary Attacker IPs
"http://check.torproject.org/cgi-bin/TorBulkExitList.py?ip=1.1.1.1"
↪# TOR Exit Nodes
"http://www.maxmind.com/en/anonymous_proxies" # MaxMind GeoIP
↪Anonymous Proxies
"http://danger.rulez.sk/projects/bruteforceblocker/blist.php"
↪# BruteForceBlocker IP List
"http://rules.emergingthreats.net/blockrules/rbn-ips.txt"
↪# Emerging Threats - Russian Business Networks List
"http://www.spamhaus.org/drop/drop.lasso" # Spamhaus Dont Route
↪Or Peer List (DROP)
"http://cinsscore.com/list/ci-badguys.txt" # C.I. Army Malicious
↪IP List
"http://www.openbl.org/lists/base.txt" # OpenBLOCK.org 30 day List
"http://www.autoshun.org/files/shunlist.csv" # Autoshun Shun List
"http://lists.blocklist.de/lists/all.txt" # blocklist.de attackers
)

cd $TMP_DIR
# This gets the various lists
for i in "${BLOCKLISTS[@]}"
do
curl "$i"> $IP_TMP
grep -Po '(?:\d{1,3}\.){3}\d{1,3}(?:/\d{1,2})?' $IP_TMP >>
$IP_BLOCKLIST_TMP
done
for i in `echo $list`; do
# This section gets wizcrafts lists
wget --quiet http://www.wizcrafts.net/$i-iptables-blocklist.html
# Grep out all but ip blocks
cat $i-iptables-blocklist.html | grep -v \< | grep -v \: |
↪grep -v \; | grep -v \# | grep [0-9] > $i.txt
# Consolidate blocks into master list
cat $i.txt >> $IP_BLOCKLIST_TMP
done

sort $IP_BLOCKLIST_TMP -n | uniq > $IP_BLOCKLIST
rm $IP_BLOCKLIST_TMP
wc -l $IP_BLOCKLIST

ipset flush blocklist
egrep -v "^#|^$" $IP_BLOCKLIST | while IFS= read -r ip
do
ipset add blocklist $ip
done

#cleanup
rm -fR $TMP_DIR/*

exit 0
It's possible you don't want all these blocked. I usually leave tor exit nodes open to enable anonymity, or if you do business in China, you certainly can't block every IP range coming from there. Remove unwanted items from the URLs to be downloaded. When I turned this on, within 24 hours, the number of banned IPs triggered by brute-force crack attempts on SSH dropped from hundreds to less than ten.
Although there are many more areas to be hardened, since according to principle three we assume all measures will be defeated, I will have to leave things like locking down cron and bash as well as automating standard security configurations across environments for another day. There are a few more packages I consider security musts, including multiple methods to check for intrusion (I run both chkrootkit and rkhunter to update signatures and scan my systems at least daily). I want to conclude with one last must-use tool: Fail2ban.
Fail2ban is available in virtually every distribution's repositories now, and it has become my go-to. Not only is it an extensible Swiss-army knife of brute-force authentication prevention, it comes with an additional bevy of filters to detect other attempts to do bad things to your system. If you do nothing but install it, run it, keep it updated and turn on its filters for any services you run, especially SSH, you will be far better off than you were otherwise. As for me, I have other higher-level software like WordPress log to auth.log for filtering and banning of malefactors with Fail2ban. You can custom-configure how long to ban based on how many filter matches (like failed login attempts of various kinds) and specify longer bans for "recidivist" abusers that keep coming back.
Here's one example of the extensibility of the tool. During log review (another important component of a holistic security approach), I noticed many thousands of the following kinds of probes, coming especially from China:

sshd[***]: Received disconnect from **.**.**.**: 11: Bye Bye [preauth]
There were two forms of this, and I could not find any explanation of a known exploit that matched this pattern, but there had to be a reason I was getting so many so quickly. It wasn't enough to be a denial of service, but it was a steady flow. Either it was a zero-day exploit or some algorithm sending malformed requests of various kinds hoping to trigger a memory problem in hopes of uncovering an exploit—in any case, there was no reason to allow them to continue.
I added this line to the failregex = section of /etc/fail2ban/filter.d/sshd.local:

^%(__prefix_line)sReceived disconnect from :
↪11: (Bye Bye)? \[preauth\]$
Within minutes, I had banned 20 new IP addresses, and my logs were almost completely clear of these lines going forward.
By now, you've seen my three primary principles of server hardening in action enough to know that systematically applying them to your systems will have you churning out reasonably hardened systems in no time. But, just to reiterate one more time:
  1. Minimize attack surface.
  2. Secure whatever remains and must be exposed.
  3. Assume all security measures will be defeated.
Feel free to give me a shout and let me know what you thought about the article. Let me know your thoughts on what I decided to include, any major omissions I cut for the sake of space you thought should have been included, and things you'd like to see in the future!

DevopsWiki

$
0
0
https://github.com/Leo-G/DevopsWiki

A wiki of Guides, Scripts, Tutorials related to devops
Devops tools

Table of Contents

  1. Vim
  2. Bash Guides and Scripts
  3. Python Guides and Scripts
  4. Awk Guides
  5. Sed
  6. Automation Guides
  7. Git
  8. Troubleshooting
  9. Backups
  10. Email Server Configuration
  11. Firewall and Monitoring
  12. Miscellaneous
  13. C programming
  14. Data Structures
  15. Code Editors
  16. Video Tutorials
  17. Continuous Integration
  18. Docker

Vim

Vim Cheat Sheet
http://michael.peopleofhonoronly.com/vim/
Vim Regular Expressions 101
http://vimregex.com/

Bash Guides and Scripts

Real time file syncing daemon with inotify tools
https://github.com/Leo-G/backup-bash
http://techarena51.com/index.php/inotify-tools-example/
Creating Init/Systemd Scripts
http://techarena51.com/index.php/how-to-create-an-init-script-on-centos-6/
Building an RPM on CentOS
http://techarena51.com/index.php/build-rpm-without-breaking-head/
Bash Scripting Tutorials for Beginners
http://techarena51.com/index.php/bash-scripting-tutorial-part-2/
http://techarena51.com/index.php/a-beginners-guide-to-bash-scripting/
Bash variable Expansion
http://wiki.bash-hackers.org/syntax/pe
Bash Special Characters explained
http://mywiki.wooledge.org/BashGuide/SpecialCharacters
Bash process substitution
http://redpill-linpro.com/sysadvent/2015/12/12/bash-process-substitution.html
Bash Indepth Tutorial
http://tldp.org/HOWTO/Bash-Prog-Intro-HOWTO.html
Back to top

Python Guides and Scripts

Python 3 String Encoding and Formatting
http://www.diveintopython3.net/strings.html
Python Local and Global Scopes
https://automatetheboringstuff.com/chapter3/
Building system monitoring apps in Python with Flask
http://techarena51.com/index.php/how-to-install-python-3-and-flask-on-linux/
Building a Database driven RESTFUL API in Python 3 with Flask
http://techarena51.com/index.php/buidling-a-database-driven-restful-json-api-in-python-3-with-flask-flask-restful-and-sqlalchemy/
Building Database driven apps with MySQL or PostgreSQL using Python and SQLAlchemy ORM
http://techarena51.com/index.php/flask-sqlalchemy-tutorial/
http://techarena51.com/index.php/flask-sqlalchemy-postgresql-tutorial/
Token based Authentication with Pyjwt
http://techarena51.com/index.php/json-web-token-authentication-with-flask-and-angularjs/
Script to automatically Scaffold a database driven CRUD app in python
https://github.com/Leo-G/Flask-Scaffold
Psutil a cross-platform Python library for retrieving information on running processes and system utilization (CPU, memory, disks, network)
https://pypi.python.org/pypi/psutil
Automating web testing with Selenium
http://techarena51.com/index.php/install-selenium-linux-automate-web-tests/
Flask Github Webhook Handler
http://techarena51.com/index.php/flask-github-webhook-handler/
Flask Web Sockets
http://blog.miguelgrinberg.com/post/easy-websockets-with-flask-and-gevent
Understanding Threading and the Global Interpreter Lock
http://jessenoller.com/blog/2009/02/01/python-threads-and-the-global-interpreter-lock
Packaging and Distributing Python Projects
http://python-packaging-user-guide.readthedocs.org/en/latest/distributing/
Python Indepth Tutorial
https://automatetheboringstuff.com/
Back to top

Awk Guides

An introduction to Awk
http://www.grymoire.com/Unix/Awk.html
Text Processing examples with Awk
http://techarena51.com/index.php/advance-text-processing-examples-awk/
Back to top

Sed

An introduction and Tutorial
http://www.grymoire.com/Unix/Sed.html
Back to top

Automation Guides

Automating Server Configs with Puppet
http://techarena51.com/index.php/a-simple-way-to-install-and-configure-a-puppet-server-on-linux/
Automating Server Configs with the SaltStack
http://techarena51.com/index.php/getting-started-with-saltstack/
Using Foreman, an Opensource Frontend for Puppet
http://techarena51.com/index.php/using-foreman-opensource-frontend-puppet/
Using StackStorm, an Opensource platform for integration and automation across services and tools.
https://docs.stackstorm.com/overview.html#st2-overview
Back to top

Git

Git Quick Start
http://rogerdudler.github.io/git-guide/
Git Indepth Tutorial
http://www.vogella.com/tutorials/Git/article.html#gitdefintion_tools1
Back to top

Troubleshooting

Troubleshooting Linux Server Memory Usage
http://techarena51.com/index.php/linux-memory-usage/
Troubleshooting Programs on Linux with Strace
http://www.redpill-linpro.com/sysadvent//2015/12/10/introduction-to-strace.html
Using Watch to continously Monitor a command
http://techarena51.com/index.php/watch-command-linux/
Troubleshooting with Tcpdump
http://techarena51.com/index.php/tcpdump-examples-to-capture-passwords/
Back to top

Backups

BUP Git based Backup
http://techarena51.com/index.php/using-git-backup-website-files-on-linux/
Real time Backup Script written in bash
https://github.com/Leo-G/backup-bash
MySQL incremental Backup with Percona
https://www.percona.com/doc/percona-xtrabackup/2.3/xtrabackup_bin/incremental_backups.html
Back to top

Email Server Configuration

Postfix configuration
http://techarena51.com/index.php/configure-secure-postfix-email-server/
Fail2ban configuration
http://techarena51.com/index.php/confiigure-fail2ban-block-brute-force-ips-scanning-postfix-logs/
Troubleshooting
http://techarena51.com/index.php/postfix-configuration-and-explanation-of-parameters/
Adding DMARC records
http://techarena51.com/index.php/what-is-dmarc-and-how-you-can-add-it/
Back to top

Firewall and Monitoring

Configuring a Firewall for linux with CSF and LFD
http://techarena51.com/index.php/how-to-configure-and-install-config-server-firewall-login-failure-daemon/
Monitoring Linux Servers with Monit
http://techarena51.com/index.php/how-to-install-monit-monitoring-service-on-your-linux-vps-server/
Back to top

Miscellaneous

Linux System Calls
http://www.digilife.be/quickreferences/qrc/linux%20system%20call%20quick%20reference.pdf
Linux one second boot
http://events.linuxfoundation.org/sites/events/files/slides/praesentation.pdf
Installing a VPN server on Linux
http://techarena51.com/index.php/how-to-install-an-opensource-vpn-server-on-linux/
Installing Ruby on Rails on Linux
http://techarena51.com/index.php/how-to-install-ruby-ruby-on-rails-and-phusion-passenger-on-centos/
Installing Gunicorn on Linux
http://techarena51.com/index.php/deploy-flask-on-ubuntu/
Installing Django on Linux
http://techarena51.com/index.php/install-django-1-7-on-linux/
The Twelve-Factor Software-As-A-Service App building methodology
http://12factor.net/
Back to top

C programming

File I/O
http://gribblelab.org/CBootcamp/10_Input_and_Output.html
C Programming Boot Camp
http://gribblelab.org/CBootcamp/
Beej's Guide to Network Programming
https://beej.us/guide/bgnet/
Back to top

Data Structures

Stack vs Heap
http://gribblelab.org/CBootcamp/7_Memory_Stack_vs_Heap.html
Back to top

Code Editors

Vim
http://www.vim.org/about.php
Atom
https://atom.io/docs/v0.196.0/getting-started-why-atom
Brackets
http://brackets.io/
Sublime Text
http://www.sublimetext.com/
GNU Emacs
https://www.gnu.org/software/emacs/
Notepad++
https://notepad-plus-plus.org/
Back to top

Video Tutorials

Sys Admin
http://sysadmincasts.com
Youtube Channel
https://www.youtube.com/channel/UCvA_wgsX6eFAOXI8Rbg_WiQ/feed
Back to top

Continuous Integration

Travis
https://docs.travis-ci.com/user/languages/python
Jenkins
http://www.vogella.com/articles/Jenkins/article.html
Back to top

Docker

Docker
http://blog.flux7.com/topic/docker

Tools for Managing OpenStack

$
0
0
http://www.linux.com/news/enterprise/cloud-computing/870311-tools-for-managing-openstack

As I mentioned in the previous article in this series, at its most basic level, OpenStack consists of an API. The group heading up OpenStack has created developer software that implements OpenStack called DevStack. DevStack is meant for testing and development but not for running an actual data center. Various companies and organizations have created their own implementations of OpenStack that are intended for production.
Although these are all separate software products, they all share the fact that they expose an API consisted with the OpenStack specification. That API allows you to control the OpenStack software programmatically, which opens up a whole world of possibilities. Furthermore, the API is RESTful, allowing you to use it in a browser, or through any programming platform that allows you to make HTTP calls.
As a developer, this design allows you to take a couple approaches to manage an OpenStack infrastructure. For one, you could make calls to the API through your browser. Or, you can write scripts and programs that run from the command-line or desktop and make the calls. The scripts can be run using various automation tools.
First, let’s consider the browser apps. Remember that a browser app lives on two ends: The server side serving out the HTML and JavaScript and so on, and the app in the browser running said HTML and JavaScript. The code running in the browser is easily viewable and debuggable in the browser itself by an experienced developer. What this means is that you do not want to put any security code in the browser. That, in turn, means you typically wouldn’t make calls from the browser directly to the OpenStack API unless you’re operating in a strictly trusted development and testing environment.
The main reason for this is you don’t want to be sending private keys down to the browser that anyone could then access and pass around. Instead, you would follow best practices of web development and implement a security system between the browser and your server, and then have the server make the calls RESTful calls to the OpenStack API.
For the other case of scripts and programs outside of the browser, you have several options. You can make the RESTful calls yourself, or you can use a third-party library that understands OpenStack. These scripts and apps could manage your infrastructure by making the OpenStack API calls.
But, there’s yet another possibility. Various management tools allow you to manage an OpenStack environment using modules built specifically for OpenStack. Two such management tools are Puppet and Chef.

Puppet

With Puppet, you first define the state of your IT infrastructure, and Puppet automatically enforces the desired state. So, to get started using Puppet, you need to create some configuration files. You can use these files in a descriptive sense, essentially describing the state of your system. However, the configuration language also includes procedural constructs such as loops, along with support for such constructs such as variables.
Puppet provides full support for OpenStack, and the OpenStack organization has even devoted a page to Puppet’s support. The modules described on this page are created by the OpenStack community for Puppet and as such reside on OpenStack’s own Git repository system.
puppet search
Figure 1: Supported OpenStack modules from Puppet Forge.

Additionally, the Puppet community has contributed modules that support OpenStack. If you head over to the Puppet Forge site, you can search by simply entering OpenStack into the search box. This brings up a few dozen modules (see Figure 1). Some are created by members of the community. The ones that are on OpenStack’s Git repository are also here as well. (Just a quick note here; in the list shown in the image, make sure you click on the module name -- the word after the slash -- not the username, which is the word before the slash. Clicking on the username takes you to a list of all modules by that user.)
Installing the modules for Puppet takes a quick and easy command, like so:
puppet module install openstack-keystone
This step installs the keystone module that’s created by the OpenStack organization. (Keystone is the name of OpenStack’s identity service.)
The modules come with examples, which you’ll want to study carefully. The openstack-keystone includes four examples, one of which is for a basic LDAP testing. Take a look at the file called ldap_identity.pp. It creates a class called keystone::roles::admin, which includes a username and password member.
Because this module is just for testing, the username and password are hardcoded in it. Then, it creates a class called keystone::ldap that contains information for connecting to LDAP, such as the following familiar-looking user string:
uid=bind,cn=users,cn=accounts,dc=example,dc=com
and other such members. The best way to become familiar with managing OpenStack through Puppet is to play with the examples and use them with a small OpenStack setup.

Chef

Chef offers similar tools for automating the provisioning and configuration of your infrastructure.
Chef uses cooking metaphors for its names. For example, a small piece of code is called a recipe, and a set of recipes is a cookbook. Here’s a page from the Chef documentation about working with OpenStack. If you’re planning to use Chef, this page includes a series of examples and explanations that will give you exactly what you need to get started (Figure 2).
Chef-diagram
Figure 2: Architecture diagram from Chef documentation [https://docs.chef.io/openstack.html].

Like Puppet, Chef includes cookbooks for working with the different aspects of OpenStack, such as Keystone. Unlike Puppet, Chef doesn’t use an original scripting language. Instead, it uses Ruby. To use Chef, you don’t need to be a Ruby programming expert, however. In many cases, you can get by just knowing enough Ruby to configure your system. But, if you need to perform advanced tasks, because it’s Ruby, you can use other aspects of the language such as its procedural constructs.
Also like Puppet, Chef includes a searchable portal where you can find community-contributed recipes and cookbooks. Staying with the cooking metaphor, the portal is called the Supermarket. Note, however, that searching the Supermarket for OpenStack doesn’t provide as many libraries as with Puppet. Although I encourage you to browse through the Supermarket, you’ll want to pay close attention to Chef’s own documentation regarding OpenStack that I mentioned earlier.
You’ll also want to install the OpenStack Chef repo found on GitHub. This page contains the repo itself and shows a README page that also contains some great step-by-step information.

Conclusion

OpenStack is not small. Although you can control it programmatically from a browser or using HTTP calls within your own programming language of choice, you can also greatly simplify your life by embracing either Puppet or Chef. Which one should you choose? I suggest trying out both to see what works for you. Be forewarned that, in either case, you’ll need to learn some syntax of the files -- especially in the case of Chef, if you’re not already familiar with Ruby. Take some time to work through the examples. Install OpenStack on your own virtual machine, and go for it. You’ll be up to speed in no time.
Learn more about OpenStack. Download a free 26-page ebook, "IaaS and OpenStack - How to Get Started"from Linux Foundation Training. The ebook gives you an overview of the concepts and technologies involved in IaaS, as well as a practical guide for trying OpenStack yourself.
Viewing all 1409 articles
Browse latest View live


<script src="https://jsc.adskeeper.com/r/s/rssing.com.1596347.js" async> </script>