Quantcast
Channel: Sameh Attia
Viewing all 1416 articles
Browse latest View live

Never Lose Another File By Mastering Mlocate

$
0
0
http://www.linux-server-security.com/linux_servers_howtos/linux_mlocate_command.html

It’s not uncommon for a Sysadmin to have to find needles which are buried deep inside haystacks. On a busy machine there can be files in their hundreds of thousands present on your filesystems. What do you do when a pesky colleague needs to check that a single configuration file is up-to-date but can’t remember where it is located?

If you’ve used Unix-type machines for a while then you’ve almost certainly come across the “find” command before. It is unquestionably exceptionally sophisticated and highly functional. Here’s an example which just searches for links inside a directory, ignoring files:
# find . -lname "*"
You can do seemingly endless things with the “find” command; there’s no denying that. The “find” command is however nice and succinct when it wants to be but it can also easily grow arms and legs very quickly. It’s not necessarily just thanks to the “find” command itself but coupled with “xargs” you can pass it all sorts of options to tune your output, and indeed delete those files which you have found.
There often comes a time when simplicity is the preferred route however. Especially when a testy boss is leaning over your shoulder, chatting away about how time is of the essence. And, imagine trying to vaguely guess the path of the file that you haven’t ever seen before but your boss is certain lives somewhere on the busy “/var” partition.
Step forward, “mlocate”. You may be aware of one of its close relatives “slocate” (which securely, note the prepended letter “s” for “secure”, took note of the pertinent file permissions to avoid unprivileged users seeing privileged files). Additionally there is also the older, original “locate” command from whence they came.
The differences, between other members of its family (according to “mlocate” at least) is that when scanning your filesystems mlocate doesn’t need to continually rescan all your filesystem(s). Instead it merges its findings (note the prepended letter “m” for “merge”) with any existing file lists, making it much more performant and less heavy on system caches.
In this article we’ll look at “mlocate” (and simply refer to it as “locate”) due to its popularity and how to quickly and easily you can tune it to your heart’s content.

   Compact And Bijou


If you’re anything like me unless you re-use complex commands frequently then ultimately you forget them and need to look them up.The beauty of the locate command is that you can query entire filesystems very quickly and without worrying about top-level, root, paths with a simple command using “locate”.
In the past you might well have discovered that the “find” command can be very stubborn and cause you lots of unwelcome head-scratching. You know, a missing semicolon here or a special character not being escaped properly there. Let’s leave the complicated “find” command alone now, put our feet up and have a gentle look into the clever little command that is “locate”.
You will most likely want to check that it’s on your system first by running these commands:
Red Hat Derivatives
# yum install mlocate
Debian Derivatives
# apt-get install mlocate
There shouldn’t be any differences between distributions but there are almost definitely a few subtle differences between versions, beware.
Next we’ll introduce a key component to the locate command, namely “updatedb”. As you can probably guess this is the command which “updates” the locate command’s “db”. It’s hardly named counter-intuitively after all.
The “db” is the locate command’s file list which I mentioned earlier. That list is held in a relatively simple and highly efficient database for performance. The “updatedb” runs periodically, usually at quiet times of the day, scheduled via a “cron job”. In Listing One we can see the innards of the file “/etc/cron.daily/mlocate.cron” (both the file’s path and its contents might possibly be distro and version dependent).
#!/bin/sh
nodevs=$(< /proc/filesystems awk '$1 == "nodev" { print $2 }')
renice +19 -p $$ >/dev/null 2>&1
ionice -c2 -n7 -p $$ >/dev/null 2>&1
/usr/bin/updatedb -f "$nodevs"
Listing One: How the “updatedb” command is triggered every day
As we can see the “mlocate.cron” script makes careful use of the excellent “nice” commands in order to have as little impact on system performance as possible. I haven’t explicitly stated that this command runs at a set time every day (although if my addled memory serves the original locate command was associated with a slow-your-computer-down scheduled run at midnight). This is thanks to the fact that on some “cron” versions delays are now introduced into overnight start times.
This is probably because of the so-called “Thundering Herd Problem”.
Imagine there’s lots of computers (or hungry animals) waking up at the same time to demand food (or resources) from a single or limited source. This can happen when all your hippos set their wristwatches using NTP (okay, this allegory is getting stretched too far but bear with me). Imagine that exactly every five minutes (just as a “cron job” might) they all demand access to food or something otherwise being served.
If you don’t believe me then have a quick look at the config from, a version of “cron” which is called “Anacron”, in Listing Two, which is the guts of the file “/etc/anacrontab”.
# /etc/anacrontab: configuration file for anacron
# See anacron(8) and anacrontab(5) for details.
SHELL=/bin/sh
PATH=/sbin:/bin:/usr/sbin:/usr/bin
MAILTO=root
# the maximal random delay added to the base delay of the jobs
RANDOM_DELAY=45
# the jobs will be started during the following hours only
START_HOURS_RANGE=3-22
#period in days   delay in minutes   job-identifier   command
1       5       cron.daily              nice run-parts /etc/cron.daily
7       25      cron.weekly             nice run-parts /etc/cron.weekly
@monthly 45     cron.monthly            nice run-parts /etc/cron.monthly
Listing Two: How delays are introduced into when “cron” jobs are run
From Listing Two you have hopefully spotted both “RANDOM_DELAY” and the “delay in minutes” column. If this aspect of “cron” is new to you then you can find out more here:
# man anacrontab
Failing that you don’t need to be using Anacron, you can introduce a delay yourself if you’d like. An excellent Web page (now more than a decade old) discusses this issue in a perfectly sensible way (sadly, it's now showing a 404 but may return):http://www.moundalexis.com/archives/000076.php
That excellent website discusses using “sleep” to introduce a level of randomality, as we can see in Listing Three.
#!/bin/sh

# Grab a random value between 0-240.
value=$RANDOM
while [ $value -gt 240 ] ; do
 value=$RANDOM
done

# Sleep for that time.
sleep $value

# Syncronize.
/usr/bin/rsync -aqzC --delete --delete-after masterhost::master /some/dir/
Listing Three: A shell script to introduce random delays before triggering an event, to avoid Thundering Herds of Hippos, which was found at http://www.moundalexis.com/archives/000076.php
The aim in mentioning these (potentially surprising) delays was to point you at the file “/etc/crontab” or the “root” user’s own “crontab” file. If you want to change the time of when the locate command runs specifically because of disk access slowdowns then it’s not too tricky. There may be a more graceful way of achieving this result but you can also just move the file “/etc/cron.daily/mlocate.cron” somewhere else (I’ll use the “/usr/local/etc” directory) and as the root user add an entry into the “root” user’s “crontab” with this command and paste the content as below:
# crontab -e
33 3 * * * /usr/local/etc/mlocate.cron
Rather than trapse through “/var/log/cron” and it’s older, rotated, versions you can quickly tell the last time your “cron.daily” jobs were fired, in the case of “anacron” at least, as so:
# ls -hal /var/spool/anacron

   Well Situated


Incidentally you might get a little perplexed if trying to look up the manuals for updatedb and the locate command. Even though it’s actually the “mlocate” command and the binary is “/usr/bin/updatedb” on my filesystem you probably want to use varying versions of these “man” commands to find what you’re looking for:
# man locate
# man updatedb
# man updatedb.conf
Let’s look at the important “updatedb” command in a little more detail now. It’s worth mentioning that after installing the locate utility you will need to initialise your file-list database before doing anything else. You have to do this as the “root” user in order to reach all the relevant areas of your filesystems or the locate command will complain otherwise. Initialise or update your database file, whenever you like, with this command:
# updatedb
Obviously the first time that this is run it may take a little while to complete but when I’ve installed the locate command afresh I’ve almost always been pleasantly surprised at how quickly it finishes. After a hop, a skip and a jump you can then immediately query your file database. However let’s wait a moment before doing that.
We’re dutifully informed by its manual that the database created as a result of running the “updatedb” command resides at the following location: “/var/lib/mlocate/mlocate.db”.
If we want to change how the “updatedb” command is run then we need to affect it with our config file, a reminder that it should live here: “/etc/updatedb.conf”. Listing Four shows the contents of it on my system:
PRUNE_BIND_MOUNTS = "yes"
PRUNEFS = "9p afs anon_inodefs auto autofs bdev binfmt_misc cgroup cifs coda configfs cpuset debugfs devpts ecryptfs exofs fuse fusectl gfs gfs2 hugetlbfs inotifyfs iso9660 jffs2 lustre mqueue ncpfs nfs nfs4 nfsd pipefs proc ramfs rootfs rpc_pipefs securityfs selinuxfs sfs sockfs sysfs tmpfs ubifs udf usbfs"
PRUNENAMES = ".git .hg .svn"
PRUNEPATHS = "/afs /media /net /sfs /tmp /udev /var/cache/ccache /var/spool/cups /var/spool/squid /var/tmp"
Listing Four: The innards of the file “/etc/updatedb.conf” which affects how our database is created
The first thing that my eye is drawn to is the “PRUNENAMES” section. As you can see by stringing together a list of directory names, delimited with spaces, you can suitably ignore them. One caveat is that only directory names can be skipped and you can’t use wildcards. As we can see all of the otherwise-hidden files in a Git repository (the “.git” directory” might be an example of putting this option to good use.
If you need to be more specific then, again using spaces to separate your entries, you can instruct the locate command to ignore certain paths. Imagine for example that you’re generating a whole host of temporary files overnight which are only valid for one day. You’re aware that this is a special directory of sorts which employs a familiar naming convention for its thousands of files. It would take the locate command a relatively long time to process the subtle changes every night adding unnecessary stress to your system. The solution is of course to simply add it to your faithful “ignore” list.

   Perfectly Appointed


As we can see from Listing Five the file “/etc/mtab” offers not just a list of the more familiar filesystems such as “/dev/sda1” but also a number of others that you may not immediately remember.
/dev/sda1 /boot ext4 rw,noexec,nosuid,nodev 0 0
proc /proc proc rw 0 0
sysfs /sys sysfs rw 0 0
devpts /dev/pts devpts rw,gid=5,mode=620 0 0
/tmp /var/tmp none rw,noexec,nosuid,nodev,bind 0 0
none /proc/sys/fs/binfmt_misc binfmt_misc rw 0 0
Listing Five: A mashed up example of the innards of the file “/etc/mtab”
As some of these filesystems shown in Listing Five contain ephemeral content and indeed content that belongs to pseudo-filesystems it is clearly important to ignore their files. If for no other reason than because of the stress added to your system during each overnight update.
In Listing Four the “PRUNEFS” option takes care of this and ditches those not suitable (for most cases). There’s certainly a few different filesystems to consider as you can see:
PRUNEFS = "9p afs anon_inodefs auto autofs bdev binfmt_misc cgroup cifs coda configfs cpuset debugfs devpts ecryptfs exofs fuse fusectl gfs gfs2 hugetlbfs inotifyfs iso9660 jffs2 lustre mqueue ncpfs nfs nfs4 nfsd pipefs proc ramfs rootfs rpc_pipefs securityfs selinuxfs sfs sockfs sysfs tmpfs ubifs udf usbfs"
The “updatedb.conf” manual succinctly informs us of the following information in relation to the “PRUNE_BIND_MOUNTS” option:
“If PRUNE_BIND_MOUNTS is 1 or yes, bind mounts are not scanned by updatedb(8).  All file systems mounted in the subtree of a bind mount are skipped as well, even if they are not bind mounts.  As an exception, bind mounts of a directory on itself are not skipped.”
Assuming that makes sense, before moving onto some locate command examples, a quick note. Excluding some versions of the “updatedb” command it can also be told to ignore certain “non-directory files” but this does not always apply so don’t blindly copy and paste config between versions if you use such an option.

 Needs Modernisation


As mentioned earlier there are times when finding a specific file needs to be so quick that it’s at your fingertips before you’ve consciously recalled the command. This is the irrefutable beauty of the locate command.
And, if you’ve ever sat in front of a horrendously slow Windows machine watching the hard disk light flash manically, as if it was suffering a conniption, thanks to the indexing service running (apparently in the background) then I can assure you that the performance that you’ll receive from the “updatedb” command will be of very welcome relief.
You should bear in mind, that unlike the “find” command, there’s no need to remember the base paths of where your file might be residing. By that I mean that all of your (hopefully) relevant filesystems are immediately accessed with one simple command and that remembering paths is almost a thing of the past.
In its most simple form the locate command looks like this:
# locate chrisbinnie.pdf
There’s also no need to escape hidden files which start with a dot or indeed expand a search with an asterisk:
# locate .bash
Listing Six shows us what has been returned, in an instant, from the many partitions the clever locate command has scanned previously.
/etc/bash_completion.d/yum.bash
/etc/skel/.bash_logout
/etc/skel/.bash_profile
/etc/skel/.bashrc
/home/chrisbinnie/.bash_history
/home/chrisbinnie/.bash_logout
/home/chrisbinnie/.bash_profile
/home/chrisbinnie/.bashrc
/usr/share/doc/git-1.5.1/contrib/completion/git-completion.bash
/usr/share/doc/util-linux-ng-2.16.1/getopt-parse.bash
/usr/share/doc/util-linux-ng-2.16.1/getopt-test.bash
Listing Six: The search results from running the command: “locate .bash”
I’m suspicious that the following usage has altered slightly, from back in the day when the “slocate” command was more popular or possibly the original locate command, but you can receive different results by adding an asterisk to that query as so:
# locate .bash*
In Listing Seven we can see the difference between that of Listing Six’s output. Thankfully the results make more sense now that we can see them side by side. In this case the addition of the asterisk is asking the locate command to return files beginning with “.bash” as opposed to all files containing that string of characters.
/etc/skel/.bash_logout
/etc/skel/.bash_profile
/etc/skel/.bashrc
/home/d609288/.bash_history
/home/d609288/.bash_logout
/home/d609288/.bash_profile
/home/d609288/.bashrc
Listing Seven: The search results from running the command: “locate .bash*” with the addition of an asterisk
If you remember I mentioned “xargs” earlier and the “find” command. Our trusty friend the locate command can also play nicely with the “--null” option of “xargs” by outputting all of the results onto one line (without spaces which isn’t great if you want to read it yourself) by using the “-0” switch like this:
# locate -0 .bash
An option which I like to use (admittedly that’s if I remember to use it because the locate command rarely needs queried twice to find a file thanks to the syntax being so simple) is that of the “-e” option.
# locate -e .bash
For the curious that “-e” switch means “existing”. And, in this case, you can use “-e” to ensure that any files returned by the locate command do actually exist at the time of the query on your filesystems.
It’s almost magical, that even on a slow machine, the mastery of the modern locate command allows us to query its file database and then check against the actual existence of many files in seemingly no time whatsoever. Let’s try a quick test with a file search that’s going to return a zillion results and use the “time” command to see how long it takes both with and without the “-e” option being enabled.
I’ll choose files with the compressed “.gz” extension. Starting with a count we can see there’s not quite a zillion but a fair number of files ending “.gz” on my machine, note the “-c” for “count”:
# locate -c .gz
7539
This time we’ll output the list but “time” it and see the abbreviated results as follows:
# time locate .gz
real    0m0.091s
user    0m0.025s
sys     0m0.012s
That’s pretty swift but it’s only reading from the overnight-run database. Let’s get it to do a check against those 7,539 files too, to see if they truly exist and haven’t been deleted or renamed since last night and time the command again:
# time locate -e .gz
real    0m0.096s
user    0m0.028s
sys     0m0.055s
The speed difference is nominal as you can see. There’s no point in talking about lightning or you-blink-and-you-miss-it, because those aren’t suitable yardsticks. Relative to the other Indexing Service I mentioned a few moments ago let’s just say that’s pretty darned fast.
If you need to move the efficient database file used by the locate command (in my version it lives here: “/var/lib/mlocate/mlocate.db”) then that’s also easy to do. You may wish to do this for example because you’ve generated a massive database file (which is only 1.1MB in my case so it’s really tiny in reality) which needs to be put onto a faster filesystem.
Incidentally even the “mlocate” utility appears to have created an “slocate” group of users on my machine so don’t be too alarmed if you see something similar, as we can see here from a standard file listing:
-rw-r-----. 1 root slocate 1.1M Jan 11 11:11 /var/lib/mlocate/mlocate.db
Back to the matter in hand. If you want to move away from “/var/lib/mlocate” as your directory being used by the database then you can use this command syntax (and you’ll have to become the “root” user with “sudo -i” or “su -” for at least the first command to work correctly):
# updatedb -o /home/chrisbinnie/my_new.db
# locate -d /home/chrisbinnie/my_new.db SEARCH_TERM
Obviously replace your database name and path. The “SEARCH_TERM” element is the fragment of the filename that you’re looking for (wildcards and all).
If you remember I mentioned that you need to run “updatedb” command as the superuser in order to reach all the areas of your filesystems.
This next example should cover two useful scenarios in one. According to the manual you can also create a “private” database for standard users as follows:
# updatedb -l 0 -o DATABASE -U source_directory
Here the previously seen “-o” option means that we output our database to a file (obviously called “DATABASE”). The “-l 0” addition apparently means that the “visibility” of the database file is affected. It means (if I’m reading the docs correctly) that my user can read it but otherwise, without that option, only the locate command can.
The second useful scenario for this example is that we can create a little database file specifying exactly which path its top-level should be. Have a look at the “database-root” or “-U source_directory” option in our example. If you don’t specify a new root file path then the whole filesystem(s) is scanned instead.
If you wanted to get clever and chuck a couple of top-level source directories into one command then you can manage that having created two separate databases. Very useful for scripting methinks.
You can achieve that like so with this command:
# locate -d /home/chrisbinnie/database_one -d /home/chrisbinnie/database_two SEARCH_TERM
The manual dutifully warns however that ALL users that can read the “DATABASE” file can also get the complete list of files in the subdirectories of the chosen “source_directory”. So use these commands with some care as a result.

   Priced To Sell


Back to the mind-blowingly simplicity of the locate command being used on a day-to-day basis.
There are many times when newbies get confused with case-sensitivity on Unix-type systems. Simply use the conventional “-i” option to ignore case entirely when using the flexible locate command:
# locate -i ChrisBinnie.pdf
If you have a file structure that has a number of symlinks holding it together then there might be occasion when you want to remove broken symlinks from the search results. You can do that with this command:
# locate -Le chrisbinnie_111111.xml
If you needed to limit the search results then you could use this functionality, also in a script for example (similar to the “-c” option for counting), as so:
# locate -l25 *.gz
This command simply stops after outputting the first 25 files that were found. Coupled with being piped through the “grep” command it’s very useful on a super busy system.

   Popular Area


We briefly touched upon performance earlier and I couldn’t help but stumble across this nicely-written Blog entry (http://jvns.ca/blog/2015/03/05/how-the-locate-command-works-and-lets-rewrite-it-in-one-minute/). The author discusses thoughts on the trade-offs between the database size becoming unwieldy and the speed at which results are delivered.
What piqued my interest is the comments on how the original locate command was written and what limiting factors were considered during its creation. Namely how disk space isn’t quite so precious any longer and nor is the delivery of results even when 700,000 files are involved.
I’m certain that the author(s) of “mlocate” and its forebears would have something to say in response to that Blog post. I suspect that holding onto the file permissions to give us the “secure” and “slocate” functionality in the database might be a fairly big hit in terms of overheads. And, as much as I enjoyed the post, needless to say I won’t be writing a Bash script to replace “mlocate” any time soon. I’m more than happy with the locate command and extol its qualities at every opportunity.

   Sold


Hopefully you have now had enough of an insight into the superb locate command to prune, tweak, adjust and tune it to your unique set of requirements.
As we’ve seen it’s fast, convenient, powerful and efficient. Additionally you can ignore the “root” user demands and use it within scripts for very specific tasks.
My favourite feature however has to be when I’ve been woken up at 4am, called out because of an emergency. It’s not a good look, having to remember this complex “find” command and typing it slowly with bleary eyes (and managing to add lots of typos):
# find . -type f -name "*.gz"
Instead I can just use this simple locate command (they do produce slightly different results but I’m sure you get the point):
# locate *.gz
As has been said, any fool can create things that are bigger, bolder, rougher and tougher but it takes a modicum of genius to create something simpler. And in terms of introducing more people to the venerable Unix-type command line there’s little argument that the locate command welcomes them with open arms.
Linux vs. Windows device driver model: architecture, APIs and build environment comparison

$
0
0
http://xmodulo.com/linux-vs-windows-device-driver-model.html

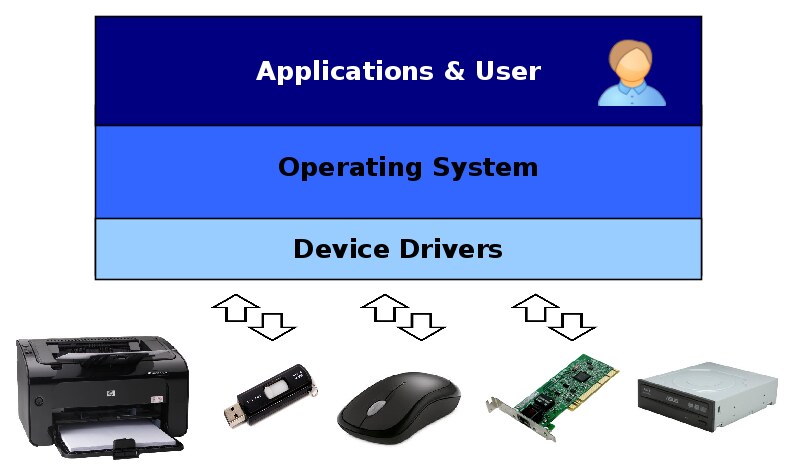
Device drivers are parts of the operating system that facilitate usage of hardware devices via certain programming interface so that software applications can control and operate the devices. As each driver is specific to a particular operating system, you need separate Linux, Windows, or Unix device drivers to enable the use of your device on different computers. This is why when hiring a driver developer or choosing an R&D service provider, it is important to look at their experience of developing drivers for various operating system platforms.
The first step in driver development is to understand the differences in the way each operating system handles its drivers, underlying driver model and architecture it uses, as well as available development tools. For example, Linux driver model is very different from the Windows one. While Windows facilitates separation of the driver development and OS development and combines drivers and OS via a set of ABI calls, Linux device driver development does not rely on any stable ABI or API, with the driver code instead being incorporated into the kernel. Each of these models has its own set of advantages and drawbacks, but it is important to know them all if you want to provide a comprehensive support for your device.
In this article we will compare Windows and Linux device drivers and explore the differences in terms of their architecture, APIs, build development, and distribution, in hopes of providing you with an insight on how to start writing device drivers for each of these operating systems.

1. Device Driver Architecture

Windows device driver architecture is different from the one used in Linux drivers, with either of them having their own pros and cons. Differences are mainly influenced by the fact that Windows is a closed-source OS while Linux is open-source. Comparison of the Linux and Windows device driver architectures will help us understand the core differences behind Windows and Linux drivers.
1.1. Windows driver architecture

While Linux kernel is distributed with drivers themselves, Windows kernel does not include device drivers. Instead, modern Windows device drivers are written using the Windows Driver Model (WDM) which fully supports plug-and-play and power management so that the drivers can be loaded and unloaded as necessary.
Requests from applications are handled by a part of Windows kernel called IO manager which transforms them into IO Request Packets (IRPs) which are used to identify the request and convey data between driver layers.
WDM provides three kinds of drivers, which form three layers:
  • Filter drivers provide optional additional processing of IRPs.
  • Function drivers are the main drivers that implement interfaces to individual devices.
  • Bus drivers service various adapters and bus controllers that host devices.
An IRP passes these layers as it travels from the IO manager down to the hardware. Each layer can handle an IRP by itself and send it back to the IO manager. At the bottom there is Hardware Abstraction Layer (HAL) which provides a common interface to physical devices.

1.2. Linux driver architecture

The core difference in Linux device driver architecture as compared to the Windows one is that Linux does not have a standard driver model or a clean separation into layers. Each device driver is usually implemented as a module that can be loaded and unloaded into the kernel dynamically. Linux provides means for plug-and-play support and power management so that drivers can use them to manage devices correctly, but this is not a requirement.
Modules export functions they provide and communicate by calling these functions and passing around arbitrary data structures. Requests from user applications come from the filesystem or networking level, and are converted into data structures as necessary. Modules can be stacked into layers, processing requests one after another, with some modules providing a common interface to a device family such as USB devices.
Linux device drivers support three kinds of devices:
  • Character devices which implement a byte stream interface.
  • Block devices which host filesystems and perform IO with multibyte blocks of data.
  • Network interfaces which are used for transferring data packets through the network.
Linux also has a Hardware Abstraction Layer that acts as an interface to the actual hardware for the device drivers.

2. Device Driver APIs

Both Linux and Windows driver APIs are event-driven: the driver code executes only when some event happens: either when user applications want something from the device, or when the device has something to tell to the OS.

2.1. Initialization

On Windows, drivers are represented by a DriverObject structure which is initialized during the execution of the DriverEntry function. This entry point also registers a number of callbacks to react to device addition and removal, driver unloading, and handling the incoming IRPs. Windows creates a device object when a device is connected, and this device object handles all application requests on behalf of the device driver.
As compared to Windows, Linux device driver lifetime is managed by kernel module's module_init and module_exit functions, which are called when the module is loaded or unloaded. They are responsible for registering the module to handle device requests using the internal kernel interfaces. The module has to create a device file (or a network interface), specify a numerical identifier of the device it wishes to manage, and register a number of callbacks to be called when the user interacts with the device file.

2.2. Naming and claiming devices

Registering devices on Windows
Windows device driver is notified about newly connected devices in its AddDevice callback. It then proceeds to create a device object used to identify this particular driver instance for the device. Depending on the driver kind, device object can be a Physical Device Object (PDO), Function Device Object (FDO), or a Filter Device Object (FIDO). Device objects can be stacked, with a PDO in the bottom.
Device objects exist for the whole time the device is connected to the computer. DeviceExtension structure can be used to associate global data with a device object.
Device objects can have names of the form \Device\DeviceName, which are used by the system to identify and locate them. An application opens a file with such name using CreateFile API function, obtaining a handle, which then can be used to interact with the device.
However, usually only PDOs have distinct names. Unnamed devices can be accessed via device class interfaces. The device driver registers one or more interfaces identified by 128-bit globally unique identifiers (GUIDs). User applications can then obtain a handle to such device using known GUIDs.
Registering devices on Linux
On Linux user applications access the devices via file system entries, usually located in the /dev directory. The module creates all necessary entries during module initialization by calling kernel functions like register_chrdev. An application issues an open system call to obtain a file descriptor, which is then used to interact with the device. This call (and further system calls with the returned descriptor like read, write, or close) are then dispatched to callback functions installed by the module into structures like file_operations or block_device_operations.
The device driver module is responsible for allocating and maintaining any data structures necessary for its operation. A file structure passed into the file system callbacks has a private_data field, which can be used to store a pointer to driver-specific data. The block device and network interface APIs also provide similar fields.
While applications use file system nodes to locate devices, Linux uses a concept of major and minor numbers to identify devices and their drivers internally. A major number is used to identify device drivers, while a minor number is used by the driver to identify devices managed by it. The driver has to register itself in order to manage one or more fixed major numbers, or ask the system to allocate some unused number for it.
Currently, Linux uses 32-bit values for major-minor pairs, with 12 bits allocated for the major number allowing up to 4096 distinct drivers. The major-minor pairs are distinct for character and block devices, so a character device and a block device can use the same pair without conflicts. Network interfaces are identified by symbolic names like eth0, which are again distinct from major-minor numbers of both character and block devices.

2.3. Exchanging data

Both Linux and Windows support three ways of transferring data between user-level applications and kernel-level drivers:
  • Buffered Input-Output which uses buffers managed by the kernel. For write operations the kernel copies data from a user-space buffer into a kernel-allocated buffer, and passes it to the device driver. Reads are the same, with kernel copying data from a kernel buffer into the buffer provided by the application.
  • Direct Input-Output which does not involve copying. Instead, the kernel pins a user-allocated buffer in physical memory so that it remains there without being swapped out while data transfer is in progress.
  • Memory mapping can also be arranged by the kernel so that the kernel and user space applications can access the same pages of memory using distinct addresses.
Driver IO modes on Windows
Support for Buffered IO is a built-in feature of WDM. The buffer is accessible to the device driver via the AssociatedIrp.SystemBuffer field of the IRP structure. The driver simply reads from or writes to this buffer when it needs to communicate with the userspace.
Direct IO on Windows is mediated by memory descriptor lists (MDLs). These are semi-opaque structures accessible via MdlAddress field of the IRP. They are used to locate the physical address of the buffer allocated by the user application and pinned for the duration of the IO request.
The third option for data transfer on Windows is called METHOD_NEITHER. In this case the kernel simply passes the virtual addresses of user-space input and output buffers to the driver, without validating them or ensuring that they are mapped into physical memory accessible by the device driver. The device driver is responsible for handling the details of the data transfer.
Driver IO modes on Linux
Linux provides a number of functions like clear_user, copy_to_user, strncpy_from_user, and some others to perform buffered data transfers between the kernel and user memory. These functions validate pointers to data buffers and handle all details of the data transfer by safely copying the data buffer between memory regions.
However, drivers for block devices operate on entire data blocks of known size, which can be simply moved between the kernel and user address spaces without copying them. This case is automatically handled by Linux kernel for all block device drivers. The block request queue takes care of transferring data blocks without excess copying, and Linux system call interface takes care of converting file system requests into block requests.
Finally, the device driver can allocate some memory pages from kernel address space (which is non-swappable) and then use the remap_pfn_range function to map the pages directly into the address space of the user process. The application can then obtain the virtual address of this buffer and use it to communicate with the device driver.

3. Device Driver Development Environment

3.1. Device driver frameworks

Windows Driver Kit
Windows is a closed-source operating system. Microsoft provides a Windows Driver Kit to facilitate Windows device driver development by non-Microsoft vendors. The kit contains all that is necessary to build, debug, verify, and package device drivers for Windows.
Windows Driver Model defines a clean interface framework for device drivers. Windows maintains source and binary compatibility of these interfaces. Compiled WDM drivers are generally forward-compatible: that is, an older driver can run on a newer system as is, without being recompiled, but of course it will not have access to the new features provided by the OS. However, drivers are not guaranteed to be backward-compatible.
Linux source code
In comparison to Windows, Linux is an open-source operating system, thus the entire source code of Linux is the SDK for driver development. There is no formal framework for device drivers, but Linux kernel includes numerous subsystems that provide common services like driver registration. The interfaces to these subsystems are described in kernel header files.
While Linux does have defined interfaces, these interfaces are not stable by design. Linux does not provide any guarantees about forward or backward compatibility. Device drivers are required to be recompiled to work with different kernel versions. No stability guarantees allow rapid development of Linux kernel as developers do not have to support older interfaces and can use the best approach to solve the problems at hand.
Such ever-changing environment does not pose any problems when writing in-tree drivers for Linux, as they are a part of the kernel source, because they are updated along with the kernel itself. However, closed-source drivers must be developed separately, out-of-tree, and they must be maintained to support different kernel versions. Thus Linux encourages device driver developers to maintain their drivers in-tree.

3.2. Build system for device drivers

Windows Driver Kit adds driver development support for Microsoft Visual Studio, and includes a compiler used to build the driver code. Developing Windows device drivers is not much different from developing a user-space application in an IDE. Microsoft also provides an Enterprise Windows Driver Kit, which enables command-line build environment similar to the one of Linux.
Linux uses Makefiles as a build system for both in-tree and out-of-tree device drivers. Linux build system is quite developed and usually a device driver needs no more than a handful of lines to produce a working binary. Developers can use any IDE as long as it can handle Linux source code base and run make, or they can easily compile drivers manually from terminal.

3.3. Documentation support

Windows has excellent documentation support for driver development. Windows Driver Kit includes documentation and sample driver code, abundant information about kernel interfaces is available via MSDN, and there exist numerous reference and guide books on driver development and Windows internals.
Linux documentation is not as descriptive, but this is alleviated with the whole source code of Linux being available to driver developers. The Documentation directory in the source tree documents some of the Linux subsystems, but there are multiple books concerning Linux device driver development and Linux kernel overviews, which are much more elaborate.
Linux does not provide designated samples of device drivers, but the source code of existing production drivers is available and can be used as a reference for developing new device drivers.

3.4. Debugging support

Both Linux and Windows have logging facilities that can be used to trace-debug driver code. On Windows one would use DbgPrint function for this, while on Linux the function is called printk. However, not every problem can be resolved by using only logging and source code. Sometimes breakpoints are more useful as they allow to examine the dynamic behavior of the driver code. Interactive debugging is also essential for studying the reasons of crashes.
Windows supports interactive debugging via its kernel-level debugger WinDbg. This requires two machines connected via a serial port: a computer to run the debugged kernel, and another one to run the debugger and control the operating system being debugged. Windows Driver Kit includes debugging symbols for Windows kernel so Windows data structures will be partially visible in the debugger.
Linux also supports interactive debugging by means of KDB and KGDB. Debugging support can be built into the kernel and enabled at boot time. After that one can either debug the system directly via a physical keyboard, or connect to it from another machine via a serial port. KDB offers a simple command-line interface and it is the only way to debug the kernel on the same machine. However, KDB lacks source-level debugging support. KGDB provides a more complex interface via a serial port. It enables usage of standard application debuggers like GDB for debugging Linux kernel just like any other userspace application.

4. Distributing Device Drivers

4.1. Installing device drivers

On Windows installed drivers are described by text files called INF files, which are typically stored in C:\Windows\INF directory. These files are provided by the driver vendor and define which devices are serviced by the driver, where to find the driver binaries, the version of the driver, etc.
When a new device is plugged into the computer, Windows looks though
installed drivers and loads an appropriate one. The driver will be automatically unloaded as soon as the device is removed.
On Linux some drivers are built into the kernel and stay permanently loaded. Non-essential ones are built as kernel modules, which are usually stored in the /lib/modules/kernel-version directory. This directory also contains various configuration files, like modules.dep describing dependencies between kernel modules.
While Linux kernel can load some of the modules at boot time itself, generally module loading is supervised by user-space applications. For example, init process may load some modules during system initialization, and the udev daemon is responsible for tracking the newly plugged devices and loading appropriate modules for them.

4.2. Updating device drivers

Windows provides a stable binary interface for device drivers so in some cases it is not necessary to update driver binaries together with the system. Any necessary updates are handled by the Windows Update service, which is responsible for locating, downloading, and installing up-to-date versions of drivers appropriate for the system.
However, Linux does not provide a stable binary interface so it is necessary to recompile and update all necessary device drivers with each kernel update. Obviously, device drivers, which are built into the kernel are updated automatically, but out-of-tree modules pose a slight problem. The task of maintaining up-to-date module binaries is usually solved with DKMS: a service that automatically rebuilds all registered kernel modules when a new kernel version is installed.

4.3. Security considerations

All Windows device drivers must be digitally signed before Windows loads them. It is okay to use self-signed certificates during development, but driver packages distributed to end users must be signed with valid certificates trusted by Microsoft. Vendors can obtain a Software Publisher Certificate from any trusted certificate authority authorized by Microsoft. This certificate is then cross-signed by Microsoft and the resulting cross-certificate is used to sign driver packages before the release.
Linux kernel can also be configured to verify signatures of kernel modules being loaded and disallow untrusted ones. The set of public keys trusted by the kernel is fixed at the build time and is fully configurable. The strictness of checks performed by the kernel is also configurable at build time and ranges from simply issuing warnings for untrusted modules to refusing to load anything with doubtful validity.

5. Conclusion

As shown above, Windows and Linux device driver infrastructure have some things in common, such as approaches to API, but many more details are rather different. The most prominent differences stem from the fact that Windows is a closed-source operating system developed by a commercial corporation. This is what makes good, documented, stable driver ABI and formal frameworks a requirement for Windows while on Linux it would be more of a nice addition to the source code. Documentation support is also much more developed in Windows environment as Microsoft has resources necessary to maintain it.
On the other hand, Linux does not constrain device driver developers with frameworks and the source code of the kernel and production device drivers can be just as helpful in the right hands. The lack of interface stability also has an implications as it means that up-to-date device drivers are always using the latest interfaces and the kernel itself carries lesser burden of backwards compatibility, which results in even cleaner code.
Knowing these differences as well as specifics for each system is a crucial first step in providing effective driver development and support for your devices. We hope that this Windows and Linux device driver development comparison was helpful in understanding them, and will serve as a great starting point in your study of device driver development process.

Active Directory Alternative For Linux : How To Install And Setup Resara Server On Linux

$
0
0
http://linuxpitstop.com/linux-active-directory-install-resara-server-on-linux

Resara Server is an Active Directory compatible open source Linux server for small businesses and simple networks. The management console lets you manage users, share files, and configure DHCP and DNS. Resara Server utilizes a technology called Samba, which is an open source implementation of the Active Directory framework. Although Samba is not actually Active Directory, it is designed to provide the same services and is compatible with almost all Active Directory components which provide network management services, such as
user authentication and computer management.
It is as a designed simple and easy to use system, here are the main features of Resara Server.
• Active Directory Compatible Domain with Samba 4
• User Management
• Computer Management
• DNS and DHCP Management
• Admin Console
• Backup System

Installing Resara Server:

To install and setup Resra Server you will be required an IP for the server, its FQDN, a default gateway, subnet mask and DNS server. Then download the installation media by following the Resara server Download Link . After downloading the installation media, boot your system from the downloaded ISO image and click on the Forward key to proceed to the Resara Installation setup.
Select the language and click on the ‘Forward’ button to move to the next step.
Resara installation
Choose your region and select the time zone from the available options and then click on the ‘forward’ key.
Time zone
Select your keyboard layout, if its other than your default.
keyboard layout
Here you need to select the hard disk to be used for installation. This will erase all the data on the disk, so make sure that no data is present on the disk. then select the ‘Forward’ button to move to the next option.
prepare disk space
Create your user name and password and move forward.
user settings
Review the installation summary before doing a click on the ‘Install’ button. Once you are OK with your selected options then click on the ‘Install’ key to start the installation process.
installation summary
Your installation process will be completing soon, just relax for a while and wait for completion.
installation progress
Once your installation complete, you will be asked to restart your computer. Disconnect your CD or ISO image and reboot your system .
restart your system
After system reboot you will be able to login to your Resara server by providing your user credentials that you have created earlier.
User Login

Resara Server Configurations:

As we have successfully installed Resara server, now we are going to start its configuration. This will guide you through the process of configuring and provisioning your Resara Server.
Resara Configurations

Network Configurations:

Set a permanent IP for your server including gateway and DNS settings. You can change the servers IP in the future via the Admin Console if necessary.
Network Configurations

Date and Time:

Set the time, date, and time zone for your server and make sure that the time between the server and client computers must be within 5 minutes of each other, Otherwise, they will not be able to join to the domain.
Date and time

Domain setup:

Configure the name of your server and domain to whatever is most appropriate for your network. The full domain
name will autofill based on what you have typed for your short domain name. But, your domain name must be unique to your organization.
domain settings

Admin Password:

Enter the admin password, for the administrator account that must contain one capital letter and a number. Once typed click on the Next button.
Admin Password

DHCP Server:

Resara Server can act as a DHCP server for your network. If you enabled this feature, then make sure you set an IP range that can communicate with the server, and also does not interfere with any other clients on your network.
dhcp setup

Server Provisioning:

Once your configurations are complete, it will go through the provisioning process that may take few minutes. You can check the Show Log box to watch what the server is doing.
Server Provisioning
Once the server has finished provisioning you can click the finished button, which will then launch the
Admin Console for further configuration of your server. Or, you can start joining computers to your domain
immediately.
Finish configurations

Resara Server Admin console:

Welcome to the Resara server admin console. You can also launch it by clicking on the Admin Console icon on your Desktop, or in the Resara folder in the list of applications in your start menu.
Resara Admin Console
There are 7 sections available here such as Users, Computers, Shares, Storage, DHCP, DNS and Server. Administration of Resara Server is seperated into management tabs and each tab is responsible for a different administrative task.

Conclusion:

Resara Server has been adopted by many types of organizations around the world. The open source Community Edition is popular among non-profits because it provides essential domain controller functionality at no cost. Larger non-profits and corporations choose the commercial version for support and scalability features, like server replication and load-balancing. This is one of the best tool that every Linux system administrator must learn and setup. Let’s give it a try and do share your comments and thoughts on its working and your experience about Resara Server. Thank you for reading.

How to select the fastest apt mirror on Ubuntu Linux

$
0
0
https://linuxconfig.org/how-to-select-the-fastest-apt-mirror-on-ubuntu-linux

The following guide will provide you with some information on how to improve Ubuntu's repository download speed by selecting the closest, that is, possibly fastest mirror relative to your geographical location.

1. Country Code

The simplest approach is to make sure that your Ubuntu mirror defined within /etc/apt/sources.list includes a relevant country code appropriate to your location. For example, below you can find a official United States Ubuntu mirror as found in /etc/apt/sources.list:
deb http://us.archive.ubuntu.com/ubuntu/ xenial main restricted
If you are not located in United States simply overwrite the us country code with appropriate code of your country. That is, if your are located for example in Australia update your /etc/apt/sources.list file for all entries as:
deb http://au.archive.ubuntu.com/ubuntu/ xenial main restricted

2. Use mirror protocol

Using mirror protocol as part of your /etc/apt/sources.list entry will instruct apt command to fetch mirrors located within your country only. In order to use mirror protocol update all lines within /etc/apt/sources.list file from the usual eg.:
deb http://us.archive.ubuntu.com/ubuntu/ xenial main restricted
to:
deb mirror://mirrors.ubuntu.com/mirrors.txt xenial main restricted
Repeat the above for all relevant lines where appropriate. Alternatively, use sed command to automatically edit your /etc/apt/sources.list file. Update the below sed command where appropriate to fit your environment:
$ sudo sed -i -e 's/http:\/\/us.archive/mirror:\/\/mirrors/' -e 's/\/ubuntu\//\/mirrors.txt/' /etc/apt/sources.list

3. Manual apt mirror selection

The above solutions look easy and they might just work for you. However, the mirror selected by apt may not be the fastest as it can be burdened by high latency. In this case you may try to choose your mirror manually from the list of mirrors located within your country. Use wget command to retrieve the list. The below wget command will retrieve apt ubuntu mirrors related to your country. Example:
$ wget -qO - mirrors.ubuntu.com/mirrors.txt
http://mirror.netspace.net.au/pub/ubuntu/
http://mirror.internode.on.net/pub/ubuntu/ubuntu/
http://mirror.overthewire.com.au/ubuntu/
http://mirror.aarnet.edu.au/pub/ubuntu/archive/
http://mirror.tcc.wa.edu.au/ubuntu/
http://ubuntu.mirror.serversaustralia.com.au/ubuntu/
http://ftp.iinet.net.au/pub/ubuntu/
http://ubuntu.mirror.digitalpacific.com.au/archive/
http://mirror.waia.asn.au/ubuntu/
http://ubuntu.uberglobalmirror.com/archive/
http://mirror.as24220.net/pub/ubuntu/
http://mirror.as24220.net/pub/ubuntu-archive/
Based on your experience select the best mirror and alter your /etc/apt/sources.list apt configuration file appropriately.

4. Choosing the fastest mirror with netselect

This solution is preferred, as it guarantees the fastest mirror selection. For this we are going to use netselect command. The netselect package is not available within Ubuntu's standard repository by default, so we will need to borrow it from Debian stable repository:
$ sudo apt-get install wget
$ wget http://ftp.au.debian.org/debian/pool/main/n/netselect/netselect_0.3.ds1-26_amd64.deb
$ sudo dpkg -i netselect_0.3.ds1-26_amd64.deb
Once you have the netselect command available on your Ubuntu system use it to locate the fastest mirror based on the lowest icmp latency. The netselect output will be relative to your location. The below example output will show top 20 apt Ubuntu mirrors ( if available ):
$ sudo netselect -s 20 -t 40 $(wget -qO - mirrors.ubuntu.com/mirrors.txt)
12 http://ubuntu.uberglobalmirror.com/archive/
20 http://ubuntu.mirror.serversaustralia.com.au/ubuntu/
21 http://ubuntu.mirror.digitalpacific.com.au/archive/
38 http://mirror.aarnet.edu.au/pub/ubuntu/archive/
39 http://mirror.overthewire.com.au/ubuntu/
45 http://mirror.internode.on.net/pub/ubuntu/ubuntu/
121 http://mirror.netspace.net.au/pub/ubuntu/
148 http://mirror.waia.asn.au/ubuntu/
152 http://mirror.as24220.net/pub/ubuntu-archive/
162 http://mirror.tcc.wa.edu.au/ubuntu/
664 http://archive.ubuntu.com/ubuntu/
3825 http://archive.ubuntu.com/ubuntu/
Only found 13 hosts out of 20 requested.
Alter manually your /etc/apt/sources.list file to reflect the above netselect results or use sed command, where the lower score number on the left represents a higher mirror transfer rate. Example:
$ sudo sed -i 's/http:\/\/us.archive.ubuntu.com\/ubuntu\//http:\/\/ubuntu.uberglobalmirror.com\/archive\//' /etc/apt/sources.list

5. Comparing results

The following are my apt-get update command results, while located within Australia:
US MIRROR ( http://us.archive.ubuntu.com/ubuntu ):
Fetched 23.1 MB in 20s (1148 kB/s)

MIRROR protocol( mirror://mirrors.ubuntu.com/mirrors.txt):
Fetched 23.1 MB in 4min 45s (81.0 kB/s)

AU MIRROR ( http://au.archive.ubuntu.com/ubuntu ):
Fetched 23.1 MB in 12s (1788 kB/s)

NETSTAT Auto-Selected ( http://ubuntu.uberglobalmirror.com/archive ):
Fetched 23.1 MB in 6s (3544 kB/s)

From MySQL To NoSQL! How To Migrate Your MySQL Data To MongoDB Using Mongify Utility

$
0
0
http://linuxpitstop.com/migrate-mysql-to-mongodb-using-mongify-utility-linux

Welcome again. Big data is here and therefore there needs to be a solution to store such kind of data in a database which is independent of the boundaries of normalization and relationships. RDBMS is no longer a great solution for storing big data. And that is why noSQL databases are now needed everywhere. Today, I am going to explain how the mongify utility can be used to migrate a database from MySQL to MongoDB. But before we jump into it, let me share with you little background information:

Introduction to MySQL

MySQL is an open source relational database management system (RDBMS) which uses the Structured Query Language (SQL) as a mechanism for dealing and interacting with the data. Although MySQL is one of the widely used and well known database management systems and is considered as reliable, scalable and efficient database management system, It is NOT well suited for handling big data and especially with HUGE insertion rates.

Introduction to MongoDB

MongoDB server is an opensource document database which stores data in JSON (which is a key:value) format. It has no db schemas filled with joins and relationships and is highly recommended as backend for web applications where huge volume of data is inserted and processed in real time.

When to Use MongoDB and When Not?

If you need a flexible database solution with no strict schema and expect a very high insert rate into your database also if reliability and security is of less concern for you then you can go for MongoDB. While on the other hand when security and reliability is of prime concern and you do not expect very huge write transactions into your database then you may use MySQL or any other RDBMS.

Introduction to Mongify

Mongify is a utility (or a ruby gem ) written in the ruby language and is used to migrate databases from SQL to mongodb. Further detailed information about ruby language and ruby gems can be found on their corresponding websites. Mongify utility migrates databases while not caring about primary keys and foreign keys as in case of an RDBMS. It supports data migration from MySQL, SQLite and other relational databases however this article only focuses on migrating data from MySQL to MongoDB.

Install Ruby if not already installed

As mentioned earlier, the mongify utility is based on ruby language therefore we need to install ruby if it is not already present on the sytem.
The following command can be used to install ruby on Ubuntu systems:
 apt-get install ruby
Below screen displays a typical output of this command:
sc2

Install ‘gem’ Package

Once ruby has been installed successfully, the next step is to install the ‘gem’ package which itself is the ruby gem manager. We will use the below command to achieve this:
apt-get install gem
The output for this command should be something list below:
sc1

Install Other Dependencies If Not Already Installed

Once these packages are installed, we need to complete a few more prerequisite packages to install and run mongify. These package dependencies are mentioned as below:
  1. ruby-dev
  2. mongodb
  3. libmysqlclient-dev
Besides these packages there are a few ‘gems’ needed as run time dependencies. These runtime dependencies include (at least):
  1. activerecord
  2. activesupport
  3. bson
  4. bson_ext
  5. highline
  6. mongo
Once all these dependencies are met, we are good to go for installing the mongify gem.

Install ‘mongify’ gem

The below command can be used to install the mongify utility:
sudo gem install mongify
The output for this command may look like something below:
sc4

Create a database.config file

Next, we need to create a database configuration file. This configuration file will contain the details and credentials for MySQL database and the MongoDB. Here we need to make sure that the correct database name, username and password are used for the MySQL database that we need to migrate.
The contents of the database.config may look similar to as shown in the following screenshot:
sc7

Check if Database Config is Correct

Next, we can check if the newly created database.config file is correct. We can use below command:
 mongify check database.config
If everything is alright, the output for this command can be something like this:
sc8

Create a Database Translation File

Now if the configuration file is correct, we can proceed to the next step which is to create a translation file.
We will use the below command to create a translation file:
mongify translation database.config >> translation.rb
The output for this command should be something like below:
sc10
We are almost done! But wait, one more step is needed and that is the actual step which will migrate the database for us.

Process the Translation File

This will be the step which will process the translation file and will create a new database in Mongodb for us. We will use below command :
mongify process database.config translation.rb
And the output should be something like below:
sc11
Congratulations! We have successfully migrated our database named ‘cloud’ from MySQL to Mongodb. This can be confirmed within the mongo shell by running below command:
$ mongo
>> db.stats()
The output for this command should be something like this:
sc12
In the above screenshot the details about our newly migrated database are displayed. It contains the database name, total number of tables (collections) and other details.

Conclusion

In this article we demonstrated how can we use the mongify utility to migrate an existing MySQL database to MongoDB. If you like this article or if you have any queries regarding the procedure, you are most welcome to share your comments and feedback here. We will come back with a new topic soon. Happy reading!

How to compare two version numbers in a shell script

$
0
0
http://ask.xmodulo.com/compare-two-version-numbers.html

Question: I am writing a shell script in which I need to compare two version number strings (e.g., "1.2.30" and "1.3.0") to determine which version is higher or lower than the other. Is there a way to compare two version number strings in a shell script?
When you are writing a shell script, there are cases where you need to compare two version numbers, and proceed differently depending on whether one version number is higher/lower than the other. For example, you want to check for the minimum version requirement (i.e., $version ≥ 1.3.0). Or you want to write a conditional statement where the condition is defined by a specific range of version numbers (e.g., 1.0.0 ≤ $version ≤ 2.3.1).
If you want to compare two strings in version format (i.e., "X.Y.Z") in a shell script, one easy way is to use sort command. With "-V" option, the sort command can sort version numbers within text (in an increasing order by default). With "-rV" option, it can sort version numbers in a decreasing order.

Now let's see how we can use the sort command to compare version numbers in a shell script.
For version number string comparison, the following function definitions come in handy. Note that these functions use the sort command.
1
2
3
4
functionversion_gt() { test"$(echo "$@" | tr """\n" | sort -V | head -n 1)"!= "$1"; }
functionversion_le() { test"$(echo "$@" | tr """\n" | sort -V | head -n 1)"== "$1"; }
functionversion_lt() { test"$(echo "$@" | tr """\n" | sort -rV | head -n 1)"!= "$1"; }
functionversion_ge() { test"$(echo "$@" | tr """\n" | sort -rV | head -n 1)"== "$1"; }
These functions perform, respectively, "greater-than", "less than or equal to", "less than", and "greater than or equal to" operations against two specified version numbers. You will need to use bash shell due to function definitions.
Below is an example bash script that compares two version numbers.
1
2
3
4
5
6
7
8
9
10
11
12
13
14
15
16
17
18
19
20
21
22
23
24
25
#!/bin/bash
VERSION=$1
VERSION2=$2
functionversion_gt() { test"$(echo "$@" | tr """\n" | sort -V | head -n 1)"!= "$1"; }
functionversion_le() { test"$(echo "$@" | tr """\n" | sort -V | head -n 1)"== "$1"; }
functionversion_lt() { test"$(echo "$@" | tr """\n" | sort -rV | head -n 1)"!= "$1"; }
functionversion_ge() { test"$(echo "$@" | tr """\n" | sort -rV | head -n 1)"== "$1"; }
ifversion_gt $VERSION $VERSION2; then
   echo"$VERSION is greater than $VERSION2"
fi
ifversion_le $VERSION $VERSION2; then
   echo"$VERSION is less than or equal to $VERSION2"
fi
ifversion_lt $VERSION $VERSION2; then
   echo"$VERSION is less than $VERSION2"
fi
ifversion_ge $VERSION $VERSION2; then
   echo"$VERSION is greater than or equal to $VERSION2"
fi
Download this article as ad-free PDF (made possible by your kind donation): Download PDF

How to copy permissions from one file to another on Linux

$
0
0
http://www.cyberciti.biz/faq/how-to-copy-permissions-from-one-file-to-another-on-linux

I need to copy or clone file ownership and permissions from another file on Linux. Is there a bash command line option to clone the user, group ownership and permissions on a file from another file on Linux operating system?

To set file owner and group use chown command. To change file mode, bits (permissions) use chmod command. Both commands accept an option to use another file as a reference is known as RFILE.

Syntax to clone permissions from another file or directory on Linux

The syntax is as follows use RFILE’s mode instead of MODE values:
chmod --reference=RRFILE FILE
chmod [options] --reference=RRFILE FILE

Examples: Copy file permission, but not files

Let us list both files:
ls -l install58.iso xenial-server-amd64.iso
Sample outputs:
-rw-rw-rw- 1 libvirt-qemu kvm 230862848 Aug 16  2015 install58.iso
-rw-r--r-- 1 libvirt-qemu kvm 786432000 Mar 14 02:01 xenial-server-amd64.iso
To copy install58.iso file permission to xenial-server-amd64.iso, enter:
chmod --reference=install58.iso xenial-server-amd64.iso
Verify it:
ls -l install58.iso xenial-server-amd64.iso
Sample outputs:
-rw-rw-rw- 1 libvirt-qemu kvm 230862848 Aug 16  2015 install58.iso
-rw-rw-rw- 1 libvirt-qemu kvm 786432000 Mar 14 02:01 xenial-server-amd64.iso
You can specify multiple files too:
chmod --reference=file.txt dest1.txt dest2.txt dest3.conf
You can combine and use find and xargs as follows:
find /path/to/dest/ -type f -print0 | xargs -O -I {} chmod --reference=/path/to/rfile.txt {}

Syntax to clone ownership from another file or directory on Linux

The syntax is as follows to use RRFILE’s owner and group rather than specifying OWNER:GROUP values
chown --reference=RRFILE FILE
chown [options] --reference=RRFILE FILE

Examples: Copy file ownership, but not files

To copy install58.iso file user and group onwership to xenial-server-amd64.iso, enter:
chown --reference=install58.iso xenial-server-amd64.iso
ls -l

Sample outputs:
Fig.01: Linux clone or copy or replicate file permissions, using another file as reference

The OrangeFS Project

$
0
0
http://www.orangefs.org

The OrangeFS Project

is work that revolves around OrangeFS, a scale-out network file system designed for use on high-end computing (HEC) systems that provides very high-performance access to multi-server-based disk storage, in parallel. The OrangeFS server and client are user-level code, making them very easy to install and manage. OrangeFS has optimized MPI-IO support for parallel and distributed applications, and it is leveraged in production installations and used as a research platform for distributed and parallel storage.
OrangeFS is now part of the Linux kernel as of version 4.6.  As this version of the kernel becomes widely available, it will simplify the use of parallel storage by Linux applications through OrangeFS.
The OrangeFS project has developed diverse methods of parallel access including Linux kernel integration, native Windows client, HCFS-compliant JNI interface to the Hadoop ecosystem of applications, WebDAV for native client access and direct POSIX-compatible libraries for pre-loading or linking.
The OrangeFS project continues to push the envelope of file system research while bringing high-performance parallel storage to production-ready releases.

Record your Terminal activity using ‘Script’ Command

$
0
0
http://www.ostechnix.com/record-your-terminal-activity-using-script-command


record

As a System administrator, you might execute lot of commands in the Terminal everyday. Sometimes you might want to refer the entire command history along with all respective outputs later. And, If you’re a programmer and write a program that displays a really long output in Terminal, you can’t scroll up to certain limit and can’t view the entire output of your Terminal session. As a technical writer, I must include what command I entered in the Terminal and what was the result I got in my articles. So, I believe It is always a best idea to record the Terminal session, and keep it aside for future reference. There are many tools out there to record your Desktop. Unfortunately, there are no such tools for servers that only has CLI session. Luckily, we have a simple command called script that really helpful to make typescript of everything printed on your Terminal.
Script command allows you to record everything you do in your Terminal, and saves the output in a text file. This command comes pre-installed with most Linux, and Unix-like operating systems.
In this brief tutorial, let me show you how to use script command.

Script command usage

When you’re ready to recording the Terminal activity, just type:
$ script
You will get a message something like below.
Script started, file is typescript
sk@sk: ~_001
Now, everything you entered in the Terminal will be saved in a file called typescript.
Also, you can give a custom name to the typescript by specifying a file name of your choice as shown below.
$ script -a my_terminal_session
Now, Let us type few commands, and see how it works.
$ whoami
$ uname -a
$ cd /home/sk/Soft_Backup
$ ls -l
$ mkdir ostechnix
$ rmdir ostechnix
That’s enough for now. You can try as many commands as you want to record. Once you are done, type ‘exit’ in the Terminal to stop recording.
$ exit
Sample output:
exit
Script done, file is typescript
As you see in the above screenshot, the script command will be stored in file called “typescript” in the current working directory.
Now, let us go ahead, and check what we did so far in the Terminal.

Check script command output

$ cat typescript
Sample output:
Script started on Friday 18 March 2016 01:29:06 PM IST
sk@sk:~$ whoami
sk
sk@sk:~$ uname -a
Linux sk 4.4.5-040405-generic #201603091931 SMP Thu Mar 10 00:34:17 UTC 2016 x86_64 x86_64 x86_64 GNU/Linux
sk@sk:~$ cd /home/sk/Soft_Backup
sk@sk:~/Soft_Backup$ ls -l
total 16
drwxrwxr-x 2 sk sk 4096 Nov 12 2014 Linux Soft
drwxrwxr-x 5 sk sk 4096 May 30 2015 OS Images
drwxrwxr-x 30 sk sk 4096 Mar 11 17:46 VHD's
drwxrwxr-x 17 sk sk 4096 Dec 30 11:48 Windows Soft
sk@sk:~/Soft_Backup$ mkdir ostechnix
sk@sk:~/Soft_Backup$ rmdir ostechnix
sk@sk:~/Soft_Backup$ exit
exit

Script done on Friday 18 March 2016 01:29:44 PM IST
sk@sk: ~_007
Voila! As you see in the above output, Script command recorded and displayed everything I have entered in the Terminal. For your easy understanding, I have marked the commands that I executed in bold letters.
You could use the output for your assignment, or just save this output for future reference, and so on.
For further details, I recommend you to refer the man pages.
$ man script
That’s all I can write about script command now. If you want a hardcopy record of the Terminal session for future reference, or for a assignment, script command is good tool to try.
If you find this tutorial, please share it on your social networks and support OSTechNix.
Cheers!

10 Useful Tips To Improve Nginx Performance

$
0
0
http://linuxpitstop.com/10-tips-to-improve-nginx-performance

Introduction

In this fast paced world where everything is getting online, you can’t afford downtime. Speed and optimization is the most challenging part of ever-evolving computer age. Performance is directly proportional to user experience. You yourself will close the website if it is taking too much time to load. Nginx is one of the widely used web server and it is an alternative of  Apache 2. It is popular for handling heavy traffic and for its stability. It is very user friendly and easy to configure. In this article we will see how we can optimize Nginx to give its best performance. Here are some of the useful tips and tricks you can apply on your Nginx hosts to load your sites faster.

Cache Resources

Every website has pages, images and other stuff which remains mostly unchanged during the visitor’s session on the site. Almost 30 percent data on the modern day web pages is static, such content should be cached in order to improve performance of Nginx. Caching will give you two benefits.
1) It will load the content faster as the static data on the page will be cached to the browser or to the nearby caching server which will reduce the load time of page as the request will be served without Nginx involvement.
2) Second benefit is less connection requests on Nginx server as the data will be loaded by the cache server so eventually it will decrease the load on your server. You can set the following directive in Nginx block in order to enable caching.
location ~* .(jpg|jpeg|png|gif|ico|css|js)$ {expires 365d;}
If the content remain unchanged , then this parameter will cache it for 365 days.

Adjust Worker Process

Servers now are multi-threaded and multi processes; Nginx has the ability to meet these modern day techniques. The default settings don’t allow Nginx to handle multiple workloads but you can make certain changes in the configuration file to make it work as multi-threaded web server. There is “worker_processes” parameter in nginx which will make it use multiple processors available in the system.
Open the file /etc/nginx/nginx.conf and change the “worker_processes auto;” parameter to :
 worker_processes 12; 

 Increase worker connections

Worker connection is related to worker process; i.e how many connections each worker processes can maintain. If you have enabled 1 worker process and you have set this value to be 10 then Nginx will be able to handle 10 connections. You can change the value depending upon the intensity of traffic on your website. All the connections exceeding your value will be queued or timed out so this parameters should be set keeping in mind all the aspects.
As shown in the following screenshot, we have set 1024 connections for each process.
Nginx

Optimization of Timeout values

Timeout factor can improve the performance of your web server. There are several timeout parameters which can be set and each parameter has its own functionality. Client_body_timeout and client_header_timeout are the parameters which wait for the header and body of client request; and if it’s not received in this time value then the client’s connection gets timed out. Keepalive_timeout is the polling time in which server polls the client connection after specific time to check its availability  and if there is no response received in the defined time, it gets timed out. You can add these parameters to your Nginx configuration.
 client_body_timeout 12;
client_header_timeout 12;
keepalive_timeout 15;

Compression

Gzip compression technique has became popular in web servers because the transfer of the compressed data is much faster as compared to the normal one. Following parameters need to be set in the nginx configuration for enabling and using Gzip compression for your web content.
gzip on
gzip_comp_level 2;
gzip_min_length 1000;
gzip_types text/plain application/x-javascript text/xml text/css application/xml;
Best approach is to enable it for large files as it consumes CPU resources as well.

Buffers

Buffer size tweaking is an important task as  low value setting for this parameter will make Nginx start writing the data to temporary file; which will result in increase of disk I/O. Lets discuss all such parameters one by one.
1) Client_body_buffer_size: This is the buffer size of the post requests which visitor is posting on the website. A good choice is around 128k.
2) Client_max_body_size: This parameter sets the maximum body of buffer size. Large requests appear to be dangerous sometimes so setting this parameter will display “Request Entity Too Large” to the client.
3) Client_header_buffer_size: This option is to restrict header size of a client request. Normally 1000 (1k) is a very good choice.
You should add the above mentioned parameters in /etc/nginx/nginx.conf.
 client_body_buffer_size 128k;
client_max_body_size 10m;
client_header_buffer_size 1k; 

Disable Access Logs

Nginx logs have too much information coming in them as each and every action is being logged. To improve its performance you can disable these logs and it will eventually save disk space also. Nginx configuration file should contain following parameter if you are looking to disable access logs.
 access_log off; 

TCP_nodelay & TCP_nopush

These parameters are important on the network level as every packet is being analyzed on core level, here are some details about these parameters.
1) TCP_nodelay: This parameter allows you to prevent your system from buffering data-sends and all the data will be sent in small bursts in real time. You can set this parameter by adding the following line
 tcp_nodelay on;
2) TCP_nopush: This parameter will allow your server to send HTTP response in one packet instead of sending it in frames. This will optimize throughout and minimize bandwidth consumption which will result in improvement of your website’s loading time.

Open_file Cache

On Linux based operating systems everything is being done using files. Open_file_cache parameter allows the server to cache file descriptors and all the frequently accessed files. You can enable this tweak by adjusting the following parameters.
 open_file_cache max=5000 inactive=20s;
open_file_cache_valid 30s;
open_file_cache_min_uses 2;
open_file_cache_errors on;

 Connection Queue

You can make some kernel changes for optimization of Nginx.  The parameter “net.core.somaxconn” and “net.ipv4.tcp_max_tw_buckets” allows you to change the length of connections which need to be accepted by Nginx. If you set these parameters too high it will be queued in the operating system before they are being handed over to Nginx. Following are the sample configurations done in /etc/sysctl.conf
 net.core.somaxconn = 65536
net.ipv4.tcp_max_tw_buckets = 1440000

Conclusion

Nginx is a very powerful web server and can serve websites of any magnitude and traffic. However, it is always recommended to tweak it to your needs so that your websites should respond in timely manners. The above mentioned tweaks, if followed, should make your web server capable to cope with medium to high size traffic sites.

Docker: How to use it in a practical way - Part 3

$
0
0
https://www.howtoforge.com/tutorial/docker-how-to-use-it-in-a-practical-way-part-3

Part 3: Creation a Notepad with WordPress and DokuWiki containers
Preface
In the first part, we talked about how docker containers work and differ from other software virtualization technologies and in the second part , we prepared our system for managing docker containers.
In this part, we will start using Docker images and create containers in a practical way. In other words, we will create a web-based, advanced personal notepad that runs on top of DokuWiki or WordPress. You can choose whichever you are comfortable with.
Docker Container Virtualisation

How to run a Docker container

First we must make sure that docker engine is working as needed by downloading a "Hello world" image and creating a container from it.
Remember, when we talk about an image it is the suspended state whereas when we talk about container it is a run-time instance of a docker image. In an analogy, that we talked in a previous part, a docker image is like the ISO file of a Linux distribution, while the container is the live session of the ISO file as if you were running it from a USB thumb drive.
To download and run the "Hello world" image just type in the terminal
sudo docker run hello-world
This command downloads the Hello World image and runs it in a container. When the container runs, it prints an informational message and then, it exits (meaning it shut down).
Docker Hello World example.
How do we check how many images do we have in our system? Well we simply run
sudo docker images
Show Docker images.
You may ask yourself, how did my system find this Hello World image and where did it come from? Well, this is where the docker hub comes in play.

Introduction to the Docker Hub

The Docker Hub is a cloud-based centralized resource for container image discovery, image building, and distribution of those images.
Specifically, Docker Hub provides some useful features and functions which we will discuss more in later parts.
Currently, we will focus on one feature and this is finding and downloading a docker image.

Searching for Docker Images

You can search for a "ready to download and run docker image", by simply visiting the online docker hub or by using the terminal. Note that you can not download a docker image from the web hub but you can learn more about an image, like how it is built and maintained etc.
So for the purpose of this part, we will focus on using the terminal way. Let us search for WordPress
sudo docker search wordpress
Search for Docker images.
As you can see there are tons of WordPress docker images, that are built with various combinations (e.g. with or without database inclusion), they are rated with popularity stars and they are either official (maintained by the docker company) or automated (built and maintained by individuals). It is obvious that anyone can create an account and upload his / her custom docker image and we will discuss it in a later part.

Downloading a Docker Image

For the purpose of this article, we will use the latest built of bitnamis' docker image, which comes with MySQL preinstalled in it. So let us download it:
sudo docker pull bitnami/wordpress:latest
Once you run the above command, it will communicate with the docker hub, ask if there is a repository named "bitnami", then asks if there is a "WordPress" build that is tagged as the "latest" version.
Download Docker image.
Currently, we have downloaded a WordPress image and nothing else. We can proceed now by downloading a DokuWiki Image by searching one and selecting the one that we like, or using the one that is as follows
sudo docker pull mprasil/dokuwiki

The Docker Image architecture

While waiting for the download procedure to complete, you can see that a docker image is a multi-layer image on top of a base image. You can see each and every layer being downloaded and then "magically" be unified. The diagram below shows an Ubuntu base image comprising 4 stacked image layers.
Docker Architecture - Part 1
As you can imagine, each Docker Image references a list of read-only layers that represent file-system differences. When you create a new container, from a Docker Image as we will do, later on, you add a new, thin, writable layer on top of the underlying stack. All changes made to the running container - such as writing new files, modifying existing files, and deleting files - are written to this thin writable container layer. The diagram below shows a container based on the Ubuntu 15.04 image.
Docker Architecture - Layers.


Deleting a Docker Image

Now if you check how many images you have on your system
sudo docker images
you will see the WordPress, DokuWiki, and the Hello World. If for any reason you want to remove and delete (rmi) an image you simply type
sudo docker rmi
where the name of the image is the name of the docker as it is displayed with "docker images" command. For example, if we want to delete the Hello World we can simply type:
sudo docker rmi hello-world

Containers are ephemeral

By design Docker containers are ephemeral. By “ephemeral,” we mean that a container can be stopped and destroyed and a new one can be built from the same Docker image and put in place with an absolute minimum of set-up and configuration.
Thus, you should keep in mind that when we will create a container from the Docker Image of your preference (WordPress or DokuWiki) any changes you make e.g. adding a post, picture, will be lost once you stop or delete the container. In other words, when a container is deleted, any data written to the container that is not stored in a data volume is deleted along with the container.
A data volume is a directory or file in the Docker host’s filesystem that is mounted directly into a container. This way you can swap containers, with new ones and keep any data safe in your users home folder. Note that, you can mount any number of data volumes into a container. Even multiple containers can also share one or more data volumes.
The diagram below shows a single Docker host (e.g. your Ubuntu 15.10) running two containers. As you can see there is also a single shared data volume located at /data on the Docker host. This is mounted directly into both containers.
Docker Container Data
This way when a container is deleted, any data stored in data volumes persists on the Docker host and can be mounted to a new container.

Docker container Networking

When you install Docker, it creates a network device in your system. You can view it (it will be named as docker0) as part of a host’s network stack by using the `ifconfig` command on your host system.
It is important to understand that Docker containers are isolated and they are individual micro-services that have their own network properties and the way we run them and connect to them is by mapping their port number to a port number of the hosts system.
This way we can expose the web service that a container runs to the host system.

Creating a personal notepad with a WordPress container

Let us get started with creating our testing notepad. First we will use the WordPress image to create a Docker container
sudo docker run --name=mynotepad -p 80:80 -p 443:443 bitnami/wordpress
With the above command, we asked the Docker service in our host system to create and run (docker run) a container named `mynotepad` (--name=mynotepad), map the HTTP and HTTPS port of the host and container ( -p 80:80 -p 443:443 ) and use the WordPress image ( bitnami/wordpress )
Docker Wordpress Container
Once the container is initialized you will be greeted with some info about the container. It is time to launch a browser and point it to http://localhost
If everything went well, you will see the default WordPress website
Wordpress running in Docker.
As you may already know to log in to the WordPress administration page, just go to http://localhost/login and use the default credentials user / bitnami. Then you can create a new user or a test post in the WordPress and publish it. You can see my test post in the image below
Wordpress in Docker
Let us get back to the terminal. As you can see your terminal currently is bind to the running container. You can use Ctrl+C to exit. This will also stop the container.
Now let us check our available containers. You can run the following command:
sudo docker ps -l
to view the container that we had previously created and run.
As you can see from the above image, there is some important information like the name of the container and the unique ID of the container. This way we can start the container again:
docker start mynotepad
Then you can check the processes that the docker container runs, with the following command:
sudo docker top mynotepad
By default with the `docker start mynotepad` the docker container is running in the background. To stop it, you can run the following command
sudo docker stop mynotepad
You can read more on how to interact with the container in the official documentation of the docker https://docs.docker.com/engine/userguide/containers/usingdocker/
Where are the containers
If you want to see where the containers are on the hosts file system then you can head over to /var/lib/docker
sudo cd /var/lib/docker
sudo ls
sudo cd containers
sudo cd ID
sudo ls
As you can see the ID numbers represent the actual containers that you have created.

Creating persistent storage

Let us create a new WordPress container, but this time, will put it in the background and also expose the WordPress folder to our host system so that we can put files in it or remove any files we don't want.
First we create a folder in our home directory
mkdir ~/wordpress-files
then run and create a container based on the same image we created the previous one:
sudo docker run -d -ti --name=mynotepad-v2 -v ~/wordpress-files:/opt/bitnami/apps -e USER_UID=`id -u` -p 80:80 bitnami/wordpress
Docker Persistant Storage.
The difference, this time, is that we used the -d parameter for detached mode and the -ti parameter to attach a terminal in interactive mode so that I can interact with it later on.
To check the running container just run the following command
sudo docker ps

Let's stop the container
sudo docker stop mynotepad-v2
Now if you run the `docker ps` command you will see nothing there.
Let's start it again with the following command:
sudo docker start mynotepad-v2
If you check the folder we have previously created you will see the WordPress installation

You can read more about the image we used at the docker hub https://hub.docker.com/r/bitnami/wordpress/

Creating a personal notepad with a DokuWiki container

This time, we will create a notepad using DokuWiki. As we have previously downloaded the image, the only thing that's left to be done is to create a container out of it.
So let's run the following command to create our `mywikipad` named container
docker run -d -p 80:80 --name mywikipad mprasil/dokuwiki
And then head over to your browser and add the following address to start the configuration of your wiki notepad:
http://localhost/install.php
You can learn more for DokuWiki from the official documentation and customize the wiki for your needs:
https://www.dokuwiki.org/manual
Dokuwiki in Docker

Deleting a Docker container

Once you are comfortable with creating, starting and stopping docker containers, you will find yourself in need to clean up the testing mess created by the multiple containers.
To delete a container first you will need to stop it and then delete it by running the following command:
docker rm
You can also add multiple ID's in the same `docker rm` command to delete multiple docker containers at the same time.

Summary

In this part, we learned how to create a container and use it in a practical way to create a personal notepad based on either WordPress or DokuWiki. We looked at some basic commands on how to start and stop the containers that we create and how to delete the images and the containers.
In the next part, we will take a look on how the docker images are created by creating our own.

15 simple TOP command examples on Linux to monitor processes

$
0
0
http://www.binarytides.com/linux-top-command

Linux TOP command

One of the most basic command to monitor processes on Linux is the top command. As the name suggests, it shows the top processes based on certain criterias like cpu usage or memory usage.


The processes are listed out in a list with multiple columns for details like process name, pid, user, cpu usage, memory usage.
Apart from the list of processes, the top command also shows brief stats about average system load, cpu usage and ram usage on the top.
This post shows you some very simple examples of how to use the top command to monitor processes on your linux machine or server.

Note your "top" command variant

Be aware that the top command comes in various variants and each has a slightly different set of options and method of usage.
To check your top command version and variant use the -v option
$ top -v
procps-ng version 3.3.9
This post focuses on the top command coming from the procps-ng project. This is the version available on most modern distros like Ubunut, Fedora, CentOS etc.

1. Display processes

To get a glimpse of the running processes, just run the top command as is without any options like this.
$ top
And immediately the output would be something like this -
top - 18:50:35 up  9:05,  5 users,  load average: 0.68, 0.52, 0.39
Tasks: 254 total, 1 running, 252 sleeping, 0 stopped, 1 zombie
%Cpu(s): 2.3 us, 0.5 sy, 0.0 ni, 97.1 id, 0.2 wa, 0.0 hi, 0.0 si, 0.0 st
KiB Mem: 8165300 total, 6567896 used, 1597404 free, 219232 buffers
KiB Swap: 1998844 total, 0 used, 1998844 free. 2445372 cached Mem

PID USER PR NI VIRT RES SHR S %CPU %MEM TIME+ COMMAND
17952 enlight+ 20 0 1062096 363340 88068 S 4.8 4.4 0:49.33 chrome
14294 enlight+ 20 0 954752 203548 61404 S 2.1 2.5 2:00.91 chrome
1364 root 20 0 519048 105704 65348 S 0.6 1.3 17:31.27 Xorg
19211 enlight+ 20 0 576608 47216 39136 S 0.6 0.6 0:01.01 konsole
13 root rt 0 0 0 0 S 0.3 0.0 0:00.10 watchdog/1
25 root 20 0 0 0 0 S 0.3 0.0 0:03.49 rcuos/2
1724 enlight+ 20 0 430144 36456 32608 S 0.3 0.4 0:03.60 akonadi_contact
1869 enlight+ 20 0 534708 52700 38132 S 0.3 0.6 0:53.94 yakuake
14040 enlight+ 20 0 858176 133944 61152 S 0.3 1.6 0:09.89 chrome


The screen contains a lot of information about the system. The header areas include uptime, load average, cpu usage, memory usage data.
The process list shows all the processes with various process specific details in separate columns.
Some of the column names are pretty self explanatory.
PID - Process ID
USER - The system user account running the process.
%CPU - CPU usage by the process.
%MEM - Memory usage by the process
COMMAND - The command (executable file) of the process

2. Sort by Memory/Cpu/Process ID/Running Time

To find the process consuming the most cpu or memory, simply sort the list.
Press M key ( yes, in capital, not small ) to sort the process list by memory usage. Processes using the most memory are shown first and rest in order.
Here are other options to sort by CPU usage, Process ID and Running Time -
Press 'P' - to sort the process list by cpu usage.
Press 'N' - to sort the list by process id
Press 'T' - to sort by the running time.

3. Reverse the sorting order - 'R'

By default the sorting is done in descending order. Pressing 'R' shall reverse the sorting order of the currently sorted column
Here is the output sorted in ascending order of cpu usage. Processes consuming the least amount of cpu are shown first.
top - 17:37:55 up  8:25,  3 users,  load average: 0.74, 0.88, 0.74
Tasks: 245 total, 1 running, 243 sleeping, 0 stopped, 1 zombie
%Cpu(s): 5.2 us, 1.7 sy, 0.0 ni, 93.2 id, 0.0 wa, 0.0 hi, 0.0 si, 0.0 st
KiB Mem: 8165300 total, 6089388 used, 2075912 free, 199060 buffers
KiB Swap: 1998844 total, 0 used, 1998844 free. 1952412 cached Mem

PID USER PR NI VIRT RES SHR S %CPU %MEM TIME+ COMMAND
1 root 20 0 185308 6020 4012 S 0.0 0.1 0:01.90 systemd
2 root 20 0 0 0 0 S 0.0 0.0 0:00.00 kthreadd
3 root 20 0 0 0 0 S 0.0 0.0 0:00.16 ksoftirqd/0
5 root 0 -20 0 0 0 S 0.0 0.0 0:00.00 kworker/0:+
7 root 20 0 0 0 0 S 0.0 0.0 0:06.98 rcu_sched
8 root 20 0 0 0 0 S 0.0 0.0 0:00.00 rcu_bh

4. Highlight the sorted column with bold text - 'x'

Press x, to highlight the values in the sort column with bold text. Here is a screenshot, with the memory column in bold text -
top command highlight column

5. Highlight sorted column background color 'b'

After highlighting the sorted column with bold font, its further possible to highlight with a different background color as well. This is how it looks
Top command highlight column background

6. Change the update delay - 'd'

The top command updates the information on the screen every 3.0 seconds by default. This refresh interval can be changed.
Press the 'd' key, and top will ask you to enter the time interval between each refresh. You can enter numbers smaller than 1 second as well, like 0.5. Enter the desired interval and hit Enter.
top - 18:48:23 up  9:19,  3 users,  load average: 0.27, 0.46, 0.39
Tasks: 254 total, 1 running, 252 sleeping, 0 stopped, 1 zombie
%Cpu(s): 1.3 us, 0.4 sy, 0.0 ni, 98.1 id, 0.2 wa, 0.0 hi, 0.0 si, 0.0 st
KiB Mem: 8165300 total, 7899784 used, 265516 free, 238068 buffers
KiB Swap: 1998844 total, 5432 used, 1993412 free. 3931316 cached Mem
Change delay from 3.0 to
PID USER PR NI VIRT RES SHR S %CPU %MEM TIME+ COMMAND
14512 enlight+ 20 0 1047688 302532 87156 S 1.3 3.7 1:34.87 /opt/googl+
15312 enlight+ 20 0 25148 3280 2628 R 0.8 0.0 0:00.04 top

7. Filter or Search processes - 'o'/'O'

You can filter the process list based on various criterias like process name, memory usage, cpu usage etc. Multiple filter criterias can be applied.
Press the 'o' or 'O' to activate filter prompt. It will show a line indicating the filter format like this -
add filter #1 (ignoring case) as: [!]FLD?VAL
Then enter a filter like this and hit Enter.
COMMAND=apache
Now top will show only those processes whose COMMAND field contains the value apache.
Here is another filter example that shows processes consuming CPU actively -
%CPU>0.0
See active filters - Press Ctrl+o to see currently active filters
Clear filter - Press '=' key to clear any active filters

8. Display full command path and arguments of process - 'c'

Press 'c' to display the full command path along with the commandline arguments in the COMMAND column.
%CPU %MEM     TIME+ COMMAND                                                    
0.0 0.0 0:00.00 /usr/bin/dbus-launch --exit-with-session /usr/bin/im-laun+
0.0 0.1 0:01.52 /usr/bin/dbus-daemon --fork --print-pid 5 --print-address+
0.0 0.3 0:00.41 /usr/bin/kwalletd --pam-login 17 20
0.0 0.0 0:00.00 /usr/lib/x86_64-linux-gnu/libexec/kf5/start_kdeinit --kde+
0.0 0.3 0:01.55 klauncher [kdeinit5] --fd=9
0.0 0.2 0:00.13 /usr/lib/telepathy/mission-control-5
0.0 0.1 0:00.00 /usr/lib/dconf/dconf-service
0.0 0.4 0:01.41 /usr/lib/x86_64-linux-gnu/libexec/kdeconnectd
0.0 0.2 0:01.09 /usr/lib/x86_64-linux-gnu/libexec/kf5/kscreen_backend_lau+

9. View processes of a user - 'u'/'U'

To view the processes of a specific user only, press 'u' and then top will ask you to enter the username.
Which user (blank for all)
Enter the desired username and hit Enter.
top - 17:33:46 up  8:21,  3 users,  load average: 2.55, 1.31, 0.81
Tasks: 246 total, 1 running, 244 sleeping, 0 stopped, 1 zombie
%Cpu(s): 11.8 us, 3.3 sy, 0.6 ni, 84.2 id, 0.0 wa, 0.0 hi, 0.1 si, 0.0 st
KiB Mem: 8165300 total, 6108824 used, 2056476 free, 198680 buffers
KiB Swap: 1998844 total, 0 used, 1998844 free. 1963436 cached Mem
Which user (blank for all) enlightened
PID USER PR NI VIRT RES SHR S %CPU %MEM TIME+ COMMAND
1696 enlight+ 20 0 440728 37728 33724 S 0.0 0.5 0:03.12 akonadi_bi+
1705 enlight+ 20 0 430304 37156 33264 S 0.0 0.5 0:03.08 akonadi_mi+
1697 enlight+ 20 0 430144 37100 33248 S 0.0 0.5 0:03.00 akonadi_co+
1599 enlight+ 20 0 504628 36132 32068 S 0.0 0.4 0:03.24 kdeconnectd
1608 enlight+ 20 0 570784 35688 29944 S 0.0 0.4 0:02.87 polkit-kde+
1584 enlight+ 20 0 781016 33308 29056 S 0.0 0.4 0:04.03 kactivitym+

10. Toggle the display of idle processes - 'i'

Press 'i' to toggle the display of idle/sleeping processes. By default all processes are display.

11. Hide/Show the information on top - 'l', 't', 'm'

The 'l' key would hide the load average information.
The 'm' key will hide the memory information.
The 't' key would hide the task and cpu information.
Hiding the header information area, makes more processes visible in the list.

12. Forest mode - 'V'

Pressing 'V' will display the processes in a parent child hierarchy. It looks something like this -
top - 09:29:34 up 17 min,  3 users,  load average: 0.37, 0.58, 0.66
Tasks: 244 total, 1 running, 242 sleeping, 0 stopped, 1 zombie
%Cpu(s): 6.1 us, 2.1 sy, 0.0 ni, 91.8 id, 0.1 wa, 0.0 hi, 0.0 si, 0.0 st
KiB Mem: 8165300 total, 3968224 used, 4197076 free, 82868 buffers
KiB Swap: 1998844 total, 0 used, 1998844 free. 1008416 cached Mem

PID USER PR NI VIRT RES SHR S %CPU %MEM TIME+ COMMAND
1 root 20 0 37844 5964 4012 S 0.0 0.1 0:01.08 systemd
279 root 20 0 35376 4132 3732 S 0.0 0.1 0:00.22 `- systemd-journal
293 root 20 0 44912 4388 3100 S 0.0 0.1 0:00.14 `- systemd-udevd
493 systemd+ 20 0 102360 2844 2572 S 0.0 0.0 0:00.01 `- systemd-timesyn
614 root 20 0 337360 8624 6904 S 0.0 0.1 0:00.03 `- ModemManager
615 avahi 20 0 40188 3464 3096 S 0.0 0.0 0:00.01 `- avahi-daemon
660 avahi 20 0 40068 324 12 S 0.0 0.0 0:00.00 `- avahi-daem+
617 root 20 0 166276 8788 8076 S 0.0 0.1 0:00.07 `- thermald
621 root 20 0 15664 2496 2312 S 0.0 0.0 0:00.00 `- anacron
2792 root 20 0 4476 844 760 S 0.0 0.0 0:00.00 `- sh
2793 root 20 0 4364 684 604 S 0.0 0.0 0:00.00 `- run-pa+
2802 root 20 0 4476 1672 1536 S 0.0 0.0 0:00.00 `- apt
2838 root 20 0 7228 676 596 S 0.0 0.0 0:00.00 `+
630 root 20 0 28932 3128 2860 S 0.0 0.0 0:00.00 `- cron
634 root 20 0 283120 6776 5924 S 0.0 0.1 0:00.04 `- accounts-daemon
636 root 20 0 86160 7224 6128 S 0.0 0.1 0:00.01 `- cupsd

13. Change the number of processes to display - 'n'

Lets say you want to monitor only few processes based on a certain filter criteria. Press 'n' and enter the number of processes you wish to display.
It will display a line saying -
Maximum tasks = 0, change to (0 is unlimited)

14. Display all CPU cores - '1'

Pressing '1' will display the load information about individual cpu cores. Here is how it looks -
top - 10:45:47 up  1:42,  5 users,  load average: 0.81, 1.14, 0.94
Tasks: 260 total, 2 running, 257 sleeping, 0 stopped, 1 zombie
%Cpu0 : 3.6 us, 3.6 sy, 0.0 ni, 92.9 id, 0.0 wa, 0.0 hi, 0.0 si, 0.0 st
%Cpu1 : 3.1 us, 3.6 sy, 0.0 ni, 93.3 id, 0.0 wa, 0.0 hi, 0.0 si, 0.0 st
%Cpu2 : 7.6 us, 1.8 sy, 0.0 ni, 90.7 id, 0.0 wa, 0.0 hi, 0.0 si, 0.0 st
%Cpu3 : 9.6 us, 2.6 sy, 0.0 ni, 87.7 id, 0.0 wa, 0.0 hi, 0.0 si, 0.0 st
KiB Mem: 8165300 total, 7118864 used, 1046436 free, 204224 buffers
KiB Swap: 1998844 total, 0 used, 1998844 free. 3410364 cached Mem

15. Show/Hide columns 'f'

By default top displays only few columns out of many more that it can display. If you want to add or remove a particular column or change the order of columns, then press f
Fields Management for window 1:Def, whose current sort field is %CPU
Navigate with Up/Dn, Right selects for move then or Left commits,
'd' or toggles display, 's' sets sort. Use 'q' or to end!

* PID = Process Id PGRP = Process Group vMj = Major Faults
* USER = Effective Use TTY = Controlling T vMn = Minor Faults
PR = Priority TPGID = Tty Process G USED = Res+Swap Size
NI = Nice Value SID = Session Id nsIPC = IPC namespace
VIRT = Virtual Image nTH = Number of Thr nsMNT = MNT namespace
RES = Resident Size P = Last Used Cpu nsNET = NET namespace
SHR = Shared Memory TIME = CPU Time nsPID = PID namespace
S = Process Statu SWAP = Swapped Size nsUSER = USER namespac
* %CPU = CPU Usage CODE = Code Size (Ki nsUTS = UTS namespace
* %MEM = Memory Usage DATA = Data+Stack (K
TIME+ = CPU Time, hun nMaj = Major Page Fa
* COMMAND = Command Name/ nMin = Minor Page Fa
PPID = Parent Proces nDRT = Dirty Pages C
UID = Effective Use WCHAN = Sleeping in F
RUID = Real User Id Flags = Task Flags
The fields marked * or bold are the fields that are displayed, in the order in which they appear in this list.


Navigate the list using up/down arrow keys and press 'd' to toggle
the display of that field. Once done, press q to go back to the process
list


The following output displays only PID, USER, CPU, MEMORY and COMMAND columns.


top - 15:29:03 up  6:16,  4 users,  load average: 0.99, 0.61, 0.63
Tasks: 247 total, 1 running, 245 sleeping, 0 stopped, 1 zombie
%Cpu(s): 6.3 us, 2.0 sy, 0.2 ni, 91.5 id, 0.1 wa, 0.0 hi, 0.0 si, 0.0 st
KiB Mem: 8165300 total, 6089244 used, 2076056 free, 189272 buffers
KiB Swap: 1998844 total, 0 used, 1998844 free. 1902836 cached Mem

PID USER %CPU %MEM COMMAND
1921 enlight+ 9.2 3.6 /opt/google/chrome/chrome
3078 enlight+ 6.9 4.2 /opt/google/chrome/chrome --type=renderer --lang=en-+
1231 root 5.3 1.0 /usr/bin/X :0 -auth /var/run/sddm/:0 -nolisten tcp -+
1605 enlight+ 2.8 2.5 /usr/bin/plasmashell --shut-up
1596 enlight+ 1.8 1.0 kwin_x11 -session 10d8d4e36b000144740943900000009530+
2088 enlight+ 0.9 1.7 /opt/google/chrome/chrome --type=renderer --lang=en-+
2534 enlight+ 0.8 1.7 /opt/google/chrome/chrome --type=renderer --lang=en-+
5695 enlight+ 0.8 0.7 /usr/bin/python /usr/bin/terminator
1859 enlight+ 0.2 1.2 /usr/bin/perl /usr/bin/shutter --min_at_startup
2060 enlight+ 0.2 1.5 /opt/google/chrome/chrome --type=renderer --lang=en-+
3541 enlight+ 0.2 3.6 /opt/google/chrome/chrome --type=renderer --lang=en-+

16. Batch mode

Top also supports batch mode output, where it would keep printing information sequentially instead of a single screen. This is useful when you need to log the top output for later analysis of some kind. Here is a simple example that shows the Cpu usage at intervals of 1 second.
$ top -d 1.0 -b | grep Cpu

17. Split output in multiple panels - 'A'

Each panel can be sorted on a different column. Press 'a' to move through the panels. Each panel can have a different set of fields displayed and different sort columns.
top command multiple panels

Conclusion

If you are looking for something easier and with a better user interface try htop. Htop has a intuitive user interface, where you need not memorize keyboard shortcuts. Htop has onscreen instructions that guide you on how to use it.

Getting started with the many ways to Docker

$
0
0
https://www.linux-toys.com/?p=435

This is a followup on how to use Docker after building a Swarm cluster. I think it is important for people to understand the different ways to create containers and choose the best way for their needs.This blog post will explain docker-compose, docker engine, and how to do persistent storage.

[Docker Compose]
Let’s begin with docker-compose. This utility allows a user to create a manifest file of all the containers needed and how they communicate with each other. This example will show you how to create a MySQL container and connect it to a web application called nodechat.

Download the sample docker-compose.yml in a new directory. Below is the contents of the file for reference.  Since YAML files are space sensitive and not easy share in a blog post, please do not copy and paste the contents below.

docker-compose.yml:
mysql:
image: rusher81572/mysql
restart: always
nodechat:
image: rusher81572/nodechat
restart: always
ports:
– 8080:8080
links:
– mysql:mysql

Type the following command to create the containers.
docker-compose up
A lot of output will be displayed on the screen next and may not bring you back to a terminal prompt. It is safe to press ctrl+c when you see the following:
nodechat_1 |
nodechat_1 | listening on *:8080
nodechat_1 | Creating Database…..
nodechat_1 | Creating Table……
Now that the containers have been created, it is time to start them.
docker-compose start
Run the following command to find out which host is running nodechat with:
docker ps

Use your web browser to navigate to the host running nodechat on port 8080. Feel free to chat with yourself =)

This is how you can stop and remove your running containers built with the compose file:
docker-compose stop
docker-compose rm -f

[Docker Engine]
Now let’s run the equivalent Docker engine commands to accomplish the same result as the docker-compose file so you will have a better understanding on how Docker works.

Pull the image from the repository:
docker pull rusher81572/mysql
docker pull rusher81572/nodechat
Run the containers in daemon mode (In the background) with -d. The -p argument exposes a port for outside access. The format for -p is outside_port:inside_port. The “name” argument specifies a container name. This will allow us to link the nodechat application to the MySQL container simply by using a name. The”link” argument links the MySQL container to Nodechat using the container name. This will allow connectivity between nodechat and MySQL to store the chat data. The format for “link” is:  container_name:link_name.
docker run -d –name mysql rusher81572/mysql
docker run -d –link mysql:mysql -p 8080:8080 rusher81572/nodechat
(If you have any issues copying and pasting the above commands….There should be two “-” before name and link. For some reason, WordPress changes them to a single minus sign)
Find out what host is running nodechat with “docker ps” and use your web browser to navigate to the host running nodechat on port 8080

[Dockerfile’s]
Dockerfile’s contain all of the steps needed to create a container such as adding files, defining volumes, installing software, and setting environment variables. The following steps will explain how to create persistent storage for containers by creating a container to share volumes with other containers.

Create a directory called “fileserver” with a file called “Dockerfile” with the following contents:
FROM ubuntu
VOLUME /share
CMD sleep infinity
Build the filesever container. The -t argument specifies the tag for the container which is basically a name for it.
docker build -t fileserver .
mkdir data
Run the container in daemon mode. The -v argument allows you to share a local directory inside the container as a volume. Replace location_to_data_dir with the full path to the data directory created in the previous step.
docker run -d -v location_to_data_dir:/share –name fileserver fileserver
(If you have any issues copying and pasting the above command….There should be two “-” before name)

Now we have a container named fileserver that can share volumes with other containers. The files will be store locally in the data directory. To create a client, create a directory called “fileserver-client” with a file called “Dockerfile” with the following contents:
FROM ubuntu
CMD sleep infinity
Build the fileserver-client container image.
docker build -t fileserver-client .
Now let’s run the fileserver-client container in interactive mode to create a test file. Interactive mode runs a container in the foreground so you can see what is happening and even interact with the shell. The argument “volumes-from” will mount all of the volumes from the container specified. Please note that the container will stop and return you to the shell after running the command.
docker run -it –volumes-from fileserver fileserver-client touch /share/foo.txt
(If you have any issues copying and pasting the above command….There should be two “-” before volumes-from)

Run another fileserver-client container to see list of files on the fileserver.
docker run -it –volumes-from fileserver fileserver-client ls /share
Check to ensure that the files are being stored locally.
ls location_to_data_dir/data
The file should be displayed in the terminal. Feel free to play around with this more. I hope that you learned something new today.

18 Linux grep command examples for a data analysis

$
0
0
http://www.linuxnix.com/grep-command-usage-linux

GREP is a command line search utility or tool to filter the input given to it. Grep got its name from ed editor as g/re/p (global / regular expression / print). Grep command can improve a command output by filtering out required information. Grep will become a killer command when we combined it with regular expressions. In this post we will see how to use grep in a basic way and then move on some advanced and rarely used options. In our next couple of posts we will see what grep can do with the help of regular expressions.
GREP command syntax
grep [options] [searchterm] filename
or
command | grep [options] [searchterm]
Before starting grep command examples, I used below file which contain following content.
cat file1.txt
Output:
surendra 31 IBM Chennai
Steve 45 BOA London
Barbi 25 EasyCMDB Christchurch
Max 25 Easy CMDB Christchurch
Nathan 20 Wipro Newyark
David 20 ai Newyark

Search single file using grep

Example 1: Search for a word “nathan” in file1.txt
grep nathan file1.txt
You dont get any output, as the word nathan is not there. By this type you should know grep is a case sensitive command. If you want specifically Nathan, use caps N in nathan and try once again.
Example 2: Search for exact word “Nathan”
root@linuxnix:~# grep Nathan file1.txt
Nathan 20 Wipro Newyark
Example 3: Search for a word which has either capital or small letters in it, no confusion between nathan or Nathan. The -i for ignore case.
root@linuxnix:~# grep -i Nathan file1.txt
Nathan 20 Wipro Newyark
Example 4: I suggest you always use single quotes for your search term. This will avoid confusions to gerp. Suppose if you want to search for “Easy CMDB” in a file, it will be difficult to search with out single quotes. Try below examples.
with out quotes:
root@linuxnix:~# grep Easy CMDB file1.txt
grep: CMDB: No such file or directory
file1.txt:Barbi 25 EasyCMDB Christchurch
file1.txt:Max 25 Easy CMDB Christchurch

What grep did?

If you observe, you got an error stating that, there is no file called CMDB. That is true, there is no such file. This output have two issues
1) Grep is considering second word in the command as file
2) Grep is considering just “Easy” as a search term.
Example 5: Search for exact search term using single quotes.
root@linuxnix:~# grep 'Easy CMDB' file1.txt
Max 25 Easy CMDB Christchurch
You may get a doubt why single quotes and not double quotes. You can use double quotes as well when you want to send bash variable in to search term.
Example 6: Search for a shell variable in a file. My shell is NAME1 which is assigned with Nathan. See below examples with single and double quotes.
root@linuxnix:~# NAME1=Nathan
root@linuxnix:~# grep '$NAME1' file1.txt
No output, now try with double quotes
root@linuxnix:~# grep "$NAME1" file1.txt
Nathan 20 Wipro Newyark
root@linuxnix:~#
See the difference? So it depends when you want to use single quotes and double quotes. If you want to pass shell variables to grep use double quotes and remaining time always use single quotes.
Example 7: If you want to inverse your search criteria ie to display all the lines which do not contain your search term then use -v option. This will display all the lines which do not contain your search term. Suppose list all the lines which do not contain Nathan in the file.
root@linuxnix:~# grep -v 'Nathan' file1.txt
surendra 31 IBM Chennai
Steve 45 BOA London
Barbi 25 EasyCMDB Christchurch
Max 25 Easy CMDB Christchurch
David 20 ai Newyark
Example 8: How about getting count of a word in a file? Search for word ‘Easy’ and tell me how many times it is there in the file.
root@linuxnix:~# grep -c 'Easy' file1.txt
2
Example 9: Ok, finding number of occurrence is fine, how about displaying line number as well for our search term? Search for Easy and display line number where that word is present.
root@linuxnix:~# grep -n 'Easy' file1.txt
3:Barbi 25 EasyCMDB Christchurch
4:Max 25 Easy CMDB Christchurch
Example 10: Some times you want to find exact word instead of finding occurrence of a word sequence. Suppose you want to find is word in a file, this will grep “this” as well as “this” contain “is” in it. Grep have a Technic to do this with the help of -w which filter out this type of stuff. Suppose I want to search for ai in our file, with normal grep it will print first and last lines as both contain ai in them. Use -w for avoiding this stuff.
With out -w option:
root@linuxnix:~# grep 'ai' file1.txt
surendra 31 IBM Chennai
David 20 ai Newyark
With -w option:
root@linuxnix:~# grep -w 'ai' file1.txt
David 20 ai Newyark
Example 11: Grep have special feature which can print lines before, after and between for a search term. Suppose if you want print two lines before to the search, use below example. Search for Max and below example prints two lines above search term as well. This will be handy when searching for log files.
root@linuxnix:~# grep -B 2 'Max' file1.txt
Steve 45 BOA London
Barbi 25 EasyCMDB Christchurch
Max 25 Easy CMDB Christchurch
Example 12: Search for a word and print two lines after to this search
root@linuxnix:~# grep -A 2 'Barbi' file1.txt
Barbi 25 EasyCMDB Christchurch
Max 25 Easy CMDB Christchurch
Nathan 20 Wipro Newyark
Example 13: Search for a word and print one line Before and after center to this search term
root@linuxnix:~# grep -C 1 'Max' file1.txt
Barbi 25 EasyCMDB Christchurch
Max 25 Easy CMDB Christchurch
Nathan 20 Wipro Newyark

Search multiple files using grep

Example 14: Grep have one more feature which allows searching multiple files at a time. We no need to use grep for each file. Suppose you want to search for Nathan in /root folder recursively use below example.
root@linuxnix:~# grep -r 'Nathan' /root/
Nathan 20 Wipro Newyark
This will not display which file contain Nathan which may confuse you. We do not know from which file Nathan came. To avoid this confusion use below example.
Example 15: Search for a word and just list the file names which contains it with in a directory.
root@linuxnix:~# grep -l 'Nathan' /root/
file1.txt
Example 16: Ok, again this command do not show the line which is again a confusion. In order to search multiple files and display their contents which matchs our search criteria use combination of -r and -n
root@linuxnix:~# grep -rn 'Nathan' /root/
file1.txt:5:Nathan 20 Wipro Newyark
test.txt:1:Nathan abc xyz who
Example 17: Restrict your search to specific files. Suppose search only txt files.
root@linuxnix:~# grep -rn 'Nathan' *.txt
file1.txt:5:Nathan 20 Wipro Newyark
test.txt:1:Nathan abc xyz who
Example 18: Some times you may see below error when opening log files.
Binary file  matches.
This error is because grep thinks it is a binary file. But our log files are never a binary one. This error is due to null value found in the log file. In order to read such files you have to use -a which tell grep to read this file as binary file.
grep -a xyz abc.txt
In our next two posts we will see how to use grep with regular expressions.

Commands to Configure hostname on CentOS 7 and RHEL 7

$
0
0
http://www.linuxtechi.com/configure-hostname-on-centos-7-and-rhel-7

Hostname is defined as label or name of a computer and network device. In this article we will discuss how to set and modify hostname on CentOS 7 & RHEL 7. There are three different commands through which we can query, set and modify hostname.
  • hostnamectl
  • nmtui
  • nmcli
Types of Hostname that we can set on CentOS 7 and RHEL 7 server.
  • Static Hostname — It is conventional hostname that we set on the servers and as the name suggest hostname will be static and persistent accross the reboot.Static hostname is stored in the file /etc/hostname.
  •  Transient Hostname — It is the hostname which is obtained from DHCP and mDNS. Transient hostname might be temporary because it is only temporarily written to kernel hostname.
  •  Pretty Hostname — It is a hostname that can include all kind of special characters. Pretty hostname is stored in the file /etc/machine-info .
Commands to check the hostname :
[root@localhost ~]# hostname
OR
[root@localhost ~]# hostnamectl status
OR
[root@localhost ~]# hostnamectl

hostnamectl command :

hostnamectl command is used to configure,modify and query hostname. Basic syntax is listed below :
# hostnamectl
Let’s set the static hostname ‘cloud.linuxtechi.com
[root@localhost ~]# hostnamectl set-hostname "cloud.linuxtechi.com"
[root@localhost ~]#
Verify the new hostname using hostnamectl and hostname command :
hostnamectl-command-output
Remove or clear the hostname (cloud.linuxtechi.com)
[root@cloud ~]# hostnamectl set-hostname ""
[root@cloud ~]#
[root@cloud ~]# hostname
localhost.localdomain
[root@cloud ~]# hostnamectl
Static hostname: n/a
Transient hostname: localhost
Icon name: computer
Chassis: n/a
Machine ID: a5c10f2a26324894a3b0b83d504c1ff2
Boot ID: c3ff9d084b364b56bb0d588b64ff6f1a
Virtualization: oracle
Operating System: CentOS Linux 7 (Core)
CPE OS Name: cpe:/o:centos:centos:7
Kernel: Linux 3.10.0-123.el7.x86_64
Architecture: x86_64
[root@cloud ~]#
Set Pretty Hostname :
[root@cloud ~]# hostnamectl set-hostname "Pradeep Antil's CentOS-7 Laptop" --pretty
[root@cloud ~]#
hostnamectl-transisent
Remove Pretty hostname :
[root@cloud ~]# hostnamectl set-hostname "" --pretty
Set Hostname on the Remote Server from your local machine.
Syntax :
# hostnamectl set-hostname -H @
Above command will use ssh for connecting and authentication for remote server.
root@linuxworld:~# hostnamectl set-hostname -H 192.168.1.13 @cloud.linuxtechi.com
root@192.168.1.13's password:
root@linuxworld:~#

nmtui command :

nmtui stands for ‘Network Manager Text User Interface‘, it is a text user interface which is used to configure hostname.
When we type nmtui command below window will appear
[root@cloud ~]# nmtui
nmtui-command
Select “Set system hostname” and then click on OK..
set-hostname-nmtui
Type the hostname whatever you want to set and then click on OK.
numtui-ok-option
Restart the hostnamed service
[root@cloud ~]# systemctl restart systemd-hostnamed
[root@cloud ~]#
Verify new hostname using ‘hostname’ & ‘hostnamectl’ command

nmcli command :

nmcli is a command line utility for configuring and query hostname.
Check the hostname :
[root@cloud ~]# nmcli general hostname
cloud.linuxtechi.com
[root@cloud ~]#
Change the hostname :
Syntax :
# nmcli general hostname
[root@cloud ~]# nmcli general hostname antil.linuxtechi.com
Restart the hostnamed service using below systemctl command
[root@cloud ~]# systemctl restart systemd-hostnamed
[root@cloud ~]# hostname
antil.linuxtechi.com
[root@cloud ~]#
Note :hostnamectl command is recommended to query and configure hostname.

A compilation of 7 new OpenStack tutorials

$
0
0
https://opensource.com/business/16/2/compilation-best-new-openstack-tutorials

Getting started, learning more, or even just finding the solution to your particular problem within the OpenStack universe can be quite an undertaking. Whether you're a developer or an operator, it can be hard to keep up with the rapid pace of development of various OpenStack projects and how to use them. The good news is that there are a number of resources to help you out, including the official documentation, a number of third-party OpenStack certification and training programs, and community-authored tutorials.
Here at Opensource.com, every month we put together a list of the best tutorials, how-tos, guides, and tips to help you keep up with what's going in OpenStack. Check out our favorites from this month.
  • If you've ever used ownCloud as a file sharing solution, either personally or for your company, you know just how versatile it is in terms of setting up storage backends. Did you know that among those options is the OpenStack Swift object storage platform? Learn how to setup ownCloud to work with OpenStack Swift in this simple tutorial.
  • Just getting started with exploring OpenStack, and want to make a go at installing it locally? Here's a quick guide to setting up Devstack in a virtual machine, along with getting the Horizon dashboard working so that you can have a visual interface with your test cloud.
  • Ready to take the next step and install OpenStack in a server environment? Here's how to deploy the RDO distribution of OpenStack onto a single server using Ansible.
  • Once you're running applications in your OpenStack cloud, you need some way to keep track of performance and any issues that pop up on each server. David Wahlstrom takes a look at 6 easy-to-use tools for monitoring applications on your virtual servers.
  • If you're an upstream OpenStack developer, you spend a good amount of time on IRC. It's where both weekly meetings and a lot of casual conversations take place. But we can't all be online 24/7. Here's a handy guide from Steve Martinelli about how to set up a ZNC bouncer to keep an eye on IRC conversations when you're away from your computer.
  • The OpenStack Health dashboard is a quick and easy way to see what's going on in the OpenStack continuous integration environment. The dashboard makes it easy to see how many jobs are being running in any given time period, and what the failure rate for tests within those jobs are. Learn more about how it works in this explainer article.
  • Even for networking experts, occasional speed bumps happen when managing virtual networks in OpenStack. Arie Bregman takes us through some of the most common problems with OpenStack's Neutron networking project configuration and how to go about troubleshooting and solving the issues.
That's it for this time around; be sure to check out our complete collection of OpenStack tutorials for more great resources. Did we miss one of your favorites? Let us know below in the comments.

How to skip existing files when copying with scp

$
0
0
http://ask.xmodulo.com/skip-existing-files-scp.html

Question: I want to download (or upload) files from (or to) a remote server using the scp command. In this case, I want to skip existing files, so that they will not get overwritten by scp. But the scp command would blindly overwrite existing files if the same name files exist at either host. How can I copy files over without overwriting existing files, so that only new files are downloaded (or uploaded) by scp?
Suppose you have a list of files on a remote host, some of which already exist locally. What you want is to transfer only those files that are not found locally. If you blindly run scp with wildcard, it would fetch all remote files (existing as well as non-existing files), and overwrite existing local files. You want to avoid this.
In another similar situation, you may want to upload local files to a remote site, but without replacing any remote files.
Here are a few ways to skip existing files when transferring files with scp.

Method One: rsync

If the local and remote hosts have rsync installed, using rsync will be the easiest way to copy only new files over, since rsync is designed for incremental/differential backups.
In this case, you need to explicitly tell rsync to "skip" any existing files during sync. Otherwise, rsync will try to use file modification time to sync two hosts, which is not what you want.
To download all remote files (over SSH) while skipping existing local files:
$ rsync -av --ignore-existing user@remote_host:/path/to/remote/directory/* /path/to/local/directory/
Similarly, to upload all local files (over SSH) without overwriting any duplicate remote files:
$ rsync -av --ignore-existing /path/to/local/directory/* user@remote_host:/path/to/remote/directory/

Method Two: getfacl/setfacl

Another way to scp only new files over to a destination is by leveraging file permissions. More specifically, what you can do is to make all destination files "read-only" before scp transfer. This will prevent any existing destination files from being overwritten by scp. After scp transfer is completed, restore the file permissions to the original state. The ACL command-line tools (getfacl and setfacl) come in handy when you temporarily change file permissions and restore them.
Here is how to scp files without replacing existing files using ACL tools.
To download all remote files (over SSH) while skiping existing local files:
$ cd /path/to/local/directory
$ getfacl -R . > permissions.txt
$ chmod -R a-w .
$ scp -r user@remote_host:/path/to/remote/directory/* .
$ setfacl --restore=permissions.txt
Similarly, to upload all local files without replacing any remote file, first back up the file permissions of the remote destination folder. Then remove write-permission from all files in the remote destination folder. Finally, upload all local files, and then restore the saved file permissions.
Download this article as ad-free PDF (made possible by your kind donation): Download PDF

Top 5 sources for open source fonts

$
0
0
https://opensource.com/life/16/2/top-sources-open-source-fonts

Open source fonts
Image by : 
Jason Baker for Opensource.com. CC-BY-SA 4.0.
Fonts, like any other digital asset on your computer, come with their own rules for licensing.
When selecting a font, the decision process involves more than choosing between serif and sans serif: understanding how the font is licensed matters too. Though typographers need to be concerned with their rights to modify and extend a given font, even you as an end user should be asking yourself some questions. Do you have permission to use a font in commercial work, or in a public work at all? Can you even share that font with another person?
If you’re creating a work you wish to share, then licensing matters to you, and you should understand how open source applies to the world of fonts.

Font licenses

The most common open source font license is the SIL Open Font License, often just referred to by its initials OFL. But it’s not the only open source font license out there. In fact, the range of licenses which have been applied to fonts is broad, and sometimes confusing.
The Fedora Project, for example, recognizes over twenty font licenses as compatible with inclusion in the project. These include everything from the well-know Creative Commons to licenses originally created for just a single font, like the Elvish Font License, created for Tengwar, which true Lord of the Rings fans may recognize as the script in which elven languages like Quenya and Sindarin are commonly written.
What makes licensing for fonts confusing is that many licenses originally written for software or other creative works often don’t mesh well with the ways in which fonts are used in derivative works, and many font licenses make distribution free but restrict other freedoms like modification or naming derived fonts with similar names to the original.
Further, copyleft licenses like the GPL can make it unclear whether creative works making use of a font must also make use of a copyleft license. While it might be entertaining to imagine a document becoming open source merely because of its font selection, that’s not a legal road most authors (or font creators) want to go down, and some licenses have explicit exceptions for fonts (for example, the GPL has an optional font exception clause).

Sources for open fonts

Most authors of open source projects, however, aren’t interested in the intricacies of how licensing applies to fonts. They just want to know that the font they are using is legal to use and redistribute with their project, and that others have those same rights.
Here are five great sources you can use to find and download open source fonts for use in your programs, documents, and artistic creations.
  • The League of Moveable Type is a community of font creators who license a curated collection of fonts under the OFL and host their source files on GitHub.
  • FontSpace is a general-purpose font download site where you can filter fonts to only those available under an open license.
  • Google Fonts is a source for “hundreds of free, open source fonts optimized for the web.” Google Fonts are designed for use with their API service for display as webfonts across any site which wishes to use them.
  • Font Squirrel is another general hosting site for fonts, all of which are free for commercial use, but the site enables you to specifically filter for open source licensed fonts if you choose.
  • The Open Font Library contains over 6,000 individual fonts from over 250 contributors, spanning a variety of licenses, all available as easy-to-use webfonts.
These, of course, are not the only sources for finding open source fonts. Your preferred Linux distribution probably ships with some already selected, and others are available elsewhere online. Just be sure you trust the source from which you are acquiring your fonts to have accurate licensing information.

Design your own

Can’t find exactly what you’re looking for? Or just want to try your hand at typography? FontForge is an open source project designed to open the world of font creation to anyone who wants to try their hand at it. Initially created by George Williams, FontForge is a jointly GPL- and BSD-licensed tool which rivals and in many ways surpasses its non-free alternatives.
FontForge provides a free ebook which lays out many of the basic things you need to know in order to get started with font creation: both how to use the program, as well as some of the high level concepts and terminology you should be familiar with.
Whatever your interest in free and open source fonts, we hope you’ll contribute any of your favorite resources in the comments below. And for more on the origins and future of open source fonts, check out this write-up of open source font pioneer Dave Crossland’s keynote at Flock 2013.

13 examples to use curly braces in Linux

$
0
0
http://www.linuxnix.com/12-examples-flower-brackets-linux

This is a small post on how to crate multiple files/folders, sequence generation with flower brackets in-order to save valuable time.
Creating empty files can be done with touch command. We will see how to create multiple files using this command in one shot.
Example 1: Create a file with name abc.txt
touch abc.txt
Example2: Create multiple files abc, cde, efg, hij, klm
touch  abc cde efg hij klm
Example 3: How about creating 1 to 20 files, ie creating multiple files with one command. Its bit tedious job for an admin. Don’t worry Linux provide us with some useful option with “Flower braces” to do expansion. Instead of writing below command
touch 1 2 3 4 5 6 7 8 9 10 11 12 13 14 15 16 17 18 19 20
We can create 20 files using flower brace {} expansion as shown below..
touch {1..20}
Your shell tries to expand this brace and generate 1 to 20 numbers. The above command will create total 20 files in one shot.
Example 4: How about creating files as 1.txt, 2.txt, 3.txt up to 1000.txt. This can be achieved suffixing it after brackets as shown below.
touch {1..1000}.txt
Example 5: How about creating a1, a2, a3 so on up to a1000 files?
touch a{1..1000}
Example 6:How about generating numbers?. We can generate numbers using flower braces with echo command. The other way to generate numbers is seq command.
echo {1..10}
Example 7: Even we can do sequence for alphabets as shown below
touch {a..z}
Example 8: Generate files from A to Z
touch {A..Z}
Note: The above alphabets generation is done using asci values
Example 9: How about creating 1 to 1000000 files in one shot, by using multiplication/matrix of numbers?. We can achieve this one with multiplying two sequences.
touch {0..1000}{0..1000}
Example10: How about creating files as multiples of 2.
touch {1..100..2}
this will create files as 1, 3, 5, 7, 9, 11 etc.
Note: This interval will work only BASH version 4.0 and above, make a note about this.
Example 11: How about creating files as multiples of 7?
touch {1..100..7}
Note: This interval option will work only bash version 4 and above.
Practical usage of this brackets
1) In bash for loop.
2) Generating sequence of numbers.
As mention in above examples we can create folders similarly in one shot. use -p option if you want to create folders in sub folders too.
Example 12: Create a folder structure as 2012, under this i want to create 12 folders for each month and under each month create 30 folders which corresponding to 30 days.
mkdir -p 2012/{1..12}/{1..30}
This will create folder 2012 under that 1 to 12 folders and under each of these folders 1 to 30 folders in one go.
Example 13: Usage in for loop.
for i in {1..10}
do
echo "Present number is $i"
done
Please feel free to comment your thoughts on this.

What is a sticky Bit and how to set it in Linux?

$
0
0
http://www.linuxnix.com/sticky-bit-set-linux

Today we will see how to set Sticky Bit in Linux. This is next to SGID in our ongoing File and Folder permissions series in Linux. We already discussed about CHMOD, UMASK, CHOWN, CHGRP, SGID and SUID file and folder permissions etc in our previous posts. In this post we will see
  • What is Sticky Bit?
  • Why we require Sticky Bit?
  • Where we are going to implement Sticky Bit?
  • How to implement Sticky Bit in Linux?

What is Sticky Bit?

Sticky Bit is mainly used on folders in order to avoid deletion of a folder and its content by other users though they having write permissions on the folder contents. If Sticky bit is enabled on a folder, the folder contents are deleted by only owner who created them and the root user. No one else can delete other users data in this folder(Where sticky bit is set). This is a security measure to avoid deletion of critical folders and their content(sub-folders and files), though other users have full permissions.

Learn Sticky Bit with examples:

Example: Create a project(A folder) where people will try to dump files for sharing, but they should not delete the files created by other users.
How can I setup Sticky Bit for a Folder?
Sticky Bit can be set in two ways
  1. Symbolic way (t,represents sticky bit)
  2. Numerical/octal way (1, Sticky Bit bit as value 1)
Use chmod command to set Sticky Bit on Folder: /opt/dump/
Symbolic way:
chmod o+t /opt/dump/
or
chmod +t /opt/dump/
Let me explain above command, We are setting Sticky Bit(+t) to folder /opt/dump by using chmod command.
Numerical way:
chmod 1757 /opt/dump/
Here in 1757, 1 indicates Sticky Bit set, 7 for full permissions for owner, 5 for read and execute permissions for group, and full permissions for others.
Checking if a folder is set with Sticky Bit or not?
Use ls -l to check if the x in others permissions field is replaced by t or T
For example: /opt/dump/ listing before and after Sticky Bit set
Before Sticky Bit set:
ls -l
total 8
-rwxr-xrwx 1 xyz xyzgroup 148 Dec 22 03:46 /opt/dump/
After Sticky Bit set:
ls -l
total 8
-rwxr-xrwt 1 xyz xyzgroup 148 Dec 22 03:46 /opt/dump/

Some FAQ’s related to Sticky Bit:

Now sticky bit is set, lets check if user “temp” can delete this folder which is created xyz user.
$ rm -rf /opt/dump
rm: cannot remove `/opt/dump': Operation not permitted
$ ls -l /opt
total 8
drwxrwxrwt 4 xyz xyzgroup 4096 2012-01-01 17:37 dump
$
if you observe other user is unable to delete the folder /opt/dump. And now content in this folder such as files and folders can be deleted by their respective owners who created them. No one can delete other users data in this folder though they have full permissions.
I am seeing “T” ie Capital s in the file permissions, what’s that?
After setting Sticky Bit to a file/folder, if you see ‘T’ in the file permission area that indicates the file/folder does not have executable permissions for all users on that particular file/folder.
Sticky bit without Executable permissions:

so if you want executable permissions, Apply executable permissions to the file.
chmod o+x /opt/dump/
ls -l
command output:
-rwxr-xrwt 1 xyz xyzgroup 0 Dec 5 11:24 /opt/dump/
Sticky bit with Executable permissions:
 
 
sticky bit unix, unix sticky bit, suid, linux sticky bit, sticky bit in unix, sticky bit aix, sticky bit chmod, sticky bits, sticky bit linux, suid sgid sticky bit, set sticky bit, stickybit, sticky bit permission, setting sticky bit, solaris sticky bit, sticky bit solaris, sticky bit directory, remove sticky bit, ubuntu sticky bit, sticky bit t, aix sticky bit, sticky bit load balancer, directory sticky bit, umask
you should see a smaller ‘t’ in the executable permission position.
How can I find all the Sticky Bit set files in Linux/Unix.
find / -perm +1000
The above find command will check all the files which is set with Sticky Bit bit(1000).
Can I set Sticky Bit for files?
Yes, but most of the time it’s not required.
How can I remove Sticky Bit bit on a file/folder?
chmod o-t /opt/dump/
Post your thoughts on this.
Viewing all 1416 articles
Browse latest View live


<script src="https://jsc.adskeeper.com/r/s/rssing.com.1596347.js" async> </script>