Quantcast
Channel: Sameh Attia
Viewing all 1416 articles
Browse latest View live

How To Install & Use VeraCrypt In Linux An Alternative To TrueCrypt [COMPLETE TUTORIAL]

$
0
0
http://www.linuxandubuntu.com/home/encrypt-data-in-linux-with-veracrypt-an-alternative-to-truecrypt


Install and use veracrypt in linux
VeraCrypt is a free, open source and cross platform data encryption tool. It's an alternative to TrueCrypt(project discontinued), the popular encryption tool for all Operating systems. VeraCrypt is an easy to use tool. In this article I will walk you through the complete process of installing & using VeraCrypt in any Linux distributions such as Debian, Arch, Ubuntu, Linux Mint etc. So let's get started.

VeraCrypt

VeraCrypt is a free file encryption tool based on the popular encryption tool, TrueCrypt.  The TrueCrypt project was suddenly discontinued and people started searching for any alternative. Although some prove that TrueCrypt is still usable because there is no vulnerability in the code. You can know more about TrueCrypt in my other post here.

VeraCrypt was started after the TrueCrypt was discontinued. Most TrueCrypt users switched to VeraCrypt because it's the closest you can get in terms of functionalities and user interface. 

Download VeraCrypt

Download VeraCrypt for Linux
VeraCrypt can be downloaded from the official website. It's just a tar file that you will need to extract it on your hard drive. 

How To Install VeraCrypt In Linux

After you have downloaded the .tar.gz file from the official website, extract it somewhere on your hard disk. You can install it through terminal and gui both. If you want to install VeraCrypt through Terminal then use the console file otherwise use gui files. In this article I will be installing using GUI file.

Open Terminal

First of all open terminal and cd into the extracted VeraCrypt directory.
Open terminal to install veracrypt

Execute Setup

Start the setup using the below command - 
$ sudo bash veracrypt-1.17-setup-gui-x64


Your filename may be different if you're using different VeraCrypt version.
Now you should see the GUI setup to install VeraCrypt. Click 'Install VeraCrypt'.
Install veracrypt in linux through GUI
Accept VeraCrypt terms and conditions
accept veracrypt terms & conditions
Start the installation
Veracrypt installation starts
The installation will begin in a separate console. It takes few seconds to finish. Enter to exit the console after installation.
VeraCrypt installation begins
Now VeraCrypt is installed. Read below to know how to use VeraCrypt.

How To Use VeraCrypt To Encrypt Files

Open VeraCrypt from application menu. 
start veracrypt from application menu
To create an encrypted container, create a file on your hard disk. 
create veracrypt file container
veracrypt file container
Select a drive slot and click create volume to create an encrypted volume with VeraCrypt.
select veracrypt volume slot and create volume
With VeraCrypt you can create an encrypted container within the file that we created in above step. But you can also encrypt external partitions such as external hard drive or USB/Flash drive. In this tutorial we'll create an encrypted file container. 
veracrypt volume craeation wizard
You can create two types of encrypted file containers with VeraCrypt. The first one is Standard VeraCrypt volume type that behaves just like a file and it's visible to everyone. In Standard VeraCrypt volume you can keep your file and lock them with a strong password.

The second type of container is Hidden VeraCrypt volume. As the name suggests it's hidden. You can guess what benefits you get with VeraCrypt hidden volume. It's not visible to anyone.

In this tutorial we'll create a Standard VeraCrypt volume.
select veracrypt volume type
Now select the text file that you created in the step above.
select file for creating veracrypt encrypted container
select veracrypt file container file
In the next step select the Encryption Algorithm. I am selecting AES you can google to know more about Encryption Algorithm.

Select Hash Algorithm, you can google to know more about Hash Algorithm.
choose file container encryption algorithm and has algorithm
In the next step select the size of your encrypted file container. The minimum container size can be 292KB.
enter encrypted volume size
Now set a complex password for your container. You will require this password in order to access files that are stored in the container.

You can also use a keyfile to open your encrypted file container. But I don't consider this option safer because you have to secure that file and in case any one else has that keyfile then your encrypted container can be unlocked. The better is creating a complex password that you can remember.
enter encrypted volume password
Select the filesystem for you container. You can choose FAT because it works with most of the OSes.
choose volume format FAT, NTFS etc
Now move your mouse on the window. It will increase cryptographic strength of the encryption keys. The longer you move the better it is. 
generate strong cryptographic keys
When you are done click format. The formatting will start and the volume will be created.
veracrypt creating encrypted file container
VeraCrypt encrypted volume created

Mount Encrypted File Container

From VeraCrypt, browse and select the file that you created and encrypted. Remember you have created your text file an encrypted container.
mount veracrypt encrypted volume
Notice that how some bytes text file is now 1 GB. It is now the container. Select it and click mount.
browse encrypted volume
Click mount after browsing the container. 
VeraCrypt mount encrypted volume
Enter password that you set while creating the container. Once you're done with your correct password, the container will be mounted and ready to be used.
VeraCrypt enter password to mount encrypted volume
Double click the mounted volume to open it. 
Double click to open mounted veracrypt volume
You can copy and paste the files in this volume. All the files are secure when you dismount this volume. To access the files in the container you will require to enter password again. So it's easy to access your files when you need to. 
Store secrets files in encrypted veracrypt volume
NOTE - The encrypted volume is just like the file, so it can be deleted as well. Please keep it safe otherwise you will delete all your secrets files by deleting this encrypted volume.

9 really odd Linux commands

$
0
0
http://www.computerworld.com/article/3035480/linux/9-really-odd-linux-commands.html

figlet shs

Credit: Sandra Henry-Stocker
You can probably make your Unix systems hum -- deliver great performance, withstand threats to file system integrity, resist hacker attacks, report problems, and run smoothly no matter what your users throw at them. But can you make them do goofy things? Let's look at a collection of some really oddball tools that you might never have heard of are tried.

shuf

The shuf command -- short for "shuffle" reorganizes the lines of a file in some pseudorandom way. Start out with a file listing the days of the week and you can rearrange them in any of 5,040 ways (7 * 6 * 5 * 4 * 3 * 2). Maybe more useful for determining who brings cookies into the office each day for the next couple of weeks.
$ shuf Days-of-Week
Monday
Tuesday
Wednesday
Saturday
Thursday
Sunday
Friday
$ shuf Days-of-Week
Sunday
Saturday
Wednesday
Tuesday
Thursday
Monday
Friday
You don't have to display the result of the entire shuffling either. Trying to decide who of your two dozen coworkers gets to bring in cookies for the rest of the week? No need to draw straws. Just limit the output to three of your shuf command with -n option like this.
$ shuf -n 3 staff
James
Kevin
May
You can also shuffle a range of numbers.


$ shuf -i 2-11
8
11
7
9
4
2
10
5
6
3
And you can have the command select just a handful of numbers out of a fairly large range.
$ shuf -n 5 -i 1-1000
85
952
149
498
2
revThe rev command reverses lines whether passed to the command as standard in or stored in a file.
$ echo Hello, World! | rev
!dlroW ,olleH
$ rev Days-of-Week
yadnuS
yadnoM
yadseuT
yadsendeW
yadsruhT
yadirF
yadrutaS

tac

The tac command is sort of the reverse of the cat command. It displays the content of a file, but in reverse order. There are probably many times when doing this can be both handy and sensible, but the command still strikes me as odd.
$ tac Days-of-Week
Saturday
Friday
Thursday
Wednesday
Tuesday
Monday
Sunday

sl

And, if tac didn't go far enough, we also have the sl command to punish people who mistakenly type sl when they meant to type ls. Their punishment? A train (i.e., steam locomotive) drives across their screen.


                      (@@) (  ) (@)  ( )  @@    ()    @ 
( )
(@@@@)
( )

(@@@)
==== ________ ___________
_D _| |_______/ \__I_I_____===__|_________|
|(_)--- | H\________/ | | =|___ ___|
/ | | H | | | | ||_| |_||
| | | H |__--------------------| [___] |
| ________|___H__/__|_____/[][]~\_______| |
|/ | |-----------I_____I [][] [] D |=======|__
__/ =| o |=-~~\ /~~\ /~~\ /~~\ ____Y___________|__|
|/-=|___|= || || || |_____/~\___/
\_/ \O=====O=====O=====O_/ \_/

look

The look command can be handy if you need to come up with words that start with a particular string. In the example below, we're looking for words that start with the string "fun".
$ look fun | head -11
fun
funambulant
funambulate
funambulated
funambulating
funambulation
funambulator
funambulatory
funambule
funambulic
funambulism
But look, it found me too. Hmmm.
$ look sandra
Sandra
sandra
Sandrakottos
The look command uses the words file (e.g., /usr/share/dict/words) on your system and only grabs words that start with the string you provide. A grep -i command would find a lot more matches in most cases.

yes

The yes command puts you into a loop that repeats the same string over and over again. It does have some useful purposes, though, even while this behavior might seem silly. People sometimes use it to provide as many "yes" responses as might be need to handle a demanding script.
The default behavior of yes is to provide an endless loop of "y" responses.
$ yes | head -4
y
y
y
y
You can, however, supply your own string.
$ yes Please loop forever | head -11
Please loop forever
Please loop forever
Please loop forever
Please loop forever
Please loop forever
Please loop forever
Please loop forever
Please loop forever
Please loop forever
Please loop forever
Please loop forever

cowsay

Probably one of the oddest commands that the powers behind Linux have come up with is the cowsay command that displays an ASCII cow saying whatever you want it to say. Here's an example. Note the use of the escape character to allow the display of the apostrophe.
$ cowsay I don\'t moo for just anyone
_____________________________
< I don't moo for just anyone >
-----------------------------
\ ^__^
\ (oo)\_______
(__)\ )\/\
||----w |
|| ||

factor

Another unusual, though not really silly, command is the factor command that factors whatever number you provide. I just happened to try a number that has just two factors.
$ factor 33431
33431: 101 331
You can verify the result if you like using an expr command like this one.
$ expr 101 \* 331 33431

figlet

The last unusual command that I'm going to cover is called figlet. It uses a small number of enlarged keyboard characters to create banner text.
$ figlet Show me!
____ _ _
/ ___|| |__ _____ __ _ __ ___ ___| |
\___ \| '_ \ / _ \ \ /\ / / | '_ ` _ \ / _ \ |
___) | | | | (_) \ V V / | | | | | | __/_|
|____/|_| |_|\___/ \_/\_/ |_| |_| |_|\___(_)
One of the most surprising thing about the figlet command is how many options are available. Someone put a lot of time into making sure that you could get the kind of output you want. Options include font variations, justification, character sets, etc. In the command below, we say to use a screen width of 40 and to center the output.
$ figlet -w 40 -c Can you do this?
____
/ ___|__ _ _ __ _ _ ___ _ _
| | / _` | '_ \ | | | |/ _ \| | | |
| |__| (_| | | | | | |_| | (_) | |_| |
\____\__,_|_| |_| \__, |\___/ \__,_|
|___/
_ _ _ _ ___
__| | ___ | |_| |__ (_)__|__ \
/ _` |/ _ \ | __| '_ \| / __|/ /
| (_| | (_) | | |_| | | | \__ \_|
\__,_|\___/ \__|_| |_|_|___(_)
Here's an example where the input is taken from a file, a script font is used, and the screen width is controlled so that we don't have more than one day of the week per line -- output truncated.
$ figlet -f script -w 60 -p < Days-of-Week

() |
/\ _ _ __| __,
/ \| | / |/ | / | / | | |
/(__/ \_/|_/ | |_/\_/|_/\_/|_/ \_/|/
/|
\|
,__ __
/| | | |
| | | __ _ _ __| __,
| | | / \_/ |/ | / | / | | |
| | |_/\__/ | |_/\_/|_/\_/|_/ \_/|/
/|
\|
I've been told that figlet (launched as newban in Spring 1991) predates Linux by a number of months and is available on a wide variety of operating systems.
I hope that was fun.

How to simulate yes/No in Linux scripts/commands

$
0
0
http://www.linuxnix.com/simulate-yesno-in-linux-scriptscommands

In some situations when executing a command or a Linux shell script we may require some manual intervention. The yes command is simple built-in command which will help you remove this manual intervention stuff in your scripts. The yes command is a cousin of echo command both print what we given. Only difference is echo will print only once, but yes will print until we intervene. Below are some examples which will come handy when simulating yes/no in scripts/commands
Example 1: Simulate yes when using rm command. My rm command is aliased to “rm -rf”, so for this example I am using rm -i for this example. Remove all files in my directory.
surendra@linuxnix:~/code/sh/temp$ touch {1..5}
surendra@linuxnix:~/code/sh/temp$ yes | rm -i *
rm: remove regular empty file ‘1’? rm: remove regular empty file ‘2’? rm: remove regular empty file ‘3’? rm: remove regular empty file ‘4’? rm: remove regularempty file ‘5’? surendra@linuxnix:~/code/sh/temp$ ls
surendra@linuxnix:~/code/sh/temp$
Example 2: Do not remove any files with rm
surendra@linuxnix:~/code/sh/temp$ touch {1..5}
surendra@linuxnix:~/code/sh/temp$ yes n | rm -i *
rm: remove regular empty file ‘1’? rm: remove regular empty file ‘2’? rm: remove regular empty file ‘3’? rm: remove regular empty file ‘4’? rm: remove regular empty file ‘5’?
surendra@linuxnix:~/code/sh/temp$ ls
1 2 3 4 5
Example 3: Simulate yes and no in a controled fashon. I want to remove 1, 3, 5 files from my directory.
surendra@linuxnix:~/code/sh/temp$ ls
1 2 3 4 5
surendra@linuxnix:~/code/sh/temp$ echo -e "y\nn\ny\nn\ny" | rm -i *
rm: remove regular empty file ‘1’? rm: remove regular empty file ‘2’? rm: remove regular empty file ‘3’? rm: remove regular empty file ‘4’? rm: remove regular empty file ‘5’? surendra@linuxnix:~/code/sh/temp$ ls
2 4
Example 4: How about taking input from user for yes, no stuff? We can use bash regular expressions for that.
if [[ "$var1" =~ ([Yy]|([Ee][Ee][Ss]]
then
echo “Yes, its present”
else
echo “its not present”
fi
Did not understand regular expressions, then see below links.
The following two tabs change content below.

Docker: How to use it in a practical way

$
0
0
https://www.howtoforge.com/tutorial/docker-how-to-use-it-in-a-practical-way-on-ubuntu

Manage and secure your org's mobile devices with Mobile Device Manager Plus
Part 2: Docker installation and service management.

Preface

In the first part, I presented the fundamental ideas behind Docker containers and how exactly they work. In this second part, we will proceed with the installation of Docker and its management as a service in our system. We will prepare our system so that in the next part we can create a personal notepad using the WordPress content management system (CMS) or the Dokuwiki which is a wiki software that doesn't require a database.
As we discussed in the first part, to accomplish the above tasks, we would have to either manually install and configure a physical machine with the Apache, MySQL, PHP parts that are needed in order to run the Wordpress CMS or the Docuwiki, or install a Linux server distribution in a virtual machine and then install and configure Apache, MySQL, PHP.
With the docker containers, we don't have to do all the manual labor. We just need to download the prebuilt image and run it in a container that has all the stuff that we need, pre-configured for us and ready to be ran. But let's just focus on our system preparation first.
Docker installation and service management.

Installing Docker

Before we start, we need to prepare our physical machine with some prerequisites for the docker service. I will describe the procedure for the Ubuntu Linux operating system, but the same applies to any distribution really, with only slight changes in the package installation commands. Currently, Docker is supported on Ubuntu 15.10/14.04/12.04. For other distributions, you can check the official documentation (https://docs.docker.com/engine/installation/linux/).

Prerequisites

Docker requires a 64-bit installation regardless of your Ubuntu version. Additionally, your kernel must be on 3.10 version at minimum, because Linux kernels older than 3.10 lack some of the features required to run Docker containers. These older versions are known to have bugs which cause data loss and frequently panic under certain conditions.

Installing Docker engine on Ubuntu 15.10

We will install the Docker engine from the official repositories because they regularly release new versions with new features and bug fixes while the Docker on the Ubuntu repositories is usually several versions older and not maintained.
If you have previously installed Docker on your Ubuntu installation from the default Ubuntu repositories, you should purge it first using the following command:
sudo apt-get --purge autoremove lxc-docker
Docker’s apt repository as of this writing it contains the Docker engine 1.10.1 version. Now let us set apt to use packages from the official repository:
1) Open a terminal window.
2) Add the corresponding gpg key for the Docker repository
sudo apt-key adv --keyserver hkp://p80.pool.sks-keyservers.net:80 --recv-keys 58118E89F3A912897C070ADBF76221572C52609D
3) Edit the /etc/apt/sources.list.d/docker.list file in your favorite editor. You can ignore if it doesn't exist, we can safely create it.
sudo nano /etc/apt/sources.list.d/docker.list
Add the following line in the docker.list file
deb https://apt.dockerproject.org/repo ubuntu-wily main
Save and close the /etc/apt/sources.list.d/docker.list file.
4) Now that the new repository is added you should update the apt package index.
sudo apt-get update
5) First you should install the `linux-image-extra kernel` package. The Linux-image-extra package allows docker to use the aufs storage driver
sudo apt-get install linux-image-extra-$(uname -r)
6) Now you can install the docker engine
sudo apt-get install docker-engine
You can verify that apt is pulling docker engine from the official repository with the following command:
apt-cache policy docker-engine
Install Docker
With the above command, you will see the version of the docker, which should probably be 1.10.1+ and some entries that indicate the official origin of the docker package. If the information is correct and you see links to the official Docker repositories then whenever you run sudo apt-get upgrade, your system will pull the new versions from the official repository.

Managing Docker service on Ubuntu 15.10

Now that we have our system prepared let's discuss the management of the Docker service that runs in the background.
First things first, we should learn how to start or stop the Docker service and also how to check if it is running with the systemctl tool.
To check if the docker is running and also check some useful information about our memory, CPU, process ID and some log entries, we can run:
sudo systemctl status docker
To start the Docker service, we issue the following command:
sudo systemctl start docker
Start Docker
To stop the Docker service, we issue the following command:
sudo systemctl stop docker
Stop Docker
If for any reason we do not want the Docker service to run always in the background, we can disable its startup during system boot by issuing the following command:
sudo systemctl disable docker
If we want to revert the above action we can enable the Docker service to start during system boot with the following command:
sudo systemctl enable docker

Summary

With the second part, we have concluded our preparation of the underlying operating system (Ubuntu 15.10 in our case) to be able to run the latest version of Docker engine. Also, we learned how to start, stop, check the status of the Docker service and either enable or disable its startup during the system boot.
In the next (third) part, we will start using Docker images and see how we can create containers in a practical way.

Automount NFS share in Linux using autofs

$
0
0
http://www.linuxtechi.com/automount-nfs-share-in-linux-using-autofs

Autofs is a service in Linux like operating system which automatically mounts the file system and remote shares when it is accessed. Main advantage of autofs is that you don’t need to mount file system at all time, file system is only mounted when it is in demand.
Autofs service reads two files Master map file ( /etc/auto.master ) and a map file like /etc/auto.misc or /etc/auto.xxxx.
In ‘/etc/auto.master’ file we have three different fields :
/        
In map file (/etc/auto.misc or /etc/auto.xxxx) also we have three different fields:
          
In this article we will mount the NFS share using autofs. NFS share ‘/db_backup‘ is exported from Fedora NFS Server (192.168.1.21). We are going to mount this nfs share on CentOS 7 & Ubuntu Linux using autofs.

Steps to mount nfs share using Autofs in CentOS 7.

Step:1 Install autofs package.

Install the autofs package using below yum command if it is not installed.
[root@linuxtechi ~]# rpm -q autofs
package autofs is not installed
[root@linuxtechi ~]# yum install autofs

Step:2 Edit the Master map file (/etc/auto.master )

Add the following line .
[root@linuxtechi ~]# vi /etc/auto.master
/dbstuff /etc/auto.nfsdb --timeout=180
Note : Mount point ‘/dbstuff’‘ must exist on your system. If not then create a directory ‘mkdir /dbstuff‘. NFS Share will automatically umount after 180 seconds or 3 minutes if don’t perform any action on the share.

Step:2 Creat a map file ‘/etc/auto.nfsdb’

Create a map file and add the following line.
[root@linuxtechi ~]# vi /etc/auto.nfsdb
db_backup -fstype=nfs,rw,soft,intr 192.168.1.21:/db_backup
Save and exit the file.
Where :
  • db_backup is a mount point.
  • -fstype=nfs is the file system type & ‘rw,soft,intr’ are mount options.
  • ‘192.168.1.21:/db_backup’ is nfs share location.

Step:3 Start the auotfs service.

[root@linuxtechi ~]# systemctl start autofs.service
[root@linuxtechi ~]# systemctl enable autofs.service
ln -s '/usr/lib/systemd/system/autofs.service''/etc/systemd/system/multi-user.target.wants/autofs.service'
[root@linuxtechi ~]#

Step:3 Now try to access the mount point.

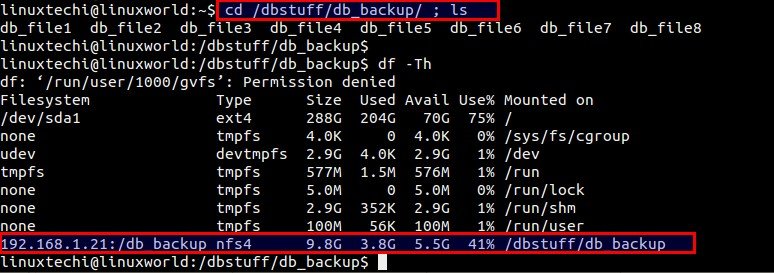
Mount point of nfs share will be ‘/dbstuff/db_backup’. When we try access the mount point then autofs service will mount nfs share automatically.
nfs-mount-autofs

Steps to mount NFS share using autofs in Ubuntu Linux.

Step:1 Install the autofs package using apt-get command.

linuxtechi@linuxworld:~$ sudo apt-get install autofs

Step:2 Edit the Master Map file ‘/etc/auto.master’

Add the following line in the master map file.
linuxtechi@linuxworld:~$ sudo vi /etc/auto.master
/dbstuff /etc/auto.nfsdb --timeout=180
Save & exit the file.
Create the mount point.
linuxtechi@linuxworld:~$ sudo mkdir /dbstuff
linuxtechi@linuxworld:~$

Step:2 Create a map file ‘/etc/auto.nfsdb’.

Add the following line in the map file.
linuxtechi@linuxworld:~$ sudo vi /etc/auto.nfsdb
db_backup -fstype=nfs4,rw,soft,intr 192.168.1.21:/db_backup

Step:3 Start the autofs service.

linuxtechi@linuxworld:~$ sudo /etc/init.d/autofs start

Step:4 Try to access the mount point.

autofs-ubuntu

4 open source tools for Linux system monitoring

$
0
0
https://opensource.com/life/16/2/open-source-tools-system-monitoring

Linux system monitoring tools
Image by : 
opensource.com
Information is the key to resolving any computer problem, including problems with or relating to Linux and the hardware on which it runs. There are many tools available for and included with most distributions even though they are not all installed by default. These tools can be used to obtain huge amounts of information.
This article discusses some of the interactive command line interface (CLI) tools that are provided with or which can be easily installed on Red Hat related distributions including Red Hat Enterprise Linux, Fedora, CentOS, and other derivative distributions. Although there are GUI tools available and they offer good information, the CLI tools provide all of the same information and they are always usable because many servers do not have a GUI interface but all Linux systems have a command line interface.
This article concentrates on the tools that I typically use. If I did not cover your favorite tool, please forgive me and let us all know what tools you use and why in the comments section.
My go to tools for problem determination in a Linux environment are almost always the system monitoring tools. For me, these are top, atop, htop, and glances.
All of these tools monitor CPU and memory usage, and most of them list information about running processes at the very least. Some monitor other aspects of a Linux system as well. All provide near real-time views of system activity.

Load averages

Before I go on to discuss the monitoring tools, it is important to discuss load averages in more detail.
Load averages are an important criteria for measuring CPU usage, but what does this really mean when I say that the 1 (or 5 or 10) minute load average is 4.04, for example? Load average can be considered a measure of demand for the CPU; it is a number that represents the average number of instructions waiting for CPU time. So this is a true measure of CPU performance, unlike the standard "CPU percentage" which includes I/O wait times during which the CPU is not really working.
For example, a fully utilized single processor system CPU would have a load average of 1. This means that the CPU is keeping up exactly with the demand; in other words it has perfect utilization. A load average of less than one means that the CPU is underutilized and a load average of greater than 1 means that the CPU is overutilized and that there is pent-up, unsatisfied demand. For example, a load average of 1.5 in a single CPU system indicates that one-third of the CPU instructions are forced to wait to be executed until the one preceding it has completed.
This is also true for multiple processors. If a 4 CPU system has a load average of 4 then it has perfect utilization. If it has a load average of 3.24, for example, then three of its processors are fully utilized and one is utilized at about 76%. In the example above, a 4 CPU system has a 1 minute load average of 4.04 meaning that there is no remaining capacity among the 4 CPUs and a few instructions are forced to wait. A perfectly utilized 4 CPU system would show a load average of 4.00 so that the system in the example is fully loaded but not overloaded.
The optimum condition for load average is for it to equal the total number of CPUs in a system. That would mean that every CPU is fully utilized and yet no instruction must be forced to wait. The longer-term load averages provide indication of the overall utilization trend.
Linux Journal has an excellent article describing load averages, the theory and the math behind them, and how to interpret them in the December 1, 2006 issue.

Signals

All of the monitors discussed here allow you to send signals to running processes. Each of these signals has a specific function though some of them can be defined by the receiving program using signal handlers.
The separate kill command can also be used to send signals to processes outside of the monitors. The kill -l can be used to list all possible signals that can be sent. Three of these signals can be used to kill a process.
  • SIGTERM (15): Signal 15, SIGTERM is the default signal sent by top and the other monitors when the k key is pressed. It may also be the least effective because the program must have a signal handler built into it. The program's signal handler must intercept incoming signals and act accordingly. So for scripts, most of which do not have signal handlers, SIGTERM is ignored. The idea behind SIGTERM is that by simply telling the program that you want it to terminate itself, it will take advantage of that and clean up things like open files and then terminate itself in a controlled and nice manner.
  • SIGKILL (9): Signal 9, SIGKILL provides a means of killing even the most recalcitrant programs, including scripts and other programs that have no signal handlers. For scripts and other programs with no signal handler, however, it not only kills the running script but it also kills the shell session in which the script is running; this may not be the behavior that you want. If you want to kill a process and you don't care about being nice, this is the signal you want. This signal cannot be intercepted by a signal handler in the program code.
  • SIGINT (2): Signal 2, SIGINT can be used when SIGTERM does not work and you want the program to die a little more nicely, for example, without killing the shell session in which it is running. SIGINT sends an interrupt to the session in which the program is running. This is equivalent to terminating a running program, particularly a script, with the Ctrl-C key combination.
To experiment with this, open a terminal session and create a file in /tmp named cpuHog and make it executable with the permissions rwxr_xr_x. Add the following content to the file.
#!/bin/bash
# This little program is a cpu hog
X=0;while [ 1 ];do echo $X;X=$((X+1));done
Open another terminal session in a different window, position them adjacent to each other so you can watch the results and run top in the new session. Run the cpuHog program with the following command:
/tmp/cpuHog
This program simply counts up by one and prints the current value of X to STDOUT. And it sucks up CPU cycles. The terminal session in which cpuHog is running should show a very high CPU usage in top. Observe the effect this has on system performance in top. CPU usage should immediately go way up and the load averages should also start to increase over time. If you want, you can open additional terminal sessions and start the cpuHog program in them so that you have multiple instances running.
Determine the PID of the cpuHog program you want to kill. Press the k key and look at the message under the Swap line at the bottom of the summary section. Top asks for the PID of the process you want to kill. Enter that PID and press Enter. Now top asks for the signal number and displays the default of 15. Try each of the signals described here and observe the results.

4 open source tools for Linux system monitoring

top

One of the first tools I use when performing problem determination is top. I like it because it has been around since forever and is always available while the other tools may not be installed.
The top program is a very powerful utility that provides a great deal of information about your running system. This includes data about memory usage, CPU loads, and a list of running processes including the amount of CPU time and memory being utilized by each process. Top displays system information in near real-time, updating (by default) every three seconds. Fractional seconds are allowed by top, although very small values can place a significant load the system. It is also interactive and the data columns to be displayed and the sort column can be modified.
A sample output from the top program is shown in Figure 1 below. The output from top is divided into two sections which are called the "summary" section, which is the top section of the output, and the "process" section which is the lower portion of the output; I will use this terminology for top, atop, htop and glances in the interest of consistency.
The top program has a number of useful interactive commands you can use to manage the display of data and to manipulate individual processes. Use the h command to view a brief help page for the various interactive commands. Be sure to press h twice to see both pages of the help. Use the q command to quit.

Summary section

The summary section of the output from top is an overview of the system status. The first line shows the system uptime and the 1, 5, and 15 minute load averages. In the example below, the load averages are 4.04, 4.17, and 4.06 respectively.
The second line shows the number of processes currently active and the status of each.
The lines containing CPU statistics are shown next. There can be a single line which combines the statistics for all CPUs present in the system, as in the example below, or one line for each CPU; in the case of the computer used for the example, this is a single quad core CPU. Press the 1 key to toggle between the consolidated display of CPU usage and the display of the individual CPUs. The data in these lines is displayed as percentages of the total CPU time available.
These and the other fields for CPU data are described below.
  • us: userspace – Applications and other programs running in user space, i.e., not in the kernel.
  • sy: system calls – Kernel level functions. This does not include CPU time taken by the kernel itself, just the kernel system calls.
  • ni: nice – Processes that are running at a positive nice level.
  • id: idle – Idle time, i.e., time not used by any running process.
  • wa: wait – CPU cycles that are spent waiting for I/O to occur. This is wasted CPU time.
  • hi: hardware interrupts – CPU cycles that are spent dealing with hardware interrupts.
  • si: software interrupts – CPU cycles spent dealing with software-created interrupts such as system calls.
  • st: steal time – The percentage of CPU cycles that a virtual CPU waits for a real CPU while the hypervisor is servicing another virtual processor.
The last two lines in the summary section are memory usage. They show the physical memory usage including both RAM and swap space.
Figure 1: The top command showing a fully utilized 4-core CPU.
You can use the 1 command to display CPU statistics as a single, global number as shown in Figure 1, above, or by individual CPU. The l command turns load averages on and off. The t and m commands rotate the process/CPU and memory lines of the summary section, respectively, through off, text only, and a couple types of bar graph formats.

Process section

The process section of the output from top is a listing of the running processes in the system—at least for the number of processes for which there is room on the terminal display. The default columns displayed by top are described below. Several other columns are available and each can usually be added with a single keystroke. Refer to the top man page for details.
  • PID – The Process ID.
  • USER – The username of the process owner.
  • PR – The priority of the process.
  • NI – The nice number of the process.
  • VIRT – The total amount of virtual memory allocated to the process.
  • RES – Resident size (in kb unless otherwise noted) of non-swapped physical memory consumed by a process.
  • SHR – The amount of shared memory in kb used by the process.
  • S – The status of the process. This can be R for running, S for sleeping, and Z for zombie. Less frequently seen statuses can be T for traced or stopped, and D for uninterruptable sleep.
  • %CPU – The percentage of CPU cycles, or time used by this process during the last measured time period.
  • %MEM – The percentage of physical system memory used by the process.
  • TIME+ – Total CPU time to 100ths of a second consumed by the process since the process was started.
  • COMMAND – This is the command that was used to launch the process.
Use the Page Up and Page Down keys to scroll through the list of running processes. The d or s commands are interchangeable and can be used to set the delay interval between updates. The default is three seconds, but I prefer a one second interval. Interval granularity can be as low as one-tenth (0.1) of a second but this will consume more of the CPU cycles you are trying to measure.
You can use the < and > keys to sequence the sort column to the left or right.
The k command is used to kill a process or the r command to renice it. You have to know the process ID (PID) of the process you want to kill or renice and that information is displayed in the process section of the top display. When killing a process, top asks first for the PID and then for the signal number to use in killing the process. Type them in and press the enter key after each. Start with signal 15, SIGTERM, and if that does not kill the process, use 9, SIGKILL.

Configuration

If you alter the top display, you can use the W (in uppercase) command to write the changes to the configuration file, ~/.toprc in your home directory.

atop

I also like atop. It is an excellent monitor to use when you need more details about that type of I/O activity. The default refresh interval is 10 seconds, but this can be changed using the interval i command to whatever is appropriate for what you are trying to do. atop cannot refresh at sub-second intervals like top can.
Use the h command to display help. Be sure to notice that there are multiple pages of help and you can use the space bar to scroll down to see the rest.
One nice feature of atop is that it can save raw performance data to a file and then play it back later for close inspection. This is handy for tracking down internmittent problems, especially ones that occur during times when you cannot directly monitor the system. The atopsar program is used to play back the data in the saved file.
Figure 2: The atop system monitor provides information about disk and network activity in addition to CPU and process data..
Figure 2: The atop system monitor provides information about disk and network activity in addition to CPU and process data.

Summary section

atop contains much of the same information as top but also displays information about network, raw disk, and logical volume activity. Figure 2, above, shows these additional data in the columns at the top of the display. Note that if you have the horizontal screen real-estate to support a wider display, additional columns will be displayed. Conversely, if you have less horizontal width, fewer columns are displayed. I also like that atop displays the current CPU frequency and scaling factor—something I have not seen on any other of these monitors—on the second line in the rightmost two columns in Figure 2.

Process section

The atop process display includes some of the same columns as that for top, but it also includes disk I/O information and thread count for each process as well as virtual and real memory growth statistics for each process. As with the summary section, additional columns will display if there is sufficient horizontal screen real-estate. For example, in Figure 2, the RUID (Real User ID) of the process owner is displayed. Expanding the display will also show the EUID (Effective User ID) which might be important when programs run SUID (Set User ID).
atop can also provide detailed information about disk, memory, network, and scheduling information for each process. Just press the d, m, n or s keys respectively to view that data. The g key returns the display to the generic process display.
Sorting can be accomplished easily by using C to sort by CPU usage, M for memory usage, D for disk usage, N for network usage and A for automatic sorting. Automatic sorting usually sorts processes by the most busy resource. The network usage can only be sorted if the netatop kernel module is installed and loaded.
You can use the k key to kill a process but there is no option to renice a process.
By default, network and disk devices for which no activity occurs during a given time interval are not displayed. This can lead to mistaken assumptions about the hardware configuration of the host. The f command can be used to force atop to display the idle resources.

Configuration

The atop man page refers to global and user level configuration files, but none can be found in my own Fedora or CentOS installations. There is also no command to save a modified configuration and a save does not take place automatically when the program is terminated. So, there appears to be now way to make configuration changes permanent.

htop

The htop program is much like top but on steroids. It does look a lot like top, but it also provides some capabilities that top does not. Unlike atop, however, it does not provide any disk, network, or I/O information of any type.

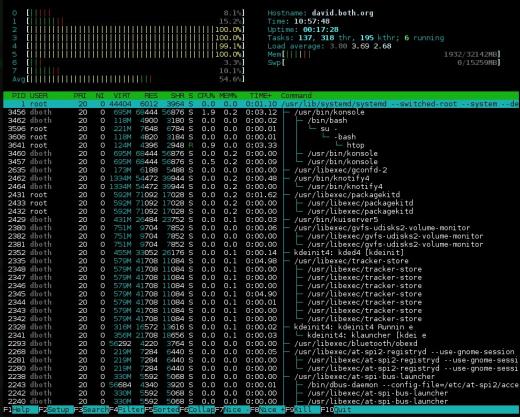
Figure 3: htop has nice bar charts to to indicate resource usage and it can show the process tree.

Summary section

The summary section of htop is displayed in two columns. It is very flexible and can be configured with several different types of information in pretty much any order you like. Although the CPU usage sections of top and atop can be toggled between a combined display and a display that shows one bar graph for each CPU, htop cannot. So it has a number of different options for the CPU display, including a single combined bar, a bar for each CPU, and various combinations in which specific CPUs can be grouped together into a single bar.
I think this is a cleaner summary display than some of the other system monitors and it is easier to read. The drawback to this summary section is that some information is not available in htop that is available in the other monitors, such as CPU percentages by user, idle, and system time.
The F2 (Setup) key is used to configure the summary section of htop. A list of available data displays is shown and you can use function keys to add them to the left or right column and to move them up and down within the selected column.

Process section

The process section of htop is very similar to that of top. As with the other monitors, processes can be sorted any of several factors, including CPU or memory usage, user, or PID. Note that sorting is not possible when the tree view is selected.
The F6 key allows you to select the sort column; it displays a list of the columns available for sorting and you select the column you want and press the Enter key.
You can use the up and down arrow keys to select a process. To kill a process, use the up and down arrow keys to select the target process and press the k key. A list of signals to send the process is displayed with 15, SIGTERM, selected. You can specify the signal to use, if different from SIGTERM. You could also use the F7 and F8 keys to renice the selected process.
One command I especially like is F5 which displays the running processes in a tree format making it easy to determine the parent/child relationships of running processes.

Configuration

Each user has their own configuration file, ~/.config/htop/htoprc and changes to the htop configuration are stored there automatically. There is no global configuration file for htop.

glances

I have just recently learned about glances, which can display more information about your computer than any of the other monitors I am currently familiar with. This includes disk and network I/O, thermal readouts that can display CPU and other hardware temperatures as well as fan speeds, and disk usage by hardware device and logical volume.
The drawback to having all of this information is that glances uses a significant amount of CPU resurces itself. On my systems I find that it can use from about 10% to 18% of CPU cycles. That is a lot so you should consider that impact when you choose your monitor.

Summary section

The summary section of glances contains most of the same information as the summary sections of the other monitors. If you have enough horizontal screen real estate it can show CPU usage with both a bar graph and a numeric indicator, otherwise it will show only the number.

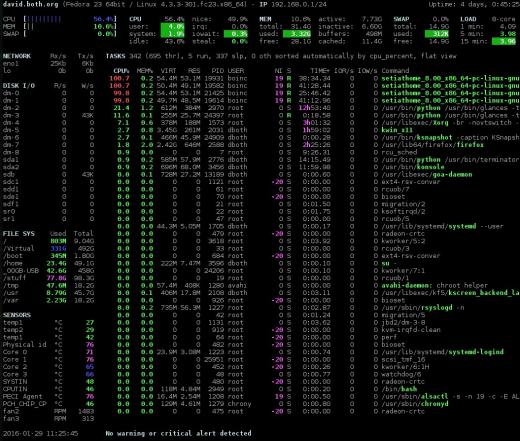
Figure 4: The glances interface with network, disk, filesystem, and sensor information.
I like this summary section better than those of the other monitors; I think it provides the right information in an easily understandable format. As with atop and htop, you can press the 1 key to toggle between a display of the individual CPU cores or a global one with all of the CPU cores as a single average as shown in Figure 4, above.

Process section

The process section displays the standard information about each of the running processes. Processes can be sorted automatically a, or by CPU c, memory m, name p, user u, I/O rate i, or time t. When sorted automatically processes are first sorted by the most used resource.
Glances also shows warnings and critical alerts at the very bottom of the screen, including the time and duration of the event. This can be helpful when attempting to diagnose problems when you cannot stare at the screen for hours at a time. These alert logs can be toggled on or off with the l command, warnings can be cleared with the w command while alerts and warnings can all be cleared with x.
It is interesting that glances is the only one of these monitors that cannot be used to either kill or renice a process. It is intended strictly as a monitor. You can use the external kill and renice commands to manipulate processes.

Sidebar

Glances has a very nice sidebar that displays information that is not available in top or htop. Atop does display some of this data, but glances is the only monitor that displays the sensors data. Sometimes it is nice to see the temperatures inside your computer. The individual modules, disk, filesystem, network, and sensors can be toggled on and off using the d,f, n, and s commands, respectively. The entire sidebar can be toggled using 2.
Docker stats can be displayed with D.

Configuration

Glances does not require a configuration file to work properly. If you choose to have one, the system-wide instance of the configuration file would be located in /etc/glances/glances.conf. Individual users can have a local instance at ~/.config/glances/glances.conf which will override the global configuration. The primary purpose of these configuration files is to set thresholds for warnings and critical alerts. There is no way I can find to make other configuration changes—such as sidebar modules or the CPU displays—permanent. It appears that you must reconfigure those items every time you start glances.
There is a document, /usr/share/doc/glances/glances-doc.html, that provides a great deal of information about using glances, and it explicitly states that you can use the configuration file to configure which modules are displayed. However, neither the information given nor the examples describe just how to do that.

Conclusion

Be sure to read the man pages for each of these monitors because there is a large amount of information about configuring and interacting with them. Also use the h key for help in interactive mode. This help can provide you with information about selecting and sorting the columns of data, setting the update interval and much more.
These programs can tell you a great deal when you are looking for the cause of a problem. They can tell you when a process, and which one, is sucking up CPU time, whether there is enough free memory, whether processes are stalled while waiting for I/O such as disk or network access to complete, and much more.
I strongly recommend that you spend time watching these monitoring programs while they run on a system that is functioning normally so you will be able to differentiate those things that may be abnormal while you are looking for the cause of a problem.
You should also be aware that the act of using these monitoring tools alters the system's use of resources including memory and CPU time. top and most of these monitors use perhaps 2% or 3% of a system's CPU time. glances has much more impact than the others and can use between 10% and 20% of CPU time. Be sure to consider this when choosing your tools.
I had originally intended to include SAR (System Activity Reporter) in this article but as this article grew longer it also became clear to me that SAR is significantly different from these monitoring tools and deserves to have a separate article. So with that in mind, I plan to write an article on SAR and the /proc filesystem, and a third article on how to use all of these tools to locate and resolve problems.

Find Out If Patch Number ( CVE ) Has Been Applied To RHEL / CentOS Linux

$
0
0
http://www.cyberciti.biz/faq/linux-find-out-patch-can-cve-applied

I know how to update my system using the yum command. But, how can I find out that patch has been applied to a package? How do I search CVE patch number applied to a package under a Red Hat Enterprise Linux/CentOS/RHEL/Fedora Linux based system?

You need to use the rpm command. Each rpm package stores information about patches including date, small description and CVE number. You can use the -q query option to display change information for the package.

rpm –changelog option

Use the command as follows:
rpm -q --changelog {package-name}
rpm -q --changelog {package-name} | more
rpm -q --changelog {package-name} | grep CVE-NUMBER

For example find out if CVE-2008-1927 has been applied to perl package or not, enter:
# rpm -q --changelog perl|grep CVE-2008-1927
Sample output:
- CVE-2008-1927 perl: double free on regular expressions with utf8 characters
List all applied patches for php, enter:
# rpm -q --changelog php
OR
# rpm -q --changelog php | more
Sample output:
* Tue Jun 03 2008 Joe Orton  5.1.6-20.el5_2.1
- add security fixes for CVE-2007-5898, CVE-2007-4782, CVE-2007-5899,
CVE-2008-2051, CVE-2008-2107, CVE-2008-2108 (#445923)
 
* Tue Jan 15 2008 Joe Orton 5.1.6-20.el5
- use magic.mime provided by file (#240845)
- fix possible crash with setlocale() (#428675)
 
* Thu Jan 10 2008 Joe Orton 5.1.6-19.el5
- ext/date: fix test cases for recent timezone values (#266441)
 
* Thu Jan 10 2008 Joe Orton 5.1.6-18.el5
- ext/date: updates for system tzdata support (#266441)
 
* Wed Jan 09 2008 Joe Orton 5.1.6-17.el5
- ext/date: use system timezone database (#266441)
 
* Tue Jan 08 2008 Joe Orton 5.1.6-16.el5
- add dbase extension in -common (#161639)
- add /usr/share/php to builtin include_path (#238455)
- ext/ldap: enable ldap_sasl_bind (#336221)
- ext/libxml: reset stream context (#298031)
.........
...
....
* Fri May 16 2003 Joe Orton 4.3.1-3
- link odbc module correctly
- patch so that php -n doesn't scan inidir
- run tests using php -n, avoid loading system modules
 
* Wed May 14 2003 Joe Orton 4.3.1-2
- workaround broken parser produced by bison-1.875
 
* Tue May 06 2003 Joe Orton 4.3.1-1
- update to 4.3.1; run test suite
- open extension modules with RTLD_NOW rather than _LAZY

How do I find CVE for a rpm file itself?

Above command will query installed package only. To query rpm file, enter:
$ rpm -qp --changelog rsnapshot-1.3.0-1.noarch.rpm | more
Further readings:

How to back up and restore file permissions on Linux

$
0
0
http://ask.xmodulo.com/backup-restore-file-permissions-linux.html

Question: I want to back up the file permissions of the local filesystem, so that if I accidentally mess up the file permissions, I can restore them to the original state. Is there an easy way to back up and restore file permissions on Linux?
You may have heard of a tragic mistake of a rookie sysadmin who accidentally typed "chmod -R 777 /" and wreaked havoc to his/her Linux system. Sure, there are backup tools (e.g., cp, rsync, etckeeper) which can back up files along with their file permissions. If you are using such backup tools, no worries about corrupted file permissions.
But there are cases where you want to temporarily back up file permissions alone (not files themselves). For example, you want to prevent the content of some directory from being overwritten, so you temporarily remove write permission on all the files under the directory. Or you are in the middle of troubleshooting file permission issues, so running chmod on files here and there. In these cases, it will be nice to be able to back up the original file permissions before the change, so that you can recover the original file permissions later when needed. In many cases, full file backup is an overkill when all you really want is to back up file permissions.
On Linux, it is actually straightforward to back up and restore file permissions using access control list (ACL). The ACL defines access permissions on individual files by different owners and groups on a POSIX-compliant filesystem.
Here is how to back up and restore file permissions on Linux using ACL tools.
First of all, make sure that you have ACL tools installed.
On Debian, Ubuntu or Linux Mint:
$ sudo apt-get install acl
On CentOS, Fedora or RHEL:
$ sudo yum install acl
To back up the file permissions of all the files in the current directory (and all its sub directories recursively), run the following command.
$ getfacl -R . > permissions.txt
This command will export ACL information of all the files into a text file named permissions.txt.

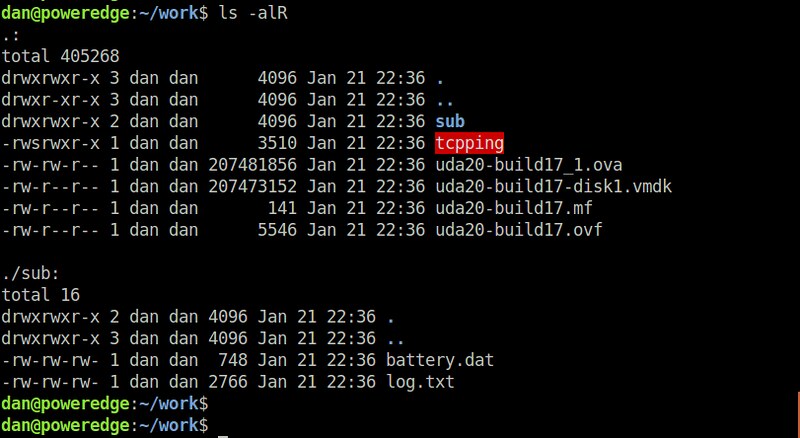
For example, the following is a snippet of permissions.txt generated from the directory shown in the screenshot.
# file: .
# owner: dan
# group: dan
user::rwx
group::rwx
other::r-x

# file: tcpping
# owner: dan
# group: dan
# flags: s--
user::rwx
group::rwx
other::r-x

# file: uda20-build17_1.ova
# owner: dan
# group: dan
user::rw-
group::rw-
other::r--
Now go ahead and change the file permissions as you want. For example:
$ chmod -R a-w .
To restore the original file permissions, go to the directory where permissions.txt was generated, and simply run:
$ setfacl --restore=permissions.txt
Verify that the original file permissions have been restored.
Download this article as ad-free PDF (made possible by your kind donation): Download PDF

How To Read CPUID Instruction For Each CPU on Linux With x86info and cpuid Commands

$
0
0
http://www.cyberciti.biz/faq/linux-cpuid-command-read-cpuid-instruction-on-linux-for-cpu

Is there a CPU-Z like a freeware/open source software that detects the central processing unit (CPU) of a modern personal computer in Linux operating system? How can I get detailed information about the CPU(s) gathered from the CPUID instruction, including the exact model of CPU(s) on Linux operating system?

There are three programs on Linux operating system that can provide CPUID information and these tools are useful to find out if specific advanced features such as virtualization, extended page tables, encryption and more:
  1. lscpu command– Show information on CPU architecture.
  2. x86info command– Show x86 CPU diagnostics.
  3. cpuid command– Dump CPUID information for each CPU. This is the closet tool to CPU-Z app on Linux.

x86info

x86info is a program which displays a range of information about the CPUs present in an x86 system.

Install x86info on Debian / Ubuntu Linux

$ sudo apt-get install x86info

Install x86info on Fedora Linux

$ sudo dnf install x86info

Install x86info on RHEL/SL/CentOS Linux

$ sudo yum install x86info

Examples

Simply type the following command:
# x86info
Sample outputs:
Linux x86info Command To Display-x86 CPU Diagnostics Info On Linux
Fig.01: Linux x86info Command To Display-x86 CPU Diagnostics Info On Linux

See TLB, cache sizes and cache associativity

# x86info -c
Sample outputs:
x86info v1.30.  Dave Jones 2001-2011
Feedback to .
 
Found 4 identical CPUs
Extended Family: 0 Extended Model: 1 Family: 6 Model: 28 Stepping: 10
Type: 0 (Original OEM)
CPU Model (x86info's best guess): Atom D510
Processor name string (BIOS programmed): Intel(R) Atom(TM) CPU D510 @ 1.66GHz
 
Cache info
L1 Instruction cache: 32KB, 8-way associative. 64 byte line size.
L1 Data cache: 24KB, 6-way associative. 64 byte line size. ECC.
L2 cache: 512KB, 8-way associative. 64 byte line size.
TLB info
Found unknown cache descriptors: 4f 59 ba c0
Total processor threads: 4
This system has 1 dual-core processor with hyper-threading (2 threads per core) running at an estimated 1.65GHz

See CPU feature flags like AES/FPU/SSE and more

# x86info -f
Sample outputs:
x86info v1.30.  Dave Jones 2001-2011
Feedback to .
 
Found 4 identical CPUs
Extended Family: 0 Extended Model: 1 Family: 6 Model: 28 Stepping: 10
Type: 0 (Original OEM)
CPU Model (x86info's best guess): Atom D510
Processor name string (BIOS programmed): Intel(R) Atom(TM) CPU D510 @ 1.66GHz
 
Feature flags:
fpu vme de pse tsc msr pae mce cx8 apic sep mtrr pge mca cmov pat pse36 clflsh ds acpi mmx fxsr sse sse2 ss ht tm pbe sse3 dtes64 monitor ds-cpl tm2 ssse3 cx16 xTPR pdcm movbe
Extended feature flags:
SYSCALL xd em64t lahf_lm dts
Long NOPs supported: yes
 
Total processor threads: 4
This system has 1 dual-core processor with hyper-threading (2 threads per core) running at an estimated 1.65GHz

See MP table showing CPUs BIOS knows about

# x86info -mp
Sample outputs:
x86info v1.30.  Dave Jones 2001-2011
Feedback to .
 
MP Table:
# APIC ID Version State Family Model Step Flags
# 0 0x14 BSP, usable 6 12 10 0xbfebfbff
# 2 0x14 AP, usable 6 12 10 0xbfebfbff
.....
..

Show register values from all possible cpuid calls

# x86info -r
....
..
eax in: 0x00000000, eax = 0000000a ebx = 756e6547 ecx = 6c65746e edx = 49656e69
eax in: 0x00000001, eax = 000106ca ebx = 00040800 ecx = 0040e31d edx = bfebfbff
eax in: 0x00000002, eax = 4fba5901 ebx = 0e3080c0 ecx = 00000000 edx = 00000000
eax in: 0x00000003, eax = 00000000 ebx = 00000000 ecx = 00000000 edx = 00000000
eax in: 0x00000004, eax = 04004121 ebx = 0140003f ecx = 0000003f edx = 00000001
eax in: 0x00000005, eax = 00000040 ebx = 00000040 ecx = 00000003 edx = 00000010
eax in: 0x00000006, eax = 00000001 ebx = 00000002 ecx = 00000001 edx = 00000000
eax in: 0x00000007, eax = 00000000 ebx = 00000000 ecx = 00000000 edx = 00000000
eax in: 0x00000008, eax = 00000000 ebx = 00000000 ecx = 00000000 edx = 00000000
eax in: 0x00000009, eax = 00000000 ebx = 00000000 ecx = 00000000 edx = 00000000
eax in: 0x0000000a, eax = 07280203 ebx = 00000000 ecx = 00000000 edx = 00000503
eax in: 0x80000000, eax = 80000008 ebx = 00000000 ecx = 00000000 edx = 00000000
eax in: 0x80000001, eax = 00000000 ebx = 00000000 ecx = 00000001 edx = 20100800
eax in: 0x80000002, eax = 20202020 ebx = 20202020 ecx = 746e4920 edx = 52286c65
eax in: 0x80000003, eax = 74412029 ebx = 54286d6f ecx = 4320294d edx = 44205550
eax in: 0x80000004, eax = 20303135 ebx = 20402020 ecx = 36362e31 edx = 007a4847
eax in: 0x80000005, eax = 00000000 ebx = 00000000 ecx = 00000000 edx = 00000000
eax in: 0x80000006, eax = 00000000 ebx = 00000000 ecx = 02006040 edx = 00000000
eax in: 0x80000007, eax = 00000000 ebx = 00000000 ecx = 00000000 edx = 00000000
eax in: 0x80000008, eax = 00003024 ebx = 00000000 ecx = 00000000 edx = 00000000
....
..
To see all information, type:
# x86info -a

cpuid

cpuid dumps detailed information about the CPU(s) gathered from the CPUID instruction, and also determines the exact model of CPU(s) from that information. It dumps all information available from the CPUID instruction. The exact collection of information available varies between manufacturers and processors. The following information is available consistently on all modern CPUs:
  1. vendor_id
  2. version information (1/eax)
  3. miscellaneous (1/ebx)
  4. feature information (1/ecx)

Install cpuid on Debian / Ubuntu Linux

$ sudo apt-get install cpuid

Install cpuid on Fedora Linux

$ sudo dnf install cpuid

Install cpuid on RHEL/SL/CentOS Linux

$ sudo yum install cpuid

Examples

Simply type the following command (this command provides lots of useful information including list of all features in human readable format):
# cpuid
# cpuid | less
# cpuid | grep 'something'

Sample outputs:
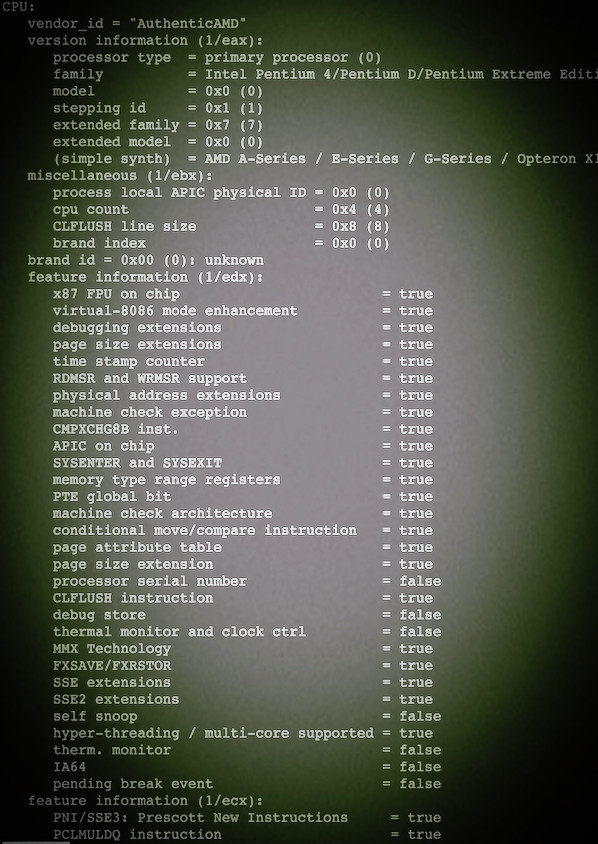
Fig.02: Linux cpuid Command To Dump CPUID information

Display information only for the first CPU

# cpuinfo -1

Use the CPUID instruction (default and very reliable)

# cpuinfo -i

Use the CPUID kernel module (not seems to be reliable on all combinations of CPU type and kernel version)

# cpuinfo -k

Search for specific CPU feature

## Is virtualization supported (see below for flags)? ##
# cpuid -1 | egrep --color -iw 'vmx|svm|ept|vpid|npt|tpr_shadow|vnmi|flexpriority'
VMX: virtual machine extensions = true
## Is advanced encryption supported? ##
# cpuid -1 | egrep --color -i 'aes|aes-ni'
AES instruction = true

Some important flags for sysadmins on Linux based system:
  1. vmx– Intel VT-x, basic virtualization.
  2. svm– AMD SVM, basic virtualization.
  3. ept– Extended Page Tables, an Intel feature to make emulation of guest page tables faster.
  4. vpid– VPID, an Intel feature to make expensive TLB flushes unnecessary when context switching between guests.
  5. npt– AMD Nested Page Tables, similar to EPT.
  6. tpr_shadow and flexpriority– Intel feature that reduces calls into the hypervisor when accessing the Task Priority Register, which helps when running certain types of SMP guests.
  7. vnmi– Intel Virtual NMI feature which helps with certain sorts of interrupt events in guests.

Display information only for the first CPU

# cpuinfo -1
Here is complete information about one of cpu:
CPU:
vendor_id="GenuineIntel"
version information (1/eax):
processor type = primary processor (0)
family= Intel Pentium Pro/II/III/Celeron/Core/Core 2/Atom, AMD Athlon/Duron, Cyrix M2, VIA C3 (6)
model= 0xd (13)
stepping id = 0x7 (7)
extended family = 0x0 (0)
extended model = 0x2 (2)
(simple synth) = Intel Core i7-3800/3900 (Sandy Bridge-E C2) / Xeon E5-1600/2600 (Sandy Bridge-E C2/M1), 32nm
miscellaneous (1/ebx):
process local APIC physical ID = 0x3 (3)
cpu count = 0x20 (32)
CLFLUSH line size = 0x8 (8)
brand index = 0x0 (0)
brand id = 0x00 (0): unknown
feature information (1/edx):
x87 FPU on chip = true
virtual-8086 mode enhancement = true
debugging extensions = true
page size extensions = true
time stamp counter = true
RDMSR and WRMSR support = true
physical address extensions = true
machine check exception = true
CMPXCHG8B inst. = true
APIC on chip = true
SYSENTER and SYSEXIT = true
memory type range registers = true
PTE global bit = true
machine check architecture = true
conditional move/compare instruction = true
page attribute table = true
page size extension = true
processor serial number = false
CLFLUSH instruction = true
debug store = true
thermal monitor and clock ctrl = true
MMX Technology = true
FXSAVE/FXRSTOR = true
SSE extensions = true
SSE2 extensions = true
self snoop = true
hyper-threading / multi-core supported = true
therm. monitor = true
IA64= false
pending break event = true
feature information (1/ecx):
PNI/SSE3: Prescott New Instructions = true
PCLMULDQ instruction = true
64-bit debug store = true
MONITOR/MWAIT = true
CPL-qualified debug store = true
VMX: virtual machine extensions = true
SMX: safer mode extensions = true
Enhanced Intel SpeedStep Technology = true
thermal monitor 2 = true
SSSE3 extensions = true
context ID: adaptive or shared L1 data = false
FMA instruction = false
CMPXCHG16B instruction = true
xTPR disable = true
perfmon and debug = true
process context identifiers = true
direct cache access = true
SSE4.1 extensions = true
SSE4.2 extensions = true
extended xAPIC support = true
MOVBE instruction = false
POPCNT instruction = true
time stamp counter deadline = true
AES instruction = true
XSAVE/XSTOR states = true
OS-enabled XSAVE/XSTOR = true
AVX: advanced vector extensions = true
F16C half-precision convert instruction = false
RDRAND instruction = false
hypervisor guest status = false
cache and TLB information (2):
0x5a: data TLB: 2M/4M pages, 4-way, 32 entries
0x03: data TLB: 4K pages, 4-way, 64 entries
0x76: instruction TLB: 2M/4M pages, fully, 8 entries
0xff: cache data is in CPUID 4
0xb2: instruction TLB: 4K, 4-way, 64 entries
0xf0: 64 byte prefetching
0xca: L2 TLB: 4K, 4-way, 512 entries
processor serial number: 0002-06D7-0000-0000-0000-0000
deterministic cache parameters (4):
--- cache 0 ---
cache type = data cache (1)
cache level = 0x1 (1)
self-initializing cache level = true
fully associative cache = false
extra threads sharing this cache = 0x1 (1)
extra processor cores on this die = 0xf (15)
system coherency line size = 0x3f (63)
physical line partitions = 0x0 (0)
ways of associativity = 0x7 (7)
WBINVD/INVD behavior on lower caches = false
inclusive to lower caches = false
complex cache indexing = false
number of sets - 1 (s) = 63
--- cache 1 ---
cache type = instruction cache (2)
cache level = 0x1 (1)
self-initializing cache level = true
fully associative cache = false
extra threads sharing this cache = 0x1 (1)
extra processor cores on this die = 0xf (15)
system coherency line size = 0x3f (63)
physical line partitions = 0x0 (0)
ways of associativity = 0x7 (7)
WBINVD/INVD behavior on lower caches = false
inclusive to lower caches = false
complex cache indexing = false
number of sets - 1 (s) = 63
--- cache 2 ---
cache type = unified cache (3)
cache level = 0x2 (2)
self-initializing cache level = true
fully associative cache = false
extra threads sharing this cache = 0x1 (1)
extra processor cores on this die = 0xf (15)
system coherency line size = 0x3f (63)
physical line partitions = 0x0 (0)
ways of associativity = 0x7 (7)
WBINVD/INVD behavior on lower caches = false
inclusive to lower caches = false
complex cache indexing = false
number of sets - 1 (s) = 511
--- cache 3 ---
cache type = unified cache (3)
cache level = 0x3 (3)
self-initializing cache level = true
fully associative cache = false
extra threads sharing this cache = 0x1f (31)
extra processor cores on this die = 0xf (15)
system coherency line size = 0x3f (63)
physical line partitions = 0x0 (0)
ways of associativity = 0x13 (19)
WBINVD/INVD behavior on lower caches = false
inclusive to lower caches = true
complex cache indexing = true
number of sets - 1 (s) = 16383
MONITOR/MWAIT (5):
smallest monitor-line size (bytes) = 0x40 (64)
largest monitor-line size (bytes) = 0x40 (64)
enum of Monitor-MWAIT exts supported = true
supports intrs as break-event for MWAIT = true
number of C0 sub C-states using MWAIT = 0x0 (0)
number of C1 sub C-states using MWAIT = 0x2 (2)
number of C2 sub C-states using MWAIT = 0x1 (1)
number of C3 sub C-states using MWAIT = 0x1 (1)
number of C4 sub C-states using MWAIT = 0x2 (2)
number of C5 sub C-states using MWAIT = 0x0 (0)
number of C6 sub C-states using MWAIT = 0x0 (0)
number of C7 sub C-states using MWAIT = 0x0 (0)
Thermal and Power Management Features (6):
digital thermometer = true
Intel Turbo Boost Technology = false
ARAT always running APIC timer = true
PLN power limit notification = true
ECMD extended clock modulation duty = true
PTM package thermal management = true
digital thermometer thresholds = 0x2 (2)
ACNT/MCNT supported performance measure = true
ACNT2 available = false
performance-energy bias capability = true
extended feature flags (7):
FSGSBASE instructions = false
IA32_TSC_ADJUST MSR supported = false
BMI instruction = false
HLE hardware lock elision = false
AVX2: advanced vector extensions 2 = false
SMEP supervisor mode exec protection = false
BMI2 instructions = false
enhanced REP MOVSB/STOSB = false
INVPCID instruction = false
RTM: restricted transactional memory = false
QM: quality of service monitoring = false
deprecated FPU CS/DS = false
intel memory protection extensions = false
AVX512F: AVX-512 foundation instructions = false
RDSEED instruction = false
ADX instructions = false
SMAP: supervisor mode access prevention = false
Intel processor trace = false
AVX512PF: prefetch instructions = false
AVX512ER: exponent & reciprocal instrs = false
AVX512CD: conflict detection instrs = false
SHA instructions = false
PREFETCHWT1= false
Direct Cache Access Parameters (9):
PLATFORM_DCA_CAP MSR bits = 1
Architecture Performance Monitoring Features (0xa/eax):
version ID = 0x3 (3)
number of counters per logical processor = 0x4 (4)
bit width of counter = 0x30 (48)
length of EBX bit vector = 0x7 (7)
Architecture Performance Monitoring Features (0xa/ebx):
core cycle event not available = false
instruction retired event not available = false
reference cycles event not available = false
last-level cache ref event not available = false
last-level cache miss event not avail = false
branch inst retired event not available = false
branch mispred retired event not avail = false
Architecture Performance Monitoring Features (0xa/edx):
number of fixed counters = 0x3 (3)
bit width of fixed counters = 0x30 (48)
x2APIC features / processor topology (0xb):
--- level 0 (thread) ---
bits to shift APIC ID to get next = 0x1 (1)
logical processors at this level = 0x2 (2)
level number = 0x0 (0)
level type = thread (1)
extended APIC ID = 3
--- level 1 (core) ---
bits to shift APIC ID to get next = 0x5 (5)
logical processors at this level = 0x10 (16)
level number = 0x1 (1)
level type = core (2)
extended APIC ID = 3
XSAVE features (0xd/0):
XCR0 lower 32 bits valid bit field mask = 0x00000007
bytes required by fields in XCR0 = 0x00000340 (832)
bytes required by XSAVE/XRSTOR area = 0x00000340 (832)
XCR0 upper 32 bits valid bit field mask = 0x00000000
YMM features (0xd/2):
YMM save state byte size = 0x00000100 (256)
YMM save state byte offset = 0x00000240 (576)
LWP features (0xd/0x3e):
LWP save state byte size = 0x00000000 (0)
LWP save state byte offset = 0x00000000 (0)
extended feature flags (0x80000001/edx):
SYSCALL and SYSRET instructions = true
execution disable = true
1-GB large page support = true
RDTSCP= true
64-bit extensions technology available = true
Intel feature flags (0x80000001/ecx):
LAHF/SAHF supported in 64-bit mode = true
LZCNT advanced bit manipulation = false
3DNow! PREFETCH/PREFETCHW instructions = false
brand=" Intel(R) Xeon(R) CPU E5-2650 0 @ 2.00GHz"
L1 TLB/cache information: 2M/4M pages & L1 TLB (0x80000005/eax):
instruction # entries = 0x0 (0)
instruction associativity = 0x0 (0)
data # entries = 0x0 (0)
data associativity = 0x0 (0)
L1 TLB/cache information: 4K pages & L1 TLB (0x80000005/ebx):
instruction # entries = 0x0 (0)
instruction associativity = 0x0 (0)
data # entries = 0x0 (0)
data associativity = 0x0 (0)
L1 data cache information (0x80000005/ecx):
line size (bytes) = 0x0 (0)
lines per tag = 0x0 (0)
associativity= 0x0 (0)
size (Kb) = 0x0 (0)
L1 instruction cache information (0x80000005/edx):
line size (bytes) = 0x0 (0)
lines per tag = 0x0 (0)
associativity= 0x0 (0)
size (Kb) = 0x0 (0)
L2 TLB/cache information: 2M/4M pages & L2 TLB (0x80000006/eax):
instruction # entries = 0x0 (0)
instruction associativity = L2 off (0)
data # entries = 0x0 (0)
data associativity = L2 off (0)
L2 TLB/cache information: 4K pages & L2 TLB (0x80000006/ebx):
instruction # entries = 0x0 (0)
instruction associativity = L2 off (0)
data # entries = 0x0 (0)
data associativity = L2 off (0)
L2 unified cache information (0x80000006/ecx):
line size (bytes) = 0x40 (64)
lines per tag = 0x0 (0)
associativity= 8-way (6)
size (Kb) = 0x100 (256)
L3 cache information (0x80000006/edx):
line size (bytes) = 0x0 (0)
lines per tag = 0x0 (0)
associativity= L2 off (0)
size (in 512Kb units) = 0x0 (0)
Advanced Power Management Features (0x80000007/edx):
temperature sensing diode = false
frequency ID (FID) control = false
voltage ID (VID) control = false
thermal trip (TTP) = false
thermal monitor (TM) = false
software thermal control (STC) = false
100 MHz multiplier control = false
hardware P-State control = false
TscInvariant= true
Physical Address and Linear Address Size (0x80000008/eax):
maximum physical address bits = 0x2e (46)
maximum linear (virtual) address bits = 0x30 (48)
maximum guest physical address bits = 0x0 (0)
Logical CPU cores (0x80000008/ecx):
number of CPU cores - 1 = 0x0 (0)
ApicIdCoreIdSize= 0x0 (0)
(multi-processing synth): multi-core (c=8), hyper-threaded (t=2)
(multi-processing method): Intel leaf 0xb
(APIC widths synth): CORE_width=5 SMT_width=1
(APIC synth): PKG_ID=0 CORE_ID=1 SMT_ID=1
(synth) = Intel Xeon E5-1600/2600 (Sandy Bridge-E C2/M1), 32nm

lscpu command example

You will get information about your CPU Architecture on Linux:
$ lscpu
Sample outputs:
Architecture:          x86_64
CPU op-mode(s): 32-bit, 64-bit
Byte Order: Little Endian
CPU(s): 32
On-line CPU(s) list: 0-31
Thread(s) per core: 2
Core(s) per socket: 8
Socket(s): 2
NUMA node(s): 2
Vendor ID: GenuineIntel
CPU family: 6
Model: 45
Stepping: 7
CPU MHz: 2000.063
BogoMIPS: 4001.39
Virtualization: VT-x
L1d cache: 32K
L1i cache: 32K
L2 cache: 256K
L3 cache: 20480K
NUMA node0 CPU(s): 0-7,16-23
NUMA node1 CPU(s): 8-15,24-31
Of course you can also extract information from /proc/cpuinfo and /dev/cpu/* files:
$ less /proc/cpuinfo

22 open source tools for creatives

$
0
0
https://opensource.com/life/16/7/22-open-source-tools-creatives

22 open source tools for creatives
Image credits : 
Whether it's visuals, audio, writing, or design, there's an open source tool out there to help get the job done.
"It's absolutely possible to go from concept to finished, polished products, using free and open source software," said Jason.
In this lightning talk, Opensource.com community moderator Jason van Gumster shares 22 open source tools for creatives:

Open source OSes for the Internet of Things

$
0
0
http://linuxgizmos.com/open-source-oses-for-the-internet-of-things

Previous posts in this IoT series have examined frameworks, development hardware, privacy/security issues, and smart hubs. But it all starts with the OS.


An Open Source Perspective on the Internet of Things
Part 5: Open Source Operating Systems for IoT

Over the past decade, the majority of new open source OS projects have shifted from the mobile market to the Internet of Things. In this fifth article in our IoT series, we look at the many new open source operating systems that target IoT. Our previous posts have examined open source IoT frameworks, as well as Linux- and open source development hardware for IoT and consumer smart home devices. But it all starts with the OS.
In addition to exploring new IoT-focused embedded Linux-based distributions, I’ve included a few older lightweight distributions like OpenWrt that have seen renewed uptake in the segment. While the Linux distros are aimed primarily at gateways and hubs, there has been equivalent growth in non-Linux, open source OSes for IoT that can run on microcontroller units (MCUs), and are typically aimed at IoT edge devices.
Keep in mind that almost all OSes these day are claiming some IoT connection, so the list is somewhat arbitrary. The contenders here fulfill most of the following properties: low memory footprint, high power efficiency, a modular and configurable communication stack, and strong support for specific wireless and sensor technologies. Some projects emphasize IoT security, and many of the non-Linux OSes focus on real-time determinism, which is sometimes a requirement in industrial IoT.
I have generally steered clear of Linux distros that are categorized as “lightweight” but are still largely aimed at desktop use or portable USB stick implementations, rather than headless devices. Still, lightweight Linux distros such as LXLE or Linux Lite could be good choices for IoT.
The choices were more difficult with non-Linux open source platforms. After all, most lightweight RTOSes can be used for IoT. I focused on the major platforms, or those that seemed to offer the most promise for IoT. Other potential candidates can be found at this Open Source RTOS site.
Not included here is Windows 10 for IoT Core, which is free to makers and supports AllJoyn and IoTivity, but is not fully open source. There are also a number of commercial RTOSes that are major players in IoT, such as Micrium’s µC/OS.

Nine Linux-based open source IoT distros
  • Brillo— In the year since Google released Brillo, the lightweight Android-based distro has seen growing adoption among hacker boards such as the Intel Edison and Dragonboard 410c, and even some computer-on-modules. The future of Brillo is tied to Google’s Weave communications protocol, which it requires. Weave brings discovery, provisioning, and authentication functions to Brillo, which can run on as little as 32MB RAM and 128MB flash.
  • Huawei LiteOS— Huawei’s LiteOS, which is not to be confused with the open source Unix variant, is said to be based on Linux, but it must be a very lean implementation indeed. Announced over a year ago, LiteOS is claimed to be deployable as a kernel as small as 10KB. LiteOS ranges from MCU-based devices to Android-compatible applications processors. The customizable OS is touted for its zero configuration, auto-discovery, auto-networking, fast boot, and real-time operation, and it offers extensive wireless support, including LTE and mesh networking. LiteOS is available with Huawei’s Agile IoT Solution, and it drives its Narrow-band IoT (NB-IoT) Solution.
  • OpenWrt/LEDE/LininoOS/DD-Wrt— The venerable, networking-focused OpenWrt embedded Linux distro has seen a resurgence due to the IoT craze. The lightweight OpenWrt is frequently found on routers and MIPS-based WiFi boards. Earlier spin-offs such as DD-Wrt and the Arduino-focused LininoOS have recently been followed by an outright fork. The Linux Embedded Development Environment (LEDE) project promises more transparent governance and predictable release cycles.
  • Ostro Linux— This Yocto Project based distro broke into the limelight in August when Intel chose it for its Intel Joule module, where it runs on the latest quad-core Atom T5700 SoC. Ostro Linux is compliant with IoTivity, supports numerous wireless technologies, and offers a sensor framework. It has a major focus on IoT security, providing OS-, device-, application, and data-level protections, including cryptography and MAC. The distribution is available in headless and media (XT) versions.
  • Raspbian— There are some other distributions for the Raspberry Pi that are more specifically aimed at IoT, but the quickly maturing Raspbian is still the best. Because it’s the most popular distro for DIY projects on one of the most widely used IoT platforms, developers can call upon numerous projects and tutorials for help. Now that Raspbian supports Node-RED, the visual design tool for Node-JS, we see less reason to opt for the RPi-specific, IoT-focused Thingbox.
  • Snappy Ubuntu Core— Also called Ubuntu Core with Snaps, this embedded version of Ubuntu Core draws upon a Snap package mechanism that Canonical is spinning off as a universal Linux package format, enabling a single binary package to work on “any Linux desktop, server, cloud or device.” Snaps enable Snappy Ubuntu Core to offer transactional rollbacks, secure updates, cloud support, and an app store platform. Snappy requires only a 600MHz CPU and 128MB RAM, but also needs 4GB of flash. It runs on the Pi and other hacker boards, and has appeared on devices including Erle-Copter drones, Dell Edge Gateways, Nextcloud Box, and LimeSDR.
  • Tizen— Primarily backed by Samsung, the Linux Foundation hosted embedded Linux stack has barely registered in the mobile market. However, it has been widely used in Samsung TVs and smartwatches, including the new Gear S3, and has been sporadically implemented in its cameras and consumer appliances. Tizen can even run on the Raspberry Pi. Samsung has begun to integrate Tizen with its SmartThings smart home system, enabling SmartThings control from Samsung TVs. We can also expect more integration with Samsung’s Artik modules and Artik Cloud. Artik ships with Fedora, but Tizen 3.0 has recently been ported, along with Ubuntu Core.
  • uClinux— The venerable, stripped-down uClinux is the only form of Linux that can run on MCUs, and only then on specific Cortex-M3, M4, and -M7 models. uClinux requires MCUs with built-in memory controllers that can use an external DRAM chip to meet its RAM requirements. Now merged into the mainline Linux kernel, uClinux benefits from the extensive wireless support found in Linux. However, newer MCU-oriented OSes such as Mbed are closing the gap quickly on wireless, and are easier to configure. EmCraft is one of the biggest boosters for uClinux on MCUs, offering a variety of Cortex-M-based modules with uClinux BSPs.
  • Yocto Project— The Linux Foundation’s Yocto Project is not a Linux distro, but an open source collaborative project to provide developers with templates, tools, and methods to create custom embedded stacks. Because you can customize stacks with minimal overhead, it’s frequently used for IoT. Yocto Project forms the basis for most commercial embedded Linux distros, and is part of projects such as Ostro Linux and Qt for Device Creation. Qt is prepping a Qt Lite technology for Qt 5.8 that will optimize Device Creation for smaller IoT targets.

Nine Non-Linux Open Source IoT OSes
  • Apache Mynewt— The open source, wireless savvy Apache Mynewt for 32-bit MCUs was developed by Runtime and hosted by the Apache Software Foundation. The modular Apache Mynewt is touted for its wireless support, precise configurability of concurrent connections, debugging features, and granular power controls. In May, Runtime and Arduino Srl announced that Apache Mynewt would be available for Arduino Srl’s Primo and STAR Otto SBCs. The OS also supports Arduino LLC boards like the Arduino Zero. (Recently, Arduino Srl and Arduino LLC settled their legal differences, announcing plans to reunite under an Arduino Holding company and Arduino Foundation.)
  • ARM Mbed— ARM’s IoT-oriented OS targets tiny, battery-powered IoT endpoints running on Cortex-M MCUs with as little as 8KB of RAM, and has appeared on the BBC Micro:bit SBC. Although originally semi-proprietary, single threaded only, and lacking deterministic features, it’s now open sourced under Apache 2.0, and provides multithreading and RTOS support. Unlike many lightweight RTOSes, Mbed was designed with wireless communications in mind, and it recently added Thread support. The OS supports cloud services that can securely extract data via an Mbed Device Connector. Earlier this year, the project launched a Wearable Reference Design.
  • Contiki— With its 10KB RAM and 30KB flash requirements, the open source Contiki can’t get as tiny as Tiny OS or RIOT OS, nor does it offer real-time determinism like RIOT and some others. However, the widely used Contiki provides extensive wireless networking support, with an IPv6 stack contributed by Cisco. The OS supplies a comprehensive list of development tools including a dynamic module loading Cooja Network Simulator for debugging wireless networks. Contiki is touted for efficient memory allocation.
  • FreeRTOS— FreeRTOS is coming close to rivaling Linux among embedded development platforms, and it’s particularly popular for developing IoT end devices. FreeRTOS lacks Linux features such as device drivers, user accounts, and advanced networking and memory management. However, it has a far smaller footprint than Linux, not to mention mainstream RTOSes like VxWorks, and it offers an open source GPL license. FreeRTOS can run on under a half kilobyte of RAM and 5-10KB of ROM, although more typically when used with a TCP/IP stack, it’s more like 24KB of RAM and 60KB flash.
  • Fuchsia— Google’s latest open source OS was partially revealed in August, leaving more questions than answers. The fact that Fuchsia has no relation to Linux, but is based on an LK distro designed to compete with MCU-oriented OSes such as FreeRTOS, led many to speculate that it’s an IoT OS. Yet, Fuchsia also supports mobile and laptop computers, so Google may have much broader ambitions for this early-stage project.
  • NuttX— The non-restrictive BSD licensed NuttX is known primarily for being the most common RTOS for open source drones running on APM/ArduPilot and PX4 UAV platform, which are collectively part of the Dronecode platform. NuttX is widely used in other resource-constrained embedded systems, as well. Although it supports x86 and Cortex-A5 and -A8 platforms, this POSIX- and ANSI-based OS is primarily aimed at Cortex-M MCUs. NuttX is fully pre-emptible, with fixed priority, round-robin, and sporadic scheduling. The OS is billed as “a tiny Linux work-alike with a much reduced feature set.”
  • RIOT OS— The 8-year old RIOT OS is known for its efficient power usage and widespread wireless support. RIOT offers hardware requirements of 1.5KB RAM and 5KB of flash that are almost as low as Tiny OS. Yet it also offers features like multi-threading, dynamic memory management, hardware abstraction, partial POSIX compliance, and C++ support, which are more typical of Linux than lightweight RTOSes. Other features include a low interrupt latency of roughly 40 clock cycles, and priority-based scheduling. You can develop under Linux or OS X and deploy to embedded devices using a native port.
  • TinyOS— This mature, open source BSD-licensed OS is about as tiny as you can get, supporting low power consumption on MCU targets “with a few kB of RAM and a few tens of kB of code space.” Written in a C dialect called nesC, the event-driven TinyOS is used by researchers exploring low-power wireless networking, including multi-hop nets. By the project’s own admission, “computationally-intensive applications can be difficult to write.” The project is working on Cortex-M3 support, but for now it’s still designed for lower-end MCUs and radio chips.
  • Zephyr— The Linux Foundation’s lightweight, security-enabled Zephyr RTOS runs on as little as 2-8KB of RAM. Zephyr works on x86, ARM, and ARC systems, but focuses primarily on MCU-based devices with Bluetooth/BLE and 802.15.4 radios like 6LoWPAN. Zephyr is based on Wind River’s Rocket OS, which is based on Viper, a stripped-down version of VxWorks. Initial targets include the Arduino Due and Intel’s Arduino 101, among others. Zephyr recently appeared on SeeedStudio’s 96Boards IoT Edition BLE Carbon SBC, which is supported by a new Linaro LITE group.

How to run commands on Linux Container (LXD) instance at provision launch time

$
0
0
https://www.cyberciti.biz/faq/run-commands-on-linux-instance-at-launch-using-cloud-init

I would like to perform common automated configuration tasks and run commands/scripts after the LXD instance starts. How to use cloud-init to run commands on my Linux Container (LXD) instance at launch time?

LXD can use the cloud-init directive to run commands or scripts at the first boot cycle when you launch an instance using the lxc command.

What is a cloud-init?

cloud-init handles early initialization of a cloud instance including LXD and Linux containers. By default cloud-init installed in the Ubuntu/CentOS and all other major cloud images. With cloud-init you can configure:
Sample cloud-init file for lxc/lxd
  1. Hostname
  2. Update system
  3. Install additional packages
  4. Generate ssh private keys
  5. Install ssh keys to a users .ssh/authorized_keys so they can log in without a password
  6. Configure static IP or networking
  7. Include users/groups
  8. Creating files
  9. Install and run chef recipes
  10. Setup and run puppet
  11. Add apt or yum repositories
  12. Run commands on first boot
  13. Disk setup
  14. Configure RHN subscription and more.
Let us get started with an example.

Step 1: Create lxc container

Type the following command to create a Ubuntu LXC container called foo (but do not run the lxc container yet):
$ lxc init ubuntu: foo
One can create a CentOS 7 based Linux container too:
$ lxc init images:centos/7/amd64 bar
You can apply certain profile too:
$ lxc init images:ubuntu/xenial/amd64 C2 -p staticlanwan

Step 2: Create yml cloud-init config file

In this example, I’m going to setup my lxc hostname, update my system, and Install ssh keys to a users .ssh/authorized_keys so they can log in without a password:
$ vi config.xml
First line must be #cloud-config:
#cloud-config
Next, I want to run ‘apt-get upgrade’ on first boot to download and install all security updates for my Linux container, so append:
# Apply updates using apt
package_upgrade: true

Setup hostname and domain name and update /etc/hosts file:
# Set hostname
hostname: foo
fqdn: foo.nixcraft.com
manage_etc_hosts: true

Run the following commands on first boot. In this case, update sshd to listen only on private IP and reload sshd, append:
#Run command on first boot only
bootcmd:
- [sh, -c, "echo 'ListenAddress 192.168.1.100'>> /etc/ssh/sshd_config"]
- systemctl reload ssh
You can install php7 and nginx packages as follows, append:
# Install packages
packages:
- nginx
- php-common
- php7.0
- php7.0-cli
- php7.0-common
- php7.0-fpm
- php7.0-gd
- php7.0-mysql
- php7.0-opcache
- php-pear
Finally, install a ssh-key for vivek login and add vivek to sudo file too, append:
# User setup
users:
- name: vivek
ssh-authorized-keys:
- ***insert-your-key-here****
sudo: ['ALL=(ALL) NOPASSWD:ALL']
groups: sudo
shell: /bin/bash
Save and close the file.

Step 3: Pass cloud-init directives to an instance with user data

You need to set a user.user-data variable as follows for foo Linux container:
$ lxc config set foo user.user-data - < config.yml
To view your lxc config for foo container, run:
$ lxc config show foo
Sample outputs:

name: foo
profiles:
- default
config:
user.user-data: "#cloud-config\npackage_upgrade: true\n\n#Set hostname\nhostname:
foo\nfqdn: foo.nixcraft.com\nmanage_etc_hosts: true\n\n#Run command on first boot
only\nbootcmd:\n - [sh, -c, \"echo 'ListenAddress 192.168.1.100'>> /etc/ssh/sshd_config\"]\n
- systemctl reload ssh\n \n# Install packages\npackages:\n - nginx\n - php-common\n
- php7.0\n - php7.0-fpm\n - php7.0-gd\n - php7.0-mysql\n\n# User setup\nusers:\n
- name: vivek\n ssh-authorized-keys:\n - ***insert-your-key-here****\n sudo:
['ALL=(ALL) NOPASSWD:ALL']\n groups: sudo\n shell: /bin/bash\n\n"
volatile.apply_template: create
volatile.base_image: 315bedd32580c3fb79fd2003746245b9fe6a8863fc9dd990c3a2dc90f4930039
volatile.eth0.hwaddr: 00:16:3e:3d:d9:47
volatile.last_state.idmap: '[{"Isuid":true,"Isgid":false,"Hostid":100000,"Nsid":0,"Maprange":65536},{"Isuid":false,"Isgid":true,"Hostid":100000,"Nsid":0,"Maprange":65536}]'
devices:
root:
path: /
type: disk
ephemeral: false

Step 4: Start your container

Type the following command:
$ lxc start foo
Wait for 2-5 minutes. To run all above tasks.

Step 5: Verify it

To login to foo LXC, enter:
$ lxc exec foo bash
Verify that sshd bind to private IP:
$ netstat -tulpn
Verify that packages are installed and system updated:
$ sudo tail -f /var/log/apt/history.log

A note about LXD not working with cloud-init

Please note that cloud-init in LXD triggers after network is up. In other words if network defined as DHCP or static but failed to get an IP address may result into hang ups in cloud-init. It will fail without much warning. Set the following command prior to the first container startup as described in step #4:
$ lxc config set foo user.network_mode link-local
$ lxc start foo

Log files for LXD

If you are having problems with cloud-init or cloud-config, take look at the following log files:
$ lxc exec foo bash
You can see the actual process logs for cloud-init's processing of the configuration file here:
# tail -f /var/log/cloud-init.log
Output of your commands can be found here:
# tail -f /var/log/cloud-init-output.log

Do I need to install the cloud-init package on the host server?

No.

References:

How To Download A RPM Package With All Dependencies In CentOS

$
0
0
https://www.ostechnix.com/download-rpm-package-dependencies-centos

download a RPM package with all dependencies
The other day I was trying to create a local repository with packages only we use often in CentOS 7. Of course we can download any package using curl or wget commands. These commands however won’t download the required dependencies. You have to spend some time and manually search and download the dependencies required by the package to install. Well, not anymore. In this brief tutorial, I will walk you through how to download a RPM package with all dependencies in two methods. I tested this guide on CentOS 7, although the same steps may work on other RPM based systems such as RHEL, Fedora and Scientific Linux.

Method 1 – Download A RPM Package With All Dependencies Using “Downloadonly” plugin

We can easily download any RPM package with all dependencies using “Downloadonly” plugin for yum command.
To install Downloadonly plugin, run the following command as root user.
yum install yum-plugin-downloadonly
Now, run the following command to download a RPM package.
yum install --downloadonly 
By default, this command will download and save the packages in /var/cache/yum/ in rhel-{arch}-channel/packages location. However, you can download and save the packages in any location of your choice using “–downloaddir” option.
yum install --downloadonly --downloaddir=
Example:
yum install --downloadonly --downloaddir=/root/mypackages/ httpd
Sample output:
Loaded plugins: fastestmirror
Loading mirror speeds from cached hostfile
* base: centos.excellmedia.net
* epel: epel.mirror.angkasa.id
* extras: centos.excellmedia.net
* updates: centos.excellmedia.net
Resolving Dependencies
--> Running transaction check
---> Package httpd.x86_64 0:2.4.6-40.el7.centos.4 will be installed
--> Processing Dependency: httpd-tools = 2.4.6-40.el7.centos.4 for package: httpd-2.4.6-40.el7.centos.4.x86_64
--> Processing Dependency: /etc/mime.types for package: httpd-2.4.6-40.el7.centos.4.x86_64
--> Processing Dependency: libaprutil-1.so.0()(64bit) for package: httpd-2.4.6-40.el7.centos.4.x86_64
--> Processing Dependency: libapr-1.so.0()(64bit) for package: httpd-2.4.6-40.el7.centos.4.x86_64
--> Running transaction check
---> Package apr.x86_64 0:1.4.8-3.el7 will be installed
---> Package apr-util.x86_64 0:1.5.2-6.el7 will be installed
---> Package httpd-tools.x86_64 0:2.4.6-40.el7.centos.4 will be installed
---> Package mailcap.noarch 0:2.1.41-2.el7 will be installed
--> Finished Dependency Resolution

Dependencies Resolved

=======================================================================================================================================
Package Arch Version Repository Size
=======================================================================================================================================
Installing:
httpd x86_64 2.4.6-40.el7.centos.4 updates 2.7 M
Installing for dependencies:
apr x86_64 1.4.8-3.el7 base 103 k
apr-util x86_64 1.5.2-6.el7 base 92 k
httpd-tools x86_64 2.4.6-40.el7.centos.4 updates 83 k
mailcap noarch 2.1.41-2.el7 base 31 k

Transaction Summary
=======================================================================================================================================
Install 1 Package (+4 Dependent packages)

Total download size: 3.0 M
Installed size: 10 M
Background downloading packages, then exiting:
(1/5): apr-1.4.8-3.el7.x86_64.rpm | 103 kB 00:00:01
(2/5): apr-util-1.5.2-6.el7.x86_64.rpm | 92 kB 00:00:01
(3/5): mailcap-2.1.41-2.el7.noarch.rpm | 31 kB 00:00:01
(4/5): httpd-tools-2.4.6-40.el7.centos.4.x86_64.rpm | 83 kB 00:00:01
(5/5): httpd-2.4.6-40.el7.centos.4.x86_64.rpm | 2.7 MB 00:00:09
---------------------------------------------------------------------------------------------------------------------------------------
Total 331 kB/s | 3.0 MB 00:00:09
exiting because "Download Only" specified
rootserver1_001
Now go the location that you specified in the above command. You will see there the downloaded package with all dependencies. In my case, I have downloaded the packages in /root/mypackages/ directory.
Let us verify the contents.
ls /root/mypackages/
Sample output:
apr-1.4.8-3.el7.x86_64.rpm
apr-util-1.5.2-6.el7.x86_64.rpm
httpd-2.4.6-40.el7.centos.4.x86_64.rpm
httpd-tools-2.4.6-40.el7.centos.4.x86_64.rpm
mailcap-2.1.41-2.el7.noarch.rpm
rootserver1_003
As you see in the above output, the package httpd has been downloaded with all dependencies.
Please note that this plugin is applicable for “yum install/yum update” and not for “yum groupinstall”. By default this plugin will download the latest available packages in the repository. You can however download a particular version by specifying the version.
Example:
yum install --downloadonly --downloaddir=/root/mypackages/ httpd-2.2.6-40.el7
Also, you can download multiple packages at once as shown below.
yum install --downloadonly --downloaddir=/root/mypackages/ httpd vsftpd

Method 2 – Download A RPM Package With All Dependencies Using “Yumdownloader” utility

Yumdownloader is a simple, yet useful command-line utility that downloads any RPM package along with all required dependencies in one go.
Install Yumdownloader using the following command as root user.
yum install yum-utils
Once installed, run the following command to download a package, for example httpd.
yumdownloader httpd
To download packages with all dependencies, use –resolve option:
yumdownloader --resolve httpd
By default, Yumdownloader will download the packages in the current working directory.
To download packages along with all dependencies to a specific location, use –destdir option:
yumdownloader --resolve --destdir=/root/mypackages/ httpd
Or
yumdownloader --resolve --destdir /root/mypackages/ httpd
Sample output:
Loaded plugins: fastestmirror
Loading mirror speeds from cached hostfile
* base: centos.excellmedia.net
* epel: epel.mirror.angkasa.id
* extras: centos.excellmedia.net
* updates: centos.excellmedia.net
--> Running transaction check
---> Package httpd.x86_64 0:2.4.6-40.el7.centos.4 will be installed
--> Processing Dependency: httpd-tools = 2.4.6-40.el7.centos.4 for package: httpd-2.4.6-40.el7.centos.4.x86_64
--> Processing Dependency: /etc/mime.types for package: httpd-2.4.6-40.el7.centos.4.x86_64
--> Processing Dependency: libaprutil-1.so.0()(64bit) for package: httpd-2.4.6-40.el7.centos.4.x86_64
--> Processing Dependency: libapr-1.so.0()(64bit) for package: httpd-2.4.6-40.el7.centos.4.x86_64
--> Running transaction check
---> Package apr.x86_64 0:1.4.8-3.el7 will be installed
---> Package apr-util.x86_64 0:1.5.2-6.el7 will be installed
---> Package httpd-tools.x86_64 0:2.4.6-40.el7.centos.4 will be installed
---> Package mailcap.noarch 0:2.1.41-2.el7 will be installed
--> Finished Dependency Resolution
(1/5): apr-util-1.5.2-6.el7.x86_64.rpm | 92 kB 00:00:01
(2/5): mailcap-2.1.41-2.el7.noarch.rpm | 31 kB 00:00:02
(3/5): apr-1.4.8-3.el7.x86_64.rpm | 103 kB 00:00:02
(4/5): httpd-tools-2.4.6-40.el7.centos.4.x86_64.rpm | 83 kB 00:00:03
(5/5): httpd-2.4.6-40.el7.centos.4.x86_64.rpm | 2.7 MB 00:00:19
rootserver1_004
Let us verify whether packages have been downloaded in the specified location.
ls /root/mypackages/
Sample output:
apr-1.4.8-3.el7.x86_64.rpm
apr-util-1.5.2-6.el7.x86_64.rpm
httpd-2.4.6-40.el7.centos.4.x86_64.rpm
httpd-tools-2.4.6-40.el7.centos.4.x86_64.rpm
mailcap-2.1.41-2.el7.noarch.rpm
rootserver1_005
Unlike “Downloadonly” plugin, Yumdownload can download the packages related to a particular group.
yumdownloader "@Development Tools" --resolve --destdir /root/mypackages/
Personally, I prefer Yumdownloader over “Downloadonly” plugin for yum. But, both are extremely easy and handy and does the same job.
That’s all for today. If you find this guide helpful, please share it on your social networks and let others to benefit.
Cheers!

Browse anonymously in Kali Linux with Anonsurf

$
0
0
https://www.blackmoreops.com/2016/10/17/browse-anonymously-in-kali-linux-with-anonsurf

IP spoofing, also known as IP address forgery or a host file hijack, is a hijacking technique in which a cracker masquerades as a trusted host to conceal his identity, spoof a Web site, hijack browsers, or gain access to a network. We use various methods to spoof our IP addresses, most common being using Proxy, VPN and TOR. Browse anonymously with Anonsurf in Kali Linux - blackMORE Ops -5I found this interesting tool named Anonsurf and it will anonymize the entire system under TOR using IPTables. It will also allow you to start and stop i2p as well. That means you can browse anonymously in Kali Linux with Anonsurf running in the background. Anonsurf will run and keep changing IP address every so often or you can simply restart the process to make it grab a new IP address and thus spoofing your own IP address. Sounds good?
Und3rf10w forked ParrotSec’s git and made a version for Kali Linux which is very easy and straight forward to install. His repo contains the sources of both the anonsurf and pandora packages from ParrotSec combined into one. Und3rf10w also made some small modifications to the DNS servers to use of Private Internet Access (instead of using FrozenDNS) and added some fixes for users who don’t use the resolvconf application. He also removed some functionality such as the GUI and IceWeasel/Firefox in RAM. There’s a installer script which makes it really easy to install it. You can review the installer script to find out more. This forked version should now work with any Debian or Ubuntu system, but this has only been tested to work on a kali-rolling amd64 system. I am also using the same system but users are advised to test and verify it in their own distro. If it works, then you will be able to hide your IP and gain anonymity as long you’re not signed into any website such as Google, Yahoo etc. I wrote a nice long article comparing different methods i.e. TOR vs VPN vs Proxy on top of each other.

anonsurf

Anonsurf will anonymize the entire system under TOR using IPTables. It will also allow you to start and stop i2p as well.
NOTE: DO NOT run this as service anonsurf $COMMAND. Run this as anonsurf $COMMAND
Browse-anonymously-with-Anonsurf-in-Kali-Linux-blackMORE-Ops-10

Pandora

Pandora automatically overwrites the RAM when the system is shutting down. Pandora can also be ran manually:
pandora bomb
NOTE: This will clear the entire system cache, including active SSH tunnels or sessions so perhaps not a good idea to run it while working. It makes the system freeze for sometime (I tried it in a VM).
So here’s how to configure Anonsurf in Kali Linux:

Download Anonsurf

Clone anonsurf  from GIT
root@kali:~# git clone https://github.com/Und3rf10w/kali-anonsurf.git
Cloning into 'kali-anonsurf'...
remote: Counting objects: 275, done.
remote: Total 275 (delta 0), reused 0 (delta 0), pack-reused 275
Receiving objects: 100% (275/275), 163.44 KiB | 75.00 KiB/s, done.
Resolving deltas: 100% (79/79), done.
Checking connectivity... done.
root@kali:~#
Browse anonymously with Anonsurf in Kali Linux - blackMORE Ops -1
Once it’s downloaded, change directory to kali-anonsurf
root@kali:~# 
root@kali:~# cd kali-anonsurf/
root@kali:~/kali-anonsurf#
root@kali:~/kali-anonsurf# ls
installer.sh  kali-anonsurf-deb-src  LICENSE  README.md
root@kali:~/kali-anonsurf#

Install anonsurf

With the installer script, it’s very straight forward to install anonsurf in Kali Linux.
root@kali:~/kali-anonsurf# ./installer.sh
--2016-10-13 12:36:53--  https://geti2p.net/_static/i2p-debian-repo.key.asc
Resolving geti2p.net (geti2p.net)... 2a02:180:a:65:2456:6542:1101:1010, 91.143.92.136
Connecting to geti2p.net (geti2p.net)|2a02:180:a:65:2456:6542:1101:1010|:443... connected.
HTTP request sent, awaiting response... 200 OK
Length: 14455 (14K) [text/plain]
Saving to: ‘/tmp/i2p-debian-repo.key.asc’

/tmp/i2p-debian-rep 100%[===================>]  14.12K  21.6KB/s    in 0.7s
<--------output-----truncated------->--------output-----truncated------->
Browse anonymously with Anonsurf in Kali Linux - blackMORE Ops -2
In Kali Linux, it will automagically update /etc/tor/torrc file and add the following lines:
VirtualAddrNetwork 10.192.0.0/10
AutomapHostsOnResolve 1
TransPort 9040
SocksPort 9050
DNSPort 53
RunAsDaemon 1
It also changes your resolver configuration to the following:
root@kali:~# cat /etc/resolv.conf
nameserver 127.0.0.1
nameserver 209.222.18.222
nameserver 209.222.18.218
If you don’t like using Private Internet Access DNS, simply the change DNS in the following lines in /etc/init.d/anonsurf script
    echo -e 'nameserver 127.0.0.1\nnameserver 209.222.18.222\nnameserver 209.222.18.218'> /etc/resolv.conf
    echo -e " $GREEN*$BLUE Modified resolv.conf to use Tor and Private Internet Access DNS"

Start anonsurf

To start anonsurf, and pass all under TOR, simply start anonsurf. It will also start TOR if that already been started:
root@kali:~# anonsurf start
 * killing dangerous applications
 * cleaning some dangerous cache elements
[ i ] Stopping IPv6 services:
[ i ] Starting anonymous mode:
 * Tor is not running!  starting it  for you
 * Saved iptables rules
 * Modified resolv.conf to use Tor and Private Internet Access DNS
 * All traffic was redirected throught Tor
[ i ] You are under AnonSurf tunnel
root@kali:~#

Find your new Public IP

You can issue the following command to find out your IP adderss
root@kali:~# anonsurf myip
My ip is:
1xx.1xx.2xx.1xx

Restart anonsurf

If you want a new IP address, simply restart anonsurf:
oot@kali:~# anonsurf restart
 * killing dangerous applications
 * cleaning some dangerous cache elements
[ i ] Stopping anonymous mode:
 * Deleted all iptables rules
 * Iptables rules restored
[ i ] Reenabling IPv6 services:
 * Anonymous mode stopped
 * killing dangerous applications
 * cleaning some dangerous cache elements
[ i ] Stopping IPv6 services:
[ i ] Starting anonymous mode:
 * Tor is not running!  starting it  for you
 * Saved iptables rules
 * Modified resolv.conf to use Tor and Private Internet Access DNS
 * All traffic was redirected throught Tor
[ i ] You are under AnonSurf tunnel
Then simply check your new IP address using the same myip command:
root@kali:~# anonsurf myip
My ip is:
1xx.1xx.6x.6x

Stop anonsurf

To stop anonsurf,
root@kali:~# anonsurf stop
 * killing dangerous applications
 * cleaning some dangerous cache elements
[ i ] Stopping anonymous mode:
 * Deleted all iptables rules
 * Iptables rules restored
[ i ] Reenabling IPv6 services:
 * Anonymous mode stopped

Testing anonymity

First of all, your IP address definitely changed, so there’s no worry on that side. I checked my public IP from command line, using Google and WhatismyIP.  This seems to be working and I was able to browse and compared to just TOR, I think it was slightly faster and more responsive.If you think it’s working slow, simply restart anonsurf and chances are you will end up in a faster connection.
The not so obvious thing people doesn’t check is if they are leaking DNS. I usually do it from http://dnsleak.com/ as shown on my post from setting up VPN.  However, I did not get any results back, so I used https://www.perfect-privacy.com/dns-leaktest/ and https://torguard.net/vpn-dns-leak-test.php and they seems to think I am in Netherlands or Belgium … so all good.
You can also check if you’re leaking IPv6 in here: http://ipv6leak.com/

Conclusion

Those who doesn’t know what ParrotSec OS is, it is another Security OS similar to Kali Linux developed by Parrot Security. I would give them a go if I were you.
Finally I would like to thank ParrotSec and Und3rf10w for taking their time and doing it. I am sure many users around the world would like to use it, specially when your country doesn’t allow access to certain Internet resources.
In case ip spoofing in Kali Linux is a requirement for you, try torsocks. It uses SOCKS proxy which is not commonly used, so chances are you will have fast browsing experiences compared to standard TOR settings.
I think I covered most of anonsurf and browsing anonymously part well. Did I make any mistakes? Do you have a suggestion? Let me know. Comments section is open as always and doesn’t require registration or any validation… so do help others and contribute where applicable.

Free tool protects PCs from master boot record attacks

$
0
0
http://www.csoonline.com/article/3133115/security/free-tool-protects-pcs-from-master-boot-record-attacks.html

The tool acts as a system driver and blocks ransomware and other malicious programs from injecting rogue code into the master boot record

MBRFilter protects Windows computers against MBR attacks.

Credit:Thinkstock
Cisco's Talos team has developed an open-source tool that can protect the master boot record of Windows computers from modification by ransomware and other malicious attacks.
The tool, called MBRFilter, functions as a signed system driver and puts the disk's sector 0 into a read-only state. It is available for both 32-bit and 64-bit Windows versions and its source code has been published on GitHub.
The master boot record (MBR) consists of executable code that's stored in the first sector (sector 0) of a hard disk drive and launches the operating system's boot loader. The MBR also contains information about the disk's partitions and their file systems.
Since the MBR code is executed before the OS itself, it can be abused by malware programs to increase their persistence and gain a head start before antivirus programs. Malware programs that infect the MBR to hide from antivirus programs have historically been known as bootkits -- boot-level rootkits.
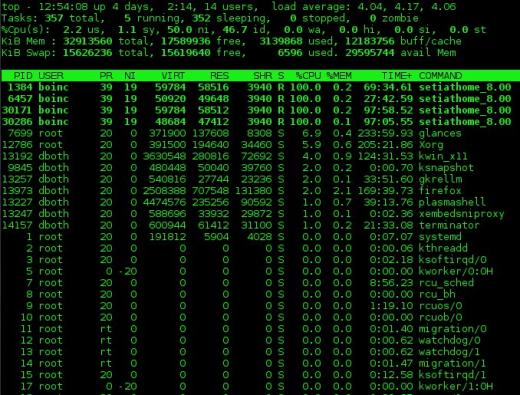
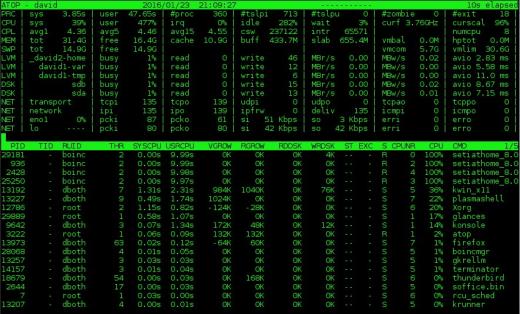
Microsoft attempted to solve the bootkit problem by implementing cryptographic verification of the bootloader in Windows 8 and later. This feature is known as Secure Boot and is based on the Unified Extensible Firmware Interface (UEFI) -- the modern BIOS.
The problem is that Secure Boot does not work on all computers and for all Windows versions and does not support MBR-partitioned disks at all. This means that there are still a large number of computers out there that don't benefit from it and remain vulnerable to MBR attacks.
More recently, ransomware authors have also understood the potential for abusing the MBR in their attacks. For example, the Petya ransomware, which appeared in March, replaces the MBR with malicious code that encrypts the OS partition's master file table (MFT) when the computer is rebooted.
The MFT is a special file on NTFS partitions that contains information about every other file: their name, size and mapping to the hard disk sectors. Encrypting the MFT renders the entire system partition unusable and prevents users from being able to use their computers.
A second ransomware program that targets the MBR and appeared this year is called Satana. It doesn't not encrypt the MFT, but encrypts the original MBR code itself and replaces it with its own code which displays a ransom note.
A third ransomware program that modifies the MBR to prevent computers from booting is called HDDCrypter and some researchers believe that it predates both Petya and Satana.
"MBRFilter is a simple disk filter based on Microsoft’s diskperf and classpnp example drivers," the Cisco Talos researchers said in a blog post. "It can be used to prevent malware from writing to Sector 0 on all disk devices connected to a system. Once installed, the system will need to be booted into Safe Mode in order for Sector 0 of the disk to become accessible for modification."


USB Killers - Hardware and Software options to destroy your data (or devices)

$
0
0
https://www.linuxforum.com/threads/usb-killers-hardware-and-software-options-to-destroy-your-data-or-devices.2194

Every new computer, whether running Linux or not, has some type of Universal Serial Bus (USB) connector. Most electronics now come with a USB connection of some type from TVs to cars. The time has arrived to worry about what device is being placed into these connectors or even being taken out.

There are two types of problems to be dealt with in this scenario. The first is to protect your hardware and the second is to protect your data with software.

Before we start, let's look at the USB system overall.

The USB hardware started in 1996 and began at a speed around 1.5 Mbps (megabytes per second), whereas today the speed is over 10 Gbps (gigabytes per second). The current estimate is that there are around 15 billion USB devices in the world making a USB device a very common item. The main aspects of USB which make it so convenient are the following:


  • Single connector type: USB replaces all the different legacy connectors with one well-defined, standardized USB connector for all USB peripheral devices. Thus eliminating the need for different cables and connectors and simplifying the design of the USB devices. The single connector type allows all USB devices to be connected directly to a standard USB port on a computer.
  • Hot-swappable: USB devices can be added and removed while the computer is running.

  • Low-cost implementation: The USB devices are managed by the USB Host which is implemented in the PC, phone, etc. The USB devices do not require a controller built-in so the cost is minimized for USB devices.

  • Plug and Play: Operating Systems (OS) identifies, configures, and loads the appropriate device driver when a USB device is connected.

  • High performance: USB offers a variety of speeds which are increasing with each update of the USB hardware.

  • Expandability: In theory, up to 127 different devices may be connected to a single bus.

  • Bus supplied power: The USB controller supplies power to all connected devices so there is no need for external power to be supplied if the device is low-powered. High-powered devices may still require an external power source.

  • Easy to use for end user: A single standard connector simplifies the usage of the USB device.
NOTE: For a detailed listing of USB devices and hubs on your Linux system, use the command from a terminal “lsusb -v”.

The USB Host is the main component of the USB system. The Host is usually the PC in to which the USB devices are plugged. The USB Host Controller Interface (HCI) is where the Hardware communicates with the Software.

The USB system works as a Master/Slave unit, usually termed Bus Mastering. The USB Host is the Master and controls the Slave (periphery devices) setting up a communication protocol between the Host and all devices. Each Host may have one or more Host Controllers which has a port or multiple ports attached to it. The port or ports on a single Host Controller of the USB Hub called the Root Hub. From these ports, devices and hubs may be attached to create USB Bus. All devices on the USB Bus are a Slave to the Host Controller of the Root Hub, which is the Master. Two devices on the same USB Bus can only communicate directly with each other through a USB Bridge.

USB connections consist of four connection points. These points allow for power and data connections. For USB 1.0, a pin provides 5V DC power while another pin provides the return of the power to complete the circuit. USB 3.0 on the other hand provides 20 volts, 5 amps, and 100 watts through the power connection. Keep in mind the power being sent through these ports!

To give a little more information, the amps used determines how fast the power can travel through the lines. A higher amperage can allow your phone to charge faster. For example, to use a 1 amp charger on your phone may require an hour to fully charge it. If you were to use a 2 amp charger, then your phone may only take half of an hour.

The Hardware option:

Let's look at the hardware first, the USB Kill. The USB Kill device looks like a regular USB Thumb Drive. It contains a capacitor, which is used to store power. The capacitor is charged to -200V DC. Once charged, the capacitor releases the stored voltage into the USB Port. The voltage may then travel into all parts of the device destroying components along the way until the voltage is dissipated. The capacitor is charged again and releases the burst of power into the system again. This process can occur numerous times in a single second. In a PC, the motherboard can be damaged in three seconds or less.

NOTE: USB Kill 1.0 can take up to 5 seconds to cause system damage.

What this means is that any hardware which has a USB port can be destroyed with the USB Kill device. Hardware can include PCs, laptops, televisions, phones, etc. The discharge of the voltage is similar to a voltage overload or a static burst such as a nearby lightning strike. Some devices have built-in protection against such power spikes, but some may not to the extent of -200V.

Everyone should be wary of using devices which may be found or ones others may try to place into your USB Port.

The USB Kill Device can be used over and over on many pieces of hardware.

NOTE: Please do not use the device maliciously if you should happen to have one.

A USB Killer Shield can be used to protect your hardware from being destroyed by a USB Kill device. A USB Killer Shield has two connectors, one is male and the other female. The male connector is plugged into the hardware and any USB device can be plugged into the female connector. By using the shield, you are protected from a USB Kill device.

NOTE: One final piece of information is that Apple devices seem to have a built-in protection from such a device so as not to allow the hardware device to be damaged.

The Software option:

For software, there is the USB Kill program. The script is more for your protection of your data. Keep all folders and files encrypted on your hard drive. Use the USBKill script from https://github.com/hephaest0s/usbkill. Once you have it on your system, run it with the command “sudo python usbkill.py” or “sudo python3 usbkill.py”. Make sure you have a USB drive in the USB Port. You can connect the drive to your wrist with a strap. If someone swipes your laptop the USB thumb drive will be removed. Once the script detects that the USB Port has had activity, then a special script will run as you have configured. The laptop could be powered off so no one can get back on it without the password. Before the laptop powers off, all data could be deleted, etc. The configuration can also specify USB Drives which will not set off the script when attached or removed.

The ability of the script is:

  • Compatible with Linux, *BSD and OS X
  • Shutdown the computer when there is USB activity
  • Customizable. Define which commands should be executed just before shut down
  • Ability to whitelist a USB device
  • Ability to change the check interval (default: 250ms)
  • Ability to melt the program on shut down
  • RAM and swap wiping
  • Works with sleep mode (OS X)
  • No dependency except secure-delete if you want usbkill to delete files/folders for you or if you want to wipe RAM or swap. sudo apt-get install secure-delete
  • Sensible defaults
The USB Kill script can help safeguard your data from theft or your hardware from unwanted use to prevent someone from copying the data off your system.

Be aware that the USB ports are useful and convenient, but they can pose a risk to your hardware and data. Keep your hardware and data safe as much as possible.

How to use Cloud Explorer with Scality S3 server

$
0
0
https://www.linux-toys.com/?p=945

I spent a few weeks searching for an open-source S3 server that I can run at home to test Cloud Explorer. I first came across Minio which is an open-source S3 server but I could not get it to work with Cloud Explorer because it had issues resolving bucket names via DNS which is a requirement using the AWS SDK. I then read an article about Scality releasing an open-source S3 server that you can run inside a Docker image. I was able to get Scality up and running quickly with little effort. In this post, I will explain how I got the Scality S3 server setup and how to use it with Cloud Explorer.
First, I needed to run the Scality Docker image which was a simple one-liner:
docker run -d --name s3server -p 8000:8000 scality/s3server
Next, I needed to modify /etc/hosts on my laptop to resolve buckets properly with Cloud Explorer. By default, the Scality Docker image resolves to localhost which can be changed. I appended the bucket names that I will use for this test (test and test2) to the localhost entry in /etc/hosts.
127.0.0.1 localhost test.localhost test2.localhost
view rawhosts hosted with by GitHub

Now I can configure the Scality S3 credentials in Cloud Explorer as shown below. I used the default Access and Secret keys by the Docker image.


Now Let’s create a bucket:


And there it is!


Let’s upload a file to make sure it works:


The file is there!


Now let’s run a performance test just for fun:

It was really cool that Scality released this as open-source. Not all of the Amazon S3 features are supported by Scality such as file versioning and others but I hope that this project continues to be worked on and gains community involvement.  After using this for a while, I put the S3 server into production for this site. All of the images that you see for this post are hosted by the S3 server inside a Docker image. Please check it out and let me know how you like Cloud Explorer. Please file any bugs on the GitHub issue tracker.

Useful Vim editor plugins for software developers - part 1

$
0
0
https://www.howtoforge.com/tutorial/vim-editor-plugins-for-software-developers

An improved version of Vi, Vim is unarguably one of the most popular command line-based text editors in Linux. Besides being a feature-rich text editor, Vim is also used as an IDE (Integrated Development Environmentby software developers around the world.
What makes Vim really powerful is the fact that it's functionality can be extended through plugins. And needless to say, there exist several Vim plugins that are aimed at enhancing users' programming experience.
Especially for software developers who are new to Vim, and are using the editor for development purposes, we'll be discussing some useful Vim plugins - along with examples - in this tutorial.
Please note that all the examples, commands, and instructions mentioned in this tutorial have been tested on Ubuntu 16.04, and the Vim version we've used is 7.4.

Plugin installation setup

Given that the tutorial is aimed at new users, it would be reasonable to assume that they don't know how Vim plugins are installed. So, first up, here are the steps required to complete the installation setup:
  • Create a directory dubbed .vim in your home directory, and then create two sub-directories named autoload and bundle.
  • Then, inside the autoload directory, you need to place a file named pathogen.vim, which you can download from here.
  • Finally, create a file named .vimrc in your home directory and add the following two lines to it:
call pathogen#infect() 
call pathogen#helptags()
Vim plugin installation
That's it. You are now ready to install Vim plugins.
Note: Here we've discussed Vim plugin management using Pathogen. There are other plugin managers available as well - to get started, visit this thread.
Now that we are all set, let's discuss a couple of useful Vim plugins.

Vim Tagbar plugin

First up is the Tagbar plugin. This plugin gives you an overview of the structure of a source file by letting you browse the tags it contains. "It does this by creating a sidebar that displays the ctags-generated tags of the current file, ordered by their scope," the plug-in's official website says. "This means that for example methods in C++ are displayed under the class they are defined in."
Sounds cool, right? Now, lets see how you can install it.
Tagbar's installation is pretty easy - all you have to do is to run the following two commands:
cd ~/.vim/bundle/
git clone git://github.com/majutsushi/tagbar
After the plugin is installed, it's ready for use. You can test it out by opening a .cpp file in Vim, entering the command mode, and running the :TagbarOpen command. Following is an example screenshot showing the sidebar (towards right) that comes up when the :TagbarOpen Vim command was executed:
Vim tagbar plugin
To close the sidebar, use the :TagbarClose command. What's worth mentioning here is that you can use the :TagbarOpen fj command to open the sidebar as well as shift control to it. This way, you can easily browse the tags it contains - pressing the Enter key on a tag brings up (and shifts control to) the corresponding function in the source code window on the left.
TagbarClose and TagbarOpen
In case you want to repeatedly open and close the sidebar, you can use the :TagbarToggle command instead of using :TagbarOpen and :TagbarClose, respectively.
If typing these commands seems time consuming to you, then you can create a shortcut for the :TagbarToggle command. For example, if you put the following line in your .vimrc file:
nmap  :TagbarToggle
then you can use the F8 key to toggle the Tagbar plugin window.
Moving on, sometimes you'll observe that certain tags are pre-fixed with a +, -, or # symbol. For example, the following screenshot (taken from the plugin's official website) shows some tags prefixed with a + symbol.
Toggle Tagbar window
These symbols basically depict the visibility information for a particular tag. Specifically, + indicates that the member is public, while - indicates a private member. The # symbol, on the other hand, indicates that the member is protected.
Following are some of the important points related to Tagbar:
  • The plugin website makes it clear that "Tagbar is not a general-purpose tool for managing tags files. It only creates the tags it needs on-the-fly in-memory without creating any files. tags file management is provided by other plugins."
  • Vim versions < 7.0.167 have a compatibility issue with Tagbar. "If you are affected by this use this alternate Tagbar download instead: zip," the website says. "It is on par with version 2.2 but probably won't be updated after that due to the amount of changes required."
  • If you encounter the error Tagbar: Exuberant ctags not found! while launching the plugin, then you can fix it by downloading and installing ctags from here.
  • For more information on Tagbar, head here.

Vim delimitMate Plugin

The next plugin we'll be discussing here is delimitMate. The plugin basically provides insert mode auto-completion for quotes, parens, brackets, and more.
It also offers "some other related features that should make your time in insert mode a little bit easier, like syntax awareness (will not insert the closing delimiter in comments and other configurable regions), and expansions (off by default), and some more," the plugin's official github page says.
Installation of this plugin is similar to the way we installed the previous one:
cd ~/.vim/bundle/
git clone git://github.com/Raimondi/delimitMate.git
Once the plugin is installed successfully (meaning the above commands are successful), you don't have to do anything else - it loads automatically when the Vim editor is launched.
Now, whenever - while in Vim - you type a double quote, single quote, brace, parentheses, or bracket, they'll be automatically completed. 
The delimitMate plugin is configurable. For example, you can extend the list of supported symbols, prevent the plugin from loading automatically, turns off the plugin for certain file types, and more. To learn how to configure delimitMate to do all this (and much more), go through the plugin's detailed documentation, which you can access by running the :help delimitMate command.
The aforementioned command will split your Vim window horizontally into two, with the upper part containing the said documentation.
Vim deliMate Plugin

Conclusion

Of the two plugins mentioned in this article, Tagbar - you'll likely agree - requires comparatively more time to get used to. But once it's setup properly (meaning you have things like shortcut launch keys in place), it's a breeze to use. delimitMate, on the other hand, doesn't require you to remember anything.
The tutorial would have given you an idea how useful Vim plugins can be. Apart from the ones discussed here, there are many more plugins available for software developers. We'll discuss a selected bunch in the next part. Meanwhile, drop in a comment if you use a cool development-related Vim plugin and want others to know about it.
In part 2 of this tutorial series I will cover the Syntax highlighting plugin Syntastic.

Scan Ruby-based apps for security issues with Dawnscanner

$
0
0
https://www.helpnetsecurity.com/2016/10/12/scan-ruby-based-apps-dawnscanner

Dawnscanner is an open source static analysis scanner designed to review the security of web applications written in Ruby.
scan ruby-based apps

Dawnscanner’s genesis

Its developer, Paolo Perego, says that he was motivated to create it back in spring 2013, when he needed a tool to review a number of Sinatra-powered security apps, but couldn’t use the Brakeman Scanner as it supports only the testing of Ruby on Rails applications.
“Dawnscanner is not tied to a particular MVC (Model View Controller) framework. It is able to review code of Sinatra, Padrino and Ruby on Rails applications, and we plan to add support for Hanami (formerly Lotus for Ruby) in the future,” he told Help Net Security.
The tool is currently able to perform 230 security checks, covering issues from CVE/OSVDB bulletins and the OWASP Ruby on Rails security cheatsheet. It is also able to spot security issues related to the Ruby interpreter version developers are using for their projects.
Dawnscanner has no GUI, but has command line flags to help people using it in their own application security pipeline. It provides several formatting options for reporting, and can store scan results in a designated folder so developers can keep a history of security findings. Scan results list found vulnerabilities, and and offer mitigation options for them.

Short- and long-term plans

Paolo’s plans for the tool are many. He wants to add support for the Hanami framework and pure Rack applications, make Dawnscanner able to parse custom code to spot OWASP Top 10 security issues, and achieve a tight GitHub integration, so that the tool is able to consume a GitHub URL as an input parameter, download the report, bundle-install dependencies, and start analyzing the code.
If you notice that these plans contrast with the provided Dawnscanner development roadmap, be aware that the roadmap is also in need of an update.
Paolo is currently working on changing the way Dawnscanner manages its knowledge base, so that the knowledge base can be updated automatically, and a change in it does not lead to a new Dawnscanner gem release.
scan ruby-based apps

Development challenges

“With a full time job, 2 kids and, well, life, it’s really hard to be always on, pushing new code, fixing bugs and so on. There are periods of time in which I had to put energies on different topics,” he notes.
He’s aware that Dawnscanner is no longer a side project “just for fun”, and that people rely on it for their code production.
“Working on a tool designed to be consumed by a community trained to implement agile software development and to release often is really challenging,” he points out.
“They don’t have much time to spend over security issues not strictly related to their business/product. Dawnscanner (and other security tools) must be proactive, always on the move and they must talk in the developers’ language in order to give pointers and instructions that are easy to consume.”
Another problem he encountered while working on the tool is the general lack of awareness of the importance of signing Ruby gems.
“Dawnscanner is digitally signed, and I believe it’s very important to provide people a means to be sure that they’re using a software version that has not been tampered with by a third party. Some of Dawnscanner’s dependencies are, however, not signed, or have an expired signing certificate, and this makes the Dawnscanner installation (with signature verification) fail,” he explains. Users complain to him about third-party expired certificates, but there’s not much he can do about it.
Paolo is proud of his creation, but knows its limitations – he knows that a code review tool can’t be guaranteed to spot all security issues. He advises developers to manually inspect sensitive code, and follow up static analysis with a full application penetration test, to ensure the detection of security issues at runtime.

Linux Lexicon: Use Watch Command To Run A Command Every X Seconds

$
0
0
https://fossbytes.com/linux-lexicon-watch-command

watch-command-in-linuxShort Bytes: Have you ever needed to run a command every couple minutes to check on something? Say you need to watch a RAID rebuild or watch a log in real time, but need to search or filter it first. That takes a lot of specialized tools, one for each task really. But using watch command this can be achieved easily.
There is a nifty little command that’s incredibly simple to use, and it’s called watch.
What watch does is it runs the command in a loop, but clears the terminal before running it each subsequent time, and additionally, displays the interval, command, and date/time as the first line. The default interval is two seconds, but this can be manually set using the -n flag with a lower limit of one-tenth of a second.
Here, below, we run the free (a memory usage reporting tool) command every five seconds.
devin@fossbytes$watch -n 5 free -m
Every 5.0s: free -m                                                                                          Sat Sep 24 13:58:24 2016
                               total        used        free      shared  buff/cache   available
    Mem:           257678      39474   170916        4101          47287      208519
    Swap:                7911        1218        6693
As you can see, we were able to pass in the -m (display in megabytes) flag to free without confusing watch. This is because all arguments after the first argument, which is a non-option, are passed to the executed command. This gives you some freedom to pass commands without the need of quotes, though, in the cases where piping and redirection are used, quotation marks will be required otherwise the output of watch will be what’s piped.
There are many options that can be passed to watch, like -t to remove the header information, or -d to highlight the differences between each interval. Below is the full list according to the documentation.
-b, –beepbeep if command has a non-zero exit
-c, –colorinterpret ANSI color and style sequences
-d, –differencehighlight changes between updates
-e, –errexitexit if command has a non-zero exit
-g, –chgexitexit when output from command changes
-n, –intervalseconds to wait between updates
-p, –preciseattempt run command in precise intervals
-t, –no-titleturn off header
-x, –execpass command to exec instead of “sh -c”
-h, –helpdisplay help and exit
-v, –versionoutput version information and exit
With these options, it’s easy to see how we can combine watch and a little bit of scripting with other tools (or sysadmin-fu as some like to call it) to create complex monitoring tools that are custom tailored to our specific needs.
Show us how you watch in the comments below.
Also ReadLinux Lexicon — Input And Output With Pipes And Redirection In Linux
Viewing all 1416 articles
Browse latest View live


<script src="https://jsc.adskeeper.com/r/s/rssing.com.1596347.js" async> </script>